Learn PHP 7: Object-Oriented Modular Programming using HTML5, CSS3, JavaScript, XML, JSON, and MySQL (2016)
Chapter 8. Multifunctional Interfaces
Steve Prettyman1
(1)
Georgia, USA
Electronic supplementary material
The online version of this chapter (doi:10.1007/978-1-4842-1730-6_8) contains supplementary material, which is available to authorized users.
“Hard work never killed anybody, but why take a chance.”
—Edgar Bergen ( http://coolfunnyquotes.com )
Chapter Objectives/Student Learning Outcomes
After completing this chapter, the student will be able to:
· Create a complete PHP application that deletes, updates, and inserts data
· Create a professional look to a completed application using CSS
· Use JavaScript to accept and manipulate data from another program
· Secure all programs in an application requiring user IDs/passwords
· Populate HTML objects with values from a JSON object
· Create a PHP program that will use current password encryption techniques
The Complete Application
In this chapter, you will complete the development of the ABC Canine Shelter Reservation System. The current version of the system allows the users to insert only one dog before requiring the them to log in again to insert additional dogs. Also, the system does not allow users to update or delete dog information that exists in the system. You have already completed most of the PHP code necessary to provide update and delete ability in Chapter 6 (data objects). You now need to attach this portion of the data object (dog_data) to the business rules tier (dog). In addition you need to make some changes to the interface tier (dog_interface and lab) to call the update and delete methods and display the results. Most of the coding needed (as you will soon see) will take place in the lab.php file. So you will start with those changes.
Data Handling Using JavaScript
The current lab.php file allows users to enter only dog information that will be inserted into the data storage (XML, JSON, or MySQL). The interface needs to be modified to allow users to indicate what activity they would like to accomplish (Insert, Update, or Delete). It also needs to allow users to pick a current dog if the process involves updating or deletion. This should, hopefully, indicate that you will need a list box that is populated with information on the dogs currently located in the shelter.
You will look at the PHP changes necessary in later sections of this chapter. For now, let’s assume that dog_interface (interface tier) will return this information, which was retrieved from dog_data (data tier) via the dog methods (business rules tier). You will also assume that similar coding to the dog_breeds program (Chapter 4) will be created to produce a dogs list box.
In addition, lab.php needs access to all the information from a particular dog that has been selected. The code will need to place all the information in the dog_name and dog_weight text boxes, the dog_breeds list box, and the dog_color radio buttons. You could accomplish this task in two ways. One is to allow the users to select the dog from the list box and then recall the dog_interface program to request the particular dog from the dog class, which in turn will request the information from the dog_data class. However, this is requiring an additional, unnecessary, call across the Internet to request the information. Instead, you can gather all the necessary information (dog_breed list box information, dogs list box information, and complete information of all dogs in the current data storage) when the user first calls the lab.php interface. You can use the current JavaScript AJAX code (Chapter 4) with just a couple of changes to retrieve all the necessary information.
You must make sure that the user indicates what type of operation is requested (at least if it is an insert or change/delete) before you populate the form objects (text boxes, list box, and radio button). You can accomplish this by not displaying the form objects until a selection has been made. You can make a slight adjustment to the combination of JavaScript code and CSS code, used in Chapter 4, to require the users to select from a dogs list box before the form is displayed.
Note
The process you are about to look at is a very common practice used in web applications. Many web applications return data in an array, JSON, or XML format. The interface (in this example, lab.php) then can use JavaScript to retrieve the information needed.
Programming note—Shopping carts use a similar technique. As the customers select items to purchase, the items are placed in a data object (probably a JSON object) on the client machine. When the customer begins the process of checking out, the data is transferred to the server. This allows the customer to make changes that will not cause additional calls to the server. Since the purchase information is not considered a security risk, this is usually a safe procedure. Of course, this would not be a good way to handle credit card information.
Using the format shown in Figure 8-1, the user is forced to select NEW or a dog from list box before proceeding. Once the user has made a choice, the HTML form can be displayed with the default values (for an insert) or the current values for the dog selected. CSS code will initially turn the display of the buttons (and the form) to "none". JavaScript code (which you will look at soon) will change the display of the correct button(s) and the form to "inline" to display at the proper time.

Figure 8-1.
The lab.php file with dogs list box
Figure 8-2 demonstrates the results when the user selects NEW. The same defaults are provided as shown in previous chapters. The only visual change is the text of the input button. The weakness of this approach occurs when the users do not have JavaScript enabled. For this example, if JavaScript is not enabled, you will require that all information be entered. You could request the individual dog information from the dog_data class (via the Dog class). While this approach is not as efficient as the JavaScript approach you are about to use, it is more customer friendly than requiring the entry of all the information.
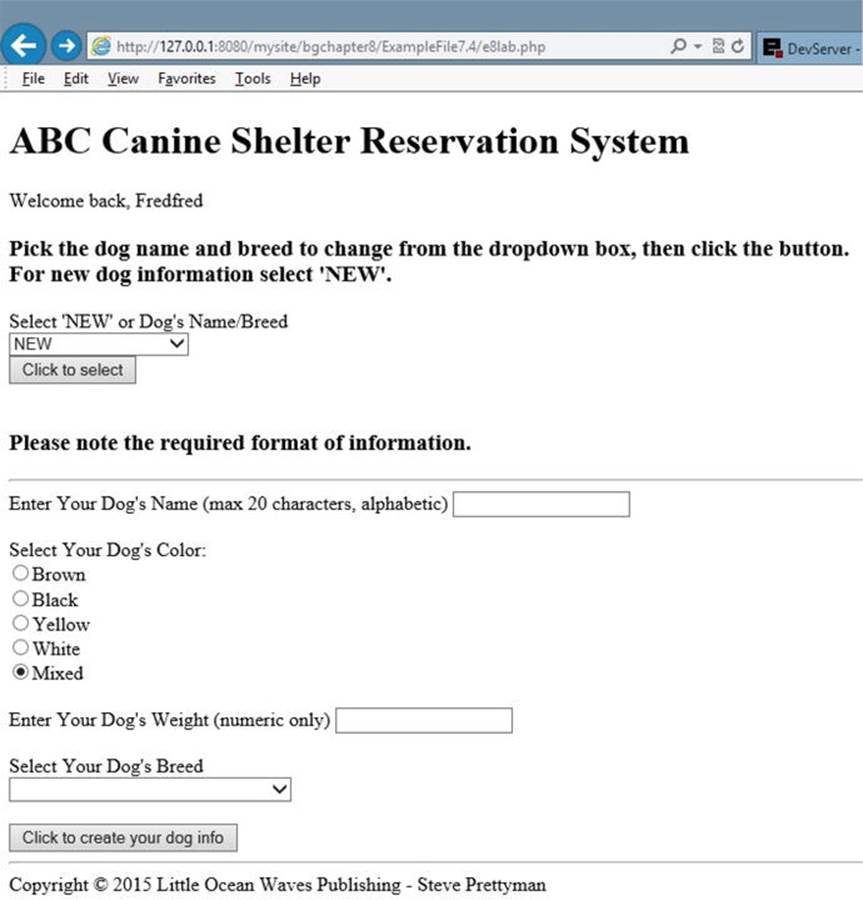
Figure 8-2.
The lab.php file with NEW selected
Figure 8-3 displays the results when an existing dog has been selected. The list box displays the dog’s name and its breed (to make it as unique as possible). In addition a dog ID could have also been provided to identify the particular dog. When the dog is selected, the dog information (dog_name, dog_color, dog_weight, and dog_breed) is populated into the form. The users then can update or delete the dog information.
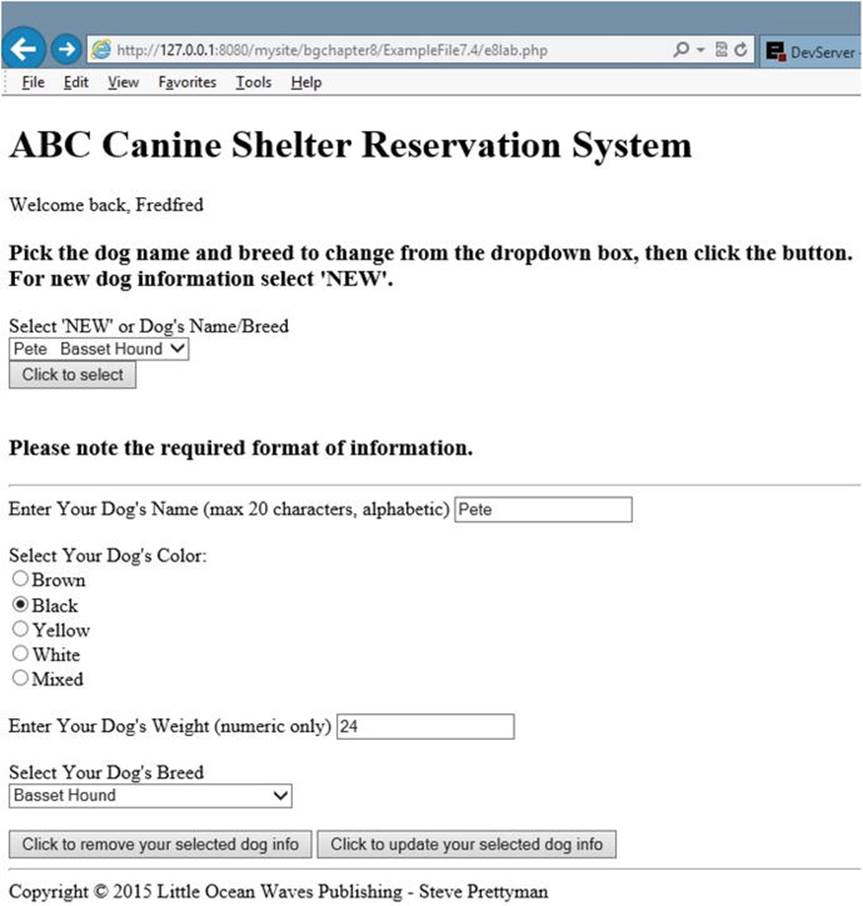
Figure 8-3.
The lab.php file with a dog selected
Note
As mentioned in previous chapters, the code provided in this example does not restrict duplicate entries. Thus, in a live environment, an additional field (dog ID) will need to be used to make the dogs unique.
Previously when an insert occurred, the system would display a message to indicate the change was successful. The user was then required to reload the lab.php file if another change was required. You can fix this problem by having the dog_interface program set a session property with the message to be returned. The dog_interface can then call the lab.php file, which in turn can check to see if there is a message to be displayed.
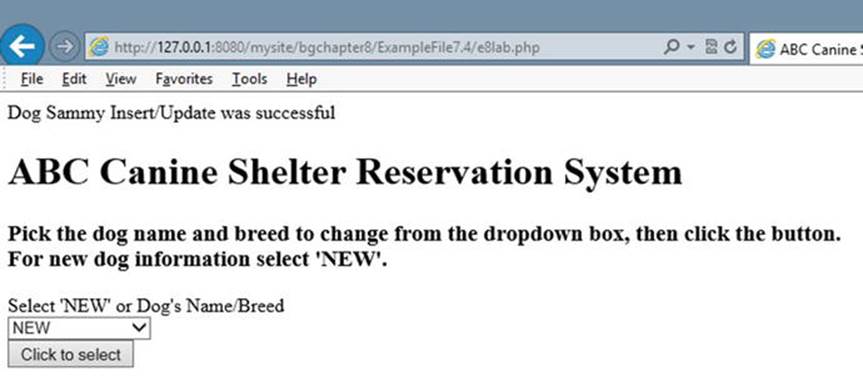
Figure 8-4.
The lab.php file handling message from dog_interface
You will use a combination of PHP code, JavaScript code, and CSS code to create the desired results. Let’s break it down.
<?php
session_start();
if ((!isset($_SESSION['username'])) || (!isset($_SESSION['password']))) {
echo "You must login to access the ABC Canine Shelter Reservation System";
echo "<p>";
echo "<a href='e8login.php'>Login</a> | <a href='e8register.php'>Create an account</a>";
echo "</p>";
}
else if(($_SERVER['HTTP_REFERER'] == ' http://127.0.0.1:8080/mysite/bgchapter8/ExampleFile8/e8login.php ') || ($_SERVER['HTTP_REFERER'] == ' http://127.0.0.1:8080/mysite/bgchapter8/ExampleFile8/e8lab.php'))
{
if (isset($_SESSION['message'])) {
echo $_SESSION['message'];
}
else {
echo "<p>Welcome back, " . $_SESSION['username'] . "</p>";
}
?>
The PHP code at the top of the lab program will now include an additional check to determine if a message has been returned. While the if part of the statement will not require any changes, the else part has a few additional changes. Note that the new if statement checks to see if the lab program has been called by itself. The $_SERVER['HTTP_REFERER'] method returns lab.php as the calling program when dog_interface uses the header method to recall lab.php. In addition, the same if statement also checks to see if login.php has called lab. These are now the only two legitimate calls than can be made to the lab.php program.
Another if statement in the else block checks to see if a $_SESSION['message'] has been returned by using the isset method. If it has been returned, then lab.php was called by dog_interface, because login does not return a $_SESSION['message']. The lab program now displays the message. If there is no $_SESSION['message'], the welcome message is displayed.
Let’s now jump to the HTML code in lab.php. Then you’ll take a look at the CSS and JavaScript code.
<body onload="checkJS();">
<h1>ABC Canine Shelter Reservation System</h1>
<div id="JS">
<script>
AjaxRequest('e8dog_interface.php');
</script>
<h3>Pick the dog name and breed to change from the dropdown box, then click the button.<br>For new dog information select 'NEW'.</h3>
Select 'NEW' or Dog's Name/Breed <div id="AjaxReturnValue"></div>
<input type="button" name="selected" id="selected" value="Click to select" onclick="process_select()" /><br><br>
<div id="input_form">
<form method="post" action="e8dog_interface.php" onSubmit="return validate_input(this)">
<h3>Please note the required format of information.</h3>
<hr>
Enter Your Dog's Name (max 20 characters, alphabetic) <input type="text" pattern="[a-zA-Z]*" title="Up to 20 Alphabetic Characters" maxlength="20" name="dog_name" id="dog_name" required/><br /><br />
Select Your Dog's Color:<br />
<input type="radio" name="dog_color" id="dog_color" value="Brown">Brown<br />
<input type="radio" name="dog_color" id="dog_color" value="Black">Black<br />
<input type="radio" name="dog_color" id="dog_color" value="Yellow">Yellow<br />
<input type="radio" name="dog_color" id="dog_color" value="White">White<br />
<input type="radio" name="dog_color" id="dog_color" value="Mixed" checked >Mixed<br /><br />
Enter Your Dog's Weight (numeric only) <input type="number" min="1" max="120" name="dog_weight" id="dog_weight" required /><br /><br />
<input type="hidden" name="dog_app" id="dog_app" value="dog" />
Select Your Dog's Breed <div id="AjaxResponse"></div><br />
<input type="hidden" name="index" id="index" value="-1"/>
<input type="submit" name="insert" id="insert" value="Click to create your dog info" />
<input type="submit" name="delete" id="delete" value="Click to remove your selected dog info" />
<input type="submit" name="update" id="update" value="Click to update your selected dog info" />
<hr>
</form>
</div>
</div>
In addition to some minor display message changes, a new div tag with an ID of AjaxReturnValue has been created to hold the dogs list box (which will provide the user a selection of dogs to choose). An HTML button (not a Submit button) follows. When clicked, it will cause a JavaScript function (process_select) to execute. Another div tag has been added which contains the HTML form. This form is to be hidden until the user clicks the button.
CSS code (#input_form { display:none; }) is included at the top of the program to keep the form from displaying. Additional CSS code also keeps the buttons from displaying. This code is very similar to the CSS code to keep the non-JS form from displaying if the user does not have JavaScript activated in the browser.
At the bottom of the form, a hidden property (index) has been created to hold the index (from the dogs array) of the dog selected. The initial value is set to -1. This property will be changed when the user selects a dog. The original Submit button is replaced by three Submit buttons (one for insert, one for delete, and one for update). Whichever button is clicked will cause a property to be created (insert, delete, or update) and set to a value. The property name is the ID of the button, and the contents in the property are the contents of the value attribute of the button selected. This will help dog_interface determine which type of changes the user is requesting. These buttons are also included on the non-JavaScript enabled form. Remember, in this example, non-JavaScript enabled browsers will be require users to enter all information needed to successfully accomplish an insert, delete, or update.
Hopefully, the changes you just looked at are pretty understandable. You are now going to look at some JavaScript code to handle this data. As mentioned, the manipulation of data by JavaScript is a common task in web applications. While this is not a JavaScript book, it is important that any web applications developer be familiar with JavaScript. I think you will see that the structure of the JavaScript language is similar to the structure of the PHP language.
First you will look at the changes to the get_breeds.js file (from Chapter 4). The file is renamed to getlists.js to reflect that it will now handle the getBreeds and dogs list boxes.
function HandleResponse(response)
{
var responsevalues = response.split('|');
document.getElementById('AjaxResponse').innerHTML = responsevalues[0];
document.getElementById('AjaxReturnValue').innerHTML = responsevalues[1];
obj = JSON.parse(responsevalues[2]);
}
All the code changes are in the HandleResponse method of the JavaScript file. Previously the values in the response property (passed to the method) were directly passed into the div tag with the AjaxResponse ID. At that point, only the list box code for the breeds was returned. Now the method will accept three types of information (the breeds list box, the dogs list box, and the dogs array). To reduce the number of calls to the web server, one AJAX call is made. It returns all the information into the response property. The information will be separated by using the pipeline (|) symbol. Soon you will see that the formation of this string will occur in the dog_interface program.
You will need to break the data in a similar way that you broke previous data using the PHP explode method. In JavaScript, the split method will break a string into an array using a parameter provided (|). In the example, this will create the array responsevalues. var creates this array as local to the method. It will be destroyed, because it will no longer be needed, when the method closes (hits the } symbol). The array now has three rows. The first row ([0]) contains the getBreeds list box code. The second row ([1]) contains the dogs list box code. The third row (I bet you guessed that one) contains the complete dogs array.
Security and performance—In this application, the dogs information is not highly sensitive. Also, the information is displayed to the users. This allows the users to see and fix any data that might have been corrupted. For more sensitive information, the array should be declared using varto keep the data accessable only to the current method (function).
The subscripts (0, 1, and 2) can now be used to pull each part of the array and release it to the proper place. responsevalues[0] is placed in AjaxResponse to display the getBreeds list. responsevalues[1] is placed in AjaxReturnValue to display the dogs list box. The dogs array, since you won’t know yet which dog the user has selected, will be placed in a JSON object (obj). As you have seen, JSON data includes named indexes and values, which are very similar to associate arrays in PHP. The var statement is not used because this object must be public and available to the complete application.
If you remember from previous chapters, arrays cannot be directly formatted into strings. Arrays must be serialized. However, JSON data can also be passed in a string. You will soon see that the “array” in responsevalues[3] has been formatted as JSON data by the dog_interfaceprogram. JavaScript’s JSON.parse method has the ability to look at data and, if it is valid, transform it into a JSON object. This is very similar to the PHP method json_encode.
Now let’s look at how you can populate the form when the user picks a dog from the dogs list box.
The JavaScript method process_select (called by the HTML button after the user picks from the dogs list) has been placed at the top of the code in the lab.php file. It could have also been placed in its own JS file and imported in the same way as the getlists.js file. This new method use the information contained in OBJ (the JSON dogs object containing all the dogs) to populate the text boxes (dog_name and dog_weight), radio buttons (dog_color), and list box (dog_breed) with the information for the dog the user selects in the list box.
function process_select() {
var colorbuttons = document.getElementsByName('dog_color');
First, all the color values from the radio buttons will be pulled from the HTML form and placed into an array called colorbuttons using the JavaScript method getElementsByName. dog_color (the name of each radio button) is passed into the method. This process will create an array of the radio buttons with the same indexes as the radio button subscripts for the color. For instance, the 0 position of the array will now contain brown, which is the first radio button displayed in the HTML form. This will allow you to set the proper color radio button by referencing its position (such as colorbuttons[0] to set brown).
if(!(document.getElementById('dogs').value == -1))
{
index = document.getElementById('dogs').selectedIndex -1;
document.getElementById('index').value = index;
document.getElementById('dog_name').value = obj.dogs[index].dog_name;
document.getElementById('dog_weight').value = obj.dogs[index].dog_weight;
HTML list boxes include both text and values. The text is what the user sees; the value is what it represents. This is very similar to PHP associative arrays—keys (indexes) and values. The if statement checks the dogs array to determine its current value. If the value is -1, this indicates that the users did not select anything, or they selected NEW. The JavaScript ! symbol works the same as the PHP ! symbol. The symbol changes the if portion of the statement to execute when the value for 'dogs' is not -1. Thus, the code will execute if the user has selected a dog from the dogs list box.
The selectedIndex property of a list box indicates the index selected by the user. However, the HTML list box is numbered starting at 1. JavaScript arrays and JSON objects indexes start at 0. This causes the selectedIndex to be one more than the position in a JavaScript array or JSON object. The code, in the example, subtracts 1 to balance out the relationship. This value is placed in index. It is also saved in the hidden property (on the HTML form) with the same name (index). Since index is a property and not a div tag, the JavaScript value property must be used to set the value of index.
obj is the JSON object (with all the dogs) that was created when the AJAX call occurred. Information can be retrieved from a JSON object in a very similar way as PHP associative arrays. The obj object is similar to the multidimensional dogs array shown in previous chapters. The top array is the dogs “array”. In the dogs array are the “arrays” for each individual dog. These do not have an associated key name, but have a numerical index. Each dog array contains the individual elements (dog_name, dog_color, dog_breed, and dog_weight). The index property, set in the previous code line, contains the dog index selected by the user. It will be used to pull the selected dog information from obj to populate the form objects.
Since you know the exact location of the data to be retrieved (in index), loops are not needed.
obj.dogs[index].dog_name uses the JSON object name (obj), the top array name (dogs), the number of the dog array needed (index), and the name of the field required (dog_name) to access the required information. Again, the format is similar to pulling information from a PHP associative array. The dog_name and dog_weight values use this dot notation format to pull the information from the obj JSON object and place it in the appropriate text box on the HTML form.
dog_color = obj.dogs[index].dog_color;
if(dog_color == "Brown")
{
colorbuttons[0].checked = true;
} else if (dog_color == "Black")
{
colorbuttons[1].checked = true;
} else if (dog_color == "Yellow")
{
colorbuttons[2].checked = true;
} else if (dog_color == "White")
{
colorbuttons[3].checked = true;
}
Setting the color requires a little more work. The dog_color is pulled from the obj object (dog_color = obj.dogs[index].dog_color;) and placed into a property (dog_color). An if statement is then used to determine what color exists in this property. (Yes, JavaScript has a case statement that you could have also used). The if statement sets the checked property of the correct radio button to true, causing the radio button to be selected. Notice that the default value ('mixed') is not included in the if statement. If the dog is 'mixed', or somehow the color did not have a value in the object, there is no reason to change from the default value ('mixed').
dog_breed = obj.dogs[index].dog_breed;
document.getElementById('dog_breed').value = dog_breed;
document.getElementById('update').style.display = "inline";
document.getElementById('delete').style.display = "inline";
document.getElementById('insert').style.display = "none";
}
The breeds list box is set using the same code style as setting the text boxes. The value property sets the list box text viewed by the users. The users can then change the value if desired. The "update" and "delete" buttons are set to "inline" to be displayed. "Insert" is set to "none".
else
{
colorbuttons[4].checked = true;
document.getElementById('dog_name').value = "";
document.getElementById('dog_weight').value = "";
document.getElementById('dog_breed').value = "Select a dog breed";
document.getElementById('insert').style.display = "inline";
document.getElementById('update').style.display = "none";
document.getElementById('delete').style.display = "none";
}
The else portion of the if statement executes if the index is -1 (NEW is selected, or nothing was selected). The defaults are set, as previously shown in other chapters, with the color set to 'mixed', the name and weight text boxes being empty, and the breeds list box set to requesting the user to Select a dog breed. The "insert" button is displayed (using "inline"). The other buttons are not displayed (using "none").
document.getElementById('input_form').style.display = "inline";
}
Finally, the display of the form itself (now called input_form') is set to 'inline', which will allow the users to see the complete form and its values, as set in the previous code. Let’s take a look at the complete code.
Example 8-1. The getlists.js file
function AjaxRequest(value)
{
var xmlHttp = getXMLHttp();
xmlHttp.onreadystatechange = function()
{
if(xmlHttp.readyState == 4)
{
HandleResponse(xmlHttp.responseText);
}
}
xmlHttp.open("GET", value, true);
xmlHttp.send(null);
}
function HandleResponse(response)
{
var responsevalues = response.split('|');
document.getElementById('AjaxResponse').innerHTML = responsevalues[0];
document.getElementById('AjaxReturnValue').innerHTML = responsevalues[1];
obj = JSON.parse(responsevalues[2]);
}
function getXMLHttp()
{
var xmlHttp;
try {
xmlHttp = new XMLHttpRequest();
}
catch(e)
{
//Internet Explorer is different than the others
Try {
xmlHttp = new ActiveXObject("Msxml2.XMLHTTP");
}
catch(e) {
try {
xmlHttp = new ActiveXObject("Microsoft.XMLHTTP");
}
catch(e)
{
alert("Old browser? Upgrade today so you can use AJAX!")
return false;
}
}
}
return xmlHttp;
}
Example 8-2. The lab.php file with update, insert, and delete
<?php
session_start();
if ((!isset($_SESSION['username'])) || (!isset($_SESSION['password']))) {
echo "You must login to access the ABC Canine Shelter Reservation System";
echo "<p>";
echo "<a href='elogin.php'>Login</a> | <a href='eregister.php'>Create an account</a>";
echo "</p>";
}
else if(($_SERVER['HTTP_REFERER'] == ' http://127.0.0.1:8080/mysite/bgchapter8/login.php ') || ($_SERVER['HTTP_REFERER'] == ' http://127.0.0.1:8080/mysite/bgchapter8/lab.php '))
{
if (isset($_SESSION['message']))
{
echo $_SESSION['message'];
}
else
{
echo "<p>Welcome back, " . $_SESSION['username'] . "</p>";
}
?>
<!DOCTYPE html>
<html lan="en">
<head>
<title>ABC Canine Shelter Reservation System</title>
<script src="getlists.js"></script>
<script src="validator.js"></script>
<style type="text/css">
#JS { display:none; }
#insert {display: none; }
#delete {display: none; }
#update {display: none; }
#input_form { display:none; }
</style>
<script>
function checkJS() {
document.getElementById('JS').style.display = "inline"; }
function process_select() {
var colorbuttons = document.getElementsByName('dog_color');
if(!(document.getElementById('dogs').value == -1)) {
index = document.getElementById('dogs').selectedIndex -1;
document.getElementById('index').value = index;
document.getElementById('dog_name').value = obj.dogs[index].dog_name;
document.getElementById('dog_weight').value = obj.dogs[index].dog_weight;
dog_color = obj.dogs[index].dog_color;
if(dog_color == "Brown") {
colorbuttons[0].checked = true;
} else if (dog_color == "Black") {
colorbuttons[1].checked = true;
} else if (dog_color == "Yellow") {
colorbuttons[2].checked = true;
} else if (dog_color == "White") {
colorbuttons[3].checked = true; }
dog_breed = obj.dogs[index].dog_breed;
document.getElementById('dog_breed').value = dog_breed;
document.getElementById('update').style.display = "inline";
document.getElementById('delete').style.display = "inline";
document.getElementById('insert').style.display = "none";
} else {
colorbuttons[4].checked = true;
document.getElementById('dog_name').value = "";
document.getElementById('dog_weight').value = "";
document.getElementById('dog_breed').value = "Select a dog breed";
document.getElementById('insert').style.display = "inline";
document.getElementById('update').style.display = "none";
document.getElementById('delete').style.display = "none";}
document.getElementById('input_form').style.display = "inline"; }
</script>
</head>
<body onload="checkJS();">
<h1>ABC Canine Shelter Reservation System</h1>
<div id="JS">
<script>
AjaxRequest('e8dog_interface.php');
</script>
<h3>Pick the dog name and breed to change from the dropdown box, then click the button.<br>For new dog information select 'NEW'.</h3>
Select 'NEW' or Dog's Name/Breed <div id="AjaxReturnValue"></div>
<input type="button" name="selected" id="selected" value="Click to select" onclick="process_select()" /><br><br>
<div id="input_form">
<form method="post" action="dog_interface.php" onSubmit="return validate_input(this)">
<h3>Please note the required format of information.</h3>
<hr>
Enter Your Dog's Name (max 20 characters, alphabetic) <input type="text" pattern="[a-zA-Z]*" title="Up to 20 Alphabetic Characters" maxlength="20" name="dog_name" id="dog_name" required/><br /><br />
Select Your Dog's Color:<br />
<input type="radio" name="dog_color" id="dog_color" value="Brown">Brown<br />
<input type="radio" name="dog_color" id="dog_color" value="Black">Black<br />
<input type="radio" name="dog_color" id="dog_color" value="Yellow">Yellow<br />
<input type="radio" name="dog_color" id="dog_color" value="White">White<br />
<input type="radio" name="dog_color" id="dog_color" value="Mixed" checked >Mixed<br /><br />
Enter Your Dog's Weight (numeric only) <input type="number" min="1" max="120" name="dog_weight" id="dog_weight" required /><br /><br />
<input type="hidden" name="dog_app" id="dog_app" value="dog" />
Select Your Dog's Breed <div id="AjaxResponse"></div><br />
<input type="hidden" name="index" id="index" value="-1"/>
<input type="submit" name="insert" id="insert" value="Click to create your dog info" />
<input type="submit" name="delete" id="delete" value="Click to remove your selected dog info" />
<input type="submit" name="update" id="update" value="Click to update your selected dog info" />
<hr>
</form>
</div>
</div>
<noscript>
<div id="noJS">
<form method="post" action="dog_interface.php">
<h3>For Updates please enter all fields. For Deletions enter at least the dog name and breed. Then click the button.<br>For new dog information enter the requested information, Then click the button.<br> Please note the required format of information.</h3>
Enter Your Dog's Name (max 20 characters, alphabetic) <input type="text" pattern="[a-zA-Z ]*" title="Up to 20 Alphabetic Characters" maxlength="20" name="dog_name" id="dog_name" required/><br /><br />
Select Your Dog's Color:<br />
<input type="radio" name="dog_color" id="dog_color" value="Brown">Brown<br />
<input type="radio" name="dog_color" id="dog_color" value="Black">Black<br />
<input type="radio" name="dog_color" id="dog_color" value="Yellow">Yellow<br />
<input type="radio" name="dog_color" id="dog_color" value="White">White<br />
<input type="radio" name="dog_color" id="dog_color" value="Mixed" checked >Mixed<br /><br />
Enter Your Dog's Weight (numeric only) <input type="number" min="1" max="120" name="dog_weight" id="dog_weight" required /><br /><br />
Enter Your Dog's Breed (max 35 characters, alphabetic) <input type="text" pattern="[a-zA-Z ]*" title="Up to 15 Alphabetic Characters" maxlength="35" name="dog_breed" id="dog_breed" required /><br />
<input type="hidden" name="dog_app" id="dog_app" value="dog" />
<input type="submit" name="input" id="input" value="Click to create your dog info" />
<input type="submit" name="delete" id="delete" value="Click to remove your selected dog info" />
<input type="submit" name="update" id="update" value="Click to update your selected dog info" />
</form>
</div>
</noscript>
</body>
</html>
The only change shown previously that was not mentioned previously is the removal of session_destroy at the end of the code. Since you want the ability for dog_interface to recall lab.php, the session needs to be active until the users complete the changes. You will create a logout routine that will close the session later in this chapter.
Do It
1.
Explain how PHP code can be used to replace the process that the JavaScript code uses to display the list boxes, determine which dog was selected, and populate the form objects with the information from the dog selected. This process would be necessary for any browsers that do not have JavaScript enabled. Hint: The PHP code will work in a very similar way to the JavaScript code. What changes would be necessary to the dog_interface.php, dog.php, and dog_data.php programs to accomplish this task?
2.
Download the code for this section from the book’s web site. Adjust the code to handle dog information that will include the following additional fields: dog_ID (unique for each dog) and dog_gender. Assume that the dog_interface.php, dog.php, and dog_data.php file will return these fields. You won’t be able to completely test this assignment until you read about the changes to these programs.
Updating, Deleting, and Inserting in the Interface Tier
It’s time to look at the changes to the programs in the interface and business rules tiers. There are very few required changes in the data tier, since previously the dog_data program was created to handle display, update, insert, and deletion of dog information. Doing this ahead of time makes the total amount of changes necessary to the other tiers much easier.
As mentioned throughout the book, the interface tier is responsible for formatting information for display and for requesting or processing information from the business rules tier. The dog_interface program should accept the dogs array information from the data tier and, if needed, format it for use in the lab.php program. It should also accept the dogs information for the dogs list box, provide any format for it, and send it to lab.php for display. In addition, dog_interface must accept requests from lab.php for insert, update, and delete of dog information and pass these requests on to the data tier for processing. This may sound like a lot, but as you will see, most of the coding already exists in these programs.
First let’s look at passing the request for insert or update to the data tier.
$dog_color = clean_input($_POST['dog_color']);
$dog_weight = clean_input($_POST['dog_weight']);
$dog_index = clean_input($_POST['index']);
The lab.php file will be sending a property ('index') to dog_interface. This property will be accepted and cleaned in the same manner as the other properties that are passed.
The type of information passed for a request to insert or update is almost exactly the same (all the dog properties plus 'index'). Thus, the processes are very similar. You do need a way to indicate to the type of request (update or insert).
if ((isset($_POST['insert'])) || (isset($_POST['update'])))
{
if (isset($_POST['insert']))
{
$insert = TRUE;
}
else
{
$insert = FALSE;
}
You can do this by creating a property. In this example, $insert will be set to TRUE if it is an insert request and FALSE if it is an update request. If the request is an update or insert, the properties array must be populated.
$properties_array = array($dog_name,$dog_breed,$dog_color,$dog_weight,$breedxml,$insert,$dog_index);
You can create the $properties_array as you have done in many examples before. Once created it will be passed into an instance of the dog class. The only real changes are the addition of $insert and $dog_index. The update procedure will use $dog_index to indicate which record to change. It will be set to -1 (by lab.php) when there is an insert because all records are inserted at the end of the data. (You could have used -1 as an indicator of an insert, instead of creating $Insert.)
$lab = $container->create_object($properties_array);
Using $container (which is an instance of dog_container already created in the code), the create_object method creates an instance of the dog class and passes the property array into it. You will make a slight change to the dog class, in a moment, to use the property array to determine if the insert or update methods from dog_data should be called to complete the request.
$_SESSION['message'] = "Dog $dog_name Insert/Update was successful<br />";
If everything was successful with the update, instead of using echo or print to display a message, the program will set $_SESSION['message'] with the message, which will then be displayed by lab.php.
header("Location: lab.php");
The application is then redirected back to lab.php. lab.php will verify that is was called from dog_interface and then display "Dog $dog_name Insert/Update was successful<br />" at the top of the page. ($dog_name is replaced with the actual dog name.)
If the request is delete, a similar process occurs.
else if($_POST['delete'])
{
$properties_array = $dog_index;
The dog_data delete method only needs the position in the array to determine what to remove. Thus, $properties_array is set to the value in $dog_index. Even though $properties_array is now a string and not an array, the processRecords method in dog_data uses polymorphism to accept an array or a string. This allows the code to be very similar to the update and insert code.
$lab = $container->create_object($properties_array);
$_SESSION['message'] = "Dog $dog_name Deletion was successful<br />";
header("Location: lab.php");
As seen with update and delete, $container (which is an instance of dog_container already created) calls the create_object method to create an instance of the dog class and pass $properties_array (which is really a string). If the delete is successful, $_SESSION['message'] is set with thedelete message. Then the lab.php program is called. lab.php will verify that dog_container called it and then display "Dog $dog_name Deletion was successful<br />" at the top of the page. ($dog_name is replaced with the actual dog name.)
These are the only code changes needed in the dog_interface program in order to handle the request to insert, update, or delete. dog_interface must also accept the dogs list box and complete dogs array from the data tier to format and send to lab.php.
dog_interface must request the dogs array information by calling the display method in dog_data.php.
$container = NULL;
The container pointer, $container, can be reused after the request to return the breeds list has been processed. By setting it to NULL, it will free up the current container (an instance of dog_container with properties set for retrieving the breeds information).
$container = new dog_container("dog");
A new instance of the dog_container passes "dog" instead of "selectbox". This lets the container know than an instance of the dog class will be created, not an instance of the breeds class.
$properties = "dog";
$lab = $container->create_object($properties);
When an instance of the dog class is created by create_object, dog is again passed in to indicate that an instance of the dog class is needed.
$container->set_app("dog");
$dog_app = $container->get_dog_application("dog");
$method_array = get_class_methods($lab);
$last_position = count($method_array) - 1;
$method_name = $method_array[$last_position];
$returned_array = $lab->$method_name("ALL");
The same code that was used to call the delete, insert, and update methods in dog_data is used to call the display method. However, ALL is passed in instead of the properties array. ALL tells the dog_data display method to return all the dog records. All the records that are returned bydog_data are dropped into $return_array.
Now that the dog_interface has all the records (in $return_array), it can format the code to display the dogs list box. The code used is similar to the code to create the breeds list box.
$resultstring = "<select name='dogs' id='dogs'>";
$resultstring = $resultstring . "<option value='-1' selected>NEW</option>";
The property $resultstring will hold all the code for the list box. First the HTML select tag is created with an ID of 'dogs'. Then the first row of the list box is created for the user to select NEW if they want to insert a new dog. Notice that the value for NEW is -1. That’s also the default value for the hidden property 'index' on the HTML form in lab.php. The code you looked at early in this chapter will determine that -1 is an indication to fill the HTML form objects with the default settings for the dog information. This is true either if the user selects NEW or does not select anything in the dogs list box.
foreach ($returned_array as $column => $column_value)
{
$resultstring = $resultstring . "<option value='$column'>" . $column_value['dog_name'];
$resultstring .= “ " . $column_value['dog_breed'] . "</option>";
}
$resultstring = $resultstring . "</select>";
A foreach loop will loop through the dogs array (contained in $returned_array) and build the remaining rows of the list box using the dog_name and dog_breed from each of the dog entries in the array. After all dogs have been placed in the list box, the list box is closed using the HTML</select> tag.
print $result . "|" . $resultstring . "|" . '{ "dogs" : ' . json_encode($returned_array) . "}";
lab.php expects to receive the breeds list box code in the first position, the dogs list box code in the second position, and the complete dogs array in the third position. $result already contains the complete breeds list box. $resultstring contains the new dogs list box. $return_array still contains all the dog records. lab.php expects the outer array of the dogs array to be labeled as 'dogs'. The display method from dog_data does not pass the outer array back. The previous code will create a dogs array that holds all the individual dog arrays in it. Notice that the $return_arrayhas been converted to JSON code when returned. The JavaScript code in lab.php will verify that it is properly formatted JSON code when it is received.
Let’s look at the complete dog_interface program.
Example 8-3. The dog_interface.php file with update, insert, and delete
<?php
session_start();
const USER_ERROR_LOG = "User_Errors.log";
const ERROR_LOG = "Errors.log";
function clean_input($value)
{
$value = htmlentities($value);
// Removes any html from the string and turns it into < format
$value = strip_tags($value);
if (get_magic_quotes_gpc())
{
$value = stripslashes($value);
// Gets rid of unwanted slashes
}
$value = htmlentities($value);
// Removes any html from the string and turns it into < format
$bad_chars = array( "{", "}", "(", ")", ";", ":", "<", ">", "/", "$" );
$value = str_ireplace($bad_chars,"",$value);
return $value;
}
class setException extends Exception {
public function errorMessage() {
list($name_error, $breed_error, $color_error, $weight_error) = explode(',', $this->getMessage());
$name_error == 'TRUE' ? $eMessage = '' : $eMessage = 'Name update not successful<br/>';
$breed_error == 'TRUE' ? $eMessage .= '' : $eMessage .= 'Breed update not successful<br/>';
$color_error == 'TRUE' ? $eMessage .= '' : $eMessage .= 'Color update not successful<br/>';
$weight_error == 'TRUE' ? $eMessage .= '' : $eMessage .= 'Weight update not successful<br/>';
return $eMessage;
}
}
function get_dog_app_properties($lab)
{
print "Your dog's name is " . $lab->get_dog_name() . "<br/>";
print "Your dog weights " . $lab->get_dog_weight() . " lbs. <br />";
print "Your dog's breed is " . $lab->get_dog_breed() . "<br />";
print "Your dog's color is " . $lab->get_dog_color() . "<br />";
}
//----------------Main Section-------------------------------------
try {
if ( file_exists("e8dog_container.php"))
{
Require_once("e8dog_container.php");
}
else
{
throw new Exception("Dog container file missing or corrupt");
}
if (isset($_POST['dog_app']))
{
if ((isset($_POST['dog_name'])) && (isset($_POST['dog_breed'])) && (isset($_POST['dog_color'])) && (isset($_POST['dog_weight'])))
{
$container = new dog_container(clean_input($_POST['dog_app']));
$dog_name = clean_input(filter_input(INPUT_POST, "dog_name"));
$dog_breed = clean_input($_POST['dog_breed']);
$dog_color = clean_input($_POST['dog_color']);
$dog_weight = clean_input($_POST['dog_weight']);
$dog_index = clean_input($_POST['index']);
$breedxml = $container->get_dog_application("breeds");
if ((isset($_POST['insert'])) || (isset($_POST['update'])))
{
if (isset($_POST['insert']))
{
$insert = TRUE;
}
else
{
$insert = FALSE;
}
$properties_array = array($dog_name,$dog_breed,$dog_color,$dog_weight,$breedxml,$insert,$dog_index);
$lab = $container->create_object($properties_array);
$_SESSION['message'] = "Dog $dog_name Insert/Update was successful<br />";
header("Location: e8lab.php");
//print "Dog $dog_name Insert/Update was successful<br />";
//get_dog_app_properties($lab);
}
else
{
$insert = FALSE;
}
$properties_array = array($dog_name,$dog_breed,$dog_color,$dog_weight,$breedxml,$insert,$dog_index);
$lab = $container->create_object($properties_array);
$_SESSION['message'] = "Dog $dog_name Insert/Update was successful<br />";
header("Location: e8lab.php");
//print "Dog $dog_name Insert/Update was successful<br />";
}
else if($_POST['delete'])
{
$properties_array = $dog_index;
$lab = $container->create_object($properties_array);
$_SESSION['message'] = "Dog $dog_name Deletion was successful<br />";
header("Location: e8lab.php");
//print "Dog $dog_name Deletion was successful<br />";
}
}
else
{
print "<p>Missing or invalid parameters. Please go back to the dog.php page to enter valid information.<br />";
print "<a href='e8lab.php'>Dog Creation Page</a>";
}
}
else // breeds select box
{
$container = new dog_container("selectbox");
$properties_array = array("selectbox");
$lab = $container->create_object($properties_array);
$container->set_app("breeds");
$dog_app = $container->get_dog_application("breeds");
$method_array = get_class_methods($lab);
$last_position = count($method_array) - 1;
$container = NULL;
$result = $lab->$method_name($dog_app);
$container = NULL;
// read dog_data array
$container = new dog_container("dog");
$properties = "dog";
$lab = $container->create_object($properties);
$container->set_app("dog");
$dog_app = $container->get_dog_application("dog");
$method_array = get_class_methods($lab);
$last_position = count($method_array) - 1;
$method_name = $method_array[$last_position];
// return dogs from data
$returned_array = $lab->$method_name("ALL");
// format dogs list box
$resultstring = "<select name='dogs' id='dogs'>";
$resultstring = $resultstring . "<option value='-1' selected>NEW</option>";
foreach ($returned_array as $column => $column_value)
{
$resultstring = $resultstring . "<option value='$column'>" . $column_value['dog_name'] . " & nbsp; & nbsp; & nbsp;" ;
$resultstring = $resultstring . $column_value['dog_breed'] . "</option>";
}
$resultstring = $resultstring . "</select>";
print $result . "|" . $resultstring . "|" . '{ "dogs" : ' . json_encode($returned_array) . "}";
}
}
catch(setException $e)
{
echo $e->errorMessage(); // displays to the user
$date = date('m.d.Y h:i:s');
$errormessage = $e->errorMessage();
$eMessage = $date . " | User Error | " . $errormessage . "\n";
error_log($eMessage,3,USER_ERROR_LOG); // writes message to user error log file
}
catch(Exception $e)
{
echo "The system is currently unavailable. Please try again later."; // displays message to the user
$date = date('m.d.Y h:i:s');
$eMessage = $date . " | System Error | " . $e->getMessage() . " | " . $e->getFile() . " | ". $e->getLine() . "\n";
error_log($eMessage,3,ERROR_LOG); // writes message to error log file
error_log("Date/Time: $date - Serious System Problems with Dog Application. Check error log for details", 1, "noone@helpme.com", "Subject: Dog Application Error \nFrom: System Log <systemlog@helpme.com>" . "\r\n");
// e-mails personnel to alert them of a system problem
}
?>
Do It
1.
Download the code for this section from the book’s web site. The example code (Example 6-3) could be broken into several methods to handle the creation of the list boxes and the dogs array. Create methods and move the code in these methods to process this information. Call the methods from the previous location of the code.
2.
Download the code for this section from the book’s web site. Adjust the code to handle dog information that will include the following additional fields: dog_ID (unique for each dog) and dog_gender. Assume that the dog.php and dog_data.php files will return these fields. You won’t be able to completely test this assignment until you read about the changes to these programs. Note: If you did not previously complete the earlier Do It, complete that assignment along with this one.
Updating, Deleting, and Inserting in the Business Rules Tier
You are getting very close to completing the ABC Canine Shelter Reservation System. A few changes need to be made to the Dog class to determine why the class was called (insert, delete, or update). Then the information can be passed to the correct method in the dog_data class. As mentioned, no changes will be needed to the dog_data class, as the methods for insert, update, and delete already exist. Also, the dog class must retrieve all the dog records from dog_data to send to the dog_interface.
<?php
class Dog
{
// ----------------------------------------- Properties ------------------------------------
private $dog_weight = 0;
private $dog_breed = "no breed";
private $dog_color = "no color";
private $dog_name = "no name";
private $error_message = "??";
private $breedxml = "";
private $insert = FALSE;
private $index = -1;
At the top of the Dog class properties, $insert and $index are created to hold the values passed from the properties_array by the dog_interface program. $index is initially set to -1, indicating the default of assuming that the user either selected NEW or did not select a dog from the dogs list box (in lab.php).
if((is_bool($properties_array[5])) && ($properties_array[6] > -1))
{ // confirms true or false and valid index or takes default
$this->insert = $properties_array[5];
$this->index = $properties_array[6];
}
$this->change_dog_data("Insert/Update");
}
if(is_numeric($properties_array))
{ // confirms valid index don't delete if not valid
$this->index = $properties_array;
$this->change_dog_data("Delete");
}
In the constructor, after the dog values (dog_name, dog_breed, dog_weight, and dog_color) have been validated, the insert and index values also need to be validated. The if statement shown uses the PHP method is_bool to determine if the value in $properties_array[5] is TRUE or FALSE. $properties_array[5] is the location of the value from the insert property. (It’s set to TRUE if it is an insert and set to FALSE if it is an Update). The if statement also determines if the value in $properties_array[6] is greater than -1. A value greater than -1 indicates an update or deletion. A value of -1 indicates an insertion request. If valid, the values are placed into $this->insert and $this->index. Then the private method called change_dog_data is called passing in “insert/update”.
The next if statement uses the PHP method is_numeric to determine if $properties_array is not actually an array and that it contains a number. If this is true, the index of the dog to be removed has been passed. If this is the case, then $property_array (containing the index to be deleted) is placed in $this->index and the private method called change_dog_data is called passing in “delete”.
private function change_dog_data($type)
{
if ( file_exists("e8dog_container.php")) {
require_once("e8dog_container.php"); // use chapter 5 container w exception handling
} else {
throw new Exception("Dog container file missing or corrupt");
}
$container = new dog_container("dogdata"); // sets the tag name to look for in XML file
$properties_array = array("dogdata"); // not used but must be passed into create_object
$dog_data = $container->create_object($properties_array); // creates dog_data object
The new change_dog_data method (called in the previous code) will use code very similar to the display_dog_data method shown in a previous chapter. First the method verifies that the dog_container exists. If the container exists, an instance of the container ($container) is created passing"dogdata" which tells the container that this request will be using the dogs XML file. Next $properties_array is created with a simple array containing "dogdata". This array will not actually be used. However, the dog_data class requires that something be passed into the constructor. An instance of dog_data ($dog_data) is now created using the create_object method of the container.
$method_array = get_class_methods($dog_data);
$last_position = count($method_array) - 1;
$method_name = $method_array[$last_position];
As seen in previous code, the change_dog_data method uses the PHP get_class_methods to create an array of methods contained in the dog_data object ($dog_data). The last method in dog_data is the processRecords method, which uses a case statement to call the correct private method.
if (($this->index > -1) && ($type == "Delete"))
{
$record_Array = $this->index;
$dog_data->$method_name("Delete",$record_Array);
}
If the index is greater than -1 and the type is "delete" then the change_dog_data method calls the processRecords method of the dog_data object and passes "delete" and the index to be deleted.
else if (($this->index == -1) && ($type == "Insert/Update"))
{
$record_Array = array(array('dog_name'=>"$this->dog_name", 'dog_weight'=>"$this->dog_weight", 'dog_color'=>"$this->dog_color", 'dog_breed'=>"$this->dog_breed"));
$dog_data->$method_name("Insert",$record_Array);
}
If the index is -1 and the type is "insert/update" then the user has requested an “insert”. An array is created containing all the dog properties (dog_name, dog_weight, dog_color, and dog_breed). Then “insert” and the array are passed into the processRecords method of the dog_object.
else if ($type == "Insert/Update")
{
$record_Array = array($this->index => array('dog_name'=>"$this->dog_name", 'dog_weight'=>"$this->dog_weight", 'dog_color'=>"$this->dog_color", 'dog_breed'=>"$this->dog_breed"));
$dog_data->$method_name("Update",$record_Array);
}
$dog_data = NULL;
}
If the index is not -1 and the type is "insert/update", then the user has requested an update of information. The same array as shown with an insert is created, with one exception. The index of the array (array($this->index => ) is set to the index of the record to be updated. The array and “update” are then passed to the processRecords method of the dog_data object.
After the record has been inserted, updated, or deleted, the dog_data object ($dog_data) is set to NULL. As stated in previous chapters, the dog_data object first updates the associate array, which contains each dog’s information. When the destructor of the dog_data object is called, the information is then updated to the dog_data XML file. Setting $dog_data to NULL releases the dog_data object, which calls its destructor.
That completes all the changes to the business rules tier. Let’s put it all together.
Example 8-4. The dog.php file with update, insert, and delete
<?php
class Dog
{
// ----------------------------------------- Properties ------------------------------------
private $dog_weight = 0;
private $dog_breed = "no breed";
private $dog_color = "no color";
private $dog_name = "no name";
private $error_message = "??";
private $breedxml = "";
private $insert = FALSE;
private $index = -1;
// ---------------------------------- Constructor ------------------------------------------
function __construct($properties_array)
{
if (method_exists('dog_container', 'create_object')) {
if (is_array($properties_array)) {
$this->breedxml = $properties_array[4];
$name_error = $this->set_dog_name($properties_array[0]) == TRUE ? 'TRUE,' : 'FALSE,';
$color_error = $this->set_dog_color($properties_array[2]) == TRUE ? 'TRUE,' : 'FALSE,';
$weight_error= $this->set_dog_weight($properties_array[3]) == TRUE ? 'TRUE' : 'FALSE';
$breed_error = $this->set_dog_breed($properties_array[1]) == TRUE ? 'TRUE,' : 'FALSE,';
$this->error_message = $name_error . $breed_error . $color_error . $weight_error;
if(stristr($this->error_message, 'FALSE'))
{
throw new setException($this->error_message);
}
if((is_bool($properties_array[5])) && ($properties_array[6] > -1))
{ // confirms true or false and valid index or takes default
$this->insert = $properties_array[5];
$this->index = $properties_array[6];
}
$this->change_dog_data("Insert/Update");
}
if(is_numeric($properties_array))
{ // confirms valid index don't delete if not valid
$this->index = $properties_array;
$this->change_dog_data("Delete");
}
}
else
{
exit;
}
}
function clean_input() { }
function set_dog_name($value)
{
$error_message = TRUE;
(ctype_alpha($value) && strlen($value) <= 20) ? $this->dog_name = $value : $this->error_message = FALSE;
return $this->error_message;
}
function set_dog_weight($value)
{
$error_message = TRUE;
(ctype_digit($value) && ($value > 0 && $value <= 120)) ? $this->dog_weight = $value : $this->error_message = FALSE;
return $this->error_message;
}
function set_dog_breed($value)
{
$error_message = TRUE;
($this->validator_breed($value) === TRUE) ? $this->dog_breed = $value : $this->error_message = FALSE;
return $this->error_message;
}
function set_dog_color($value){
$error_message = TRUE;
(ctype_alpha($value) && strlen($value) <= 15) ? $this->dog_color = $value : $this->error_message = FALSE;
return $this->error_message; }
/ -------------------------------- Get Methods ---------------------------------------------
function get_dog_name()
{
return $this->dog_name;
}
function get_dog_weight()
{
return $this->dog_weight;
}
function get_dog_breed()
{
return $this->dog_breed;
}
function get_dog_color()
{
return $this->dog_color;
}
function get_properties()
{
return "$this->dog_name,$this->dog_weight,$this->dog_breed,$this->dog_color.";
}
// ----------------------------General Methods---------------------------------------------
private function validator_breed($value)
{
$breed_file = simplexml:load_file($this->breedxml);
$xmlText = $breed_file->asXML();
if(stristr($xmlText, $value) === FALSE)
{
return FALSE;
}
else
{
return TRUE;
}
}
private function change_dog_data($type)
{
if ( file_exists("e8dog_container.php")) {
require_once("e8dog_container.php"); // use chapter 5 container w exception handling
} else {
throw new Exception("Dog container file missing or corrupt");
}
$container = new dog_container("dogdata"); // sets the tag name to look for in XML file
$properties_array = array("dogdata"); // not used but must be passed into create_object
$dog_data = $container->create_object($properties_array); // creates dog_data object
$method_array = get_class_methods($dog_data);
$last_position = count($method_array) - 1;
$method_name = $method_array[$last_position];
if (($this->index > -1) && ($type == "Delete"))
{
$record_Array = $this->index;
$dog_data->$method_name("Delete",$record_Array);
}
else if (($this->index == -1)&&($type == "Insert/Update"))
{
$record_Array = array(array('dog_name'=>"$this->dog_name", 'dog_weight'=>"$this->dog_weight", 'dog_color'=>"$this->dog_color", 'dog_breed'=>"$this->dog_breed"));
$dog_data->$method_name("Insert",$record_Array);
}
else if ($type == "Insert/Update")
{
$record_Array = array($this->index => array('dog_name'=>"$this->dog_name", 'dog_weight'=>"$this->dog_weight", 'dog_color'=>"$this->dog_color", 'dog_breed'=>"$this->dog_breed"));
$dog_data->$method_name("Update",$record_Array);
}
$dog_data = NULL;
}
function display_dog_data($record)
{
if ( file_exists("e8dog_container.php")) {
require_once("e8dog_container.php"); // use chapter 5 container w exception handling
} else {
throw new Exception("Dog container file missing or corrupt");
}
$container = new dog_container("dogdata"); // sets the tag name to look for in XML file
$properties_array = array("dogdata"); // not used but must be passed into create_object
$dog_data = $container->create_object($properties_array); // creates dog_data object
$method_array = get_class_methods($dog_data);
$last_position = count($method_array) - 1;
$method_name = $method_array[$last_position];
$record_Array = $record;
return $dog_data->$method_name("Display",$record_Array);
}
}
?>
As you’ve read, there are no required changes to the dog_data.php file because it already contains insert, update, and delete methods.
Do It
1.
Download the code for this section from the book’s web site. Run the (almost) completed program. Try to “break” the program. Did you accomplish the task? If so, what broke? Attempt to fix any problems you might discover.
2.
Download the code for this section from the book’s web site. Adjust the code to handle dog information that will include the following additional fields: dog_ID (unique for each dog) and dog_gender. Adjust the dog.php and dog_data.php programs to return these fields. You should now be able to test the complete application. Note: If you did not previously complete the Do Its earlier in this chapter, complete these assignments along with this one.
Final Touches
You will finish the coding of the ABC Canine Shelter Reservation System in this section (finally!). You will use some CSS code from Chapter 2 to help make the application look more professional. In addition, you will add a menu that will allow the users to read the errors logs and sign out of the application (close the session).
The CSS code from Chapter 2 uses the HTML tag (<div id='wrapper'>) to control the contents of the body section. This tag is therefore added directly after the body tag (and closed right before the closing body tag).
<body onload="checkJS();">
<div id="wrapper">
<div id="header"><h1><img src="brody.jpg"> ABC Canine Shelter Reservation System</h1>
The CSS code also uses the HTML tag (<div id='header'>) to format the header (title) of the page. The code has also been adjusted to include an image of a dog using the HTML img tag.
<a href="e8readerrorlog.php">Manage Error Logs</a> | <a href="e75changepassword.php">Change Password</a> | <a href="e8lab.php?logoff=True">Log Off</a>
</div>
A simple menu is also included in the header section, which will allow the users to read the error log, change their passwords, or log off the application. Notice that the code to log off the system will recall the lab.php program and create a property "logoff" with a value of "True". You will make just a sight final adjustment to the lab.php code to handle this selection.
All the remaining contents of the body section are placed in the HTML tag (<div ='contents'>).
<head>
<title>ABC Canine Shelter Reservation System</title>
<link href="e8dogstylesheet.css" rel="stylesheet">
The CSS code from Chapter 2 will be pulled into the file in the head section. The file has been renamed. The contents of the file remain unchanged except for adding a float: top to the wrapper to align the display with the top of the browser and text-align: center to the header to center the title of the application.
These changes provide a better look and feel for the application.
The last code you need to look at in the lab.php program is the logoff routine.
session_start();
if (isset($_GET['logoff']))
{
session_destroy();
}
if ((!isset($_SESSION['username'])) || (!isset($_SESSION['password'])) || (isset($_GET['logoff']))) {
At the top of the code for lab.php an if statement is added to determine if logoff has been set (via GET). If it has, the session is destroyed. The if statement to determine if the user ID and password has not been set, and is also modified to include checking if logoff has been set. If it has been set, then (at this point) the user is no longer logged in to the system.
echo "<html><head><title>ABC Canine Shelter Reservation System</title>";
echo "<link href= 'e8dogstylesheet.css' rel='stylesheet'><style type='text/css'>img { height: 100px; width: 140px; }</style></head><body>";
echo "<div id='wrapper'><div id='header'><h1><img src='brody.jpg'>ABC Canine Shelter Reservation System</h1></div>";
echo "<div id='content'>";
echo "You must login to access the ABC Canine Shelter Reservation System";
echo "<p>";
echo "<a href='e74login.php'>Login</a> | <a href='e73registration.php'>Create an account</a>";
echo "</p>";
echo "</div><div id='footer'>Copyright © 2015 Little Ocean Waves Publishing - Steve Prettyman</div></div>";
echo "</body></html>";
The user is then redirected to either log in or create an account. Also notice that the code has been modified to include the same div tags for wrapper, header, content, and footer. This will give the page the same look as the lab.php file.
In addition, any page displayed to the users should have this look. The displayRecords method of the readerrorlog program has also been modified (as shown here) to include the same div tags.
echo "<html><head><title>ABC Canine Shelter Reservation System</title>";
echo "<link href=' e8dogstylesheet.css' rel='stylesheet'>";
echo "<style> table { border: 2px solid #5c744d;}";
echo "img { height: 100px; width: 140px; } </style>";
echo "</head><body>";
echo "<div id='wrapper'><div id='header'><h1><img src='brody.jpg'> ABC Canine Shelter Reservation System</h1></div><div id='content'>";
echo "<table>";
echo "<caption>Log File: " . ERROR_LOG . "</caption>";
echo "<tr><th></th><th>Date/Time</th><th>Error Type</th><th>Error Message</th></tr><tr>";
for ($J=$row_Count; $J >= 0; $J--)
{
echo "<td><a href='e58readlogfile.php?rn=$J'>Delete</a></td>";
for($I=0; $I < 3; $I++)
{
echo "<td> " . $error_Array[$J][$I] . " </td> ";
}
echo "</tr>";
}
echo "</table>";
echo "</div><div id='footer'>Copyright © 2015 Little Ocean Waves Publishing - Steve Prettyman</div></div>";
echo "</body></html>";
Let’s look at the final version of lab.php in Example 8-5.
Example 8-5. The complete lab.php file
<?php
session_start();
if (isset($_GET['logoff']))
{
session_destroy();
}
if ((!isset($_SESSION['username'])) || (!isset($_SESSION['password'])) || (isset($_GET['logoff']))) {
echo "<html><head><title>ABC Canine Shelter Reservation System</title>";
echo "<link href='e8dogstylesheet.css' rel='stylesheet'><style type='text/css'>img { height: 100px; width: 140px; }</style></head><body>";
echo "<div id='wrapper'><div id='header'><h1><img src='brody.jpg'>ABC Canine Shelter Reservation System</h1></div>";
echo "<div id='content'>";
echo "You must login to access the ABC Canine Shelter Reservation System";
echo "<p>";
echo "<a href='e74login.php'>Login</a> | <a href='e73registration.php'>Create an account</a>";
echo "</p>";
echo "</div><div id='footer'>Copyright & copy; 2015 Little Ocean Waves Publishing - Steve Prettyman</div></div>";
echo "</body></html>";
}
else if(($_SERVER['HTTP_REFERER'] == ' http://127.0.0.1:8080/mysite/bgchapter8/ExampleFile7.4/e74login.php ') || ($_SERVER['HTTP_REFERER'] == 'http://127.0.0.1:8080/mysite/bgchapter8/ExampleFile7.4/e8lab.php '))
{
?>
<!DOCTYPE html>
<html lan="en">
<head>
<title>ABC Canine Shelter Reservation System</title>
<link href=" e8dogstylesheet.css" rel="stylesheet">
<script src="e8getlists.js"></script>
<script src="e5validator.js"></script>
<style type="text/css">
#JS { display:none; }
#input_form { display:none; }
#insert {display: none; }
#delete {display: none; }
#update {display: none; }
img { height: 100px; width: 140px; }
</style>
<script>
function checkJS() {
document.getElementById('JS').style.display = "inline";
}
function process_select() {
var colorbuttons = document.getElementsByName('dog_color');
if(!(document.getElementById('dogs').value == -1))
{
index = document.getElementById('dogs').selectedIndex -1;
document.getElementById('index').value = index;
document.getElementById('dog_name').value = obj.dogs[index].dog_name;
document.getElementById('dog_weight').value = obj.dogs[index].dog_weight;
dog_color = obj.dogs[index].dog_color;
if(dog_color == "Brown")
{
colorbuttons[0].checked = true;
} else if (dog_color == "Black")
{
colorbuttons[1].checked = true;
} else if (dog_color == "Yellow")
{
colorbuttons[2].checked = true;
}
else if (dog_color == "White")
{
colorbuttons[3].checked = true;
}
dog_breed = obj.dogs[index].dog_breed;
document.getElementById('dog_breed').value = dog_breed;
document.getElementById('update').style.display = "inline";
document.getElementById('delete').style.display = "inline";
document.getElementById('insert').style.display = "none";
}
else
{
colorbuttons[4].checked = true;
document.getElementById('dog_name').value = "";
document.getElementById('dog_weight').value = "";
document.getElementById('dog_breed').value = "Select a dog breed";
document.getElementById('insert').style.display = "inline";
document.getElementById('update').style.display = "none";
document.getElementById('delete').style.display = "none";
}
document.getElementById('input_form').style.display = "inline";
}
</script>
</head>
<body onload="checkJS();">
<div id="wrapper">
<div id="header"><h1><img src="brody.jpg"> ABC Canine Shelter Reservation System</h1>
<a href="e8readerrorlog.php">Manage Error Logs</a> | <a href="e75changepassword.php">Change Password</a> | <a href="e8lab.php?logoff=True">Log Off</a>
</div>
<div id="content">
<?php
if (isset($_SESSION['message']))
{
echo "<p>" . $_SESSION['message'] . "</p>";
}
else
{
echo "<p> Welcome back, " . $_SESSION['username'] . "</p>";
}
?>
<div id="JS">
<script>
AjaxRequest('e8dog_interface.php');
</script>
<h3>Pick the dog name and breed to change from the dropdown box, then click the button.<br>For new dog information select 'NEW'.</h3>
Select 'NEW' or Dog's Name/Breed <div id="AjaxReturnValue"></div>
<input type="button" name="selected" id="selected" value="Click to select" onclick="process_select()" /><br><br>
<div id="input_form">
<form method="post" action="e8dog_interface.php" onSubmit="return validate_input(this)">
<h3>Please note the required format of information.</h3>
<hr>
Enter Your Dog's Name (max 20 characters, alphabetic) <input type="text" pattern="[a-zA-Z]*" title="Up to 20 Alphabetic Characters" maxlength="20" name="dog_name" id="dog_name" required/><br /><br />
Select Your Dog's Color:<br />
<input type="radio" name="dog_color" id="dog_color" value="Brown">Brown<br />
<input type="radio" name="dog_color" id="dog_color" value="Black">Black<br />
<input type="radio" name="dog_color" id="dog_color" value="Yellow">Yellow<br />
<input type="radio" name="dog_color" id="dog_color" value="White">White<br />
<input type="radio" name="dog_color" id="dog_color" value="Mixed" checked >Mixed<br /><br />
Enter Your Dog's Weight (numeric only) <input type="number" min="1" max="120" name="dog_weight" id="dog_weight" required /><br /><br />
<input type="hidden" name="dog_app" id="dog_app" value="dog" />
Select Your Dog's Breed <div id="AjaxResponse"></div><br />
<input type="hidden" name="index" id="index" value="-1"/>
<input type="submit" name="insert" id="insert" value="Click to create your dog info" />
<input type="submit" name="delete" id="delete" value="Click to remove your selected dog info" />
<input type="submit" name="update" id="update" value="Click to update your selected dog info" />
<hr>
</form>
</div> </div>
<noscript>
<div id="noJS">
<form method="post" action="e8dog_interface.php">
<h3>For Updates please enter all fields. For Deletions enter at least the dog name and breed. Then click the button.<br>For new dog information enter the requested information, Then click the button.<br> Please note the required format of information.</h3>
Enter Your Dog's Name (max 20 characters, alphabetic) <input type="text" pattern="[a-zA-Z ]*"title="Up to 20 Alphabetic Characters" maxlength="20" name="dog_name" id="dog_name" required/><br /><br />
Select Your Dog's Color:<br />
<input type="radio" name="dog_color" id="dog_color" value="Brown">Brown<br />
<input type="radio" name="dog_color" id="dog_color" value="Black">Black<br />
<input type="radio" name="dog_color" id="dog_color" value="Yellow">Yellow<br />
<input type="radio" name="dog_color" id="dog_color" value="White">White<br />
<input type="radio" name="dog_color" id="dog_color" value="Mixed" checked >Mixed<br /><br />
Enter Your Dog's Weight (numeric only) <input type="number" min="1" max="120" name="dog_weight" id="dog_weight" required /><br /><br />
Enter Your Dog's Breed (max 35 characters, alphabetic) <input type="text" pattern="[a-zA-Z ]*" title="Up to 15 Alphabetic Characters" maxlength="35" name="dog_breed" id="dog_breed" required /><br />
<input type="hidden" name="dog_app" id="dog_app" value="dog" />
<input type="submit" name="input" id="input" value="Click to create your dog info" />
<input type="submit" name="delete" id="delete" value="Click to remove your selected dog info" />
<input type="submit" name="update" id="update" value="Click to update your selected dog info" />
</form>
</div>
</noscript>
</div>
<div id="footer">Copyright & copy; 2015 Little Ocean Waves Publishing - Steve Prettyman</div>
</div>
</body> </html>
<?php } ?>
Example 8-6. The complete readerrorlog.php file
<?php
session_start();
function deleteRecord($recordNumber, &$row_Count, &$error_Array)
{
for ($J=$recordNumber; $J < $row_Count - 1; $J++)
{
for($I=0; $I < 3; $I++)
{
$error_Array[$J][$I] = $error_Array[$J + 1][$I];
}
}
unset($error_Array[$row_Count]);
$row_Count--;
}
function saveChanges($row_Count,$error_Array,$log_File)
{
$logFile = fopen($log_File, "w");
for($I=0; $I < $row_Count; $I++)
{
$writeString = $error_Array[$I][0] . " | " . $error_Array[$I][1] . " | " . $error_Array[$I][2];
fwrite($logFile, $writeString);
}
fclose($logFile);
}
function displayRecords($row_Count, $error_Array)
{
echo "<html><head><title>ABC Canine Shelter Reservation System</title>";
echo "<link href= 'e8dogstylesheet.css' rel='stylesheet'>";
echo "<style> table { border: 2px solid #5c744d;}";
echo "img { height: 100px; width: 140px; } </style>";
echo "</head><body>";
echo "<div id='wrapper'><div id='header'><h1><img src='brody.jpg'> ABC Canine Shelter Reservation System</h1></div><div id='content'>";
echo "<table>";
echo "<caption>Log File: " . ERROR_LOG . "</caption>";
echo "<tr><th></th><th>Date/Time</th><th>Error Type</th><th>Error Message</th></tr><tr>";
echo "<tr><th></th><th>Date/Time</th><th>Error Type</th><th>Error Message</th></tr><tr>";
for ($J=$row_Count; $J >= 0; $J--)
{
echo "<td><a href='e58readlogfile.php?rn=$J'>Delete</a></td>";
for($I=0; $I < 3; $I++)
{
echo "<td> " . $error_Array[$J][$I] . " </td> ";
}
echo "</tr>";
}
echo "</table>";
echo "</div><div id='footer'>Copyright & copy; 2015 Little Ocean Waves Publishing - Steve Prettyman</div></div>";
echo "</body></html>";
}
const ERROR_LOG = "Errors.log";
if ((!isset($_SESSION['username'])) || (!isset($_SESSION['password']))) {
echo "<html><head><title>ABC Canine Shelter Reservation System</title>";
echo "<link href='e8dogstylesheet.css' rel='stylesheet'><style type='text/css'>img { height: 100px; width: 140px; }</style></head><body>";
echo "<div id='wrapper'><div id='header'><h1><img src='brody.jpg'>ABC Canine Shelter Reservation System</h1></div>";
echo "<div id='content'>";
echo "You must login to access the ABC Canine Shelter Reservation System";
echo "<p>";
echo "<a href='e74login.php'>Login</a> | <a href='e73registration.php'>Create an account</a>";
echo "</p>";
echo "</div><div id='footer'>Copyright & copy; 2015 Little Ocean Waves Publishing - Steve Prettyman</div></div>";
echo "</body></html>";
}
else
{
$logFile = fopen(ERROR_LOG, "r");
$row_Count = 0;
while(!feof($logFile))
{
$error_Array[$row_Count] = explode(' | ', fgets($logFile));
$row_Count++;
}
$row_Count--;
fclose($logFile);
if(isset($_GET['rn']))
{
deleteRecord($_GET['rn'], $row_Count, $error_Array);
saveChanges($row_Count,$error_Array,ERROR_LOG);
}
displayRecords($row_Count,$error_Array);
}
?>
Do It
1.
Download the code for this section from the book’s site. Also, download the displaychangelog.php program from Chapter 6 (in Example 6-4) along with a change log if you don’t already have one. Update the menu provided in the lab.php program to provide a link to thedisplaychangelog.php program. Add code to the displaychangelog.php program to require the users to log in. Redirect the users to the choice of login or registration (as shown in the examples) if they are not logged in. Also update the HTML in the displaychangelog.php file to use thee8dogstylesheet.css file to display the change log page and the login/registration selection page in the same format as shown in Figure 8-5.
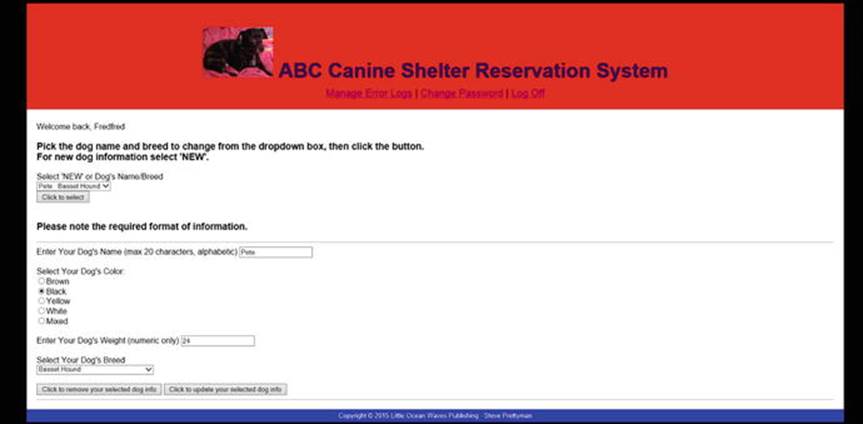
Figure 8-5.
The complete lab.php file
2.
Download the code for this section from the book’s web site. Adjust the code to handle dog information that will include the following additional fields: dog_ID (unique for each dog) and dog_gender. Adjust all programs necessary (including the readerrorlog and displaychangelog (in 6-4)). You should now be able to test the complete application.
3.
Download the code for this section from the book’s site. Add a menu for the users to return to the shelter registration page (lab.php) or log off when they are using the readerrorlog.php file. Add the code needed to the readerrorlog.php file to log off the user. If you have not already done so, include changes need to format the display of the readerrorlog.php file as shown in Figure 8-5. Also these changes in the displaychangelog.php file (if you did #1).
ABC Canine Shelter Reservation System Logical Design
The final logical design of the ABC Canine Shelter Reservation System shows the application with four tiers (authentication, interface, business rules, and data). Additional tiers could also be used to break a large application across multiple servers.
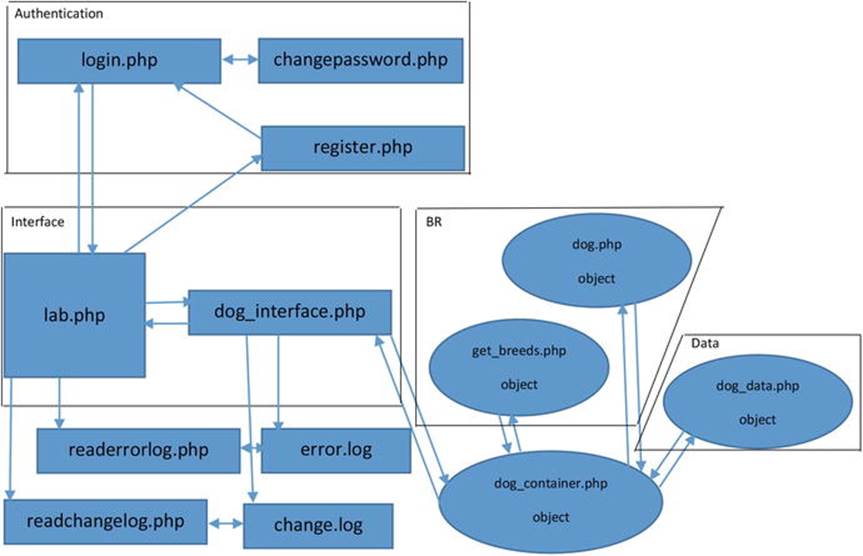
Figure 8-6.
The complete ABC Canine Shelter Reservation System
In addition to the tiers, maintenance programs (readerrorlog and readchangelog) provide the ability to tighten security, fix errors, and provide backup and recovery.
Limitations
The ABC Canine Shelter Reservation System has been used as a teaching tool in this book. However, the system is not complete and ready for the real world. Many of the limitations of the system have been addressed in this book and used as exercises for you to gain further PHP programming skills. The changes shown next should be made to the system to improve the user experience, security, and performance. In addition, user testing is critical to ensure that the users of the system are satisfied. Users who are not happy with the design and performance of the system are not likely to use it.
lab.php
· A Dog_ID or some other type of unique field needs to be included to determine the difference between dogs with the same name and breed.
· The form for users not using JavaScript needs to use PHP to call and retrieve needed information for update and delete ability.
· A link to displaychangelog.php needs to be provided in the menu selection.
· A Dog_Gender field needs to exist. It would also be good if dog pictures existed.
· The program needs to handle and respond to users attempt to insert a dog that already exists.
dog_interface.php
· Dog_ID information (update/insert) needs to be accepted from the Dog class and passed to lab.php.
· Code is needed to return requests to lab.php for the complete dogs array and a specific dog for the non_JavaScript-enabled browsers. The information will be retrieved from dog.php.
· The Dog_Gender field needs to be pulled from dog.php and passed to lab.php.
· A session message must be passed to the lab.php program when the user attempts to enter a dog that is already in the data. The message is created in a catch block.
dog.php
· The Dog_ID information needs to be pulled from dog_data.php and passed to dog_interface.php.
· The Dog_Gender needs to be pulled from dog_data.php and passed to dog_interface.php.
dog_data.php
· The Dog_ID needs to be passed to dog.php. The ability to insert and update this field needs to be included.
· The Dog_Gender needs to be passed to dog.php. The ability to insert and updated this field needs to be included.
register.php
· This program needs to include a unique field (customerID) to determine duplicate user IDs. This field will be generated and not entered by the users.
· This program needs to detect users attempting to create a duplicate ID. Code could even make suggestions for user ID names based on what the user attempted to create (such as adding numbers to the end of the user ID).
· This program needs to require the user to also use a special symbol for the password.
· This program needs security questions in case the user forgets his password.
· Additional fields are needed, such as name, e-mail, and address.
login.php
· This program needs to be able to create a temporary password for users who forget their passwords but remember answers to their security questions.
Overall
· You need to consider moving more program (file) names to XML files for easier version changes.
· You need to consider adding levels of access and approval for new user IDs.
Chapter Terms
|
$_SERVER['HTTP_REFERER'] |
HTML button |
|
split |
var |
|
JSON object |
JSON.parse |
|
getElementsByName |
HTML list boxes |
|
selectedIndex |
value |
|
dot notation format |
checked property |
|
is_bool |
img |
|
float: top |
text-align: center |
|
Four Tier Application |
Chapter Questions and Projects
Multiple Choice
1.
Which JavaScript method accomplishes a similar task as the PHP method explode?
a.
explode
b.
slice
c.
split
d.
None of these
2.
Which JavaScript method accomplishes a similar task as the PHP method json_decode?
a.
JSON.scan
b.
JSON.parse
c.
JSON.decode
d.
None of these
3.
A JSON object is similar to which PHP object?
a.
An array
b.
A multidimensional array
c.
An associative array
d.
None of these
4.
An HTML button can be used to do what?
a.
Can be used to call a JavaScript method
b.
Can submit a form
c.
Can display a form
d.
All of the above
5.
The private word is used to create a private object in PHP. What word is used in JavaScript to accomplish the same?
a.
private
b.
No additional word is needed; they are private by default
c.
var
d.
None of these
True/False
1.
JavaScript is commonly used to retrieve and use data passed from other program languages.
2.
The CSS code display: form is used to display a form that has been hidden from the user.
3.
The CSS code p {float: top } will cause everything in all paragraph tags to float to the top of the browser window.
4.
getElementsByName can be used to create an array from a grouping of radio buttons.
5.
is_numeric could be used to determine if an object is not an array.
Short Answer/Essay
1.
Explain why and how initially hiding a form from the users will force them to make a selection from a list box.
2.
Explain how each program in the ABC Canine Shelter Reservation System uses -1 to indicate a request for insert.
3.
Explain each tier of a four-tier application.
4.
What changes would need to occur in the ABC Canine Shelter Reservation System to convert it to a Feline Shelter Reservation System?
5.
Give an example of three algorithms (blocks of code) that have been continuously reused in the ABC Canine Shelter Reservation System.
Projects
1.
Go back to the section entitled “Limitations” in this chapter and view the list again. Download the complete code from this chapter and fix one (or more) of these limitations. Make sure to fix the limitation in all the applicable files.
Term Project
1.
Update the ABC Computer Parts Inventory application to provide complete delete, update, and insert capabilities (as shown in this chapter). Add CSS to each program in the application interface to provide a more professional display of the information. Add any code needed to ensure that the users are logged in to access any part of the application. List any limitations that still exist in this application.