Oracle PL/SQL by Example, Fifth Edition (2015)
Chapter 11. Introduction to Cursors
In this chapter, you will learn about
![]() Types of Cursors
Types of Cursors
![]() Cursor Loop
Cursor Loop
![]() Cursor FOR LOOPs
Cursor FOR LOOPs
![]() Nested Cursors
Nested Cursors
Cursors are memory areas where the Oracle platform executes SQL statements. In database programming, cursors are internal data structures that allow processing of SQL query results. For example, you use a cursor to operate on all the rows of the STUDENT table for those students taking a particular course (having associated entries in the ENROLLMENT table). In this chapter, you will learn to declare an explicit cursor that enables a user to process many rows returned by a query and to write code that will process each row one at a time.
Lab 11.1: Types of Cursors
After this lab, you will be able to
![]() Make Use of an Implicit Cursor
Make Use of an Implicit Cursor
![]() Make Use of an Explicit Cursor
Make Use of an Explicit Cursor
For the Oracle platform to process an SQL statement, it needs to create an area of memory known as the context area; this will contain the information necessary to process the statement. This information includes the number of rows processed by the statement and a pointer to the parsed representation of the statement (parsing an SQL statement is the process whereby information is transferred to the server, at which point the SQL statement is evaluated as being valid). In a query, the active set refers to the rows that will be returned.
A cursor is a handle, or pointer, to the context area. Through the cursor, a PL/SQL program can control the context area and what happens to it as the statement is processed. Two important features about the cursor are as follows:
1. Cursors allow you to fetch and process rows returned by a SELECT statement, one row at a time.
2. A cursor is named so that it can be referenced.
There are two types of cursors:
1. An implicit cursor is automatically declared by Oracle every time an SQL statement is executed. The user will not be aware of this happening and will not be able to control or process the information in an implicit cursor.
2. An explicit cursor is defined by the program for any query that returns more than one row of data. That means the programmer has declared the cursor within the PL/SQL code block. This declaration allows the application to sequentially process each row of data as it is returned by the cursor.
Making Use of an Implicit Cursor
To better understand the capabilities of an explicit cursor, you first need to understand the process followed for an implicit cursor.
Process of an Implicit Cursor
![]() Any given PL/SQL block issues an implicit cursor whenever an SQL statement is executed, as long as an explicit cursor does not exist for that SQL statement.
Any given PL/SQL block issues an implicit cursor whenever an SQL statement is executed, as long as an explicit cursor does not exist for that SQL statement.
![]() A cursor is automatically associated with every DML (Data Manipulation Language) statement (UPDATE, DELETE, INSERT).
A cursor is automatically associated with every DML (Data Manipulation Language) statement (UPDATE, DELETE, INSERT).
![]() All UPDATE and DELETE statements have cursors that identify the set of rows that will be affected by the operation.
All UPDATE and DELETE statements have cursors that identify the set of rows that will be affected by the operation.
![]() An INSERT statement needs a place to receive the data that is to be inserted in the database; the implicit cursor fulfills this need.
An INSERT statement needs a place to receive the data that is to be inserted in the database; the implicit cursor fulfills this need.
![]() The most recently opened cursor is called the “SQL” cursor.
The most recently opened cursor is called the “SQL” cursor.
The implicit cursor is used to process INSERT, UPDATE, DELETE, and SELECT INTO statements. During the processing of an implicit cursor, the Oracle platform automatically performs the OPEN, FETCH, and CLOSE operations.
Did You Know?
An implicit cursor can tell you how many rows were affected by an update. Cursors have attributes such as ROWCOUNT. SQL%ROWCOUNT, for example, returns the numbers of rows updated. It can be used as follows:
SET SERVEROUTPUT ON
BEGIN
UPDATE student
SET first_name = 'B'
WHERE first_name LIKE 'B%';
DBMS_OUTPUT.PUT_LINE(SQL%ROWCOUNT);
END;
Consider the following example of an implicit cursor:
For Example ch11_1a.sql
SET SERVEROUTPUT ON;
DECLARE
v_first_name VARCHAR2(35);
v_last_name VARCHAR2(35);
BEGIN
SELECT first_name, last_name
INTO v_first_name, v_last_name
FROM student
WHERE student_id = 123;
DBMS_OUTPUT.PUT_LINE ('Student name: '||
v_first_name||' '||v_last_name);
EXCEPTION
WHEN NO_DATA_FOUND THEN
DBMS_OUTPUT.PUT_LINE
('There is no student with student ID 123');
END;
The Oracle platform automatically associates an implicit cursor with the SELECT INTO statement and fetches the values for the variables, v_first_name and v_last_name. Once the SELECT INTO statement completes, Oracle closes the implicit cursor.
Unlike an implicit cursor, an explicit cursor is defined by the program for any query that returns more than one row of data. Thus you need to process an explicit cursor as follows: First you declare a cursor. Second, you open an earlier declared cursor. Third, you fetch the earlier declared and opened cursor. Finally, you close the cursor.
Making Use of an Explicit Cursor
The only means of generating an explicit cursor is for the cursor to be named in the declaration section of the PL/SQL block.
The advantages of declaring an explicit cursor over using an indirect implicit cursor are that the explicit cursor gives more programmatic control to the programmer. Implicit cursors are less efficient than explicit cursors, which makes it harder to trap data errors.
The process of working with an explicit cursor consists of the following steps:
1. Declaring the cursor. This initializes the cursor into memory.
2. Opening the cursor. The previously declared cursor can now be opened; memory is allocated.
3. Fetching the cursor. The previously declared and opened cursor can now retrieve data; this is the process of fetching the cursor.
4. Closing the cursor. The previously declared, opened, and fetched cursor must now be closed to release memory allocation.
Declaring a Cursor
Declaring a cursor defines the name of the cursor and associates it with a SELECT statement. The first step is to declare the cursor with the following syntax:
CURSOR c_cursor_name IS select statement
Did You Know?
The naming conventions that are used in this book advise you to always name a cursor as c_cursorname. When you include c_ at the beginning of the name, it will always be clear to you that the name is referencing a cursor.
It is not possible to make use of a cursor unless the complete cycle of (1) declaring, (2) opening, (3) fetching, and (4) closing has been performed. To explain these four steps, the following examples show code fragments for each step. After we go over the process step by step, you will then be shown the complete process.
The following example is a PL/SQL fragment that demonstrates the first step of declaring a cursor. A cursor named C_MyCursor is declared as a SELECT statement of all the rows in the zipcode table that have the item state equal to “NY.”
For Example ch11_1b.sql
DECLARE
CURSOR C_MyCursor IS
SELECT *
FROM zipcode
WHERE state = 'NY';
...
–<code would continue here with opening, fetching,
and closing of the cursor>
Did You Know?
Cursor names follow the same rules of scope and visibility that apply to the PL/SQL identifiers. Because the name of the cursor is a PL/SQL identifier, it must be declared before it is referenced. Any valid select statement can be used to define a cursor, including joins and statements with the UNION or MINUS clause.
Record Types
A record is a composite data structure, which means that it is composed of one or more elements. Records are very much like a row of a database table, but each element of the record does not stand on its own. PL/SQL supports three kinds of records: (1) table based, (2) cursor based, and (3) programmer defined.
A table-based record is one whose structure is drawn from the list of columns in the table. A cursor-based record is one whose structure matches the elements of a predefined cursor. To create a table-based or cursor-based record, use the %ROWTYPE attribute.
<record_name> <table_name or cursor_name>%ROWTYPE
For Example ch11_1c.sql
SET SERVEROUTPUT ON
DECLARE
vr_student student%ROWTYPE;
BEGIN
SELECT *
INTO vr_student
FROM student
WHERE student_id = 156;
DBMS_OUTPUT.PUT_LINE (vr_student.first_name||' '
||vr_student.last_name||' has an ID of 156');
EXCEPTION
WHEN no_data_found
THEN
RAISE_APPLICATION_ERROR(-2001,'The Student '||
'is not in the database');
END;
The variable vr_student is a record type of the existing database table student. That is, it has the same components as a row in the student table. A cursor-based record is much the same, except that it is drawn from the select list of an explicitly declared cursor. When referencing elements of the record, you use the same syntax that you use with tables:
record_name.item_name
To define a variable that is based on a cursor record, you must first declare the cursor. In the following lab, you will start by declaring a cursor and then proceed with the process of opening the cursor, fetching from the cursor, and finally closing the cursor.
A table-based record is drawn from a particular table structure. Consider the following code fragment:
For Example
DECLARE
vr_zip ZIPCODE%ROWTYPE;
vr_instructor INSTRUCTOR%ROWTYPE;
The record vr_zip has a structure similar to a row of the ZIPCODE table. Its elements are CITY, STATE, and ZIP. Note that if the CITY column of the ZIPCODE table has been defined as VARCHAR2(15), the attribute CITY of the vr_zip record will have the same data type structure. Similarly, the record vr_instructor is based on the row of the INSTRUCTOR table.
Making Use of Record Types
Here is an example of a record type in an anonymous PL/SQL block.
For Example
SET SERVEROUTPUT ON;
DECLARE
vr_zip ZIPCODE%ROWTYPE;
BEGIN
SELECT *
INTO vr_zip
FROM zipcode
WHERE rownum < 2;
DBMS_OUTPUT.PUT_LINE('City: '||vr_zip.city);
DBMS_OUTPUT.PUT_LINE('State: '||vr_zip.state);
DBMS_OUTPUT.PUT_LINE('Zip: '||vr_zip.zip);
END;
In this example, you select a single row for the ZIPCODE table into the vr_zip record. Next, you display each element of the record on the screen. Notice that to reference each attribute of the record, dot notation is used. When run, the example produces the following output:
City: Santurce
State: PR
Zip: 00914
PL/SQL procedure successfully completed.
A cursor-based record is based on the list of elements of a predefined cursor. The record vr_student_name has a structure similar to a row returned by the SELECT statement defined in the cursor. It contains two attributes, the student’s first and last names. A cursor-based record can be declared only after its corresponding cursor has been declared; otherwise, a compilation error will occur.
For Example
DECLARE
CURSOR c_student_name IS
SELECT first_name, last_name
FROM student;
vr_student_name c_student_name%ROWTYPE;
Lab 11.2: Cursor Loop
After this lab, you will be able to
![]() Process an Explicit Cursor
Process an Explicit Cursor
![]() Make Use of User-Defined Records
Make Use of User-Defined Records
![]() Make Use of Cursor Attributes
Make Use of Cursor Attributes
To process a cursor, you will have to loop through it. In this section, we explain the details of each step of the loop by going through a code example.
Processing an Explicit Cursor
The following example shows the declaration section of a PL/SQL block that defines a cursor named c_student, based on the student table with the last_name and the first_name concatenated into one item called name and leaving out the created_by and modified_bycolumns. The block then declares a record based on this cursor.
For Example
DECLARE
CURSOR c_student is
SELECT first_name||' '||Last_name name
FROM student;
vr_student c_student%ROWTYPE;
Opening a Cursor
The next step in controlling an explicit cursor is to open it. When the open cursor statement is processed, four actions will take place automatically:
1. The variables (including bind variables) in the WHERE clause are examined.
2. Based on the values of the variables, the active set is determined and the PL/SQL engine executes the query for that cursor. Variables are examined at cursor open time only.
3. The PL/SQL engine identifies the active set of data—the rows from all involved tables that meet the WHERE clause criteria.
4. The active set pointer is set to the first row.
The syntax for opening a cursor is
OPEN cursor_name;
Did You Know?
A pointer into the active set is also established at the cursor open time. The pointer determines which row is the next to be fetched by the cursor. More than one cursor can be opened at a time.
The following example shows how the cursor c_student would be opened by continuing the previous example.
For Example
DECLARE
CURSOR c_student is
SELECT first_name||' '||Last_name name
FROM student;
vr_student c_student%ROWTYPE;
BEGIN
OPEN c_student;
Fetching Rows in a Cursor
After the cursor has been declared and opened, you can retrieve data from the cursor. The process of getting the data from the cursor is referred to as fetching the cursor. There are two methods of fetching a cursor, which use the following commands:
FETCH cursor_name INTO PL/SQL variables;
or
FETCH cursor_name INTO PL/SQL record;
When the cursor is fetched, the following occurs:
1. The fetch command is used to retrieve one row at a time from the active set. This is generally done inside a loop. The values of each row in the active set can then be stored into the corresponding variables or PL/SQL record one at a time, performing operations on each one successively.
2. After each FETCH command, the active set pointer is moved forward to the next row. Thus, each fetch will return successive rows of the active set, until the entire set is returned. The last FETCH command will not assign values to the output variables; thus they will still contain their prior values.
Closing a Cursor
Once all of the rows in the cursor have been processed (retrieved), the cursor should be closed. This tells the PL/SQL engine that the program is finished with the cursor, and the resources associated with it can be freed. The syntax for closing the cursor is
CLOSE cursor_name;
Did You Know?
Once a cursor is closed, it is no longer valid to fetch from it. Likewise, it is not possible to close an already closed cursor. Either attempt will result in an Oracle error.
For Example ch11_2a.sql
SET SERVEROUTPUT ON;
DECLARE
CURSOR c_student_name IS
SELECT first_name, last_name
FROM student
WHERE rownum <= 5;
vr_student_name c_student_name%ROWTYPE;
BEGIN
OPEN c_student_name;
LOOP
FETCH c_student_name INTO vr_student_name;
EXIT WHEN c_student_name%NOTFOUND;
DBMS_OUTPUT.PUT_LINE('Student name: '||
vr_student_name.first_name
||' '||vr_student_name.last_name);
END LOOP;
CLOSE c_student_name;
END;
In this example, a cursor is declared that returns five student names. Next, a cursor-based record is declared. In the body of the program, an explicit cursor is processed via the cursor loop. In the body of the loop, each record is returned by the cursor to the cursor-based record,vr_student_name. Next the content of the cursor is displayed on the screen. When run, the example produces the following output:
Student name: Austin V. Cadet
Student name: Frank M. Orent
Student name: Yvonne Winnicki
Student name: Mike Madej
Student name: Paula Valentine
PL/SQL procedure successfully completed.
Consider the same example with single modification. Notice that the DBMS_OUTPUT.PUT_LINE statement has been moved outside the loop.
For Example ch11_2b.sql
SET SERVEROUTPUT ON;
DECLARE
CURSOR c_student_name IS
SELECT first_name, last_name
FROM student
WHERE rownum <= 5;
vr_student_name c_student_name%ROWTYPE;
BEGIN
OPEN c_student_name;
LOOP
FETCH c_student_name INTO vr_student_name;
EXIT WHEN c_student_name%NOTFOUND;
END LOOP;
CLOSE c_student_name;
DBMS_OUTPUT.PUT_LINE('Student name: '||
vr_student_name.first_name||' '
||vr_student_name.last_name);
END;
The DBMS_OUTPUT.PUT_LINE has been moved outside the loop. First the loop will process the five student records. The values for each record will be placed in the record vr_student_name, but each time the loop iterates it will replace the value in the record with a new value. When the five iterations of the loop are finished, it will exit because of the EXIT WHEN condition, leaving the vr_student_name record with the last value that was in the cursor. This is the only value that will be displayed via the DBMS_OUTPUT.PUT_LINE, which comes after the loop is closed.
Making Use of a User-Defined Record
A user-defined record is based on the record type defined by a programmer. To make use of such a record, first you declare a record type, and then you declare a record variable based on the record type.
For Example
type type_name IS RECORD
(field_name 1 DATATYPE 1,
field_name 2 DATATYPE 2,
...
field_name N DATATYPE N);
record_name TYPE_NAME%ROWTYPE;
Consider the following code fragment:
For Example
SET SERVEROUTPUT ON;
DECLARE
-- declare user-defined type
TYPE instructor_info IS RECORD
(instructor_id instructor.instructor_id%TYPE,
first_name instructor.first_name%TYPE,
last_name instructor.last_name%TYPE,
sections NUMBER(1));
-- declare a record based on the type defined above
rv_instructor instructor_info;
In this code fragment, a type instructor_info is defined. This type contains four attributes: the instructor’s ID, first name, and last name, and the number of sections taught by this instructor. Next, a record based on the type just described is declared. As a result, this record has structure similar to the type, instructor_info.
Consider the following example:
For Example ch11_2c.sql
SET SERVEROUTPUT ON;
DECLARE
TYPE instructor_info IS RECORD
(first_name instructor.first_name%TYPE,
last_name instructor.last_name%TYPE,
sections NUMBER);
rv_instructor instructor_info;
BEGIN
SELECT RTRIM(i.first_name),
RTRIM(i.last_name), COUNT(*)
INTO rv_instructor
FROM instructor i, section s
WHERE i.instructor_id = s.instructor_id
AND i.instructor_id = 102
GROUP BY i.first_name, i.last_name;
DBMS_OUTPUT.PUT_LINE('Instructor, '||
rv_instructor.first_name||
' '||rv_instructor.last_name||
', teaches '||rv_instructor.sections||
' section(s)');
EXCEPTION
WHEN NO_DATA_FOUND THEN
DBMS_OUTPUT.PUT_LINE
('There is no such instructor');
END;
In this example, a record called vr_instructor is declared. This record is based on the type defined previously. In the body of the PL/SQL block, this record is initialized with the help of the SELECT INTO statement, and then the values in the cursor are displayed on the screen. Note that the columns of the SELECT INTO statement are listed in the same order that the attributes are defined in instructor_info type. There is no need to use dot notation for this record initialization.
When run, this example produces the following output:
Instructor, Tom Wojick, teaches 9 section(s)
PL/SQL procedure successfully completed.
Making Use of Cursor Attributes
Table 11.1 lists the attributes of a cursor, which are used to determine the result of a cursor operation when fetched or opened.
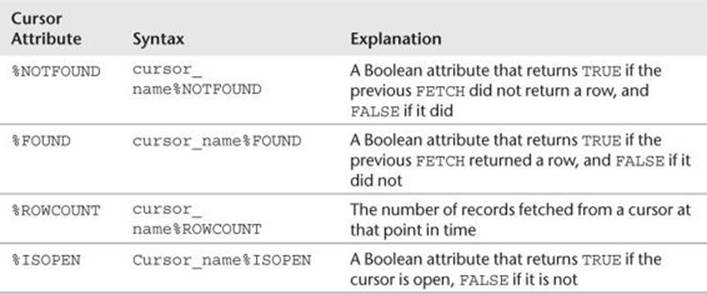
Table 11.1 Explicit Cursor Attributes
You can make use of the attribute %NOTFOUND to close a loop. It would also be a wise idea to add an exception clause to the end of the block to close the cursor if it is still open. If you add the following statements to the end of the PL/SQL block, it will be complete:
EXIT WHEN c_student%NOTFOUND;
END LOOP;
CLOSE c_student;
EXCEPTION
WHEN OTHERS
THEN
IF c_student%ISOPEN
THEN
CLOSE c_student;
END IF;
END;
Cursor attributes can be used with implicit cursors by using the prefix “SQL”—for example, SQL%ROWCOUNT.
If you use the SELECT INTO syntax in your PL/SQL block, you will be creating an implicit cursor. You can then use these attributes on the implicit cursor.
For Example ch11_3a.sql
SET SERVEROUTPUT ON;
DECLARE
v_city zipcode.city%type;
BEGIN
SELECT city
Into v_city
from zipcode
Where zip = 07002;
IF SQL%ROWCOUNT = 1
THEN
DBMS_OUTPUT.PUT_LINE(v_city ||' has a '||
'ZIP code of 07002');
ELSIF SQL%ROWCOUNT = 0
THEN
DBMS_OUTPUT.PUT_LINE('The ZIP code 07002 is '||
' not in the database');
ELSE
DBMS_OUTPUT.PUT_LINE('Stop harassing me');
END IF;
END;
The PL/SQL block ch11_3a would display the following output:
Bayonne has a ZIP code of 07002
PL/SQL procedure successfully completed.
The declaration section declares a variable, v_city, anchored to the data type of the city item in the zipcode table. The SELECT statement causes an implicit cursor to be opened, fetched, and then closed. The IF clause makes use of the attribute %ROWCOUNT to determine whether the implicit cursor has a row count of 1. If it does have a row count of 1, then the first DBMS_OUTPUT line will be displayed. Notice that this example does not handle a situation where the row count is greater than 1. Since the zipcode table’s primary key is the ZIP code, this could happen.
If you rerun this block after changing 07002 to 99999, you will get the following result:
ERROR at line 1:
ORA-01403: no data found
ORA-06512: at line 4
A SELECT statement in a PL/SQL block that does not return any rows will raise a “no data found” exception. Because there is no exception handler, the preceding error would be displayed.
You may have expected the second and third conditions of the IF statement to capture the instance of a %ROWCOUNT equal to 0. Now that you understand a SELECT statement that returns no rows will raise a WHEN NO_DATA_FOUND exception, it would be a good idea to handle this situation by adding a WHEN NO_DATA_FOUND exception to the existing block. You can add a %ROWCOUNT in the exception, either to display the row count in a DBMS_OUTPUT statement or to create an IF statement that handles the various possibilities.
Putting It All Together
Here is an example of the complete cycle of declaring, opening, fetching, and closing a cursor, including use of cursor attributes.
For Example ch11_4.sql
1> DECLARE
2> v_sid student.student_id%TYPE;
3> CURSOR c_student IS
4> SELECT student_id
5> FROM student
6> WHERE student_id < 110;
7> BEGIN
8> OPEN c_student;
9> LOOP
10> FETCH c_student INTO v_sid;
11> EXIT WHEN c_student%NOTFOUND;
12> DBMS_OUTPUT.PUT_LINE('STUDENT ID : '||v_sid);
13> END LOOP;
14> CLOSE c_student;
15> EXCEPTION
16> WHEN OTHERS
17> THEN
18> IF c_student%ISOPEN
19> THEN
20> CLOSE c_student;
21> END IF;
22> END;
This example illustrates a complete cursor fetch loop, in which multiple rows of data are returned from the query. The cursor is declared in the declaration section of the block (lines 1–6) just like other identifiers. In the executable section of the block (lines 7–15), a cursor is opened using the OPEN (line 8) statement. Because the cursor returns multiple rows, a loop is used to assign returned data to the variables with a FETCH statement (line 10). Because the loop statement has no other means of termination, an exit condition must be specified. In this case, one of the attributes for the cursor is %NOTFOUND (line 11). The cursor is then closed to free the memory allocation (line 14). Additionally, if the exception handler is called, a check is made to see if the cursor is open (line 18) or closed (line 20).
This example is now modified to make use of the cursor attributes %FOUND and %ROWCOUNT.
For Example ch11_5.sql
SET SERVEROUTPUT ON
DECLARE
v_sid student.student_id%TYPE;
CURSOR c_student IS
SELECT student_id
FROM student
WHERE student_id < 110;
BEGIN
OPEN c_student;
LOOP
FETCH c_student INTO v_sid;
IF c_student%FOUND THEN
DBMS_OUTPUT.PUT_LINE
('Just FETCHED row '
||TO_CHAR(c_student%ROWCOUNT)||
' Student ID: '||v_sid);
ELSE
EXIT;
END IF;
END LOOP;
CLOSE c_student;
EXCEPTION
WHEN OTHERS
THEN
IF c_student%ISOPEN
THEN
CLOSE c_student;
END IF;
END;
In this script, there has been a modification to the loop structure. Instead of relying on an exit condition, an IF statement is used. The IF statement makes use of the cursor attribute %FOUND, which returns TRUE when a row is “found” in the cursor and FALSE when it is not found. The attribute %ROWCOUNT then returns a number, which is the current row number of the cursor.
The next example demonstrates how to fetch a cursor that has taken data from the student table into the cursor variable %ROWTYPE. The cursor selects only those students with a student_id less than 110. The columns are the STUDENT_ID, LAST_NAME, FIRST_NAME, and a count of the number of classes the student is enrolled in. The cursor is fetched with a loop and then all of the columns are output.
For Example ch11_6.sql
SET SERVEROUTPUT ON
DECLARE
CURSOR c_student_enroll IS
SELECT s.student_id, first_name, last_name,
COUNT(*) enroll,
(CASE
WHEN count(*) = 1 Then ' class.'
WHEN count(*) is null then
' no classes.'
ELSE ' classes.'
END) class
FROM student s, enrollment e
WHERE s.student_id = e.student_id
AND s.student_id <110
GROUP BY s.student_id, first_name, last_name;
r_student_enroll c_student_enroll%ROWTYPE;
BEGIN
OPEN c_student_enroll;
LOOP
FETCH c_student_enroll INTO r_student_enroll;
EXIT WHEN c_student_enroll%NOTFOUND;
DBMS_OUTPUT.PUT_LINE('Student INFO: ID '||
r_student_enroll.student_id||' is '||
r_student_enroll.first_name|| ' ' ||
r_student_enroll.last_name||
' is enrolled in '||r_student_enroll.enroll||
r_student_enroll.class);
END LOOP;
CLOSE c_student_enroll;
EXCEPTION
WHEN OTHERS
THEN
IF c_student_enroll %ISOPEN
THEN
CLOSE c_student_enroll;
END IF;
END;
In the declaration section, a cursor c_student_enroll is defined as well as a record, which is the type of a row of the cursor. The cursor loop structure makes use of an exit condition with the %NOTFOUND cursor attribute. When there are no more rows, the %NOTFOUND attribute will be TRUE and will cause the loop to exit. While the cursor is open and the loop is processing, it will fetch a row of the cursor in a record, one at a time. The DBMS output will cause each row to be displayed to the screen. Finally, the cursor is closed. An exception clause will also close the cursor if any error is raised.
Assorted Tips on Cursors
Cursor SELECT LIST
Match the select list with PL/SQL variables or PL/SQL record components.
The number of variables must be equal to the number of columns or expressions in the select list. The number of the components of a record must match the columns or expressions in the select list.
Cursor Scope
The scope of a cursor declared in the main block (or an enclosing block) extends to the sub-blocks.
Expressions in a Cursor SELECT List
PL/SQL variables, expressions, and even functions can be included in the cursor select list.
Column Aliases in Cursors
An alternative name you provide to a column or expression in the select list. In an explicit cursor column, aliases are required for calculated columns when
![]() You FETCH into a record declared with a %ROWTYPE declaration against that cursor.
You FETCH into a record declared with a %ROWTYPE declaration against that cursor.
![]() You want to reference the calculated column in the program.
You want to reference the calculated column in the program.
Lab 11.3: Cursor FOR LOOPS
After this lab, you will be able to
![]() Make Use of Cursor FOR LOOPS
Make Use of Cursor FOR LOOPS
Making Use of Cursor FOR LOOPS
An alternative method of handling cursors is called the cursor FOR LOOP because of the simplified syntax that is used. When using the cursor FOR LOOP, the process of opening, fetching, and closing is handled implicitly. This makes the blocks much simpler to code and easier to maintain.
The cursor FOR LOOP specifies a sequence of statements to be repeated once for each row returned by the cursor. You can use a cursor FOR LOOP when you need to fetch and process each and every record from a cursor until you want to stop processing and exit the loop.
To make use of this column, you need to create a new table called table_log with the following script:
create table table_log
(description VARCHAR2(250));
Then run this script:
For Example ch11_7.sql
DECLARE
CURSOR c_student IS
SELECT student_id, last_name, first_name
FROM student
WHERE student_id < 110;
BEGIN
FOR r_student IN c_student
LOOP
INSERT INTO table_log
VALUES(r_student.last_name);
END LOOP;
END;
SELECT * from table_log;
The following PL/SQL block reduces by 5 percent the cost of all courses having an enrollment of eight or more students. It makes use of a cursor FOR LOOP that updates the course table with the discounted cost.
For Example ch11_8.sql
DECLARE
CURSOR c_group_discount IS
SELECT DISTINCT s.course_no
FROM section s, enrollment e
WHERE s.section_id = e.section_id
GROUP BY s.course_no, e.section_id, s.section_id
HAVING COUNT(*)>=8;
BEGIN
FOR r_group_discount IN c_group_discount LOOP
UPDATE course
SET cost = cost * .95
WHERE course_no = r_group_discount.course_no;
END LOOP;
COMMIT;
END;
The cursor c_group_discount is declared in the declaration section. The proper SQL is used to generate the SELECT statement to answer the question given. The cursor is processed in a FOR LOOP in each iteration of the loop and the SQL update statement is executed. As a consequence, the cursor does not have to be opened, fetched, and closed. Also, a cursor attribute does not have to be used to create an exit condition for the loop that is processing the cursor.
Lab 11.4: Nested Cursors
After this lab, you will be able to
![]() Process Nested Cursors
Process Nested Cursors
Cursors can be nested inside each other. Although this may sound complex, it is really just a loop inside a loop, much like nested loops, which were covered in previous chapters. If you have one parent cursor and two child cursors, then each time the parent cursor makes a single loop, it will loop through each child cursor once and then begin a second round. In the next two examples, you will encounter a nested cursor with a single child cursor.
Processing Nested Cursors
In the following example, line numbers were added so that individual lines could be referenced in the explanation that follows. You will have to remove the line numbers when you run the code.
For Example ch11_9.sql
SET SERVEROUTPUT ON
1 DECLARE
2 v_zip zipcode.zip%TYPE;
3 v_student_flag CHAR;
4 CURSOR c_zip IS
5 SELECT zip, city, state
6 FROM zipcode
7 WHERE state = 'CT';
8 CURSOR c_student IS
9 SELECT first_name, last_name
10 FROM student
11 WHERE zip = v_zip;
12 BEGIN
13 FOR r_zip IN c_zip
14 LOOP
15 v_student_flag := 'N';
16 v_zip := r_zip.zip;
17 DBMS_OUTPUT.PUT_LINE(CHR(10));
18 DBMS_OUTPUT.PUT_LINE('Students living in '||
19 r_zip.city);
20 FOR r_student in c_student
21 LOOP
22 DBMS_OUTPUT.PUT_LINE(
23 r_student.first_name||
24 ' '||r_student.last_name);
25 v_student_flag := 'Y';
26 END LOOP;
27 IF v_student_flag = 'N'
28 THEN
29 DBMS_OUTPUT.PUT_LINE
('No students for this ZIP code');
30 END IF;
31 END LOOP;
32 END;
There are two cursors in the example: a cursor of the ZIP codes and a cursor of the list of students. The variable v_zip is initialized in line 16 to be the ZIP code of the current record of the c_zip cursor. The c_student cursor ties in the c_zip cursor by means of this variable. Thus, when the cursor is processed in lines 20–26, it retrieves students who have the ZIP code of the current record for the parent cursor. The parent cursor is processed in lines 13–31. Each iteration of the parent cursor executes the DBMS_OUTPUT statement in lines 16 and 17 only once. TheDBMS_OUTPUT statement in line 22 is executed once for each iteration of the child loop, producing a line of output for each student. The DBMS_OUTPUT.PUT_LINE statement in line 29 executes only if the inner loop did not execute; this is accomplished by setting a variablev_student_flag. The variable is set to N in the beginning of the parent loop. If the child loop executes at least once, the variable will be set to Y. After the child loop is closed, a check is made with an IF statement to determine the value of the variable. If it is still N, then it can be safely concluded that the inner loop did not process. This will then allow the last DBMS_OUTPUT.PUT_LINE statement to execute. Nested cursors are more often parameterized. Parameters in cursors are explained in depth in Lab 12.2, “Complex Nested Cursors.”
The next example is a PL/SQL block with two cursor FOR LOOP. The parent cursor retrieves the student_id, first_name, and last_name from the student table for students with a student_id less than 110 and outputs one line with this information. For each student, the child cursor loops through all the courses in which the student is enrolled, outputting the course_no and the description.
For Example ch11_10.sql
SET SERVEROUTPUT ON
DECLARE
v_sid student.student_id%TYPE;
CURSOR c_student IS
SELECT student_id, first_name, last_name
FROM student
WHERE student_id < 110;
CURSOR c_course IS
SELECT c.course_no, c.description
FROM course c, section s, enrollment e
WHERE c.course_no = s.course_no
AND s.section_id = e.section_id
AND e.student_id = v_sid;
BEGIN
FOR r_student IN c_student
LOOP
v_sid := r_student.student_id;
DBMS_OUTPUT.PUT_LINE(chr(10));
DBMS_OUTPUT.PUT_LINE(' The Student '||
r_student.student_id||' '||
r_student.first_name||' '||
r_student.last_name);
DBMS_OUTPUT.PUT_LINE(' is enrolled in the '||
'following courses: ');
FOR r_course IN c_course
LOOP
DBMS_OUTPUT.PUT_LINE(r_course.course_no||
' '||r_course.description);
END LOOP;
END LOOP;
END;
The SELECT statements for the two cursors are defined in the declaration section of the PL/SQL block. A variable to store the student_id from the parent cursor is also declared. The course cursor is the child cursor. Because it makes use of the variable v_sid, the variable must be declared first. Both cursors are processed with a FOR LOOP, which eliminates the need for OPEN, FETCH, and CLOSE statements. When the parent student loop is processed, the first step is to initialize the variable v_sid, and the value is then used when the child loop is processed. ADBMS_OUTPUT statement is used so that the display is generated for each cursor loop. The parent cursor will display the student name once, and the child cursor will display the name of each course in which the student is enrolled.
The following example shows a nested cursor:
For Example ch11_11.sql
SET SERVEROUTPUT ON
DECLARE
v_amount course.cost%TYPE;
v_instructor_id instructor.instructor_id%TYPE;
CURSOR c_inst IS
SELECT first_name, last_name, instructor_id
FROM instructor;
CURSOR c_cost IS
SELECT c.cost
FROM course c, section s, enrollment e
WHERE s.instructor_id = v_instructor_id
AND c.course_no = s.course_no
AND s.section_id = e.section_id;
BEGIN
FOR r_inst IN c_inst
LOOP
v_instructor_id := r_inst.instructor_id;
v_amount := 0;
DBMS_OUTPUT.PUT_LINE(
'Amount generated by instructor '||
r_inst.first_name||' '||r_inst.last_name
||' is');
FOR r_cost IN c_cost
LOOP
v_amount := v_amount + NVL(r_cost.cost, 0);
END LOOP;
DBMS_OUTPUT.PUT_LINE
(' '||TO_CHAR(v_amount,'$999,999'));
END LOOP;
END;
The declaration section contains a declaration for two variables. The first is v_amount of the data type matching that of the cost in the course table; the second is the v_instructor_id of the data type matching the instructor_id in the instructor table. There are also two declarations for two cursors. The first is for c_inst, which consists of the first_name, last_name, and instructor_id for an instructor from the instructor table. The second cursor, c_cost, will produce a result set of the cost of the course taken for each student enrolled in a course given by the instructor that matches the variable v_instructor_id. These two cursors will be run in nested fashion.
First, the cursor c_inst is opened in a FOR LOOP. The value of the variable v_instructor_id is initialized to match the instructor_id of the current row of the c_inst cursor. The variable v_amount is initialized to 0.
The second cursor is opened within the loop for the first cursor. Consequently, for each iteration of the cursor c_inst, the second cursor will be opened, fetched, and closed. The second cursor will loop through all the costs generated by each student enrolled in a course for the instructor, which is the current value of the c_inst cursor. Each time the nest loop iterates, it will increase the variable v_amount by adding the current cost in the c_cost loop.
Prior to opening the c_cost loop, a DBMS_OUTPUT statement displays the instructor name. After the c_cost cursor loop is closed, a DBMS_OUTPUT statement displays the total amount generated by all the enrollments of the current instructor.
The result set would be as follows:
Amount generated by instructor Fernand Hanks is
$49,110
Amount generated by instructor Tom Wojick is
$24,582
Amount generated by instructor Nina Schorin is
$43,319
Amount generated by instructor Gary Pertez is
$29,317
Amount generated by instructor Anita Morris is
$18,662
Amount generated by instructor Todd Smythe is
$21,092
Amount generated by instructor Marilyn Frantzen is
$34,311
Amount generated by instructor Charles Lowry is
$37,512
Amount generated by instructor Rick Chow is
$0
Amount generated by instructor Irene Willig is
$0
In this example, the nested cursor is tied to the current row of the outer cursor by means of the variable v_instructor_id. A more common way of handling this task is to pass a parameter to a cursor. You will learn more about how to achieve this in Chapter 12.
Summary
In this chapter you learned how to make use of various types of cursors. First you learned how the Oracle platform processes an implicit cursor, and then you learned all of the steps required to use an explicit cursor. Additionally, you learned about the various record types and saw how to use them in the context of a cursor. Finally, you learned about three types of cursor loops: a regular loop, a FOR LOOP, and nested cursors.
By the Way
The companion website provides additional exercises and suggested answers for this chapter, with discussion related to how those answers resulted. The main purpose of these exercises is to help you test the depth of your understanding by utilizing all of the skills that you have acquired throughout this chapter.
All materials on the site are licensed Creative Commons Attribution-Sharealike 3.0 Unported CC BY-SA 3.0 & GNU Free Documentation License (GFDL)
If you are the copyright holder of any material contained on our site and intend to remove it, please contact our site administrator for approval.
© 2016-2026 All site design rights belong to S.Y.A.