Oracle PL/SQL by Example, Fifth Edition (2015)
Chapter 13. Triggers
In this chapter, you will learn about
![]() What Triggers Are
What Triggers Are
![]() Types of Triggers
Types of Triggers
In Chapter 1, you encountered the concept of named PL/SQL blocks such as procedures, functions, and packages that can be stored in the database. In this chapter, you will learn about another type of named PL/SQL block called a database trigger. You will also learn about different characteristics of triggers and their usage in the database.
Lab 13.1: What Triggers Are
After this lab, you will be able to
![]() Define a Database Trigger
Define a Database Trigger
![]() Use BEFORE and AFTER Triggers
Use BEFORE and AFTER Triggers
![]() Employ Autonomous Transactions
Employ Autonomous Transactions
Database Trigger
A database trigger is a named PL/SQL block that is stored in a database and executed implicitly when a triggering event occurs. The act of executing a trigger is referred to as firing the trigger. A triggering event can be any of the following:
![]() A DML (for example, INSERT, UPDATE, or DELETE) statement executed against a database table. Such trigger can fire before or after a triggering event. For example, if you have defined a trigger to fire before an INSERT statement on the STUDENT table, this trigger fires each time before you insert a row in the STUDENT table.
A DML (for example, INSERT, UPDATE, or DELETE) statement executed against a database table. Such trigger can fire before or after a triggering event. For example, if you have defined a trigger to fire before an INSERT statement on the STUDENT table, this trigger fires each time before you insert a row in the STUDENT table.
![]() A DDL (for example, CREATE or ALTER) statement executed either by a particular user against a schema or by any user. Such triggers are often used for auditing purposes and are specifically helpful to Oracle database administrators. They can record various schema changes, including when those changes were made and by which user.
A DDL (for example, CREATE or ALTER) statement executed either by a particular user against a schema or by any user. Such triggers are often used for auditing purposes and are specifically helpful to Oracle database administrators. They can record various schema changes, including when those changes were made and by which user.
![]() A system event such as startup or shutdown of the database.
A system event such as startup or shutdown of the database.
![]() A user event such as login and logoff. For example, you can define a trigger that fires after a login on a database and that records the username and time of login.
A user event such as login and logoff. For example, you can define a trigger that fires after a login on a database and that records the username and time of login.
The general syntax for creating a trigger is shown in Listing 13.1 (the reserved words and phrases surrounded by brackets are optional).
Listing 13.1 General Syntax for Creating a Trigger
CREATE [OR REPLACE] [EDITIONABLE|NONEDITIONABLE] TRIGGER trigger_name
{BEFORE|AFTER} triggering_event ON table_name
[FOR EACH ROW]
[FOLLOWS|PRECEDES another_trigger]
[ENABLE/DISABLE]
[WHEN condition]
DECLARE
Declaration statements
BEGIN
Executable statements
EXCEPTION
Exception-handling statements
END;
The reserved word CREATE specifies that you are creating a new trigger. The reserved word REPLACE specifies that you are modifying an existing trigger. REPLACE is optional. Note, however, that both CREATE and REPLACE are included in most cases.
Suppose you create a trigger as shown in Listing 13.2.
Listing 13.2 Creating Trigger
CREATE TRIGGER trigger_name
...
In a few days, you decide to modify this trigger. If you do not include the reserved word REPLACE in the CREATE clause of the trigger, an error message will be generated when you compile the trigger. The error message states that the name of your trigger is already used by another object. Once REPLACE is included in the CREATE clause of the trigger, there is less chance of an error occurring because if it is a new trigger, it is created, and if it is an old trigger, it is replaced.
However, you should be mindful when using the reserved word REPLACE for a number of reasons. First, if you happen to use REPLACE with the name of an existing stored function, procedure, or package, you will end up with different database objects that have the same name. This occurs because triggers have a separate naming space in the database. While sharing of the same name by a trigger and a procedure, function, or package does not cause errors, potentially it might become confusing; thus it is not considered a good programming practice. Second, when you use the reserved word REPLACE and decide to associate a different table with your trigger, an error message is generated. For example, assume you created a trigger STUDENT_BI on the STUDENT table. Next, you decide to modify this trigger and associate it with the ENROLLMENT table. As a result, the following error message is generated:
ORA-04095: trigger 'STUDENT_BI' already exists on another table, cannot replace it
The optional reserved words EDITIONABLE and NONEDITIONABLE specify whether a trigger is an editioned or noneditioned object. Note that this designation applies only if editioning has been enabled for object type TRIGGER.
Did You Know?
Oracle introduced a very important feature called edition-based redefinition in version 11g, release 2. This feature enables you to apply changes to various database objects without invalidating the whole system, thereby allowing for near-zero downtime. For example, previously making structural changes to a table would invalidate numerous functions, procedures, and packages dependent on that table. As a result, you would need to check and recompile all invalidated database objects, potentially requiring downtime for the database. With edition-based redefinition, you can implement all these changes seamlessly and migrate users from the old version of the system to the new version without incurring any downtime.
Edition-based redefinition is outside the scope of this book. Detailed information on this feature can be found in Oracle’s online help (www.oracle.com).
The trigger_name references the name of the trigger. BEFORE or AFTER specifies when the trigger fires (before or after the triggering event). The triggering_event references a DML statement issued against the table. The table_name is the name of the table associated with the trigger. The clause FOR EACH ROW specifies that a trigger is a row-level trigger and fires once for each row either inserted, updated, or deleted. You will encounter row- and statement-level triggers in Lab 13.2. A WHEN clause specifies a condition that must evaluate to TRUE for the trigger to fire. For example, this condition may specify a certain restriction on the column of a table.
The next two options, FOLLOWS/PRECEDES and ENABLE/DISABLE, were added to the CREATE OR REPLACE TRIGGER clause in Oracle 11g. Prior to Oracle 11g, you needed to issue the ALTER TRIGGER command to enable or disable a trigger once it had been created. TheENABLE/DISABLE option specifies whether a trigger is created in the enabled or disabled state. When a trigger is enabled, it fires when a triggering event occurs. Conversely, when a trigger is disabled, it does not fire when a triggering event occurs. Note that when a trigger is first created without ENABLE/DISABLE option, it is enabled by default. To disable the trigger, you need to issue the ALTER TRIGGER command, as shown in Listing 13.3.
Listing 13.3 Disabling Trigger
ALTER TRIGGER trigger_name DISABLE;
Similarly, to enable a trigger that was disabled previously, you issue the ALTER TRIGGER command, as shown in Listing 13.4.
Listing 13.4 Enabling Trigger
ALTER TRIGGER trigger_name ENABLE;
The FOLLOWS/PRECEDES option allows you to specify the order in which triggers should fire. It applies to triggers that are defined on the same table and fire at the same timing point. For example, if you defined two triggers on the STUDENT table that fire before the insert operation is carried out, Oracle does not guarantee the order in which these triggers will fire unless you explicitly specify it with the FOLLOWS/PRECEDES clause. Note that the trigger referenced in the FOLLOWS/PRECEDES clause must already exist and have been successfully compiled.
The portion of the trigger described to this point is often referred to as the trigger header. Next, we define the trigger body. The body of a trigger has the same structure as an anonymous PL/SQL block. Similar to the case for a PL/SQL block, the declaration and exception sections are optional.
Triggers are used for different purposes, such as the following:
![]() Enforcing complex business rules that cannot be defined by using integrity constraints
Enforcing complex business rules that cannot be defined by using integrity constraints
![]() Maintaining complex security rules
Maintaining complex security rules
![]() Automatically generating values for derived columns
Automatically generating values for derived columns
![]() Collecting statistical information on table accesses
Collecting statistical information on table accesses
![]() Preventing invalid transactions
Preventing invalid transactions
![]() Providing value auditing
Providing value auditing
The body of a trigger is a PL/SQL block. However, several restrictions apply when you decide to create a trigger:
![]() A trigger may not issue a transactional control statement such as COMMIT, SAVEPOINT, or ROLLBACK. When the trigger fires, all operations performed by the trigger become part of a transaction. When a transaction is committed or rolled back, the operations performed by the trigger are committed or rolled back as well. An exception to this rule is a trigger that contains an autonomous transaction. Autonomous transactions are discussed in detail later in this lab.
A trigger may not issue a transactional control statement such as COMMIT, SAVEPOINT, or ROLLBACK. When the trigger fires, all operations performed by the trigger become part of a transaction. When a transaction is committed or rolled back, the operations performed by the trigger are committed or rolled back as well. An exception to this rule is a trigger that contains an autonomous transaction. Autonomous transactions are discussed in detail later in this lab.
![]() Any function or procedure called by a trigger may not issue a transactional control statement unless it contains an autonomous transaction.
Any function or procedure called by a trigger may not issue a transactional control statement unless it contains an autonomous transaction.
![]() It is not permissible to declare LONG or LONG RAW variables in the body of a trigger.
It is not permissible to declare LONG or LONG RAW variables in the body of a trigger.
Did You Know?
If you drop a table, the table’s database triggers are dropped as well.
BEFORE Triggers
Consider the following example of a trigger on the STUDENT table mentioned earlier in this chapter. This trigger fires before the INSERT statement on the STUDENT table and populates the STUDENT_ID, CREATED_DATE, MODIFIED_DATE, CREATED_BY, and MODIFIED_BYcolumns. The column STUDENT_ID is populated with the number generated by the STUDENT_ID_SEQ sequence, and the columns CREATED_DATE, MODIFIED_DATE, CREATED_USER, and MODIFIED_USER are populated with the current date and the current user name information, respectively.
For Example ch13_1a.sql
CREATE OR REPLACE TRIGGER student_bi
BEFORE INSERT ON STUDENT
FOR EACH ROW
BEGIN
:NEW.student_id := STUDENT_ID_SEQ.NEXTVAL;
:NEW.created_by := USER;
:NEW.created_date := SYSDATE;
:NEW.modified_by := USER;
:NEW.modified_date := SYSDATE;
END;
This trigger fires for each row before the INSERT statement on the STUDENT table. Notice that the name of the trigger is STUDENT_BI, where “STUDENT” references the name of the table on which the trigger is defined and the letters “BI” mean “before insert.” There is no specific requirement for naming triggers; however, this approach to naming a trigger is descriptive because the name of the trigger contains the name of the table affected by the triggering event, the time of the triggering event (before or after), and the triggering event itself.
In the body of the trigger, there is a pseudorecord, :NEW, which allows for accessing a row that is currently being processed. In other words, a row is inserted into the STUDENT table. The :NEW pseudorecord is of a type TRIGGERING_TABLE%TYPE, so, in this case, it is of theSTUDENT%TYPE type. To access individual members of the pseudorecord :NEW, dot notation is used. In other words, :NEW.CREATED_BY refers to the member CREATED_BY of the :NEW pseudorecord, and the name of the record is separated by the dot from the name of its member.
Did You Know?
In addition to the :NEW pseudorecord, an :OLD pseudorecord exists. It allows you to access the current information of the record that is being updated or deleted. Thus the :OLD pseudorecord is undefined for the INSERT statements and the :NEW pseudorecord is undefined for the DELETE statements. However, the PL/SQL compiler does not generate syntax errors when :OLD or :NEW pseudorecords are used in triggers where the triggering event is an INSERT or DELETE operation, respectively. In this case, the member values are set to NULLfor the :OLD and :NEW pseudorecords.
Take a closer look at the statement that assigns a sequence value to the STUDENT_ID column. The ability to access a sequence via PL/SQL expressions is a new feature added in Oracle 11g. Prior to Oracle 11g, sequences could be accessed only via queries, as shown in the next version of the example.
For Example Code Fragment Based on ch13_1a.sql
CREATE OR REPLACE TRIGGER student_bi
...
DECLARE
v_student_id STUDENT.STUDENT_ID%TYPE;
BEGIN
SELECT STUDENT_ID_SEQ.NEXTVAL
INTO v_student_id
FROM dual;
...
END;
To create this trigger on the STUDENT table in SQL Developer, you may choose from the two options. First, the trigger can be created by executing the script in the Worksheet window, just as you would with any other PL/SQL block. At the time of trigger compilation, you are prompted to enter the value for bind variables because of the references to the :NEW and :OLD pseudorecords in the body of the trigger, as shown in Figure 13.1. Note that check box next to NULL. If it is checked, simply click the Apply button and the trigger will be created. If this check box is not checked, then check it and click the Apply button.
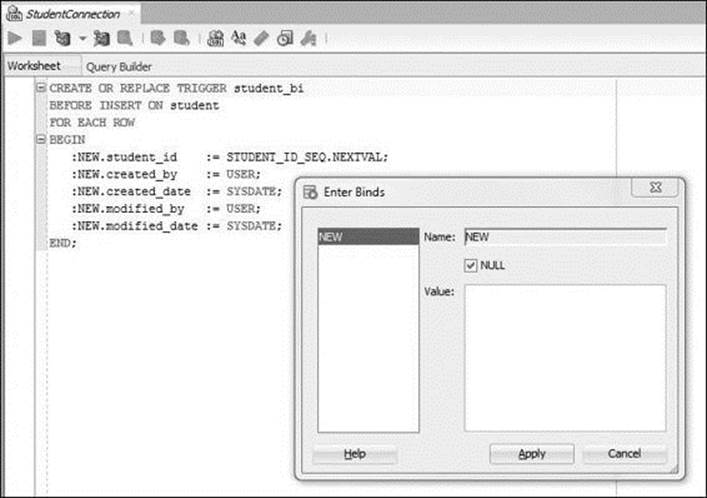
Figure 13.1 Creating a Database Trigger in the Worksheet Window
The second option for creating a trigger is to right-click on Triggers and choose the New Trigger option, as shown in Figure 13.2. This activates the Create Trigger window, as shown in Figure 13.3. In this window, you provide schema name, trigger name, table name, the timing of the triggering event, and the event on which the trigger should fire.
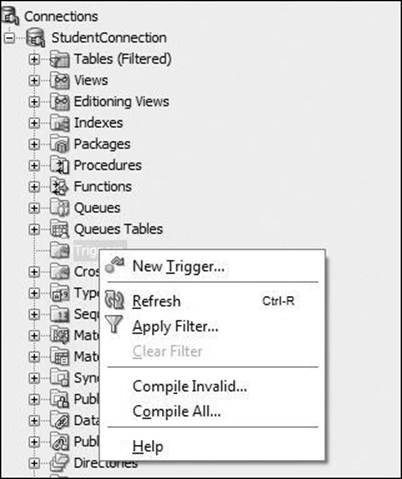
Figure 13.2 Creating a Database Trigger via New Trigger Option
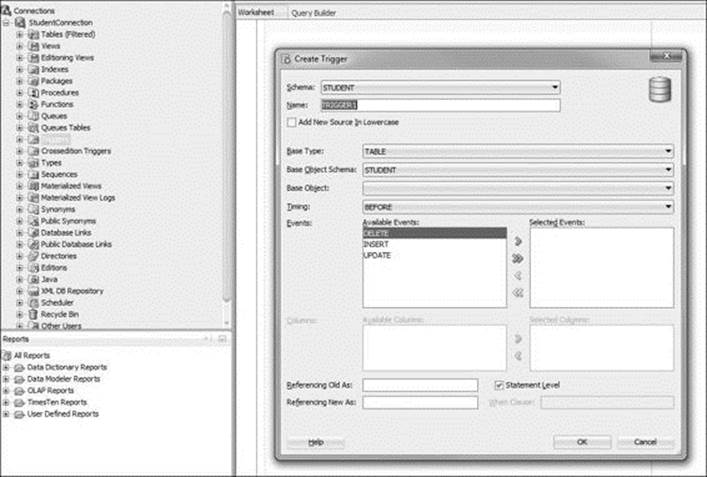
Figure 13.3 Create Trigger Window
Note that the schema name has already been set to STUDENT, and a default name for the trigger has been provided, TRIGGER1, that should be changed to STUDENT_BI. In addition, the Base Type has been set to a TABLE and Base Object Schema has been set to STUDENT. This implies that a trigger is being created on a table in the STUDENT schema. Next, the Base Object must be selected from the drop-down menu—in this case, it is STUDENT table. Under the Events option, the INSERT option is moved from the Available Events to Selected Events. By default, the Statement Level check box is enabled. Because you are creating a row-level trigger, this option should be unchecked. Finally, there is an option to provide different names for the :NEW and :OLD pseudorecords and one or more conditions for the WHEN clause. After you fill in the Create Trigger window for the STUDENT_BI trigger, it should contain the information shown in Figure 13.4.
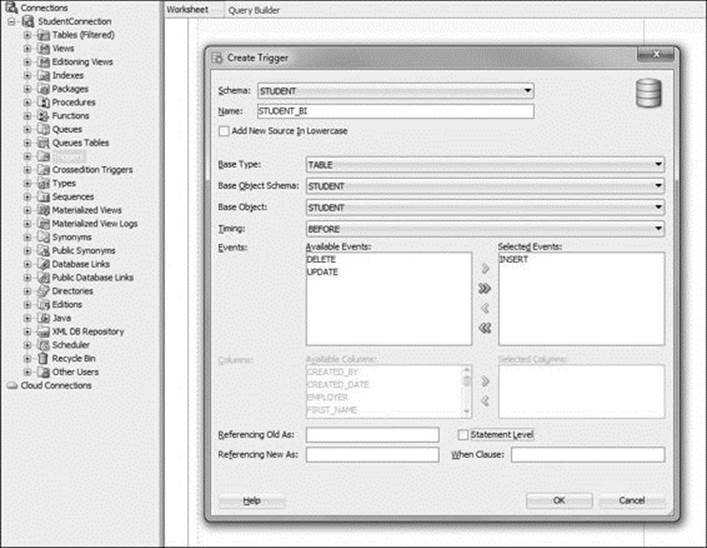
Figure 13.4 Creating a STUDENT_BI Trigger in the Trigger Window
Once all of the required information has been provided in the Create Trigger window, the trigger is created, as shown in Figure 13.5. Notice that information provided in the Create Trigger window was used to create the trigger header. The trigger body contains a single statement, NULL.
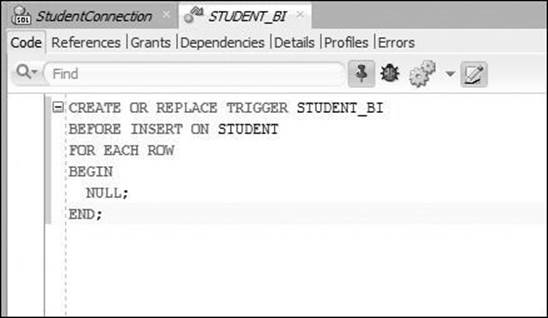
Figure 13.5 Newly Created STUDENT_BI Trigger
Next, you need to provide the executable statements for the body of the trigger and compile the trigger. To do so, you click the Compile button, as shown in Figure 13.6.
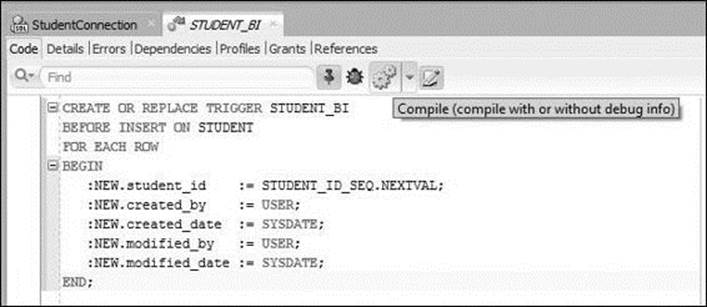
Figure 13.6 Compiling the STUDENT_BI Trigger
Now the trigger STUDENT_BI has been created on the STUDENT table. Please note that going forward all triggers in this chapter and Chapter 14 are created by using the Worksheet window rather than the Create Trigger window.
Now that you have created a trigger on the STUDENT table, consider the following INSERT statement.
For Example INSERT Statement on the STUDENT Table
INSERT INTO STUDENT
(student_id, first_name, last_name, zip, registration_date,
created_by, created_date, modified_by, modified_date)
VALUES
(STUDENT_ID_SEQ.NEXTVAL, 'John', 'Smith', '00914', SYSDATE,
USER, SYSDATE, USER, SYSDATE);
This INSERT statement contains values for the columns STUDENT_ID, CREATED_BY, CREATED_DATE, MODIFIED_BY, and MODIFIED_DATE. Note that for every row you insert into the STUDENT table, you must provide the values for these columns; they are always derived in the same fashion. Now that you have created the trigger, however, there is no need to provide values for these columns in the INSERT statement because the trigger automatically populates these columns in a consistent manner every time an INSERT statement is executed against the STUDENTtable. Therefore, the INSERT statement can be modified as follows:
For Example Modified INSERT Statement on the STUDENT Table
INSERT INTO STUDENT
(first_name, last_name, zip, registration_date)
VALUES
('John', 'Smith', '00914', SYSDATE);
This version of the INSERT statement is significantly shorter than the previous version. Specifically, instead of providing values for nine columns, you need to provide values for only four columns. The columns STUDENT_ID, CREATED_BY, CREATED_DATE, MODIFIED_BY, andMODIFIED_DATE are no longer present.
You should use BEFORE triggers in the following situations:
![]() When a trigger provides values for derived columns before an INSERT or UPDATE statement is completed. For example, the trigger can provide audit-oriented columns such as CREATED_DATE and MODIFIED_DATE.
When a trigger provides values for derived columns before an INSERT or UPDATE statement is completed. For example, the trigger can provide audit-oriented columns such as CREATED_DATE and MODIFIED_DATE.
![]() When a trigger determines whether an INSERT, UPDATE, or DELETE statement should be allowed to complete. For example, when you insert a record into the INSTRUCTOR table, a trigger can verify whether the value provided for the column ZIP is valid—in other words, whether there is a record in the ZIPCODE table corresponding to the value of zip that you provided.
When a trigger determines whether an INSERT, UPDATE, or DELETE statement should be allowed to complete. For example, when you insert a record into the INSTRUCTOR table, a trigger can verify whether the value provided for the column ZIP is valid—in other words, whether there is a record in the ZIPCODE table corresponding to the value of zip that you provided.
AFTER Triggers
Assume there is a table called AUDIT_TRAIL having the structure shown in Figure 13.7. This table is used to collect user access information on different tables in the STUDENT schema. For example, you can record who deleted records from the INSTRUCTOR table and when they were deleted.
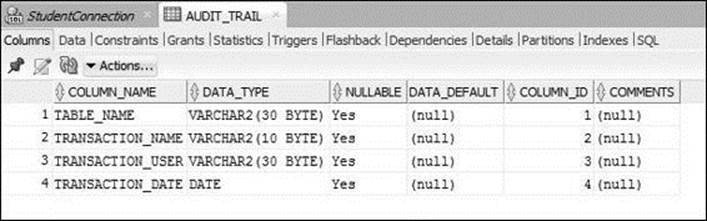
Figure 13.7 AUDIT_TRAIL Table Structure
To accomplish this, you would need to create a trigger on the INSTRUCTOR table, as shown in the following example.
For Example ch13_2a.sql
CREATE OR REPLACE TRIGGER instructor_aud
AFTER UPDATE OR DELETE ON INSTRUCTOR
DECLARE
v_trans_type VARCHAR2(10);
BEGIN
v_trans_type := CASE
WHEN UPDATING THEN 'UPDATE'
WHEN DELETING THEN 'DELETE'
END;
INSERT INTO audit_trail
(TABLE_NAME, TRANSACTION_NAME, TRANSACTION_USER, TRANSACTION_DATE)
VALUES
('INSTRUCTOR', v_trans_type, USER, SYSDATE);
END;
This trigger fires after an UPDATE or DELETE statement is issued on the INSTRUCTOR table. The body of the trigger contains two Boolean functions, UPDATING and DELETING. The function UPDATING evaluates to TRUE if an UPDATE statement is issued on the table, and the function DELETING evaluates to TRUE if a DELETE statement is issued on the table. Another Boolean function, INSERTING, also evaluates to TRUE when an INSERT statement is issued against the table.
This trigger inserts a record into the AUDIT_TRAIL table when an UPDATE or DELETE operation is issued against the INSTRUCTOR table. First, it determines which operation was issued against the INSTRUCTOR table via the CASE statement. The result of this evaluation is then assigned to the v_trans_type variable. Next, the trigger adds a new record to the AUDIT_TRAIL table.
Once this trigger is created on the INSTRUCTOR table, any UPDATE or DELETE operation causes the creation of new records in the AUDIT_TRAIL table. Furthermore, this trigger may be enhanced by calculating how many rows were updated or deleted from the INSTRUCTOR table.
You should use AFTER triggers in the following situations:
![]() When a trigger should fire after a DML statement is executed
When a trigger should fire after a DML statement is executed
![]() When a trigger performs actions not specified in a BEFORE trigger
When a trigger performs actions not specified in a BEFORE trigger
Autonomous Transaction
As stated previously, when a trigger fires, all operations performed by the trigger become part of a transaction. When this transaction is committed or rolled back, the operations performed by the trigger are committed or rolled back as well. Consider an UPDATE statement against theINSTRUCTOR table as shown in Listing 13.5.
Listing 13.5 UPDATE on the INSTRUCTOR Table
UPDATE instructor
SET phone = '7181234567'
WHERE instructor_id = 101;
When this UPDATE statement is executed, the INSTRUCTOR_AUD trigger fires and adds a single record to the AUDIT_TRAIL table as shown in Listing 13.6.
Listing 13.6 SELECT from the AUDIT_TRAIL Table
SELECT *
FROM audit_trail;
TABLE_NAME TRANSACTION_NAME TRANSACTION_USER TRANSACTION_DATE
---------- ---------------- ---------------- ----------------
INSTRUCTOR UPDATE STUDENT 05/07/2014
Next, consider rolling back the UPDATE statement just issued. In this case, the record inserted in the AUDIT_TRAIL table is rolled back as well, as shown in the Listing 13.7.
Listing 13.7 Rolling Back UPDATE on the INSTRUCTOR Table
ROLLBACK;
SELECT *
FROM audit_trail;
TABLE_NAME TRANSACTION_NAME TRANSACTION_USER TRANSACTION_DATE
---------- ---------------- ---------------- ----------------
As you can see, the AUDIT_TRAIL table no longer contains any records. To circumvent such behavior, you may choose to employ autonomous transactions.
An autonomous transaction is an independent transaction started by another transaction that is usually referred to as the main transaction. In other words, an autonomous transaction may issue various DML statements and commit or roll them back, without committing or rolling back the DML statements issued by the main transaction.
To define an autonomous transaction, you employ the AUTONOMOUS_TRANSACTION pragma. You have already encountered one pragma, EXCEPTION_INIT, in Chapter 10. Recall that a pragma is a special instruction to the PL/SQL compiler that is processed at the time of the compilation. The AUTONOMOUS_TRANSACTION pragma appears in the declaration section of a block, as shown in Listing 13.8.
Listing 13.8 AUTONOMOUS_TRANSACTION Pragma
DECLARE
PRAGMA AUTONOMOUS_TRANSACTION;
Now consider a modified version of the INSTRUCTOR_AUD trigger that includes an the autonomous transaction. Newly added statements are shown in bold.
For Example ch13_2b.sql
CREATE OR REPLACE TRIGGER instructor_aud
AFTER UPDATE OR DELETE ON INSTRUCTOR
DECLARE
v_trans_type VARCHAR2(10);
PRAGMA AUTONOMOUS_TRANSACTION;
BEGIN
v_trans_type := CASE
WHEN UPDATING THEN 'UPDATE'
WHEN DELETING THEN 'DELETE'
END;
INSERT INTO audit_trail
(TABLE_NAME, TRANSACTION_NAME, TRANSACTION_USER, TRANSACTION_DATE)
VALUES
('INSTRUCTOR', v_trans_type, USER, SYSDATE);
COMMIT;
END;
In this version of the trigger, you added the AUTONOMOUS_TRANSACTION pragma to the declaration portion and the COMMIT statement to the executable portion of the trigger.
Now try issuing the UPDATE statement as in Listing 13.5 and then rolling it back and querying the AUDIT_TRAIL table. Even though the changes on the INSTRUCTOR table were rolled back, the AUDIT_TRAIL table will continue to contain a record of the attempted UPDATEoperation.
Lab 13.2: Types of Triggers
After this lab, you will be able to
![]() Use Row and Statement Triggers
Use Row and Statement Triggers
![]() Use INSTEAD OF Triggers
Use INSTEAD OF Triggers
Row and Statement Triggers
In Lab 13.1, you encountered the term row trigger. A row trigger is fired as many times as there are rows affected by the triggering statement. When the statement FOR EACH ROW is present in the CREATE TRIGGER clause, the trigger is a row trigger. Consider the code fragment shown inListing 13.9.
Listing 13.9 Code Fragment of the COURSE_AU Trigger
CREATE OR REPLACE TRIGGER course_au
AFTER UPDATE ON COURSE
FOR EACH ROW
...
In this code fragment, the statement FOR EACH ROW is present in the CREATE TRIGGER clause. Therefore, this trigger is a row trigger. Thus, if an UPDATE statement causes 20 records in the COURSE table to be modified, this trigger will fire 20 times.
A statement trigger is fired once for the triggering statement. In other words, a statement trigger fires once, regardless of the number of rows affected by the triggering statement. To create a statement trigger, you omit the FOR EACH ROW statement in the CREATE TRIGGER clause, as shown in Listing 13.10.
Listing 13.10 Code Fragment of the ENROLLMENT_AD Trigger
CREATE OR REPLACE TRIGGER enrollment_ad
AFTER DELETE ON ENROLLMENT
...
This particular trigger fires once after a DELETE statement is issued against the ENROLLMENT table. Whether the DELETE statement removes one row, five rows, or 500 rows from the ENROLLMENT table, this trigger fires only once.
Statement triggers should be used when the operations performed by the trigger do not depend on the data in the individual records. For example, if you want to limit access to a table to business hours only, you might use a statement trigger. Consider the following example.
For Example ch13_3a.sql
CREATE OR REPLACE TRIGGER instructor_biud
BEFORE INSERT OR UPDATE OR DELETE ON INSTRUCTOR
DECLARE
v_day VARCHAR2(10);
BEGIN
v_day := RTRIM(TO_CHAR(SYSDATE, 'DAY'));
IF v_day LIKE ('S%')
THEN
RAISE_APPLICATION_ERROR (-20000, 'A table cannot be modified during off hours');
END IF;
END;
This statement trigger on the INSTRUCTOR table fires before an INSERT, UPDATE, or DELETE statement is issued. First, the trigger determines the day of the week. If the day happens to be Saturday or Sunday, an error message is generated. For example, if the following UPDATEstatement on the INSTRUCTOR table is issued on Saturday or Sunday
UPDATE instructor
SET zip = 10025
WHERE zip = 10015;
the trigger generates this error message:
update INSTRUCTOR
*
ERROR at line 1:
ORA-20000: A table cannot be modified during off hours
ORA-06512: at "STUDENT.INSTRUCTOR_BIUD", line 8
ORA-04088: error during execution of trigger 'STUDENT.INSTRUCTOR_BIUD'
Notice that this trigger checks for a specific day of the week, but it does not check the time of day. You can create a more sophisticated trigger that checks which day of the week it is and whether the current time is between 9:00 A.M. and 5:00 P.M. If the day falls in the business week and the time of the day is not between 9:00 A.M. and 5:00 P.M., the error is generated.
INSTEAD OF Triggers
So far, you have seen triggers that are defined on database tables. PL/SQL provides another kind of trigger that is defined on database views. A view is a custom representation of data that can be referred to as a “stored query.” Consider the following example of a view created against theCOURSE table:
For Example ch13_4a.sql
CREATE VIEW course_cost
AS
SELECT course_no, description, cost
FROM course;
Watch Out!
You may find that you do not have privileges to create a view when logged in as STUDENT. In such a case, you need to log in as SYS and grant a CREATE VIEW privilege as follows:
GRANT CREATE VIEW TO student;
Did You Know?
Once a view is created, it does not contain or store any data. The data is derived from the SELECT statement associated with the view. In the preceding example, the COURSE_COST view contains three columns that are selected from the COURSE table.
Similar to tables, views can be manipulated via INSERT, UPDATE, and DELETE statements, with some restrictions. Be aware that when any of these statements are issued against a view, the corresponding data is modified in the underlying table. For example, consider an UPDATEstatement against the COURSE_COST view.
For Example ch13_5a.sql
UPDATE course_cost
SET cost = 2000
WHERE course_no = 450;
Once this UPDATE statement is executed, both SELECT statements against the COURSE_COST view and SELECT statements against the COURSE table return the same value of the cost for course number 450, as shown in Listing 13.11.
Listing 13.11 Selecting Data from the COURSE_COST View and the COURSE Table
SELECT *
FROM course_cost
WHERE course_no = 450;
COURSE_NO DESCRIPTION COST
---------- ------------------------ ----------
450 DB Programming in Java 2000
SELECT course_no, cost
FROM course
WHERE course_no = 450;
COURSE_NO COST
---------- ----------
450 2000
As mentioned earlier, some restrictions are placed on the views in terms of whether they can be modified by INSERT, UPDATE, and DELETE statements. Specifically, these restrictions apply to the underlying SELECT statement, which is also referred to as a “view query.” Thus, if a view query performs any of the operations or contains any of the following constructs, a view cannot be modified by an UPDATE, INSERT, and DELETE statements:
![]() Set operations such as UNION, UNION ALL, INTERSECT, and MINUS
Set operations such as UNION, UNION ALL, INTERSECT, and MINUS
![]() Group functions such as AVG, COUNT, MAX, MIN, and SUM
Group functions such as AVG, COUNT, MAX, MIN, and SUM
![]() GROUP BY or HAVING clauses
GROUP BY or HAVING clauses
![]() CONNECT BY or START WITH clauses
CONNECT BY or START WITH clauses
![]() The DISTINCT operator
The DISTINCT operator
![]() The ROWNUM pseudocolumn
The ROWNUM pseudocolumn
For example, consider a view created against the INSTRUCTOR and SECTION tables that summarizes how many courses are taught by an instructor.
For Example ch13_6a.sql
CREATE VIEW instructor_summary_view
AS
SELECT i.instructor_id, COUNT(s.section_id) total_courses
FROM instructor i
LEFT OUTER JOIN section s
ON (i.instructor_id = s.instructor_id)
GROUP BY i.instructor_id;
Note that the SELECT statement is written in the ANSI 1999 SQL standard. It uses the outer join between the INSTRUCTOR and SECTION tables. The LEFT OUTER JOIN indicates that an instructor record in the INSTRUCTOR table that does not have a corresponding record in theSECTION table is included in the result set, with TOTAL_COURSES being equal to zero in this result.
Did You Know?
Detailed explanations and examples of statements using the new ANSI 1999 SQL standard may be found in Oracle’s online help. Throughout this book we try to provide you with examples illustrating both standards; however, our main focus is on PL/SQL features rather than SQL.
This view is not updatable because it contains the group function, COUNT(). As a result, the DELETE statement
DELETE FROM instructor_summary_view
WHERE instructor_id = 109;
causes the following error:
ORA-01732: data manipulation operation not legal on this view
01732. 00000 - "data manipulation operation not legal on this view"
Recall that PL/SQL provides a special kind of trigger that can be defined on database views. This INSTEAD OF trigger is created as a row trigger. An INSTEAD OF trigger fires instead of the triggering statement (INSERT, UPDATE, DELETE) that has been issued against a view and directly modifies the underlying tables.
Consider an INSTEAD OF trigger defined on the INSTRUCTOR_SUMMARY_VIEW. This trigger deletes a record from the INSTRUCTOR table for the corresponding value of the instructor’s ID.
For Example ch13_7a.sql
CREATE OR REPLACE TRIGGER instructor_summary_del
INSTEAD OF DELETE ON instructor_summary_view
FOR EACH ROW
BEGIN
DELETE FROM instructor
WHERE instructor_id = :OLD.INSTRUCTOR_ID;
END;
Note the usage of the INSTEAD OF clause in the trigger header. Once the trigger is created, the DELETE statement against the INSTRUCTOR_SUMMARY_VIEW does not generate any errors.
DELETE FROM instructor_summary_view
WHERE instructor_id = 109;
1 row deleted.
When this DELETE statement is issued, the trigger deletes a record from the INSTRUCTOR table corresponding to the specified value of INSTRUCTOR_ID.
Now consider the same DELETE statement with a different instructor ID:
DELETE FROM instructor_summary_view
WHERE instructor_id = 101;
When this DELETE statement is issued, it causes the following error:
ORA-02292: integrity constraint (STUDENT.SECT_INST_FK) violated - child record found
ORA-06512: at "STUDENT.INSTRUCTOR_SUMMARY_DEL", line 2
ORA-04088: error during execution of trigger 'STUDENT.INSTRUCTOR_SUMMARY_DEL'
The INSTRUCTOR_SUMMARY_VIEW joins the INSTRUCTOR and SECTION tables based on the INSTRUCTOR_ID column that is present in both tables. The INSTRUCTOR_ID column in the INSTRUCTOR table has a primary key constraint defined on it. The INSTRUCTOR_IDcolumn in the SECTION table has a foreign key constraint that references the INSTRUCTOR_ID column of the INSTRUCTOR table. Thus, the SECTION table is considered a child table of the INSTRUCTOR table.
The original DELETE statement does not cause any errors because there is no record in the SECTION table corresponding to the instructor ID of 109. In other words, the instructor with an ID of 109 does not teach any courses.
The second DELETE statement causes an error because the INSTEAD OF trigger tries to delete a record from the INSTRUCTOR table, the parent table. However, there is a corresponding record in the SECTION table, the child table, with an instructor ID of 101. This causes an integrity constraint violation error. It might seem that one more DELETE statement (highlighted in bold in the following example) should be added to the INSTEAD OF trigger.
For Example ch13_7b.sql
CREATE OR REPLACE TRIGGER instructor_summary_del
INSTEAD OF DELETE ON instructor_summary_view
FOR EACH ROW
BEGIN
DELETE FROM section
WHERE instructor_id = :OLD.INSTRUCTOR_ID;
DELETE FROM instructor
WHERE instructor_id = :OLD.INSTRUCTOR_ID;
END;
Notice that the newly added DELETE statement removes records from the SECTION table before the INSTRUCTOR table because the SECTION table contains child records of the INSTRUCTOR table. However, the DELETE statement against the INSTRUCTOR_SUMMARY_VIEW causes yet another error:
DELETE FROM instructor_summary_view
WHERE instructor_id = 101;
ORA-02292: integrity constraint (STUDENT.GRTW_SECT_FK) violated - child record found
ORA-06512: at "STUDENT.INSTRUCTOR_SUMMARY_DEL", line 2
ORA-04088: error during execution of trigger 'STUDENT.INSTRUCTOR_SUMMARY_DEL'
This time, the error refers to a different foreign key constraint that specifies the relationship between the SECTION and GRADE_TYPE_WEIGHT tables. In this case, the child records are found in the GRADE_TYPE_WEIGHT table. Thus, before deleting records from the SECTION table, the trigger must delete all corresponding records from the GRADE_TYPE_WEIGHT table. However, the GRADE_TYPE_WEIGHT table has child records in the GRADE table, so the trigger must delete records from the GRADE table first.
This example illustrates the complexity of designing an INSTEAD OF trigger. To ensure that such a trigger works as intended, you must be aware of two important factors: the relationships among tables in the database and the ripple effect that a particular design may introduce. This example suggests deleting records from four underlying tables. However, those tables contain information that relates not only to the instructors and the sections they teach, but also to the students and the sections in which they are enrolled.
Summary
In this chapter, you began learning about database triggers, including what they are, how they fire, which types of triggers are available, and how they may be used. You also learned how to define and employ autonomous transactions. In Chapter 14, you will learn about compound triggers and their usage.
By the Way
The companion website provides additional exercises and suggested answers for this chapter, with discussion related to how those answers resulted. The main purpose of these exercises is to help you test the depth of your understanding by utilizing all of the skills that you have acquired throughout this chapter.
All materials on the site are licensed Creative Commons Attribution-Sharealike 3.0 Unported CC BY-SA 3.0 & GNU Free Documentation License (GFDL)
If you are the copyright holder of any material contained on our site and intend to remove it, please contact our site administrator for approval.
© 2016-2026 All site design rights belong to S.Y.A.