Practical PHP and MySQL Web Site Databases: A Simplified Approach (2013)
Chapter 3. Login/Logout for Members and an Administrator
In Chapter 2, you created your first interactive pages using a database and a table. By now, you have probably realized that what you created was not very practical; however, you learned how to embed interactivity into a real-world page. A more practical application is to allow registered users to log in and log out of private pages. When users log in, they should be able to access extra features offered by the web site. These could be a page of special offers for members, or it could be the ability to add a comment in a blog, access the minutes of meetings, or view the dates of special events for members only.
In the previous tutorial, any user could view a table of members, but the members would not be pleased that their private details are available to everybody. We must now prevent this and allow only the administrator (a membership secretary, say) and the webmaster to view the table of members.
An administrator is a special category of user: she should be able to view the members’ table and also to amend or delete records. Computer-savvy administrators can use phpMyAdmin, but many administrators will be membership secretaries with only basic computer skills. They will need a simple interface that enables them to view, alter, and delete records. This chapter will teach you how to create and implement a user-friendly interface for the administrator. Chapters 4, 5, and 6 will progressively improve this interface.
To log in to private pages on a web site, registered members and the administrator must enter information known only to them—for instance, the user’s e-mail address and password or a username and a password. The database will automatically check that the login details match the user’s information held in the database. If the login details are verified, the user is admitted to the private web pages.
This chapter has seven main sections that cover the following topics:
· Create the revised database and table
· Tidy the styling
· Remove or replace redundant menu buttons in the headers
· Deal with undesirable characters in the registration page
· Differentiate between two types of membership
· Create user levels to limit access to private pages
· Log in
· Create a members’ only page
· Planning the administrator’s role
· Testing the Login/Logout page
Create the Logindb Database and Table
The tutorials in this chapter are based on the templates used in Chapter 2. I will clarify the file structure by using a new name for the database and for the folder containing the PHP and HTML pages. This is necessary because I found that if students pile modification upon modification, they can get into a terrible muddle. Therefore, as a general rule, I will continue to use a separate folder and a new database name for each new chapter in this book. However, a table can have the same name (for example, users) as the previous tutorial. This is acceptable as long as the table is located in a different database folder.
Create a new folder and a new database as follows:
1. In the XAMPP htdocs folder, create a new folder called login.
2. Download the PHP files for Chapter 3 from the book’s page at http://www.apress.com, and put them in the new login folder in htdocs. Alternatively, you can practice creating the listings by typing each file in your HTML editor as you go through the chapter. Save them in your login folder in the htdocs folder.
3. Now type http://localhost/phpmyadmin in the address field of your browser.
4. Click the Databases tab.
5. Create a new database called logindb.
6. Select the box next to logindb, and click Check Privileges.
7. Click Add User, and enter the following attributes:
1. User name: william
2. Host: localhost
3. Password: catonlap
4. Database name: logindb
8. Check all the global privileges, and then accept the default (zeros) for the resources.
9. Click the Go button at the bottom of the page.
10.In the htdocs’ login folder, create the mysqli_connect.php file so that it connects to logindb as shown in the following listing:
Listing for the Snippet of Code Required for Connecting to the New Database (msqli_connect. php)
<?php
// Create a connection to the logindb database and to MySQL.
// Set the encoding and the access details as constants:
DEFINE ('DB_USER', 'william');
DEFINE ('DB_PASSWORD', 'catonlap');
DEFINE ('DB_HOST', 'localhost');
DEFINE ('DB_NAME', 'logindb');
// Make the connection:
$dbcon = @mysqli_connect (DB_HOST, DB_USER, DB_PASSWORD, DB_NAME) ![]()
OR die ('Could not connect to MySQL: ' . mysqli_connect_error() );
// Set the encoding...
mysqli_set_charset($dbcon, 'utf8');
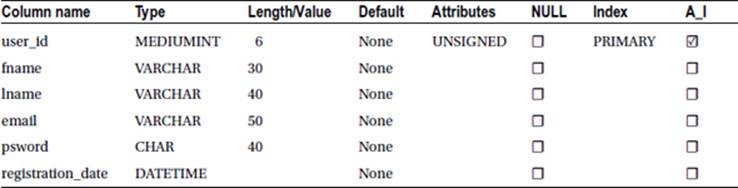
11. In the database logindb, create a new table named users with six columns. Its layout and attributes are exactly the same as the users table in Chapter 2. The details are given in Table 3-1.
Table 3-1. The attributes for the users table
Next we will do a little housekeeping. We will remove the styling instructions from as many as possible of the included files and transfer the styles to the main style sheet includes.css
Tidy the Styling
Best practice decrees that as much as possible of the CSS styling should be incorporated in the main style sheet. Therefore, the styling has been transferred from most of the included files to the global style sheet includes.css.
Why is this necessary? The pages worked well without this step, so why do it? The answer is that pages will not validate successfully unless the styles are removed from the included files. Validation using the World Wide Web Consortium (W3C) validator is an important part of web development to ensure that your code conforms to the standard expected by modern browsers and web-site owners. Also, a page that validates will be more secure. Your clients will be impressed if you can demonstrate that the pages on his web site conform to the latest W3C recommendations. To demonstrate this to a client, I always add an HTML5 validation logo and code to each page. This links to the URL http://validator.w3.org. If styling instructions form part of an included file, the validator will display a red failure message and display the statement, “Element style not allowed as child of element div.”
The revised style sheet is listed next. The items transferred from the included files are shown in bold type in the following code snippet for the style sheet includes.css:
/*the global style sheet includes.css*/
body { text-align:center; background-color:#D7FFEB; color:navy; ![]()
font-family: "times new roman"; font-size: 100%; color: navy; margin: auto; }
h2 { font-size:150%; color:navy; text-align:center;}
h3 { font-size:110%; color:navy; text-align:center; }
#container { position:relative; min-width:960px; max-width:1200px; margin:auto; ![]()
text-align:left; }
#header, #header-members { margin:10px auto 0 auto; min-width:960px; max-width:1200px; ![]()
height:175px; background-image: url('images/tile-pale.jpg'); background-repeat: repeat; ![]()
padding:0; color:white;
}
h1 { position:relative; top:40px; font-size:350%; color:white; margin:auto 0 auto 20px; ![]()
width: 487px; }
#reg-navigation ul { float:right; font-size:medium; width:160px; margin:-150px 15px 0 88%; }
ul { position:absolute; top:190px; left:-10px; color:navy; width:135px; ![]()
text-align:center; margin:0;}
/* set general side button styles */
li { width:115px; list-style-type :none; margin-bottom: 3px; text-align: center; }
/* set general anchor styles */
li a { display: block; width:115px; color: white; font-weight: bold; text-decoration: none }
/* specify state styles. */
/* mouseout (default) */
li a { background: #5B78BE; border: 4px outset #aabaff; }
/* mouseover */
li a:hover { display:block; background: #0a4adf; border: 4px outset #8abaff; width:115px; }
/* onmousedown */
li a:active { background:#aecbff; border: 4px inset #aecbff; }
#midcol { width:90%; margin:auto; }
#mid-left-col { width:48%; float:left; text-align:left; }
#mid-right-col {width:48%; float:right; text-align:left; }
#content { margin-left:150px; margin-right:150px; }
table { width:500px; border:1px navy solid; border-collapse:collapse; margin:auto; }
td { border:1px navy solid; padding:1px 0 1px 4px; text-align:left; }
form { margin-left:180px; }
#footer { margin:auto; text-align:center; }
p.error { color:red; font-size:105%; font-weight:bold; }
.label { float:left; width:210px; text-align:right; clear:left; margin-right:5px; }
#submit { margin-left:215px; text-align:center; }
span.left { text-align:left; }
#loginfields input { float:left; margin-bottom:5px; }
#loginfields label { margin-bottom:5px; }
#loginfields span { float:left; }
#loginfields submit { margin:5px auto 5px auto; }
span.left { text-align:left; }
Later in this chapter’s listings, you will see that I removed the internal styling from many included files. Now we will tidy the header menus.
Remove or Replace Redundant Menu Buttons in the Headers
As mentioned in Chapter 2, some header menu buttons have become redundant and some new buttons are needed. In this section, the header menus will be amended. We must prevent the public and ordinary members from viewing the membership table. To achieve this, we need to remove the link that displays the table of members from all the headers except the header on the administration page. We need to remove the login link on the members’ page, because the member is already logged in. We must also add a logout link. The Register link is also redundant because the members and the administrator are already registered; therefore, that menu button will also be removed.
![]() Tip Redundant buttons are easily overlooked when you are absorbed in the coding of the database and the web-site pages. Try to cultivate the habit of checking the header on each new or revised page to ensure that there are no redundant or missing buttons.
Tip Redundant buttons are easily overlooked when you are absorbed in the coding of the database and the web-site pages. Try to cultivate the habit of checking the header on each new or revised page to ensure that there are no redundant or missing buttons.
Add a Login Button to the Home Page Header
We will now add a new button to the header menu on the home page so that members can log in. We will also remove the View Users button because we want to arrange things so that only the administrator is able to view the table of members. The revised header is shown in Figure 3-1.

Figure 3-1. The revised header for the home page. The New Password button has been removed, and the View Users button is replaced with a Login button
The View Users and New Password buttons have been removed, and a Login button is added. The revised header will automatically be included in the non-private pages (page-2, page-3, and so on) because the header file name is unchanged.
The new login link in the header is indicated in bold type in Listing 3-1.
Listing 3-1. Revising the Home page Header Menu (header.php)
<div id="header">
<h1>This is the header </h1>
<div id="reg-navigation">
<ul>
<li><a href="login.php">Login</a></li>
<li><a href="register-page.php">Register</a></li>
</ul>
</div>
</div>
With XAMPP running, enter http://localhost/login/index.php into a browser to view the home page with the new login button as shown in Figure 3-1.
Remove Redundant Buttons from the Registration and New Password Headers
A new header will be required for the registration page and the new password page because the previous headers had redundant menu buttons,
On the registration page, the user has no password and so cannot log in; therefore, the Login and New Password buttons will be removed. The Register button is redundant because the user has already accessed the registration page. We will now remove the redundant buttons from the header for the registration page and replace them with something more useful. The new header is shown in Figure 3-2.

Figure 3-2. The new header for the Registration page and the New Password page
The redundant buttons are replaced by two meaningful links, Erase Entries and Cancel. I chose the words “Erase Entries” rather than “Clear” or “Erase All” after testing the site with users who were fairly new computer owners. They were confused by the “Clear” and “Erase All” wording, but they immediately understood “Erase Entries.” The Erase Entries button reloads the registration page and then displays empty fields. The Cancel button returns the user to the home page. Listing 3-2a gives the revised header code for the registration and new password pages.
Listing 3-2a. Replacing Redundant Buttons with Meaningful Buttons (register-header.php)
<div id="header">
<h1>This is the Header</h1>
<div id="reg-navigation">
<ul>
<li><a href="register-page.php">Erase Entries</a></li>
<li><a href="index.php">Cancel</a></li>
</ul>
</div>
</div>
The registration page for this chapter and subsequent chapters will be linked to the new header as shown in bold type in the next snippet of code shown in Listing 3-2b.
Listing 3-2b. Including the New Header in the Registration Page (register-page.php)
<!doctype html>
<html lang=en>
<head>
<title>Register page</title>
<meta charset=utf-8>
<link rel="stylesheet" type="text/css" href="includes.css">
</head>
<body>
<div id="container">
<?php include("register-header.php"); ?>
<?php include("nav.php"); ?>
<?php include("info-col.php"); ?>
The Revised Registration Page
The rest of the code is the same as the registration page in Chapter 2. The revised code is included in the downloadable files for Chapter 3.
The rest of the code for this page is unchanged. The new header will now be applied to the New Password page.
The New Header for the New Password Page
The same new header will be required for the New Password page. This was shown in Figure 3-2.
The new-password page for this chapter and subsequent chapters will be linked to the new header as shown in bold type in the next snippet of code in Listing 3-2c.
Listing 3-2c. Replacing Redundant Buttons with Meaningful Buttons (password-header.php)
<div id="header">
<h1>This is the Header</h1>
<div id="reg-navigation">
<ul>
<li><a href="register-password .php">Erase Entries</a></li>
<li><a href="index.php">Cancel</a></li>
</ul>
</div>
</div>
The Erase Entries button reloads the new-password page and displays empty fields. The Cancel button returns the user to the home page.
The included file for the header is amended in the register-password file (register-password.php) as given in the following code snippet:
<div id="container">
<?php include("password-header.php"); ?>
<?php include("nav.php"); ?>
<?php include("info-col.php"); ?>
The rest of the code goes here and is unchanged from Chapter 2.
A New Header Menu for the Members’ Page
For the members’ page, the Register button and the View Members button have been removed and a Logout button added, as shown in Figure 3-3.

Figure 3-3. The modified header menu for the members’ page
Note in Figure 3-3 that when a member is logged into the members’ page, the Login menu button changes to a Logout button. There are several clever ways of achieving this, but the least complicated way is to load a new header into the members’ page. This is effective because sometimes the special members’ page also requires a slightly changed header image or text. Note also that the redundant Register and New Password buttons have been removed from the header menu.
I named the new file header-members.php. The new Logout button has a link that sends the user to the page named logout.php. This, in turn, sends the user to the home page. Why does the link not go directly to the home page? Because the intermediate page logout.php contains some code for closing a session before it accesses the home page. A session is a device that will be explained in the next section. The logout link is shown in bold type in the following code snippet for the new header.
The code for the two links that remain are indicated in Listing 3-3.
Listing 3-3. Creating the New Header for the Members’ Page (header-members.php)
<div id="header-members">
<h1>This is the Header</h1>
<div id="reg-navigation">
<ul>
<li><a href="logout.php">Logout</a></li>
<li><a href="register-password.php">New Password</a></li>
</ul>
</div>
</div>
If the web site has more than one page that is exclusively for members, you could add more buttons to the file members-header.php or, alternatively, you could put links in the body of the members’ page.
Amend the Header for the Thank-You Page
When a user reaches the Thank-You page, she has registered and no longer requires the Register button, nor does she require any of the other buttons. The Thank-You page header only needs a button that redirects the user to the home page. The header with the Home Page button is shown inFigure 3-4.

Figure 3-4. The revised header for the Thank-You page
The Home Page menu button in the header redirects the user to the home page (index.php), as shown in Listing 3-4a.
Listing 3-4a. Creating the Code for the Revised Thank-You Header (header-thanks.php)
<div id="header">
<h1>This is the thank you header</h1>
<div id="reg-navigation">
<p> </p>
<ul>
<li><a href="index.php">Home Page</a></li>
</ul>
</div>
</div>
The Thank-You page will now be amended to include the revised header. The includes at the start of the Thank-You page are shown in the next snippet of code. The revised include is shown in bold type in Listing 3-4b.
Listing 3-4b. Creating the Revised Thank-You Page (register-thanks.php)
<!doctype html>
<html lang=en>
<head>
<title>Registration thank you page</title>
<meta charset=utf-8>
<link rel="stylesheet" type="text/css" href="includes.css">
</head>
<body>
<div id="container">
<?php include("header-thanks.php"); ?>
<?php include("nav.php"); ?>
<?php include("info-col.php"); ?>
The rest of the code is unchanged from the code in Chapter 2.
The Registration Page and Undesirable Characters
In Chapter 2, you learned how the function mysqli_real_escape_string() converted apostrophes so that they were not regarded as PHP code; the function for achieving this also cleaned text input by removing some other undesirable characters. The same function will be used in the registration page to clean every piece of text entered by a user. However, some user entries will require further cleaning, and this is covered in Chapter 6. The function has the following format:
$fn = mysqli_real_escape_string($dbcon, trim($_POST['fname']));
We’ll add that function to our registration page now. While we’re at it, let’s also add the updated register-header.php file that includes only the two buttons Erase Entries and Cancel.
Figure 3-5 shows the registration page with its new header.
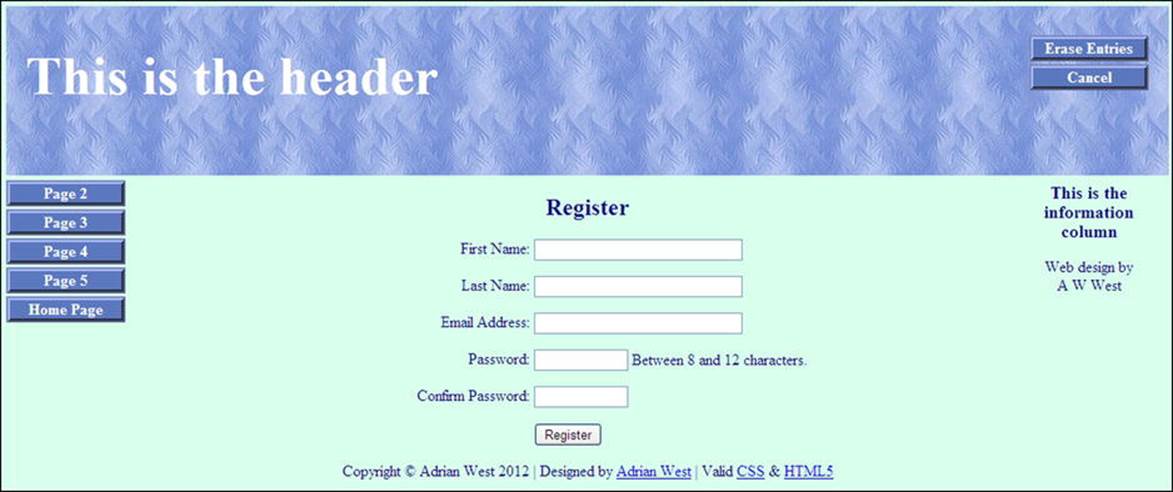
Figure 3-5. The registration page with its new header
Using the modified code with its new function, you will be able to enter names that include an apostrophe, such as O’Hara. The modified code for cleaning entries in register-page.php is shown in bold type in Listing 3-5.
Listing 3-5. Creating the Amended Registration Page (register-page.php)
<!doctype html>
<html lang=en>
<head>
<title>Register page</title>
<meta charset=utf-8><!--important prerequisite for escaping problem characters-->
<link rel="stylesheet" type="text/css" href="includes.css">
</head>
<body>
<div id="container">
<!--Use the revised header-->
<?php include("register-header.php"); ?>
<?php include("nav.php"); ?>
<?php include("info-col.php"); ?>
<div id="content"><!-- Registration handler content starts here -->
<p>
<?php
// The link to the database is moved to the top of the PHP code.
require ('mysqli_connect.php'); // Connect to the db.
// This query INSERTs a record in the users table.
// Has the form been submitted?
if ($_SERVER['REQUEST_METHOD'] == 'POST') {
$errors = array(); // Initialize an error array.
// Check for a first name:
if (empty($_POST['fname'])) {
$errors[] = 'You forgot to enter your first name.';
} else {
$fn = mysqli_real_escape_string($dbcon, trim($_POST['fname']));
}
// Check for a last name
if (empty($_POST['lname'])) {
$errors[] = 'You forgot to enter your last name.';
} else {
$ln = mysqli_real_escape_string($dbcon, trim($_POST['lname']));
}
// Check for an email address
if (empty($_POST['email'])) {
$errors[] = 'You forgot to enter your email address.';
} else {
$e = mysqli_real_escape_string($dbcon, trim($_POST['email']));
}
// Check for a password and match it against the confirmed password
if (!empty($_POST['psword1'])) {
if ($_POST['psword1'] != $_POST['psword2']) {
$errors[] = 'Your two passwords did not match.';
} else {
$p = mysqli_real_escape_string($dbcon, trim($_POST['psword1']));
}
} else {
$errors[] = 'You forgot to enter your password.';
}
if (empty($errors)) { // If it runs
// Register the user in the database...
// Make the query:
$q = "INSERT INTO users (user_id, fname, lname, email, psword, registration_date)
VALUES (' ', '$fn', '$ln', '$e', SHA1('$p'), NOW() )";
$result = @mysqli_query ($dbcon, $q); // Run the query.
if ($result) { // If it runs
header ("location: register-thanks.php");
exit();
} else { // If it did not run
// Message:
echo '<h2>System Error</h2>
<p class="error">You could not be registered due to a system error. We apologize ![]()
for any inconvenience.</p>';
// Debugging message:
echo '<p>' . mysqli_error($dbcon) . '<br><br>Query: ' . $q . '</p>';
} // End of if ($result)
mysqli_close($dbcon); // Close the database connection.
// Include the footer and quit the script:
include ('footer.php');
exit();
} else { // Report the errors.
echo '<h2>Error!</h2>
<p class="error">The following error(s) occurred:<br>';
foreach ($errors as $msg) { // Extract the errors from the array and echo them
echo " - $msg<br>\n";
}
echo '</p><h3>Please try again.</h3><p><br></p>';
}// End of if (empty($errors))
} // End of the main Submit conditional.
?>
<h2>Register</h2>
<form action="register-page.php" method="post">
<p><label class="label" for="fname">First Name:</label> ![]()
<input id="fname" type="text" name="fname" size="30" maxlength="30" ![]()
value="<?php if (isset($_POST['fname'])) echo $_POST['fname']; ?>"></p>
<p><label class="label" for="lname">Last Name:</label>
<input id="lname" type="text" name="lname" size="30" maxlength="40" ![]()
value="<?php if (isset($_POST['lname'])) echo $_POST['lname']; ?>"></p>
<p><label class="label" for="email">Email Address:</label>![]()
<input id="email" type="text" name="email" size="30" maxlength="60" ![]()
value="<?php if (isset($_POST['email'])) echo $_POST['email']; ?>" > </p>
<p><label class="label" for="psword1">Password:</label>
<input id="psword1" type="password" name="psword1" size="12" maxlength="12"
value="<?php if (isset($_POST['psword1'])) echo $_POST['psword1']; ?>" > ![]()
Between 8 and 12 characters.</p>
<p><label class="label" for="psword2">Confirm Password:</label>
<input id="psword2" type="password" name="psword2" size="12" maxlength="12" ![]()
value="<?php if (isset($_POST['psword2'])) echo $_POST['psword2']; ?>" ></p>
<p><input id="submit" type="submit" name="submit" value="Register"></p>
</form>
<?php include ('footer.php'); ?>
</p>
</div>
</div>
</body>
</html>
Register Some Members
At this point, you should register a few fictitious people in the database so that you will have something to play with later in the chapter. To save you time, I repeated the list of members from Chapter 2, and they are shown in Table 3-2.
Table 3-2. Register Some Members
|
Name |
|
Password |
|
Patrick O’Hara |
pohara@myisp.org.uk |
shamrock |
|
Mike Rosoft |
miker@myisp.com |
willgates |
|
Olive Branch |
obranch@myisp.co.uk |
anoilyone |
|
Frank Insence |
finsence@myisp.net |
perfume |
|
Annie Versary |
aversary@myisp.com |
birthdaygirl |
|
Terry Fide |
tfide@myisp.de |
scaredstiff |
|
Rose Bush |
rbush@myisp.co.uk |
redblooms |
To maintain the security of private pages, we use a device called sessions. A session is a server-side store of information about a user. It is deleted when a user exits a site, or it times-out after a period (typically 20 minutes) that is set by the server administrator. A session checks the credentials of users before allowing them to access a page.
Differentiating Between Two Types of Membership
The simpleIdb database in the previous chapter had a security problem; any non-registered user could view the table of members by simply accessing the web site. We will now ensure that the table of members can be viewed only by the developer and the membership secretary (the administrator) and not by the whole world. One solution is to instruct the membership secretary how to install and use phpMyAdmin; however, we will assume that our membership secretary is not very computer literate and does not want to learn phpMyAdmin.
Our solution will be to restrict access to the view_table.php page and all other administrator pages so that only the membership secretary is allowed to view them. This will be achieved by using sessions and a different user_level number for the administrator. The administrator will be provided with a user-friendly interface so that he can search and amend membership records.
To sum up, our rules for differentiating between types of membership will be as follows:
· Non-members will not be able to view private pages because users can’t log in until they are registered.
· Registered members will be able to access members’ pages because they can log in. Doing so, initiates a session that allows them to open members’ pages.
· The administrator is the only person able to access administration pages. When he logs in, the act of logging in starts a session that checks his user_level before he can open an administrator’s page. His user_level is different from ordinary members’ user levels.
Before designing a login page, we must also create a means of differentiating between an ordinary registered member and a member who is also the administrator. The administrator will have extra privileges. In the next tutorial, you will learn how to add a new column with the titleuser_level to an existing database table. This new column will enable us to differentiate between types of membership.
Create User Levels to Limit Access to Private Pages
To limit access to the view table page, we will add a column to the users table called user_level. In this column, we will give the administrator a user level number 1. That number relates to the membership secretary’s login details and to no other person.
Access phpMyAdmin, and click the database logindb. Then click the users table. Click the Structure tab. Look below the records to find the item Add one column. The next steps are illustrated in Figure 3-6.

Figure 3-6. The Add symbol (circled) can be seen at the bottom of this screen shot
Below the list of fields, you will see where you can add another column (shown at the bottom of Figure 3-6). The details are as follows.
Find the item labeled Add 1, select the radio button labeled After, and use the drop-down menu to select registration_date. Alternatively, select the radio button labeled At end of table then click the Go button.
You will be taken to the next screen as shown in Figure 3-7.
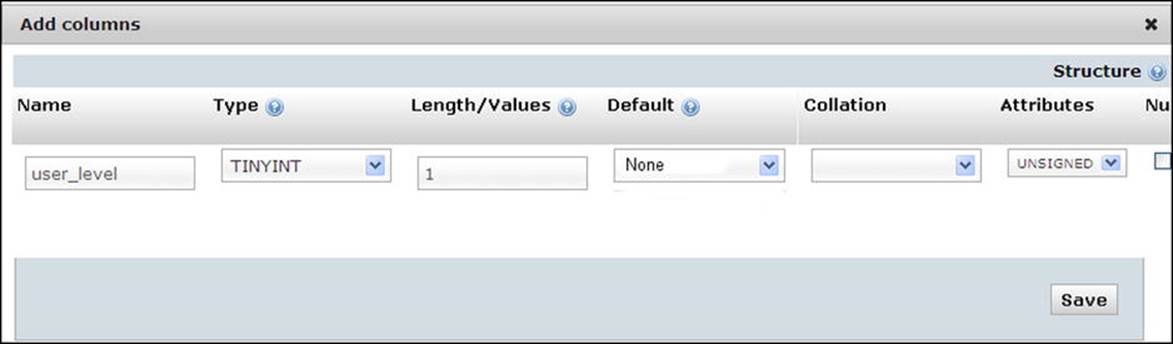
Figure 3-7. Creating the title and attributes for the new user_level column
Insert the new column name and its attributes as follows:
· Name: user_level
· Type: TINYINT
· Value: 1
· Default: None
· Attributes: UNSIGNED
When you are satisfied with the attributes, click the Save button. The new column will be created.
The next step is to launch XAMPP and access the page by entering http://localhost/login/index.php into the address field of a browser. When the index page appears, click the Register button on the header menu and register this user as an ordinary member:
· First name: James
· Last name: Smith
· E-mail: jsmith@myisp.co.uk
· Password: blacksmith
When using his proper e-mail address and password, James Smith can view the members’ special pages but he cannot view or amend a list of members.
We will now appoint James Smith to be the membership secretary, with the right to administer the membership list. For security, he needs a second name and a pseudo e-mail address and password to access the administration section; therefore, he needs an additional registration identity. The second e-mail address is important because his office colleagues probably know his personal e-mail address. Every effort must be made to keep the administrator’s login details secret. The e-mail address should be fictitious, but it must conform to the accepted format for e-mails. Now register the membership secretary a second time using his pseudonym (“Jack”), the new e-mail address, and the new password as follows:
· First name: Jack
· Last name: Smith
· E-mail: jsmith@outcook.com
· Password: dogsbody
In a real-world situation, you would not use a password that could be easily guessed. The one I used in this tutorial would not be secure, but I chose it because it is memorable and therefore helpful for exploring this tutorial.
Now use phpMyAdmin to access the database logindb and the users table. Click the Browse tab, and find the administrator Jack Smith’s record, as shown in Figure 3-8. If you click the Edit link, you will be able to change his user_level field from 0 to 1. Click the Go button to save the change.
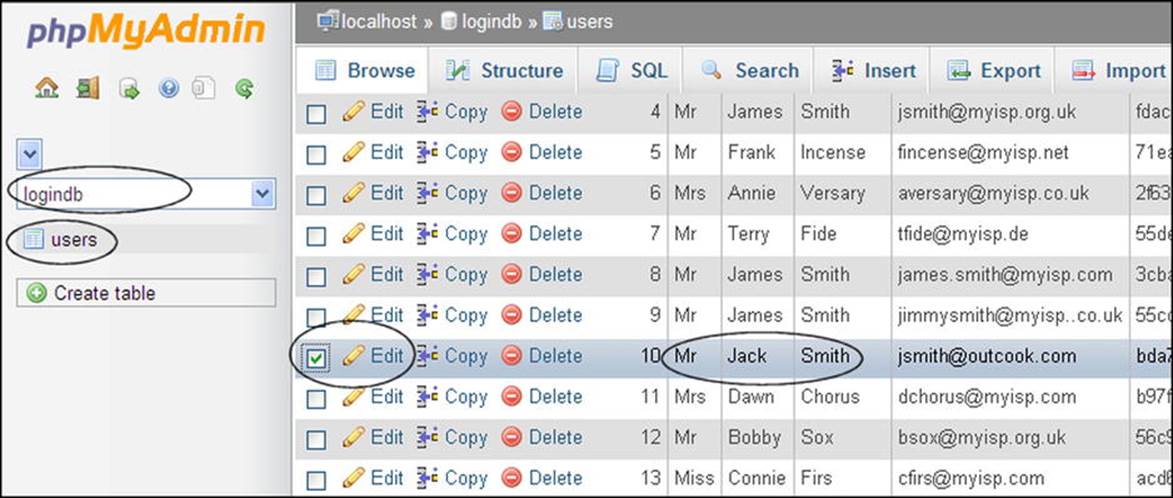
Figure 3-8. Find Jack Smith’s record so that you can edit his user_level
When James Smith logs in with his personal e-mail address and his original password, he will be taken to the members’ page just like any other member. This is because when he uses his original password, his user_level is zero, the same as all other registered members. However, when he logs in with his different e-mail address and the administrator’s password dogsbody, he will be taken to a page where he can administer the database because his e-mail address and the dogsbody password relate to user_level 1.
A real-world administrator would ensure that nobody could ever discover his alternative e-mail address and his new password. People contacting the administrator would use his original name and personal e-mail address.
![]() Tip If James Smith resigns and a new administrator is appointed, the webmaster will delete Jack Smith’s record. He will then give the new administrator a pseudonym and a new password. The new membership secretary would be asked to acquire an alternative e-mail address and then to register as a new member using the alternative e-mail address and a new password. The webmaster would then set the new membership secretary’s user level to 1.
Tip If James Smith resigns and a new administrator is appointed, the webmaster will delete Jack Smith’s record. He will then give the new administrator a pseudonym and a new password. The new membership secretary would be asked to acquire an alternative e-mail address and then to register as a new member using the alternative e-mail address and a new password. The webmaster would then set the new membership secretary’s user level to 1.
Now we will create the login page and introduce some new PHP statements.
Log In
From a user’s point of view, the ability to log in or log out of a web site is pointless unless it leads to some advantage, such as a special page for members or permission to post comments in a blog. In the following sections, we will create new pages that will interact with registered users. These will be a login page, a members-only page, and an administrator’s page. The same login page is used for logging into either the members’ pages or the administrator’s pages. You would be forgiven for thinking that the admin and members’ pages are fully protected by the login process. However, imagine the following scenario.
A member has logged in to a private page and is then called away to take a telephone call. Someone could look at the member’s computer and read the URL of the private page in the address field of the browser. If that person then entered the URLs on her own computer she could access the private page. Clearly, this must be prevented. This is achieved by means of the sessions described later in this chapter.
First we must create a header for the login page.
The Header for the Login Page
Figure 3-9 shows the login header with three menu buttons.

Figure 3-9. The login page header
The code for the login header appears in Listing 3-9.
Listing 3-9. Creating the Header for the Login Page (login-header.php)
<div id="header">
<h1>This is the header</h1>
<div id="reg-navigation">
<ul>
<li><a href="login.php">Erase Entries</a></li>
<li><a href="register-page.php">Register</a></li>
<li><a href="index.php">Cancel</a></li>
</ul>
</div>
</div>
Now we need to look at a procedure for limiting access to the table of members. We will prevent general users and registered members from viewing the table, but we will allow the administrator to view the table and amend records.
The appearance of the login page is shown in Figure 3-10.

Figure 3-10. The login page
The form fields for the e-mail address and password could have been located in the code in the login page, but for increased security, an external included file is used. A malevolent person would then have the difficulty of assembling the components before he could interfere with the form, especially when the components are PHP files and they are located in different folders. The listing for the login page uses the include() function to pull the form’s fields into the page from the file named login-page.inc.php. Note that the redundant buttons have been removed from the heading on this page.
The Login Page
Now that we have a user_level column, we can create the login page to include two conditionals. The conditionals will recognize the user_level of the administrator (user_level 1) and the ordinary member (user_level 0). When the genuine administrator logs in, he will see the administration page complete with his new menu buttons. When registered members log in, they will be redirected to the members’ page. The new login page header is pulled into the page by means of the include statement in bold type in Listing 3-10a.
Listing 3-10a. Creating the Login Page (login.php)
<!doctype html>
<html lang=en>
<head>
<title>The Login page</title>
<meta charset=utf-8>
<link rel="stylesheet" type="text/css" href="includes.css">
</head>
<body>
<div id="container">
<?php include("login-header.php"); ?>
<?php include("nav.php"); ?>
<?php include("info-col.php"); ?>
<div id="content"><!-- Start of the login page content. -->
<?php
// This section processes submissions from the login form
// Check if the form has been submitted:
if ($_SERVER['REQUEST_METHOD'] == 'POST') {
//connect to database
require ('mysqli_connect.php'); #1
// Validate the email address
if (!empty($_POST['email'])) {
$e = mysqli_real_escape_string($dbcon, $_POST['email']);
} else {
$e = FALSE;
echo '<p class="error">You forgot to enter your email address.</p>';
}
// Validate the password
if (!empty($_POST['psword'])) {
$p = mysqli_real_escape_string($dbcon, $_POST['psword']);
} else {
$p = FALSE;
echo '<p class="error">You forgot to enter your password.</p>';
}
if ($e && $p){//if no problems #2
// Retrieve the user_id, first_name and user_level for that email/password combination
$q = "SELECT user_id, fname, user_level FROM users WHERE (email='$e' AND psword=SHA1('$p'))";
// Run the query and assign it to the variable $result
$result = mysqli_query ($dbcon, $q);
// Count the number of rows that match the email/password combination
if (@mysqli_num_rows($result) == 1) {//if one database row (record) matches the input:-
// Start the session, fetch the record and insert the three values in an array
session_start(); #3
$_SESSION = mysqli_fetch_array ($result, MYSQLI_ASSOC);
// Ensure that the user level is an integer.
$_SESSION['user_level'] = (int) $_SESSION['user_level'];
// Use a ternary operation to set the URL #4
$url = ($_SESSION['user_level'] === 1) ? 'admin-page.php' : 'members-page.php';
header('Location: ' . $url); // Make the browser load either the members’ or the admin page
exit(); // Cancel the rest of the script
mysqli_free_result($result);
mysqli_close($dbcon);
} else { // No match was made.
echo '<p class="error">The e-mail address and password entered do not match our records ![]()
<br>Perhaps you need to register, just click the Register button on the header menu</p>';
}
} else { // If there was a problem.
echo '<p class="error">Please try again.</p>';
}
mysqli_close($dbcon);
} // End of SUBMIT conditional.
?>
<!-- Display the form fields--> #5
<div id="loginfields">
<?php include ('login_page.inc.php'); ?>
</div><br>
<?php include ('footer.php'); ?>
</div>
</div>
</body>
</html>
![]() Caution If you type the book’s listings in your text editor, do not include the line numbers (#1, #2, #3, and so on). These are provided to help you understand the explanation of the PHP given at the end of each listing. The downloaded files omit the line numbers. This caution applies to all the listings in the book.
Caution If you type the book’s listings in your text editor, do not include the line numbers (#1, #2, #3, and so on). These are provided to help you understand the explanation of the PHP given at the end of each listing. The downloaded files omit the line numbers. This caution applies to all the listings in the book.
Explanation of the Code
Most of the code will by now be familiar to you. Some code is explained by comments within the listing, but there are a few new PHP patterns that need explaining as follows:
require ('login_functions.inc.php'); #1
require() is an alternative to the include() function. If the file in the brackets can’t be located, the page will cease loading. Because the two files work together, there is no point continuing if the file in the brackets cannot be found.
if ($e && $p){//if no problems encountered #2
// Retrieve the user_id, first_name and user_level for that email/password combination:
$q = "SELECT user_id, fname, user_level FROM users WHERE (email='$e' AND psword=SHA1('$p'))";
If no problems are encountered (that is, if $e and $p exist), the two user entries are validated and assigned to the variable $q.
session_start(); #3
$_SESSION = mysqli_fetch_array ($result, MYSQLI_ASSOC);
// Ensure that the user level is an integer.
$_SESSION['user_level'] = (int) $_SESSION['user_level'];
A session is started, and it is used to check the authorization of the person logging in. If the user_level has been saved as True or False, it needs to be converted to a whole number using (int). Sessions have been introduced for the first time, and they will be explained fully at the end of this explanatory section. Meanwhile, just accept them.
// Use a ternary operation to set the URL #4
$url = ($_SESSION['user_level'] === 1) ? 'admin-page.php' : 'members-page.php';
header('Location: ' . $url); // Make the browser load either the members’ or the admin page
exit(); // Cancel the rest of the script.
At this point, I will break the rule I set myself for this book: I am introducing a clever piece of shorthand code. However, it is not a trick invented by me; it is a common PHP device for choosing between two outcomes and is therefore particularly useful and not too difficult to understand.
The word ternary has nothing to do with a reserve for seabirds of the family laridae. It is a mathematical term that has been adopted by web-site script developers. It is the third operator in the series “unary, binary, ternary.” In other words, ternary has three parts. The ternary operator is often called a ternary conditional because it is a very concise way of setting a conditional. The operator uses the symbols ? and :. The format we are using redirects the user to either the URL for the admin page or the URL for the members’ page. The code is
$url = ($_SESSION['user_level'] === 1) ? 'admin-page.php' : 'members-page.php';
The first part of the statement on the right (enclosed in brackets) looks at the user_level in the session array and asks if it is identical to 1. The three equal signs mean “identical to.” If it is identical to 1, the question mark turns the next two items into a conditional statement. It is saying, “If the user_level is identical to 1, then assign the admin-page.php to the variable named $url.” The colon is the equivalent of “else”; therefore, if the user_level is not identical to 1, the $url is set to members-page.php. Registered members have a user_level of 0.
The variable $url, therefore, is set to a particular page and the user is redirected to that page using the familiar header statement:
header('Location: ' . $url); // Make the browser load either the members’ or the admin page
exit(); // Quit the script.
The longhand equivalent of the ternary statement is
if ($_SESSION['user_level'] === 1) {
header(‘location: admin-page.php');
exit();
}else{
header(‘location: members-page.php');
exit();
}
<!-- Display the form fields--> #5
<div id="loginfields">
<?php include ('login_page.inc.php'); ?>
</div><br>
<?php include ('footer.php'); ?>
</div>
</div>
</body>
</html>
The form fields are displayed by the included file login_page.inc.php. This file is described next.
The Login Form Fields
The login_page.inc.php file describes the form fields that will be pulled into the login page. The form is sticky—that is, the user entries are retained and redisplayed if the user makes a mistake that triggers an error message. Listing 3-10b shows the form fields.
Listing 3-7b. Displaying the Form Fields in the Login Page (login_page.inc.php)
<h2>Login</h2>
<form action="login.php" method="post">
<p><label class="label" for="email">Email Address:</label>
<input id="email" type="text" name="email" size="30" maxlength="60" ![]()
value="<?php if (isset($_POST['email'])) echo $_POST['email']; ?>" > </p>
<br>
<p><label class="label" for="psword">Password:</label>
<input id="psword" type="password" name="psword" size="12" maxlength="12" ![]()
value="<?php if (isset($_POST['psword'])) echo $_POST['psword']; ?>" > ![]()
<span> Between 8 and 12 characters.</span></p>
<p> </p><p><input id="submit" type="submit" name="submit" value="Login"></p>
</form><br>
The form fields are formatted by the following code, which we already added to the end of the main style sheet in the earlier “Tidy the Styles” section:
#loginfields input { float:left; margin-bottom:5px; }
#loginfields label { margin-bottom:5px; }
#loginfields span { float:left; }
#loginfields submit { margin:5px auto 5px auto; }
span.left { text-align:left; }
If the user’s login data does not match the data in the database table, an error message is displayed as shown in Figure 3-11.
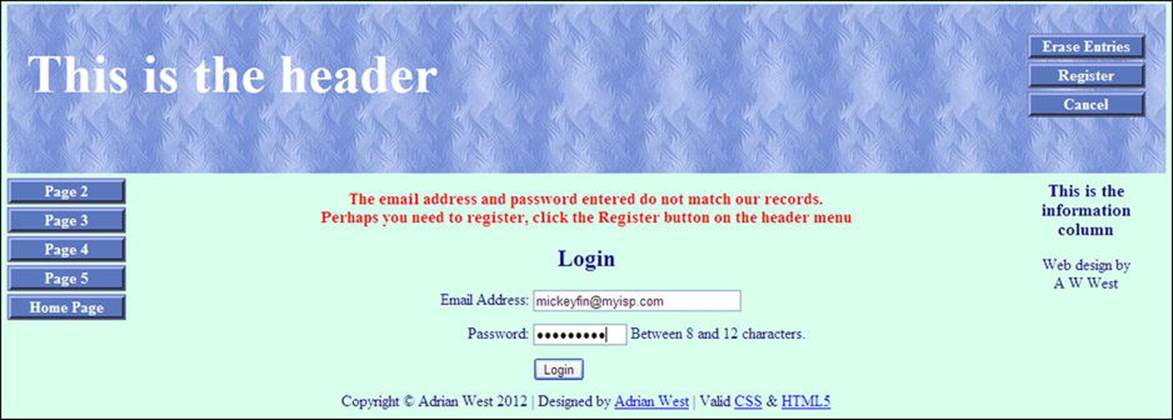
Figure 3-11. One of the error messages displayed when the login is unsuccessful
The login has a sticky form so that the user’s entries are retained when an error is encountered. No hint is given as to which of the two entries was incorrect; this is a security feature. For instance, if the error message stated that the e-mail address was incorrect but the password was acceptable, a hacker would be able to concentrate on trying possible e-mail addresses.
The new database logindb will allow registered members to log in and log out of a members’ page. Non-registered users will therefore be prevented from accessing the member’s page. This is not completely secure because someone could look over the member’s shoulder and discover the file name of the member’s page in the browser’s address field. Using that name, she could then access the member’s page, as previously mentioned. This security loophole will be dealt with by using sessions.
Sessions
Pages that need to be kept private will use the feature called sessions; therefore, sessions and their application will now be explained. Registered members should be able to log in once per visit to the web site. They should not have to log in several times to access several private pages. The login state should persist as long as that user is logged in. The time between login and logout is called a session. The login starts a session, and the logout closes the session. A session stores some information temporarily on the server, and additional information is stored temporarily on the user’s computer in a cookie. If a session exists, extra features will be available for the logged-in user.
There is a way of using sessions without a cookie, but that is less secure. The European Union has ruled that web sites must state that they are using a cookie. The message declaring the use of a cookie can sometimes cause users to panic, but there is nothing to stop the web site adding a soothing message to the effect that the temporary cookie is quite safe to use. If users disable cookies, they won’t be able to access the private pages even if they are authorized to access them. The alternative is to attach the session to the URL on each link. We will use the more secure method and employ a temporary cookie on the user’s computer.
![]() Tip Think of a session as a sort of security pass. When a user has successfully logged in, a security pass (a session) for that person is posted in the cookie and also in the memory of the server. A security guard is stationed at the door of each private page. When the user tries to open a private page, the security guard on that page checks the security pass (the session). If the pass confirms that the person is authorized to access the page, the private page is opened. When a user logs out, the session and the cookie are destroyed. Sessions carry with them several pieces of useful information about the user that can be accessed and used in the private pages.
Tip Think of a session as a sort of security pass. When a user has successfully logged in, a security pass (a session) for that person is posted in the cookie and also in the memory of the server. A security guard is stationed at the door of each private page. When the user tries to open a private page, the security guard on that page checks the security pass (the session). If the pass confirms that the person is authorized to access the page, the private page is opened. When a user logs out, the session and the cookie are destroyed. Sessions carry with them several pieces of useful information about the user that can be accessed and used in the private pages.
The process when using sessions is as follows:
1. If a user is authorized to log in and he logs in successfully, a session is created.
2. When a user tries to access a private page, the private page checks to see if a session for that particular user exists.
3. If the session exists, the private page is opened.
4. If the session does not exist, the user is directed back to the login page.
5. By using sessions, the server can be made to differentiate between types of users, such as non-members, registered members, and administrators.
6. Logged-in users can either move to other private pages or log out. When they log out, the session and its temporary cookie are destroyed.
A session is started as follows:
// Set the session data:
session_start();
A session is closed as follows:
}else{ //cancel the session
$_SESSION = array(); // Destroy the variables.
session_destroy(); // Destroy the session itself.
setcookie('PHPSESSID', ", time()-3600,'/', ", 0, 0);//Destroy the cookie
header("location:index.php");
exit();
The act of logging in creates a session that saves variables in an array named $_SESSION. When the user has logged in and tries to open a private page, the code checks that a session has been set up for that user. If it has, the private page will be opened in the user’s browser.
In the following statements extracted from the code for login.php, the data is selected and then a session is created. Information is retained in a temporary cookie and in a temporary variable on the server for use in private pages.
//Select three items from a record that is defined by a combination of the user’s
// e-mail and password. The three items are user_id, fname, and user_level.
$q = "SELECT user_id, fname, user_level FROM users WHERE (email='$e' AND psword=SHA1('$p'))";
//The selected data is assigned to a variable called $result
$result = mysqli_query ($dbcon, $q); //Run the query.
// If a matching record (row) is found, the number of records (rows) found will be one
if (@mysqli_num_rows($result) == 1) {//The user input matched the database record
// Start the session, fetch the record and insert the three values into the session ![]()
array
session_start();
$_SESSION = mysqli_fetch_array ($result, MYSQLI_ASSOC);
![]() Tip The session_start() function and the statements checking the session must appear before the HTML tag. Beginners are often puzzled by the session_start() function appearing on every private page: why does it not start a new session to replace the existing session? The answer is that if a session exists, the function does not start another session; instead, it checks the user’s credentials and, if they are satisfactory, it allows the private page to load. If a session does not exist, it will start one; however, that session is not effective and a conditional statement sends the user back to the login page.
Tip The session_start() function and the statements checking the session must appear before the HTML tag. Beginners are often puzzled by the session_start() function appearing on every private page: why does it not start a new session to replace the existing session? The answer is that if a session exists, the function does not start another session; instead, it checks the user’s credentials and, if they are satisfactory, it allows the private page to load. If a session does not exist, it will start one; however, that session is not effective and a conditional statement sends the user back to the login page.
Sessions create a unique user identity. This is called a UID (a unique identification number). The <?php session_start(); ?> statement establishes a UID. It registers the user’s session on the server and saves the information for use on any private pages. The following is an example of the code at the start of a private page accessible only to the administrator with a user_level number 1):
<?php
session_start();
if (!isset($_SESSION['user_level']) or ($_SESSION['user_level'] != 1))
{ header("Location: login.php");
exit();
}
?>
<!doctype html>
The code can be translated as follows: “If the session does not exist, or if the user level is not equal to 1, then the user will be sent back to the login page.”
Our next step is to create a members-only page protected by the login session.
A Members-only Page
Use the downloadable page members-page.php, or create the page by hand-coding it using Listing 3-12. The members’ page created for this tutorial is shown in Figure 3-12.
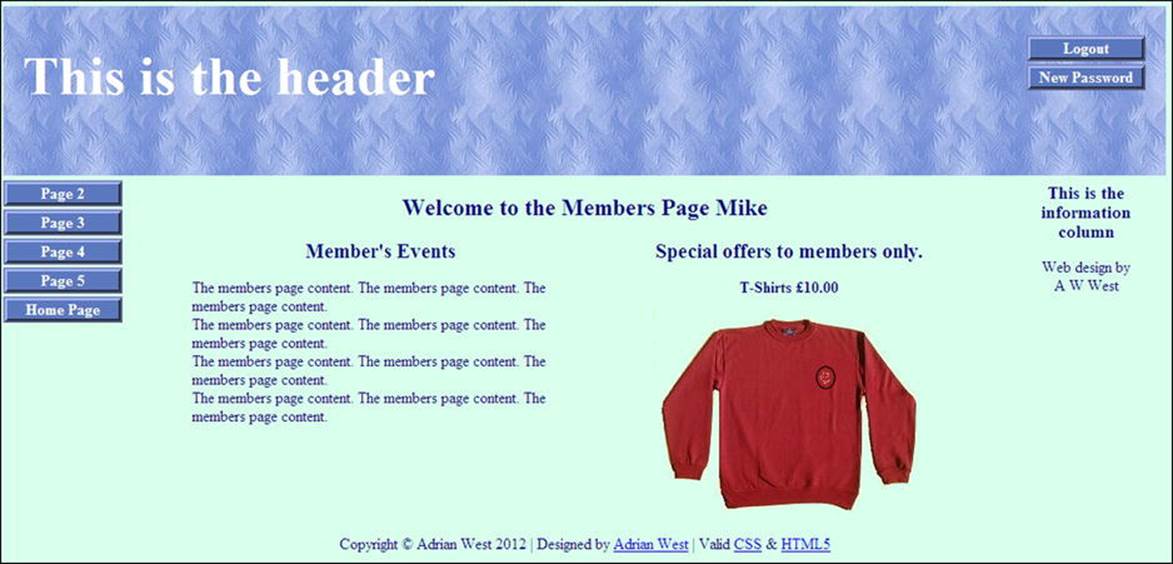
Figure 3-12. The members-only page. Note that the member is welcomed by name
Note the revised members’ header in Figure 3-12.
Also note the session, the redirection to the login page and the included file for the new header shown in bold type in Listing 3-12.
Listing 3-12. Creating the Members Page (members-page.php)
<?php #1
session_start();
if (!isset($_SESSION['user_level']) or ($_SESSION['user_level'] != 0))
{ header("Location: login.php");
exit();
}
?>
<!doctype html>
<html lang=en>
<head>
<title>Members page</title>
<meta charset=utf-8>
<link rel="stylesheet" type="text/css" href="includes.css">
<style type="text/css">
#mid-right-col { text-align:center; margin:auto;
}
#midcol h3 { font-size:130%; margin-top:0; margin-bottom:0;
}
</style>
</head>
<body>
<div id="container">
<?php include("header-members.php"); ?>
<?php include("nav.php"); ?>
<?php include("info-col.php"); ?>
<div id="content"><!-- Start of the member's page content. -->
<?php
echo '<h2>Welcome to the Members Page ';
if (isset($_SESSION['fname'])){
echo "{$_SESSION['fname']}";
}
echo '</h2>';
?>
<div id="midcol">
<div id="mid-left-col">
<h3>Member's Events</h3>
<p>The members page content. The members page content. The members page content. <br>The ![]()
members page content. The members page content. The members page content.<br>The members ![]()
page content. The members page content. The members page content.<br>The members page ![]()
content. The members page content. The members page content.</p>
</div>
<div id="mid-right-col">
<h3>Special offers to members only.</h3>
<p><b>T-Shirts £10.00</b></p>
<img alt="Polo shirt" title="Polo shirt" height="207" src="images/polo.png" ![]()
width="280"><br>
<br>
</div>
</div></div><!-- End of the members page content. -->
</div>
<div id="footer">
<?php include("footer.php"); ?>
</div>
</body>
</html>
Explanation of the Code
<?php #1
session_start();
if (!isset($_SESSION['user_level']) or ($_SESSION['user_level'] != 0))
{ header("Location: login.php");
exit();
}
?>
<!doctype html>
<html lang=en>
<head>
The snippet of PHP code must appear before the first HTML tag. As with all private pages, it begins with the session_start() function. The header redirection statement ensures that if no session was started or the user_level was not zero, the user would be redirected to the login page.
The next section demonstrates the importance of planning. Hasty decisions at this stage can cause major headaches later.
Planning the Administrator’s Role
We now need to plan very carefully by considering what the membership secretary might wish to do with the web site and the database. My assumptions follow.
The membership secretary would want to do the following:
· View the members-only page using his original member’s password
· View the table of members using his administrator’s e-mail and password
· Change the administrator’s password occasionally for extra security
To achieve these aims we need to complete the following tasks:
· Create a new header for the administration page.
· Create the administration page.
The administrator’s requirements will dictate the content of the menu in the header of the administration page.
Later, in Chapters 4 and 5, we will add extra features to incorporate the following requirements:
· Search for and edit members’ details using his administrator’s password. (Say, Miss Jones has just married and her name needs changing to Mrs. Smith.) The Search button has been added to the header, ready for this button to be functional in future chapters.
· Delete records using his administrator’s password (necessary when a member has resigned or died).
· The administrator will also need to know the total number of members—someone is bound to ask him. This will be automatically displayed below the table of members.
We will now create the administrator’s header and a private administrator’s page.
A New Header for the Administration Page
Based on the first part of the preceding plan, the header for the administration page needs four buttons: Logout, View Members, Search, and New Password. The new header embedded in the administrator’s page is shown in Figure 3-13.
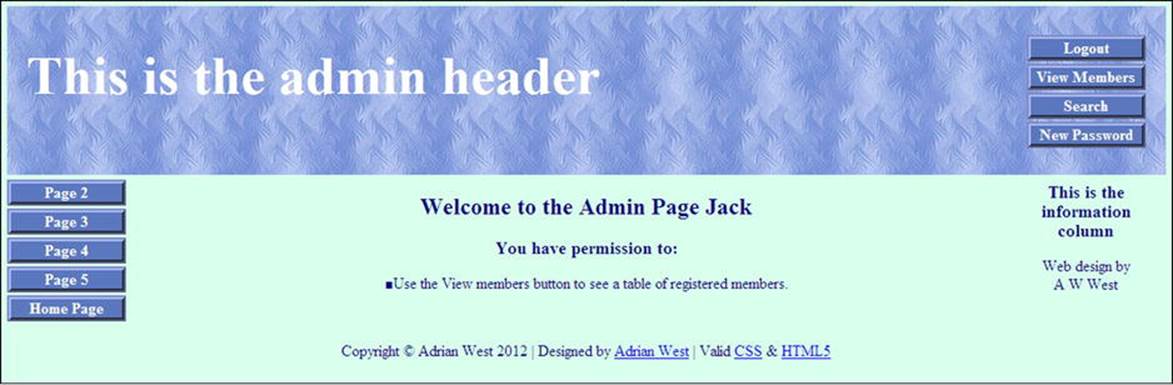
Figure 3-13. The new header is shown embedded in the administrator’s page
The header now has four buttons, and to accommodate the longer text in the heading, the <h1> style width was increased to 600 pixels in the includes.css style sheet. The new Logout and Search buttons are shown in bold type in Listing 3-13a.
Listing 3-13a. Creating the Administration Page Header (header-admin.php)
<div id="header-admin">
<h1>This is the admin header</h1>
<div id="reg-navigation">
<ul>
<li><a href="logout.php">Logout</a></li>
<li><a href="register-view_users-page.php">View Members</a></li>
<li><a href="#">Search</a></li>
<li><a href="register-password.php">New Password</a></li>
</ul>
</div>
</div>
![]() Note The search button does not work because we have not yet created the Search page. We will create the Search page in Chapter 4.
Note The search button does not work because we have not yet created the Search page. We will create the Search page in Chapter 4.
In the next step, we will add the new header and session details to an administration page. The code is shown in Listing 3-13b.
The Administrator’s Page
Listing 3-13b is the code for the administration page.
Listing 3-13b. Creating an Administration Page (admin-page.php)
<?php #1
session_start();
if (!isset($_SESSION['user_level']) or ($_SESSION['user_level'] != 1))
{ header("Location: login.php");
exit();
}
?>
<!doctype html>
<html lang=en>
<head>
<title>Page for administrator</title>
<meta charset=utf-8>
<link rel="stylesheet" type="text/css" href="includes.css">
<style type="text/css">
p { text-align:center; }
</style>
</head>
<body>
<div id="container">
<?php include("header-admin.php"); ?>
<?php include("nav.php"); ?>
<?php include("info-col.php"); ?>
<div id="content"><!-- Start of the member's page content. -->
<?php #2
echo '<h2>Welcome to the Admin Page ';
if (isset($_SESSION['fname'])){
echo "{$_SESSION['fname']}";
}
echo '</h2>';
?>
<div id="midcol">
<h3>You have permission to:</h3><p>■Use the View members button to see
a table of registered members.</p><p> </p>
</div>
</div>
<div id="footer">
<?php include("footer.php"); ?>
</div>
</body>
</html>
Explanation of the Code
<?php #1
session_start();
if (!isset($_SESSION['user_level']) or ($_SESSION['user_level'] != 1))
{ header("Location: login.php");
exit();
}
?>
This is the security guard (session). If the person trying to access the page has not logged in and does not have the right user_level—that is, his user_level is not user_level number 1—he will be unable to open the page and instead he will be redirected to the login page.
<?php #2
echo '<h2>Welcome to the Admin Page ';
if (isset($_SESSION['fname'])){
echo "{$_SESSION['fname']}";
}
echo '</h2>';
?>
If the session detects that the person has the right credentials, the page will open and he will be welcomed by his first name as previously shown in Figure 3-13.
The Logout Page
The next page enables users to log out. The code destroys the session when it is no longer required.
This is not a page that is visible to users. It acts as an intermediary page between the login page and the home page. Listing 3-13c shows the code.
Listing 3-13c. Creating the Logout Code (logout.php)
<?php
session_start();//access the current session. #1
// if no session variable exists then redirect the user
if (!isset($_SESSION['user_id'])) { #2
header("location:index.php");
exit();
//cancel the session and redirect the user:
}else{ //cancel the session #3
$_SESSION = array(); // Destroy the variables.
session_destroy(); // Destroy the session
setcookie('PHPSESSID', ", time()-3600,'/', ", 0, 0);//Destroy the cookie
header("location:index.php");
exit();
}
?>
Explanation of the Code
session_start();//access the current session. #1
The code allows the logged-in user to access the information in the memory of the session that was initiated in the login page. Line #1 links the new page to the information stored in that session.
//if no session variable then redirect the user
if (!isset($_SESSION['user_id'])) { #2
header("location:index.php");
exit();
If the session does not exist, the user is redirected to the home page.
}else{ //cancel the session #3
$_SESSION = array(); // Destroy the variables.
session_destroy(); // Destroy the session itself.
setcookie('PHPSESSID', ", time()-3600,'/', ", 0, 0);//Destroy the cookie
If the session exists, log out by destroying the session and redirecting the user to the home page. A temporary cookie was used to store the session identity (known as the SID). This cookie is also destroyed. The SID was stored in enciphered form by the item called PHPSESSID. The last line in the code block beginning with line #3 will destroy the temporary cookie.
Testing the Login/logout Function
The web designer can access a table of members using phpMyAdmin. It is usual to allow an administrator/membership secretary to view a table of members. The administrator would have very limited powers for security, but he should be able to edit or delete a record. This is covered in the next section.
Start XAMPP, and use a browser to test the login facility. Enter the following URL into the browser’s address field:
http://localhost/login/login.php
You should now be able to load the members’ page for ordinary members. You will also be able to load the administrator’s page when the administrator logs in. The only button that does not yet function is Search. This will be dealt with in Chapter 4. Concerning the administrator’s page, the table view is not very helpful yet because the administrator cannot delete or amend a record. This will be achieved in Chapter 4 by the addition of delete and edit links.
Amending and deleting individual records is easy in phpMyAdmin, but the term Delete is used instead of the term DROP that is used to delete whole tables and databases.
Amending and Deleting Individual Records
The webmaster/developer can amend and delete records as follows:
1. access phpMyAdmin by entering the following into the address field of a browser:
http://localhost/phpmyadmin/.
2. Access the logindb database and then the users table.
3. Select the Browse tab, and you will see the list of registered members. This is shown in Figure 3-14.
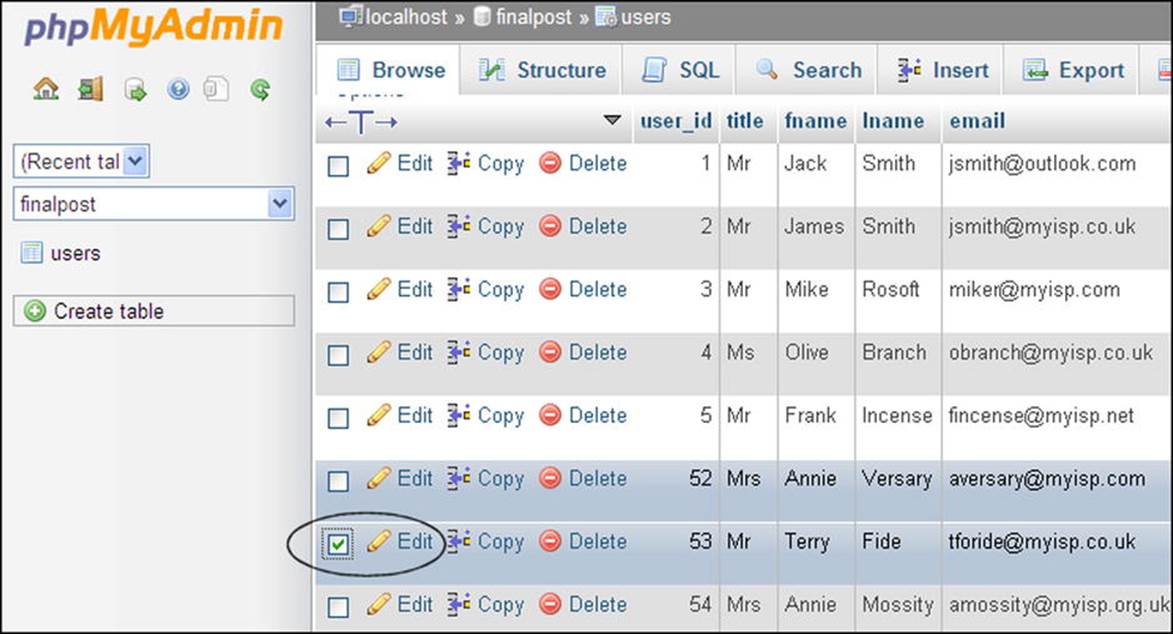
Figure 3-14. Edit or delete an individual record
Find the member’s record to be amended or deleted and select its check box (shown ringed). When you click Edit, you will be presented with a screen that will enable you to amend any item on a record except the password. If you click Delete, you will be asked if you really mean it. You can then decline or accept.
Summary
In this chapter, you tidied the main style sheet so that, where possible, styles were no longer scattered among the included files. You amended various headers to give them more meaningful menu buttons, and you also removed redundant buttons. You discovered how to log in to private pages and how to log out of those special pages. You described a way of differentiating between different types of members by using sessions. You created a members-only page and learned how to use sessions to protect private pages. You learned how to use a session so that only the administrator could access the administrator’s page.
In each tutorial, explanations were provided for the PHP and SQL code. You added a little more security by removing the ability of ordinary members to view the table of members. You prevented unauthorized persons from using a browser to enter the URLs of private pages. You learned how a developer could amend or delete individual records.
In the next chapter, you will learn how the membership secretary/administrator can search, amend, and delete records.