Practical PHP and MySQL Web Site Databases: A Simplified Approach (2013)
Chapter 5. Register Addresses and Phone Numbers
The tutorials in this chapter assume that web site users are applying for membership in an organization that requires a membership fee—for instance, a political party or a conservation society.
Web site databases for such organizations usually require the postal addresses and telephone numbers of their members. Some registration forms have pull-down menus that allow the user to choose a class of membership.
When a registration form has many fields, some will be required fields and some will be optional. This chapter deals with a larger registration form than the previous chapters, and two of the fields are optional. This chapter contains the following sections:
· Create a new database and a table with 17 columns
· The importance of documentation
· Create an extended registration form with a pull-down menu
· Add a PayPal debit/credit card image
· Include PayPal on the “Thank You” page
· Amend the header for the administrator’s page
· Apply pagination to the View_Users table
· Searching and editing records
· Search for a member’s address and phone number
The first step is to create a new database.
Create a New Database and a Table with 17 Columns
Follow these steps to create a new database and a multi-column table:
1. Open the XAMPP htdocs folder, and create a new folder named postal
2. Download the files for Chapter 5 from the book’s web site at www.apress.com, and place the files in htdocs in the new folder called postal.
3. Then use a browser to access phpMyAdmin, click the Databases tab, and create a new database called postaldb.
4. Scroll down, find the newly created database, and select the box alongside it.
5. Click Check Privileges, click Add User, and add a new user and password as follows:
1. User name: jenner, Host: Local Host, and Password: vaccination.
6. Scroll down and click Check All, which is next to the Global Privileges.
7. At the bottom right of the window, leave Resources limits as the default—that is, all zeros.
8. Scroll to the bottom, and click Add User (or on some versions, click Go) to save the user’s details.
9. In the left panel of phpMyAdmin, click your new database postaldb and then create a new table with the name users. Choose 17 columns and then click the Go button.
Create the File for Connecting to the Database
Name the following file mysqli_connect.php, and add it to the postal folder in the htdocs folder:
<?php
// Create a connection to the postaldb database and to MySQL
// Set the encoding to utf-8
// Set the database access details as constants
DEFINE ('DB_USER', 'jenner');
DEFINE ('DB_PASSWORD', 'vaccination');
DEFINE ('DB_HOST', 'localhost');
DEFINE ('DB_NAME', 'postaldb');
// Make the connection
$dbcon = @mysqli_connect (DB_HOST, DB_USER, DB_PASSWORD, DB_NAME) ![]()
OR die ('Could not connect to MySQL: ' . mysqli_connect_error() );
// Set the encoding
mysqli_set_charset($dbcon, 'utf8');
Now create the table with columns and attributes as described in the next section.
Create the Table
We will create a table suitable for a membership database that requires postal addresses and telephone numbers. The database table will also include extra items for the benefit of the administrator. These are class of membership and a field to indicate whether members have paid their subscription fee. The table will have columns with the titles and attributes shown in Table 5-1.
Table 5-1. The titles and attributes for the users table
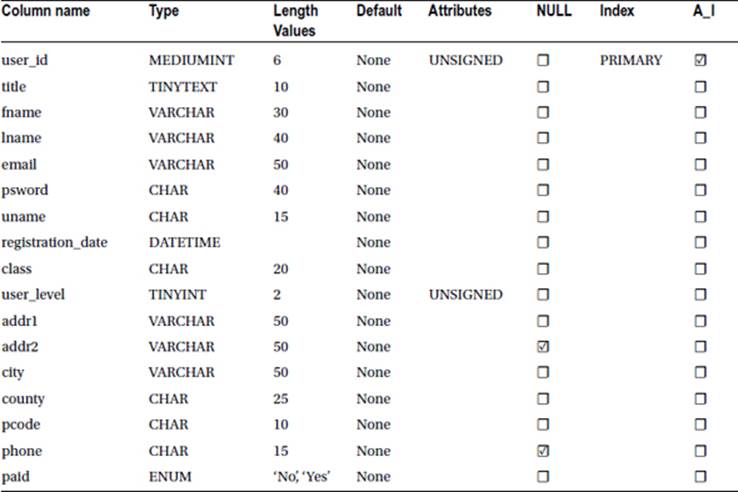
Note that the addr2 (the second address) and phone columns have their NULL boxes selected. This is because they will be optional fields. NULL simply means that a field can be left empty by the user. Many users might not have an additional address (such as a district in a very large town). Some users are ex-directory and do not wish to disclose their telephone numbers in order to reduce the nuisance created by cold-callers.
In the USA, you would naturally change county to state. In the UK, you could omit county because the Royal Mail relies entirely on postal codes for sorting mail.
Using ENUM
ENUM ensures that only those values that you specify can be stored in that cell in the table. The values might be M and F (male and female) or, as in our tutorial, No and Yes. The administrator can enter a lowercase no or yes in the paid column and the ENUM will change the case to No andYes. ENUM need not be limited to two values—many more can be specified . The choices must be separated by commas, and each must be surrounded by single or double quotes. If you choose NOT NULL for the paid column, the first value (No) will be the default. If you select the NULL box for an ENUM column, an empty field will also be a valid value.
The Importance of Documentation
Because the database is becoming increasingly complex, it is imperative that you continue to record everything that you do. If you don’t, you will spend many unhappy hours wondering what you did and why certain changes won’t work. This is especially true with a large number of pages, as in the current project. I keep careful records in a notebook, and I create a flow chart; in fact, I cannot work without a flow chart. Charts often extend over several A4 pages. I print these and paste them together.
My charts show all the pages, page titles, headers, and links between the pages. As the work progresses, I amend the flow chart by correcting faults, adding pages and adding any new features required by the client. Amending the chart as you develop a database-driven web site is vital, and you neglect this at your peril. A flow chart is particularly valuable when working in a team and when troubleshooting during development of the database. Figure 5-1 shows a small section of one of my flow charts.
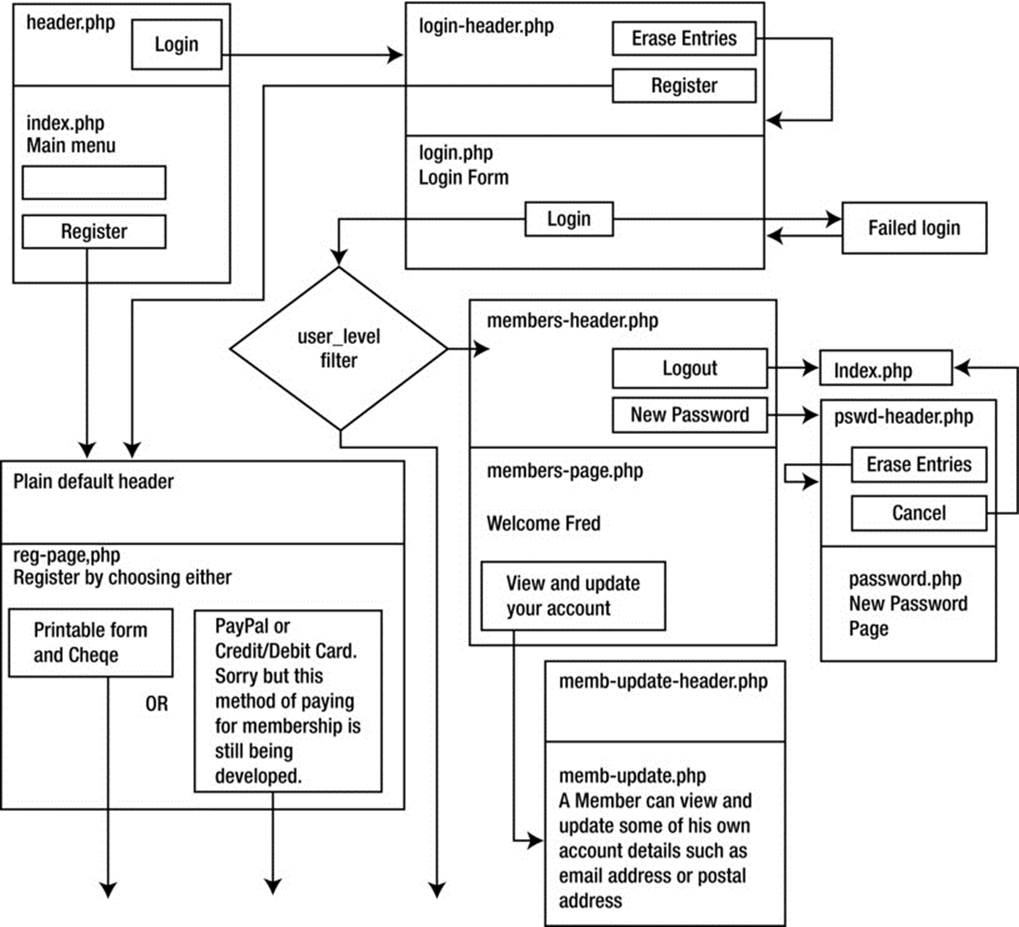
Figure 5-1. A small section of a flow chart
Commercial programs are available for creating flow charts, but I use the drawing toolbar and text boxes in Microsoft Word. The diamond-shaped text box denotes a switch. The switch in the flow chart shown in Figure 5-1 is a filter that detects a member’s user_level and switches him either to the member’s page or to the administrator’s page. Changing the shape of a text box from a rectangle to a diamond is possible in all versions of Word. Type a question in a search engine to determine how to achieve this in your own version of Word. Visio is an expensive alternative; for an excellent free program, try Diagram Designer from the following web site:
http://meesoft.logicnet.dk/
Next, we will create a registration page based on the page used in the previous tutorials, but it will be extended to contain many extra fields. The page will also demonstrate a pull-down selection menu. The registration page will display14 of the 17 fields; the other three fields will be hidden from the user. An internal style will be used because some aspects of the form style will be required only for the form.
Extend the Registration Form, and Add a Pull-down Menu
The extended registration page is shown in Figure 5-2.
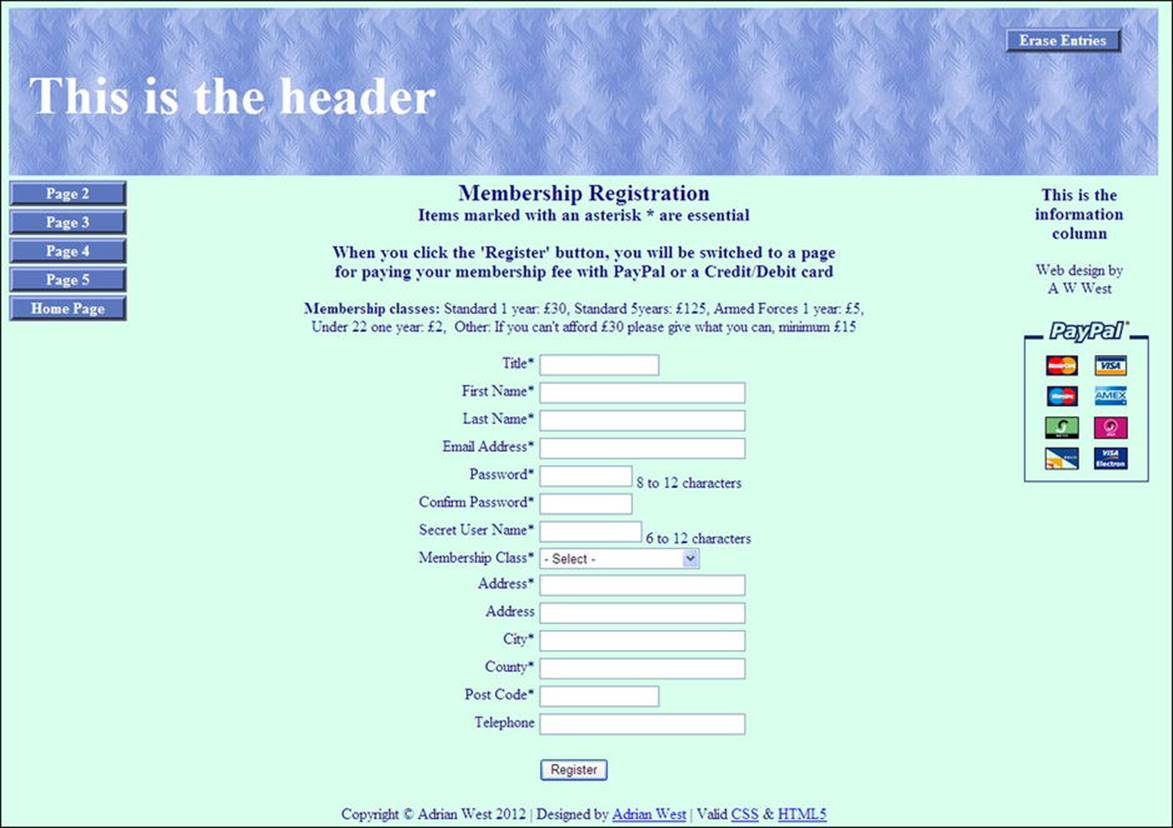
Figure 5-2. The extended registration page
When the fields are filled out correctly and the Register button is clicked, the user will be taken to a Thank you page containing a PayPal payment button and logo. The user can pay the appropriate registration fee by PayPal or by debit/credit card.
Always Announce Prices and Fee Payments Up Front
Always declare up front the full cost and the available payment methods. This is now a legal requirement in the UK. In other parts of the world, this might not be a legal requirement, but you should always declare all costs in advance. Users become very irritated if extra costs are suddenly announced at the end of a transaction. They will usually close your web site without paying. As well as stating the cost, we will add an image supplied by PayPal showing the various acceptable credit cards. However, users will not be able to pay until they submit the registration form and theThank You page appears,
The registration page now contains 14 visible fields and three hidden fields. The hidden fields are user_id, registration_date, and paid. Hidden fields are not visible on the page that is displayed on the user’s screen because they are relevant only to the administrator. The page will also contain a pull-down menu. The new fields and the new internal styling are shown in bold type in Listing 5-2.
Listing 5-2. Creating the New Registration Page with 14 Visible Fields (register-page.php)
<!doctype html>
<html lang=en>
<head>
<title>Register page</title>
<meta charset=utf-8>
<link rel="stylesheet" type="text/css" href="includes.css">
<style type="text/css"> #1
#midcol { width:98%; margin:auto; }
input, select { margin-bottom:5px; }
h2 { margin-bottom:0; margin-top:5px};
h3.content { margin-top:0; }
.cntr { text-align:center; }
</style>
</head>
<body>
<div id="container">
<?php include("register-header.php"); ?>
<?php include("nav.php"); ?>
<?php include("info-col-cards.php"); ?>
<div id="content"><!--The registration page content begins-->
<?php
// This code inserts a record into the users table
require ('mysqli_connect.php'); // Connect to the database
// Has the form been submitted?
if ($_SERVER['REQUEST_METHOD'] == 'POST') {
$errors = array(); // Start an array to hold the errors
// Check for a title:
if (empty($_POST['title'])) {
$errors[] = 'You forgot to enter your title.';
} else { $title = mysqli_real_escape_string($dbcon, trim($_POST['title']));
}
// Check for a first name
if (empty($_POST['fname'])) {
$errors[] = 'You forgot to enter your first name.';
} else { $fn = mysqli_real_escape_string($dbcon, trim($_POST['fname']));
}
// Check for a last name
if (empty($_POST['lname'])) {
$errors[] = 'You forgot to enter your last name.';
} else { $ln = mysqli_real_escape_string($dbcon, trim($_POST['lname']));
}
// Check for an email address
if (empty($_POST['email'])) {
$errors[] = 'You forgot to enter your email address.';
} else {
$e = mysqli_real_escape_string($dbcon, trim($_POST['email']));
}
// Check for a password and match it against the confirmation password
if (!empty($_POST['psword1'])) {
if ($_POST['psword1'] != $_POST['psword2']) {
$errors[] = 'Your two passwords did not match.';
} else { $p = mysqli_real_escape_string($dbcon, trim($_POST['psword1']));
}
} else { $errors[] = 'You forgot to enter your password.';
}
if (empty($_POST['uname'])) {
$errors[] = 'You forgot to enter your secret username.';
} else {
$uname = trim($_POST['uname']);
}
// Check for a membership class
if (empty($_POST['class'])) {
$errors[] = 'You forgot to enter your membership class';
} else { $class = trim($_POST['class']);
}
// Check for address1
if (empty($_POST['addr1'])) {
$errors[] = 'You forgot to enter your address.';
} else { $ad1 = mysqli_real_escape_string($dbcon, trim($_POST['addr1']));
}
// Check for address2 #2
if (!empty($_POST['addr2'])) {
$ad2 = mysqli_real_escape_string($dbcon, trim($_POST['addr2']));
}else{ $ad2 = NULL;
}
}
// Check for city
if (empty($_POST['city'])) {
$errors[] = 'You forgot to enter your City.';
} else { $cty = mysqli_real_escape_string($dbcon, trim($_POST['city']));
}
// Check for the county
if (empty($_POST['county'])) {
$errors[] = 'You forgot to enter your county.';
} else { $cnty = mysqli_real_escape_string($dbcon, trim($_POST['county']));
}
// Check for the post code
if (empty($_POST['pcode'])) {
$errors[] = 'You forgot to enter your post code.';
} else { $pcode = mysqli_real_escape_string($dbcon, trim($_POST['pcode']));
}
// Check for the phone number
if (!empty($_POST['phone'])) {
$ph = mysqli_real_escape_string($dbcon, trim($_POST['phone']));
}else
$ph = NULL;
}
if (empty($errors)) { // If there were no errors
//Determine whether the email address has already been registered #3
$q = "SELECT user_id FROM users WHERE email = '$e' ";
$result=mysqli_query ($dbcon, $q) ;
if (mysqli_num_rows($result) == 0){//The mail address has not been registered![]()
already therefore register the user in the users table
// Make the query:
$q = "INSERT INTO users (user_id, title, fname, lname, email, psword, registration_date,![]()
uname, class, addr1, addr2, city, county, pcode, phone, paid) VALUES (' ', '$title', '$fn',![]()
'$ln', '$e', SHA1('$p'), NOW(), '$uname', '$class', '$ad1', '$ad2', '$cty', '$cnty',![]()
'$pcode', '$ph', '$pd' )";
$result = @mysqli_query ($dbcon, $q); // Run the query.
if ($result) { // If it ran OK
header ("location: register-thanks.php");
exit();
} else { // If it failed to run
// Error message:
echo '<h2>System Error</h2>
<p class="error">Registration failed because of a system error. We apologize![]()
for any inconvenience.</p>';
// Debugging message:
echo '<p>' . mysqli_error($dbcon) . '<br><br>Query: ' . $q . '</p>';
} // End of if ($result)
mysqli_close($dbcon); // Close the database connection
// Include the footer and stop the script
include ('footer.php');
exit();
}else{//The email address is already registered #4
echo '<p class="error">The email address is not acceptable because it is already![]()
registered</p>';
}
} else { // Report the errors
echo '<h2>Error!</h2>
<p class="error">The following error(s) occurred:<br>';
foreach ($errors as $msg) { // Print each error.
echo " - $msg<br>\n";
}
echo '</p><h3>Please try again.</h3><p><br></p>';
}// End of if (empty($errors))
} // End of the submit conditional
?>
<div id="midcol">
<h2>Membership Registration</h2>
<h3 class="content">Items marked with an asterisk * are essential</h3>
<p class="cntr"><b>Membership classes:</b> Standard 1 year: 30, Standard 5years:![]()
125, Armed Forces 1 year: 5,
<br>Under 21 one year: 2, Other: If you can't afford 30 please give![]()
what you can, minimum 15</p>
<form action="register-page.php" method="post">
<label class="label" for="title">Title*</label>
<input id="title" type="text" name="title" size="15" maxlength="12"![]()
value="<?php if (isset($_POST['title'])) echo $_POST['title']; ?>">
<br><label class="label" for="fname">First Name*</label>É
<input id="fname" type="text" name="fname" size="30" maxlength="30" ![]()
value="<?php if (isset($_POST['fname'])) echo $_POST['fname']; ?>">
<br><label class="label" for="lname">Last Name*</label>É
input id="lname" type="text" name="lname" size="30" maxlength="40" ![]()
value="<?php if (isset($_POST['lname'])) echo $_POST['lname']; ?>">
<br><label class="label" for="email">Email Address*</label>É
<input id="email" type="text" name="email" size="30" maxlength="60" ![]()
value="<?php if (isset($_POST['email'])) echo $_POST['email']; ?>" >
<br><label class="label" for="psword1">Password*</label>É
<input id="psword1" type="password" name="psword1" size="12" maxlength="12" ![]()
value="<?php if (isset($_POST['psword1'])) echo $_POST['psword1']; ?>" >![]()
8 to 12 characters
<br><label class="label" for="psword2">Confirm Password*</label>É
<input id="psword2" type="password" name="psword2" size="12" maxlength="12" ![]()
value="<?php if (isset($_POST['psword2'])) echo $_POST['psword2']; ?>" >
<!--The pull-down menu-->
<br><label class="label" for="class">Membership Class*</label> #5
<select name="class">
<option value="">- Select -</option>
<option value="30"<?php if (isset($_POST['class']) AND ($_POST['class'] == '30'))
echo ' selected="selected"'; ?>>Standard 1 year 30</option>
<option value="125"<?php if (isset($_POST['class']) AND ($_POST['class'] == '125'))
echo ' selected="selected"'; ?>>Standard 5 years 125</option>
<option value="5"<?php if (isset($_POST['class']) AND ($_POST['class'] == '5'))
echo ' selected="selected"'; ?>>Armed Forces 1 year 5</option>
<option value="2"<?php if (isset($_POST['class']) AND ($_POST['class'] == '2'))
echo ' selected="selected"'; ?>>Under 22 1 year 2**</option>
<option value="15"<?php if (isset($_POST['class']) AND ($_POST['class'] == '15'))
echo ' selected="selected"'; ?>>Minimum 1 year 15</option>
</select
<br><label class="label" for="addr1">Address*</label>![]()
<input id="addr1" type="text" name="addr1" size="30" maxlength="30"![]()
value="<?php if (isset($_POST['addr1'])) echo $_POST['addr1']; ?>">
<br><label class="label" for="addr2">Address</label>É
<input id="addr2" type="text" name="addr2" size="30" maxlength="30"![]()
value="<?php if (isset($_POST['addr2'])) echo $_POST['addr2']; ?>">
<br><label class="label" for="city">City*</label>É
<input id="city" type="text" name="city" size="30" maxlength="30"![]()
value="<?php if (isset($_POST['city'])) echo $_POST['city']; ?>">
<br><label class="label" for="county">County*</label>É
<input id="county" type="text" name="county" size="30" maxlength="30"![]()
value="<?php if (isset($_POST['county'])) echo $_POST['county']; ?>">
<br><label class="label" for="pcode">Post Code*</label>É
<input id="pcode" type="text" name="pcode" size="15" maxlength="15"![]()
value="<?php if (isset($_POST['pcode'])) echo $_POST['pcode']; ?>">
<br><label class="label" for="phone">Telephone</label>
<input id="phone" type="text" name="phone" size="30" maxlength="30"![]()
value="<?php if (isset($_POST['phone'])) echo $_POST['phone']; ?>">
<p><input id="submit" type="submit" name="submit" value="Register"></p>
</form>
</div>
</div>
</div>
<?php include ('footer.php'); ?>
<!-- End of the page content -->
</body>
</html>
Explanation of the Code
<style type="text/css"> #1
input, select { margin-bottom:5px; }
h2 { margin-bottom:0; }
h3.content { margin-top:0; }
.cntr { text-align:center; }
</style>
The internal styling differs slightly from the main style to ensure that the subheadings are centered. These styles overwrite the main style.
// Check for address2 #2
if (!empty($_POST['addr2'])) {
$ad2 = mysqli_real_escape_string($dbcon, trim($_POST['addr2']));
}else{ $ad2 = NULL;
}
You will not have seen this pattern before. The second address field is not a required field. On the form displayed, it has no asterisk because it can be deliberately left empty by the user. In the code, the exclamation mark in front of the word empty is important, The expression !emptymeans “not empty.” However, if the user entered a second address, that address is assigned to the variable $ad2. If the field is empty, no error message is generated and the key word NULL has been assigned to the variable $ad2. NULL means that the field can be left empty without generating an error message. If the registration form field for addr2 is empty, the addr2 cell in the database table will be empty. Examine the rest of the code and see if you can find the same pattern being used for another optional field.
//Determine whether the email address has already been registered #3
$q = "SELECT user_id FROM users WHERE email = '$e' ";
$result=mysqli_query ($dbcon, $q) ;
if (mysqli_num_rows($result) == 0){//The mail address has not been registered![]()
already therefore register the user in the users table
The code checks whether the e-mail address is already in the database table. If it is not, the user is registered.
}else{//The email address is already registered #4
echo '<p class="error">The email address is not acceptable because it is already![]()
registered</p>';
}
This concludes the statement begun in line #3. If the e-mail address is already present in the database table, this else statement pauses the script and displays an error message. Duplicate e-mail addresses are not acceptable. This raises another problem: suppose a husband and wife both wish to register, and they share an e-mail address. This is best dealt with by having a membership class for a couple or even a family.
<br><label class="label" for="class">Membership Class*</label> #5
<select name="class">
<option value="">- Select -</option>
<option value="30"<?php if (isset($_POST['class']) AND ($_POST['class'] == '30'))
echo ' selected="selected"'; ?>>Standard 1 year 30</option>
<option value="125"<?php if (isset($_POST['class']) AND ($_POST['class'] == '125'))
echo ' selected="selected"'; ?>>Standard 5 years 125</option>
<option value="5"<?php if (isset($_POST['class']) AND ($_POST['class'] == '5'))
echo ' selected="selected"'; ?>>Armed Forces 1 year 5</option>
<option value="2"<?php if (isset($_POST['class']) AND ($_POST['class'] == '2'))
echo ' selected="selected"'; ?>>Under 22 1 year 2**</option>
<option value="15"<?php if (isset($_POST['class']) AND ($_POST['class'] == '15'))
echo ' selected="selected"'; ?>>Minimum 1 year 15</option>
</select
The code uses the echo function to produce a sticky field for the pull-down menu, as shown in Figure 5-3.
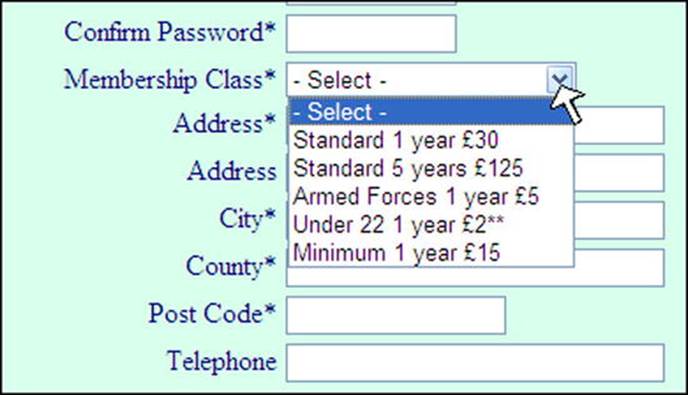
Figure 5-3. The pull-down menu for selecting the class of membership
If the user fails to choose one of the options, an error message is generated and inserted into the $errors array. The field containing the text - Select - is the same as an empty field because it has an empty variable value assigned to it. As a result, it generates an error message saying the user forgot to enter a membership class.
Sticky Fields for a Pull-down Menu
The pull-down menu in the register page detailed in Listing 5-1 had sticky field codes. A simple pull-down menu is unable to retain the entry for the class of membership. The non-sticky code is as follows:
<br><label class="label" for="class">Membership Class*</label>
<select name="class">
<option value="">- Select -</option>
<option value="30">Standard 1 year 30</option>
<option value="125">Standard 5 years 125</option>
<option value="5">Armed Forces 1 year 5</option>
<option value="2">Under 22 1 year 2**</option>
<option value="15">Minimum 1 year 15</option>
</select>
The code can be made sticky using the amendments shown in bold type in the next snippet. This snippet is not available separately in the downloadable files.
Code Snippet for a Sticky Pull-down Menu
<br><label class="label" for="class">Membership Class*</label>
<select name="class">
<option value="">- Select -</option>
<option value="30"<?php if (isset($_POST['class']) AND ($_POST['class'] == '30'))
echo ' selected="selected"'; ?>>Standard 1 year 30</option>
<option value="125"<?php if (isset($_POST['class']) AND ($_POST['class'] == '125'))
echo ' selected="selected"'; ?>>Standard 5 years 125</option>
<option value="5"<?php if (isset($_POST['class']) AND ($_POST['class'] == '5'))
echo ' selected="selected"'; ?>>Armed Forces 1 year 5</option>
<option value="2"<?php if (isset($_POST['class']) AND ($_POST['class'] == '2'))
echo ' selected="selected"'; ?>>Under 22 1 year 2**</option>
<option value="15"<?php if (isset($_POST['class']) AND ($_POST['class'] == '15'))
echo ' selected="selected"'; ?>>Minimum 1 year 15</option>
</select
The extended registration page informs the user that membership fees can be paid using PayPal or a debit/credit card. This is achieved pictorially using a PayPal image in the information column on the right side, as described in the next section.
Add PayPal Debit/Credit Card Images
The image can be downloaded from the PayPal web site and added to a new version of the info column. The result is shown in Figure 5-4.

Figure 5-4. The revised info column
Listing 5-2 is the code for the new info column.
Listing 5-2. Create the Info Column with PayPal Image (info-col-cards.php)
<div id="info-col">
<h3>This is the information column</h3>
<p>Web design by <br>A W West</p>
<img alt="Pay by PayPal or Credit card" title="Pay by PayPal ![]()
or Credit card" src="images/vertical_solution_PP.png">
</div>
The new info-col-cards.php file will be included only in the registration page and Thank You page. All the other pages have no need for this information; therefore, they will include the original info-col.php.
The Header for the Registration Page
The header for the registration page has only one menu button. The code is given in the next snippet.
The Snippet of Code for Creating the Header for the Registration Page (register-header.php)
<div id="header">
<h1>This is the header</h1>
<div id="reg-navigation">
<ul>
<li><a href="register-page.php">Erase Entries</a></li>
</ul>
</div>
</div>
The “Thank You” page includes a PayPal button for paying the membership fee. This will now be described.
Include PayPal on the Thank You Page
A payment method will now be added to the Thank You page. This is shown in Figure 5-5.
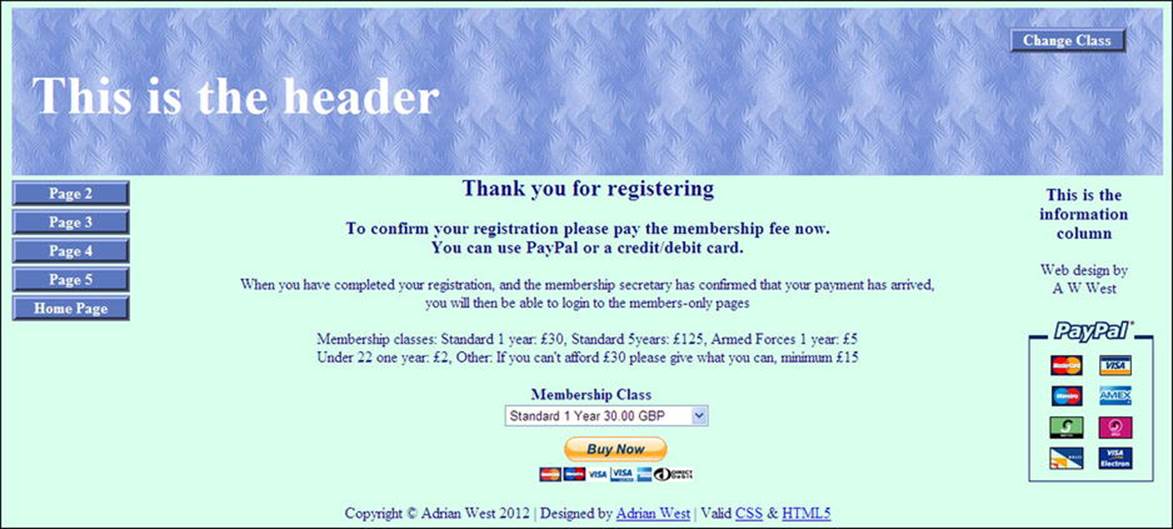
Figure 5-5. A PayPal link added to the Thank You page
The Thank You page from the previous chapter forms the basis of the new page. The user’s membership application will be recorded in the database, but the Paid cell will contain the default value No. This is because the Paid item is an ENUM hidden from the user. The administrator is the only person allowed to enter data in that field. The administrator will change the Paid cell to Yes when he receives an e-mail from PayPal confirming the payment. The PayPal e-mail also provides the new member’s postal address and e-mail address. If the administrator is satisfied that the details match the information that the user entered in the database, he will amend the member’s record.
We are using PayPal in the Thank You page because it is the most popular payment system and it is free. A web site owner can sign up at the paypal.com page (or paypal.co.uk page), and she will be given a merchant ID and the option to generate and copy a snippet of code to embed the payment link in her page. If the owner already has a PayPal account, she can log in and then go to My Profile and My Business Info, where she can find her Merchant Account ID. That ID will enable her to access the appropriate page to generate the code to embed in her page. Listing 5-5apresents the code for the Thank You page.
Listing 5-5a. Creating a Combined Thank You and PayPal Payment Page (register-thanks.php)
<!doctype html>
<html lang=en>
<head>
<title>Registration thank-you page</title>
<meta charset=utf-8>
<link rel="stylesheet" type="text/css" href="includes.css">
<style type="text/css">
p { text-align:center; }
table, tr, td, form { margin:auto; width:180px; text-align:center; border:0; }
form input { margin:auto; }
img { border:none; }
input.fl-left { float:left; }
#submit { float:left; }
</style>
</head>
<body>
<div id="container">
<?php include("header-thanks.php"); ?>
<?php include("nav.php"); ?>
<?php include("info-col-cards.php"); ?>
<div id="content"><!-- Start of the thank you page content. -->
<div id="midcol">
<h2>Thank you for registering</h2>
<h3>To complete your registration please pay the membership fee now. ![]()
<br>You can use PayPal or a credit/debit card.</h3>
<p>When you have completed your registration and the membership secretary ![]()
has confirmed that your payment has arrived,<br>you will then be able to login to the ![]()
members-only pages</p>
<!--Explain the cost of membership-->
<p>Membership classes: Standard 1 year: £30, Standard 5years: £125, ![]()
Armed Forces 1 year: £5<br>
Under 22 one year: £2, Other: If you can't afford £30 ![]()
please give what you can, minimum £15
</p>
<!--Insert the code generated by PayPal-->
<form action="https://www.paypal.com/cgi-bin/webscr" method="post"> #1
<input type="hidden" name="cmd" value="_s-xclick">
<input type="hidden" name="hosted_button_id" value="XXXXXXXXXXXXX">
<table>
<tr><td><input type="hidden" name="on0" value="Membership Class"><b>Membership ![]()
Class</b></td></tr>
<tr><td>
<select name="os0">
<option value="Standard 1 Year 30">Standard 1 Year 30.00 GBP</option>
<option value="Standard 5 Year 125">Standard 5 Year 125.00 GBP</option>
<option value="Armed Forces 1 Year ;5">Armed Forces 1 Year 5.00 GBP</option>
<option value="Under 22 1 Year 2">Under 22 1 Year 2.00 GBP</option>
<option value="Other 1 Year 15 Min">Other 1 Year 15.00 GBP</option>
</select>
</td></tr>
</table>
<input type="hidden" name="currency_code" value="GBP">
<input style="margin:10px 0 0 40px" type="image" ![]()
src="https://www.paypalobjects.com/en_US/GB/i/btn/btn_buynowCC_LG.gif" name="submit" ![]()
alt="PayPal — The safer, easier way to pay online.">
<img alt="" src="https://www.paypalobjects.com/en_GB/i/scr/pixel.gif" width="1" height="1">
</form>
</div>
<!--End of code generated by PayPal-->
</div></div>
<!-- End of the thank-you page content. -->
<?php include("footer.php"); ?>
</body>
</html>
Explanation of the Code
<!--Insert the code generated by PayPal-->
<form action="https://www.paypal.com/cgi-bin/webscr" method="post"> #1
<input type="hidden" name="cmd" value="_s-xclick">
<input type="hidden" name="hosted_button_id" value="XXXXXXXXXXXXX">
This is a small portion of the code generated by PayPal. For security I have used a dummy value for the PayPal ID for this tutorial. PayPal provides a 13-character ID code.
The header now has no menu buttons because until the registrant’s payment is received. The registrant can only access the home page. The home page is accessible from the main menu. The header code is given in Listing 5-5b.
Listing 5-5b. The Header for the “Thank You” Page (header-thanks.php)
<div id="header">
<h1>This is the header</h1>
<div id="reg-navigation">
<p> </p>
<ul>
<li><a href="register-thanks.php">Change Class</a></li>
</ul>
</div>
</div>
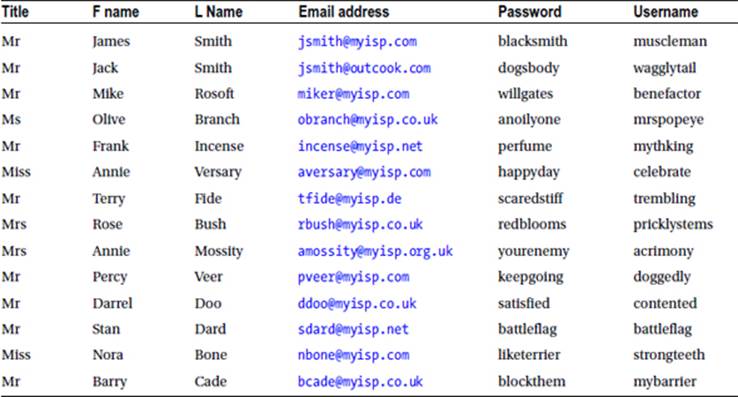
Before we go any further, you need to register some extra members.
Register Some Members
![]() Tip Entering the data can be tedious. To reduce the tedium in this tutorial, the addresses and telephone numbers can be identical for each entry. A set of suitable data is suggested next.
Tip Entering the data can be tedious. To reduce the tedium in this tutorial, the addresses and telephone numbers can be identical for each entry. A set of suitable data is suggested next.
When experimenting, I use the following data in every record. This is acceptable because no searches are made using addresses and telephone numbers:
Address 1: 2 The Street
Address 2: The Village (optional and should be omitted in some records)
City: Townsville
County or State: Devon (or CA, for example, if a USA state)
Post or Zip code: EX7 9PP (or a USA zip code)
Phone: 01234 777 888 (optional, and you should omit it in some records)
Register the following members
Table 5-2. Some members’ names
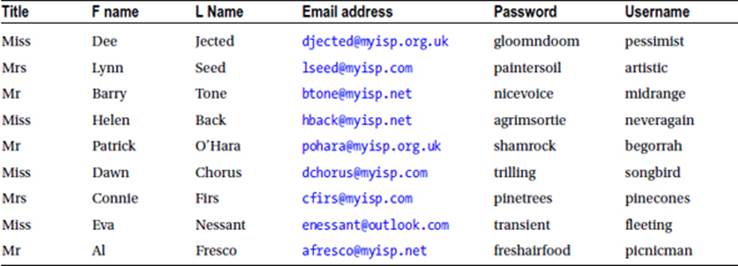
If you later require more data to play with, some suggestions are given in Table 5-3.
Table 5-3. Some additional suggestions for registrations
![]() Important Jack Smith will once again act as the administrator. Enter http://localhost/phpmyadmin in the address field of a browser, access the users table, browse, and then change Jack Smith’s user_level from 0 to 1. Also, be sure to use phpMyAdmin to change the administrator’s paid column to Yes. Change some other members’ paid columns to Yes and some to No. Remember that if you can’t log in to a member’s account, it is probably because his paid column is not set to Yes. This is as it should be.
Important Jack Smith will once again act as the administrator. Enter http://localhost/phpmyadmin in the address field of a browser, access the users table, browse, and then change Jack Smith’s user_level from 0 to 1. Also, be sure to use phpMyAdmin to change the administrator’s paid column to Yes. Change some other members’ paid columns to Yes and some to No. Remember that if you can’t log in to a member’s account, it is probably because his paid column is not set to Yes. This is as it should be.
A Small Amendment to the Login Page
The login page (included in the downloaded files) is almost the same as the one in the previous chapter, except that we must prevent an applicant from accessing the members-only pages before the administrator has received the membership fee. The following snippet of code shows in bold type the amendment to the query:
$q = "SELECT user_id, fname, user_level FROM users ![]()
WHERE (email='$e' AND psword=SHA1('$p')AND paid='Yes')";
The error message is also modified as follows:
echo '<p class="error">The email address and password do not match our ![]()
records.<br>Perhaps your fee has not yet arrived from PayPal.<br>If you need to ![]()
register, click the Register button on the header menu</p>';
We must now alter the administrator’s pages to match the extra columns. For instance, the membership secretary (administrator) might wish to update whether the members have paid their fees or amend an address or a telephone number. For example, Miss Eva Nessant might have just married Fred Bloggs and asked for her record to be changed to Mrs. Eva Bloggs. Her address and telephone number might also change. In Chapter 7, we will lighten the administrator’s workload and allow the members to update their own records.
In this chapter, a change will be made to the administration page’s header to incorporate a new button. The page content for the administrator will be similar to the previous tutorials except for some additional helpful hints for the administrator.
Amend the Administrator’s Header
To avoid having a mile-wide table display, the large number of columns will be split into two separate displays: one relating to membership details, and the other relating to members’ addresses and telephone numbers. A new search facility is required so that the members’ addresses can be displayed in their own table. This will be launched by means of a new button on the header menu labeled Addresses.
This, in turn, means we need a modified header that includes the Addresses button, as shown in Figure 5-6. Because the header is the launch pad, we will begin by listing the new header.

Figure 5-6. The new header containing the new Addresses button
The new addresses button is shown in bold type in Listing 5-6.
Listing 5-6. Installing a New Addresses Button in the Header (header-admin.php)
<div id="header-admin">
<h1>This is the admin header</h1>
<div id="reg-navigation">
<ul>
<li><a href="logout.php">Logout</a></li>
<li><a href="admin_view_users.php">View Members</a></li>
<li><a href="search.php">Search</a></li>
<i><a href="search_addresses.php">Addresses</a></li>
<li><a href="register-password.php">New Password</a></li>
</ul>
</div>
</div>
![]() Note The link will not work until we have produced the search_addresses.php page. We will do this later in the chapter.
Note The link will not work until we have produced the search_addresses.php page. We will do this later in the chapter.
The table displayed by the admin_view_users.php file needs the two extra columns class and paid.
Apply Pagination to the admin_view_users Table
From the administrator’s point of view, the admin_view_users table needs to be revised to show some of the new columns. The paginated table needs to display the columns shown in Figure 5-7.
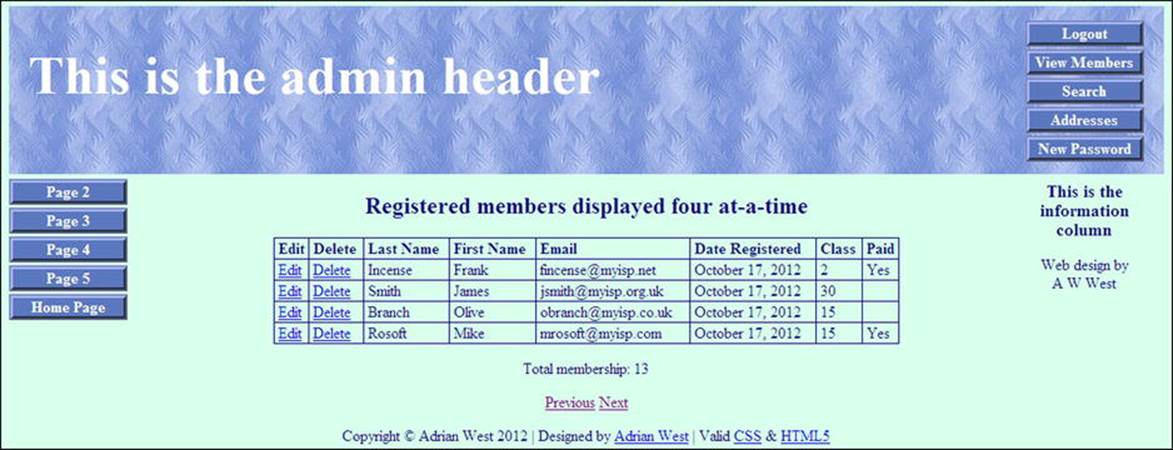
Figure 5-7. The new table display. Note the new Class and Paid columns
To save you the tedious task of entering a huge number of registrations, each table display has again been limited to four records. In a real-world situation, you would display about 20 to 25 rows per page. Figure 5-7 shows the table display with two extra columns.
The amendments to the code are shown in bold type in Listing 5-7. Because this is an administrator’s page, we must protect it with the session details.
Listing 5-7. Creating the Paginated Table to Display Two Extra Columns (admin_view_users.php)
<?php #1
session_start();
if (!isset($_SESSION['user_level']) or ($_SESSION['user_level'] != 1))
{ header("Location: login.php");
exit();
}
?>
<!doctype html>
<html lang=en>
<head>
<title>View users page for an administrator</title>
<meta charset=utf-8>
<link rel="stylesheet" type="text/css" href="includes.css">
<style type="text/css">
p { text-align:center; }
</style>
</head>
<body>
<div id="container">
<?php include("header-admin.php"); ?>
<?php include("nav.php"); ?>
<?php include("info-col.php"); ?>
<div id="content"><!-- Start of the display page -->
<h2>Registered members are displayed four rows at-a-time</h2>
<p>
<?php
// This script retrieves all the records from the users table
require ('mysqli_connect.php'); // Connect to the database
//set the number of rows per display page
$pagerows = 4;
// Has the total number of pagess already been calculated?
if (isset($_GET['p']) && is_numeric
($_GET['p'])) {//already been calculated
$pages=$_GET['p'];
}else{//use the next block of code to calculate the number of pages
//First, check for the total number of records
$q = "SELECT COUNT(user_id) FROM users";
$result = @mysqli_query ($dbcon, $q);
$row = @mysqli_fetch_array ($result, MYSQLI_NUM);
$records = $row[0];
//Now calculate the number of pages
if ($records > $pagerows){ //if the number of records will fill more than one page
//Calculatethe number of pages and round the result up to the nearest integer
$pages = ceil ($records/$pagerows);
}else{ $pages = 1;
}
}//page check finished
//Declare which record to start with
if (isset($_GET['s']) && is_numeric
($_GET['s'])) {//already been calculated
$start = $_GET['s'];
}else{
$start = 0;
}
// Make the query #2
$q = "SELECT lname, fname, email, DATE_FORMAT(registration_date, '%M %d, %Y') ![]()
É
AS regdat, class, paid, user_id FROM users ORDER BY registration_date ![]()
DESC LIMIT $start, $pagerows";
$result = @mysqli_query ($dbcon, $q); // Run the query
$members = mysqli_num_rows($result);
if ($result) { // If it ran without a problem, display the records #3
// Table header
echo '<table>
<tr><td><b>Edit</b></td>
<td><b>Delete</b></td>
<td><b>Last Name</b></td>
<td><b>First Name</b></td>
<td><b>Email</b></td>
<td><b>Date Registered</b></td>
<td><b>Class</b></td>
<td><b>Paid</b></td>
</tr>';
// Fetch and display all the records #4
while ($row = mysqli_fetch_array($result, MYSQLI_ASSOC)) {
echo '<tr>
<td><a href="edit_record.php?id=' . $row['user_id'] . '">Edit</a></td>
<td><a href="delete_record.php?id=' . $row['user_id'] . '">Delete</a></td>
<td>' . $row['lname'] . '</td>
<td>' . $row['fname'] . '</td>
<td>' . $row['email'] . '</td>
<td>' . $row['regdat'] . '</td>
<td>' . $row['class'] . '</td>
<td>' . $row['paid'] . '</td>
</tr>';
}
echo '</table>'; // Close the table.
mysqli_free_result ($result); // Free up the resources
} else { // If a problem is encountered
// Display message
echo '<p class="error">The current record could not be retrieved. ![]()
We apologize for any inconvenience.</p>';
// Debugging message
echo '<p>' . mysqli_error($dbcon) . '<br><br>Query: ' . $q . '</p>';
} // End of if ($result).
//Now display the total number of records/members
$q = "SELECT COUNT(user_id) FROM users";
$result = @mysqli_query ($dbcon, $q);
$row = @mysqli_fetch_array ($result, MYSQLI_NUM);
$members = $row[0];
mysqli_close($dbcon); // Close the database connection
echo "<p>Total membership: $members</p>";
if ($pages > 1) {
echo '<p>';
//What number is the current page?
$current_page = ($start/$pagerows) + 1;
//If the page is not the first page then create a ‘Previous’ link
if ($current_page != 1) {
echo '<a href="admin_view_users.php?s=' . ($start - $pagerows) . '&p=' . $pages . '">Previous</a> ';
}
//Create a ‘Next’ link
if ($current_page != $pages) {
echo '<a href="admin_view_users.php?s=' . ($start + $pagerows) . '&p=' . $pages . '">![]()
Next</a> ';
}
echo '</p>';
}
?>
</div><!-- End of administration page content -->
<?php include("footer.php"); ?>
</div>
</body>
</html>
Explanation of the Code
<?php #1
session_start();
if (!isset($_SESSION['user_level']) or ($_SESSION['user_level'] != 1))
{
header("Location: login.php");
exit();
}
?>
A security guard (a session) must be added to the beginning of every administration page.
// Make the query #2
$q = "SELECT lname, fname, email, DATE_FORMAT(registration_date, '%M %d, %Y') ![]()
AS regdat, class, paid, user_id FROM users ORDER BY registration_date É
DESC LIMIT $start, $pagerows";
The two columns class and paid are added to the SELECT query. The rows are again ordered by registration date, but now they will be in descending order (DESC) because our imaginary administrator prefers to view the latest registrations at the top of the table.
if ($result) { // If it ran without a problem, display the records #3
// Table header
echo '<table>
<tr><td><b>Edit</b></td>
<td><b>Delete</b></td>
<td><b>Last Name</b></td>
<td><b>First Name</b></td>
<td><b>Email</b></td>
<td><b>Date Registered</b></td>
<td><b>Class</b></td>
<td><b>Paid</b></td>
</tr>';
If no problem was encountered, then display the table titles including the extra two items.
// Fetch and display all the records #4
while ($row = mysqli_fetch_array($result, MYSQLI_ASSOC)) {
echo '<tr>
<td><a href="edit_record.php?id=' . $row['user_id'] . '">Edit</a></td>
<td><a href="delete_record.php?id=' . $row['user_id'] . '">Delete</a></td>
<td>' . $row['lname'] . '</td>
<td>' . $row['fname'] . '</td>
<td>' . $row['email'] . '</td>
<td>' . $row['regdat'] . '</td>
<td>' . $row['class'] . '</td>
<td>' . $row['paid'] . '</td>
</tr>';
}
echo '</table>'; // Close the table
Searching and Editing Records
The search form and its code are exactly the same as those in Chapter 4; therefore, they will not be repeated here. We do, however, need to add the Class and Paid columns to the table displayed on the screen when a record is displayed using the Search button on the header menu.
The search result with the two new columns is shown in Figure 5-8.
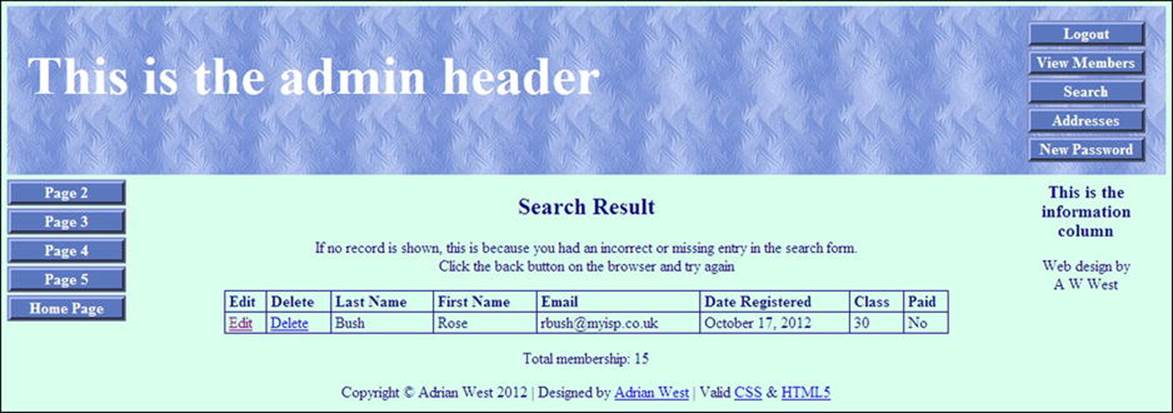
Figure 5-8. The search result now displays a record with the two extra columns, Class and Paid
The changes for adding the two extra columns are shown in bold type in Listing 5-8
Listing 5-8. Creating Two Extra Columns in the Table Display (view_found_record.php)
<?php #1
session_start();
if (!isset($_SESSION['user_level']) or ($_SESSION['user_level'] != 1))
{
header("Location: login.php");
exit ();
}
?>
<!doctype html>
<html lang=en>
<head>
<title>View found particular record page</title>
<meta charset=utf-8>
<link rel="stylesheet" type="text/css" href="includes.css">
<style type="text/css">
p { text-align:center; }
</style>
</head>
<body>
<div id="container">
<?php include("header-admin.php"); ?>
<?php include("nav.php"); ?>
<?php include("info-col.php"); ?>
<div id="content"><!-- Start of content. -->
<h2>Search Result</h2>
<?php
// This script retrieves records from the users table
require ('mysqli_connect.php'); // Connect to the database
echo '<p>If no record is shown, this is because you had an incorrect or missing entry ![]()
in the search form.<br>Click the back button on the browser and try again</p>';
$fname=$_POST['fname'];
$fname = mysqli_real_escape_string($dbcon, $fname);
$lname=$_POST['lname'];
$lname = mysqli_real_escape_string($dbcon, $lname);
$q = "SELECT lname, fname, email, DATE_FORMAT(registration_date, '%M %d, %Y') ![]()
AS regdat, class, paid, user_id FROM users WHERE lname='$lname' AND fname='$fname ![]()
ORDER BY registration_date ASC ' ";
$result = @mysqli_query ($dbcon, $q); // Run the query
if ($result) { // If it ran OK, display the record
// Table headings
echo '<table>
<tr><td><b>Edit</b></td>
<td><b>Delete</b></td>
<td><b>Last Name</b></td>
<td><b>First Name</b></td>
<td><b>Email</b></td>
<td><b>Date Registered</b></td>
<td><b>Class</b></td>
<td><b>Paid</b></td>
</tr>';
// Fetch and display the records
while ($row = mysqli_fetch_array($result, MYSQLI_ASSOC)) {
echo '<tr>
<td><a href="edit_record.php?id=' . $row['user_id'] . '">Edit</a></td>
<td><a href="delete_record.php?id=' . $row['user_id'] . '">Delete</a></td>
<td>' . $row['lname'] . '</td>
<td>' . $row['fname'] . '</td>
<td>' . $row['email'] . '</td>
<td>' . $row['regdat'] . '</td>
<td>' . $row['class'] . '</td>
<td>' . $row['paid'] . '</td>
</tr>';
}
echo '</table>'; // Close the table.
mysqli_free_result ($result); // Free up the resources
} else { // If it did not run OK.
// Error message
echo '<p class="error">The user could not be found. We apologize ![]()
for any inconvenience.</p>';
// Debugging message
echo '<p>' . mysqli_error($dbcon) . '<br><br>Query: ' . $q . '</p>';
} // End of if ($result)
//Now display the total number of records/members
$q = "SELECT COUNT(user_id) FROM users";
$result = @mysqli_query ($dbcon, $q);
$row = @mysqli_fetch_array ($result, MYSQLI_NUM);
$members = $row[0];
mysqli_close($dbcon); // Close the database connection
echo "<p>Total membership: $members</p>";
?>
</div><!--End of view-found-record page content-->
<?php include("footer.php"); ?>
</div>
</body>
</html>
Explanation of the Code
All of the code has been seen and explained before, but line #1 is a reminder of the importance of the session for private pages.
<?php #1
session_start();
if (!isset($_SESSION['user_level']) or ($_SESSION['user_level'] != 1))
{
header("Location: login.php");
exit();
}
?>
The form for editing a record now needs two extra fields, and this will be described next.
Modify the Form for Editing Records
The form for editing a record will now contain two more fields, class and paid. This enables the membership secretary to view a member’s chosen class of membership. He can also enter Yes in the paid field when the member’s PayPal payment arrives. These fields are shown in Figure 5-9.
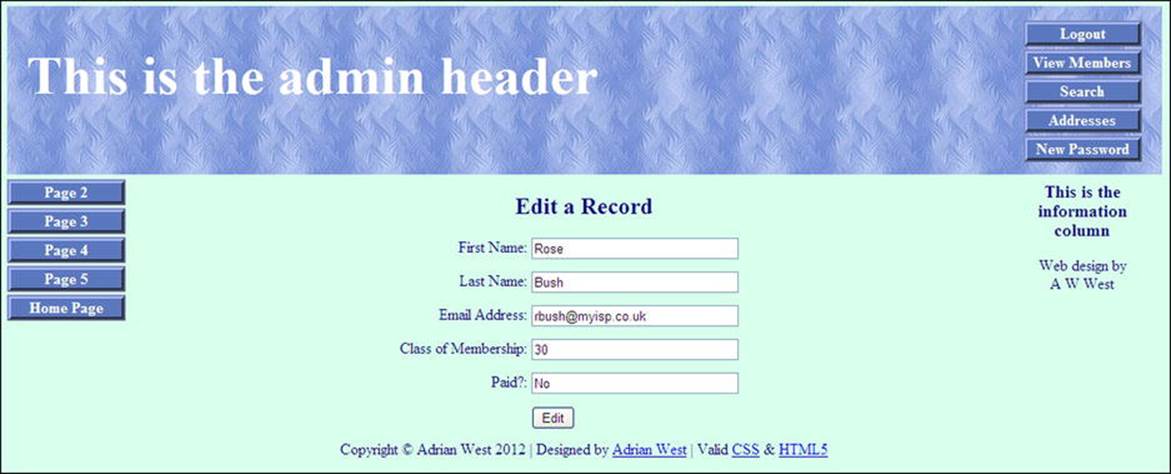
Figure 5-9. The screen for editing a record
All five fields can be edited by the administrator. When the Edit button is clicked, the revised data is shown, together with a message saying that the record was edited successfully. Editing an address or telephone number will be covered in Chapter 6. The code for editing a record is given in Listing 5-9
Listing 5-9. Creating an Editing Screen to Include the Two Additional Fields (edit_record.php)
<?php #1
session_start();
if (!isset($_SESSION['user_level']) or ($_SESSION['user_level'] != 1))
{
header("Location: login.php");
exit ();
}
?>
<!doctype html>
<html lang=en>
<head>
<title>Edit a record</title>
<meta charset=utf-8>
<link rel="stylesheet" type="text/css" href="includes.css">
<style type="text/css">
p { text-align:center; }
input.fl-left { float:left; }
#submit { float:left; }
</style>
</head>
<body>
<div id="container">
<?php include("header-admin.php"); ?>
<?php include("nav.php"); ?>
<?php include("info-col.php"); ?>
<div id="content"><!--Start of the edit record page-->
<h2>Edit a Record</h2>
<?php
// After clicking the Edit link in the register_found_record.php page ![]()
this editing interface appears
// Look for a valid user ID, either through GET or POST
if ( (isset($_GET['id'])) && (is_numeric($_GET['id'])) ) { // From view_users.php
$id = $_GET['id'];
} elseif ( (isset($_POST['id'])) && (is_numeric($_POST['id'])) ) { // Form submission
$id = $_POST['id'];
} else { // No valid ID, stop the script.
echo '<p class="error">This page has been accessed in error.</p>';
include ('footer.php');
exit();
}
require ('mysqli_connect.php');
// Has the form been submitted?
if ($_SERVER['REQUEST_METHOD'] == 'POST') {
$errors = array();
// Look for the first name
if (empty($_POST['fname'])) {
$errors[] = 'You forgot to enter the first name.';
} else {
$fn = mysqli_real_escape_string($dbcon, trim($_POST['fname']));
}
// Look for the last name
if (empty($_POST['lname'])) {
$errors[] = 'You forgot to enter the last name.';
} else {
$ln = mysqli_real_escape_string($dbcon, trim($_POST['lname']));
}
// Look for the email address
if (empty($_POST['email'])) {
$errors[] = 'You forgot to enter the email address.';
} else {
$e = mysqli_real_escape_string($dbcon, trim($_POST['email']));
}
// Look for the class of membership
if (!empty($_POST['class'])) {
$class = mysqli_real_escape_string($dbcon, trim($_POST['class']));
}else{
$class = NULL;
}
// Look for the payment confirmation
if (!empty($_POST['paid'])) {
$paid = mysqli_real_escape_string($dbcon, trim($_POST['paid']));
}else{
$paid = NULL;
}
if (empty($errors)) { // If no problems occurred,
//determine whether the email address has already been registered for a user,
//but ignore the email address of the user being updated, he may wish to keep his
//current email address
$q = "SELECT user_id FROM users WHERE email = '$e' AND user_id != $id";
$result = @mysqli_query($dbcon, $q);
if (mysqli_num_rows($result) == 0){//The email address is not already registered or it
//belongs to the user being updated, therefore, update the users table
$q = "UPDATE users SET fname='$fn', lname='$ln', email='$e', class='$class', ![]()
paid='$paid' WHERE user_id=$id LIMIT 1";
$result = @mysqli_query ($dbcon, $q);
if (mysqli_affected_rows($dbcon) == 1) { // If no problem was encoutered
// Echo a message confirming that the edit was satisfactory
echo '<h3>The user has been edited.</h3>';
} else { // Echo a message if the query failed
echo '<p class="error">The user was not be edited due to a system error. ![]()
We apologize for any inconvenience.</p>'; // Error message
echo '<p>' . mysqli_error($dbcon) . '<br />Query: ' . $q . '</p>';
// Debugging message
}
}else{//The email address is already registered for another user
echo '<p class="error">The email address is not acceptable because it is ![]()
already registered for another member</p>';
}
} else { // Display the errors
echo '<p class="error">The following error(s) occurred:<br />';
foreach ($errors as $msg) { // Echo each error
echo " - $msg<br />\n";
}
echo '</p><p>Please try again.</p>';
} // End of if (empty($errors))section
} // End of the conditionals
// Select the user's information
$q = "SELECT fname, lname, email, class, paid FROM users WHERE user_id=$id";
$result = @mysqli_query ($dbcon, $q);
if (mysqli_num_rows($result) == 1) { // Valid user ID, display the form.
// Get the user's information
$row = mysqli_fetch_array ($result, MYSQLI_NUM);
// Create the form
echo '<form action="edit_record.php" method="post">
<p><label class="label" for="fname">First Name:</label>É
<input class="fl-left" id="fname" type="text" name="fname" size="30" maxlength="30" ![]()
value="' . $row[0] . '"></p>
<br><p><label class="label" for="lname">Last Name:</label>É
<input class="fl-left" type="text" name="lname" size="30" maxlength="40" ![]()
value="' . $row[1] . '"></p>
<br><p><label class="label" for="email">Email Address:</label>É
<input class="fl-left" type="text" name="email" size="30" maxlength="50" ![]()
value="' . $row[2] . '"></p>
<br><p><label class="label" for="class">Class of Membership:</label>É
<input class="fl-left" type="text" name="class" size="30" maxlength="50" ![]()
value="' . $row[3] . '"></p>
<br><p><label class="label" for="paid">Paid?:</label>É
<input class="fl-left" type="text" name="paid" size="30" maxlength="50" ![]()
value="' . $row[4] . '"></p>
<br><p><input id="submit" type="submit" name="submit" value="Edit"></p>
<br><input type="hidden" name="id" value="' . $id . '" />
</form>';
} else { // The user could not be validated
echo '<p class="error">This page has been accessed in error.</p>';
}
mysqli_close($dbcon);
include ('footer.php');
?>
</div>
</div>
</body>
</html>
All the code has been seen and explained before; therefore, further explanation is unnecessary. Where anything new has been inserted, the comments within the listing give a full explanation.
Note the screen for deleting a particular record is exactly the same as in Chapter 4 and will not be repeated here to save space. However, the file delete_record.php is included in the downloads for Chapter 5. See this to review the code.
We need to limit the amount of information shown to the administrator. An extremely wide and confusing table would be required to display a member’s full details. Therefore, a member’s details will be split and displayed using two separate pages. The administrator will be able to view the addresses separately from the rest of the member’s information by means of the search-addresses.php page. To access this page, a new Addresses button will be added to the menu.
Searching for Members’ Addresses and Phone Numbers
When the administrator clicks the Addresses button, a new search page appears. This is named search_addresses.php. The appearance of the search_addresses.php page is almost identical to the previous search.php page except that it states that the search is for addresses, as shown in Figure 5-10.
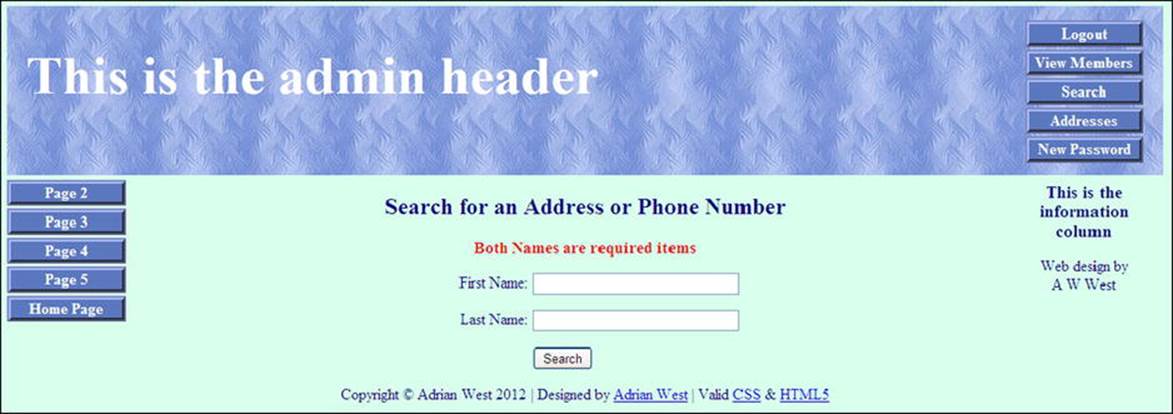
Figure 5-10. Searching for an address or phone number
The differences between search.php and search_addresses.php are shown in bold type in the Listing 5-10.
Listing 5-10. Creating a Screen for Searching Addresses and Phone Numbers (search_addresses.php)
<?php #1
session_start();
if (!isset($_SESSION['user_level']) or ($_SESSION['user_level'] != 1)) {
header("Location: login.php");
exit();
}
?>
<!doctype html>
<html lang=en>
<head>
<title>Search page</title>
<meta charset=utf-8>
<link rel="stylesheet" type="text/css" href="includes.css">
<style type="text/css">
h3.red { color:red; font-size:105%; font-weight:bold; text-align:center;}
</style>
</head>
<body>
<div id="container">
<?php include("header-admin.php"); ?>
<?php include("nav.php"); ?>
<?php include("info-col.php"); ?>
<div id="content"><!--Start of search address page content-->
<h2>Search for an Address or Phone Number</h2>
<h3 class="red">Both Names are required items</h3>
<!--the form has been commented out in the downloaded file to prevent an address being accessed. An active version of the file is provided in the downloads for Chapter 6-->
<form action="view_found_address.php" method="post">
<p><label class="label" for="fname">First Name:</label>![]()
<input id="fname" type="text" name="fname" size="30" maxlength="30" ![]()
value="<?php if (isset($_POST['fname'])) echo $_POST['fname']; ?>"></p>
<p><label class="label" for="lname">Last Name:</label>![]()
<input id="lname" type="text" name="lname" size="30" maxlength="40" ![]()
value="<?php if (isset($_POST['lname'])) echo $_POST['lname']; ?>"></p>
<p><input id="submit" type="submit" name="submit" value="Search"></p>
</form>
<?php include ('footer.php'); ?>
</div><!-- End of the search address page content -->
</div>
</body>
</html>
When the information is entered and the Search button is clicked, the view_found_address.php page is displayed as shown in Figure 5-11. Note that the search button will not produce a result in this chapter; a record will be retrievable in the next chapter. The screen shot of a retrieved record in Figure 5-11 was produced using the code provided in Chapter 6. Note that in Chapter 6 it will display an additional column for the member’s title.
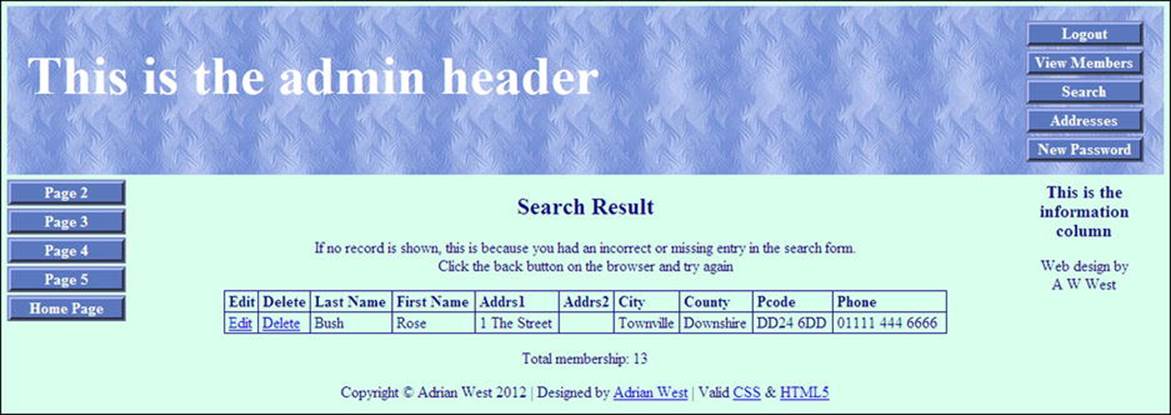
Figure 5-11. The new table displays the address and telephone number of the selected member
![]() Note Only those files that needed modifying have been described to save space. Many PHP files for this chapter have not been mentioned because they are exactly the same as the files in Chapter 4. The downloaded files for Chapter 5 can be viewed to see the code for all the files.
Note Only those files that needed modifying have been described to save space. Many PHP files for this chapter have not been mentioned because they are exactly the same as the files in Chapter 4. The downloaded files for Chapter 5 can be viewed to see the code for all the files.
Summary
In this chapter, we created a database containing many more fields than the ones in prior chapters. We added sessions to all the administration pages for security. We added a new Addresses button to the administrator’s page header. We learned how to add PayPal logos and buttons to the pages. Pagination was demonstrated in a tabular display of members. The form for editing records was modified to include extra data. A page for searching addresses and phone numbers was provided.
In the next chapter, you will learn how the administrator can view and edit addresses and telephone numbers. Also in the next chapter, we will add the finishing touches to the database. The filing system will be tidied up by placing the included files in an includes folder. For increased security, extra user input filters will be introduced. A title column will be added to the table display for editing and deleting a record, and the title column will also be added to the table display for editing addresses and phone numbers.