Sams Teach Yourself PHP, MySQL and Apache All in One (2012)
Part IV. PHP and MySQL Integration
Chapter 16. Learning Basic SQL Commands
In this chapter, you learn the following:
• The basic MySQL data types
• How to use the CREATE TABLE command to create a table
• How to use the INSERT command to enter records
• How to use the SELECT command to retrieve records
• How to use basic functions, the WHERE clause, and the GROUP BY clause in SELECT expressions
• How to select from multiple tables, using JOIN or subselects
• How to use the UPDATE and REPLACE commands to modify existing records
• How to use the DELETE command to remove records
• How to use string functions built in to MySQL
• How to use date and time functions built in to MySQL
The preceding chapter explained the basics of the database design process, and this chapter provides a primer on the core SQL syntax, which you use to create and manipulate your MySQL database tables. This is a hands-on chapter, and it assumes that you can issue queries directly to MySQL, either through the MySQL command-line interface or through another management interface such as phpMyAdmin, which is included in the XAMPP installation provided through the Quick Start process in Chapter 1, “Installation QuickStart Guide with XAMPP.”
Note that although this might not be the most exciting chapter in the book, it does show you many basic and functional examples of elements you’ll use throughout the rest of your work.
Learning the MySQL Data Types
Properly defining the fields in a table is important to the overall optimization of your database. You should use only the type and size of field you really need to use; do not define a field as 10 characters wide if you know you’re only going to use 2 characters—that’s 8 extra characters the database has to account for, even if they are unused. These field types are also referred to as data types, as in the “type of data” you will be storing in those fields.
MySQL uses many different data types, broken into three categories: numeric, date and time, and string types. Pay close attention because properly defining the data type is more important than any other part of the table-creation process.
Numeric Data Types
MySQL uses all the standard ANSI SQL numeric data types. So if you’re coming to MySQL from a different database system, these definitions will look familiar to you. The following list shows the common numeric data types and their descriptions:
Note
The terms signed and unsigned are used in the list of numeric data types. If you remember your basic algebra, you’ll recall that a signed integer can be a positive or negative integer, whereas an unsigned integer is always a non-negative integer.
• INT—A normal-sized integer that can be signed or unsigned. If signed, the allowable range is from –2147483648 to 2147483647. If unsigned, the allowable range is from 0 to 4294967295. You can specify a width of up to 11 digits.
• TINYINT—A small integer that can be signed or unsigned. If signed, the allowable range is from –128 to 127. If unsigned, the allowable range is from 0 to 255. You can specify a width of up to 4 digits.
• SMALLINT—A small integer that can be signed or unsigned. If signed, the allowable range is from –32768 to 32767. If unsigned, the allowable range is from 0 to 65535. You can specify a width of up to 5 digits.
• MEDIUMINT—A medium-sized integer that can be signed or unsigned. If signed, the allowable range is from –8388608 to 8388607. If unsigned, the allowable range is from 0 to 16777215. You can specify a width of up to 9 digits.
• BIGINT—A large integer that can be signed or unsigned. If signed, the allowable range is from –9223372036854775808 to 9223372036854775807. If unsigned, the allowable range is from 0 to 18446744073709551615. You can specify a width of up to 11 digits.
• FLOAT(M,D)—A floating-point number that cannot be unsigned. You can define the display length (M) and the number of decimals (D). This is not required and defaults to 10,2, where 2 is the number of decimals and 10 is the total number of digits (including decimals). Decimal precision can go to 24 places for a FLOAT.
• DOUBLE(M,D)—A double-precision floating-point number that cannot be unsigned. You can define the display length (M) and the number of decimals (D). This is not required and will default to 16,4, where 4 is the number of decimals. Decimal precision can go to 53 places for a DOUBLE.REAL is a synonym for DOUBLE.
• DECIMAL(M,D)—An unpacked floating-point number that cannot be unsigned. In unpacked decimals, each decimal corresponds to 1 byte. Defining the display length (M) and the number of decimals (D) is required. NUMERIC is a synonym for DECIMAL.
Of all the MySQL numeric data types, you will likely use INT most often. You can run into problems if you define your fields to be smaller than you actually need; for example, if you define an ID field as an unsigned TINYINT, you cannot successfully insert that 256th record if ID is a primary key (and thus required).
Date and Time Types
MySQL has several data types available for storing dates and times, and these data types are flexible in their input. In other words, you can enter dates that are not really days, such as February 30—February has only 28 or 29 days, never 30. Also, you can store dates with missing information. For example, if you know that someone was born sometime in November 1980, you can use 1980-11-00, where 00 would have been for the day, if you knew it.
The flexibility of MySQL’s date and time types also means that the responsibility for date checking falls on the application developer (that would be you). MySQL checks only two elements for validity: that the month is between 0 and 12 and that the day is between 0 and 31. MySQL does not automatically verify that the thirtieth day of the second month (February 30) is a valid date. Therefore, any date validation you want to include in your application should happen in your PHP code before you even attempt to add a record with a bogus date into your database table.
The MySQL date and time data types are as follows:
• DATE—A date in YYYY-MM-DD format, between 1000-01-01 and 9999-12-31. For example, December 30, 1973, is stored as 1973-12-30.
• DATETIME—A date and time combination in YYYY-MM-DD HH:MM:SS format, between 1000-01-01 00:00:00 and 9999-12-31 23:59:59. For example, 3:30 in the afternoon on December 30, 1973, is stored as 1973-12-30 15:30:00.
• TIMESTAMP—A timestamp between midnight, January 1, 1970, and sometime in 2037. You can define multiple lengths to the TIMESTAMP field, which directly correlates to what is stored in it. The default length for TIMESTAMP is 14, which stores YYYYMMDDHHMMSS. This looks like the previous DATETIME format, only without the hyphens between numbers; 3:30 in the afternoon on December 30, 1973, is stored as 19731230153000. Other definitions of TIMESTAMP are 12 (YYMMDDHHMMSS), 8 (YYYYMMDD), and 6 (YYMMDD).
• TIME—Stores the time in HH:MM:SS format.
• YEAR(M)—Stores a year in two-digit or four-digit format. If the length is specified as 2 (for example, YEAR(2)), YEAR can be 1970 to 2069 (70 to 69). If the length is specified as 4, YEAR can be 1901 to 2155. The default length is 4.
You will likely use DATETIME or DATE more often than any other date- or time-related data type.
String Types
Although numeric and date types are fun, most data you’ll store will be in string format. This list describes the common string data types in MySQL:
• CHAR(M)—A fixed-length string between 1 and 255 characters in length (for example, CHAR(5)), right-padded with spaces to the specified length when stored. Defining a length is not required, but the default is 1.
• VARCHAR(M)—A variable-length string between 1 and 255 characters in length; for example, VARCHAR(25). You must define a length when creating a VARCHAR field.
• BLOB or TEXT—A field with a maximum length of 65,535 characters. BLOBs are Binary Large Objects and are used to store large amounts of binary data, such as images or other types of files. Fields defined as TEXT also hold large amounts of data; the difference between the two is that sorts and comparisons on stored data are case sensitive on BLOBs and are not case sensitive in TEXT fields. You do not specify a length with BLOB or TEXT.
• TINYBLOB or TINYTEXT—A BLOB or TEXT column with a maximum length of 255 characters. You do not specify a length with TINYBLOB or TINYTEXT.
• MEDIUMBLOB or MEDIUMTEXT—A BLOB or TEXT column with a maximum length of 16,777,215 characters. You do not specify a length with MEDIUMBLOB or MEDIUMTEXT.
• LONGBLOB or LONGTEXT—A BLOB or TEXT column with a maximum length of 4,294,967,295 characters. You do not specify a length with LONGBLOB or LONGTEXT.
• ENUM—An enumeration, which is a fancy term for list. When defining an ENUM, you are creating a list of items from which the value must be selected (or it can be NULL). For example, if you want your field to contain A or B or C, you would define your ENUM as ENUM ('A', 'B', 'C'), and only those values (or NULL) could ever populate that field. ENUMs can have 65,535 different values. ENUMs use an index for storing items.
Note
The SET type is similar to ENUM in that it is defined as a list. However, the SET type is stored as a full value rather than an index of a value, as with ENUMs.
You will probably use VARCHAR and TEXT fields more often than other field types, and ENUMs are useful as well.
Learning the Table-Creation Syntax
The table-creation command requires
• Name of the table
• Names of fields
• Definitions for each field
The generic table-creation syntax is
CREATE TABLE table_name (column_name column_type);
The table name is up to you, of course, but should be a name that reflects the usage of the table. For example, if you have a table that holds the inventory of a grocery store, you would not name the table s. You would probably name it something like grocery_inventory. Similarly, the field names you select should be as concise as possible and relevant to the function they serve and the data they hold. For example, you might call a field holding the name of an item item_name, not n.
The following table-creation example creates a generic grocery_inventory table with fields for ID, item name, item description, item price, and quantity. Each of the fields are a different type; the ID and quantity fields hold integers, the item name field holds up to 50 characters, the item description field holds up to 65,535 characters of text, and the item price field contains a float:
CREATE TABLE grocery_inventory (
id INT NOT NULL PRIMARY KEY AUTO_INCREMENT,
item_name VARCHAR (50) NOT NULL,
item_desc TEXT,
item_price FLOAT NOT NULL,
curr_qty INT NOT NULL
);
Note
The id field is defined as a primary key. You learn more about keys in later chapters, in the context of creating specific tables as parts of sample applications. In addition, by using auto_increment as an attribute of the field in the example here, you are telling MySQL to go ahead and add the next available number to the id field for you when a record is inserted.
The MySQL server responds with Query OK each time a command, regardless of type, is successful. Otherwise, an error message displays, telling you where your query went awry. Depending on the interface you are using, you may or may not see this specific response. However, regardless of the interface, it should provide you with some indication of the status of the query.
Using the INSERT Command
After you have created some tables, you use the SQL command INSERT for adding new records to these tables. The basic syntax of INSERT is
INSERT INTO table_name (column list) VALUES (column values);
Within the parenthetical list of values, you must enclose strings within quotation marks. The SQL standard is single quotes, but MySQL enables the usage of either single or double quotes. So, if you are used to working in Oracle, which forces single-quoted strings, there’s no need to change your behavior. Remember to escape the type of quotation mark used, if it is within the string itself.
Note
Integers do not require quotation marks around them.
Here is an example of a string where escaping is necessary:
O'Connor said "Boo"
If you enclose your strings in double quotes, the INSERT statement looks like this:
INSERT INTO table_name (column_name) VALUES ("O'Connor said \"Boo\"");
If you enclose your strings in single quotes instead, the INSERT statement looks like this:
INSERT INTO table_name (column_name) VALUES ('O\'Connor said "Boo"');
A Closer Look at INSERT
Besides the table name, the INSERT statement consists of two main parts: the column list and the value list. Only the value list is actually required, but if you omit the column list, you must specifically provide for each column in your value list—in the exact order.
Using the grocery_inventory table as an example, you have five fields: id, item_name, item_desc, item_price, and curr_qty. To insert a complete record, you could use either of these statements:
• A statement with all columns named:
INSERT INTO grocery_inventory
(id, item_name, item_desc, item_price, curr_qty)
VALUES ('1', 'Apples', 'Beautiful, ripe apples.', '0.25', 1000);
• A statement that uses all columns but does not explicitly name them:
INSERT INTO grocery_inventory VALUES ('2', 'Bunches of Grapes',
'Seedless grapes.', '2.99', 500);
Give both of them a try and see what happens. You should get a successful response to both commands.
Now for some more interesting methods of using INSERT. Because id was defined at creation time as an auto-incrementing integer in the grocery_inventory table, you do not have to put it in your value list. However, if there’s a value you specifically do not want to list (such as id), you then must list the remaining columns in use. For example, the following statement does not list the columns and does not give a value for id:
INSERT INTO grocery_inventory VALUES
('Bottled Water (6-pack)', '500ml spring water.', 2.29, 250);
The preceding statement produces an error, such as this:
ERROR 1136: Column count doesn't match value count at row 1
Because you did not list any columns in this query, MySQL expects all of them to be in the value list; since you did not, the query results in an error. If your goal was to let MySQL do the work for you by auto-incrementing the id field, you could use either of these statements:
• A statement with all columns named except id:
INSERT INTO grocery_inventory (item_name, item_desc, item_price, curr_qty)
VALUES ('Bottled Water (6-pack)', '500ml spring water.', '2.29', 250);
• A statement that uses all columns, but does not explicitly name them and indicates a NULL entry for id (so one is filled in for you):
INSERT INTO grocery_inventory VALUES ('NULL', 'Bottled Water (12-pack)',
'500ml spring water.', 4.49, 500);
Go ahead and try both so that your grocery_inventory table has four records in total. It makes no different to MySQL which one you use, but as with everything based on your own preferences, be consistent in your application development. Consistent structures are easier for you to debug later because you know what to expect.
Using the SELECT Command
SELECT is the SQL command used to retrieve records from your tables. This command syntax can be totally simple or very complicated, depending on which fields you want to select, whether you want to select from multiple tables, and what conditions you plan to impose. As you become more comfortable with database programming, you will learn to enhance your SELECT statements, ultimately making your database do as much work as possible and not overworking your programming language.
The most basic SELECT syntax looks like this:
SELECT expressions_and_columns FROM table_name
[WHERE some_condition_is_true]
[ORDER BY some_column [ASC | DESC]]
[LIMIT offset, rows]
Look at the first line:
SELECT expressions_and_columns FROM table_name
One handy expression is the * symbol, which stands for everything. So, to select everything (all rows, all columns) from the grocery_inventory table, your SQL statement would be
SELECT * FROM grocery_inventory;
Depending on how much data is in the grocery_inventory table, your results will vary, but the results might look something like this:
+----+-------------------------+-------------------------+------------+----------+
| id | item_name | item_desc | item_price | curr_qty |
+----+-------------------------+-------------------------+------------+----------+
| 1 | Apples | Beautiful, ripe apples. | 0.25 | 1000 |
| 2 | Bunches of Grapes | Seedless grapes. | 2.99 | 500 |
| 3 | Bottled Water (6-pack) | 500ml spring water. | 2.29 | 250 |
| 4 | Bottled Water (12-pack) | 500ml spring water. | 4.49 | 500 |
+----+-------------------------+-------------------------+------------+----------+
4 rows in set (0.00 sec)
Note
This output comes from the MySQL command line interface; it creates a lovely, formatted table with the names of the columns along the first row as part of the resultset. If you are using a different interface to MySQL, your results will look different. (Focus on observing the expected data and not the interface differences.)
If you want to select specific columns only, replace the * with the names of the columns, separated by commas. The following statement selects just the id, item_name, and curr_qty fields from the grocery_inventory table:
SELECT id, item_name, curr_qty FROM grocery_inventory;
The results are displayed as:
+----+-------------------------+----------+
| id | item_name | curr_qty |
+----+-------------------------+----------+
| 1 | Apples | 1000 |
| 2 | Bunches of Grapes | 500 |
| 3 | Bottled Water (6-pack) | 250 |
| 4 | Bottled Water (12-pack) | 500 |
+----+-------------------------+----------+
4 rows in set (0.00 sec)
Ordering SELECT Results
Results of SELECT queries are ordered as they were inserted into the table and should not be relied on as a meaningful ordering system. If you want to order results a specific way, such as by date, ID, name, and so on, specify your requirements using the ORDER BY clause. In the following statement, the intention is a resultset ordered alphanumerically by item_name:
SELECT id, item_name, curr_qty FROM grocery_inventory
ORDER BY item_name;
Success! The results are as follows:
+----+-------------------------+----------+
| id | item_name | curr_qty |
+----+-------------------------+----------+
| 1 | Apples | 1000 |
| 4 | Bottled Water (12-pack) | 500 |
| 3 | Bottled Water (6-pack) | 250 |
| 2 | Bunches of Grapes | 500 |
+----+-------------------------+----------+
4 rows in set (0.03 sec)
Tip
When selecting results from a table without specifying a sort order, the results may or may not be ordered by their key value. This occurs because MySQL reuses the space taken up by previously deleted rows. In other words, if you add records with ID values of 1 through 5, delete the record with ID number 4, and then add another record (ID number 6), the records might appear in the table in this order: 1, 2, 3, 6, 5.
The default sorting of ORDER BY results is ascending (ASC); strings sort from A to Z, integers start at 0, and dates sort from oldest to newest. You can also specify a descending sort, using DESC:
SELECT id, item_name, curr_qty FROM grocery_inventory
ORDER BY item_name DESC;
Here are the results:
+----+-------------------------+----------+
| id | item_name | curr_qty |
+----+-------------------------+----------+
| 2 | Bunches of Grapes | 500 |
| 3 | Bottled Water (6-pack) | 250 |
| 4 | Bottled Water (12-pack) | 500 |
| 1 | Apples | 1000 |
+----+-------------------------+----------+
4 rows in set (0.00 sec)
You’re not limited to sorting by just one field—you can specify as many fields as you want as long as they are separated by commas. The sorting priority is the order in which you list the fields.
Limiting Your Results
You can use the LIMIT clause to return only a certain number of records from your SELECT query result. Two requirements apply when using the LIMIT clause: the offset and the number of rows. The offset is the starting position, and the number of rows should be self-explanatory.
Suppose that you have more than two or three records in the grocery_inventory table, and you want to select the ID, name, and quantity of the first two, ordered by curr_qty. In other words, you want to select the two items with the least inventory. The following single-parameter limit starts at the 0 position and goes to the second record:
SELECT id, item_name, curr_qty FROM grocery_inventory
ORDER BY curr_qty LIMIT 2;
Here are the results:
+----+------------------------+----------+
| id | item_name | curr_qty |
+----+------------------------+----------+
| 3 | Bottled Water (6-pack) | 250 |
| 2 | Bunches of Grapes | 500 |
+----+------------------------+----------+
2 rows in set (0.00 sec)
The LIMIT clause can prove useful in an actual application. For example, you can use the LIMIT clause within a series of SELECT statements to travel through results in steps (first two items, next two items, next two items after that):
1. SELECT * FROM grocery_inventory ORDER BY curr_qty LIMIT 0, 2;
2. SELECT * FROM grocery_inventory ORDER BY curr_qty LIMIT 2, 2;
3. SELECT * FROM grocery_inventory ORDER BY curr_qty LIMIT 4, 2;
If you specify an offset and number of rows in your query, and no results are found, you won’t see an error—just an empty resultset. For example, if the grocery_inventory table contains only six records, a query with a LIMIT offset of 6 produces no results.
In web-based applications, when you see lists of data display with links such as “previous 10” and “next 10,” it’s a safe bet that a LIMIT clause is at work.
Using WHERE in Your Queries
You have learned numerous ways to retrieve particular columns from your tables but not specific rows. This is when the WHERE clause comes in to play. From the example SELECT syntax, you see that WHERE is used to specify a particular condition:
SELECT expressions_and_columns FROM table_name
[WHERE some_condition_is_true]
An example is to retrieve all the records for items with a quantity of 500:
SELECT * FROM grocery_inventory WHERE curr_qty = 500;
Here are the results:
+----+-------------------------+---------------------+------------+----------+
| id | item_name | item_desc | item_price | curr_qty |
+----+-------------------------+---------------------+------------+----------+
| 2 | Bunches of Grapes | Seedless grapes. | 2.99 | 500 |
| 4 | Bottled Water (12-pack) | 500ml spring water. | 4.49 | 500 |
+----+-------------------------+---------------------+------------+----------+
2 rows in set (0.00 sec)
As shown previously, if you use an integer as part of your WHERE clause, quotation marks are not required. Quotation marks are required around strings, however, and the same rules apply with regard to escaping characters as you learned in the section on INSERT.
Using Operators in WHERE Clauses
You’ve used the equal sign (=) in your WHERE clauses to determine the truth of a condition—that is, whether one thing is equal to another. You can use many types of operators, with comparison operators and logical operators being the most popular types. Table 16.1 lists the comparison operators and their meanings.
Table 16.1 Basic Comparison Operators and Their Meanings
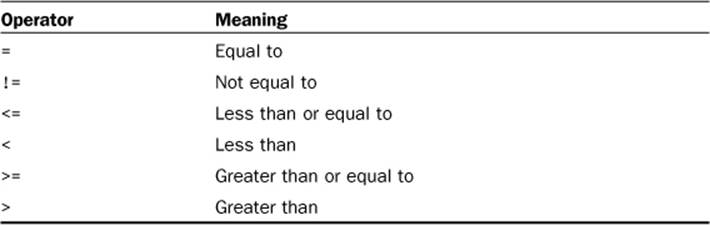
There’s also a handy operator called BETWEEN, which is useful with integer or date comparisons because it searches for results between a minimum and maximum value. For example:
SELECT * FROM grocery_inventory WHERE item_price BETWEEN 1.50 AND 3.00;
Here are the results:
+----+------------------------+---------------------+------------+----------+
| id | item_name | item_desc | item_price | curr_qty |
+----+------------------------+---------------------+------------+----------+
| 2 | Bunches of Grapes | Seedless grapes. | 2.99 | 500 |
| 3 | Bottled Water (6-pack) | 500ml spring water. | 2.29 | 250 |
+----+------------------------+---------------------+------------+----------+
2 rows in set (0.00 sec)
Other operators include logical operators, which enable you to use multiple comparisons within your WHERE clause. The basic logical operators are AND and OR. When using AND, all comparisons in the clause must be true to retrieve results, whereas using OR allows a minimum of one comparison to be true. Also, you can use the IN operator to specify a list of items that you want to match.
String Comparison Using LIKE
You were introduced to matching strings within a WHERE clause by using = or !=, but there’s another useful operator for the WHERE clause when comparing strings: the LIKE operator. This operator uses two characters as wildcards in pattern matching:
• %—Matches multiple characters
• _—Matches exactly one character
For example, if you want to find records in the grocery_inventory table where the first name of the item starts with the letter A, you would use the following:
SELECT * FROM grocery_inventory WHERE item_name LIKE 'A%';
Here are the results:
+----+-----------+-------------------------+------------+----------+
| id | item_name | item_desc | item_price | curr_qty |
+----+-----------+-------------------------+------------+----------+
| 1 | Apples | Beautiful, ripe apples. | 0.25 | 1000 |
+----+-----------+-------------------------+------------+----------+
1 row in set (0.00 sec)
Note
Unless performing a LIKE comparison on a binary string, the comparison is not case sensitive. You can force a case-sensitive comparison using the BINARY keyword.
Selecting from Multiple Tables
You are not limited to selecting only one table at a time. That would certainly make application programming a long and tedious task! When you select from more than one table in one SELECT statement, you are really joining the tables together.
Suppose that you have two tables: fruit and color. You can select all rows from each of the two tables by using two separate SELECT statements:
SELECT * FROM fruit;
This query might result in something like this:
+----+-----------+
| id | fruitname |
+----+-----------+
| 1 | apple |
| 2 | orange |
| 3 | grape |
| 4 | banana |
+----+-----------+
4 rows in set (0.00 sec)
SELECT * FROM color;
The second query could result in data like this:
+----+-----------+
| id | colorname |
+----+-----------+
| 1 | red |
| 2 | orange |
| 3 | purple |
| 4 | yellow |
+----+-----------+
4 rows in set (0.00 sec)
When you want to select from both tables at once, the syntax of the SELECT statement differs somewhat. First, you must ensure that all the tables you’re using in your query appear in the FROM clause of the SELECT statement. Using the fruit and color example, if you simply want to select all columns and rows from both tables, you might think you would use the following SELECT statement:
SELECT * FROM fruit, color;
With this query, you get results like this:
+----+-----------+----+-----------+
| id | fruitname | id | colorname |
+----+-----------+----+-----------+
| 1 | apple | 1 | red |
| 2 | orange | 1 | red |
| 3 | grape | 1 | red |
| 4 | banana | 1 | red |
| 1 | apple | 2 | orange |
| 2 | orange | 2 | orange |
| 3 | grape | 2 | orange |
| 4 | banana | 2 | orange |
| 1 | apple | 3 | purple |
| 2 | orange | 3 | purple |
| 3 | grape | 3 | purple |
| 4 | banana | 3 | purple |
| 1 | apple | 4 | yellow |
| 2 | orange | 4 | yellow |
| 3 | grape | 4 | yellow |
| 4 | banana | 4 | yellow |
+----+-----------+----+-----------+
16 rows in set (0.00 sec)
Sixteen rows of repeated information are probably not what you were looking for. What this query did is literally join a row in the color table to each row in the fruit table. Because there are 4 records in the fruit table and 4 entries in the color table, that’s 16 records returned to you.
When you select from multiple tables, you must build proper WHERE clauses to ensure that you really get what you want. In the case of the fruit and color tables, what you really want is to see the fruitname and colorname records from these two tables where the IDs of each match up. This brings us to the next nuance of the query: how to indicate exactly which field you want when the fields are named the same in both tables.
Simply, you append the table name to the field name, like this:
tablename.fieldname
So, the query for selecting fruitname and colorname from both tables where the IDs match would be as follows:
SELECT fruitname, colorname FROM fruit, color WHERE fruit.id = color.id;
This query produces a better result for you:
+-----------+-----------+
| fruitname | colorname |
+-----------+-----------+
| apple | red |
| orange | orange |
| grape | purple |
| banana | yellow |
+-----------+-----------+
4 rows in set (0.00 sec)
However, if you attempt to select a column that appears in both tables with the same name, you get an ambiguity error:
SELECT id, fruitname, colorname FROM fruit, color
WHERE fruit.id = color.id;
This query produces the following error:
ERROR 1052: Column: 'id' in field list is ambiguous
If you want to select the ID from the fruit table, you use this:
SELECT fruit.id, fruitname, colorname FROM fruit,
color WHERE fruit.id = color.id;
This query produces these results:
+------+-----------+-----------+
| id | fruitname | colorname |
+------+-----------+-----------+
| 1 | apple | red |
| 2 | orange | orange |
| 3 | grape | purple |
| 4 | banana | yellow |
+------+-----------+-----------+
4 rows in set (0.00 sec)
This was a basic example of joining two tables together for use in a single SELECT query. The JOIN keyword is an actual part of SQL, which enables you to build more complex queries.
Using JOIN
You can use several types of JOINs in MySQL, all of which refer to the order in which the tables are put together and the results are displayed. The type of JOIN used with the fruit and color tables is an INNER JOIN, although it wasn’t written explicitly as such. To rewrite the SQL statement using the proper INNER JOIN syntax, you use the following:
SELECT fruitname, colorname FROM fruit
INNER JOIN color ON fruit.id = color.id;
Your resultset looks like this:
+-----------+-----------+
| fruitname | colorname |
+-----------+-----------+
| apple | red |
| orange | orange |
| grape | purple |
| banana | yellow |
+-----------+-----------+
4 rows in set (0.00 sec)
The ON clause replaces the WHERE clause you’ve seen before; in this instance, it tells MySQL to join together the rows in the tables where the IDs match each other. When joining tables using ON clauses, you can use any conditions that you would use in a WHERE clause, including all the various logical and arithmetic operators.
Another common type of JOIN is the LEFT JOIN. When joining two tables with LEFT JOIN, all rows from the first table are returned, no matter whether there are matches in the second table. Suppose that you have two tables in an address book, one called master_name, containing basic records, and one called email, containing email records. Any records in the email table would be tied to a particular ID of a record in the master_name table. For example, look at these two tables (the master_name and email tables, respectively):
+---------+-----------+----------+
| name_id | firstname | lastname |
+---------+-----------+----------+
| 1 | John | Smith |
| 2 | Jane | Smith |
| 3 | Jimbo | Jones |
| 4 | Andy | Smith |
| 5 | Chris | Jones |
| 6 | Anna | Bell |
| 7 | Jimmy | Carr |
| 8 | Albert | Smith |
| 9 | John | Doe |
+---------+-----------+----------+
+---------+-------------------+
| name_id | email |
+---------+-------------------+
| 2 | jsmith@jsmith.com |
| 6 | annabell@aol.com |
| 9 | jdoe@yahoo.com |
+---------+-------------------+
Using LEFT JOIN on these two tables, you can see that if a value from the email table does not exist, an empty value appears in place of an email address:
SELECT firstname, lastname, email FROM master_name
LEFT JOIN email ON master_name.name_id = email.name_id;
The LEFT JOIN query here produces these results:
+-----------+----------+-------------------+
| firstname | lastname | email |
+-----------+----------+-------------------+
| John | Smith | |
| Jane | Smith | jsmith@jsmith.com |
| Jimbo | Jones | |
| Andy | Smith | |
| Chris | Jones | |
| Anna | Bell | annabell@aol.com |
| Jimmy | Carr | |
| Albert | Smith | |
| John | Doe | jdoe@yahoo.com |
+-----------+----------+-------------------+
9 rows in set (0.00 sec)
A RIGHT JOIN works like LEFT JOIN but with the table order reversed. In other words, when using a RIGHT JOIN, all rows from the second table are returned, no matter whether matches exist in the first table. However, in the case of the master_name and email tables, there are only three rows in the email table, whereas there are nine rows in the master_name table. This means that only three of the nine rows are returned by this query:
SELECT firstname, lastname, email FROM master_name
RIGHT JOIN email ON master_name.name_id = email.name_id;
The results are as expected:
+-----------+----------+-------------------+
| firstname | lastname | email |
+-----------+----------+-------------------+
| Jane | Smith | jsmith@jsmith.com |
| Anna | Bell | annabell@aol.com |
| John | Doe | jdoe@yahoo.com |
+-----------+----------+-------------------+
3 rows in set (0.00 sec)
Several different types of JOINs are available in MySQL, and you have learned about the most common types. To learn more about JOINs such as CROSS JOIN, STRAIGHT JOIN, and NATURAL JOIN, visit the MySQL Manual at http://dev.mysql.com/doc/refman/5.5/en/join.html. As you continue your learning elsewhere, I highly recommend learning more about and practicing JOINs; they can be one of the most powerful tools in your SQL toolkit.
Using Subqueries
Simply stated, a subquery is a SELECT statement that appears within another SQL statement. Such queries can prove extremely useful because they often eliminate the need for bulky JOIN queries, and in the case of application programming, subqueries can eliminate the need for multiple queries within loops.
An example of the basic subquery syntax is shown here:
SELECT expressions_and_columns FROM table_name WHERE somecolumn = (SUBQUERY);
You can also use subqueries with UPDATE and DELETE statements, as shown here:
DELETE FROM table_name WHERE somecolumn = (SUBQUERY);
or
UPDATE table_name SET somecolumn = 'something' WHERE somecolumn = (SUBQUERY);
Note
The outer statement of a subquery can be SELECT, INSERT, UPDATE, DELETE, SET, or DO.
The subquery must always appear in parentheses—no exceptions!
When using subqueries, the WHERE portion of the outer statement does not have to use the = comparison operator. In addition to =, you can use any of the basic comparison operators as well as keywords such as IN.
The following example uses a subquery to obtain records from users in the master_name table who have an email address in the email table:
SELECT firstname, lastname FROM master_name
WHERE name_id IN (SELECT name_id FROM email);
The results of this query may look something like this:
+—————-+—————+
| firstname | lastname |
+-----------+----------+
| Jane | Smith |
| Anna | Bell |
| John | Doe |
+-----------+----------+
3 rows in set (0.00 sec)
For a more detailed discussion of subqueries, including limitations, see the Subqueries section of the MySQL Manual at http://dev.mysql.com/doc/refman/5.5/en/subqueries.html.
Using the UPDATE Command to Modify Records
UPDATE is the SQL command used to modify the contents of one or more columns in an existing record or set of records. The most basic UPDATE syntax looks like this:
UPDATE table_name
SET column1='new value',
column2='new value2'
[WHERE some_condition_is_true]
The guidelines for updating a record are similar to those used when inserting a record: The data you’re entering must be appropriate to the data type of the field, and you must enclose your strings in single or double quotes, escaping where necessary.
For example, assume that you have a table called fruit containing an ID, a fruit name, and the status of the fruit (ripe or rotten):
+----+------------+--------+
| id | fruit_name | status |
+----+------------+--------+
| 1 | apple | ripe |
| 2 | orange | rotten |
| 3 | grape | ripe |
| 4 | banana | rotten |
+----+------------+--------+
4 rows in set (0.00 sec)
To update the status of the fruit to ripe, use
UPDATE fruit SET status = 'ripe';
You receive a response from the database like so:
Query OK, 2 rows affected (0.00 sec)
Rows matched: 4 Changed: 2 Warnings: 0
Take a close look at the result of the query. It was successful, as you can tell from the Query OK message. Also note that only two rows were affected—if you try to set the value of a column to the value it already is, the update won’t occur for that column.
The second line of the response shows that four rows were matched, and only two were changed. If you’re wondering what matched, the answer is simple: Because you did not specify a particular condition for matching, the match is all rows.
You must be careful and use a condition when updating a table, unless you really intend to change all the columns for all records to the same value. For the sake of argument, assume that the word grape is spelled incorrectly in its row in the table, and you want to use UPDATE to correct this mistake:
UPDATE fruit SET fruit_name = 'grape';
This query would have horrible results:
Query OK, 4 rows affected (0.00 sec)
Rows matched: 4 Changed: 4 Warnings: 0
When you read the result, you should be filled with dread: Four of four records were changed, instead of only the one you intended, meaning your fruit table now looks like this:
+----+------------+--------+
| id | fruit_name | status |
+----+------------+--------+
| 1 | grape | ripe |
| 2 | grape | ripe |
| 3 | grape | ripe |
| 4 | grape | ripe |
+----+------------+--------+
4 rows in set (0.00 sec)
All your fruit records are now grapes. While you were attempting to correct the spelling of one field, all fields were changed because you failed to specify a condition.
When doling out UPDATE privileges to your users, think about the responsibility you’re giving to someone—one wrong move and your entire table could be grapes. In the preceding example, you could have used the id or fruit_name field in your WHERE clause, as you will see in the following section.
Conditional UPDATEs
Making a conditional UPDATE means that you are using WHERE clauses to match specific records. Using a WHERE clause in an UPDATE statement is just like using a WHERE clause in a SELECT statement. All the same comparison and logical operators can be used, such as equal to, greater than, OR, and AND.
Assume that your fruit table has not been completely filled with grapes but instead contains four records, one with a spelling mistake (grappe instead of grape). The UPDATE statement to fix the spelling mistake is as follows:
UPDATE fruit SET fruit_name = 'grape' WHERE fruit_name = 'grappe';
In this case, only one row was matched and one row was changed, as shown with this result:
Query OK, 1 row affected (0.00 sec)
Rows matched: 1 Changed: 1 Warnings: 0
Your fruit table should be intact, and all fruit names should be spelled properly:
SELECT * FROM fruit;
This SELECT query shows the following:
+----+------------+--------+
| id | fruit_name | status |
+----+------------+--------+
| 1 | apple | ripe |
| 2 | pear | ripe |
| 3 | banana | ripe |
| 4 | grape | ripe |
+----+------------+--------+
4 rows in set (0.00 sec)
Using Existing Column Values with UPDATE
Another feature of UPDATE is the capability to use the current value in the record as the base value. For example, go back to the grocery_inventory table example, with a table that looks like this:
+----+-------------------------+-------------------------+------------+----------+
| id | item_name | item_desc | item_price | curr_qty |
+----+-------------------------+-------------------------+------------+----------+
| 1 | Apples | Beautiful, ripe apples. | 0.25 | 1000 |
| 2 | Bunches of Grapes | Seedless grapes. | 2.99 | 500 |
| 3 | Bottled Water (6-pack) | 500ml spring water. | 2.29 | 250 |
| 4 | Bottled Water (12-pack) | 500ml spring water. | 4.49 | 500 |
| 5 | Bananas | Bunches, green. | 1.99 | 150 |
| 6 | Pears | Anjou, nice and sweet. | 0.5 | 500 |
| 7 | Avocado | Large Haas variety. | 0.99 | 750 |
+----+-------------------------+-------------------------+------------+----------+
7 rows in set (0.00 sec)
When someone purchases a product, such as an apple (id = 1), the inventory table should be updated accordingly. However, you won’t know exactly what number to enter in the curr_qty column, just that you sold one. In this case, use the current value of the column and subtract 1:
UPDATE grocery_inventory SET curr_qty = curr_qty - 1 WHERE id = 1;
This query should give you a new value of 999 in the curr_qty column, and indeed it does:
SELECT * FROM grocery_inventory;
The SELECT query shows the new inventory quantity:
+----+-------------------------+-------------------------+------------+----------+
| id | item_name | item_desc | item_price | curr_qty |
+----+-------------------------+-------------------------+------------+----------+
| 1 | Apples | Beautiful, ripe apples. | 0.25 | 999 |
| 2 | Bunches of Grapes | Seedless grapes. | 2.99 | 500 |
| 3 | Bottled Water (6-pack) | 500ml spring water. | 2.29 | 250 |
| 4 | Bottled Water (12-pack) | 500ml spring water. | 4.49 | 500 |
| 5 | Bananas | Bunches, green. | 1.99 | 150 |
| 6 | Pears | Anjou, nice and sweet. | 0.5 | 500 |
| 7 | Avocado | Large Haas variety. | 0.99 | 750 |
+----+-------------------------+-------------------------+------------+----------+
7 rows in set (0.00 sec)
Using the REPLACE Command
Another method for modifying records is to use the REPLACE command, which is remarkably similar to the INSERT command.
REPLACE INTO table_name (column list) VALUES (column values);
The REPLACE statement works like this: If the record you are inserting into the table contains a primary key value that matches a record already in the table, the record in the table is deleted and the new record inserted in its place.
Note
The REPLACE command is a MySQL-specific extension to ANSI SQL. This command mimics the action of a DELETE and re-INSERT of a particular record. In other words, you get two commands for the price of one.
Using the grocery_inventory table, the following command replaces the entry for Apples:
REPLACE INTO grocery_inventory VALUES
(1, 'Granny Smith Apples', 'Sweet!', '0.50', 1000);
You should see the following result:
Query OK, 2 rows affected (0.00 sec)
In the query result, notice that the result states 2 rows affected. In this case, because id is a primary key that had a matching value in the grocery_inventory table, the original row was deleted and the new row was inserted: 2 rows affected.
Use a SELECT query to verify that the entry is correct, which it is:
+----+-------------------------+-------------------------+------------+----------+
| id | item_name | item_desc | item_price | curr_qty |
+----+-------------------------+-------------------------+------------+----------+
| 1 | Granny Smith Apples | Sweet! | 0.50 | 1000 |
| 2 | Bunches of Grapes | Seedless grapes. | 2.99 | 500 |
| 3 | Bottled Water (6-pack) | 500ml spring water. | 2.29 | 250 |
| 4 | Bottled Water (12-pack) | 500ml spring water. | 4.49 | 500 |
| 5 | Bananas | Bunches, green. | 1.99 | 150 |
| 6 | Pears | Anjou, nice and sweet. | 0.5 | 500 |
| 7 | Avocado | Large Haas variety. | 0.99 | 750 |
+----+-------------------------+-------------------------+------------+----------+
7 rows in set (0.00 sec)
If you use a REPLACE statement, and the value of the primary key in the new record does not match a value for a primary key already in the table, the record is simply inserted, and only one row is affected.
Using the DELETE Command
The basic DELETE syntax is as follows:
DELETE FROM table_name
[WHERE some_condition_is_true]
[LIMIT rows]
Notice that no column specification is used in the DELETE command—when you use DELETE, the entire record is removed. You might recall the fiasco earlier in this chapter regarding grapes in the fruit table, when updating a table without specifying a condition caused an update of all records. You must be similarly careful when using DELETE.
Assuming the following structure and data in a table called fruit
+----+------------+--------+
| id | fruit_name | status |
+----+------------+--------+
| 1 | apple | ripe |
| 2 | pear | rotten |
| 3 | banana | ripe |
| 4 | grape | rotten |
+----+------------+--------+
4 rows in set (0.00 sec)
the following statement removes all records in the table:
DELETE FROM fruit;
You can always verify the deletion by attempting to SELECT data from the table. If you were to issue this command after removing all the records:
SELECT * FROM fruit;
You would see that all your fruit is gone:
Empty set (0.00 sec)
Conditional DELETE
A conditional DELETE statement, just like a conditional SELECT or UPDATE statement, means you are using WHERE clauses to match specific records. You have the full range of comparison and logical operators available to you, so you can pick and choose which records you want to delete.
A prime example is to remove all records for rotten fruit from the fruit table:
DELETE FROM fruit WHERE status = 'rotten';
Two records were deleted:
Query OK, 2 rows affected (0.00 sec)
Only ripe fruit remains:
+----+------------+--------+
| id | fruit_name | status |
+----+------------+--------+
| 1 | apple | ripe |
| 3 | banana | ripe |
+----+------------+--------+
2 rows in set (0.00 sec)
You can also use ORDER BY clauses in your DELETE statements; look at the basic DELETE syntax with the ORDER BY clause added to its structure:
DELETE FROM table_name
[WHERE some_condition_is_true]
[ORDER BY some_column [ASC | DESC]]
[LIMIT rows]
At first glance, you might wonder, “Why does it matter in what order I delete records?” The ORDER BY clause isn’t for the deletion order; it’s for the sorting order of records.
In this example, a table called access_log shows access time and username:
+----+---------------------+----------+
| id | date_accessed | username |
+----+---------------------+----------+
| 1 | 2012-01-06 06:09:13 | johndoe |
| 2 | 2012-01-06 06:09:22 | janedoe |
| 3 | 2012-01-06 06:09:39 | jsmith |
| 4 | 2012-01-06 06:09:44 | mikew |
+----+---------------------+----------+
4 rows in set (0.00 sec)
To remove the oldest record, first use ORDER BY to sort the results appropriately, and then use LIMIT to remove just one record:
DELETE FROM access_log ORDER BY date_accessed DESC LIMIT 1;
Select all from access_log and verify that only three records exist:
SELECT * FROM access_log;
The results are as follows:
+----+---------------------+----------+
| id | date_accessed | username |
+----+---------------------+----------+
| 2 | 2012-01-06 06:09:22 | janedoe |
| 3 | 2012-01-06 06:09:39 | jsmith |
| 4 | 2012-01-06 06:09:44 | mikew |
+----+---------------------+----------+
3 rows in set (0.00 sec)
Frequently Used String Functions in MySQL
MySQL’s built-in string-related functions can be used several ways. You can use functions in SELECT statements without specifying a table to retrieve a result of the function. Or you can use functions to enhance your SELECT results by concatenating two fields to form a new string. The following examples are by no means a complete library of MySQL string-related functions. For more, see the MySQL Manual at http://dev.mysql.com/doc/refman/5.5/en/string-functions.html.
Length and Concatenation Functions
The group of length and concatenation functions focuses on the length of strings and concatenating strings together. Length-related functions include LENGTH(), OCTET_LENGTH(), CHAR_LENGTH(), and CHARACTER_LENGTH(), which do almost the same thing: count characters in a string.
SELECT LENGTH('This is cool!');
The result is this:
+-------------------------+
| LENGTH('This is cool!') |
+-------------------------+
| 13 |
+-------------------------+
1 row in set (0.00 sec)
The fun begins with the CONCAT() function, which concatenates two or more strings:
SELECT CONCAT('My', 'S', 'QL');
This query results in the following:
+-------------------------+
| CONCAT('My', 'S', 'QL') |
+-------------------------+
| MySQL |
+-------------------------+
1 row in set (0.00 sec)
Imagine using this function with a table containing names, split into firstname and lastname fields. Instead of using two strings, use two field names to concatenate the firstname and the lastname fields. By concatenating the fields, you reduce the lines of code necessary to achieve the same result in your application:
SELECT CONCAT(firstname, lastname) FROM master_name;
This query results in the following:
+-----------------------------+
| CONCAT(firstname, lastname) |
+-----------------------------+
| JohnSmith |
| JaneSmith |
| JimboJones |
| AndySmith |
| ChrisJones |
| AnnaBell |
| JimmyCarr |
| AlbertSmith |
| JohnDoe |
+-----------------------------+
9 rows in set (0.00 sec)
Tip
If you’re using a field name and not a string in a function, do not enclose the field name within quotation marks. If you do, MySQL interprets the string literally. In a CONCAT() example, like this
SELECT CONCAT('firstname', 'lastname') FROM master_name;
you get the following result:
+---------------------------------+
| CONCAT('firstname', 'lastname') |
+---------------------------------+
| firstnamelastname |
| firstnamelastname |
| firstnamelastname |
| firstnamelastname |
| firstnamelastname |
| firstnamelastname |
| firstnamelastname |
| firstnamelastname |
| firstnamelastname |
+---------------------------------+
9 rows in set (0.00 sec)
The CONCAT() function would be useful if there were some sort of separator between the names, and that’s where the next function comes in: CONCAT_WS().
As you might have figured out, CONTACT_WS() stands for concatenate with separator. The separator can be anything you choose, but the following example uses whitespace:
SELECT CONCAT_WS(' ', firstname, lastname) FROM master_name;
This query results in the following:
+-------------------------------------+
| CONCAT_WS(' ', firstname, lastname) |
+-------------------------------------+
| John Smith |
| Jane Smith |
| Jimbo Jones |
| Andy Smith |
| Chris Jones |
| Anna Bell |
| Jimmy Carr |
| Albert Smith |
| John Doe |
+-------------------------------------+
9 rows in set (0.00 sec)
If you want to shorten the width of your result table, you can use AS to name the custom result field:
SELECT CONCAT_WS(' ', firstname, lastname) AS fullname FROM master_name;
With this, you get the following results:
+--------------+
| fullname |
+--------------+
| John Smith |
| Jane Smith |
| Jimbo Jones |
| Andy Smith |
| Chris Jones |
| Anna Bell |
| Jimmy Carr |
| Albert Smith |
| John Doe |
+--------------+
9 rows in set (0.00 sec)
Trimming and Padding Functions
MySQL provides several functions for adding and removing extra characters (including whitespace) from strings. The RTRIM() and LTRIM() functions remove whitespace from either the right or left side of a string:
SELECT RTRIM('stringstring ');
This query results in the following, although it is difficult to see the change:
+--------------------------+
| RTRIM('stringstring ') |
+--------------------------+
| stringstring |
+--------------------------+
1 row in set (0.00 sec)
The LTRIM() function results are easier to see:
SELECT LTRIM(' stringstring');
This query results in the following, with the whitespace clearly stripped:
+-------------------------+
| LTRIM(' stringstring') |
+-------------------------+
| stringstring |
+-------------------------+
1 row in set (0.00 sec)
You may have padded strings to trim if the string is coming out of a fixed-width field and either doesn’t need to carry along the additional padding or is being inserted into a varchar or other non-fixed-width field. If your strings are padded with a character besides whitespace, use the TRIM()function to name the characters you want to remove. For example, to remove the leading X characters from the string XXXneedleXXX, use
SELECT TRIM(LEADING 'X' FROM 'XXXneedleXXX');
Here is the result of this query:
+---------------------------------------+
| TRIM(LEADING 'X' FROM 'XXXneedleXXX') |
+---------------------------------------+
| needleXXX |
+---------------------------------------+
1 row in set (0.00 sec)
You can use TRAILING to remove the characters from the end of the string:
SELECT TRIM(TRAILING 'X' FROM 'XXXneedleXXX');
The results of this query are as follows:
+----------------------------------------+
| TRIM(TRAILING 'X' FROM 'XXXneedleXXX') |
+----------------------------------------+
| XXXneedle |
+----------------------------------------+
1 row in set (0.00 sec)
If neither LEADING nor TRAILING is indicated, both are assumed:
SELECT TRIM('X' FROM 'XXXneedleXXX');
This query results in this:
+-------------------------------+
| TRIM('X' FROM 'XXXneedleXXX') |
+-------------------------------+
| needle |
+-------------------------------+
1 row in set (0.00 sec)
Just as RTRIM() and LTRIM() remove padding characters, RPAD() and LPAD() add characters to a string. For example, you might want to add specific identification characters to a string that is part of an order number, in a database used for sales. When you use the padding functions, the required elements are the string, the target length, and the padding character. For example, pad the string needle with the X character until the string is 10 characters long using this query:
SELECT RPAD('needle', 10, 'X');
You will see this result:
+-------------------------+
| RPAD('needle', 10, 'X') |
+-------------------------+
| needleXXXX |
+-------------------------+
1 row in set (0.00 sec)
Location and Position Functions
The group of location and position functions is useful for finding parts of strings within other strings. The LOCATE() function returns the position of the first occurrence of a given substring within the target string. For example, you can look for a needle in a haystack:
SELECT LOCATE('needle', 'haystackneedlehaystack');
You should see this result:
+--------------------------------------------+
| LOCATE('needle', 'haystackneedlehaystack') |
+--------------------------------------------+
| 9 |
+--------------------------------------------+
1 row in set (0.00 sec)
The substring needle begins at position 9 in the target string. If the substring cannot be found in the target string, MySQL returns 0 as a result.
Note
Unlike position counting within most programming languages, which start at 0, position counting using MySQL starts at 1.
An extension of the LOCATE() function is to use a third argument for starting position. If you start looking for needle in haystack before position 9, you’ll receive a result. Otherwise, because needle starts at position 9, you’ll receive a 0 result if you specify a greater starting position.
Substring Functions
If your goal is to extract a substring from a target string, several functions fit the bill. Given a string, starting position, and length, you can use the SUBSTRING() function. This example gets three characters from the string MySQL, starting at position 2:
SELECT SUBSTRING("MySQL", 2, 3);
The result is as follows:
+--------------------------+
| SUBSTRING("MySQL", 2, 3) |
+--------------------------+
| ySQ |
+--------------------------+
1 row in set (0.00 sec)
If you just want a few characters from the left or right ends of a string, use the LEFT() and RIGHT() functions:
SELECT LEFT("MySQL", 2);
The result of this query is as follows:
+------------------+
| LEFT("MySQL", 2) |
+------------------+
| My |
+------------------+
1 row in set (0.00 sec)
Similarly, using RIGHT()
SELECT RIGHT("MySQL", 3);
produces the following results:
+-------------------+
| RIGHT("MySQL", 3) |
+-------------------+
| SQL |
+-------------------+
1 row in set (0.00 sec)
One of the many common uses of substring functions is to extract parts of order numbers to find out who placed the order. In some applications, the system is designed to automatically generate an order number containing a date, customer identification, and other information. If this order number always follows a particular pattern, such as XXXX-YYYYY-ZZ, you can use substring functions to extract the individual parts of the whole. For example, if ZZ always represents the state to which the order was shipped, you can use the RIGHT() function to extract these characters and report the number of orders shipped to a particular state.
String Modification Functions
PHP has numerous functions to modify the appearance of strings, but if you can perform the task as part of the SQL statement, all the better—let the database system do as much work as possible.
The MySQL LCASE() and UCASE() functions transform a string into lowercase or uppercase:
SELECT LCASE('MYSQL');
This query produces the following results:
+----------------+
| LCASE('MYSQL') |
+----------------+
| mysql |
+----------------+
1 row in set (0.00 sec)
For uppercasing, use the following
SELECT UCASE('mysql');
This query produces the following results:
+----------------+
| UCASE('mysql') |
+----------------+
| MYSQL |
+----------------+
1 row in set (0.00 sec)
Tip
A practical use of the LCASE() and UCASE() functions is when you are validating user input against data stored in MySQL—such as in the case of a user login form. If you want the login process to appear not case sensitive, you could attempt to match the uppercase (or lowercase) version of the user input against the uppercase (or lowercase) version of the data stored in the table.
Remember, if you use the functions with field names, don’t use quotation marks:
SELECT UCASE(lastname) FROM master_name;
Use the preceding query to produce results like this:
+-----------------+
| UCASE(lastname) |
+-----------------+
| BELL |
| CARR |
| DOE |
| JONES |
| JONES |
| SMITH |
| SMITH |
| SMITH |
| SMITH |
+-----------------+
9 rows in set (0.00 sec)
Another fun string-manipulation function is REPEAT(), which does just what it sounds like—repeats a string for a given number of times:
SELECT REPEAT("bowwow", 4);
You should see this result:
+--------------------------+
| REPEAT("bowwow", 4) |
+--------------------------+
| bowwowbowwowbowwowbowwow |
+--------------------------+
1 row in set (0.00 sec)
The REPLACE() function replaces all occurrences of a given string with another string:
SELECT REPLACE('bowwowbowwowbowwowbowwow', 'wow', 'WOW');
This query produces the following:
+---------------------------------------------------+
| REPLACE('bowwowbowwowbowwowbowwow', 'wow', 'WOW') |
+---------------------------------------------------+
| bowWOWbowWOWbowWOWbowWOW |
+---------------------------------------------------+
1 row in set (0.00 sec)
Using Date and Time Functions in MySQL
You can use MySQL’s built-in date-related functions in SELECT statements, with or without specifying a table, to retrieve a result of the function. Or you can use the functions with any type of date field: date, datetime, timestamp, and year. Depending on the type of field in use, the results of the date-related functions are more or less useful. The following examples are by no means a complete library of MySQL date and time-related functions. For more, see the MySQL Manual at http://dev.mysql.com/doc/refman/5.5/en/date-and-time-functions.html.
Working with Days
The DAYOFWEEK() and WEEKDAY() functions do similar things with slightly different results. Both functions find the weekday index of a date, but the difference lies in the starting day and position.
If you use DAYOFWEEK(), the first day of the week is Sunday, at position 1, and the last day of the week is Saturday, at position 7. For example:
SELECT DAYOFWEEK('2012-01-09');
This query produces the following result:
+-------------------------+
| DAYOFWEEK('2012-01-09') |
+-------------------------+
| 2 |
+-------------------------+
1 row in set (0.00 sec)
The result shows that January 9, 2012, was weekday index 2, or Monday. Using the same date with WEEKDAY() gives you a different result with the same meaning:
+-----------------------+
| WEEKDAY('2012-01-09') |
+-----------------------+
| 0 |
+-----------------------+
1 row in set (0.00 sec)
The result shows that January 9, 2012, was weekday index 0. Because WEEKDAY() uses Monday as the first day of the week at position 0 and Sunday as the last day at position 6, 0 is accurate: Monday.
The DAYOFMONTH() and DAYOFYEAR() functions are more straightforward, with only one result and a range that starts at 1 and ends at 31 for DAYOFMONTH() and 366 for DAYOFYEAR(). Some examples follow:
SELECT DAYOFMONTH('2012-01-09');
This query produces the following results:
+--------------------------+
| DAYOFMONTH('2012-01-09') |
+--------------------------+
| 9 |
+--------------------------+
1 row in set (0.00 sec)
Now try:
SELECT DAYOFYEAR('2012-01-09');
This query produces the following results:
+-------------------------+
| DAYOFYEAR('2012-01-09') |
+-------------------------+
| 09 |
+-------------------------+
1 row in set (0.00 sec)
It might seem odd to have a function that returns the day of the month on a particular date because the day is right there in the string. But think about using these types of functions in WHERE clauses to perform comparisons on records. If you have a table that holds online orders with a field containing the date the order was placed, you can quickly get a count of the orders placed on any given day of the week, or see how many orders were placed during the first half of the month versus the second half.
The following two queries show how many orders were placed during the first three days of the week (throughout all months) and then the remaining days of the week:
SELECT COUNT(id) FROM orders WHERE DAYOFWEEK(date_ordered) < 4;
SELECT COUNT(id) FROM orders WHERE DAYOFWEEK(date_ordered) > 3;
Using DAYOFMONTH(), the following examples show the number of orders placed during the first half of any month versus the second half:
SELECT COUNT(id) FROM orders WHERE DAYOFMONTH(date_ordered) < 16;
SELECT COUNT(id) FROM orders WHERE DAYOFMONTH(date_ordered) > 15;
You can use the DAYNAME() function to add more life to your results because it returns the name of the weekday for any given date:
SELECT DAYNAME(date_ordered) FROM orders;
This query produces results such as these:
+-----------------------+
| DAYNAME(date_ordered) |
+-----------------------+
| Thursday |
| Monday |
| Thursday |
| Thursday |
| Wednesday |
| Thursday |
| Sunday |
| Sunday |
+-----------------------+
8 rows in set (0.00 sec)
Functions aren’t limited to WHERE clauses—you can use them in ORDER BY clauses as well, such as the following:
SELECT DAYNAME(date_ordered) FROM orders ORDER BY DAYOFWEEK(date_ordered);
Working with Months and Years
Days of the week are not the only parts of the calendar, and MySQL has functions specifically for months and years as well. Just like the DAYOFWEEK() and DAYNAME() functions, MONTH() and MONTHNAME() return the number of the month in a year and the name of the month for a given date. For example:
SELECT MONTH('2012-01-09'), MONTHNAME('2012-01-09');
This query produces the following:
+---------------------+-------------------------+
| MONTH('2012-01-09') | MONTHNAME('2012-01-09') |
+---------------------+-------------------------+
| 1 | January |
+---------------------+-------------------------+
1 row in set (0.00 sec)
Using MONTHNAME() on the orders table shows the proper results but can show a lot of repeated data:
+-------------------------+
| MONTHNAME(date_ordered) |
+-------------------------+
| November |
| November |
| November |
| November |
| November |
| November |
| November |
| October |
+-------------------------+
8 rows in set (0.00 sec)
You can use DISTINCT to get nonrepetitive results:
SELECT DISTINCT MONTHNAME(date_ordered) FROM orders;
This query produces results like these:
+-------------------------+
| MONTHNAME(date_ordered) |
+-------------------------+
| November |
| October |
+-------------------------+
2 rows in set (0.00 sec)
For work with years, the YEAR() function returns the year of a given date:
SELECT DISTINCT YEAR(date_ordered) FROM orders;
This query produces results like the following:
+--------------------+
| YEAR(date_ordered) |
+--------------------+
| 2011 |
| 2012 |
+--------------------+
1 row in set (0.00 sec)
Working with Weeks
Weeks can be tricky things—there can be 53 weeks in a year if Sunday is the first day of the week and December hasn’t ended. For example, December 30 of 2001 was a Sunday:
SELECT DAYNAME('2001-12-30');
Here’s proof:
+-----------------------+
| DAYNAME('2001-12-30') |
+-----------------------+
| Sunday |
+-----------------------+
1 row in set (0.00 sec)
That fact made December 30 of 2001 part of the 53rd week of the year, which you can see using this query:
SELECT WEEK('2001-12-30');
The week of the year is shown appropriately in the results:
+--------------------+
| WEEK('2001-12-30') |
+--------------------+
| 53 |
+--------------------+
1 row in set (0.00 sec)
The 53rd week contained December 30 and 31 and was only 2 days long; the first week of 2002 began with January 1.
If you want your weeks to start on Mondays but still want to find the week of the year, the optional second argument enables you to change the start day. A 1 indicates a week that starts on Monday. In the following examples, a Monday start day makes December 30 part of the 52nd week of 2001, but December 31 is still part of the 53rd week of 2001:
SELECT WEEK('2001-12-30',1);
This query produces the following results:
+----------------------+
| WEEK('2001-12-30',1) |
+----------------------+
| 52 |
+----------------------+
1 row in set (0.00 sec)
While this query:
SELECT WEEK('2001-12-31',1);
produces this result:
+----------------------+
| WEEK('2001-12-31',1) |
+----------------------+
| 53 |
+----------------------+
1 row in set (0.00 sec)
Working with Hours, Minutes, and Seconds
If you’re using a date that includes the exact time, such as datetime or timestamp, or even just a time field, there are functions to find the hours, minutes, and seconds from that string. Not surprisingly, these functions are called HOUR(), MINUTE(), and SECOND(). HOUR() returns the hour in a given time, which is between 0 and 23. The range for MINUTE() and SECOND() is 0 to 59.
Here is an example:
SELECT HOUR('2012-01-09 07:27:49') AS hour,
MINUTE('2012-01-09 07:27:49') AS minute,
SECOND('2012-01-09 07:27:49') AS second;
This query produces the following:
+------+--------+--------+
| hour | minute | second |
+------+--------+--------+
| 7 | 27 | 49 |
+------+--------+--------+
1 row in set (0.00 sec)
That’s a lot of queries to get at one time from a datetime field—you can put the hour and minute together and even use CONCAT_WS() to put the : between the results and get a representation of the time:
SELECT CONCAT_WS(':',HOUR('2012-01-09 07:27:49'),
MINUTE('2012-01-09 07:27:49')) AS sample_time;
This query produces the following:
+-------------+
| sample_time |
+-------------+
| 7:27 |
+-------------+
1 row in set (0.00 sec)
In the next section, you learn how to use the DATE_FORMAT() function to properly format dates and times.
Formatting Dates and Times with MySQL
The DATE_FORMAT() function formats a date, datetime, or timestamp field into a string by using options that tell it exactly how to display the results. The syntax of DATE_FORMAT() is as follows:
DATE_FORMAT(date,format)
Table 16.2 lists many formatting options for DATE_FORMAT().
Table 16.2 DATE_FORMAT() Format String Options
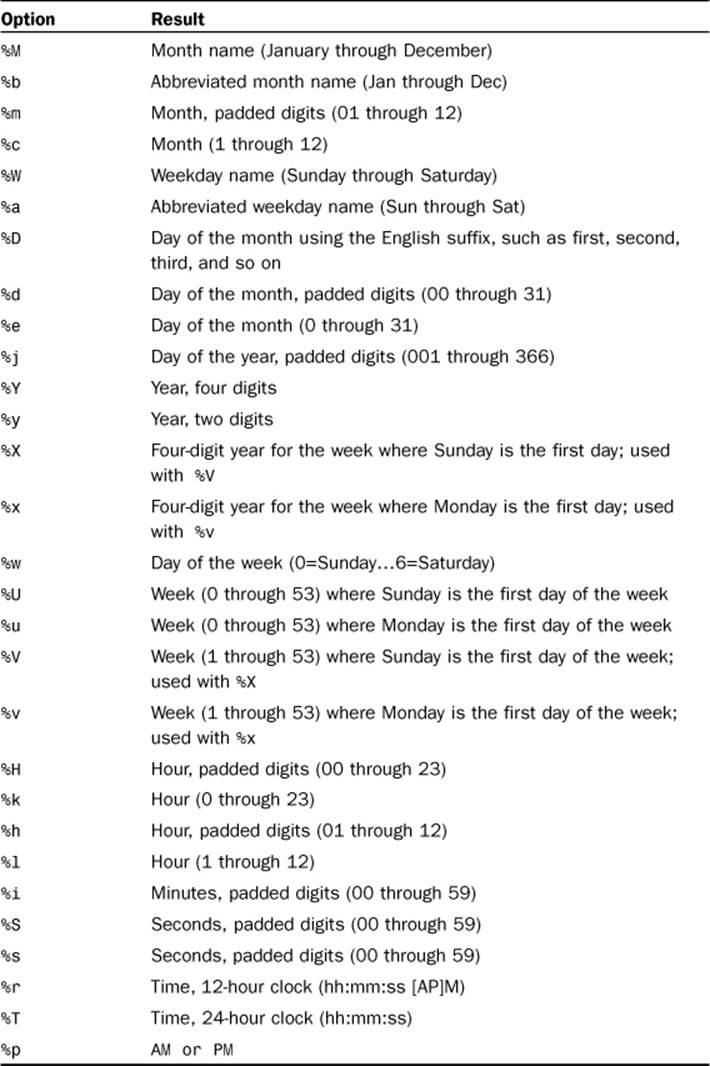
Note
Any other characters used in the DATE_FORMAT() option string appear literally.
To display the 02:02 result that we rigged in the previous section, you use the %h and %i options to return the hour and minute from the date with a : between the two options. For example:
SELECT DATE_FORMAT('2012-01-09 02:02:00', '%h:%i') AS sample_time;
This query produces the following:
+-------------+
| sample_time |
+-------------+
| 02:02 |
+-------------+
1 row in set (0.00 sec)
The following are just a few more examples of the DATE_FORMAT() function in use, but this function is best understood by practicing it yourself.
SELECT DATE_FORMAT('2012-01-09', '%W, %M %D, %Y') AS sample_time;
This query produces the following output:
+----------------------------+
| sample_time |
+----------------------------+
| Monday, January 9th, 2012 |
+----------------------------+
1 row in set (0.00 sec)
Here’s a query to format the time right now (well, when I wrote this):
SELECT DATE_FORMAT(NOW(),'%W the %D of %M, %Y
around %l o\'clock %p') AS sample_time;
The output as I ran the query just this moment was this:
+-------------------------------------------------------+
| sample_time |
+-------------------------------------------------------+
| Tuesday the 10th of January, 2012 around 8 o'clock PM |
+-------------------------------------------------------+
1 row in set (0.04 sec)
Take some time to play around with date formatting options on your own; there are plenty, and you’ll find them easy to follow.
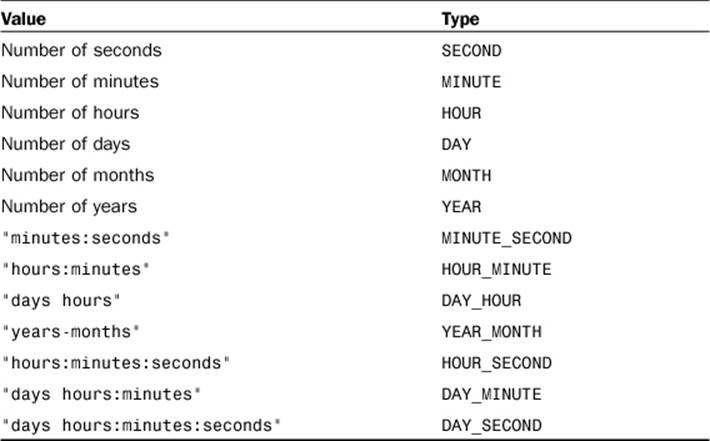
Performing Date Arithmetic with MySQL
MySQL has several functions to help perform date arithmetic, and this is one of the areas where it is typically more efficient to allow MySQL to do the math than your PHP script. The DATE_ADD() and DATE_SUB() functions return a result given a starting date and an interval. The syntax for both functions is as follows:
DATE_ADD(date,INTERVAL value type)
DATE_SUB(date,INTERVAL value type)
Table 16.3 shows the possible types and their expected value format.
Table 16.3 Values and Types in Date Arithmetic
For example, to find the date of the current day plus 21 days, use the following:
SELECT DATE_ADD(NOW(), INTERVAL 21 DAY);
The query as I ran it just now produced the following result:
+----------------------------------+
| DATE_ADD(NOW(), INTERVAL 21 DAY) |
+----------------------------------+
| 2012-01-31 21:02:16 |
+----------------------------------+
1 row in set (0.02 sec)
Using DATE_SUB() produced this result:
+----------------------------------+
| DATE_SUB(NOW(), INTERVAL 21 DAY) |
+----------------------------------+
| 2011-12-20 21:02:23 |
+----------------------------------+
1 row in set (0.00 sec)
Use the expression DAY as shown in Table 16.3, despite what might be a natural tendency to use DAYS instead of DAY. Using DAYS results in an error:
ERROR 1064: You have an error in your SQL syntax near 'DAYS)' at line 1
If you use DATE_ADD() or DATE_SUB() with a date value rather than a datetime value, the result is shown as a date value unless you use expressions related to hours, minutes, and seconds. In that case, your result is a datetime result.
For example, the result of the first query here remains a date field, whereas the second becomes a datetime:
SELECT DATE_ADD("2011-12-31", INTERVAL 1 DAY);
This query produces the following results:
+----------------------------------------+
| DATE_ADD("2011-12-31", INTERVAL 1 DAY) |
+----------------------------------------+
| 2012-01-01 |
+----------------------------------------+
1 row in set (0.00 sec)
While this query:
SELECT DATE_ADD("2011-12-31", INTERVAL 12 HOUR);
produces this result:
+------------------------------------------+
| DATE_ADD("2011-12-31", INTERVAL 12 HOUR) |
+------------------------------------------+
| 2011-12-31 12:00:00 |
+------------------------------------------+
1 row in set (0.00 sec)
You can also perform date arithmetic using the + and - operators instead of DATE_ADD() and DATE_SUB() functions, such as here:
SELECT "2011-12-31" + INTERVAL 1 DAY;
This query produces the following result:
+-------------------------------+
| "2011-12-31" + INTERVAL 1 DAY |
+-------------------------------+
| 2012-01-01 |
+-------------------------------+
1 row in set (0.00 sec)
Special Functions and Conversion Features
The MySQL NOW() function returns a current datetime result and is useful for time-stamping login or access times, as well as for numerous other tasks. MySQL has a few other functions that perform similarly.
The CURDATE() and CURRENT_DATE() functions are synonymous, and each returns the current date in YYYY-MM-DD format:
SELECT CURDATE(), CURRENT_DATE();
This query produces results like the following:
+------------+----------------+
| CURDATE() | CURRENT_DATE() |
+------------+----------------+
| 2012-01-10 | 2012-01-10 |
+------------+----------------+
1 row in set (0.01 sec)
Similarly, the CURTIME() and CURRENT_TIME() functions return the current time in HH:MM:SS format:
SELECT CURTIME(), CURRENT_TIME();
This query produces results like the following:
+-----------+----------------+
| CURTIME() | CURRENT_TIME() |
+-----------+----------------+
| 09:14:26 | 09:14:26 |
+-----------+----------------+
1 row in set (0.00 sec)
The NOW(), SYSDATE(), and CURRENT_TIMESTAMP() functions return values in full datetime format (YYYY-MM-DD HH:MM:SS):
SELECT NOW(), SYSDATE(), CURRENT_TIMESTAMP();
This query produces results like the following:
+---------------------+---------------------+---------------------+
| NOW() | SYSDATE() | CURRENT_TIMESTAMP() |
+---------------------+---------------------+---------------------+
| 2012-01-10 15:23:52 | 2012-01-10 15:23:52 | 2012-01-10 15:23:52 |
+---------------------+---------------------+---------------------+
1 row in set (0.00 sec)
The UNIX_TIMESTAMP() function returns the current date in—or converts a given date to—UNIX timestamp format. UNIX timestamp format is in seconds since the epoch, or seconds since midnight, January 1, 1970. For example:
SELECT UNIX_TIMESTAMP();
This query produces results like the following for the time the query is run:
+------------------+
| UNIX_TIMESTAMP() |
+------------------+
| 1326247953 |
+------------------+
1 row in set (0.00 sec)
This query gets the UNIX timestamp for a specific date:
SELECT UNIX_TIMESTAMP('1973-12-30');
The result of this query is:
+------------------------------+
| UNIX_TIMESTAMP('1973-12-30') |
+------------------------------+
| 126086400 |
+------------------------------+
1 row in set (0.00 sec)
The FROM_UNIXTIME() function performs a conversion of a UNIX timestamp to a full datetime format when used without any options:
SELECT FROM_UNIXTIME('1326247953');
The result of this query is as follows:
+-----------------------------+
| FROM_UNIXTIME('1326247953') |
+-----------------------------+
| 2012-01-10 21:12:33 |
+-----------------------------+
1 row in set (0.00 sec)
You can use the format options from the DATE_FORMAT() functions to display a timestamp in a more appealing manner:
SELECT FROM_UNIXTIME(UNIX_TIMESTAMP(), '%D %M %Y at %h:%i:%s');
The result of this query at the moment I wrote this is this:
+---------------------------------------------------------+
| FROM_UNIXTIME(UNIX_TIMESTAMP(), '%D %M %Y at %h:%i:%s') |
+---------------------------------------------------------+
| 10th January 2012 at 09:15:38 |
+---------------------------------------------------------+
1 row in set (0.00 sec)
Summary
In this chapter, you learned the basics of SQL, from table creation to manipulating records. The table-creation command requires three important pieces of information: the table name, the field name, and the field definitions. Field definitions are important because a well-designed table helps speed along your database. MySQL has three different categories of data types: numeric, date and time, and string.
The INSERT command, used to add records to a table, names the table and columns you want to populate and then defines the values. When placing values in the INSERT statement, you must enclose strings within single or double quotes. The SELECT SQL command is used to retrieve records from specific tables. The * character enables you to easily select all fields for all records in a table, but you can also specify particular column names. If the resultset is too long, the LIMIT clause provides a simple method for extracting slices of results if you indicate a starting position and the number of records to return. To order the results, use the ORDER BY clause to select the columns to sort. Sorts can be performed on integers, dates, and strings, in either ascending or descending order. The default order is ascending. Without specifying an order, results display in the order they appear in the table.
You can pick and choose which records you want to return using WHERE clauses to test for the validity of conditions. Comparison or logical operators are used in WHERE clauses, and sometimes both types are used for compound statements. Selecting records from multiple tables within one statement is as advanced as it gets because this type of statement—called JOIN—requires forethought and planning to produce correct results. Common types of JOIN are INNER JOIN, LEFT JOIN, and RIGHT JOIN, although MySQL supports many different kinds of JOIN. You also learned that you can use subqueries instead of JOINs when working with multiple tables.
The UPDATE and REPLACE commands modify existing data in your MySQL tables. UPDATE is good for changing values in specific columns and for changing values in multiple records based on specific conditions. REPLACE is a variation of INSERT that deletes and then reinserts a record with a matching primary key. Be careful when using UPDATE to change values in a column because failure to add a condition results in the given column being updated throughout all records in the table.
The DELETE command is simple: It removes whole records from tables. This also makes it dangerous, so be sure you give DELETE privileges only to users who can handle the responsibility. You can specify conditions when using DELETE so that records are removed only if a particular expression in a WHERE clause is true. Also, you can delete smaller sets of records in your table using a LIMIT clause. If you have an exceptionally large table, deleting portions is less resource-intensive than deleting each record in a huge table.
You were introduced to MySQL functions that perform actions on strings, dates, and times. If you have strings in MySQL that you want to concatenate or for which you want to count characters, you can use functions such as CONCAT(), CONCAT_WS(), and LENGTH(). To pad or remove padding from strings, use RPAD(), LPAD(), TRIM(), LTRIM(), and RTRIM() to get just the strings you want. You can also find the location of a string within another string, or return a part of a given string using the LOCATE(), SUBSTRING(), LEFT(), and RIGHT() functions. Functions such as LCASE(), UCASE(),REPEAT(), and REPLACE() also return variations of the original strings. MySQL’s built-in date and time functions can definitely take some of the load off your application by internally formatting dates and times and performing the date and time arithmetic. The formatting options used for theDATE_FORMAT() function provide a simple method to produce a custom display string from any sort of date field. The DATE_ADD() and DATE_SUB() functions and their numerous available interval types help you determine dates and times in the past or future. In addition, functions such as DAY(),WEEK(), MONTH(), and YEAR() prove useful for extracting parts of dates for use in WHERE or ORDER BY clauses.
Q&A
Q. What characters can I use to name my tables and fields, and what is the character limit?
A. The maximum length of database, table, or field names is 64 characters. Any character you can use in a directory name or filename, you can use in database and table names, except / and .. These limitations are in place because MySQL creates directories and files in your filesystem, which correspond to database and table names. No character limitations (besides length) apply in field names.
Q. Can I use multiple functions in one statement, such as making a concatenated string all uppercase?
A. Sure. Just be mindful of your opening and closing parentheses. This example shows how to uppercase the concatenated first and last names from the master name table:
SELECT UCASE(CONCAT_WS(' ', firstname, lastname)) FROM master_name;
The results would be something like this:
+--------------------------------------------+
| UCASE(CONCAT_WS(' ', firstname, lastname)) |
+--------------------------------------------+
| JOHN SMITH |
| JANE SMITH |
| JIMBO JONES |
| ANDY SMITH |
| CHRIS JONES |
| ANNA BELL |
| JIMMY CARR |
| ALBERT SMITH |
| JOHN DOE |
+--------------------------------------------+
9 rows in set (0.00 sec)
If you want to uppercase just the last name, use this:
SELECT CONCAT_WS(' ', firstname, UCASE(lastname)) FROM master_name;
The results would be something like this:
+--------------------------------------------+
| CONCAT_WS(' ', firstname, UCASE(lastname)) |
+--------------------------------------------+
| John SMITH |
| Jane SMITH |
| Jimbo JONES |
| Andy SMITH |
| Chris JONES |
| Anna BELL |
| Jimmy CARR |
| Albert SMITH |
| John DOE |
+--------------------------------------------+
9 rows in set (0.00 sec)
Workshop
The workshop is designed to help you review what you’ve learned and begin putting your knowledge into practice.
Quiz
1. The integer 56678685 could be which data type(s)?
2. How would you define a field that could contain only the following strings: apple, pear, banana, cherry?
3. What would be the LIMIT clauses for selecting the first 25 records of a table? Then the next 25?
4. How do you formulate a string comparison using LIKE to match first names of John or Joseph?
5. How do you explicitly refer to a field called id in a table called table1?
6. Write a SQL statement that joins two tables, orders and items_ordered, each of which has a primary key of order_id. From the orders table, select the following fields: order_name and order_date. From the items_ordered table, select the item_description field.
7. Write a SQL query to find the starting position of a substring "grape" in a string "applepearbananagrape".
8. Write a query that selects the last five characters from the string "applepearbananagrape".
Answers
1. MEDIUMINT, INT, or BIGINT.
2. ENUM ('apple', 'pear', 'banana', 'cherry')
or
SET ('apple', 'pear', 'banana', 'cherry')
3. LIMIT 0, 25 and LIMIT 25, 25
4. LIKE 'Jo%'
5. Use table1.id instead of id in your query.
6. SELECT orders.order_name, orders.order_date, items_ordered.item_description FROM orders LEFT JOIN items_ordered ON orders.order_id = items_ordered.id;
7. SELECT LOCATE('grape', 'applepearbananagrape');
8. SELECT RIGHT("applepearbananagrape", 5);
Activity
Take the time to create some sample tables and practice using basic INSERT and SELECT commands.
All materials on the site are licensed Creative Commons Attribution-Sharealike 3.0 Unported CC BY-SA 3.0 & GNU Free Documentation License (GFDL)
If you are the copyright holder of any material contained on our site and intend to remove it, please contact our site administrator for approval.
© 2016-2025 All site design rights belong to S.Y.A.