Sams Teach Yourself PHP, MySQL and Apache All in One (2012)
Part VI. Administration and Fine-Tuning
Chapter 30. Setting Up a Secure Web Server
In this chapter, you learn the following:
• The SSL/TLS family of protocols and the underlying cryptography concepts
• What secure certificates are and how to create and manage them
• How to activate the mod_ssl Apache module
This chapter explains how to set up an Apache server capable of secure transactions. If you are using shared server space with a hosting provider, you do not have access to these configuration options; the process of setting up a secure web server is specific to the provider and usually is not something you can do yourself. However, if you have root access to your server, this chapter will teach you the basics of securing your web server.
The Need for Security
Several types of Internet-related transactions require a high level of security. These include financial transactions, such as banking operations and electronic commerce, but also any exchange of sensitive information, such as medical records and corporate documents. Secure transactions over the Internet require three main elements:
• Confidentiality—If you are transmitting or accessing sensitive information such as your credit card number or your personal medical history, you certainly do not want a stranger to get hold of it.
• Integrity—Transmitted information must be protected from external manipulation—if you place an order online to buy 100 shares of stock, you don’t want anyone to intercept the message and change it to an order to buy 1,000 shares.
• Authentication—You need to trust that the organizations or individuals you are communicating with are who they say they are.
The SSL Protocol
SSL stands for Secure Sockets Layer, and TLS stands for Transport Layer Security. These two families of protocols were originally designed to provide security for HTTP transactions, but they also can be used for a variety of other Internet protocols such as IMAP (Internet Message Access Protocol) and NNTP (Network News Transfer Protocol). HTTP running over SSL is referred to as Secure HTTP.
Netscape released SSL version 2 in 1994 and SSL version 3 in 1995. TLS is an IETF (Internet Engineering Task Force) standard designed to standardize SSL as an Internet protocol, but it is just a modification of SSL version 3 with a small number of added features and minor cleanups. The TLS acronym is the result of arguments between Microsoft and Netscape over the naming of the protocol because each company proposed its own name. However, the name has not stuck, and most people refer to these protocols simply as SSL. Unless otherwise specified, the rest of this chapter refers to SSL/TLS as SSL.
You specify that you want to connect to a server using SSL by replacing http with https in the protocol component of a URI (uniform resource identifier). The default port for HTTP over SSL is 443.
The following sections explain how SSL addresses the confidentiality, integrity, and authentication requirements outlined previously. You also learn a bit about the underlying mathematical and cryptographic principles at the core of SSL.
Addressing the Need for Confidentiality
The SSL protocol protects data by encrypting it. Encryption is the process of converting a message, the plaintext, into a new encrypted message, the ciphertext. Although the plaintext is readable by everyone, the ciphertext is completely unintelligible to anyone who might intercept it. Decryption is the reverse process, which transforms the ciphertext back into the original plaintext.
Usually, the encryption and decryption process involves an additional piece of information: a key. If both sender and receiver share the same key, the process is referred to as symmetric cryptography. If sender and receiver have different, complementary keys, the process is called asymmetricor public key cryptography.
Symmetric Cryptography
If the key used to both encrypt and decrypt the message is the same, the process is known as symmetric cryptography. DES, Triple DES, RC4, and RC2 are algorithms used for symmetric key cryptography. Many of these algorithms can have different key sizes, measured in bits. In general, given an algorithm, the greater the number of bits in the key, the more secure the algorithm is and the slower it will run because of the increased computational needs of performing the algorithm.
Symmetric cryptography is relatively fast compared to public key cryptography, which is explained in the next section. Symmetric cryptography has two main drawbacks, however. One is that keys must be changed periodically to avoid providing an eavesdropper with access to large amounts of material encrypted with the same key. The other issue is the key distribution problem: How do you get the keys to each one of the parties, and do so in a safe manner? This was one of the original limiting factors of symmetric cryptography; the problem was solved by periodically having people traveling around with suitcases full of keys. Then along came public key cryptography.
Public Key Cryptography
Public key cryptography takes a different approach than its symmetric predecessor. Instead of both parties sharing the same key, a pair of keys exists: one public and the other private. The public key can be widely distributed, whereas the owner keeps the private key secret. These two keys arecomplementary—a message encrypted with one of the keys can be decrypted only by the other key.
Using this method, anyone wanting to transmit a secure message to you can encrypt the message using your public key, assured that only the owner of the private key—you—can decrypt it. Even if an eavesdropper has access to the public key, he cannot decrypt the communication meant for you. In fact, you want the public key to be as widely available as possible so that more people can send encrypted messages to you. Public key cryptography can also be used to provide message integrity and authentication. People with public keys place these keys on public key servers or simply send the keys to others with whom they want to have secure email exchanges. Using the appropriate software tools, such as PGP or GnuPG, the sender encrypts the outgoing message based on the recipient’s public key.
The assertion that only the owner of the private key can decrypt a message meant for her means that with the current knowledge of cryptography and availability of computing power, brute force alone will not break the encryption in a reasonable time frame; however, if the underlying algorithm or its implementation is flawed, such attacks are possible.
Note
Public key cryptography is similar to giving away many identical padlocks and retaining the master key. Anybody who wants to send you a message privately can do so by putting it in a safe and locking it with one of those padlocks (public keys) before sending it to you. Only you have the appropriate key (private key) to open that padlock (decrypt the message).
The SSL protocol uses public key cryptography in the initial handshake phase to securely exchange symmetric keys that can then be used to encrypt the communication.
Addressing the Need for Integrity
Data integrity is preserved by performing a special calculation on the contents of the message and storing the result with the message itself. When the message arrives at its destination, the recipient then performs the same calculation and compares the results. If the contents of the message changed, the results of the calculation will differ—and you’ll know someone else has tampered with it.
Digest algorithms perform just that process: creating message digests. A message digest is a method of creating a fixed-length representation of an arbitrary message that uniquely identifies it (like a fingerprint). A good message digest algorithm should be irreversible and collision resistant, at least for practical purposes. Irreversible means that the original message cannot be obtained from the digest, and collision resistant means that no two different messages should have the same digest. Examples of digest algorithms are MD5 (Message Digest) and SHA (Secure Hash).
Message digests alone, however, do not guarantee the integrity of the message—an attacker could change the text and the message digest. Message authentication codes, or MACs, are similar to message digests, but incorporate a shared secret key in the process. The result of the algorithm depends both on the message and the key used. Because the attacker has no access to the key, he cannot modify both the message and the digest. HMAC (Hash Message Authentication Code) is an example of a message authentication code algorithm.
The SSL protocol uses MAC codes to avoid replay attacks and to ensure integrity of the transmitted information.
Addressing the Need for Authentication
SSL uses certificates to authenticate the parties in a communication. Public key cryptography can be used to digitally sign messages. In fact, just the act of your encrypting a message with your secret key guarantees the receiver that the message came from you. Other digital signature algorithms involve first calculating a digest of the message and then signing the digest.
You can tell that the person who created that public and private key pair is the one sending the message, but how do you tie that key to a person or organization that you can trust in the real world? It is plausible that an attacker could impersonate a sender’s identity and distribute a different public key, claiming it is the legitimate one.
Trust can be achieved by using digital certificates. Digital certificates are electronic documents that contain a public key and information about its owner (name, address, and so on). To be useful, the certificate must be signed by a trusted third party (certification authority, or CA) who certifies that the information is correct. There are many different kinds of CAs, as described later in the chapter. Some of them are commercial entities, providing certification services to companies conducting business over the Internet. Companies providing internal certification services create other CAs.
The CA guarantees that the information in the certificate is correct, and that the key belongs to that individual or organization. Certificates have a period of validity and can expire or be revoked. Certificates can be chained so that the certification process can be delegated. For example, a trusted entity can certify companies, which in turn can take care of certifying its own employees.
If this whole process is to be effective and trusted, the certificate authority must require appropriate proof of identity from individuals and organizations before it issues a certificate.
By default, browsers include a collection of root certificates for trusted certificate authorities.
SSL and Certificates
The main standard defining certificates is X.509, adapted for Internet usage. An X.509 certificate contains the following information:
• Issuer—The name of the signer of the certificate
• Subject—The person holding the key being certified
• Subject public key—The public key of the subject
• Control information—Data such as the dates for which the certificate is valid
• Signature—The signature that covers the previous data
You can check a real-life certificate by connecting to a secure server with your browser. If the connection has been successful, a little padlock icon or another visual clue is added to the status bar of your browser. Depending on your browser, you should be able to click the representative icon to view information on the SSL connection and the remote server certificate. In the following example, the SSL certificate is examined for https://www.amazon.com/. You can see that the issuer of the certificate is VeriSign (see Figure 30.1). The page and its assets downloaded seamlessly because VeriSign is a trusted certification authority.
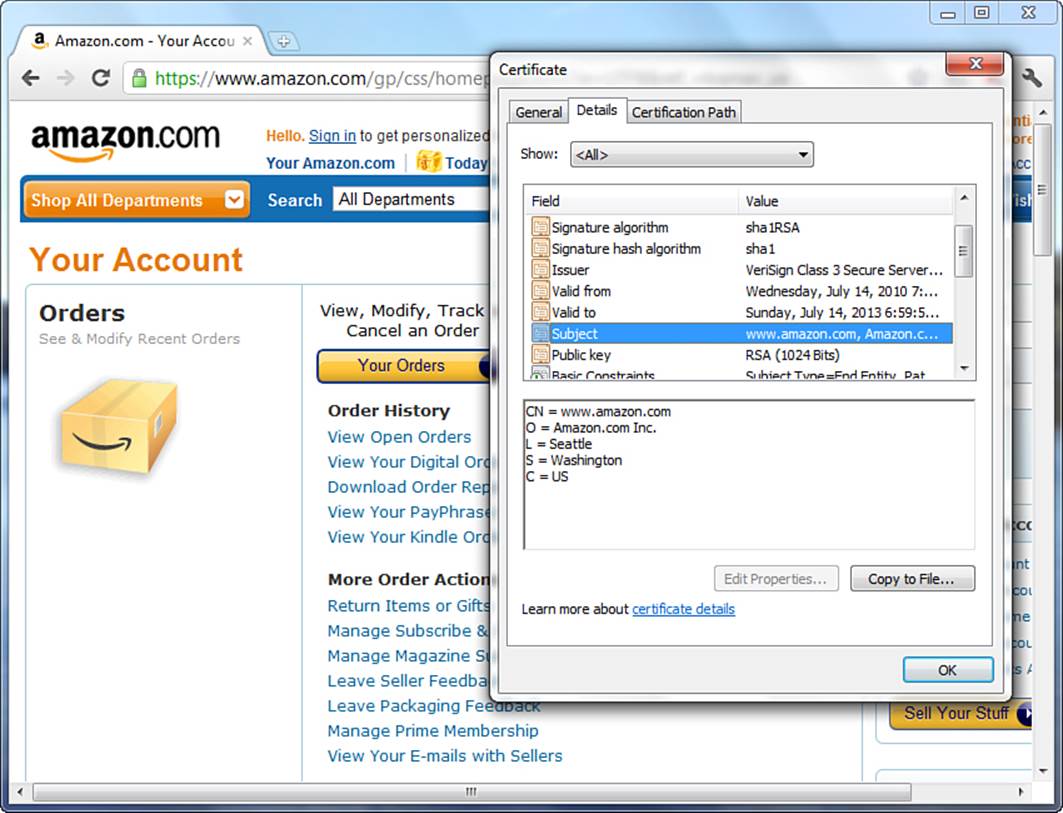
Figure 30.1 SSL certificate in use at www.amazon.com.
In the case of the certificate in Figure 30.1, the Subject is an entity named Amazon.com, Inc. located in Seattle, Washington, United States. The common name of this entity is www.amazon.com.
C stands for country, ST for state, L for locality, O for organization, and CN for common name. In a website certificate, the common name identifies the fully qualified domain name (FQDN) of the website. This is the server name part of the URL; in this case, the www.amazon.com domain and the hostname www. If this address does not match what you typed in the location bar, the browser issues an error.
Note
If the CN were *.amazon.com, the SSL certificate would be valid for any host on the amazon.com domain.
SSL Protocol Summary
You have seen how SSL achieves confidentiality via encryption, integrity via message authentication codes, and authentication via certificates and digital signatures.
The process to establish an SSL connection is the following:
1. The user uses his browser to connect to the remote web server.
2. The handshake phase begins—the browser and server exchange keys and certificate information.
3. The browser checks the validity of the server certificate, including that it has not expired, that it has been issued by a trusted CA, and so on.
4. Optionally, the server can require the client to present a valid certificate as well.
5. Server and client use each other’s public key to securely agree on a symmetric key.
6. The handshake phase concludes and transmission continues using symmetric cryptography.
Obtaining and Installing SSL Tools
SSL support is provided by mod_ssl, an Apache module. This module requires the OpenSSL library—an open source implementation of the SSL/TLS protocols and a variety of other cryptographic algorithms. OpenSSL is based on the SSLeay library developed by Eric A. Young and Tim J. Hudson.
Because of the restrictions on the distribution of string cryptography and patented intellectual property worldwide, the installation of SSL-related tools varies in its ease from platform to platform. The following sections provide an overview for obtaining and installing SSL-related tools.
OpenSSL
You can find all the files and instructions necessary for installing OpenSSL at http://www.openssl.org/. Users of UNIX/Linux (and their variants) will find the installation of the OpenSSL software to be similar to installing other system tools. However, the casual Windows user will discover that there are currently no freely distributed precompiled binaries. As such, Windows users must compile the OpenSSL tools on their own. After you have installed the OpenSSL toolkit, you have all the necessary elements for creating and manipulating certificates and keys, as well as for interfacing with the mod_ssl Apache module.
Installation for Windows Users
Windows users familiar with the process of building their own binaries may do so with the OpenSSL source code provided at the OpenSSL website. The instructions for compiling OpenSSL on Windows are in the INSTALL.W32 file found in the source distribution. Restating these instructions is beyond the scope of this book; however, you will find they are comprehensive and well written. The required tools are ActiveState Perl for Windows and one of the following C compilers:
• Visual C++
• Borland C
• GNU C (Cygwin or MinGW)
Be sure to follow the instructions appropriate to your compiler of choice because they are different for each. You can also find tips from Apache for compiling OpenSSL as part of the Apache compilation instructions at http://httpd.apache.org/docs/2.4/platform/win_compiling.html.
Installation for UNIX/Linux Users
If you are running a recent Linux or FreeBSD distribution, OpenSSL might already be installed in your system. Should you need to install OpenSSL, you can download the source from the OpenSSL website. After you have downloaded the file, uncompress it and cd into the created directory (replace -version in the following commands with your particular current version of OpenSSL):
# gunzip < openssl-version.tar.gz | tar xvf -
# cd openssl-version
Complete installation instructions are found in the INSTALL file, but in short, the config script helps you build the software, which is followed by the make and make install processes.
The mod_ssl Apache Module
In the past, SSL extensions for Apache had to be distributed separately because of export restrictions. Currently, mod_ssl is bundled with Apache 2.2 and above, but only as part of the source distributions. Although this is not an issue for UNIX/Linux users, Windows users will find they must build Apache from source to build the mod_ssl module; mod_ssl is not distributed in the precompiled and distributed binaries. The mod_ssl module depends on the OpenSSL library, so a valid OpenSSL installation is required.
For Windows Users
When downloading the precompiled installation binaries, be sure to select the version with openssl in the filename. For instance, httpd-2.2.22-win32-x86-openssl-0.9.8t.msi is the name of the Windows installer for Apache 2.2.22.
Note
At the time of writing, there was no Windows binary distribution for Apache 2.4. When there is, you can expect it to follow this naming convention.
If you want to build OpenSSL and Apache with mod_ssl from source, follow the Apache documentation found at http://httpd.apache.org/docs/2.4/platform/win_compiling.html. Again, restating these instructions is beyond the scope of this book, but they will provide you with all the information you need if you choose to go that route. The core requirements for building from source are as follows:
• Installed OpenSSL toolkit
• Microsoft Visual C++ 5.0 or higher
• The Windows Platform SDK
• The awk utility (awk, gawk, or similar)
For UNIX/Linux Users
The source distribution used in Chapter 3, “Installing and Configuring Apache,” should already include the files necessary to use mod_ssl. Therefore, for UNIX/Linux users to use mod_ssl, you only need to follow the configure and make/make install process again, with the following addition as part of the configure command:
--enable-ssl --with-ssl=/usr/local/ssl/
This assumes that you installed OpenSSL in the listed location; if it resides in another directory on your server, just substitute the location in the preceding command.
If you compiled mod_ssl statically into Apache, you can check whether it is present by issuing the following command, which provides a list of compiled-in modules:
# /usr/local/apache2/bin/httpd -l
Note
The preceding command assumes that you installed Apache in the /usr/local/apache2 directory.
If mod_ssl was compiled as a dynamic loadable module, the following line must be added to or uncommented in the Apache configuration file (httpd.conf):
LoadModule ssl_module modules/libmodssl.so
When you have finished making changes to the httpd.conf file, restart Apache so that your changes take effect. If you look in your error_log after restarting, mod_ssl will be part of your server signature, as follows:
Apache/2.4.1 (Unix) mod_ssl/2.4.1 OpenSSL/0.9.8t PHP/5.4.0
Managing Certificates
After installing and configuring OpenSSL and mod_ssl, the next step for a working SSL server implementation is to create a server certificate. This section explains in detail how to create and manage certificates and keys by using the openssl command-line tool. If you are using SSL for an e-commerce site, encryption protects customer data from eavesdroppers, and the certificate enables customers to verify that you are who you claim to be.
Note
The examples refer to the UNIX version of the command-line program openssl. If you are running under Windows, you need to use openssl.exe instead and change the paths of the examples to use backslashes rather than forward slashes. In addition, if you installed OpenSSL in a directory unlike the one listed here, simply substitute that directory in the examples.
Creating a Key Pair
You must have a public/private key pair before you can create a certificate request. Assume that the FQDN for the certificate you want to create is www.example.com. You can create the keys by issuing the following command:
# openssl genrsa –-des3 -out www.example.com.key 1024
• The genrsa switch indicates to OpenSSL that you want to generate a key pair.
• The -des3 switch indicates that the private key should be encrypted and protected by a pass phrase.
• The -out switch indicates where to store the results.
• 1024 indicates the number of bits of the generated key.
The result of invoking this command looks like this:
Generating RSA private key, 1024 bit long modulus
..............++++++
.......................++++++
e is 65537 (0x10001)
Enter pass phrase for www.example.com.key:
As you can see, you are asked to provide a pass phrase; choose a secure one. The pass phrase is necessary to protect the private key, and you are asked for it whenever you want to start the server.
Tip
You can choose not to password-protect the key. This is convenient because you will not need to enter the pass phrase during reboots, but it is highly unsecure, and a compromise of the server means a compromise of the key as well. In any case, you can choose to unprotect the key either by leaving out the -des3 switch in the generation phase or by issuing the following command:
# openssl rsa -in www.example.com.key -out www.example.com.key.unsecure
It is a good idea to back up the www.example.com.key file. You can learn about the contents of the key file by issuing the following command:
# openssl rsa -noout -text -in www.example.com.key
Elements of the key are then displayed to you.
Creating a Certificate Signing Request
To get a certificate issued by a CA, you must submit a certificate signing request. To create a request, issue the following command:
# req -new -key www.example.com.key -out www.example.com.csr
You are prompted for the certificate information, something like this:
Using configuration from /usr/local/ssl/install/openssl/openssl.cnf
Enter PEM pass phrase:
You are about to be asked to enter information that will be incorporated
into your certificate request.
What you are about to enter is what is called a Distinguished Name or a DN.
There are quite a few fields but you can leave some blank
For some fields there will be a default value,
If you enter '.', the field will be left blank.
-----
Country Name (2 letter code) [AU]:US
State or Province Name (full name) [Some-State]:CA
Locality Name (eg, city) []: San Francisco
Organization Name (eg, company) [Internet Widgits Pty Ltd]:.
Organizational Unit Name (eg, section) []:.
Common Name (eg, YOUR name) []:www.example.com
Email Address []:administrator@example.com
Please enter the following 'extra' attributes
to be sent with your certificate request
A challenge password []:
An optional company name []:
It is important that the Common Name field entry matches the address that visitors to your website will type in their browsers. This is one of the checks that the browser performs for the remote server certificate. If the names differ, a warning indicating the mismatch issues to the user.
The certificate is now stored in www.example.com.csr. You can learn about the contents of the certificate using the following command:
# openssl req -noout -text -in www.example.com.csr
You can submit the certificate signing request file to a CA for processing. VeriSign, Thawte, and Network Solutions are two of those CAs, but many CAs are available. You can learn more about the VeriSign, Thawtem, and Network Solutions submission procedures at their websites for their products:
• VeriSign—http://www.verisign.com/ssl/
• Thawte—http://www.thawte.com/ssl/web-server-ssl-certificates/
• Network Solutions—http://www.networksolutions.com/SSL-certificates/
Creating a Self-Signed Certificate
You can also create a self-signed certificate. That is, you can be both the issuer and the subject of the certificate. Although this is not useful for a commercial website, it enables you to test your installation of mod_ssl and to have a secure web server while you wait for the official certificate from the CA:
# openssl x509 -req -days 30 -in
www.example.com.csr -signkey
www.example.com.key -out www.example.com.cert
You need to copy your certificate www.example.com.cert (either the one returned by the CA or your self-signed one) to /usr/local/ssl/openssl/certs/ and your key to /usr/local/ssl/openssl/private/.
Protect your key file by issuing the following command:
# chmod 400 www.example.com.key
This command makes the key readable by only the root user.
SSL Configuration
The previous sections introduced the (not-so-basic) concepts behind SSL, and you have learned how to generate keys and certificates. Now you can configure Apache to support SSL. As you learned earlier in the chapter, the mod_ssl module must either be compiled statically, or, if you have compiled as a loadable module, the appropriate LoadModule directive must be present in the httpd.conf file.
Apache 2.2 and later ships with an “extra” configuration file specifically for running an SSL-aware server. To use this extra file, just uncomment this line in httpd.conf:
Include conf/extra/httpd-ssl.conf
Next, modify the standard configuration snippet in httpd-ssl.conf, replacing the information with your own, of course:
UseCanonicalName On
<VirtualHost www.example.com:443>
ServerName www.example.com
SSLEngine on
SSLCertificateFile /usr/local/ssl/openssl/certs/www.example.com.cert
SSLCertificateKeyFile /usr/loca/ssl/openssl/certs/www.example.com.key
</VirtualHost>
This snippet configures a new virtual host that will listen to port 443 (the default port for HTTPS); you enable SSL on that virtual host with the SSLEngine directive. The SSLCertificateFile and SSLCertificateKeyfile directives indicate where to find the server’s certificate and the file containing the associated key.
Starting the Server
Previous versions of Apache required you to issue the apachectl startssl command when you wanted to start Apache in secure mode. However, given the configuration methods defined in the previous section, starting Apache in secure mode is no different from starting Apache without SSL: Issue the apachectl start command. As long as the httpd-ssl.conf file is included in httpd.conf via directive, per the earlier instructions, Apache starts the SSL-enabled server. If your server is already running and you restart it, you are prompted for your pass phrase if your key is protected by one. After you enter the correct pass phrase, Apache starts, and you should be able to connect securely to it using the https://www.example.com/ URL. Substitute your own domain name, of course. If you cannot successfully start your server, check the Apache error log for clues about what might have gone wrong. For example, if you cannot bind to the port, make sure that another Apache instance is not running already. You must have administrator privileges to bind to port 443.
Summary
This chapter explained the fundamentals of the SSL protocol and mod_ssl, the Apache module that implements support for SSL. You were given an introduction to installing and configuring OpenSSL and mod_ssl, and how to use the openssl command-line tool for certificate and key generation and management. You can access the mod_ssl reference documentation at http://httpd.apache.org/docs/2.4/mod/mod_ssl.html for in-depth syntax explanation and additional configuration information. Bear in mind also that SSL is just part of maintaining a secure server, which includes applying security patches, OS configuration, access control, physical security, and so on.
Q&A
Q. Can I have SSL with name-based virtual hosting?
A. A question that comes up frequently is how to make name-based virtual hosts work with SSL. The answer is that you currently cannot, as noted in Chapter 29, “Apache Performance Tuning and Virtual Hosting.” Name-based virtual hosts depend on the Host header of the HTTP request, but the certificate verification happens when the SSL connection is being established and no HTTP request can be sent. There is a protocol for upgrading an existing HTTP connection to TLS, but it is mostly unsupported by current browsers (see RFC 2817, at http://www.rfc-editor.org/rfc/rfc2817.txt).
Q. Can I use SSL with other protocols?
A. The mod_ssl module implements the SSL protocol as a filter. Other protocols using the same Apache server can easily take advantage of the SSL.
Workshop
The workshop is designed to help you review what you’ve learned.
Quiz
1. Name three requirements to carry on secure communications on the Internet.
2. How do you start an SSL-enabled instance of Apache?
Answers
1. Confidentiality, integrity, and authentication.
2. Ensure that the httpd-ssl.conf file is included via a directive in the httpd.conf file, and issue the command apachectl start. As long as the httpd-ssl.conf file is included, any SSL-enabled instances will start along with non-SSL instances.