SQL - The Shortest Route For Beginners (2015)
Chapter 8. Manipulate Data In Tables
What is Data Manipulation
In database terminology, the term data manipulation signifies toward three major actions, these are: insert, update, and delete. Insert is performed to add new data to the tables, update operation is performed to change the data residing under the tables, and delete helps in removing unneeded data. Once you create a table, you execute these actions using three data manipulation (DML) commands: INSERT, UPDATE, and DELETE.
COMMIT and ROLLBACK
As stated earlier, DDL commands cannot be rolled back; these commands immediately affect the database. In contrast, DML commands (Insert, Update, and Delete) can be reversed using the ROLLBACK command, but prior to using COMMIT. To make the changes permanent and irreversible, use the COMMIT command. On the contrary, to undo the changes as they had never happened, run the ROLLBACK command. These two are also called Transaction Control Statements because they manage changes made by DML statements.
Add Data
The first action that you perform on a table, after its creation, is to add new rows to it. For this, you use the INSERT data manipulation command. This command can be used in the following three ways:
· Add a complete row to a table
· Add a partial row to a table
· Add rows from another table through subquery
The following syntax of the INSERT command is used to add just one row at a time to a table. Use this command when you are inserting either a complete or a partial single row. The third insertion approach is discussed on Page 125.
Syntax :
INSERT INTO {table name} [(column, column …)]
VALUES (value, value …);
Besides the command keywords (INSERT INTO) and the mandatory table name, the above syntax requires column and value information. Note that the column list is optional (hence provided in square brackets). These are the columns in the table that you wish to populate. The VALUE clause is mandatory which holds corresponding values for the columns. It must be provided while inserting a single row, and must be enclosed in parentheses.
Insert a Complete Row
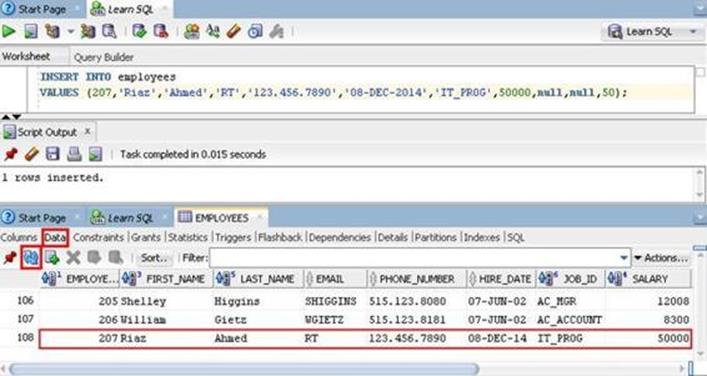
As being optional, you can omit the column list when you are inserting a complete row by adding values for each column in a table. In the following example you are adding a new complete record to the Employees table. Because the statement carries values for each column, therefore the column list is omitted. However, in this kind of manipulation, the values must be listed according to the order of the columns defined in the table. Always enclose character and date values within single quotation marks; don’t do so for numeric values. When you do not know a value for a column, just use the null keyword in its place, as it is used for commission percent and manager id columns in the following statement. Omitting it will return "not enough values" error message.
The successful execution of this statement will return 1 rows inserted message in the Script Output pane. Click on the Data tab, and then on the Refresh button ![]() under this tab. You’ll see this new record. Although inserted, this row is still not permanent in the table. In SQL Develop you can make the change permanent by clicking the commit icon
under this tab. You’ll see this new record. Although inserted, this row is still not permanent in the table. In SQL Develop you can make the change permanent by clicking the commit icon ![]() . Alternatively, you can type and execute the COMMIT command in the Worksheet pane. Similarly, click the rollback icon
. Alternatively, you can type and execute the COMMIT command in the Worksheet pane. Similarly, click the rollback icon ![]() to undo the change, or type and execute the ROLLBACK command.
to undo the change, or type and execute the ROLLBACK command.
SQL Statement :
INSERT INTO employees
VALUES (207,’Riaz’,’Ahmed’,’RT’,’123.456.7890’,’08-DEC-2014’,’IT_PROG’,50000,null,null,50);
Output :
Insert a Partial Row
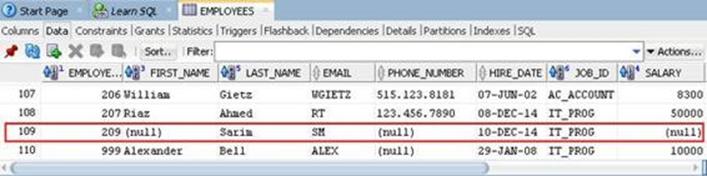
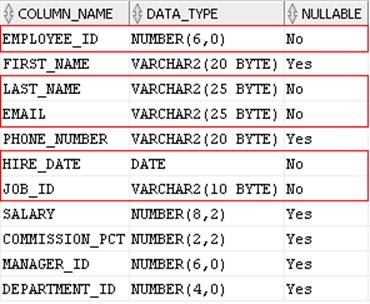
You can also add partial rows to a table which means you only provide values for some specific columns, and not for all. This can be done by explicitly defining the column(s) you wish to populate, as demonstrated in the following statement. In this example, you identified the names of five columns (employee_id, last_name, email, hire_date, and job_id marked as NOT NULLABLE in the table structure) from the Employees table that you intended to populate, and provided corresponding values in the specified column order – the columns left blank here will be filled up in the Update Data section coming ahead. You may omit only those column from such insert operations that allow null values. Omitting a value for a column that does not allow NULL values and does not have a default value as well, will throw an error message, and the row insertion process will fail.
SQL Statement :
INSERT INTO employees (employee_id, last_name, email, hire_date, job_id)
VALUES (209, 'Sarim', 'SM', '10-DEC-2014', 'IT_PROG');
Output :
Employees Table Definitions :
NOTE: In this approach you are not required to follow the column order of the table. Instead, you must provide values according to the list defined in the INSERT statement. For example, you could write this statement like this:
INSERT INTO employees
(job_id,hire_date,email,last_name,employee_id)
VALUES
('IT_PROG', '10-DEC-2014', 'SM', 'Sarim',209);
Insert Rows from Another Table
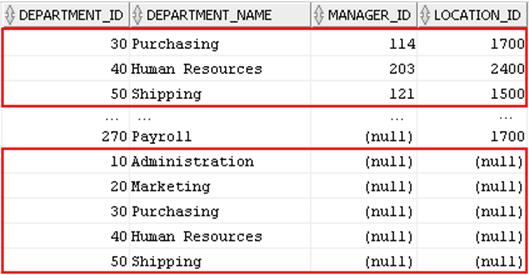
In the previous two insert examples you added single rows to the Employees table. There is another form of this command that lets you add multiple rows at once through a subquery. In this form you insert rows into a (target) table from another (source) table. According to the following syntax, you can omit the column list here as well (as done in the first insert example statement below). In this statement you are inserting values from all columns in all rows into a new target table named dept3 from the Departments table.
In the second statement, you specified the columns you wanted to put data in. You also used the WHERE clause in the subquery to set a condition. As you can see in the output screenshot, the statement inserted records of five department (10-50) again. The same records were inserted because there was no primary key constraint defined in the new table.
Couple of things that you must ensure for this particular scenario are that, not only both the source and target tables exist in the same schema, but must also have the same structure. Before you execute the example statements, first execute the statement provided in the side bar to create the target table.
Target Table Statement
CREATE TABLE dept3
(
department_id number(4),
department_name varchar2(30),
manager_id number(6),
location_id number(4)
);
NOTE: After executing the above CREATE TABLE statement, if the new table didn’t appear in the Tables list under the Connections pane, then first click on the Learn SQL connection in this pane, and then click the Refresh icon at the top of this pane.
Syntax :
INSERT INTO {table name} [(column, column …)]
{subquery};
SQL Statement # 1 :
INSERT INTO dept3 SELECT * FROM departments;
SQL Statement # 2 :
INSERT INTO dept3 (department_id, department_name)
SELECT department_id, department_name
FROM departments
WHERE department_id <= 50;
Output :
Update Data
While inserting a new record in a previous section you left some columns blank. The UPDATE DML command allows you to fill up null values in table columns as well as replace existing values with new ones. Besides the UPDATE keyword, the syntax of this command has three components:
· Table Name: It is the name of the table you want to modify data in.
· column=value: The name of the column which is to be modified along with the new value. The (=) operator must be placed in between. You can add more column/value pairs to update as many columns in the table as you want; one pair is mandatory. Each pair must be separated from others with a comma.
· WHERE condition: Although optional, the WHERE clause has a very significant role in this command. Here too, you set a condition which determines which rows in the table are to be updated. If you omit this clause, all rows in the table will be updated.
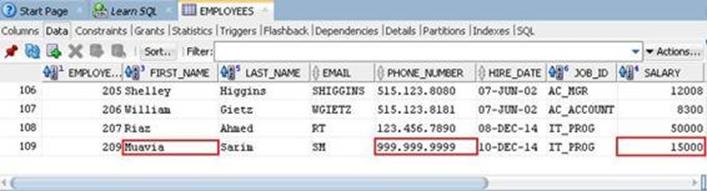
In the following statement, you are updating first name and phone number of employee number 209. Note that in addition to the null values, you can also replace existing values through this command.
NOTE: Always make a habit to use the WHERE clause in the UPDATE statements, otherwise every row in the table will be updated.
Syntax :
UPDATE {table name}
SET {column = value} [, column = value, …]
[WHERE condition];
SQL Statement :
UPDATE employees
SET first_name='Muavia', phone_number='999.999.9999', salary=15000
WHERE employee_id=209;
Output :
Delete Data
Delete is another important operation which is performed on a database to remove existing rows from a table, and it is performed by executing the DML DELETE command. It also must be used with the WHERE clause, unless you want to delete all records from a table. Use either COMMIT or ROLLBACK to make the changes permanent.
The first example, which uses a string condition, deletes a single record, because there is just one row having the first name ‘Riaz’. If you have multiple records with the same first name (such as John) , then you should add more filters using the AND operator to delete the specific record, as demonstrated in the second example, which removes multiple records, but ensures that the employees working as Sales Manager (who are also eligible to get commissions) are not deleted.
Since there exists no employee who was hired on or before 1st January 2001, the date example will not delete any record.
The next example deletes all rows from the emp3 table.
The last statement attempts to delete department number 10. This statement will fail due to the implementation of the integrity constraint, and will return integrity constraint (HR.EMP_DEPT_FK) violated - child record found error. The error occurs because the department number provided in the WHERE clause is referenced by the foreign key constraint declared in the Employees table, which contains record of one employee (Jennifer Whalen) enrolled in this department.
|
Syntax : DELETE FROM {table name} [WHERE condition]; SQL Statement – String Example : DELETE FROM employees WHERE first_name=’Riaz’; SQL Statement – Numeric Example : DELETE FROM emp2 WHERE commission_pct > 0 AND job_id <> ’SA_MAN’; SQL Statement – Date Example : DELETE FROM emp2 WHERE hire_date < TO_DATE(’01.01.2001’,’DD.MM.YYYY’); SQL Statement – Delete All Records Example : DELETE FROM emp3; SQL Statement – Failure Example : DELETE FROM departments WHERE department_id = 10; |
NOTE: Always make a habit to use the WHERE clause in the DELETE statements, otherwise every row in the table will be deleted.
Test Your Skill
1. What are the two commands that you execute after performing a DML operation?
2. Identify error in the following statement:
INSERT INTO Departments VALUES (99,’Manufacturing’);
3. Identify errors in the following statement:
UPDATE Employees first_name=Smith salary=10,000
WHERE employee_id=999;
4. Do you think that the following statement would execute?
DELETE FROM Employees
WHERE hire_date > to_date(’01-01-2015’);
5. Add a new record to the Employees table. Allocate an used department to this new employee. Insert only required values, and commit the insertion.
6. Attempt to delete the department used in step 5. Was it deleted?
7. Delete the employee created in step 5 and try to delete the department again. What happened this time?
All materials on the site are licensed Creative Commons Attribution-Sharealike 3.0 Unported CC BY-SA 3.0 & GNU Free Documentation License (GFDL)
If you are the copyright holder of any material contained on our site and intend to remove it, please contact our site administrator for approval.
© 2016-2026 All site design rights belong to S.Y.A.