BDD in Action: Behavior-Driven Development for the whole software lifecycle (2015)
Part 1. First steps
Chapter 2. BDD-the whirlwind tour
This chapter covers
· An end-to-end walkthrough of BDD practices in action
· Discovering features and describing them through stories and examples
· Using executable specifications to specify features in detail
· Using low-level BDD to implement features
· Using BDD test results as living documentation
· Using living documentation to support ongoing maintenance
In this chapter, we’ll look at a concrete example of how BDD might work on a real-world project. As you saw in the previous chapter, BDD involves the development team engaging in conversations with the customer throughout the project, using examples to build up a more concrete and less ambiguous understanding of what the business really needs. You write specifications in an executable form that you can use to define software requirements, drive their implementation, and validate the product you deliver. You can also apply these techniques during more high-levelrequirements analysis, helping you focus on the capabilities and features of the application that will genuinely add value to the business.
A key part of this practice involves defining scenarios, or concrete examples of how a particular feature or story works. These scenarios will help you to validate and extend your understanding of the problem, and they’re also an excellent communication tool. They act as the foundation of the acceptance criteria, which you then integrate into the build process in the form of automated acceptance tests. In conjunction with the automated acceptance tests, these examples guide the development process, helping designers to prepare effective and functional user-interface designs and assisting developers to discover the underlying behaviors that they’ll need to implement to deliver the required features.
In the rest of this chapter, we’ll look at a practical example of this process in action. We’ll touch on aspects of the whole development cycle, from business analysis to implementing, testing, and maintaining the code.
2.1. Introducing the train timetable application
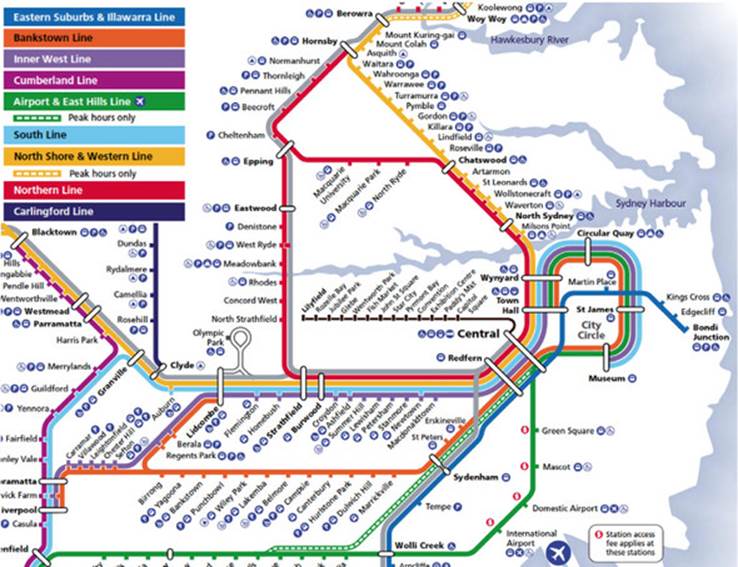
For this chapter’s example, suppose you work for a large, government public-transport department. You’ve been asked to lead a small team building a service that will provide train timetable data and real-time updates about delays, track work, and so on for various mobile apps used by commuters. Figure 2.1 illustrates the rail network you’ll be working with.
Figure 2.1. Part of the Sydney rail network
The department has just introduced Agile and BDD practices, so you’ll start by talking to the key stakeholders to make sure that you and your team have a clear idea of the business goals driving the project. This will help the team deliver a better, more targeted application.
When you’ve understood and articulated the business goals, you’ll need to work with your business analyst and business stakeholders to decide what software features will be able to achieve these goals. These features are high-level requirements, such as “Provide travellers with optimal itineraries between stations” or “Notify commuters if their train is late.”
You probably won’t be able to deliver features this big in one go, so you’ll need to break them down into smaller units, known to Agile practitioners as stories. These stories might include things like “Find the optimal itinerary between stations on the same line” and “Find the optimal itinerary between stations on different lines.”
When it comes to implementing a story, you get together with your business analyst, developer, and tester to describe the story in terms of concrete examples. Many of these examples will already have been discussed with the business stakeholders. These examples become the acceptance criteria for the story, and they’re expressed in a formal BDD style that you can later automate:
Given Western line trains leave Parramatta at 7:58, 8:02, 8:08, 8:11
When I want to travel from Parramatta to Town Hall at 8:00
Then I should be told to take the 8:02 train
These acceptance criteria act as the starting point for development work. Because the department uses Java for their development projects, you’ll automate the acceptance criteria using a Java tool called JBehave and write the application code in Java.
As you build the features, you’ll use a lower-level BDD unit-testing tool called Spock to help you design, document, and verify your implementation.
You’ll also generate test reports and living documentation from the automated acceptance criteria to illustrate what features have been completed and how they work.
The aim of this chapter is to give you an idea of the approach and some of the technologies involved, rather than to provide a full working example of any particular technology stack, but we’ll go into enough technical detail for you to follow along. In the chapters that follow, we’ll look at each of the topics covered in this chapter, and many others, in much more detail.
2.2. Determining the value proposition of the application
One of the key goals of BDD is to ensure that everyone has a clear understanding of what a project is trying to deliver, and of the underlying business objectives of the project. This, in itself, goes a long way toward ensuring that the application actually meets these objectives.
You can achieve this by working with users and other stakeholders to define or clarify a set of high-level business goals for the application. These goals should provide a concise vision of what you need to build. Business goals are about delivering value, so it’s common to see them expressed in terms of increasing or protecting revenue, or of decreasing costs.
In this case, the aim of the application you have to build is to provide train schedules and real-time updates for commuters. You could express the primary business goal behind this application like this:
Increase ticket sales revenue by making it easier and more time-efficient to
travel by train
Understanding and defining these goals makes it much easier to determine the relative value of a proposed feature. For example, a feature that notifies commuters if their train is late would contribute to the overall goal, because it would give travellers the opportunity to change their plans accordingly. On the other hand, a feature that lets commuters rate railway stations might not be considered to be of particularly high value.
2.3. Requirements analysis: discovering and understanding features
Once you have a better understanding of the high-level goals of your application, you can work with the stakeholders to determine exactly what they need to achieve these goals. This typically involves defining a set of features that the application will need in order to deliver the value you’re after.
For this chapter, assume you’ve agreed with the stakeholders on the following essential features:
· Provide travellers with optimal itineraries.
· Provide real-time train timetable information about service delays to travellers.
· Allow commuters to record their favorite trips.
· Notify commuters if their train is late.
Let’s look at how you might describe some of these features.
2.3.1. Describing features
Once you have a general idea of the features you want to deliver, you need to describe them in more detail. There are many ways to describe a requirement.
Agile teams like to write a short outline of the requirement in a format that’s small enough to fit on an index card.[1] Teams practicing BDD often use the following format as a guideline:[2]
1 These index cards can then be used to plan and visualize your progress.
2 This format was originally proposed by Chris Matts, in the context of Feature Injection, which we’ll look at in the next chapter.

The order here is important. When you plan features and stories, your principal aim should be to deliver business value. Start out with what business value you intend to provide ![]() , then who needs the feature you’re proposing,
, then who needs the feature you’re proposing, ![]() , and finally what feature you think will support this outcome
, and finally what feature you think will support this outcome![]() .
.
This helps ensure that each feature actively contributes to achieving a business goal, and so reduces the risk of scope creep. It also acts as a healthy reminder of why you’re implementing this feature in the first place. For example, you could say something like this:

This is not your only option. Many teams use a template popular in earlier Agile approaches:

This variation aims to help developers understand the context of the requirement in terms of who will be using a feature and what they expect it to do for them. The stakeholder ![]() refers to the person using the feature
refers to the person using the feature ![]() , or who is interested in its output. The business goal
, or who is interested in its output. The business goal ![]() identifies why this feature is needed and what value it’s supposed to provide. The equivalent of the feature mentioned earlier might be something like this:
identifies why this feature is needed and what value it’s supposed to provide. The equivalent of the feature mentioned earlier might be something like this:
As a commuter
I want to know the best way to travel between two stations
So that I can get to my destination quickly
Both of these are handy conventions, but there’s no obligation to choose one format over another, as long as you remember to express the business benefits clearly. For example, some experienced practitioners are happy to use the “in order to ... as a ... I want” format for higher-level features, where the emphasis is very much on the business value the system should deliver, but they switch to “as a ... I want ... so ... that” for more detailed user stories within a feature, when the stories clearly are about delivering value to particular users in the context of that feature.
2.3.2. Breaking features down into stories
A feature may be detailed enough to work with as is, but often you’ll need to break it up into smaller pieces. In Agile projects, larger features are often broken into user stories, where each story explores a different facet of the problem and is small enough to deliver in a single iteration.
For example, the “Provide travellers with optimal itineraries” feature might be too large to build in one go (the developers think that finding itineraries involving connecting trains will be a complicated piece of work). In addition, you might like to get some feedback on the user interface design before you build the whole feature. You could break this feature into smaller stories, such as the following:
· Find the optimal itinerary between stations on the same line.
· Find out what time the next trains for the destination station leave.
· Find the optimal itinerary between stations on different lines.
You can describe these stories in a little more detail using the same format that’s used for the features:
Story: Find the optimal itinerary between stations on the same line
In order to get to my destination on time
As a commuter
I want to know what train I should take
Story: Find out what time the next trains for my destination station leave
In order to plan my trips more effectively
As a commuter
I want to know the next trains going to my destination
Story: Find the optimal itinerary between stations on different lines
In order to get to my destination on time
As a commuter
I want to know what train I should take
And details for any connections I need to make
Note that this sort of story list is by no means a rigid set of specifications that users and developers need to sign off on. Defining stories is a dynamic, iterative process, designed to facilitate communication and a shared understanding of the problem space. As you implement each story, you can get feedback from the stakeholders that will allow you to refine or drop stories or add new ones that might contribute to the business goals in other ways. Discovering features and stories is an ongoing learning process.
2.3.3. Illustrating the stories with examples
Once you have some features and stories of value, you can start to explore them in more detail. One very effective way to do this is to ask the users and other stakeholders for concrete examples.
When you hear a user asking for a feature, you’ll often immediately start to build a conceptual model of the problem you’ll need to solve. In doing so, it’s easy to let implicit and unstated assumptions cloud your understanding, leading to an inaccurate mental model and an incorrect implementation further down the line. Asking the stakeholders to give you concrete examples of what they mean is a great way to test and confirm your understanding of the problem.
For example, you might have the following exchange with Jill, the rail network domain expert:[3]
3 You can follow along with these examples by referring to the map in figure 2.1.
You: Can you give me an example of a commuter travelling between two stations?
Jill: Sure, how about going from Parramatta to Town Hall.
You: And what would that look like?
Jill: Well, they’d have to take the Western line. That’s a heavily used line, and there are between eight and sixteen trains per hour, depending on the time of day. We’d just need to propose the next scheduled trips on that line.
You: Can you give me an example of a trip where a commuter would have the choice of more than one line?
Jill: Yes, a commuter going from Epping to Central could take the Epping line or the Northern line. The trip time will vary from about 27 minutes to around 43 minutes, and trains from any of these lines would typically be arriving every couple of minutes, so we’d need to give commuters enough information on departure and arrival times for the trains on both lines.
Even in this simple example, you can see that there are some subtleties. It’s not always a simple matter of proposing the next train; you have to give the commuter details about departure and arrival times for all the scheduled upcoming trains.
2.4. Implementation: building and delivering features
Once you understand the features your application needs, you have to build them. In this section, we’ll look at the core BDD lifecycle.
You’ll learn how to take the business-focused examples we discussed in the previous section, and rewrite them in the form of executable specifications. You’ll see how you can automate these specifications, and how doing so leads to discovering what code you need to write. And you’ll see how these executable specifications can be a powerful reporting and living-documentation tool.
2.4.1. Going from examples to acceptance criteria
You can use your examples (such as Jill’s commuter trip examples) as the basis for the acceptance criteria. In a nutshell, the acceptance criteria are what will satisfy stakeholders (and QA) that the application does what it’s supposed to do.
Conversations like the one with Jill (in section 2.3.3) are a great way to build up your understanding of the problem space, but you can take things a lot further if you use a slightly more structured style. In BDD, the following notation is often used to express examples:[4]
4 The syntax shown here is sometimes referred to as the Gherkin format, but this is not strictly accurate—Gherkin is the syntax used by Cucumber and related tools, whereas these examples use JBehave. We’ll look at all this in great detail in chapter 5.
Given <a context>
When <something happens>
Then <you expect some outcome>
This format helps you think in terms of how users interact with the system and what the outcomes should be. As you’ll see in the next section, they’re also easy to convert into automated acceptance tests using tools like Cucumber and JBehave. But because you may want to automate these tests later on, their format is a little less flexible. As you’ll see, words like Given, When, and Then have special meanings for these tools, so it’s best to think of them as special keywords.
Using this notation, you could express the requirement mentioned previously as follows:

When you talk through this example with Jill, she points out that trains travel in two directions on a line, so the Given section ![]() is incomplete—you also need to give a starting point and a direction. Or, if you give the destination station, you can work out the direction of the trains from this. You could refine this scenario as follows:
is incomplete—you also need to give a starting point and a direction. Or, if you give the destination station, you can work out the direction of the trains from this. You could refine this scenario as follows:

When you talk this example through, though, you realize that you only have two minutes to buy a ticket and get to the right platform. You really need to be told about the next few trains:

Before we take this example any further, or move on to more complicated requirements, let’s see how you can transform these acceptance criteria into executable specifications, using JBehave, Maven, and Git in this chapter.
2.4.2. Setting up Maven and Git
There are many specialized BDD tools that you can use to automate your acceptance criteria. Popular choices include tools like JBehave, Cucumber, SpecFlow, and Behat. While not indispensable, these tools make it easier to express the automated tests in a structured form similar to the “Given ... When ... Then” expressions used in the previous section. This makes it easier for product owners and testers to understand and identify the automated acceptance criteria, which in turn can help increase their confidence in the automated tests and in the automated acceptance-testing approach in general.
Throughout the rest of this book, I’ll illustrate examples using several different BDD tools. In this chapter, I’ll use examples written with JBehave and Java,[5] and the project will be built and run using Maven.[6] The test reports will be generated using Thucydides,[7] an open source library that makes it easier to organize and report on BDD test results.
5 If Java isn’t your cup of tea, don’t worry; the code samples are designed to be readable by anyone with some programming background. We’ll look at BDD tools in .NET, Ruby, and Python from chapter 5 onwards.
6 Maven (http://maven.apache.org/) is a widely used build tool in the Java world.
7 See the Thucydides site (http://thucydides.info) for more details about this library.
The source code for this chapter is available on GitHub[8] and on the Manning website. If you want to follow along, you’ll need a development environment with the following software installed:
8 The source for this chapter on GitHub is at https://github.com/bdd-in-action/chapter-2.
· A Java JDK (the sample code was developed using Java 1.7.0, but it should work fine with JDK 1.6.0)
· Maven 3.0.x
· Git
GitHub lets you access a repository in a number of ways. If you have Git installed and a GitHub account set up with SSH access,[9] you can clone the sample code repository like this:
9 See GitHub help (https://help.github.com/articles/set-up-git) for a good tutorial on installing Git for your OS.
$ git clone git@github.com:bdd-in-action/chapter-2.git
If you haven’t set up and configured SSH keys for GitHub, you can also use the following command (Git will ask you for your username and password):
$ git clone https://github.com:bdd-in-action/chapter-2.git
Once you’ve cloned the project, it’s a good idea to run mvn verify in the project directory so that Maven can download the dependencies it and the project needs. It will only need to do this once, but it can take some time. Run the following commands:
$ cd chapter-2
$ mvn verify
If you want to code each step yourself, go to the train-timetables directory and check out the start branch:
$ git checkout start
When you do this, you’ll get a simple project skeleton with a properly configured Maven build script (the pom.xml file) and a directory structure that you can use to get started. If at any point you’d like to take a look at the sample solution, run the following command:
$ git checkout master
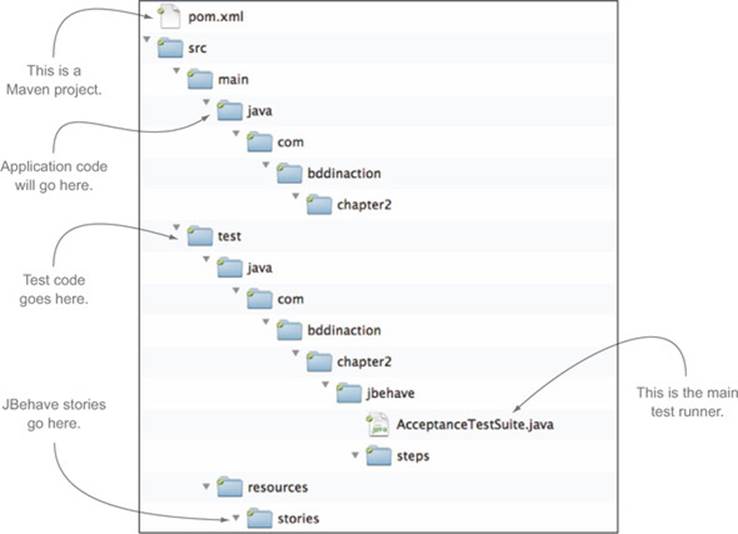
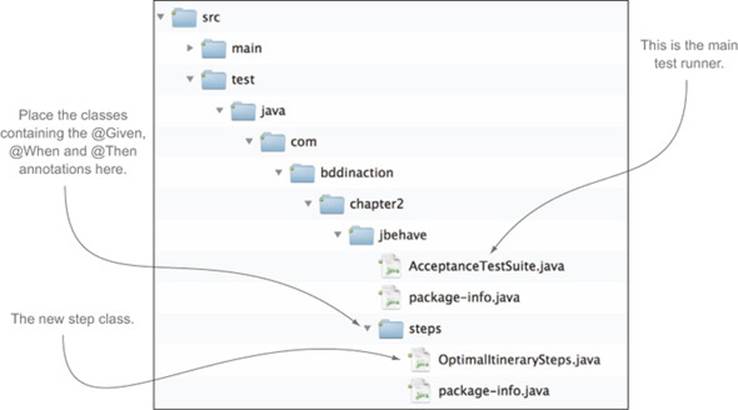
The initial project structure looks something like figure 2.2 and follows the standard Maven conventions. Application code will go in the src/main/java directory, and test code will go in the src/test/java directory. The JBehave stories that you’ll write will go in the src/test/resources/stories directory. The AcceptanceTestSuite class is a simple JUnit-based test runner that will run all the JBehave stories in or under the src/test/resources directory.
Figure 2.2. The initial project structure
2.4.3. Executable specifications: automating the acceptance criteria
Expressing your requirements in the form of structured examples provides many benefits. Examples tend to make great starting points for discussions of business needs and expectations, and they make it much easier to flush out misunderstandings and invalid assumptions than do more abstract specifications. Another major advantage of this approach is that it makes it easier to automate the requirements in the form of acceptance tests.
Now that you’ve got your development environment set up, it’s time to automate the example we discussed in the previous sections. JBehave, like many BDD tools, uses a special language to represent executable specifications in a structured but still very readable form. In JBehave, you could express the scenario as follows.
Listing 2.1. Acceptance criteria expressed in JBehave
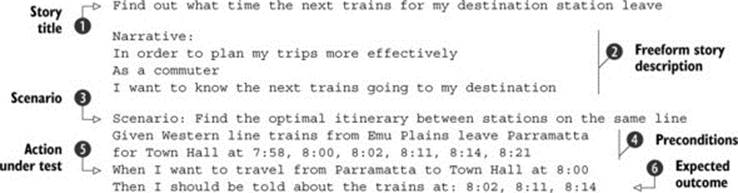
This is little more than a structured version of the example we discussed earlier. You start off with the story description ![]() and
and ![]() . The Scenario keyword
. The Scenario keyword ![]() marks the start of each new scenario. The keywords Given
marks the start of each new scenario. The keywords Given ![]() , When
, When ![]() , and Then
, and Then ![]() introduce the various parts of each scenario.
introduce the various parts of each scenario.
In JBehave, scenarios are grouped by story and are stored in files with a .story suffix.[10] As you can see in figure 2.3, the file containing this story definition is called find_next_train_departures.story.
10 This is slightly different from Cucumber and Cucumber-based tools, which use .feature files. We’ll come back to this difference and its implications in chapter 5.
Figure 2.3. The JBehave story files are organized into directories.
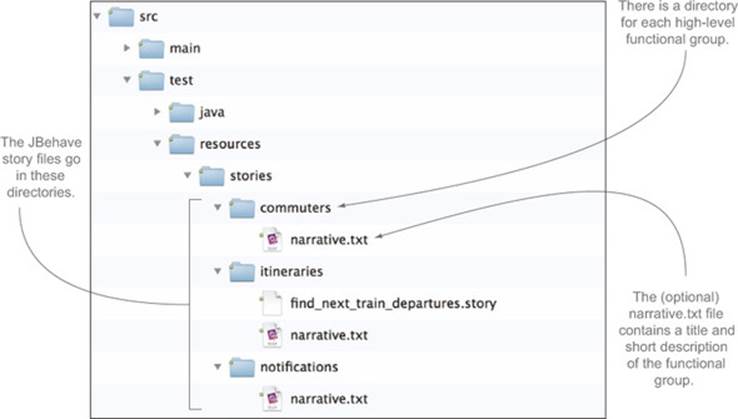
You could place all your .story files directly in the stories directory, but this becomes unwieldy when you start to have a large number of story files. Instead, it’s best to group the stories into high-level functional groups. For example, as this project progresses, you might end up with directories such as
· itineraries (itinerary calculations and timetable information)
· commuters (personalized trip data for commuters)
· notifications (delay notifications for commuters)
For documentation purposes, you can also add a text file called narrative.txt[11] in each of these directories. The text file will contain the name of the functional group and a short description of what it covers. For example, the narrative.txt file for the itineraries directory might look like the following listing.
11 If provided, the narrative.txt file is also used by Thucydides to generate the living documentation you’ll see further on.
Listing 2.2. The narrative.txt file describes high-level functionality

You now have an executable specification. Though there’s no code behind this JBehave scenario, you can still execute it. If you want to try this out, go into the train-timetables directory and run the following command:
$ mvn verify
This generates a set of reports in the target/site/thucydides directory.[12] If you open the index.html file in this directory and click on the only test in the Test table at the bottom of the screen, you should see something like figure 2.4.
12 If you’re not a regular Maven user, Maven will first download the libraries it needs to work with—this may take some time, but you’ll only need to do it once.
Figure 2.4. The JBehave story in the acceptance test reports

At this point, your scenario is no longer a simple text document; it’s now an executable specification. It can be run as part of the automated build process to automatically determine whether a particular feature has been completed or not. When tests like this are first executed, they’re flagged as “pending,” which means, in BDD terms, that the test has been automated but that the code that implements the supporting features has not yet been written. As the features are implemented and the acceptance tests succeed, they’re marked as “passed” to indicate that you’ve completed work in this area.
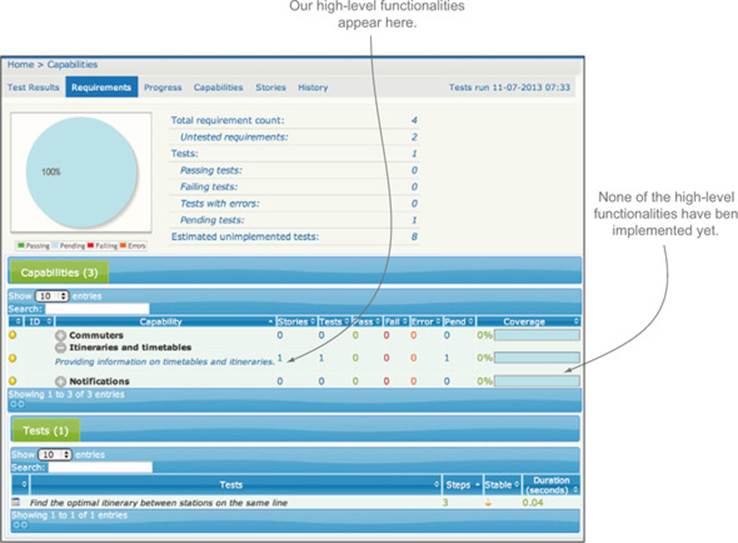
But living documentation is more than just test reporting. It should also report on the state of all of your specified requirements, even the ones that don’t have any tests yet. This gives a much more complete picture of your project and your product. You can see an example of this type of requirements-level reporting by clicking on the Requirements tab in the reports you just generated (see figure 2.5). Here you should see a list of all the high-level requirements we discussed earlier, along with an idea of how much work has been completed for each of them (which, at this stage, will be precisely none).
Figure 2.5. Living documentation should also tell you what requirements you have specified, even if there are no tests for them yet.
Before we look at how to automate scenarios like this in Java, let’s look at another variation. An important part of this application is the ability to tell commuters when they’ll arrive at their destination if they leave at a certain time. Jill provided some examples that you can use to build up a scenario describing this requirement.
Listing 2.3. Calculating arrival times
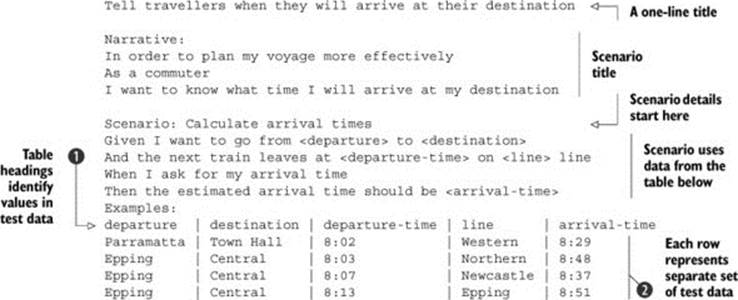
The main novelty here is the use of a table in text form to represent the test data. The table headings ![]() identify the values in the test data. Each row in the table
identify the values in the test data. Each row in the table ![]() represents a separate set of test data to be used with this scenario.
represents a separate set of test data to be used with this scenario.
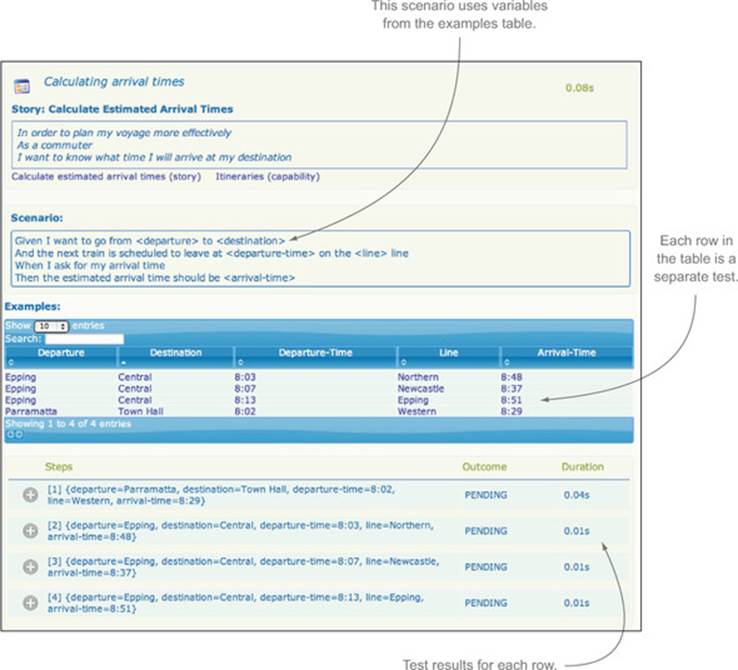
You can put this story into a file called calculate_estimated_arrival_times.story, next to the previous story file. This will add it to the set of stories that JBehave runs, so it will become part of your living documentation when you run the tests (see figure 2.6).
Figure 2.6. Living documentation for a table-based scenario
The language used in both of these scenarios is very close to that provided by the user. When the scenarios appear in the test reports, the use of this familiar language makes it easier for testers, end users, and other non-developers to understand what features are being tested and how they’re being tested.
2.4.4. Automated tests: implementing the acceptance criteria
Now that you’ve defined and automated some acceptance criteria, the real work begins. Naturally the logic required to verify acceptance criteria doesn’t write itself: you’ll need to add some code to make the tests actually do their jobs.
You’ll start with the first scenario we looked at in listing 2.1:
Scenario: Find the optimal itinerary between stations on the same line
Given Western line trains from Emu Plains leave Parramatta for Town Hall at
7:58, 8:00, 8:02, 8:11, 8:14, 8:21
When I want to travel from Parramatta to Town Hall at 8:00
Then I should be told about the trains at: 8:02, 8:11, 8:14
Continuing this example using JBehave and Java, you could implement an empty automated test for this scenario in a class called OptimalItinerarySteps.java as shown in the next listing.
Listing 2.4. A pending JBehave scenario implementation
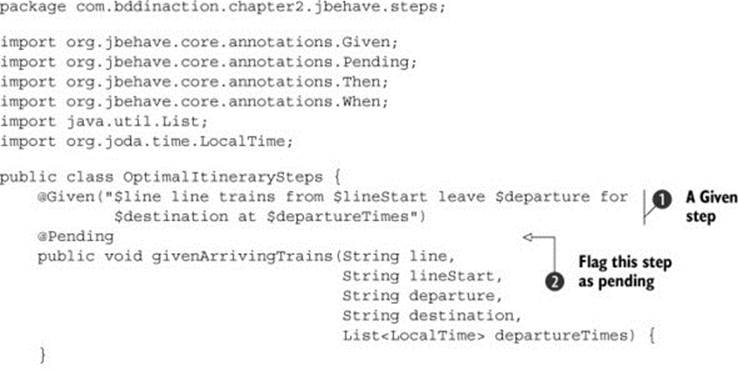
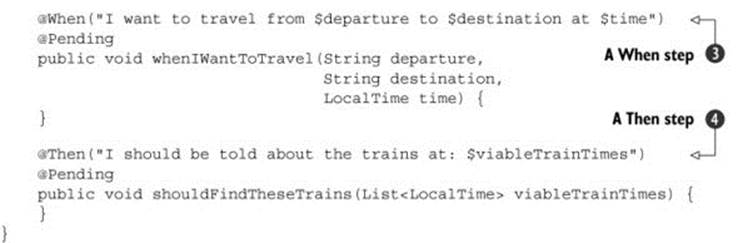
This class goes in the steps package underneath the jbehave package in the src/test/java directory (see figure 2.7). JBehave tests can be implemented in Java or in other JVM languages such as Groovy or Scala. When it executes a scenario, JBehave will use the text from the @Given ![]() ,@When
,@When ![]() , and @Then
, and @Then ![]() annotations to determine what method to call at each step. As the listing shows, you can also pass elements from the scenario text to the test methods in the form of parameters.
annotations to determine what method to call at each step. As the listing shows, you can also pass elements from the scenario text to the test methods in the form of parameters.
Figure 2.7. The package structure containing the new steps class
As it’s written here, the @Pending annotation ![]() will ensure that this test will produce exactly the same results shown in figure 2.4. But as soon as possible, you’ll want to flesh out the implementation of each method and turn this into a fully operational test.
will ensure that this test will produce exactly the same results shown in figure 2.4. But as soon as possible, you’ll want to flesh out the implementation of each method and turn this into a fully operational test.
These steps act as the starting point for your production code: they tell you what you need to build to get this feature out the door. BDD practitioners like to start with the outcome they need to obtain and work backwards, so let’s see how that would work here.
Start with the @Then step, which expresses the outcome you expect. What you really want is for the service to give you a list of proposed train times that match the train times you expect. One way you could express this is as follows:
@Then("I should be told about the trains at: $expectedTrainTimes")
public void shouldBeInformedAbout(List<LocalTime> expectedTrainTimes) {
assertThat(proposedTrainTimes).isEqualTo(expectedTrainTimes);
}
JBehave will match the first line of your scenario, extract the list of expected times (indicated by $expectedTrainTimes in the @Then annotation), and pass them to the method as a parameter. Note that this example also removes the @Pending annotation so that JBehave will know that it’s supposed to execute this step. But this won’t compile yet—you still need to decide where the proposed train will come from.
BDD helps you discover the technical design you need in order to deliver the business goals. Suppose you decide to implement this application using a number of different web services. For example, you may need an itinerary service that provides information about departure times to a website or a mobile app. This service doesn’t exist yet, so you need to discover what this service should do. One of the most effective ways to do this is simply to write the code you would like to have. This allows you to design a clean, readable, self-documenting API.
For example, to find the next departure times from a given station, one very simple implementation might look something like this:
proposedTrainTimes = itineraryService.findNextDepartures(departure,
destination,
startTime);
Integrating this into the @When step, you’ll get something like this:
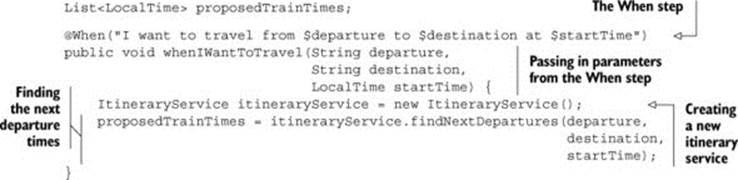
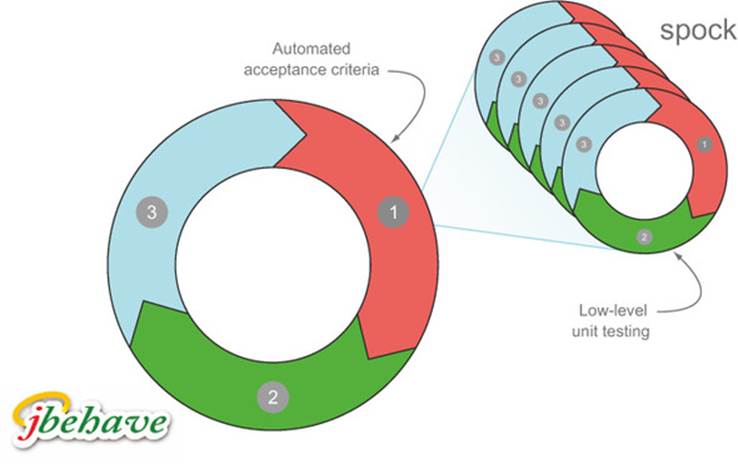
To get this acceptance criteria to pass, you’ll implement the findNextDepartures() method. But before you do so, you need to change gears from acceptance testing to unit testing. As you’ll see, acceptance testing is used to demonstrate the high-level, end-to-end behavior of an application, and unit testing is used to build up the components you’ll use to implement this behavior. Acceptance tests typically use a full or near-full application stack, whereas unit tests concentrate on individual components in isolation. Unit tests make it easier to focus on getting a particular class working and identifying what other services or components it needs. Unit tests also make it easier to detect and isolate errors or regressions. You’ll typically write many small unit tests in order to get an acceptance criterion to pass (see figure 2.8).
Figure 2.8. You’ll typically need to write many low-level, TDD-style unit tests to get an automated acceptance criterion to pass. The example in this chapter uses JBehave for the acceptance criteria and Spock for the unit tests.
You could use a conventional unit-testing framework such as JUnit for these unit tests. But because this book is about BDD, you’ll use a more BDD-specific unit-testing tool called Spock. Spock is a lightweight and expressive BDD-style testing library for Java and Groovy applications that you’ll use extensively later on in this book.
Groovy is a dynamic language built on top of Java that incorporates many features from languages like Ruby and Python. It’s a very expressive language that works well for checking outcomes in a clean and concise manner.
Writing unit tests in Spock
In Spock, you write unit tests in the form of “specifications,” using a very readable “given ... when ... then” structure similar to that used in the JBehave scenarios. For example, if you wanted to test a Calculator class in Spock, you could write something like this:
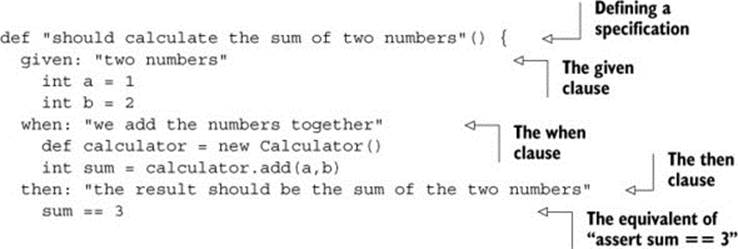
Many Java developers like to write unit tests using Spock because it lets them write concise and descriptive tests with less boilerplate code than would be needed using Java.
You’ll start off by essentially testing the acceptance criteria described in the JBehave scenario in listing 2.1, but at a unit-testing level. In Spock, you could create a Groovy class called WhenCalculatingArrivalTimes.groovy in an appropriate package in the src/test/groovy directory.[13]This class might look something like the following:
13 In the sample solution, we put this class in the com.bddinaction.chapter2.services package.
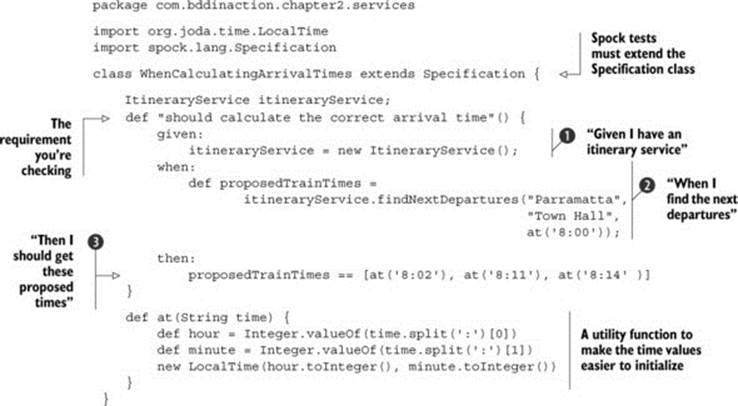
This specification does essentially the same thing as the JBehave test. It creates a new itinerary service ![]() , finds the next departures between Parramatta and Town Hall starting from 8:00 am
, finds the next departures between Parramatta and Town Hall starting from 8:00 am ![]() , and checks that it matches the times you expect
, and checks that it matches the times you expect ![]() . When this passes, you can be confident that the ItineraryService class does what you expect it to do.
. When this passes, you can be confident that the ItineraryService class does what you expect it to do.
Of course, if you run this specification, it will fail, because you haven’t written any application code yet. It’s now time to write that code. Let’s see what the findNext-Departures() method might look like:
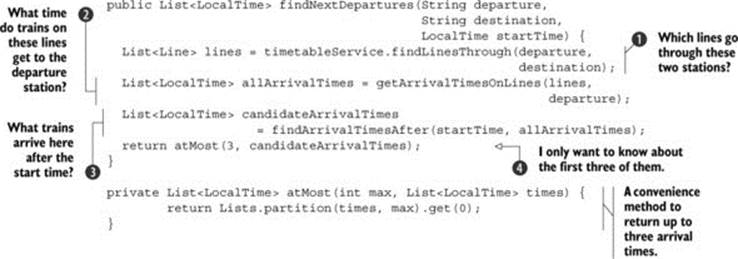
The job of the itinerary service is to calculate information about departure times and trip details based on the current timetables, and to do this, it will need timetable data. But you haven’t written the code to figure out this bit yet: timetables are complicated things and represent a separate area of concern. Following good design practices, you can use a separate service to provide timetable details to the itinerary service. The preceding code introduces a timetableService object ![]() to take care of this.
to take care of this.
The first thing this code does is find the train lines that will take the user from the departure station to the destination. This is the domain of the timetable service, so you ask it to provide you with a list of lines going from one station to another ![]() . In this context, a line represents the path that trains take from one terminus to another, in a given direction. Remember, the timetable service doesn’t have any methods yet, so you’ve just discovered something that you need the timetable service to do.
. In this context, a line represents the path that trains take from one terminus to another, in a given direction. Remember, the timetable service doesn’t have any methods yet, so you’ve just discovered something that you need the timetable service to do.
Once you have a list of the lines, you can find the times of the trains arriving at the departure station on any line. There are a few ways you could do this, but you’ll delegate it to another method ![]() and move on with the main business logic.
and move on with the main business logic.
The last thing this method needs to do is to find the arrival times after the requested starting time ![]() and return the next three departure times
and return the next three departure times ![]() .
.
You can see the complete source code on GitHub,[14] but let’s focus on the get-ArrivalTimesOnLines() method, shown here:
14 The GitHub page is at https://github.com/bdd-in-action/chapter-2.
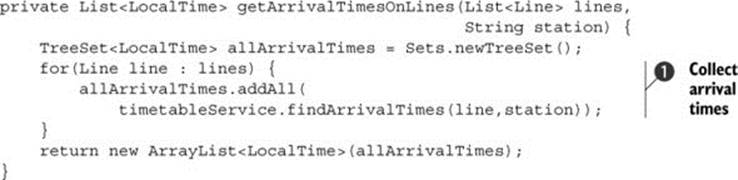
This method is interesting because it points out something else you need the timetable service to do. The logic isn’t complicated—it just collects the arrival times of all the lines going through a given station ![]() . A Line is a simple domain object with a name, a departure station, and a list of stations on that line.[15]
. A Line is a simple domain object with a name, a departure station, and a list of stations on that line.[15]
15 For simplicity, the full implementation of the Line class is provided in the sample code.
But for the getArrivalTimesOnLines() method to work, you need to know the times that trains on a particular line are due to arrive at the departure station, and you need to get this information from the timetable service.
This means you need a TimetableService object that does the following:
· Finds the lines through any two stations.
· Finds the arrival times for a given line at a particular station.
You can formalize what you need in the Given step of your Spock specification by creating a “pretend” timetable service that behaves exactly as you’d like it to, and ensuring that your itinerary service processes the data it gets from the timetable service correctly. You could do this with the following code:
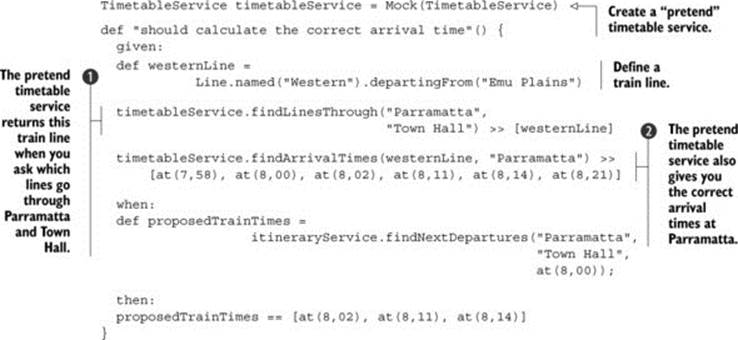
This sets up a “pretend” (or “mock”) timetable service to model what you need the real timetable service to do. You know that it needs to tell you what lines go through any two stations ![]() and what time trains on a given line get to a particular station
and what time trains on a given line get to a particular station ![]() . The >> sign in Spock is shorthand for saying “when I call this method with these parameters, return these values.”
. The >> sign in Spock is shorthand for saying “when I call this method with these parameters, return these values.”
For this to compile, you need a TimetableService. In Java, you’d typically define an interface. This lets you put off actually implementing the TimetableService until later, after you’ve finished with the ItineraryService class. You defined the methods the TimetableServiceneeds in ![]() and
and ![]() , so the interface might look like this:
, so the interface might look like this:
package com.bddinaction.chapter2.services;
import com.bddinaction.chapter2.model.Line;
import org.joda.time.LocalTime;
import java.util.List;
public interface TimetableService {
List<LocalTime> findArrivalTimes(Line line, String targetStation);
List<Line> findLinesThrough(String departure, String destination);
}
The final piece in the puzzle is the findArrivalTimesAfter() method, which returns a list of departure times after a given time, as shown in this possible implementation:
private List<LocalTime> findArrivalTimesAfter(LocalTime startTime,
List<LocalTime> times) {
List<LocalTime> viableArrivalTimes = Lists.newArrayList();
for(LocalTime arrivalTime : times) {
if (arrivalTime.isAfter(startTime)) {
viableArrivalTimes.add(arrivalTime);
}
}
return viableArrivalTimes;
}
Now, when you run this test using mvn verify, it should pass, which demonstrates that you now have a working itinerary service. But you aren’t done yet. The itinerary service is built on the assumption that the timetable service does its job correctly and uses a “dummy” timetable service (known as a “stub” or “mock” object) to avoid needing a real one. This is a very effective way to build the itinerary service, as you can concentrate exclusively on the business logic of this service. But to get your acceptance criteria, you’ll also need to implement this timetable service.
The behavior defined for the mock timetable service provides very precise low-level requirements about how the timetable service should behave. This will be the starting point when you implement this service. You’re going to write a new Spock test calledWhenFindingLinesThroughStations.groovy (once again in the com.bddinaction.chapter2.services package) that builds on these requirements and describes what the timetable service should do in more detail:
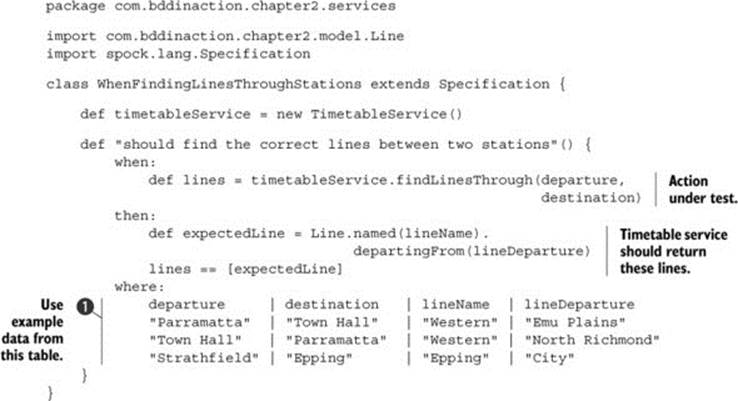
This test builds on the example from the acceptance criteria to explore the requirements. But unit testing should be more thorough than acceptance testing. In this case, you use a table-driven approach ![]() similar to the JBehave table in listing 2.3. This makes it easy to add a more comprehensive set of examples, which is what you want at this level of detail.
similar to the JBehave table in listing 2.3. This makes it easy to add a more comprehensive set of examples, which is what you want at this level of detail.
Once you’ve implemented the findLinesThrough() method, you can proceed to the next function you need: finding the arrival times at a given station. Here you can use a similar approach, writing a new Spock specification as your starting point.
Exercise 2.1
Write the unit tests for the “Find the arrival times of a given line at a particular station” feature, and implement the corresponding code.
There are many possible ways to implement this service, and we won’t delve into the details here. But along the way, you may discover other services or components that you need, which in turn you can mock out and then implement. Once there are no more mocked-out classes to implement, the acceptance criteria will run correctly, and you’ll have finished the feature.
2.4.5. Tests as living documentation
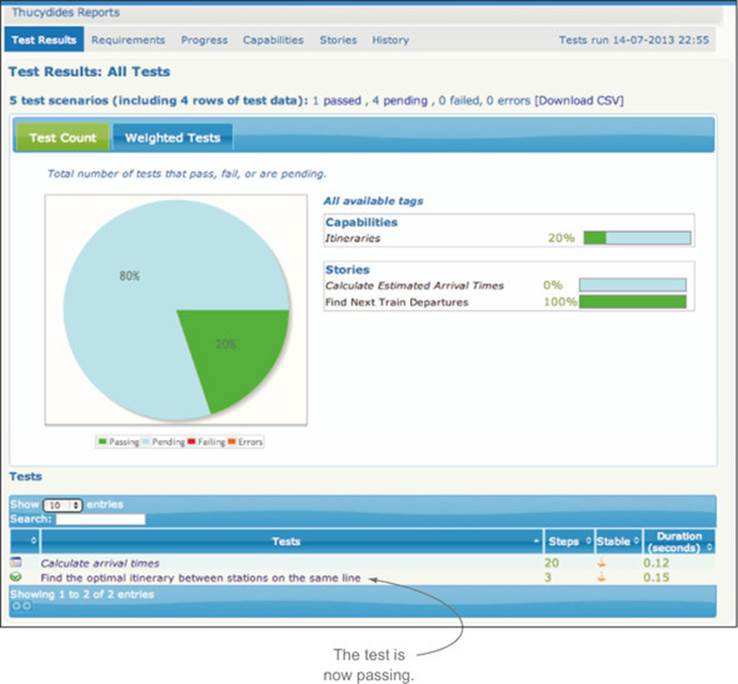
Once a feature has been implemented, you should be able to run your tests and see passing acceptance criteria among the pending ones (see figure 2.9). When you’re applying practices like BDD, this result does more than simply tell you that your application satisfies the business requirements. A passing acceptance test is also a concrete measure of progress. An implemented test either passes or fails. Ideally, if all of the acceptance criteria for a feature have been automated and run successfully, you can say that this feature is finished and ready for production.
Figure 2.9. The passing test should now appear in the test reports
More than just evaluating the quality of your application, the state of the tests gives a clear indication of where it’s at in the development progress. The proportion of passing tests compared to the total number of specified acceptance criteria gives a good picture of how much work has been done so far and how much remains. In addition, by tracking the number of completed automated acceptance tests against the number of pending tests, you can get an idea of the progress you’re making over time.
When you write tests in this narrative style, another benefit emerges. Each automated acceptance test becomes a documented, worked example of how the system can be used to solve a particular business requirement. And when the tests are web tests, the worked examples will even be illustrated with screenshots taken along the way.
But what about the testers? Automated acceptance testing and QA.
Automatically deploying your application into production when the automated acceptance tests pass requires a great deal of discipline and the utmost confidence in the quality and comprehensiveness of your automated tests. This is a worthy goal, and a number of organizations do manage this, but for most, things are not quite that simple.
In typical enterprise environments, the testers will probably still want to do at least some exploratory testing before releasing the application to production. But if the automated test results are clear and visible, they can save the QA team days or weeks of time that would normally be spent on regression or basic mechanical testing, and let them focus on more interesting testing activities. This, in turn, can speed up the release cycle significantly.
2.5. Maintenance
In many organizations, the developers who worked on the initial project don’t maintain the application once it goes into production. Instead, the task is handed over to a maintenance or BAU (Business as Usual) team. In this sort of environment, executable specifications and living documentation are a great way to streamline the handover process, as they provide a set of worked examples of the application’s features and illustrations of the code that supports these features.
Executable specifications also make it much easier for maintenance teams to implement changes or bug fixes. Let’s see how this works with a simple example. Suppose that users have requested to be informed about trains that are due to arrive within the next 30 minutes, and not just the next 15, as is currently the case.
The scenario related to this requirement is as follows:
Find out what time the next trains for my destination station leave
Narrative:
In order to plan my trips more effectively
As a commuter
I want to know the next trains going to my destination
Scenario: Find the optimal itinerary between stations on the same line
Given Western line trains from Emu Plains leave Parramatta for Town Hall at
7:58, 8:00, 8:02, 8:11, 8:14, 8:21
When I want to travel from Parramatta to Town Hall at 8:00
Then I should be told about the trains at: 8:02, 8:11, 8:14
This scenario expresses your current understanding of the requirement: the application currently behaves like this, and you have automated acceptance criteria and unit tests to prove it.
But the new user request has changed all this. The scenario now should be something like this:

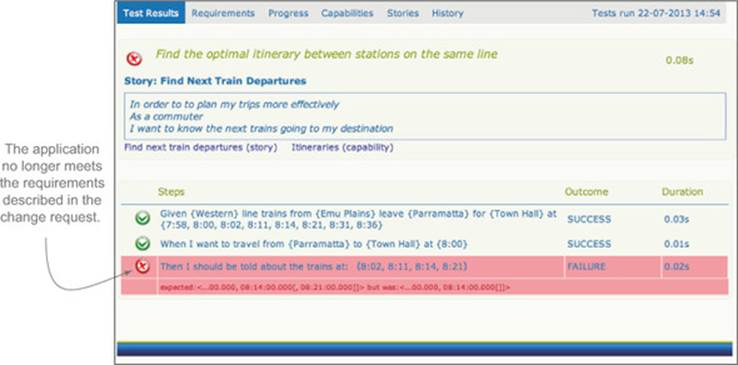
When you run this new scenario, it will fail (see figure 2.10). This is good! It demonstrates that the application doesn’t do what the requirements ask of it. Now you have a starting point for implementing this modification.
Figure 2.10. A failing acceptance criterion illustrates a difference between what the requirements ask for and what the application currently does.
From here, you can use the unit tests to isolate the code that needs to be changed. You’ll update the “should calculate the correct arrival time” Spock specification to reflect the new acceptance criterion:
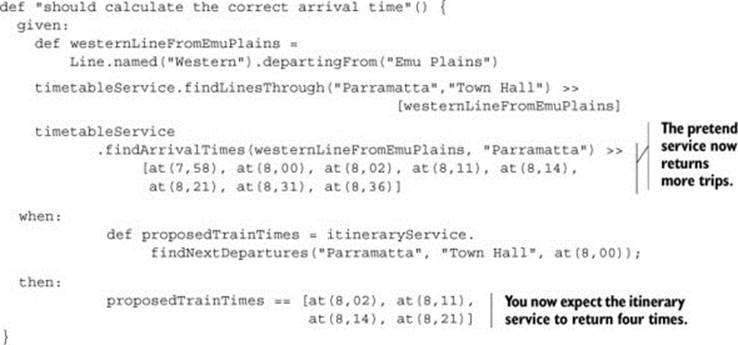
This, in turn, helps you isolate the code that needs to change in the ItineraryService class. From here, you’ll be in a much better position to update the code correctly.
For larger changes, more work will obviously be involved. But the principle remains the same for modifications of any size. If the change request is a modification of an existing feature, you need to update the automated acceptance criteria to reflect the new requirement. If the change is a bug fix that your current acceptance criteria didn’t catch, then you need to first write new automated acceptance criteria to reproduce the bug, then fix the bug, and finally use the acceptance criteria to demonstrate that the bug has been resolved. And if the change is big enough to make existing acceptance criteria redundant, you can delete the old acceptance criteria and write new ones.
2.6. Summary
In this chapter, you learned about the overall BDD project lifecycle. In particular, you saw the following:
· Understanding the underlying business objectives of a project lets you discover features and stories that can deliver these business objectives.
· Features describe functionality that will help users and stakeholders achieve their goals.
· Features can be broken down into stories that are easier to build and deliver in one go.
· Concrete examples are an effective way to describe and discuss features.
· Examples, expressed in a semi-structured “Given ... When ... Then” notation, can be automated in the form of automated acceptance criteria.
· Acceptance criteria drive the low-level implementation work and help you design and write only the code you really need.
· You can also use the BDD-style “Given ... When ... Then” structure in your unit tests.
· The automated acceptance criteria also document the features delivered, in the form of living documentation.
· Automated acceptance criteria and BDD-style unit tests make maintenance considerably easier.
In the following chapters, we’ll discuss each of these themes in much more detail, and we’ll also look at how the approaches we discuss can be put into practice using different tools and technologies.