Programming for Musicians and Digital Artists: Creating music with ChucK (2015)
Part 2. Now it gets really interesting!
Chapter 8. Multithreading and concurrency: running many programs at once
This chapter covers
· Using spork to turn functions into concurrent shreds
· Using Machine.add() and other virtual machine functions
· Composing music using separate, concurrent shreds
· Using concurrency to control multiple aspects of objects
· Organizing your concurrent ChucK files and projects
In your ChucK journey so far, you’ve learned how to write single ChucK programs that create sound and music. But many of you may wonder how you can get ChucK to run multiple files and processes concurrently. You might have clicked the Add Shred button a few times and noted that multiple programs can happily run and make sound at the same time. Or, you might be curious what the advantages of running multiple programs at once might be. Running multiple shreds at once, or concurrency, is what this chapter is all about.
As a real-life example of concurrency, imagine you’ve been really busy and haven’t had time to do your laundry. Imagine that you have many loads of laundry to do—whites, darks, sheets, and towels—and you start by running your whites in the washing machine and then transfer them to the dryer. After they dry, you continue by washing and drying your darks, and then your sheets, and finally your towels. This would take a long time!
Now imagine you took the concept of concurrency to your laundry (which most of you already do). After you wash your white clothes, you put them into the dryer. But then you put the darks into the washing machine. So two things are now happening at the same time! If you run a process in your washing machine at the same time as running a process in your dryer, you’ll get your laundry done much faster. Concurrency in programming is like going to a Laundromat, where you can do all four of your loads in four separate machines, all at the same time.
In this chapter we explore how concurrency works in ChucK. This is an advanced topic in computer science, known as multithreading. ChucK was designed to rethink how programming languages deal with multithreading, including control and timing between running processes. ChucK’s way of dealing with concurrency and multithreading, combined with its on-the-fly coding architecture and capabilities, make these topics much easier to use and understand.
8.1. Programming with concurrency
Manipulating time and concurrency are two core concepts in the ChucK language. Taking full advantage of these, and in tandem, is the key to unlocking the full potential of the language.
So, what is concurrency, and why is it useful? Concurrency means having more than one thing happening at the same time. If you’ve ever run more than one ChucK program at a time, you’ve already used a basic form of concurrency. More broadly speaking, concurrent programming is the ability to specify two or more independent and potentially related pieces of code and run them at the same time with mechanisms for synchronizing their behaviors.
We’ve talked throughout this book about the fundamental relationship between time and sound. Similar to how sound, music, and time are interrelated, music is often about the simultaneity of many processes, all happening in parallel. Doing your laundry in parallel helps you save time, but the different instrument parts in music must all take place in parallel, simultaneously, for them to fit together and make up the whole song. Concurrency lets you model this in code.
Concurrency lets you break down complicated processes and deal with them individually, without having to constantly consider the full picture. For example, one concurrent module can deal with sound synthesis, another can control pitches, and yet another might handle real-time input from an external controller, such as a keyboard or joystick. In ChucK, concurrency builds on top of and works closely with time. Concurrent processes normally don’t need to worry about how other modules work; they need only to control time in their own way and can share data and synchronize with each other only when desired.
Let’s start by looking at a simple concurrency example, as shown in the following listing, where you’ll create and run two concurrent functions that each print a unique message (the string “foo!” for one function and “BAAAAAAAR!!!” for the other) and make a unique sound (an 800 Hz pop sound for one function and a 700 Hz pop for the other). Each function advances time but by different amounts (1/4 second in one, 1 second in the other).
Listing 8.1. Basic concurrency example, print with sound
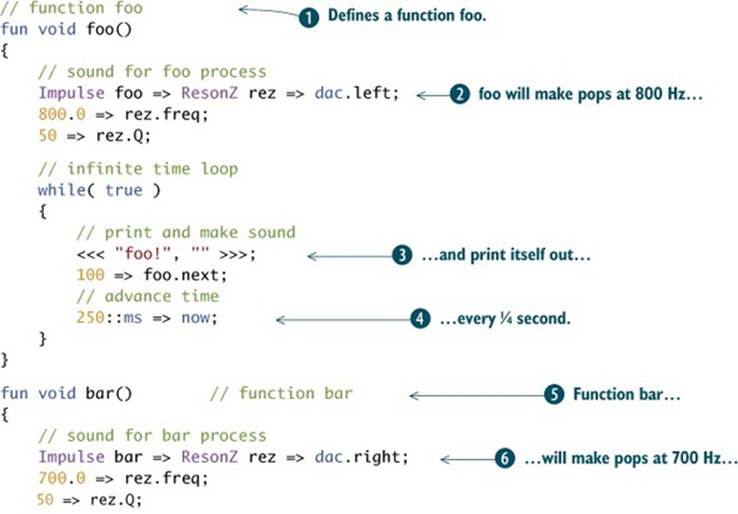

The example shows a simple concurrent program, where you define two functions, foo() ![]() and bar()
and bar() ![]() , each of which continually prints a different string
, each of which continually prints a different string ![]()
![]() and synthesizes a little tuned pop
and synthesizes a little tuned pop ![]()
![]() . Each function loops at two different rates (250::ms
. Each function loops at two different rates (250::ms ![]() and 1::second
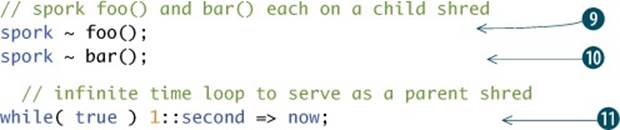
and 1::second ![]() ). Attempting to run these functions one after another will result in only the first actually running, because each contains an infinite time loop. Thus the first function called would just run forever, never returning to the point where another function could be called. But this program does something a bit different: it runs foo() and bar() on two separate concurrent processes
). Attempting to run these functions one after another will result in only the first actually running, because each contains an infinite time loop. Thus the first function called would just run forever, never returning to the point where another function could be called. But this program does something a bit different: it runs foo() and bar() on two separate concurrent processes ![]()
![]() . After sporking these two shreds, the main program is a simple infinite loop that actually doesn’t do anything but advance time
. After sporking these two shreds, the main program is a simple infinite loop that actually doesn’t do anything but advance time ![]() .
.
But how do you do this? What is this spork ~ operation?
8.2. Shreds and sporking
In ChucK, each running process is called a shred, which you can think of as a strand or thread of code. So far, you’ve been running a single program (creating a single process) by clicking the Add Shred button. But new shreds can also be created from functions by executing specific ChucK code, through a special ChucK operation called a spork. In listing 8.1, which we show part of here again, you sporked (ChucK-speak for spawning new shreds) function foo() on a new shred with the syntax spork ~ foo() ![]() , and then you sporked function bar() on another shred
, and then you sporked function bar() on another shred ![]() . The spork operations don’t actually run the functions, but the new shreds will begin running automatically when the existing code advances time. This happens down in the main infinite loop
. The spork operations don’t actually run the functions, but the new shreds will begin running automatically when the existing code advances time. This happens down in the main infinite loop ![]() , where the two child shreds then begin running as well:
, where the two child shreds then begin running as well:
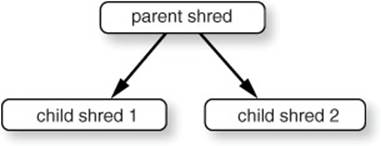
So, when you start the main program by clicking the Add Shred button, you create what’s called the parent shred, as shown in figure 8.1. The sporking operations ![]()
![]() set up the child shreds, which begin as soon as the infinite loop is entered
set up the child shreds, which begin as soon as the infinite loop is entered ![]() . This relationship between the parent and the child shreds is shown in figure 8.1 If, for some reason, the parent shred terminated, the children would be automatically destroyed. But in this case, you have an infinite loop, so you have to explicitly stop the shreds by clicking the Clear VM button.
. This relationship between the parent and the child shreds is shown in figure 8.1 If, for some reason, the parent shred terminated, the children would be automatically destroyed. But in this case, you have an infinite loop, so you have to explicitly stop the shreds by clicking the Clear VM button.
Figure 8.1. Parent shred (running program) can spork functions as child shreds.
One cool thing about shreds is that as long as each shred takes care of time in its own way, ChucK coordinates and synchronizes all shreds properly with respect to time. It all just works!
Spork?
Spork comes from the idea of forking a parallel process from other programming systems, except that ChucK shreds (called threads in other languages), have some key differences from parallel processes in those languages. Shreds are deterministic (predictable) and heavily dependent on time, so in ChucK, you spork shreds to create concurrent behaviors, which are handled by the shreduler, which is called a scheduler in other languages.
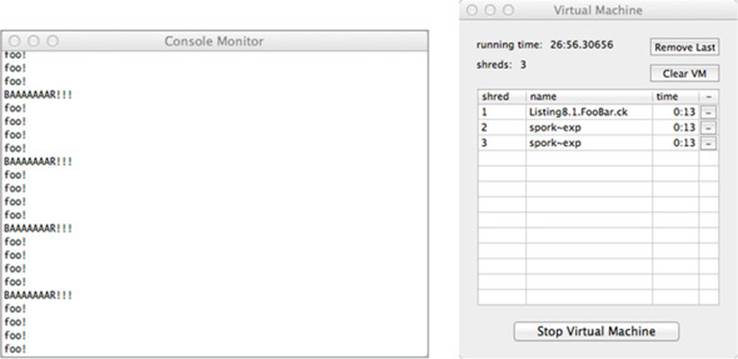
To better see what has happened inside the ChucK VM, look at the console and VM monitors from the miniAudicle (figure 8.2). The Console Monitor shows the two processes printing out their text messages, one “BAAAAAAAR!!!” for each four “foos!” The VM monitor shows that we have three shreds running: one parent (the file containing all the code, and two children (foo and bar). Note that all three shreds have been running for the same total time, because they were started at the same instant.
Figure 8.2. Console monitor and VM resulting from running the code of listing 8.1. The VM shows three shreds: the parent first, then two children.
A little more on parent and child shreds
You might be wondering why the last line ![]() of listing 8.1 (while( true ) 1:: second => now;) is necessary. This has to do with an implicit relationship between new shreds that get sporked (child shreds) and the shred from where they’re sporked (the parent shred). ChucK automatically gets rid of child shreds when their parent shred ends; for example, when it reaches the end of its code. So without the infinite loop in the last line, the children would be shreduled to run but would never run, because they would have no parent. For this reason, where the parent ends or potentially ends before any child shred you still need, the parent shred should be kept running.
of listing 8.1 (while( true ) 1:: second => now;) is necessary. This has to do with an implicit relationship between new shreds that get sporked (child shreds) and the shred from where they’re sporked (the parent shred). ChucK automatically gets rid of child shreds when their parent shred ends; for example, when it reaches the end of its code. So without the infinite loop in the last line, the children would be shreduled to run but would never run, because they would have no parent. For this reason, where the parent ends or potentially ends before any child shred you still need, the parent shred should be kept running.
Now that you know how to run current processes (programs) using spork ~, you can unlock a whole new dimension of power in your musical programming. For one, you can start to approach your music making even more compositionally, such as factoring different instruments into different processes.
8.3. A parallel, multithreaded, concurrent drum machine
So, now that you know a little about concurrency, let’s put it to work immediately to make a smarter drum machine, as shown in listing 8.2. You first make a few global duration variables that all of your shreds can share ![]() . Then you make three functions, one for each drum sound: kick
. Then you make three functions, one for each drum sound: kick ![]() , snare
, snare ![]() , and hihat
, and hihat ![]() .
.
Listing 8.2. Parallel, multithreaded, concurrent drum machine
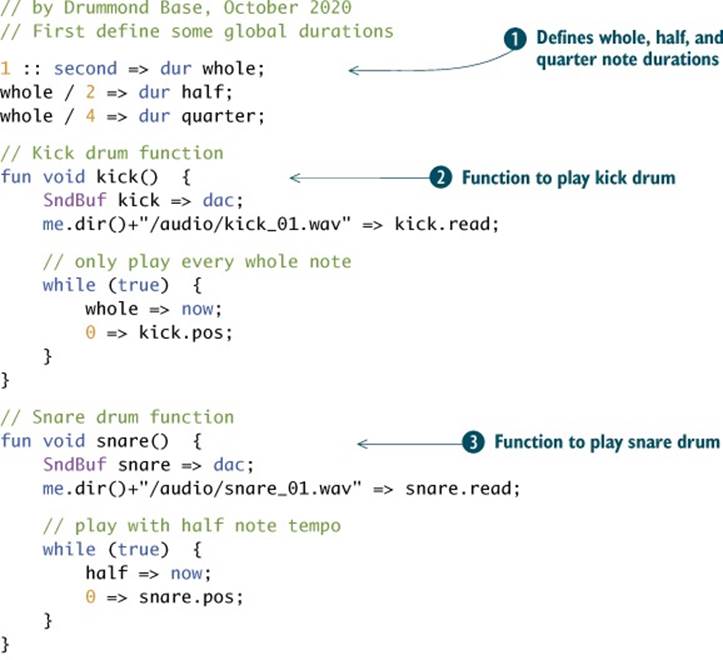
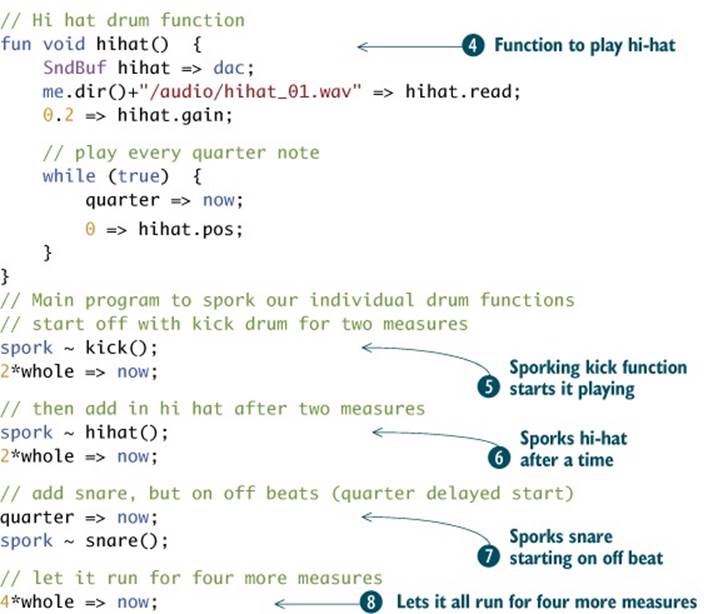
Once your functions and global tempo variables are defined, you can spork them at will in your main program. First, you spork the kick() drum function and advance time by two measures (2*whole) ![]() . Then you add in the hihat() function and let both of those run for two more measures
. Then you add in the hihat() function and let both of those run for two more measures ![]() . Finally, you add in the snare() function but delayed by a quarter note
. Finally, you add in the snare() function but delayed by a quarter note ![]() . You let it all run for four measures
. You let it all run for four measures ![]() ; then the program ends, ending all of the children shreds too. If you watch the VM window while everything runs, you’ll see the shreds appear as they begin and disappear together at the end.
; then the program ends, ending all of the children shreds too. If you watch the VM window while everything runs, you’ll see the shreds appear as they begin and disappear together at the end.
From this somewhat simple example, some of the power of concurrency should be becoming clear. Already you might be seeing the power of being able to create a function for each instrument and then spork those as shreds, in arbitrary orders and at arbitrary times, to make a musical composition. You could change the function for any individual instrument or the order in which they’re sporked to tweak your composition in really flexible ways.
You’ve seen how to create different instruments and players that can run on independent shreds, cooperating and synchronizing to make very cool music. Concurrency is great for factoring out different drums in a drum kit or different instruments of an ensemble. But you can do more with shreds and concurrency, such as using them to control parameters for a single synthesis model or sound. Next, you’ll learn how to do that.
Exercise: make your own even better drum machine
Modify the drum machine example to make your own composition. Change the order and timings of when the drum functions are sporked and removed. Change the durations used within individual drum functions, like changing half to quarter, or define an eighth duration, and use that for the hi-hat timing. Change the snare code to randomly play on either quarter- or half-note durations. Use what you learned in previous chapters about using arrays, logic, and the modulo operator to make this parallel drum machine even better. Give some drum functions an array to control when they play. Use modulo in a different drum function to control when it makes sound. Add more instruments. Play with the tempo variables. Express yourself!
8.4. Using concurrency to control aspects of common objects
Now we’ll look at a different application of concurrency: using two different shreds to control one or more shared objects, as shown in figure 8.3.
Figure 8.3. Shreds can be used to control different aspects of common objects. For example, control code A might play notes at one rate, while control code B might control detuning, vibrato, or other expression.
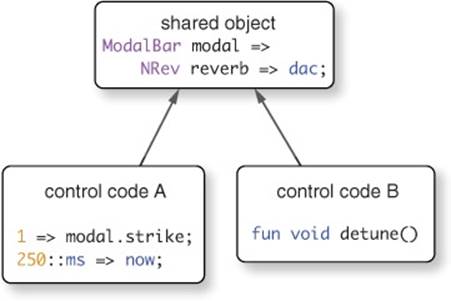
In the example in the following listing, you create two functions that both operate on a global ModalBar UGen ![]() that makes your sound. The main shred controls articulation via .strike
that makes your sound. The main shred controls articulation via .strike ![]() , and another shred detunes your global ModalBar over time, using a sine function. This tuning shred is the sporked
, and another shred detunes your global ModalBar over time, using a sine function. This tuning shred is the sporked ![]() detune() function
detune() function ![]() .
.
Listing 8.3. Controlling different aspects of a single global object using concurrency
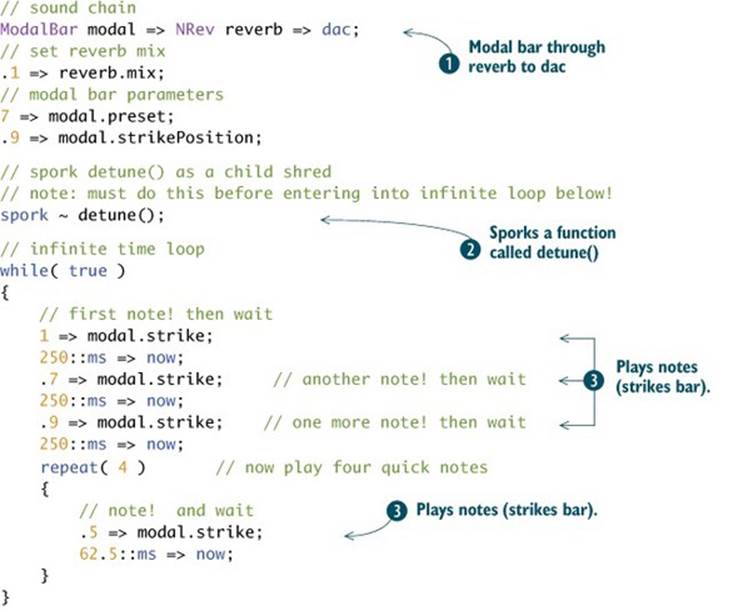
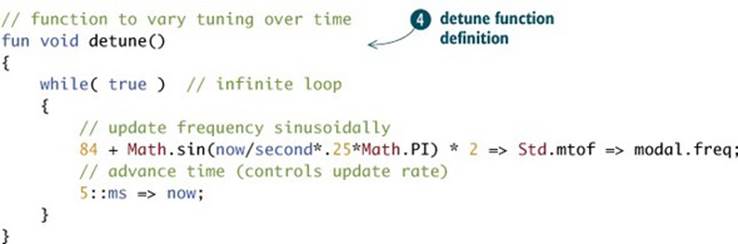
When you run the code of listing 8.3, you hear a repeating drum pattern played on the ModalBar in the main loop, but you also hear the pitch of the bar change slowly up and down due to the sporked detune() function. You could write and spork even more functions to control the same ModalBarobject, giving you more flexibility over the sound. Concurrency!
Now you know that you can use concurrency in a number of ways, including synchronizing many independent instruments or controlling a single global instrument from separate shreds. Before we go on, let’s note a few important things about shreds and concurrency:
· A shred is a ChucK process, a strand of sequential code.
· A new shred can be created by using spork ~ on a function.
· Shreds don’t necessarily need to know about each other and only need to deal with time locally.
· There’s no limit on the number of shreds (so spork away!).
· Parent shreds must be kept alive to keep child shreds running.
The use of time and concurrency together is a simple and powerful way to get a whole lot more out of ChucK. As always, we recommend that you experiment freely. So far, we’ve introduced the most precise and direct way to introduce concurrent behavior into your music-making programs, but it’s not the only way. Up next, you’ll take a look at a higher-level way to organize and run many programs at once.
8.5. Machine commands: adding ChucK files as new shreds
So far in this chapter you’ve worked with sporking shreds as functions from within a single program. But there’s a way to add entire ChucK files saved on disk as new shreds. This allows you to factor and control your code, reuse files you like, and generally create music in super-flexible ways. To do this you’ll use a set of functions associated with the VM object, which is really the running part of the ChucK language. Similar to our Std and Math functions from those libraries, the VM functions are called using the Machine prefix. First you’ll see how to use Machine.add() to spork new processes from ChucK files; then you’ll use that to further structure your programs and compositions.
8.5.1. ChucK Machine commands for adding and running files
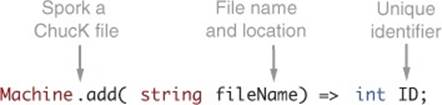
The first and most important function is Machine.add(filePath), which adds the code found at filePath as a new shred in the VM. Machine.add() returns a unique integer if it can successfully find and run the program specified in the argument and returns 0 if there’s a failure of some kind.Figure 8.4 shows how the Machine.add() function is used.
Figure 8.4. Machine.add() function adds a new ChucK program specified by filePath, returning a unique integer if it’s successful and 0 if it fails for any reason (can’t find file, file has an error, and so on).
Note that you might need to use me.dir() or other file path techniques that you learned in chapter 4 to make sure that ChucK can find the file you’re trying to add. If there’s an error, ChucK will return a zero and inform you in the Console Monitor window:
[chuck](VM): sporking incoming shred: 1 (Main.ck)...
[myFile.ck]: no such file or directory
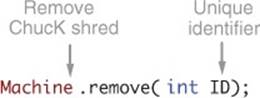
Another useful Machine function is Machine.remove(ID), which removes any shred numbered ID from the VM, terminating any shreds associated with it (if it’s a parent that sporked any shreds while running). If ChucK can’t find the specified shred, it returns an error number but doesn’t stop any other shreds from running. Figure 8.5 shows this function.
Figure 8.5. The Machine.remove function removes shreds associated with the integer argument.
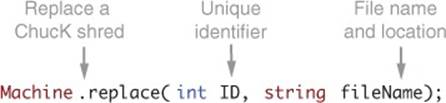
Machine.replace() takes two arguments. The first is an integer pointing to a running shred, and the second is the name of a new ChucK file that you’d like to replace the running shred with. Figure 8.6 shows this function.
Figure 8.6. The Machine.replace function removes a shred associated with an integer argument and replaces it with a new shred created by running the file associated with the second argument.
8.5.2. Using Machine functions for composition
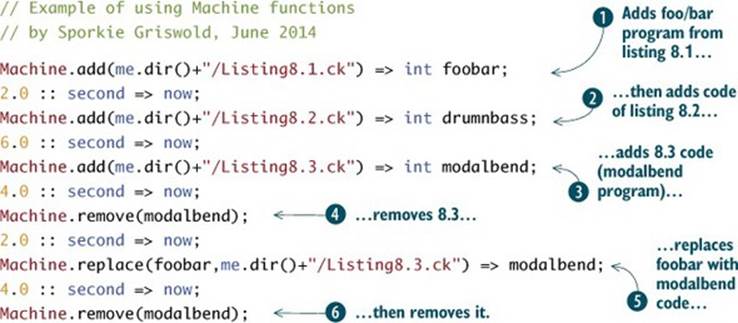
As an example of how to use your new Machine functions, let’s assume you’ve saved the programs associated with listings 8.1–8.3 as Listing8.1.ck, Listing8.2.ck, and Listing8.3.ck. Now create one more file from the code in listing 8.4, and save it as score.ck in the same directory where your other three files are located. If you load and run score.ck, you’ll hear all of the examples from this chapter so far, all arranged into a composition!
The code first loads, runs, and sporks your foobar program (Listing8.1.ck) ![]() and waits 2 seconds and adds your concurrent drum machine
and waits 2 seconds and adds your concurrent drum machine ![]() (Listing8.2.ck). After letting that run for 6 seconds, the score program adds the bending modal bar from Listing8.3.ck
(Listing8.2.ck). After letting that run for 6 seconds, the score program adds the bending modal bar from Listing8.3.ck ![]() . The drum machine will stop by itself, because it contains no infinite loops. But then the code explicitly stops the modalbend shred by using Machine.remove()
. The drum machine will stop by itself, because it contains no infinite loops. But then the code explicitly stops the modalbend shred by using Machine.remove() ![]() . The score.ck code then replaces foobar with modalbend
. The score.ck code then replaces foobar with modalbend ![]() , lets that run for 4 seconds, and then removes modalbend
, lets that run for 4 seconds, and then removes modalbend ![]() , stopping all sound. Watch the VM window while all of this runs, and you’ll see each amazing event, with all associated shreds, as they happen.
, stopping all sound. Watch the VM window while all of this runs, and you’ll see each amazing event, with all associated shreds, as they happen.
Listing 8.4. Using Machine.add, Machine.remove, and Machine.replace
Clearly you’ve unlocked an incredible new source of power for organizing your code and controlling your compositions. So let’s finish this chapter with an even more musical example, a jazz combo!
8.6. Example: building a multithreaded jazz band
To conclude, let’s combine some of the cool instrument UGens you learned about in the previous two chapters with your newfound tools of sporking and Machine functions to create a really musical example. The code of listings 8.5–8.10 assembles and controls a jazz quartet, consisting of an electric piano player (FM Rhodey instrument), a bass player (STK Mandolin with tweaked parameters), a SndBuf drummer, and a flute solo. Each runs in its own separate files, with its own knowledge and agenda, but together they make up a pretty good band, playing a nice improv.
Because you’re going to put the code for each of your jazz band players in a separate file, first we’ll talk about file organization. Next, you’ll hire your players (write your individual programs for each instrument), and then we’ll introduce an architecture for running your concurrent code. At the end, you’ll hear some cool jazz.
8.6.1. A file organization structure for your jazz band
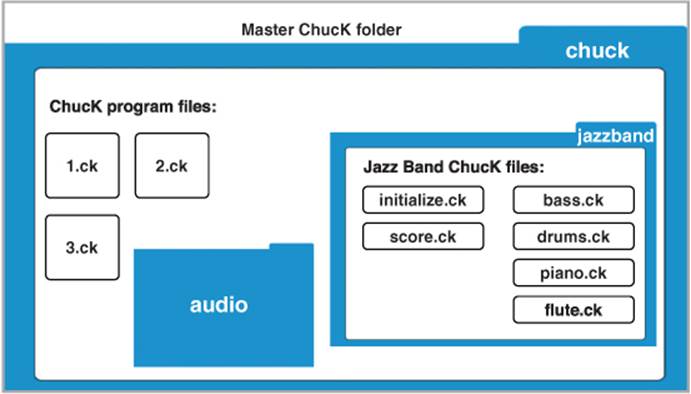
To keep all of this organized, you should make a new directory called jazzband, where you’ll save all of the individual player files, along with the master score.ck file and a file called initialize.ck, which kicks everything off. You’ll use this file architecture (shown in figure 8.7) from now on in the book, because now that you know about spork and Machine.add(), you’ll likely be creating multiple files for each new project.
Figure 8.7. Suggested file architecture for our jazz band example. A directory called jazzband holds all of your files, one for each player/instrument, along with your score (where you Machine.add() your players), and a file called initialize.ck, the only file you need to run.
8.6.2. Programming the individual players
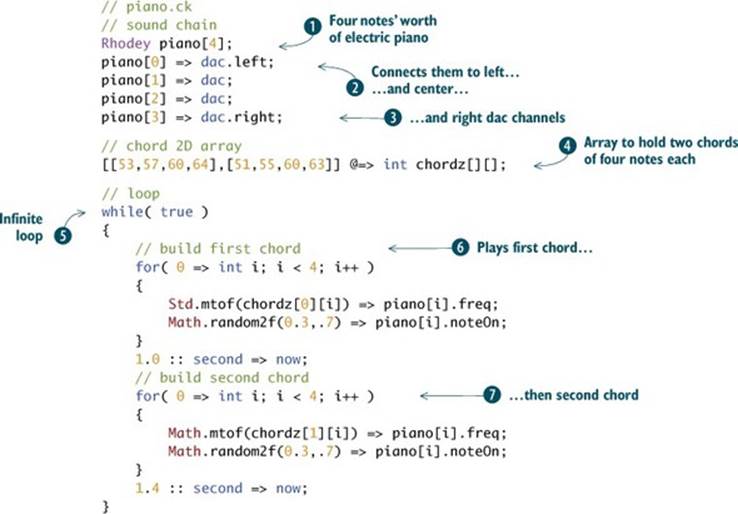
The first instrument you’ll hire for your band is an electric piano, using the FM Rhodey electric piano UGen, shown in listing 8.5. You’ll make four of them in an array ![]() , so you can play four-note chords, and you’ll connect those four notes to different channels in your stereo dac soundfield
, so you can play four-note chords, and you’ll connect those four notes to different channels in your stereo dac soundfield ![]()
![]() . You then define two chords via a two-dimensional array
. You then define two chords via a two-dimensional array ![]() . In an infinite loop
. In an infinite loop ![]() , you play one chord for a bit
, you play one chord for a bit ![]() and then the other chord for a bit
and then the other chord for a bit ![]() , looping forever.
, looping forever.
Listing 8.5. Jazz band: piano.ck
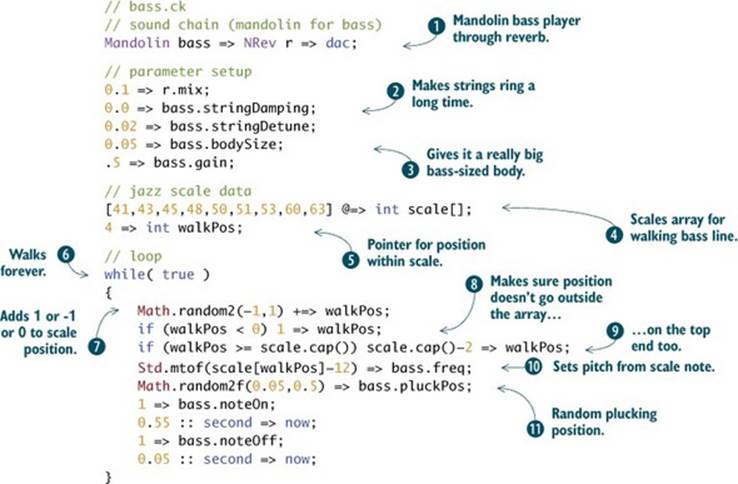
Your next player (listing 8.6) is a bassist, made by using a Mandolin ![]() with parameters adjusted to make the strings ring for a long time
with parameters adjusted to make the strings ring for a long time ![]() and to have a really big body
and to have a really big body ![]() . You then define a jazz scale in an array
. You then define a jazz scale in an array ![]() and a pointer into that array that you’ll modify to walk up and down the scale
and a pointer into that array that you’ll modify to walk up and down the scale ![]() . This will make the bass player do a characteristic walking bass line in an infinite loop
. This will make the bass player do a characteristic walking bass line in an infinite loop ![]() , as she randomly moves up the scale, down the scale, or stays on the same note
, as she randomly moves up the scale, down the scale, or stays on the same note ![]() . Since they could walk off either end of the array, you have to check to make sure the walk pointer doesn’t become less than zero
. Since they could walk off either end of the array, you have to check to make sure the walk pointer doesn’t become less than zero ![]() or greater than the size of the array
or greater than the size of the array ![]() . Finally, you set the note
. Finally, you set the note ![]() and pluck the bass at a random string position
and pluck the bass at a random string position ![]() .
.
Listing 8.6. Jazz band: bass.ck
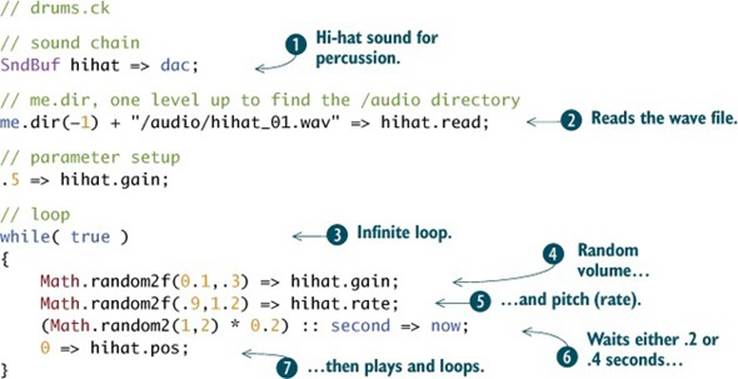
Your next band member (listing 8.7) is a drummer who will play a pretty random hihat sample using SndBuf ![]() . Because you’re using SndBuf, you’ll need to load a sample, so it’s important that your /audio directory live at the same level as the jazzband directory. You use the me.dir(-1) function
. Because you’re using SndBuf, you’ll need to load a sample, so it’s important that your /audio directory live at the same level as the jazzband directory. You use the me.dir(-1) function ![]() to point up one directory level so you can find the /audio directory. Once all of that’s set, you drop into a loop
to point up one directory level so you can find the /audio directory. Once all of that’s set, you drop into a loop ![]() and play with random parameters
and play with random parameters ![]()
![]()
![]() and go back and loop forever
and go back and loop forever ![]() .
.
Listing 8.7. Jazz band: drums.ck Listing
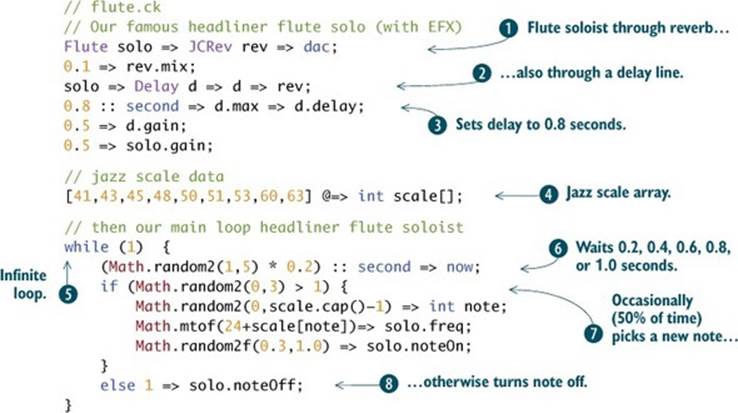
Your final band member (listing 8.8) is the headliner, a famous cool STK flute player ![]() with lots of delay effects added
with lots of delay effects added ![]()
![]() . The flautist uses the same jazz scale that the bass player walks around
. The flautist uses the same jazz scale that the bass player walks around ![]() and in an infinite loop
and in an infinite loop ![]() plays random coolness
plays random coolness ![]() at random time intervals
at random time intervals ![]() , sometimes playing very hip, introspective rests
, sometimes playing very hip, introspective rests ![]() .
.
Listing 8.8. Jazz band: flute.ck
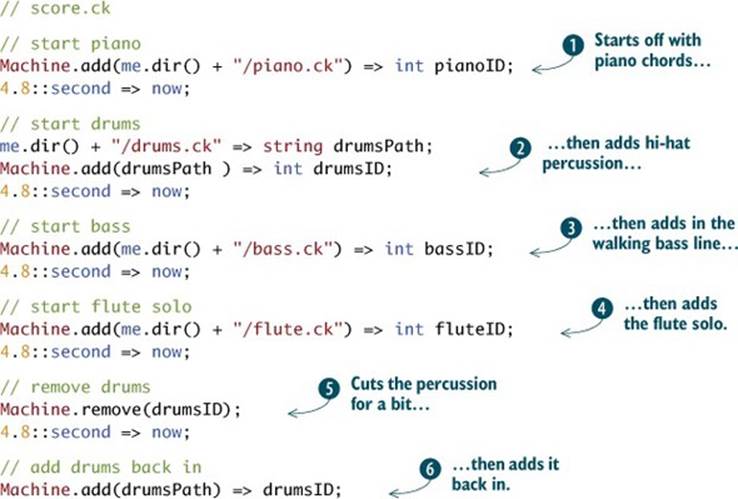
The score program (listing 8.9) controls all of your players, acting as a conductor to add them in a compositionally meaningful way. The piano starts it all out ![]() , and after a bit the drummer joins
, and after a bit the drummer joins ![]() . After some more time, the bass player starts their walk
. After some more time, the bass player starts their walk ![]() , and then the flute headliner saunters on stage and begins to play
, and then the flute headliner saunters on stage and begins to play ![]() . After a short while you remove the drummer
. After a short while you remove the drummer ![]() and add him back in after a little while
and add him back in after a little while ![]() .
.
Listing 8.9. Jazz band: score.ck
Of course this code, or the players, could be modified as much as you like, adding, replacing, and so on. As programmer/composer, you get to decide. You can now run score.ck, and if all of your other files are in the right place and run fine, you should hear the jazz band. If you see any errors, fix them by running the individual file; then try again. Testing each player individually as you type and save is good programming practice. It’s called modular development, testing, and debugging.
8.6.3. An architecture for running your concurrent code
While we’re talking about creating and managing multiple files, we’re going to introduce you to a suggested architecture for organizing and running your code. We talked about making a directory for each new composition or project, depicted in figure 8.7. One extra file in that directory is initialize.ck, shown in the next listing, which you’ll use from now on as your master program that runs everything else. The file score.ck will still take care of most of your compositional things, such as adding instruments and timing. But you’ll use initialize.ck to do things you need to before the song begins.
Listing 8.10. Jazz band: initialize.ck

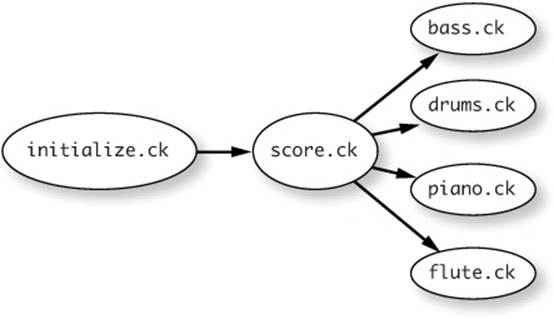
For now, the initialize.ck file shown in listing 8.10 only adds score.ck ![]() , which in turn adds all of your jazz band instrument files. The whole chain of Machine.add() function calls is shown in figure 8.8. Yes, it’s sort of dumb to have one file add one other file, but very soon you’ll see why it’s a good idea to have this file separated from the score or any other song-time ChucK files.
, which in turn adds all of your jazz band instrument files. The whole chain of Machine.add() function calls is shown in figure 8.8. Yes, it’s sort of dumb to have one file add one other file, but very soon you’ll see why it’s a good idea to have this file separated from the score or any other song-time ChucK files.
Figure 8.8. Suggested file architecture for your jazz band example. Initialize.ck adds score.ck, which then adds your instrument files. Soon, initialize.ck will do more interesting things.
Exercise: Expand your jazz band
Make the players better or different. Add more drums to the drummer. Use arrays to control the drumming. Change the scales (remember that flute and bass use the same scale, but they don’t have to). Change score.ck to add the instruments at different times, or start them all together. Add another instrument of your choosing. Compose, explore, program!
8.7. Summary
Wow! You now know that you can run multiple programs at the same time (concurrency or multithreading) but in a very controllable way. You can now do the following:
· Make new shreds from within code, by sporking functions.
· Make new shreds from ChucK files, by using Machine.add().
· Use Machine.remove() and Machine.replace() to control your shreds.
· Use structured code, like score.ck and initialize.ck, to compose music.
Frankly, this is huge. The sky is pretty much the limit now, because you can use code you’ve already written or code that others have written, reusing and borrowing functions, ideas, and entire compositions from yourself and others. You can run as many ChucK files as you like, actually as many as your CPU will support without clicking or distorting. Clicking or breaking up of the output audio is what happens when your computer finally runs out of horsepower to run your ChucK code. If this happens, you’ll have to run fewer files at the same time.
But, it’s not over yet. Next up you’ll learn how to further expand your powers by learning how to make your own objects and classes, which are modules of encapsulated code that you can use, somewhat like functions, but objects and classes are much more powerful. So let’s get to it, unless you want to compose for a while using shreds, which we wouldn’t blame you for at all.