Heroku: Up and Running (2013)
Chapter 2. How Heroku Works
At the time of writing, Heroku has had over three million separate applications deployed on its infrastructure, and this number grows day by day. Running a large number of applications day to day requires a substantially different approach than running just a handful, and this is one of the reasons that the Heroku architecture is markedly different from what you or I might develop if we were setting up our own environment on our own hardware for a single application. Heroku’s task is to support the running of all of these applications at the same time, managing the deployments that users are requesting, as well as scaling applications’ needs.
In order to achieve this, the Heroku platform is broken up into several key segments; the most important among these are:
§ Routers, which ensure your application receives the requests from users on the Web
§ Dynos, where your application code actually runs day to day
In addition to these, there are a number of extra components, such as the Logplex and the various add-ons and services available to your applications (see Figure 2-1).
So, let’s walk through all of these parts in turn.
What Is a Dyno?
When you deploy an application to Heroku, it is run in a container called a dyno. The more dynos your app has, the more running instances of your application are available to take requests. Each dyno is completely isolated from other dynos. You can add dynos to extend capacity and to allow for fault tolerance (since one dyno going down will not affect other dynos). At the time of writing, each dyno represents 512 MB of physical RAM.
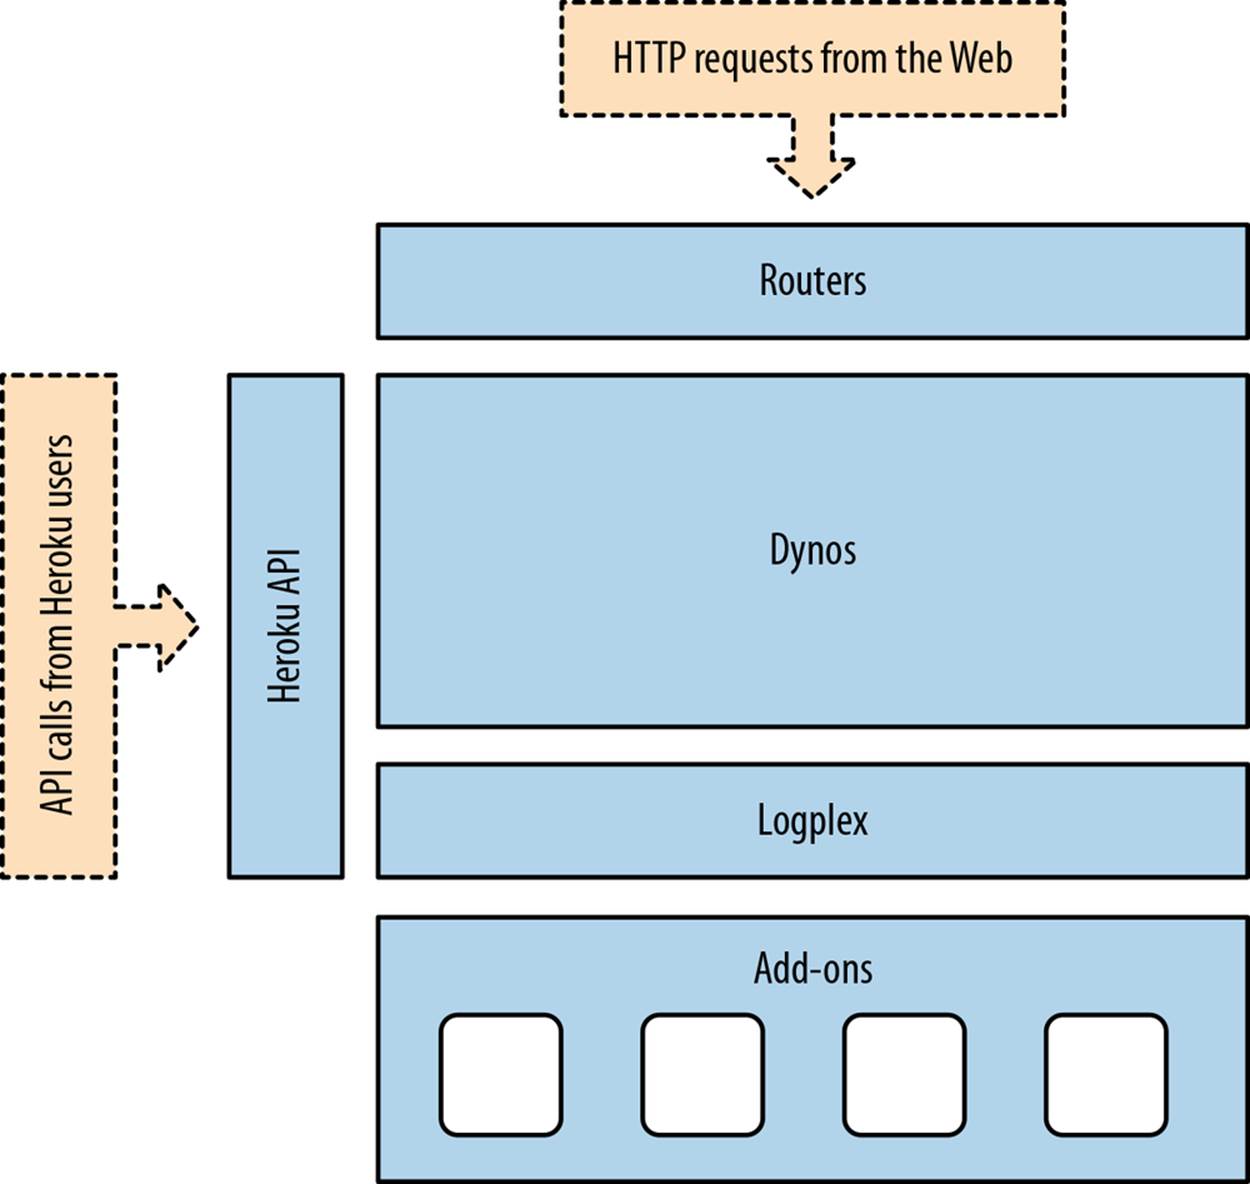
Figure 2-1. Overall architecture of the Heroku platform
Applications are billed by the dyno/hour prorated to the second, and every application is credited with 750 dyno/hours per month. The caveat here is that Heroku idles any applications running a single dyno when not in use to free resources for other applications.
So, a dyno is like a small virtual computer, but if your application is split up over multiple compute units, how does Heroku know which dynos to send requests to?
HTTP Routing
When a user types your application’s URL into a browser or tries to make a request to it via an API (and so on), there needs to be a way to connect the user with your application running somewhere deep down within the Heroku platform. There are thousands of applications running on Heroku, and maintaining a persistent location for an application within the platform is an approach fraught with danger.
The Heroku router is a piece of software (written using Erlang, called Hermes), which acts as a gateway between your users and the dynos that are running your code. In its memory, it is aware of every single application currently deployed to the platform and the external URLs that each of these applications should respond to (including the *.herokuapp.com URLs, legacy *.heroku.com URLs, and any custom domains that you may have added). Lastly, it stores the current location of your application on the platform at the current time.
Therefore, the routers have a lot to keep track of. So what exactly does it look like when a request comes in from a user on a web browser?
Request Life Cycle
When a user wants to visit your site, he types the URL into the address bar and hits Enter. Then a DNS query is made to your provider. They see you’ve pointed your address at Heroku either using an A record or a CNAME. With this information, the request is sent to the Heroku routers.
Every time a router receives a request, it carries out a lookup on the URL being requested and determines the location of your application code. Once found, it fires the request at your code and awaits a response. This is where your application steps in and handles the request, doing whatever you programmed it to do.
Once your code has completed processing the request and a response has been returned, the router will pass the response back to the end user. The best part about this is that the routers are completely transparent to the outside world.
Now that you know what happens when a request goes through, what happens if something hangs in your application? Does Heroku just keep thousands of dead requests alive?
Long-Running Requests
As a way of protecting the user from long-running requests, the router processing the request will wait for only 30 seconds before returning a timeout error to the end user. The error returned in these instances shows in your application logs as an H12. Note, though, that this only counts the first byte returned. Once that first byte of response is returned, the router sets a 55-second rolling window before an error is returned (in these instances, the error code changes to an H15). This, therefore, means that you are effectively able to stream responses back to the user without worrying about hitting this timeout error.
Let’s say we’re sending a valid request that our server should be able to respond to. We know that our code lives on a dyno, but where exactly does a dyno live?
The Dyno Manager and Dynos
In simple terms, a dyno is an isolated, virtualized UNIX container that provides the environment required to run an application.
Each dyno running on the platform will be running different application code (see Figure 2-2). For instance, if it were a Ruby on Rails application, one dyno could be running an instance of Unicorn, whereas if it were a Java application you might see Tomcat or something similar. Across this array of dynos, you may have potentially thousands of applications, with each dyno running something different. Some applications running at a higher scale will be running on more than one of those dynos, some will be running on only one or two, but the key thing to remember here is that a single application could be represented anywhere within this system.
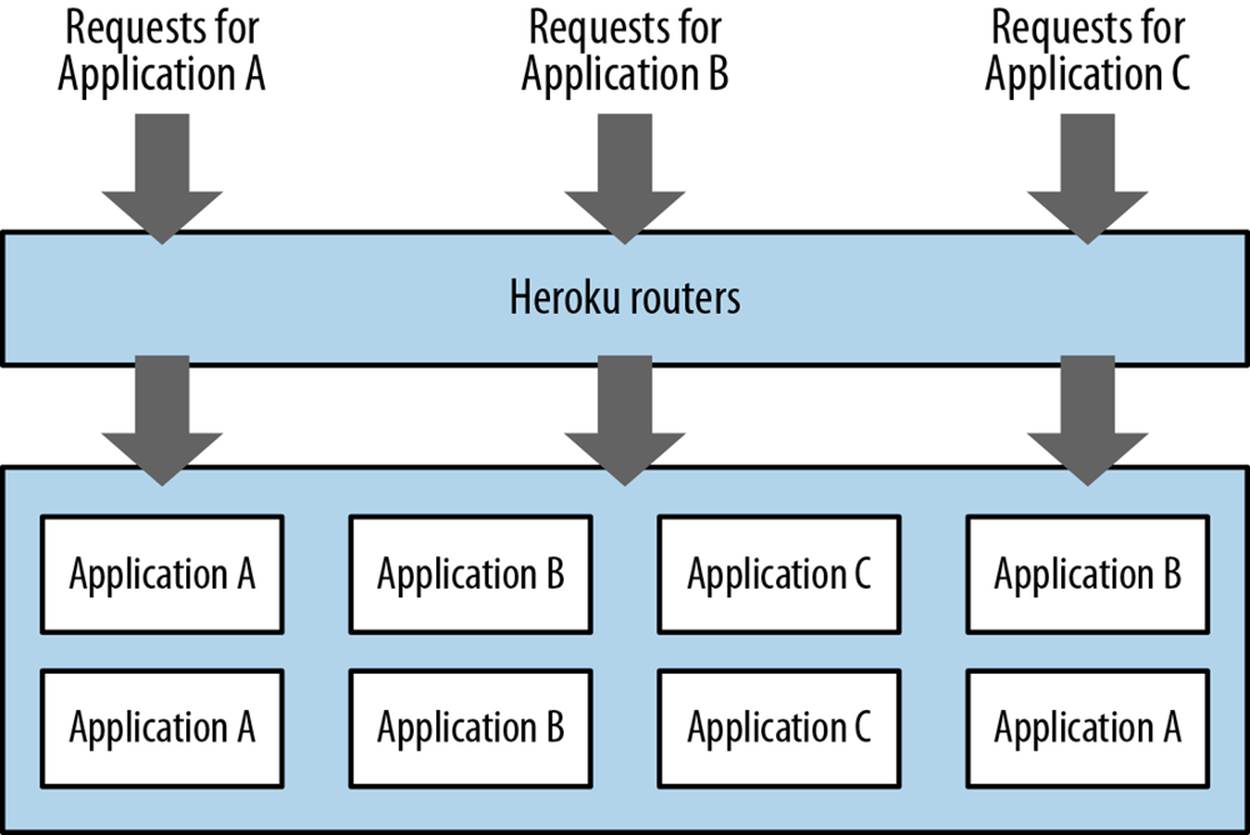
Figure 2-2. The Dyno manager
Before your application code is paired with a dyno, the dynos are all identical. This uniformity allows Heroku to easily manage the thousands of applications on the platform. When you send your code to Heroku it is compiled into a format known internally as a “slug” that can then be quickly run on any of the available dynos. Because Heroku manages such a staggering array of dynos, it is inevitable that performance of an underlying server may slow to a halt or a hardware failure will occur. Luckily, when this is detected, dynos will be automatically stopped and restarted.
While 10,000 hours of uptime on a hard drive might sound like a long time, if you’re running 10,000 hard drives, that’s one failure per hour.
Because of this, Heroku advocates building stateless web apps. As an additional measure toward stability, each dyno is restarted once every 24 hours. All of this requires no interaction on your part, freeing you up to focus on developing your app code.
Configuration
A given codebase may have numerous deployments: a production site, a staging site, and any number of local environments maintained by each developer. An open source app may have hundreds or thousands of deployments.
Although all running the same code, each of these deploys have environment-specific configurations. One example would be credentials for an external service, such as Amazon S3. Developers may share one S3 account, while the staging and production sites each have their own keys.
The traditional approach for handling such config vars is to put them under source (in a properties file of some sort). This is an error-prone process, and is especially complicated for open source apps, which often have to maintain separate (and private) branches with app-specific configurations.
A better solution is to use environment variables, and keep the keys out of the code. On a traditional host or working locally, you can set environment vars in your bashrc. On Heroku, you use config vars:
$ heroku config:set GITHUB_USERNAME=joesmith
Adding config vars and restarting myapp... done, v12
GITHUB_USERNAME: joesmith
$ heroku config
GITHUB_USERNAME: joesmith
OTHER_VAR: production
$ heroku config:get GITHUB_USERNAME
joesmith
$ heroku config:unset GITHUB_USERNAME
Unsetting GITHUB_USERNAME and restarting myapp... done, v13
Heroku manifests these config vars as environment variables to the application. These environment variables are persistent (they will remain in place across deploys and app restarts), so unless you need to change values, you need to set them only once.
By making use of these configuration variables, it is therefore possible to have two different dynos containing the same application code that behave differently. For instance, one may be a production grade application that sends emails to its users, whereas the other may be a development system that emails only the developers.
So a dyno is a container that holds our code and our configuration, but how do we get our application code into them? Heroku calls this process slug compilation.
Releases
Before we talk about the process of creating a release that is deployed onto Heroku, let’s quickly define what a release is.
As far as Heroku is concerned, a release comprises a combination of your application code (or slug), and the configuration around it. Therefore, any changes to either of these will generate a new “release,” which can be seen via the releases command:
$ heroku releases -a neilmiddleton
=== neilmiddleton Releases
v62 Deploy e5b55f5 neil@heroku.com 2013/04/29 22:24:44
v61 Deploy 5155279 neil@heroku.com 2013/04/24 18:44:57
v60 Add-on add newrelic:standard neil@heroku.com 2013/04/19 00:04:06
v59 Add papertrail:choklad add-on neil@heroku.com 2013/04/19 00:03:00
v58 Deploy 0685e10 neil@heroku.com 2013/04/18 17:53:20
v57 Deploy 823fbdf neil@heroku.com 2013/04/18 17:25:55
v56 Remove librato:dev add-on neil@heroku.com 2013/04/16 23:42:39
This definition of releases makes it possible to roll back to previous versions of your code and the configuration surrounding it. This is very useful if a deploy goes bad or your configuration changes cause unforeseen issues.
Slug Compilation
From the moment Heroku detects you are pushing code, it will fire up a runtime instance to compile your app (in the very early days of Heroku, this wasn’t needed, as Rails was the only supported web framework). Additionally, external dependencies, such as gems, could simply be preinstalled on every dyno. Although that was a neat idea, the list of external dependencies your code might rely on grows exponentially. Instead of trying to preinstall all of that software, Heroku relies on tools adopted by the community for dependency management.
Before any code is coupled to your dyno or any dependencies are installed, the dyno has a base image of preexisting software. This is known internally as the runtime because the image will need to have enough functionality to run your code or at least install dependencies needed to run your code. This image is kept fairly lightweight to minimize overhead. All software on the base image (e.g., cURL) is available as open source. This is an intentional choice to maximize code portability and to increase compatibility with a user’s development machine. This includes the base operating system, which is and always has been a flavor of Linux. By keeping all the base images of dynos the same, security updates of components are completed by Heroku engineers quickly and with little or no impact to running applications.
Although some criticisms of platform as a service (PaaS) involve the so-called “vendor lock-in,” such incompatibilities in the ecosystem would indicate a cost associated to adopting the platform. It is Heroku’s goal to provide as seamless and transparent a deploy process as possible while maintaining reliability and consistency. Heroku supports open source software and so should you.
So, now that Heroku has a secure base image with suitable tools, and it has your application code, it runs a buildpack to determine exactly what needs to be done to set up your code to run. The buildpacks are all open source and can be forked and customized. For more information on how buildpacks work, see Chapter 8.
Once the buildpack is done executing successfully, a snapshot of the finished product (minus runtime image) is placed in storage for easy access at a later time. This product is referred to as a slug, and you may have noticed while deploying that Heroku will tell you your slug size. One reason to pay attention is that larger slugs take longer to transfer over the network, and therefore take longer to spin up on new dynos.
Now that your slug is saved, dynos carrying old application code are sent commands to begin killing off their processes. While this is being done, your code is copied over to other dynos. Once the old application quits running, the new dynos are brought online and made available to the routers ready to serve requests.
Because Heroku keeps a copy of your application in storage, if you need to scale out to more dynos it can easily copy the slug to a new dyno and spin it up. This type of quick turnaround means that you can do things like run a scheduler in its own dyno, and every time a command is executed on one of your apps via the run command, like heroku run bash, you are actually running it inside of a completely fresh and isolated dyno. This protects you from accidentally running rm -rf on your production web server.
Now that you know a bit more about what actually goes on in the process of building a slug and spinning it up as a running process, let’s take a look at how we can use this to our advantage.
Scale Out, Not Up
Traditionally, when servers run out of capacity, they are scaled up (i.e., developers turn off the machine and add RAM, a bigger hard drive, more cores, a better networking card, etc., and then turn it back on). This might buy some time, but eventually as an application grows in user base, a server will max out on upgrades and engineers will have no choice but to scale out. Scaling out is when you add extra servers for capacity rather than extra capacity to your server. This is a great practice because you can scale out in an unlimited way, whereas scaling up is very limited. Typically, scaling up is easy, and scaling out is hard. It requires provisioning new hardware, networking it, installing software, patching and updating that software, building out a load-balancing infrastructure, and then buying a bunch of pagers since more hardware means more failures.
When you run on Heroku, your application is already primed to scale out, all without the pagers. Storing compiled application code into slugs and keeping this separate from your running instances gives you a massive amount of elasticity. When you give Heroku the command, it pairs your compiled slug with a dyno to give you more capacity. This means you could take your app from 2 dynos to 102 dynos with one command (that’s 51 gigs of RAM if you’re doing the math at home). So, if your big V2 product launch is coming up in a few days, you can sleep soundly knowing that extra capacity is available if you need it, but you’re not obligated to use it.
This ability to scale out is not by accident, and it comes with a host of side benefits. As we mentioned earlier, it makes your application more fault tolerant of hardware errors. For instance, a single server could be running several dynos when the memory fails. Normally this would be a significant issue in traditional environments, but the dyno manager is able to spot the dead instance and migrate the dynos somewhere else in a heartbeat (see Figure 2-3).
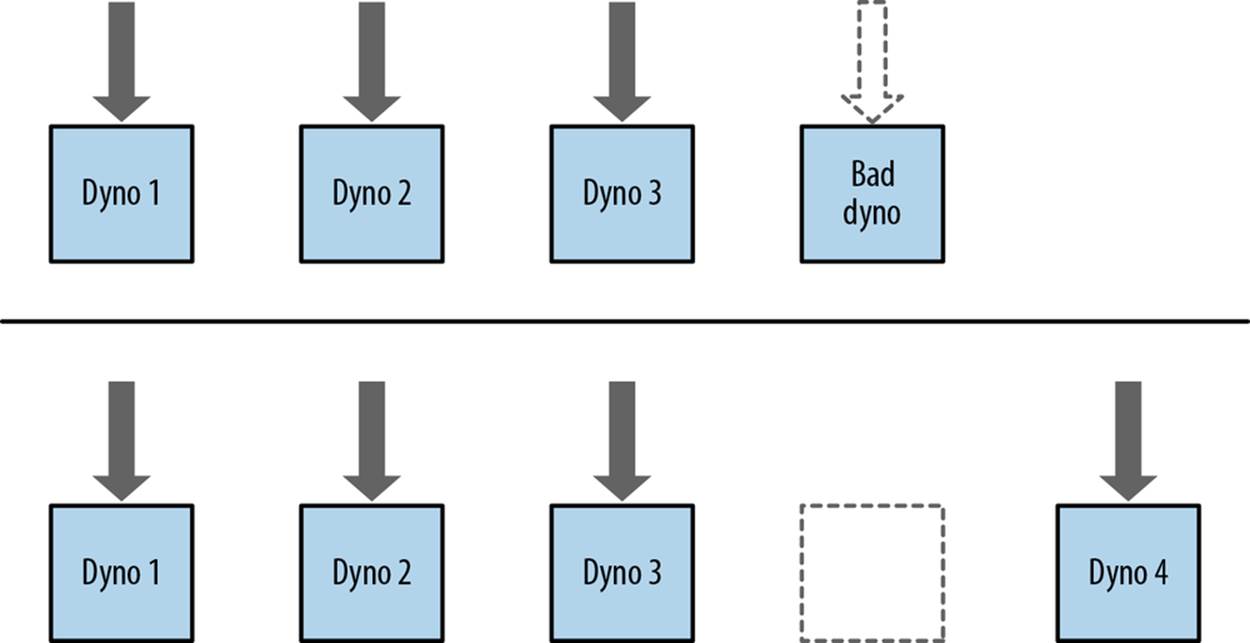
Figure 2-3. The dyno manager recovering from a node failure
Another benefit of the dyno architecture is isolation. Each dyno is a completely separate container from all others, so there is no possibility of another application accessing your application code, or suffering because a rogue dyno is spinning out of control and using up all the CPU on the host instance. As far as you the developer are concerned, these are all separate entities.
Erosion Resistance
A nontechnical benefit to the dyno architecture is erosion resistance. Software erosion is what happens to your app without your knowledge or consent over time: it was working at one point but doesn’t work anymore. Imagine a security vulnerability is discovered in the operating system your app is running. If you don’t patch the vulnerability quickly, attackers may take advantage of the exploit and gain access to your code, or worse. Although you didn’t intentionally put the vulnerability in your app, doing nothing erodes the ability of your app to perform its job safely and securely.
When your application experiences an error due to an erosion of software, you have to invest energy diagnosing and resolving the problem. Erosion is a problem that all applications suffer from regardless of size, and one that many applications have problems dealing with if left for too long.
Software erosion can be thought of principally as your application getting “out of date.” Your application consists of many moving parts, some of which are being constantly updated by the communities around the world. For instance, you have operating system upgrades, kernel patches, and infrastructure software (e.g., Apache, MySQL, SSH, OpenSSL) updates to fix security vulnerabilities or add features. All of these need to be kept up to date and are often left by the wayside due to the effort required to do so.
Because all dynos are derived from the same image, it is guaranteed to be the latest and greatest image that the Heroku operations team has put together at the time the dyno is created. These images are put through lengthy test processes and evaluation before being placed into production.
Once your application is up and running, its dynos are silently cycled automatically once a day to ensure that the dyno image version they are running is the latest available runtime (your slug will stay the same). You can check your application logs to see that the cycling process has occurred. Therefore, if you were to deploy an application to Heroku and leave it for several months, it would be no more out of date than one deployed a day ago.
Workers and Background Processing
Not all dynos need be ones that respond to HTTP requests. A dyno can be thought of as a container for UNIX processes. Dynos can therefore handle a variety of different types of tasks. While your web dynos will handle all your web requests, other dynos may be tasked with carrying out some sort of background processing, be it working a job queue, sending emails, or managing event triggers based on a calendar. The list of possibilities here is endless. However, note that these dynos still have an attached cost and will therefore need consideration when planning your application architecture and projecting costs.
A very common use case of a worker dyno is to process outgoing email. When a user signs up on a website, she will typically get a confirmation or welcome email. If you are sending this message during your web request, your user must wait for the email transaction to complete before she gets to go to the next page. This makes your site seem slow and can actually lead to timeouts. By putting that information into a lightweight queue and sending that email off from a background worker, you can improve the speed of your web server while increasing its capacity.
You can also schedule one-off background tasks with Heroku’s scheduler. This is like a worker, but only runs a specific command for a given interval. This is very similar to how you might schedule a task to be run with cron. Tasks run by the scheduler are only charged for the time they use, so if a task takes only 12 minutes to complete, your account will be debited only 12 dyno/minutes.
Now that we’ve got our web stack and our worker infrastructure under control, let’s take a look at the other features Heroku provides to help developers.
Other Services
We’ve discussed the main components of the Heroku platform that keep your application code up and running, so now let’s talk about some of the supporting services that make up the parts of the platform the user doesn’t see. These include the Logplex, deployment systems, and the various add-ons that you are able to attach to your application to provide ancillary services.
The Logplex
Every application generates output, be it content via generated web pages or data via an external API. Another form of output that applications create are logfiles on the server. If you’ve run a production web server, you’ll know there is no substitute for easy access to logs.
In a traditional web server configuration, many logfiles are created. First, you have the regular system logfiles that are generated by the operating system itself. Then you have the logfiles created by the services running on the server, such as Apache (web server) logs, or PostgreSQL (database server) logs. Lastly, you have your own application logfiles.
Typically, all of these files are written to the local disk on their respective servers before processes such as UNIX’s logrotate come along and archive the files to another location, usually compressing them down. A respectable system administrator at this point will periodically archive these logfiles to a different location for later interrogation or reference.
One of the downsides of logfiles is that they affect the way we look at the data within a system. Application and system logs contain a time-ordered stream of information about what is happening in your application at any given time. Although this stream is constant and ongoing, the way they are typically represented in logfiles tends to imply that there is a beginning and an end. To address this misperception, Heroku developed the Logplex.
The Logplex is an open source tool that replaces the logfile concept by providing a constant stream of information flowing from your application with no beginning and no end. What’s more, this stream contains a single canonical source of information from every part of the stack—be it the routers, your dynos, and so on. This means that as a developer you are able to tap into this feed at any time and see all of your application’s activity in one place at the same time. Therefore, Heroku does not provide logfiles per se, but offers this stream. Should you wish to capture this information, Heroku allows you to drain this information into an external store.
Here’s a sample of Logplex output from a simple web application:
Jul 19 19:37:30 MyApplication_Production heroku/router: GET
www.myapplication.com/admin/applicants dyno=web.1 queue=0 wait=0ms
service=381ms status=200 bytes=22849
Jul 19 19:37:30 MyApplication_Production app/web.1: Completed 200
OK in 370ms (Views: 213.0ms | ActiveRecord: 131.6ms)
Jul 19 19:38:27 MyApplication_Production app/postgres: [5-1] postgres
[www] LOG: duration: 61.517 ms statement: SELECT count(*) FROM
pg_stat_activity;
Jul 19 19:41:17 MyApplication_Production heroku/router: GET
www.myapplication.com/ dyno=web.2 queue=0 wait=0ms service=14ms
status=302 bytes=115
Jul 19 19:41:17 MyApplication_Production app/web.2: Started GET
"/" for 180.76.5.168 at 2012-07-19 16:41:17 +0000
Jul 19 19:41:17 MyApplication_Production app/web.2: Processing by
User::SessionsController#index as HTML
Jul 19 19:41:17 MyApplication_Production app/web.2: Completed in 6ms
Jul 19 19:41:57 MyApplication_Production app/postgres: [19753-1]
[www] LOG: checkpoint starting: time
Jul 19 19:41:58 MyApplication_Production app/postgres: [19754-1]
[www] LOG: checkpoint complete: wrote 0 buffers (0.0%); 0
transaction log file(s) added, 0 removed, 1 recycled; write=0.000 s,
sync=0.000 s, total=0.014 s; sync files=0, longest=0.000 s,
average=0.000 s
Jul 19 19:45:38 MyApplication_Production app/postgres: [5-1] postgres
[www] LOG: duration: 61.340 ms statement: SELECT oid, typname
FROM pg_type where typtype = 'b' AND typname IN ('hstore')
Jul 19 19:46:58 MyApplication_Production app/postgres: [19755-1]
[www] LOG: checkpoint starting: time
Databases and Other Add-Ons
So far we have talked about how Heroku can take your application code and run it in the cloud, allowing you to scale to meet your application needs. However, we haven’t talked about how Heroku provides all the other services that a modern web application needs.
It is not uncommon these days for an application to require more than just code. Databases are an extremely common requirement, as are external services such as Email SMTP or caching services such as Memcached. Lots of other services are becoming more common as well: Redis, AMQP, full-text search, image and video processing, NoSQL databases, and SMS are all growing in usage on a daily basis.
So how does Heroku provide these services? Well, in short, Heroku doesn’t. From a very early stage, Heroku put together the Add-on program, which is a process whereby an external vendor can develop a service and then make it available to the platform via the add-ons API.
By using this approach, it has been possible for a library of add-ons to build up over time that can provide almost all the ancillary services that an application might ever need to consume. Because most of these services are attached via simple configuration, the effort required to use these services with their own application is very low.
TIP
More information on the add-ons library can be found here.
One of the most popular add-ons is one provided by Heroku itself. Called Heroku Postgres, this add-on provides PostgreSQL services to all applications.
On initial deployment, Heroku will detect the language and type of your application. If you are deploying using a popular database-backed web framework, such as Ruby on Rails, Heroku will provision and configure the PostgreSQL add-on for your application. This means that deploying a database-driven application is as simple as pushing your code to Heroku and running a migration.
The Heroku Postgres service comes in a variety of shapes and forms, so there is a dedicated chapter to this topic later on in the book (Chapter 5).
However, not everyone requires PostgreSQL; for example, you might want to use MySQL or some other form of database with your application code. Although Heroku recommends PostgreSQL, most of the alternatives can be found in the add-ons library (e.g., Amazon’s Relational Database Service [RDS] or the ClearDB MySQL service). For more information on these alternative database services, see the relevant sections in the add-ons library.
Deployment Systems
One of the most commonly overlooked parts of the Heroku platform is the deployment system. This incredibly complex part of Heroku is what takes your code and transforms it into a platform-friendly version that can be scaled up and down instantly and at will. What’s more, the deployment system also alters your application to suit the platform, injecting various components and configuration to make your life, as the developer, much easier and simpler.
All Heroku deployments are carried out via the use of the Git source control system. By pushing your code to Heroku you are asking the platform to deploy your code. But how does this work?
Well, for starters, Heroku holds a copy of the Git repository for every single application on the platform. When you push into the master branch, you initiate a deploy and Heroku will start making your repository ready for deployment. You can push into other branches if you wish, but these will only be stored on Heroku and will not be deployed, as the platform will only ever deploy the master branch. However, it is possible to push from a remote feature branch such as staging into the Heroku master. You will learn more on this later in the chapter, when we talk about application management.
When Heroku receives your code via push, several things occur. Heroku takes your code and identifies it (e.g., as a Rails application, Django, Java, etc.). Once identified, it runs the code through a buildpack. Buildpacks are special programs that understand the structure of your application and its appropriate conventions. By understanding your application structure, these buildpacks are able to make the changes required for your application to function correctly on the platform. This can include a variety of changes such as ensuring configuration settings are correct, injecting application framework plug-ins, or overwriting configuration files such as database configurations.
Buildpacks are provided by the Heroku operations team, as well as by other open source developers. Anyone can write their own buildpack for their own means. For more information on buildpacks in general, see Chapter 8.
Once your application has been prepared, it is stored in a slug. This slug is stored in a file store waiting for a deployment request, as mentioned earlier. In most cases, the slug is immediately deployed to new dynos, replacing the ones that you already have running.
Most use cases already have a buildpack prebuilt by the Heroku operations team. For instance, if you were to push a Django application to Heroku, the hard work of slug compilation is done for you, and there is nothing more you need to do. Should you wish to push something a little off the beaten track or if you need to customize the way that your application deployments are handled, you are now able to write your own custom buildpacks and ask the platform to use these instead of the default. More information on this can be found in Chapter 8, which goes into detail about buildpacks.
TIP
All of the default buildpacks can be seen on GitHub.