The Mikado Method (2014)
Appendix C. Dealing with dynamically typed languages
This appendix covers
· Getting fast feedback from dynamically typed languages
· Driving change with tests
How you use the Mikado Method differs a bit from how you get fast feedback when it comes to different kinds of languages. The biggest difference is probably between statically typed and dynamically typed languages. This appendix will show you how to work with a dynamically typed language.
Even if you work mostly with statically typed languages, there’s value in reading this appendix because there are dynamic aspects in statically typed languages too, such as the reflection capabilities in Java. But if you work with dynamically typed languages like JavaScript or Python, this appendix was created with you in mind.
In this appendix, we’ll work with a variant of the code in chapter 5, and we’ll assume you’ve read chapters 1–3, and the first part of chapter 5. Because of this, we’ll skip the description of the problem and solution and go straight for the code.
First, though, we’ll look very quickly at why dynamic languages require a slightly different approach.
C.1. How to get feedback in a dynamic environment
Statically typed languages offer rapid feedback from the compiler in the form of compiler errors, but these aren’t available in a dynamically typed language. You need another way to generate fast and repetitive feedback. One way to do this is to run the actual program when you make a change, but we think that approach is much too slow. We generally choose another approach: automated tests.
We don’t think that there’s much to debate about whether tests are good or not; we believe they’re absolutely crucial when you’re dealing with dynamically typed languages. In fact, we believe they’re equally crucial when you’re dealing with statically typed languages. As a consequence, we’re not going to argue about their value, nor will we debate whether we should “test first” or “test last.” We’ll use a test-first approach, and the tests will drive the change here.
Feedback from debugging
Another way to get feedback from your code is running it in a debugger. A useful debugging environment provides means to inspect the state of your code and data and also allows you to analyze it at a pace that suits you. There are pros and cons with debugging, but it’s definitely something we do from time to time.
The biggest challenge with debugging is getting the application in a certain state—exposing the problem we’re trying to fix. That’s why we combine debugging with tests. This gives us the best of both worlds: repeatability and quick setup from the tests, and analysis and code inspection at a very detailed level from the debugging environment.
C.2. The loan server (again)
Imagine the loan server from chapter 5 again and how that’s used. It consists of three basic services:
· Apply
· Fetch
· Approve
These are web services, and the API is described in Chapter 5.
Our mission here is to separate the approve functionality from the rest of the application’s functionality so that they can run in separate environments. The difference in this appendix is that we’ll look at an example that uses JavaScript and Node.js. Before we change the code, we’ll go through it so you can get an overview, and then we’ll look at how we can approach a change without breaking the code.
Node.js
Node.js is a software platform written in JavaScript that’s mainly used to build server-side applications. It contains a built-in HTTP server library that makes it easy to run a web server without using external software, like the Apache web server. This gives the user (the developer) more control over how the web server works.
C.2.1. A run-through of the Node.js code
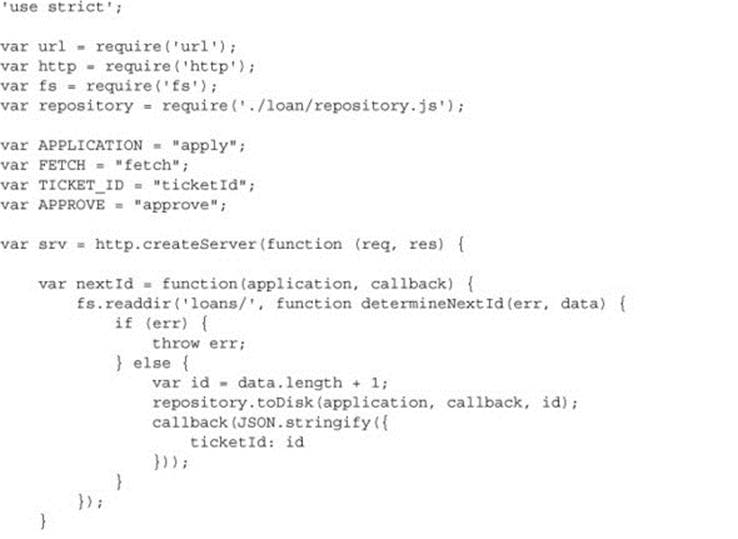
The code we have today is a small mess, and all the code resides in just two files: loan_server.js and repository.js. Let’s look at the contents of loan_server.js first.
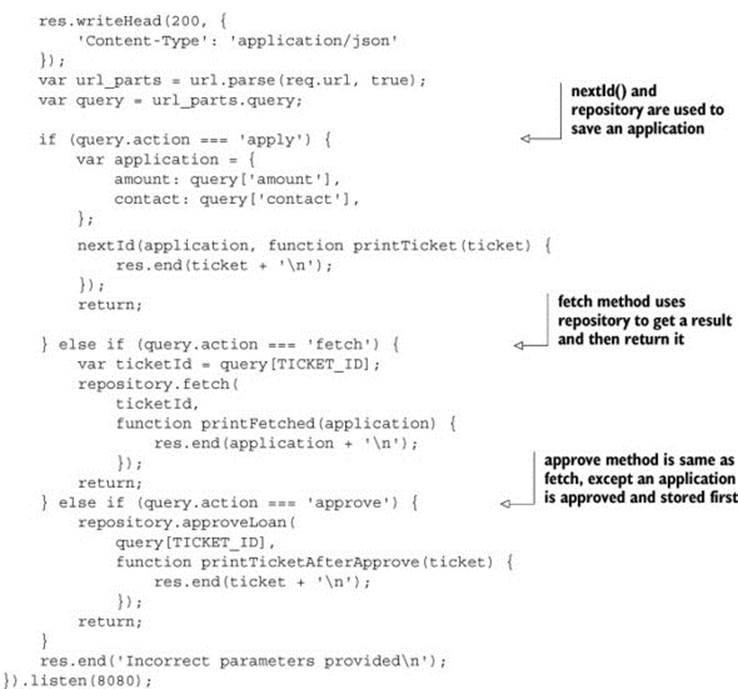
Listing C.1. The initial loan_server.js code
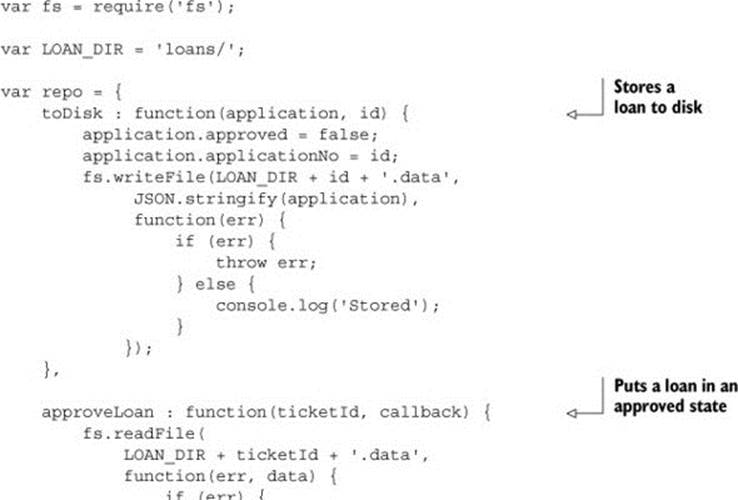
The following listing shows the repository code, which handles most of the writing and fetching of data from disk. We won’t use that in our example; it’s just here to give you a complete picture of the whole loan server codebase.
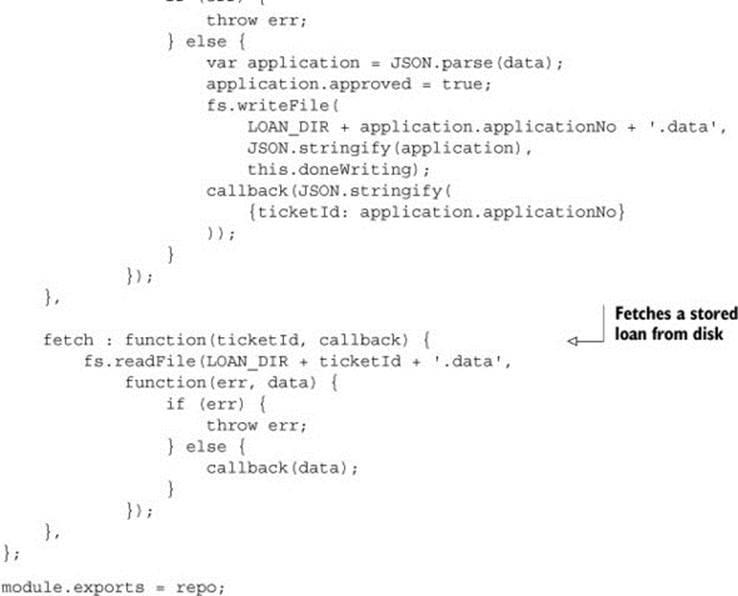
Listing C.2. The initial repository.js code
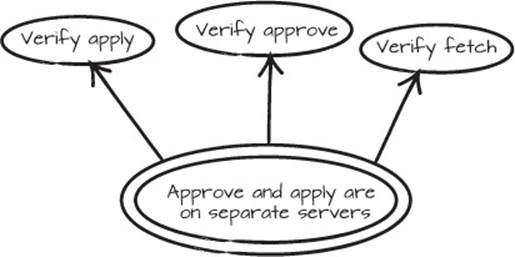
Before we change any code, we need to make sure we haven’t broken anything. The authors of loan_server.js didn’t write any tests, so we need write them now. We’ll start with the assumption that we want to test fetch, apply, and approve in that order, so that goes into our Mikado Graph, which produces a picture like the one in figure C.1.
Now that we have a graph, it’s time to create the first test and drive the change from there. When we start with a test, we create an expectation on the code, which we create an implementation for. When that expectation is later met, we not only have a working program, we also have a regression test in place. We won’t initially drive much change, because we want to cover the code with tests before we change it. But that will change slightly over the course of our restructuring.
Figure C.1. The goal and the test prerequisites
As you can see in the following test (listing C.3), we’re creating a seam in the code. We do that so the code can be tested more easily. We could test the code on a different level, with cURL for instance, but that requires more setup and would make the test depend on a filesystem and an active network connection. We don’t want to rely on those for regression tests.
cURL
cURL is a command-line tool for transferring data with URL syntax, supporting HTTP, HTTPS, and IMAP, among other protocols. That makes it a great tool for when you want to fake or test sending data to a web server.
Listing C.3. Our first test
When we run the test it produces the following results:
Testing loan-server_test.jsF
>> Loan Server - fetch
>> TypeError: Cannot call method 'writeHead' of undefined
>> at server.start (lib/loan-server.js:29:10)
>> at Object.exports.Loan Server.apply (test/loan-server_test.js:11:13)
>> at Object.exports.Loan Server.setUp (test/loan-server_test.js:7:2)
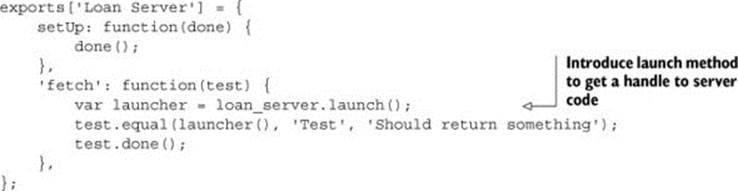
This tells us that we forgot something when we called launcher(). Upon closer inspection, it looks like we need to pass an http-response to our test when we call the launcher. We actually need to pass a request as well, so let’s do that and see what happens. The updated graph is shown in figure C.2.
Figure C.2. Response (res) and request (req) are needed as parameters
C.2.2. Extending the test
Once we add the request and the response to the test, it looks like this:
'fetch': function(test) {
var launcher = loan_server.launch();
var req = {};
var res = {
writeHead : function() {}
};
test.equal(launcher(req, res), 'Test', 'Should return something');
test.done();
}
With this addition, the test results tell us this:
>> Loan Server - fetch
>> TypeError: Parameter 'url' must be a string, not undefined
>> at Object.urlParse [as parse] (url.js:96:11)
>> at server.launch (lib/loan-server.js:30:26)
>> at Object.exports.Loan Server.apply (test/loan-server_test.js:16:13)
>> at Object.exports.Loan Server.setUp (test/loan-server_test.js:7:2)
OK, now we need to provide the server launcher with something else, and from the look of the output it seems we need a URL on our request. Let’s see if we can add fetch to that URL and maybe get a more sensible response. See figure C.3.
Figure C.3. Request needs a URL

We now add some more to the test, as follows:
'fetch': function(test) {
var launcher = loan_server.launch();
var req = {
url : 'action=?fetch&ticketId=1'
};
var res = {
writeHead : function() {}
};
test.equal(launcher(req, res), 'Test', 'Should return something');
test.done();
}
After running the modified test we get the following result:
>> Loan Server - fetch
>> TypeError: Object #<Object> has no method 'end'
>> at server.launch (lib/loan-server.js:59:10)
>> at Object.exports.Loan Server.apply (test/loan-server_test.js:18:13)
>> at Object.exports.Loan Server.setUp (test/loan-server_test.js:7:2)
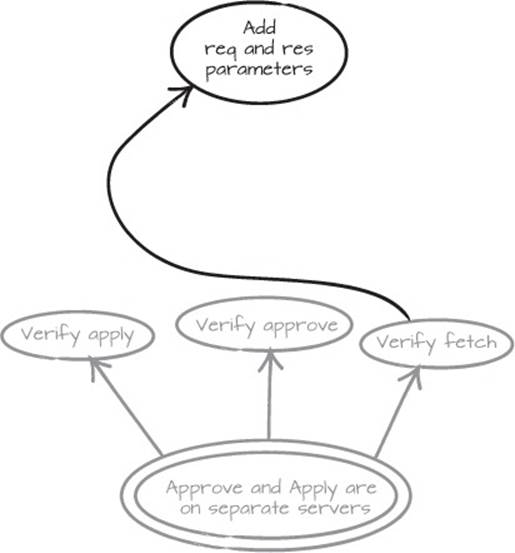
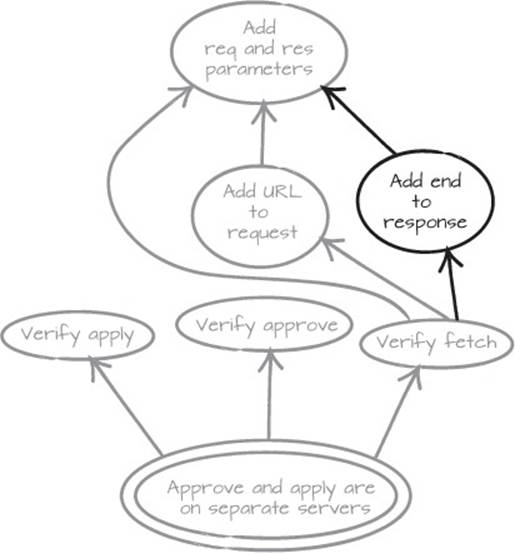
This is what it looks like to drive changes with tests. You modify the test, and then the code. In between you add nodes to the graph. Our updated graph now looks like figure C.4.
Figure C.4. end needs to be faked too
The error message we got from the test tells us that the end method on the response is called, which makes sense because after we’ve fetched data, we want that to be returned from our server. We add the method to the response stub that we use for testing purposes, like the next listing shows.
Listing C.4. The test is growing.
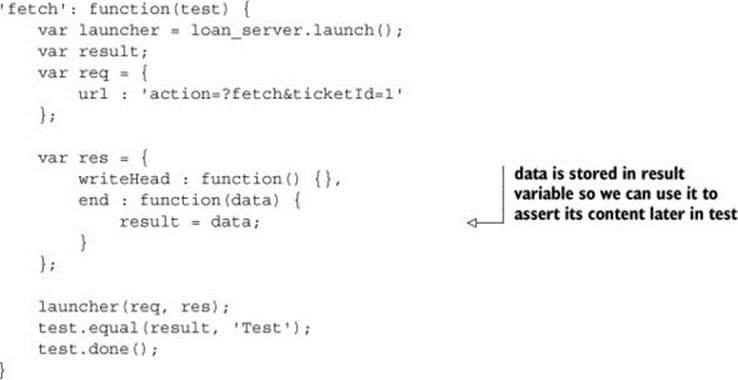
Notice that we pick up the data from the end function and use that in our assertion. But we’re not there quite yet. The result from the server tells us this:
Testing loan-server_test.jsFatal error: ENOENT, open 'loans/1.data'
F
>> Incomplete tests/setups/teardowns:
>> Loan Server - fetch 0 [ 'Loan Server - fetch' ]
Fatal error: A test was missing test.done(),
so nodeunit exploded. Sorry!
It looks like we’re getting everything right, but we’re not getting the response we were hoping for. After a brief investigation, we realize that’s not very strange, because we’re trying to read applications from a loans directory that doesn’t exist at this location. The applications reside in a directory relative to the server path, not the tests path.
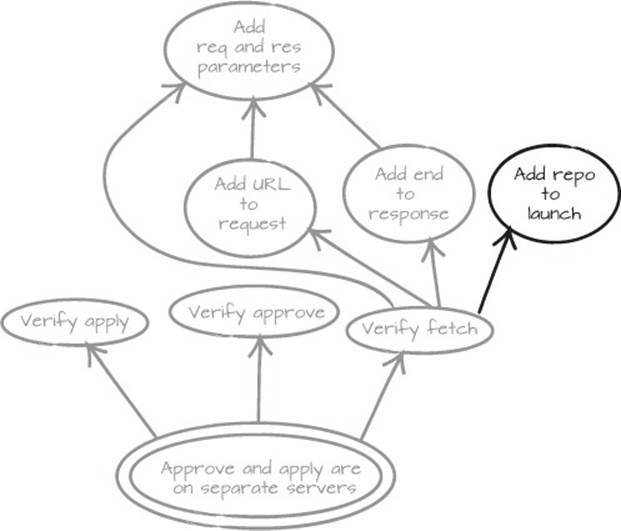
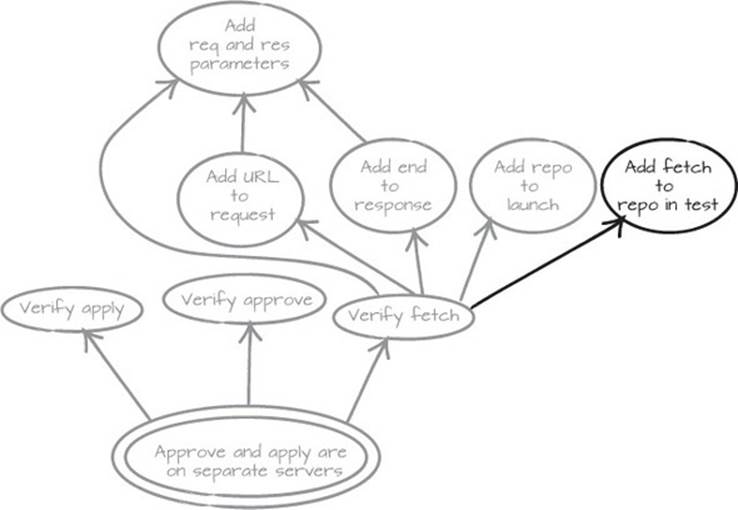
This leads us to the conclusion that if we want full control over the tests, we need to control the repository as well. We add that to the graph and then extend the test. The updated graph can be seen in figure C.5.
Figure C.5. Add repo to launch for easier testing
Listing C.5. An ever-growing test
'fetch': function(test) {
var repo = {};
var launcher = loan_server.launch(repo);
var result;
var req = {
url : '?action=fetch&ticketId=1'
};
var res = {
writeHead : function() {},
end : function(data) {
result = data;
}
};
launcher(req, res);
test.equal(result,
'{applicationNo : 1,
amount : 10000,
approved : false,
contact : "donald@ducks.burg"}');
test.done();
}
To be able to test the loan server fully, we added a repository to the launch() method. This means that now we need to modify some production code as well.
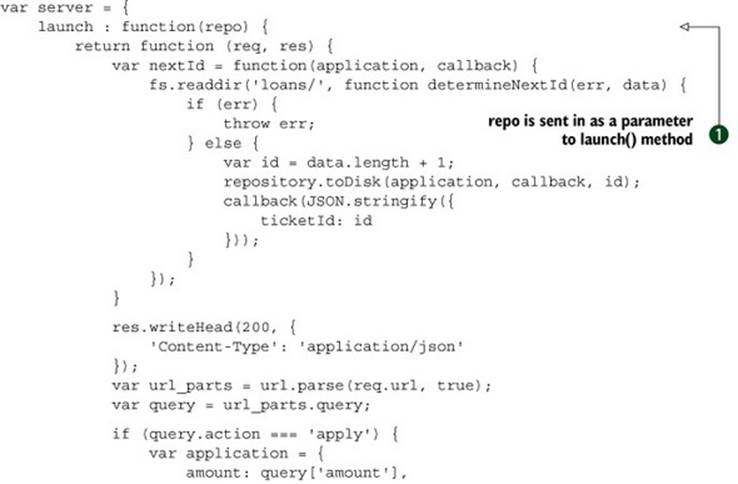
In the following code, we’ve added an argument to the launch function ![]() , and the repository is passed in as we launch the server
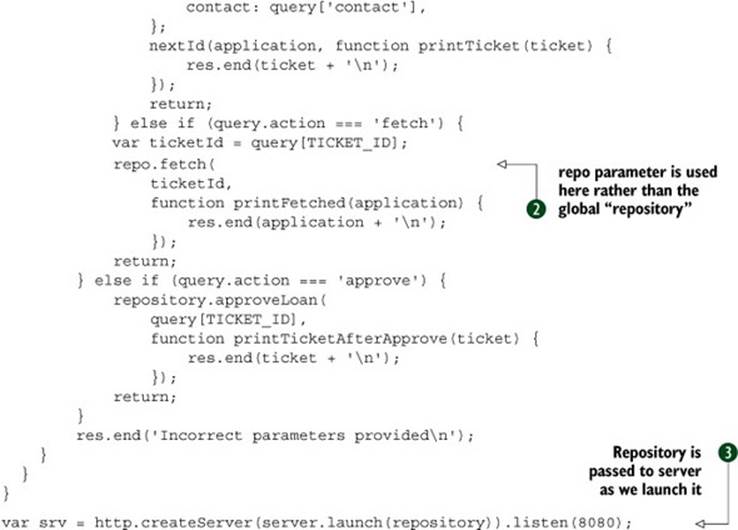
, and the repository is passed in as we launch the server ![]() . For this to be of any use, we’ve also made sure that the repo argument is used in the fetch() method
. For this to be of any use, we’ve also made sure that the repo argument is used in the fetch() method ![]() .
.
Listing C.6. Modified loan_server.js
When we run the test now, something interesting happens. We no longer get an error that tells us that it can’t locate the file loans/1.data. We get another missing method:
>> Loan Server - fetch
>> TypeError: Object #<Object> has no method 'fetch'
>> at server.launch (lib/loan-server.js:44:8)
>> at Object.exports.Loan Server.apply (test/loan-server_test.js:24:2)
>> at Object.exports.Loan Server.setUp (test/loan-server_test.js:7:2)
By now we know that this means. We need to add a method to our stubbed repo.
Listing C.7. The test grows.
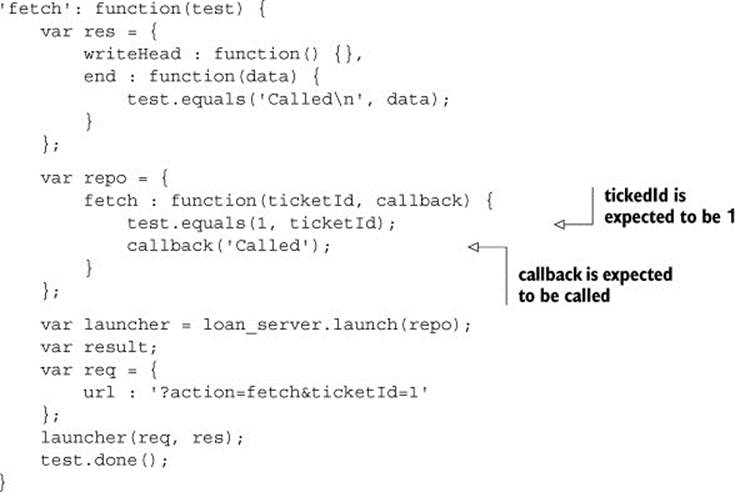
If you look carefully, you’ll see that we’ve shifted our testing tactics slightly. We no longer expect to get a result from the launcher; we merely expect that the correct methods will be called. Instead of testing a state at the end, we verify that the behavior we expect is there, and we expect that the repo method fetch() is called with 1 as the ticketId. We also expect that the callback will be called.
Something is wrong here, though. The test doesn’t test everything correctly. The fetch() method is replicating the behavior in the repository and is short-circuiting the real code. In order to test this correctly, we need to modify the test slightly and the production code as well. We need to be able to control what gets called back. Let’s add that to the graph (see figure C.6) and then change our test code so it looks like the following listing.
Figure C.6. Control the callback function
Listing C.8. The test shifts in its approach.
'fetch': function(test) {
var wasCalled = false;
var response = {
writeHead : function() {},
end : function(data) {
wasCalled = true;
}
};
var repo = {
fetch : function(ticketId, callback) {
test.equals(1, ticketId);
}
};
var request = {
url : '?action=fetch&ticketId=1'
};
var launcher = server.launch(repo, server.serveResult(response));
launcher(request, response);
test.equals(true, wasCalled);
test.done();
}
This change in our test forces us to change the production code, and the biggest change is that we’ve added a serveResult() method to our server that uses the response. To make this work, we add a function to the production code:
...
serveResult : function(response) {
return function printFetched(application) {
response.end(application + '\n');
}
}
...
We also changed how it’s launched. The actual fetch code now looks like this:
...
} else if (query.action === 'fetch') {
var ticketId = query[TICKET_ID];
repo.fetch(
ticketId,
returnResult(res)
);
return;
}
...
And this is how the server is now launched:
var srv = http.createServer(server.launch(
repository, server.serveResult)
).listen(8080);
And with that, we’ve completed our test and also that part of the graph that deals with the changes to the fetch functionality. If you look at the form of the Mikado Graph, you’ll see that it fans out, and a lot of prerequisites were created because we were experimenting with tests. This is often the case when you cover code with tests before you change it. The same thing will happen with the “Verify apply” and “Verify approve” prerequisites.
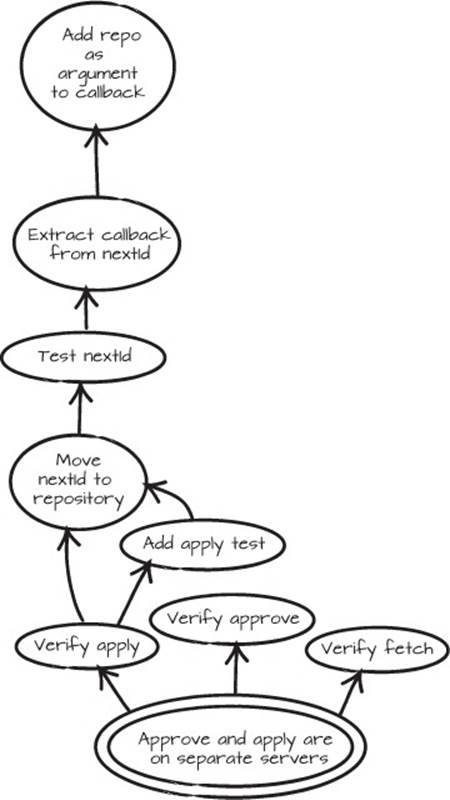
We won’t do a detailed run-through of the approve and apply prerequisites—you should have the idea by now. If you want to see what a graph and the restructuring of approve and apply look like, we suggest you download the code from the Mikado Method GitHub repository and try it yourself. We will, however, show you what the apply graph ended up looking like when we tried to restructure loan_server.js some more. It’s very small (see figure C.7) because most of the work was done in the fetch verification.
Figure C.7. An example of testing apply
If you combine both the apply and fetch graphs, and also add the approve part, the graph gets pretty big. There’s a lot of work involved in covering code with tests afterward, and most of this work could have been avoided if we had tests from the beginning. The work of adding tests overshadows our real task, which was to separate the servers, but without the tests, we didn’t have the courage to do so.
By now you should understand the general idea of letting tests, instead of the compiler, speak to you.
Tests on a different level
Sometimes when you move methods and functions between units, such as classes and files, you can’t be 100% sure that you haven’t made a mistake. And sometimes moving things and other small changes are absolutely necessary in order to introduce a seam. In those cases, we suggest you test your program on a different level, maybe using an integration test or by running the program. We mentioned cURL earlier, and that we didn’t want to rely on it for regression testing. But as an intermediate solution in the transition between two states in a refactoring, it can be a quick way to make sure nothing gets broken.
C.3. Summary
In this appendix, you’ve seen how you can drive small changes to code with tests. This is useful in cases where you need to loosen a system enough to get it under test, and then modify it even more. This is particularly important in situations where you can’t rely on a compiler. The Mikado Method is about taking risky changes and transforming them into boring ones by breaking them down into safe steps. Getting to a safe step in JavaScript, as an example, differs slightly from similar changes in statically typed languages.
There are more differences between dynamically and statically typed languages than just the type system, but our main point is that when you use JavaScript or Python or any other dynamically typed language, the level of certainty that static typing offers isn’t there, so it needs to be replaced with something else. We prefer that something else to be a solid base of tests. If you don’t have that now, start creating it.
Table C.1. Static versus dynamic typing and the Mikado Method
|
Static |
Dynamic |
|
· Try a change—see if you get a compiler error. · Change a method signature with an IDE, which does the job for you safely. |
· Try a change—run the tests—see if there’s an error. · Change a method signature, find all the references by searching the codebase for a potential match, and then change all those places manually or maybe with a regex. |
Try this
· Change a piece of dynamically typed code. What’s the most common error you make?
· Write a unit test for your code. What was hard about it?
· Imagine a restructuring and then draw a graph without actually changing code. Now make the change as the graph suggests. How did that feel?