How to Use Objects: Code and Concepts (2016)
Part V: Appendix
Appendix A. Working with Eclipse Plugins
Eclipse is not just a great IDE. It does more than simply support many languages and tools. It is also extensible by nifty add-ons created for special purposes. Beyond all of this, it is also a strong basis for building stand-alone applications for end-users. It offers a vibrant community and a rich ecosystem of reusable off-the-shelf components, both open source and commercial. The technical basis for all of this is Eclipse’s powerful plugin mechanism. It enables the assembly of largely independent components into consistent overall applications.
This appendix introduces the mechanism and the tools of the plugin development environment (PDE). The goal is to enable you to work with the book’s sample code and to start creating your own plugins. At the same time, we want to contradict the myth that plugins are complex and unwieldy beasts that suck up valuable development time. In many cases, it is the incomplete tutorials on the web, which fail to mention the possible technical stumbling blocks or leave out crucial insights, that are responsible for these losses.
The Eclipse plugin mechanism consists of two layers (Fig. A.1): At the bottom, the OSGi layer offers the typical features of a module system such![]() 203 as dependencies, versioning, and explicit exports. It also takes care of class loading and access to resources such as images. All of this is described in the META-INF/MANIFEST.MF file of each plugin. The OSGi implementation Equinox is part of the normal Eclipse platform. On top of this, Eclipse adds
203 as dependencies, versioning, and explicit exports. It also takes care of class loading and access to resources such as images. All of this is described in the META-INF/MANIFEST.MF file of each plugin. The OSGi implementation Equinox is part of the normal Eclipse platform. On top of this, Eclipse adds![]() 175,65 its own specific extension point/extension mechanism. The declarations are
175,65 its own specific extension point/extension mechanism. The declarations are![]() 12.3.3 given in a fileplugin.xml in each plugin using extensions. Because OSGi has laid a very solid foundation, this second layer is actually very thin.
12.3.3 given in a fileplugin.xml in each plugin using extensions. Because OSGi has laid a very solid foundation, this second layer is actually very thin.

Figure A.1 The Levels of OSGi and Eclipse
This appendix focuses on the OSGi layer, because the editing of the file plugin.xml has already been covered in some detail.![]() 12.3.3
12.3.3
![]() OSGi includes support for services (Fig. A.1), which are defined by Java interfaces and can then be implemented by any bundle that is loaded into the OSGi runtime.
OSGi includes support for services (Fig. A.1), which are defined by Java interfaces and can then be implemented by any bundle that is loaded into the OSGi runtime.![]() 11.5.6 This introduces dependency inversion: Code consuming the service is no longer tied to a
11.5.6 This introduces dependency inversion: Code consuming the service is no longer tied to a![]() 12.2.1.4 specific implementation and therefore remains more flexible. Because Eclipse itself does not use services extensively, we will not cover them here.
12.2.1.4 specific implementation and therefore remains more flexible. Because Eclipse itself does not use services extensively, we will not cover them here.
Bundles and plugins are technically the same thing.
For historical reasons, the Eclipse and OSGi layers use different terminology: Where Eclipse talks of “plugins,” OSGi talks of “bundles.” Within the Eclipse context, they are technically the same thing. If you like, you can say that an Eclipse plugin at the higher level is technically represented as an OSGi bundle at the lower level, with an additional optional plugin.xml file. The distinction appears both in the documentation and in the sources, because the Equinox API refers to “bundles,” while class names from the Eclipse IDE often include the term “plugin.”
Throughout the appendix, we will also introduce the relevant Eclipse tools as we go along. The central entry point is the plugin manifest editor:
Tool: Plugin Manifest Editor
An Eclipse plugin is described mainly through the files META-INF/MANIFEST.MF and plugin.xml. Clicking on either of these opens the plugin manifest editor, which provides access to all relevant aspects of a plugin.
A.1 OSGi: A Module System for Java
The plain JVM comes with a sophisticated idea: The classes of a running application are fetched on demand by dedicated class loader objects. Basically each class is tagged at runtime with its own class loader, and when a class references another class, it asks its own class loader to provide it. Unfortunately, that’s it. There are no further features that enable![]() 11.5.1 encapsulation at the level of “modules”; in fact, the JVM does not define such a concept. Classes usually come packaged in JAR files for convenience, but at runtime they share one huge, flat namespace. Only the established naming conventions for packages prevent frequent clashes.
11.5.1 encapsulation at the level of “modules”; in fact, the JVM does not define such a concept. Classes usually come packaged in JAR files for convenience, but at runtime they share one huge, flat namespace. Only the established naming conventions for packages prevent frequent clashes.
Of course, this is quite unacceptable for larger applications, in particular if they are assembled from independently developed plugins. For instance, the naming conventions for packages do not help if two plugins happen to require different versions of the same library. Also, conventions are guidelines but they can be circumvented: You can access a package-visible class or method contained in any library simply by placing your own class in a package with the same name—even if you use a different JAR file.
OSGi provides a proper module system for Java.
The OSGi layer of Eclipse provides all of these missing features.
A.1.1 The Structure of OSGi Bundles
OSGi calls a module a bundle (Fig. A.2). Each bundle contains a tree of packages and subpackages with classes, as usual. It can also contain libraries in the form of JAR files. These libraries are hidden from other bundles, so that different bundles can use different versions of the same library. A bundle makes explicit which packages it wishes to export; the others remain hidden, as indicated by dashed lines in Fig. A.2. A bundle can declare dependencies on other bundles. It can then access the exported packages of those bundles.
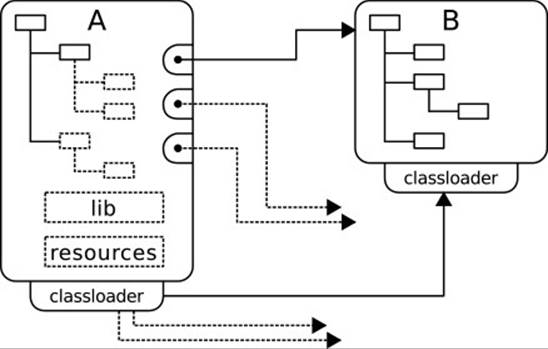
Figure A.2 A Bundle in OSGi
![]() OSGi is very powerful and flexible and the preceding description glosses over many of its capabilities. For instance, a running application can contain different versions of the same plugin, but it usually doesn’t. One can export the packages contained in a bundle’s libraries, but one usually doesn’t. One can import named packages, rather than depending on bundles, but one usually doesn’t. The purpose of this section is to give a thorough overview of OSGi, but without wading through all the details.
OSGi is very powerful and flexible and the preceding description glosses over many of its capabilities. For instance, a running application can contain different versions of the same plugin, but it usually doesn’t. One can export the packages contained in a bundle’s libraries, but one usually doesn’t. One can import named packages, rather than depending on bundles, but one usually doesn’t. The purpose of this section is to give a thorough overview of OSGi, but without wading through all the details.
![]() Here is the first stumbling block: If a bundle has unsatisfied dependencies at runtime, Equinox will not load it. Any dependent bundles will also be skipped. However, the startup process of the application will still continue. When you get ClassNotFound Exceptions, you should check the startup log messages—perhaps the relevant bundle has not been loaded at all.
Here is the first stumbling block: If a bundle has unsatisfied dependencies at runtime, Equinox will not load it. Any dependent bundles will also be skipped. However, the startup process of the application will still continue. When you get ClassNotFound Exceptions, you should check the startup log messages—perhaps the relevant bundle has not been loaded at all.
A bundle’s manifest contains a self-description.
Each OSGi bundle describes itself through a file META-INF/MANIFEST.MF. That file gives the bundle’s name, identifier, version, dependencies, and exports, among other things. We will explicitly not show these files to discourage![]() A.1.2 you from working with the raw text. Use the plugin manifest editor instead.
A.1.2 you from working with the raw text. Use the plugin manifest editor instead.
The OSGi class loaders enforce the module system’s access restrictions.
If OSGi offers theses expressive extra features, one might expect that it requires complex modifications to the JVM. However, this is not the case at all. The Equinox implementation just uses a single crucial observation: Because all class loading happens through class loaders, it is sufficient to make these class loaders enforce the access restrictions. At runtime, the Equinox implementation creates a dedicated, special-purpose class loader for each bundle (Fig. A.2). It is wired up with the class loaders of required bundles to propagate requests.
![]() The class loading process is often perceived as problematic, because even compiling code can fail with an obscure ClassNotFoundException at runtime. First, it is important to think about the general setup: Have you got the dependencies and their versions right? Is a required bundle perhaps dropped at runtime because of missing dependencies, as explained earlier? Are the libraries included in the build, as will be explained later? If all else fails, you can use the class org.eclipse.osgi.framework.debug.Debug and set its static fieldDEBUG_LOADER to true to trace the search for classes.
The class loading process is often perceived as problematic, because even compiling code can fail with an obscure ClassNotFoundException at runtime. First, it is important to think about the general setup: Have you got the dependencies and their versions right? Is a required bundle perhaps dropped at runtime because of missing dependencies, as explained earlier? Are the libraries included in the build, as will be explained later? If all else fails, you can use the class org.eclipse.osgi.framework.debug.Debug and set its static fieldDEBUG_LOADER to true to trace the search for classes.
OSGi provides a runtime infrastructure for bundles.
OSGi can be understood as a runtime infrastructure that manages the loaded bundles. It represents bundles as Bundle objects, and you can access these bundles by calling Platform.getBundle() with a bundle’s name. In addition to other things, the bundles then give access to their contents: One can load (exported) classes and query the resources along the usual path, through the bundle’s class loader. Alternatively, one can search the bundle’s entries directly.
org.osgi.framework.Bundle
public interface Bundle extends Comparable<Bundle> {
Class<?> loadClass(String name) throws ClassNotFoundException;
URL getResource(String name);
Enumeration<URL> getResources(String name) throws IOException;
URL getEntry(String path);
Enumeration<URL> findEntries(String path, String filePattern,
boolean recurse);
...
}
![]() The URLs returned from these methods are usually internal. To get the content of a retrieved resource, use the URL’s openStream() method. If you must have the actual disk location, you can use the FileLocator class from the org.eclipse.core.runtime plugin. It translates URLs to an external format if possible. There is a serious catch, however: When launching an application or a JUnit test from within Eclipse, the bundles
The URLs returned from these methods are usually internal. To get the content of a retrieved resource, use the URL’s openStream() method. If you must have the actual disk location, you can use the FileLocator class from the org.eclipse.core.runtime plugin. It translates URLs to an external format if possible. There is a serious catch, however: When launching an application or a JUnit test from within Eclipse, the bundles![]() A.2.1
A.2.1 ![]() A.2.2 are loaded from the development workspace directly, so the resources are actually files. When packaging bundles in JARs and installing them, however, the URL translation suddenly fails because the resources are located within JARs. Consequently, using File Locator is rather problematic. If you still insist that you must have the files, you can export a plugin through a feature and select the option “Unpack the plug-in archive after
A.2.2 are loaded from the development workspace directly, so the resources are actually files. When packaging bundles in JARs and installing them, however, the URL translation suddenly fails because the resources are located within JARs. Consequently, using File Locator is rather problematic. If you still insist that you must have the files, you can export a plugin through a feature and select the option “Unpack the plug-in archive after![]() 174
174 ![]() A.3 installation” in the feature definition file.
A.3 installation” in the feature definition file.
OSGi also defines an explicit life cycle for bundles and allows bundles to be loaded and unloaded dynamically. The bundles themselves are notified if they declare an activator class. The activator must implement the following simple interface:
org.osgi.framework.BundleActivator
public interface BundleActivator {
public void start(BundleContext context) throws Exception;
public void stop(BundleContext context) throws Exception;
}
Eclipse provides an implementation Plugin, which keeps a reference to the bundle upon startup. It is then not necessary to go through the Platform to find the bundle.
org.eclipse.core.runtime.Plugin
public abstract class Plugin implements BundleActivator {
public void start(BundleContext context) throws Exception {
bundle = context.getBundle();
...
}
public final Bundle getBundle() {
if (bundle != null)
return bundle;
...
return null;
}
...
}
It is a common practice for a plugin’s activator to provide a static reference to the bundle object and to expose the bundle symbolic name as a constant. Here is the example of the JavaCore plugin:
org.eclipse.jdt.core.JavaCore
public final class JavaCore extends Plugin {
public static final String PLUGIN_ID = "org.eclipse.jdt.core" ;
public static JavaCore getJavaCore() {
return (JavaCore) getPlugin();
}
...
}
Fragments are merged into their host bundles at runtime.
Sometimes it is useful to split the implementation of one logical bundle over several physical bundles. For instance, a bundle might have to be complemented by translated language files. Or, like the SWT bundle, it might contain platform-specific code that must be loaded according to the current operating system and hardware.
Fragments address these scenarios. They are packaged into independent JAR files, so that they can be distributed and deployed on their own. At runtime, their content its merged virtually into a designated host plugin: The classes share a common class loader and namespace. When requested, they are loaded from the host or the fragment, as the case might be.
A.1.2 Working with Bundles in Eclipse
When you think of the powerful plugins available for the Eclipse IDE, you may be left with the impression that plugins themselves are heavyweight and complex. This is not the case.
Plugin projects are small and lightweight.
A project in Eclipse consists of a top-level folder and a tiny XML file named .project. A Java project adds an XML file .classpath for internal purposes and an src folder. A plugin project requires only one additional file, the META-INF/MANIFEST.MF with the bundle’s self-description. If you add![]() 12.3.3 extensions or extension points, a top-level plugin.xml will be created automatically. That’s it. Setting up this structure is really simple.
12.3.3 extensions or extension points, a top-level plugin.xml will be created automatically. That’s it. Setting up this structure is really simple.
Tool: Creating an OSGi Bundle
Use the New Project dialog (File/New/Project) or in the package explorer use Context Menu/New/Project and choose Plug-in Project.
Tool: Converting a Java Project to a Bundle
Select the project in the package explorer and choose Configure/Convert to Plug-in Projects from its context menu.
Some people might suggest that the manifests of Eclipse plugins are very complex and cumbersome to work with. When you hear such a remark, just ask these people how they edit the MANIFEST.MF and plugin.xml files. Very often you will find that they use a text editor. Don’t do that.
The Eclipse tooling makes a bundle’s structure easily accessible.
The plugin manifest editor in Eclipse gives easy access to all the relevant information. Let us look through the manifest of the Java IDE’s central ingredient, the org.eclipse.jdt.core plugin. The Overview page contains the plugin’s ID, name, version, and activator [Fig. A.3(a)]. TheDependencies contain the IDs of the required bundles [Fig. A.3(b)]. Working with these entries is obvious from the user interface. Of course, the Add button for dependencies pops up a filtering selection dialog, so that typos are excluded.
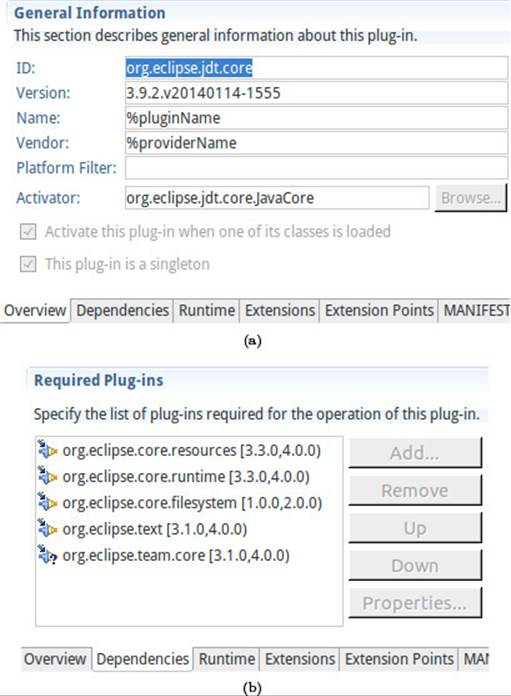
Figure A.3 Basic Properties of Bundles
![]() The Eclipse support also covers refactoring. When you rename a bundle in the workspace, the manifests of all dependent bundles are updated automatically. The same holds for exported packages, to be discussed next.
The Eclipse support also covers refactoring. When you rename a bundle in the workspace, the manifests of all dependent bundles are updated automatically. The same holds for exported packages, to be discussed next.
Exported packages are given on the Runtime page.
A slight confusion may arise from the placement of a bundle’s exported packages. These are accessible through the Runtime tab, which may sound somewhat too “dynamic” for an essentially static visibility restriction—but there it is. The user interface is otherwise straightforward (Fig. A.4). The Add button shows a selection dialog, as would be expected.
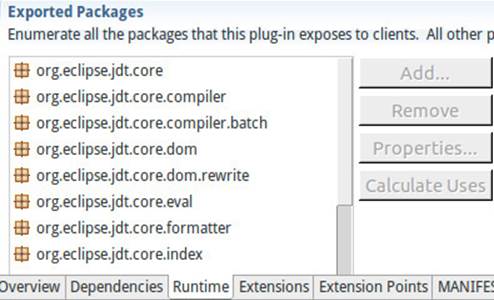
Figure A.4 Exports of a Bundle
Enclosed libraries are entered in the Runtime and Build pages.
Bundles can contain and enclose libraries (Fig. A.2). By convention, they are packaged in a top-level folder lib. This point requires a bit of caution when working with bundles, because entries in three different places have to agree for everything to work out correctly. The plugin development tools do a great job most of the time, but one has to be aware of the background connections, especially when changing the libraries. The three places in question are as follows:
Manifest Class Path The bundle’s MANIFEST.MF file lists the library JARs in the Classpath section of the Runtime tab. Fig. A.5(a) shows the Hibernate example from Chapter 5. These entries are evaluated by the OSGi runtime environment when it constructs the bundle’s class loader.
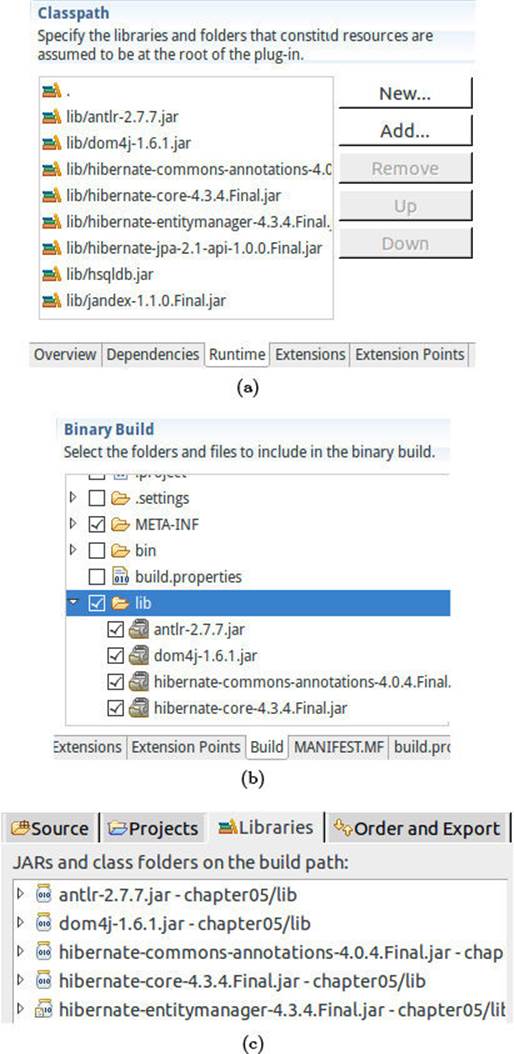
Figure A.5 Enclosing Libraries in Bundles
Build Specification The bundle’s build.properties file, accessible through the Build page [Fig. A.5(b)], must list the JARs for inclusion in the packaged bundle. These entries are used during packaging. When they are missing, the bundle does not physically contain the libraries referenced in the manifest, so they will not be found after all.
Compilation Class Path The Java compiler’s class path, accessible through the usual Project Properties dialog or the Configure Build Path entry in the project’s context menu [Fig. A.5(c)], must list the same JARs again. The IDE’s compiler treats plugin projects as Java projects and does not look into the special bundle manifests.
The Runtime page of the manifest editor is the primary source.
The plugin development tooling regards the Runtime page of the manifest file as the primary source. When a JAR file is added there, it automatically gets added in the other two places as well. However, when removing or exchanging library files, one sometimes has to work by hand. Because failures are rather annoying and have subtle explanations, we list the most common stumbling blocks.
![]() It is not sufficient to use Add to build path from the context menu of the project. Although the code will compile, it will not run as a proper plugin. Unfortunately, it
It is not sufficient to use Add to build path from the context menu of the project. Although the code will compile, it will not run as a proper plugin. Unfortunately, it![]() A.2.5 will run if you start a normal Java main class from the plugin, because the Java launch configuration takes the compilation class path into account. This can be quite confusing in the beginning.
A.2.5 will run if you start a normal Java main class from the plugin, because the Java launch configuration takes the compilation class path into account. This can be quite confusing in the beginning.
![]()
![]() A.2When the entry on the Build page is missing, the plugin will work when launched from within Eclipse, but not when packaged and deployed in a stand-alone Eclipse instance. The reason is that the special launching class loaders look into the plugin projects directly without considering the build.properties file.
A.2When the entry on the Build page is missing, the plugin will work when launched from within Eclipse, but not when packaged and deployed in a stand-alone Eclipse instance. The reason is that the special launching class loaders look into the plugin projects directly without considering the build.properties file.
![]() You must include the entry “.” in the bundle class path, unless the bundle class path is completely empty. If you have library entries but not the root “.”, the bundle’s own classes will not be loaded. Unfortunately, the plugin development environment often removes this entry accidentally when manipulating the list of libraries. Look in the MANIFEST.MF text file to make sure the entry is present and to correct any problems.
You must include the entry “.” in the bundle class path, unless the bundle class path is completely empty. If you have library entries but not the root “.”, the bundle’s own classes will not be loaded. Unfortunately, the plugin development environment often removes this entry accidentally when manipulating the list of libraries. Look in the MANIFEST.MF text file to make sure the entry is present and to correct any problems.
When something compiles but does not run, you can try the following tool, which will remove any unwarranted entries from the build path.
Tool: Update Class Path from Plugin Manifest
To synchronize the Java class path with the plugin manifest, choose Plugin Tools/Update Classpath from the plugin project’s context menu.
The Extensions and Extension Points are declared in the plugin.xml
The manifest editor also provides the pages Extensions and Extension Points.![]() 12.3.3 These have already been covered in the treatment of the Eclipse extension mechanism.
12.3.3 These have already been covered in the treatment of the Eclipse extension mechanism.
There are, however, two technical points worth noting. First, the plugin.xml file is created only when the first extension or extension point is declared. The second point is really a stumbling block.
![]() Make Eclipse plugins singleton bundles. While the lower-level OSGi runtime does allow different versions of the same bundle to be loaded simultaneously, this is not possible with the Eclipse extension mechanism. Be sure to tick the check box This plug-in is a singleton in the manifest editor’s Overview page.
Make Eclipse plugins singleton bundles. While the lower-level OSGi runtime does allow different versions of the same bundle to be loaded simultaneously, this is not possible with the Eclipse extension mechanism. Be sure to tick the check box This plug-in is a singleton in the manifest editor’s Overview page.
A.1.3 OSGi as an Application Platform
OSGi also provides a new entry point for applications, as a replacement for the plain Java main() method. Just implement IApplication and start computing. The following code may look small in size, but Eclipse itself starts up from IDEApplication, which also implements the interface. When implementing stand-alone applications based on the Eclipse Rich![]() 174 Client Platform, this is your starting point.
174 Client Platform, this is your starting point.
osgi.HelloWorld
public class HelloWorld implements IApplication {
public Object start(IApplicationContext context)
throws Exception {
System.out.println("Hello, world!");
return null;
}
public void stop() {}
}
![]() The interface IApplication is defined in bundle org.eclipse.equinox.app, but most of the time classes from org.eclipse.core.runtime are required anyway, so it is a safe bet to list that bundle in the dependencies. It also includes the OSGi basics.
The interface IApplication is defined in bundle org.eclipse.equinox.app, but most of the time classes from org.eclipse.core.runtime are required anyway, so it is a safe bet to list that bundle in the dependencies. It also includes the OSGi basics.
To be able to launch the application, you have to do one more thing: You have to create a simple extension in the plugin manifest editor (Fig. A.6).![]() 12.3.3.1
12.3.3.1

Figure A.6 Declaring an OSGi Application to Eclipse
![]() Be sure to give the extension point org.eclipse.core.runtime.applications itself a readable ID attribute. That attribute will be used for selecting the application
Be sure to give the extension point org.eclipse.core.runtime.applications itself a readable ID attribute. That attribute will be used for selecting the application![]() A.2.3 during launch.
A.2.3 during launch.
A.1.4 Defining Target Platforms
In the real world, versioning is of supreme importance. When you write plugins and ship them to users, you can never be sure which exact configuration their IDEs really have. At the very least, you should think carefully about your plugins’ minimal requirements. Do you develop for, say, theEclipse Kepler or Juno releases and thereby exclude users still working with the Indigo release? Professionals are usually not following the latest development snapshots, because they cannot afford to lose valuable time on the latest bugs in their tools. To maintain consistency within a team, larger organizations may be rather conservative about migrating even to the next stable Eclipse release.
Do not work against your development installation.
When you do nothing about versions, you do the worst thing possible: Your plugins are compiled and deployed against the collection of plugins within your running Eclipse instance. If you happen to follow the latest patches for some tools, your code will be compiled against those. Also, any plugin![]() A.1.2 dependency you enter in the manifest editor will automatically be tagged with the version from the snapshot plugin. As a result, the plugins will not work correctly in your users’ IDEs. This is a road to disaster for your project.
A.1.2 dependency you enter in the manifest editor will automatically be tagged with the version from the snapshot plugin. As a result, the plugins will not work correctly in your users’ IDEs. This is a road to disaster for your project.
Establish a stable baseline by using target platforms.
Fortunately, the Eclipse plugin tooling recognizes the importance of proper version management. It enables you to define a target platform consisting of a selection of plugins against which your plugins will be compiled and which will also be used for launching and building. You can even define several target platforms and switch between them—plugins are always identified by their symbolic name and their expected versions.
To define a target platform, create an empty general project to contain the definition file. Although you can place the file anywhere, it keeps things nice and clean if you use a separate project. Then use New/Other/Plug-in Development/Target Definition to create the actual definition file and edit its contents.
The simplest way to create a stable baseline for your development is to list a stable release as the source of the target platform. Fig. A.7 shows the definition for the example code accompanying the book. We deliberately use the rather old Indigo release here to follow up the point made in the introduction to this subsection: Very often, you cannot expect your customers to use the newest tools. When you click the Add button and enter an update site, you can choose the required plugins just as in the software installation wizard.
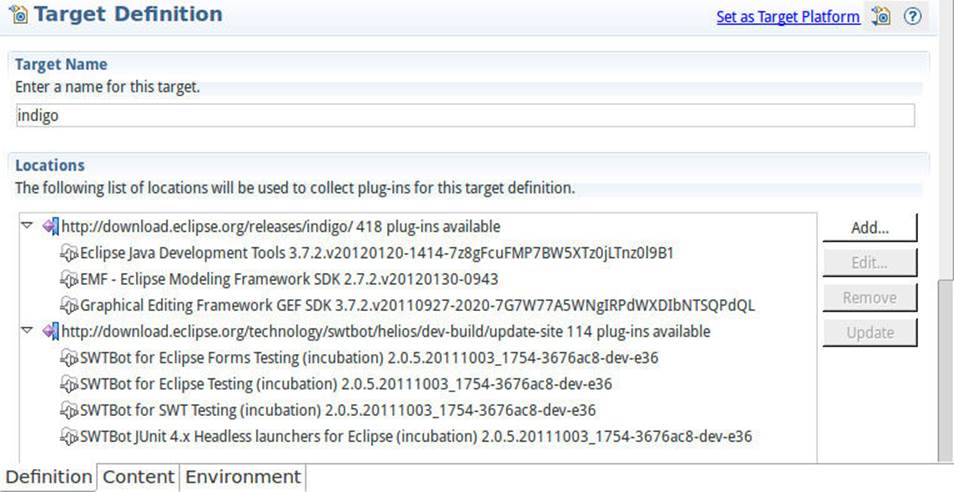
Figure A.7 Defining a Target Platform
Creating a target definition can take quite some time, because the selected plugins will be downloaded from the Internet. It is, however, time well spent: Without an explicit target, you simply cannot do any professional software development.
The current target platform is a global choice.
Mostly a software project will have a single target platform and will be managed in a dedicated Eclipse workspace anyway. Eclipse therefore has only a single global setting for the target platform. It is accessible through the general workbench Preferences dialog (Fig. A.8). The Running Platform is not usually a good choice, so you quickly Add the newly created one and set it as the default.
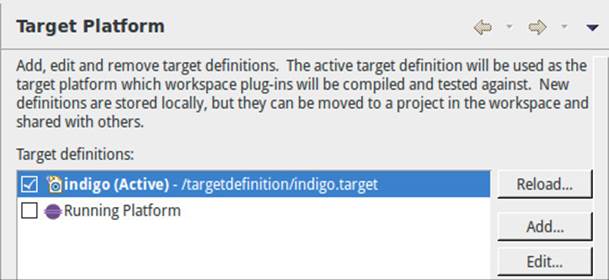
Figure A.8 The Target Platform in the Preferences
Eclipse will recompile all plugins in the workspace against the new target. It will also launch your application against this target. As a result, you can be sure that your customers, who are still stuck with the Indigo release, will see exactly the same behavior as you see during testing and debugging.
Establish a target platform before starting on your plugins.
The target platform is used in many places throughout the plugin development tooling. One particular point is that the manifest editor will, by default, set the required version of a newly created dependency to the version found in the target platform. It is really annoying if you find you have to downgrade all versions by hand after you choose a new target.
Reload the target platform after changing it.
If you edit a target definition after first creating it, the plugin tooling sometimes does not pick up the new content in all places. In particular, plugins that are obviously present sometimes fail to show up in the manifest editor’s Add Dependency dialog. Simply clicking the Reload button in the selection page (Fig. A.8) fixes such issues. As a shortcut, you can click the Set as target platform link at the top of the target platform editor.
A.2 Launching Plugins
Having created a few plugins, you will want to see them run. Here are a few steps matching common scenarios. The first and smallest set of steps, for JUnit plugin tests, also discusses the selection of plugins for launch configurations in general.
A.2.1 JUnit Plugin Tests
Running a JUnit plugin test is simple enough:
Tool: Starting Unit Tests for Plugins
Select Run As/JUnit Test Case from the test class’s context menu, either in the package explorer or in the editor. You can also press Alt-Shift-X T to launch the test, which is particularly convenient during editing of tests. When applying these steps to packages or projects, Eclipse will execute all contained test classes.
![]() Be sure not to choose Run As/JUnit Test. That mode does not set up the plugin’s expected working environment such as an Eclipse workspace.
Be sure not to choose Run As/JUnit Test. That mode does not set up the plugin’s expected working environment such as an Eclipse workspace.
Beyond these basics, JUnit tests must run quickly. If it takes ages for a test to come up, you will not run the test frequently and it is not very useful. There are two important points to be observed in regard to ensuring a quick startup time. First, make sure that the run configuration’s Maintab selects a headless execution—that is, that an execution that does not start up a user interface before running the tests (Fig. A.9). Of course, this approach works only if your test does not rely on the workbench window.

Figure A.9 Launching Headless JUnit Tests
Second, minimize the number of plugins that must be loaded and initialized. On the Plugins page of the launch configuration, go through these steps (or create the launch configuration from scratch): Select Deselect all, then select the plugin under test, and finally select Add Required Plug-ins.
![]() Be sure to uncheck the point Add new workspace plug-ins to this launch configuration automatically on the Plug-ins page. Otherwise, your startup times will deteriorate whenever you create new plugins. Also, the new plugins may rely on dependencies that have not yet been established, which may break the launch configuration.
Be sure to uncheck the point Add new workspace plug-ins to this launch configuration automatically on the Plug-ins page. Otherwise, your startup times will deteriorate whenever you create new plugins. Also, the new plugins may rely on dependencies that have not yet been established, which may break the launch configuration.
![]() When you change any of the dependencies of your application’s bundles, the launch configuration does not change accordingly. The result is that some bundles are silently not loaded because their dependencies are not satisfied. (There are log messages to this effect on the console, though, when you look closely.) This results in odd behavior and missing functionality. For instance, your new editor for some file type may suddenly be no longer available. Just open the launch configuration and click Add Required Plug-ins.
When you change any of the dependencies of your application’s bundles, the launch configuration does not change accordingly. The result is that some bundles are silently not loaded because their dependencies are not satisfied. (There are log messages to this effect on the console, though, when you look closely.) This results in odd behavior and missing functionality. For instance, your new editor for some file type may suddenly be no longer available. Just open the launch configuration and click Add Required Plug-ins.
A.2.2 Contributions to the Eclipse IDE
Many plugins are actually contributions to the Eclipse IDE, so you have to test them within that context. The plugin tooling makes it simple to start up a separate IDE, complete with workspace, Java Development Tools, and so on. Just create a new launch configuration of type Eclipse Application and choose org.eclipse.ui.ide.workbench as the OSGi application to be started on the Main page (Fig. A.10). Alternatively, you can run the product org.eclipse.platform.ide by choosing it in the Product selection box (grayed out in Fig. A.10).

Figure A.10 Launching an IDE with Your Plugins
Of course, starting the workbench takes as much time as your normal Eclipse startup. This may be too long for brief debugging cycles. If you want to minimize the number of plugins on the Plugins page for a quicker![]() A.2.1 startup, be sure to include theorg.eclipse.ui.ide.application and its dependencies. Unfortunately, you will also have to add the basics, such as the plugin for the Project Explorer (org.eclipse.ui.navigator and dependencies) and the Java Development tools (org.eclipse.jdt.ui and dependencies) by hand.
A.2.1 startup, be sure to include theorg.eclipse.ui.ide.application and its dependencies. Unfortunately, you will also have to add the basics, such as the plugin for the Project Explorer (org.eclipse.ui.navigator and dependencies) and the Java Development tools (org.eclipse.jdt.ui and dependencies) by hand.
It may be better to switch over to selecting entire features in the Plug-ins page. Features group plugins according to an end user’s perspective. For![]() A.3 instance, a normal working environment can be constructed from the features org.eclipse.jdt for the Java Tooling andorg.eclipse.platform for the overall IDE. Adding the required features gives a complete launch configuration, as shown in Fig. A.11. Recall from Section A.1.4 that we deliberately chose the outdated Indigo platform because some of our customers are still stuck with that release.
A.3 instance, a normal working environment can be constructed from the features org.eclipse.jdt for the Java Tooling andorg.eclipse.platform for the overall IDE. Adding the required features gives a complete launch configuration, as shown in Fig. A.11. Recall from Section A.1.4 that we deliberately chose the outdated Indigo platform because some of our customers are still stuck with that release.
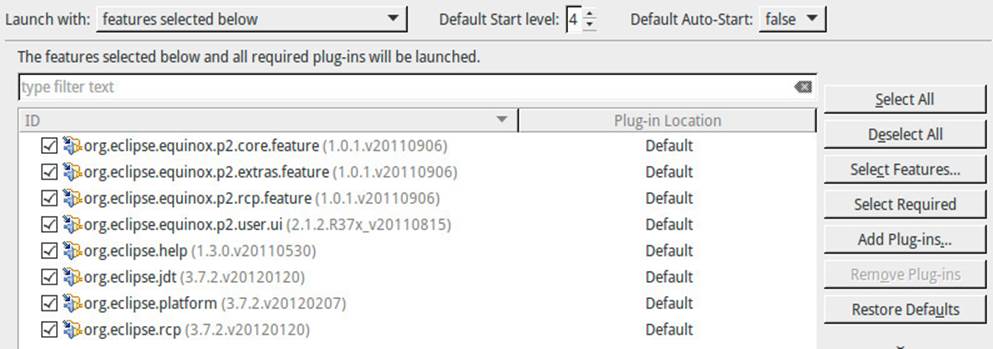
Figure A.11 Launching an IDE with a Set of Features from the Target Platform
![]()
![]() A.1.4Another, very viable method is to minimize the target platform itself to contain the minimal working environment that you expect your users to have. Then you can simply launch with all present plugins; you do not have to go through further minimization steps.
A.1.4Another, very viable method is to minimize the target platform itself to contain the minimal working environment that you expect your users to have. Then you can simply launch with all present plugins; you do not have to go through further minimization steps.
A.2.3 Eclipse Applications
![]() 174The Eclipse platform enables you to write entire applications from scratch. While they can make use of the rich selection of available plugins, they do
174The Eclipse platform enables you to write entire applications from scratch. While they can make use of the rich selection of available plugins, they do![]() A.1.3 not have to look like an IDE at all. In fact, a minimal application is nothing more than a main class implementingIApplication.
A.1.3 not have to look like an IDE at all. In fact, a minimal application is nothing more than a main class implementingIApplication.
You can start such applications through the launch configuration type Eclipse Application. The selection of plugins is the same as in the previous sections. The only difference is that you choose your own application, as declared in the extension pointorg.eclipse.core.runtime.applications, on the Main page (Fig. A.12).
A.2.4 Installing Plugins in the Workspace
One attractive feature of the plugin development environment is that you can very quickly write your own development tools. For instance, the code snippets in this book were retrieved from the example sources and formatted into the book’s LATEX directory by a special-purpose builder. In another project, we wrote a small translator that turns HTML templates into Java classes while creating the DOM trees. The resulting Java classes are then compiled by Eclipse’s own Java builder. Just think of all the new opportunities to speed up your work!
Tool: Install Plugins in the Running Workbench
From a plugin project’s context menu, choose Export/Plug-in Development/Deployable plug-ins and fragments. The wizard will build the plugins and place them into the current workspace so that they become available after you restart the IDE.
![]()
![]() A.3This approach is actually a massive shortcut, which circumvents the usual packaging of plugins into features and features into update sites, which is followed by installing the content of the resulting update site into the IDE properly. When starting out on a real-world project that you will ship to others, be sure to go all the way early on.
A.3This approach is actually a massive shortcut, which circumvents the usual packaging of plugins into features and features into update sites, which is followed by installing the content of the resulting update site into the IDE properly. When starting out on a real-world project that you will ship to others, be sure to go all the way early on.

Figure A.12 Launching a Stand-alone Application
A.2.5 Java Programs
When your application does not use the Eclipse runtime infrastructure at all, the plugin development tools also allow you to start a class with a normal main() method. The tooling will analyze the dependencies and will add the JAR files containing required plugins to the normal Java class path. In this manner, you can, for instance, start an SWT/JFace application as![]() 7.1
7.1 ![]() 9.3 if SWT and JFace were part of the normal Java library. The advantage of this approach is that startup is incredibly fast and lightweight.
9.3 if SWT and JFace were part of the normal Java library. The advantage of this approach is that startup is incredibly fast and lightweight.
![]() This shortcut is useful mainly for experiments and demos. We mention it here to give you a quick access path to the user interface examples in the book. Whenever you want to hand your application to users, you will have to gather all the required JAR files yourself and create a launching script to feed them into the JVM. You will also have to take care of picking the platform-specific fragments—for instance, for the SWT native
This shortcut is useful mainly for experiments and demos. We mention it here to give you a quick access path to the user interface examples in the book. Whenever you want to hand your application to users, you will have to gather all the required JAR files yourself and create a launching script to feed them into the JVM. You will also have to take care of picking the platform-specific fragments—for instance, for the SWT native![]() 7.4 widgets. In such cases, it is much better to spend the little extra learning effort and use the OSGi infrastructure properly.
7.4 widgets. In such cases, it is much better to spend the little extra learning effort and use the OSGi infrastructure properly.
![]() If you like the speed of pure Java applications but want to retain the full plugin infrastructure for your application, just work hard on minimizing the required plugins. Starting up a pure OSGi application, without a full Eclipse workspace and resource management, does not take significantly longer than starting with a raw Java main class.
If you like the speed of pure Java applications but want to retain the full plugin infrastructure for your application, just work hard on minimizing the required plugins. Starting up a pure OSGi application, without a full Eclipse workspace and resource management, does not take significantly longer than starting with a raw Java main class.
A.3 Where to Go from Here
As a professional plugin developer, you cannot get around the challenges of the last mile: How will your plugins be shipped to their users? How will you provide timely updates with bug fixes? How can you make sure that your own stand-alone OSGi applications will run on different platforms, even if they do contain platform-specific bundles such as SWT?
We will not cover these topics here, because this is a book on object-oriented![]() 174 development and its concepts, not about the details of the Eclipse platform itself. To give you a head start, let us briefly look at the main ingredients of a solution:
174 development and its concepts, not about the details of the Eclipse platform itself. To give you a head start, let us briefly look at the main ingredients of a solution:
Features Plugins and bundles are useful as technical packaging mechanisms, because they support modular programming, information![]() 11.5.1 hiding, and separation of concerns. They are, however, too fine-grained
11.5.1 hiding, and separation of concerns. They are, however, too fine-grained![]() 11.5.2 for consumption by the end user. For instance, an end user will want to add “the Java Tools” to the Eclipse IDE, without asking whether they are split across plugins according to model-view separation. Features
11.5.2 for consumption by the end user. For instance, an end user will want to add “the Java Tools” to the Eclipse IDE, without asking whether they are split across plugins according to model-view separation. Features![]() 9.1 are sets of plugins that are installed together. Features can have dependencies on other features, so that Eclipse installs these automatically as well.
9.1 are sets of plugins that are installed together. Features can have dependencies on other features, so that Eclipse installs these automatically as well.
Update Sites Eclipse defines a standard format for websites offering plugins and features for download. Within Eclipse, you can describe such update sites through update site projects, which reference plugins and features from your workspace. An export wizard then takes care of assembling all the necessary artifacts into an overall ZIP file, which you can unpack on a web server.
Products The Eclipse Rich Client Platform is made for building stand-alone applications that do not even have to look like an IDE anymore and do not have to rely on a workspace. You can bring up any user interface you like and just pull in those aspects that you require. A product is a selection of plugins or features. Eclipse can automatically create a native launcher, complete with icons and other branding that you specify, and will include the correct native plugin fragments for different platforms from its delta pack.
Headless Builds Once you start on serious projects, it becomes cumbersome to click through the export wizards to create update sites. The professional way is to set up a build server that pulls in the sources from a version control system, compiles all plugin projects, and packages everything up neatly into an update site. Perhaps you will even publish the nightly build automatically to your project website. For![]() 248 a solid solution, look at Tycho, which integrates the special requirements of building and deploying Eclipse plugins into the generic build
248 a solid solution, look at Tycho, which integrates the special requirements of building and deploying Eclipse plugins into the generic build![]() 173 process of the Maven build tool.
173 process of the Maven build tool.
All materials on the site are licensed Creative Commons Attribution-Sharealike 3.0 Unported CC BY-SA 3.0 & GNU Free Documentation License (GFDL)
If you are the copyright holder of any material contained on our site and intend to remove it, please contact our site administrator for approval.
© 2016-2026 All site design rights belong to S.Y.A.