Learn Ruby on Rails For Web Development (2015)
Chapter 1. THE DEVELOPMENT ENVIRONMENT
The first time I tried to install Rails and all the stuff that goes along with it, I gave up in sheer frustration after more than an hour of hair-pulling exasperation.
I've been programming computers since I was seven years old. I think it's safe to say that trying to install Rails for the first time was by far the most mind-numbing, unclear, obscure, bottomless pit of insanity that I've ever encountered in the world of programming.
Even today; installing Rails seems to take me over a half hour, and if I'm not paying particularly close attention, something STILL goes wrong. It's just bizarre! I think that's a real shame because it definitely turns away a lot of people from learning Rails.
And it's all so...un-necessary!
First things first, in a traditional Rails installation, the type of computer operating system you're running will determine how you install Rails (and Ruby too...don't forget about Ruby - it needs to be installed as well!).
Basically we're looking at three options here. Either you're running a Windows machine of some sort, a Mac, or some flavor of Linux.
Traditionally, Rails developers tend to use Macs or Linux operating systems because those both have command line terminals built right in and both run on a traditional Unix directory structure.
There's a Windows version of Rails that you can install if you're determined to use a Windows PC but that's a whole can of insanity that I'm not willing to open, let alone swallow.
If you simply must use a Windows PC as your development tool of choice, don't use the Windows version of Rails. Instead, I highly suggest that you download the free VirtualBox software from Oracle (https://www.virtualbox.org/) and install a Linux virtual machine on your computer. I suggest you choose Ubuntu for your Linux OS (it's free, really popular, and fun to use).
BUT!! We aren't going to go the traditional route in this book! We aren't going to install Rails at all! You my friend, are living in a golden age where development environments can be run IN THE CLOUD!
So it doesn't matter if you're running a Windows PC, a Mac, or a Linux box...we'll all log into a virtual environment way up there in the magic cloud that has everything we need pre-installed and just waiting for us to play with.
There are a lot of cloud development companies to choose from, most of them offer free tiers that are more than powerful enough for our purposes (most allow free environments for single developers - you usually just have to pay for multi-user accounts when you have lots of team members that need to access the thing all at once).
A couple popular choices are:
http://nitrous.io
http://c9.io
For this book we're going to use http://c9.io
So head over there and sign up for a free account. Just enter your email address and pick a password, then verify your email address by clicking the link in the email that they auto-send you and you're good to go.
When you log into your account you'll see your user dashboard:
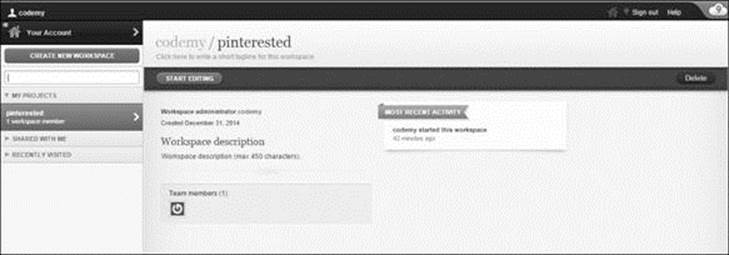
(C9.io Dashboard)
Up at the top left-hand corner of the screen; click the button that says "Create New Workspace". A Workspace is what c9.io calls the development environment. You'll create a new workspace for every Rails App that you build. Since we're just building one app in this book, we just need one workspace.
From the box that pops up, name your new Rails app, let's call ours: pinterested. Type that into the field that asks for the name, click the "Ruby on Rails" icon to designate that this will be a ruby app, and then click the "Create" button.
That's all there is to it! In a few moments (sometimes up to a minute), your Rails development environment will be ready to go!
One of the nice things about these cloud environments is that you can access them from anywhere, on any computer that has a web browser and an Internet connection. It doesn't matter if you're on a Windows, a Mac, or a Linux machine. And it will always be exactly how you left it.
I guess there's nothing left to do but fire up our new dev environment and see what's what!
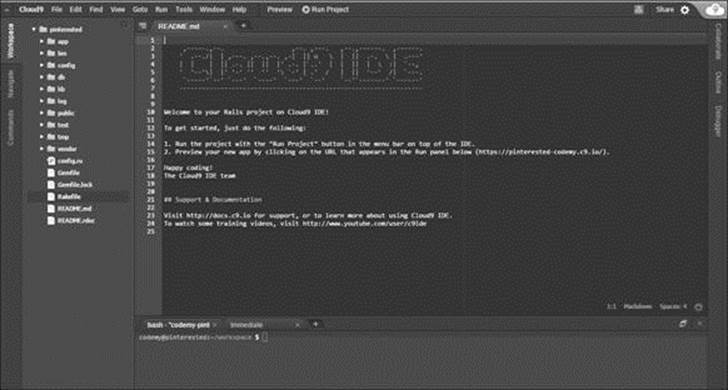
(C9.io Development Environment)
So let's take a quick look at what we've got here. Basically there are three sections. The section on the left sidebar is a list of directories and files that come with Rails. These are the standard directories and files that come with ALL Rails installations.
There's a lot of stuff there and it might seem overwhelming at first. That's OK! I'm going to break it all down and explain what's important for us to know about, and what we can ignore for later (and what we can ignore forever).
The next section is the sort of lower middle section.
That's the command line. Some people call it the terminal (if you're on a Mac or Linux and not using a cloud development environment, you'll use an actual terminal that will look and act similar to this one). The terminal, or command line (I tend to use each of those terms interchangeably), is where we'll type in commands to do a lot of different things along the way.
The section right above that, which should have some sort of readme document open the first time, is basically the text editor. It allows us to open files, edit files, and save files. We'll be spending a big chunk of our time using the text editor.
You can close that readme file and any other welcome page type files that are open. Just click the little X at the top of each file in the text editor.
To open one of the files from the directory tree on the left hand side of the screen, just double click it and it should open in the text editor.
WHAT VERSION OF RAILS AND RUBY ARE WE USING?
Normally if we were running our development environment on a Mac, Linux, or Windows PC, you would usually need to update the version of both Ruby and Rails on your system. We don't really need to worry about that in this case because we're working on a cloud development environment and usually they keep these things fairly up to date.
But I might as well show you how to check and see which version of both Ruby and Rails we're currently running. It may be the case in the future when you need to run specific versions of Ruby or Rails or something else, so being able to figure out what version you're running is important. It also let's gain a little familiarity with the terminal.
So head down to the terminal and type in:
1 $ rails -v
2
It should output something like:
1 $ rails -v
2 Rails 4.1.6
3
So that means that we are currently running Rails version 4.1.6. That's ok. As of the writing of this book, there's a newer version of Rails out; 4.2.0 but we don't really need to update.
Next go ahead and check the version of Ruby that we're currently running. Can you guess what command we'll need to type in? Shockingly enough, it's:
1 $ ruby -v
2
And that should output something like this:
1 $ ruby -v
2 ruby 2.1.4p265
3
Which means that we're running Ruby version 2.1.4p265. Likewise, that's a new enough version of Ruby to suit our purposes.
COMMON TERMINAL COMMANDS
So that's how the terminal works; you just enter commands and hit enter and the command gets executed, and then there's usually some sort of output that you can see. The terminal is actually a pretty powerful device and you can do a ton of things with it.
Of courses, in this book we won't be diving too deep into the wonderful world of command line goodness, but it's probably helpful to go over a few common commands that we might come across as we go along. So let's take a quick look at some common command line commands.
1 $ pwd
2
The pwd command shows us what directory we're currently in. When I type it into my terminal, I get this:
1 $ pwd
2 /home/ubuntu/workspace
3
That means that we are currently in the home/ubuntu/workspace directory. The workspace directory contains all of the files and directories that we see listed over there on the left hand side of the screen. In fact, we can see exactly what files are included in that directory (or any directory for that matter) by entering the ls command:
1 $ ls
2
That will output something that looks like this:
1 $ ls
2 Gemfile Gemfile.lock README.md README.rdoc Rakefile app/ bin/
3 config/ config.ru db/ lib/ log/ public/ spring/ test/ tmp/ vendor/
4
The things with slashes next to them (' / ') are directories, the rest are files.
We can navigate to those directories by using the cd command. cd stands for "change directory" and looks like this:
1 $ cd public/
2
That will move us into the public directory. Running the pwd command will now show us:
1 $ pwd
2 /home/ubuntu/workspace/public
3
To move back to our workspace directory, we can issue this command:
1 $ cd ../
2
Which basically says "move backwards one level"...and now we find ourselves back in the workspace directory.
Here's a fun fact tip about the cd command...you don't have to actually type out the entire command. Usually you can just start to type in out and then hit your 'tab' key on the keyboard and the terminal will autocorrect fill in the rest of the thing. So if you type in cd pu and then hit tab, it will fill the rest in (cd public/) and then you can just hit enter.
That might not seem like such a big deal, but sometimes you can end up typing a long bunch of words into the command line, using that tab trick really helps!
CREATING YOUR FIRST RAILS PROJECT
Normally if we weren't running a virtual development environment, we'd have to generate our new rails project. You'd do that by navigating to the directory where you'd like to create your app (in our case it would be the 'workspace' directory) and then enter this command:
1 $ rails new pinterested
2
That command would generate a new project called pinterested and place it into the workspaces directory. Fortunately we don't have to do that in this case because we're working on a virtual development environment and c9.io spins up our new project when we first create it on the c9.io dashboard.
So we're already good to go. Those new project files have already been generated; in fact, those are the files that you see listed in the directory tree on the left hand side of your screen, or by entering the command: ls in the command line.
FIRING UP OUR APP
So all of the files are there, but in order to first fire up our app we need to start up the Rails server. Out of the box, Rails comes with a lightweight web server called WEBrick. It isn't really production level quality, but it works just fine in our development environment. Normally you'd want something like Apache or Nginx for your production web server, and we'll talk about that later. For now, we're happy to use WEBrick.
To fire up our WEBrick server, just click that button at the very top of the screen, right in the middle of the screen, that says 'Run Project'.
If we were working on a mac/linux/winpc, we would need to enter this command into the terminal (in the same directory where our project is located):
1 $ rails server
2
But since we're on a cloud development environment, we can just click the Run Project button at the top of the screen.
You'll notice that when we click that button, a new terminal box pops up. The WEBRick server is running in that terminal, and we can switch back and forth between those two terminal screens. Once the web server starts running, it keeps running in that terminal and you won't be able to do anything else in that terminal (that's why a new terminal screen popped up).
Take a look at that terminal, you should see a line at the very top that says something like:
1 Your code is running at https://pinterested-codemy.c9.io.
2 => Booting WEBrick
3 ...
...and then a whole bunch of other stuff. Give it a few moments to get up and running and then type that URL into a new tab on your web browser (be sure to remove the period that's oddly listed at the end of the URL).
That should bring up a screen that looks like this:
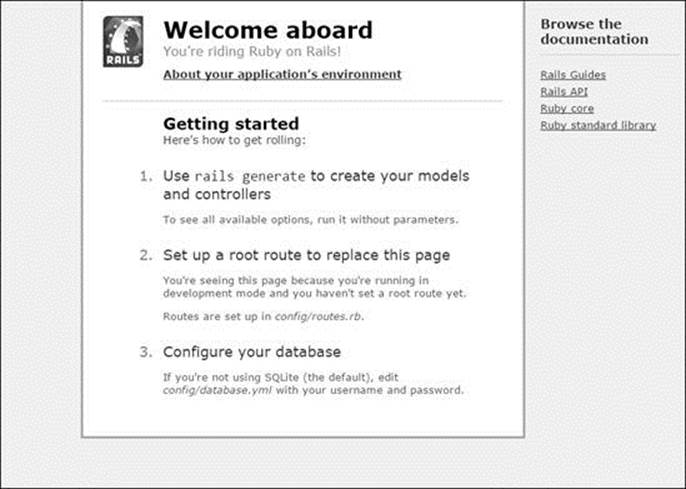
(Default Rails Project Homepage)
Congratulations! You've officially created your very first Rails app. Sure, there's not really much of anything there at the moment, but we can quickly change that!
Before we add more pages, I want to take a couple of minutes to explain the architecture that Rails uses... it's called the MVC architecture.
UNDERSTANDING THE MVC ARCHITECTURE
MVC stands for Model, View, Controller and it allows us to separate the different parts of our web app and only need to focus on the things that are most important to us. That'll make more sense in just a few moments, I promise!
So let's take a quick look at each of these things.
MODEL: the model is basically the database.
VIEW: the views are basically the web pages, think of them as the thing that people see (or VIEW) when they go to your web site.
CONTROLLER: the controller is the thing that sits behind the scenes and 'controls' the interaction between the web page VIEW and the database MODEL. Think of the controller as an air flight traffic controller, telling things where to go and generally controlling everything.
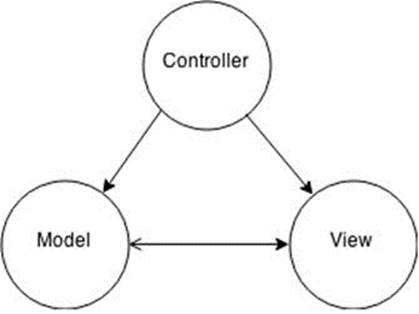
(Model View Controller Diagram)
So our rails app is made up of these three different areas, and if you browse through that directory tree on the left hand side of the screen (specifically look in the 'app' directory), you'll see things like views, models, and controllers. Looking around a bit more you'll see a db directory.
We don't need to know what all of these things are or what they do just yet; we just need to start familiarizing ourselves with the fact that those things are there, and that they correspond to something in either the MODEL, VIEW, or CONTROLLER part of our MCV framework.
Why is this cool?
It probably makes very little sense right now, but the MVC architecture is VERY cool because it lets us focus on the things we really care about, like the Views (how our website looks) and can sit back and let Rails itself (through the behind the scenes controllers) deal with the nitty gritty nasty database stuff.
I've been programming computers since I was seven years old. But to this day databases still give me headaches. I understand how they work, I know how to use them, and I HAVE used them hundreds of times in the past...but I don't like using them! I always have to look things up, I always tend to screw something up, and generally I just have bad experiences with databases.
Rails is fantastic because I don't have to deal with any database junk...Rails does all the heavy lifting for me! I just have to tell Rails "hey create a table with these columns that will contain this type of data" and Rails does the rest. This will make more sense as we move along, so you'll have to just trust me for now!
GEMFILES
Besides the MVC architecture, the other main component of Rails that you need to be aware of, are things called Gems.
Gems are really cool. In fact, Gems are what allows us to build really cool apps very very quickly. Whenever you want to do something interesting or complicated but don't want to write the code to do it yourself (which is pretty much EVERY time - right?) you simply add a Gem.
Gems add functionality to our apps. Pretty much any functionality you'd like to add, you can find a Gem to use.
Want users to be able to join your site, log in, log out, and update their user info? Writing the code to do that would take a LOT of work and experience. Instead, slap in a Gem.
Want users to be able to upload images to your site? Slap in the paperclip gem.
You get the idea.
We'll be using lots of Gems in this book and you'll get used to adding and installing them. For right now, I just want to introduce you to the concept.
RubyGems.org is the worldwide repository of Gems. That's where you can search for specific Gems and read the documentation for each of them. Some Gems are well documented, some are not.
I don't know how many Gems there are, but as of today those Gems have been downloaded 4,185,990,468 times...that's over four billion. So, yeah!
Adding Gems to your project is generally pretty easy, and I don't want you to get hung up on this process because it'll become old hat later on. For now I'll just outline the basic process.
Your app contains a file, called the Gemfile where you'll type in all the Gems you'll be using. You can see the Gemfile there on the left-hand side of your development environment towards the bottom of the list of files. Open it now by clicking it.
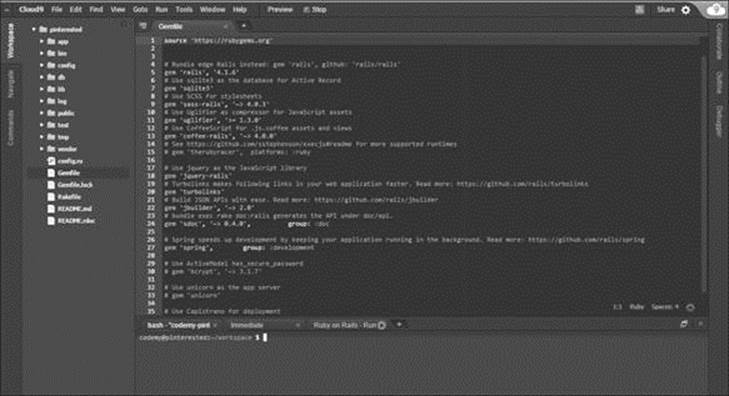
(Gemfile)
You'll see that there are Gems listed in there already. Rails installed them automatically when you started your project. Let's go ahead and clean that file up a bit.
Normally we like to use comments (those lines that start with '#') because it helps explain our code. But in this case those comments are just in the way.
So delete all the comments and straighten up the file a bit.
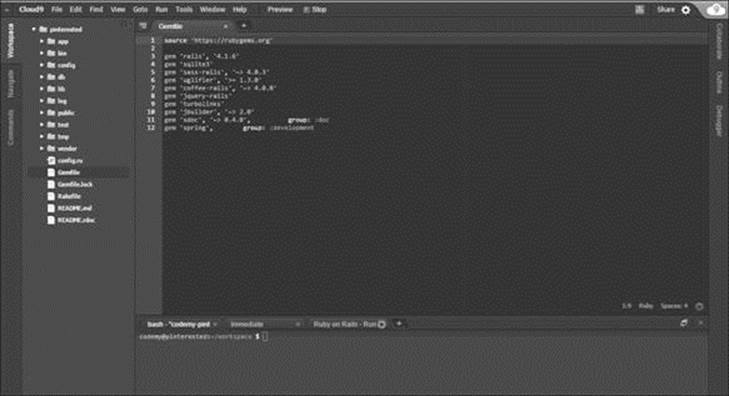
(Cleaned Up Gemfile With No Comments)
So that's our Gemfile. To add a new Gem, we just type in the name of the Gem and it's version number on a new line in the Gemfile. Then in the terminal you'll type in the command:
1 $ bundle install
2
That will install all of the Gems that have been added since the last time you ran the bundle install command. Generally it's a good idea to close your Rails Server terminal and restart your rails app as well after every bundle install.
I always forget to restart my Rails server and so I usually get an error when I reload a web page after installing a Gem. Then I smack my head and remember to restart the server and everything works out ok.
Some Gems only require you to add their name and version number to the Gemfile and then run the bundle install command. Other Gems may have special instructions that are a little more elaborate. Each Gem's documentation will tell you how to install it specifically, and usually how to use the Gem in your app.
But we'll get into all that later. As we move throughout this book building our Pinterested app, adding Gems will become old hat.
ADDING PAGES TO OUR WEB APPLICATION
So enough MVC theory jibber jabber, let's add some pages to our app. Head back to our development environment and pull up the main terminal (not the one still running the web server). Next type this command into the command prompt.
1 $ rails generate controller home index
2
So what does this line do? It tells our Rails app to add a new page called index, and to add that page to the home directory and generate a controller for it. Typing that command in should result in this bunch of gobbledigook:
1 create app/controllers/home_controller.rb
2 route get 'home/index'
3 invoke erb
4 create app/views/home
5 create app/views/home/index.html.erb
6 invoke test_unit
7 create test/controllers/home_controller_test.rb
8 invoke helper
9 create app/helpers/home_helper.rb
10 invoke test_unit
11 create test/helpers/home_helper_test.rb
12 invoke assets
13 invoke coffee
14 create app/assets/javascripts/home.js.coffee
15 invoke scss
16 create app/assets/stylesheets/home.css.scss
So that's a whole lot of stuff! Right now, we don't really need to know what all that stuff is. For now, just understand that we've generated a new controller, and a new page called index that's sitting in the home directory. In fact, we can switch over to our running app in the next browser tab and type in:
https://pinterested-codemy.c9.io/home/index
Be sure to replace the 'codemy' with whatever your account name is at c9.io, and be sure to change the pinterested to whatever you named your project (wait - didn't you name your project pinterested? Of course you did!).
Here's what you should see if everything went according to plan:

(Rails initial /home/index page: https://pinterested-codemy.c9.io/home/index)
Sure, there's not much on that page yet...but how easy was it to create? Pretty easy. Now we can edit that page and make it look however we want.
So where exactly IS that file? It's located at:
1 /home/ubuntu/workspace/app/views/home/index.html.erb
2
That's where it is located via the command line, but there's no reason for us to navigate to that file via the command line. Instead we can just double-click through the directory tree sitting right there on the left hand side of the screen.
Double-click the app directory to expand it, then double-click the views directory to expand it, then double-click the home directory to expand it, and voila! You should see the index.html.erb file sitting right there. Go ahead and double-click it and it should fire right up in the text editor there in the middle of the screen.
(Development Environment Directory Tree /app/views/home/index.html.erb)
NOTE: notice how the file ends in .erb? Most web pages tend to end in .html but our Rails pages tend to end in .html.erb and that tells the app to allow us to use embedded Ruby (.erb) on each web page. We'll look at embedded Ruby soon.
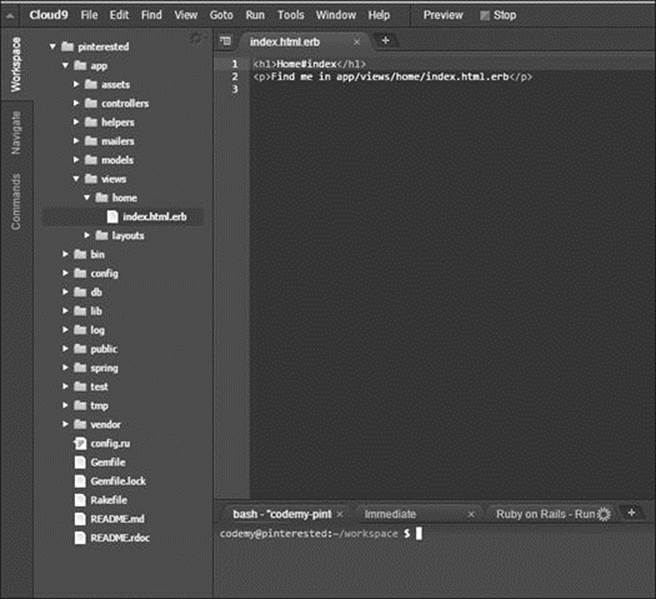
Take a look at our index.html.erb file in text editor (shown above):
1 <h1>Home#index</h1>
2 <p>Find me in app/views/home/index.html.erb</p>
3
Again...there's not much there right now, but we can edit it and make it look however we want just by editing it in the text editor right now.
So let's edit that index.html.erb file. Fire it up in the text editor and replace what's there already with this, or whatever you like:
1 <h1>Welcome To My App</h1>
2 <p>It's Gonna Kick All Ass...</p>
Then go ahead and save it by hitting Control and S (Ctrl + S) and your keyboard, or command S if you're running a Mac.
Now head back to that page in your web browsers and hit reload on your browser.

(Updated rails /home/index page: https://pinterested-codemy.c9.io/home/index)
See how easy that was? Sure there's still not much there, and we didn't really do anything with that edit...but it's going to come quickly now!
CHANGE THE ROUTE
We've touched on MVC a little bit, now let's see a little bit of it in action. Right now our Index page is located at https://pinterested-codemy.c9.io/home/index
But what we'd really like to see is that page shown as our main homepage at https://pinterested-codemy.c9.io So how do we do that?
Easily.
All we need to do is change the routing of our project a bit (think controller in the MVC). Take a look at /config/routes.rb
/config/routes.rb
1 Rails.application.routes.draw do
2 get 'home/index'
3 .
4 .
5 end
6
Navigate to that file in the directory tree on the left side of the screen of your development environment and double click it to open it in the text editor. You should see a couple lines at the top of that file, and then a page full of commented out stuff (stuff with #'s in front of it).
So what's going on here? Basically that file is telling our app to route our index.html.erb file to home/index and that's why our index page shows up at:
https://pinterested-codemy.c9.io/home/index
In fact, in the future if we want to add more pages, we'll have to add routes to those pages right here. They'll probably look a lot like that line (get 'home/index') only for different pages (ie get 'home/about' would create a route to a page at /home/about etc).
But for now we need to modify that line to let our program know that we don't want our index page routed to /home/index. In fact, we want to make that our ROOT page (ie the page at the root of our url https://pinterested-codemy.c9.io), Easy enough, just edit that file:
/config/routes.rb
1 Rails.application.routes.draw do
2 root 'home#index'
3 .
4 .
5 end
6
See what we did? We changed the line get 'home/index' into the line root 'home#index'
Notice the '#' instead of a '/', that's what we need to do to designate that page as a root page. If we go ahead and save the newly edited routes.rb file and reload our web browser at https://pinterested-codemy.c9.io/home/index we'll get an error because the route to that page no longer exists!
Instead if we navigate to https://pinterested-codemy.c9.io we'll see our index page right there, which is exactly what we were shooting for.
Things are moving right along! We better save our work!
VERSION CONTROL WITH GITHUB AND BITBUCKET
One of the most important things to do as a programmer is set up version control to keep track of all the different changes you make as you develop your app. It's generally a 'best-practices' type of thing, but it makes sense.
If you totally blow up your app (and you probably will at some point), it's nice to be able to simply roll back to before you blew it up and proceed ahead as if nothing happened.
Version control is especially useful when you're working with a bunch of people, and they're all making changes and adding/removing things. Your version control will keep track of who did what, and when and where.
But it's important even if you're working by yourself and don't plan on ever working with a team of people because you're always going to screw up and need to roll back your code. Trust me.
Most coders use something called "Git" for their version control, and then push their code up to a third party website like Github or Bitbucket for safe keeping.
You have a choice when it comes to picking a third party site to host your code on. Github seems to be much more popular, all the coders seem to use it. In fact, most people use their Github account as a sort of resume piece.
Why? Because unless you pay for it, all the code you push up to Github is public. Anyone can see it, download it, whatever. So potential employers always want to see your Github account; so they can check out your chops.
That's fine if you're working on a lot of open source type projects, but personally I'm usually developing proprietary apps that I'm using to make me money. I don't want ANYONE to see that code.
So I use Bitbucket. Bitbucket gives you free private repositories, and you only have to pay to add team members and things like that. But for individuals, you get free private repositories. Github, on the other hand, gives you free PUBLIC repositories and you pay to get private ones.
I think it's a good idea to have some sort of Github presence if you're looking to turn this programming thing into a full time job. Like I said, employers will want to see your Github page.
What I recommend you do is use Github for things like this book! As you follow along with the code in this book (and any others you read) use Github.
We're building a pinterest clone. Another book might show you to make a shopping cart like site. Still another book might teach you to clone Twitter.
If you follow along with each of those books building what they build, at the end you'll have three solid example projects on your Github page to show potential employers. And then they'll hire you for hundreds of thousands of dollars a year in salary and you can send me some of that cash every month :-p
So it just depends on what you're doing whether or not you use Github or Bitbucket. I'll show you how to set up each of them right now.
INSTALLING GIT
Normally you'd need to install git into your development environment, but we're using the awesome c9.io cloud environment and they've already installed git for us and it's ready to go.
All we need to do is configure it. So let's do that now. We've got to punch in four or five commands into our terminal command line:
1 $ git config --global user.name "Your Name"
2 $ git config --global user.email your.email@example.com
3 $ git config --global push.default matching
4 $ git config --global alias.co checkout
5 $ git init
6
So obviously you're going to want to change line 1 to add your own name where it says "Your Name" and just as obviously you're going to want to add your actual email address to line to where it asks for your email address.
Remember, Git is used to keep track of who makes what changes, so it needs to know your name and email address.
You'll have noticed that after you entered the last command (line 5) you got a little output printed on the screen; probably something like this:
1 $ git init
2 Initialized empty Git repository in /home/ubuntu/workspace/.git/
3
Basically that means that a new directory has been generated to handle all of our version control files on our development environment, and that directory is named .git/ You can cd into that directory in the terminal if you're curious to see what's in there (just remember to cd ../ back to the main directory when you're done snooping around).
So now Git is configured for our development environment, we need to add our project files to our local repository. Once we've added them, we'll 'push' them up to either Github or Bitbucket. Adding our project files to our local git repository is a two-step process:
1 $ git add .
2
That command will add all the files of our project into a sort of staging area. Basically it says "Hey, my files are ready to go!" The period '.' means "all files". Next we need to 'commit' those files to the repository. Committing, in essence, moves the files from the staging area into the repository.
1 $ git commit -am "initial commit"
2
There's a couple of things to notice with this command. First the flag -am. That tells git to grab all (-a) our staged files and look for a comment (technically a 'message' hence the -m flag). The comment is "initial commit". You can type anything you want as the comment, just enclose it in either a double quote or single quote.
Comments are important for version control because the comment/message will be shown next to every file that has changed since the last commit. That makes it easier to eyeball your code up on Github or Bitbucket and track down specific changes.
So for instance, let's pretend we just added an 'about us' page to our project and wanted to commit the changes. In that case I would have typed $ git commit -am "added an about us page"
That's how comments/messages work in version control. Get used to typing those two lines, followed by a third line to push the code up to github or bitbucket that we'll look at in a minute.
ROLLING BACK CODE
So now if you make some catastrophic mistake, you can roll your code back (as long as you haven't committed the mistaken code already). All you have to do is punch in this command:
1 $ git checkout -f
2
And your errors will melt away.
GITHUB OR BITBUCKET
So now and all we need to do now is decide whether or not to use Github or Bitbucket to host our code.
GitHub.com
Bitbucket.org
Head over to one or the other of those sites and sign up for a free account.
USING BITBUCKET
Like I said, I'll show you how to use both, but since I tend to use Bitbucket myself, we'll start with them.
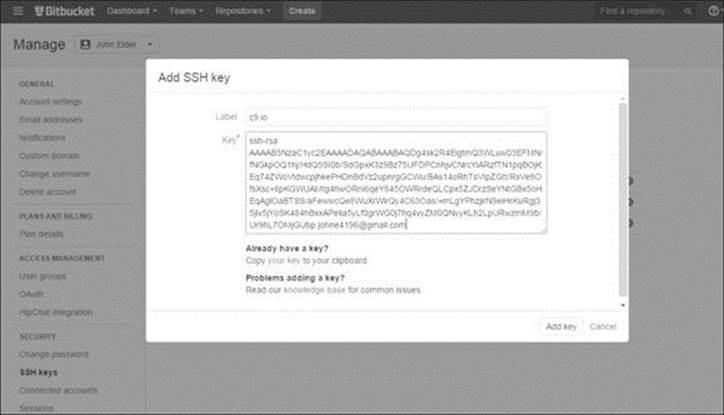
After you sign up for a Bitbucket account, you'll need to add an SSH key so that Bitbucket knows you are who you say you are when you push code from your development environment onto your Bitbucket account.
Normally you'd have to generate a public key, but our development environment already has one ready to go, and you can find it by punching in this command to the terminal:
1 $ cat ~/.ssh/id_rsa.pub
2
That should output a whole bunch of gobblediegook to the screen that looks something like this:
ssh-rsa AAAAB3NzaC1yc2EAAAADAQABAAABAQDg4sk2R4EigtmQ3WLuw03EFMN/fNGkpOQ1hj/HdQ9SI0b/SdGpxK3z9Bz75UFDPCnhjvCNrcYiARzfTN1pqBOjKEq74ZWoVtdwcpjhkePHDnBdVz2upnrgGCWu/BAs14oRhTsVIpZGtt/RsVe8OfsXsc+lIpKGWUAMtg4hwORni6qeY845OWRrdeQLCpx5ZJDrzSeYNtGBx5oHEqAglOaBTSS/aFewwcQe8WuXrWlrQy4C63Oas/+mLgYPhzjirN9eiHrKuRgj35jlv5jYoSK484hBxxAPelia5yLf0grWG0j7hq4vyZM0QNyyKLh2LpURwzmM9b/Ur9hL7OMjGUbp johne4196@gmail.com
That's your public SSH key. Drag your mouse over the whole lot of it to highlight it, and then copy it by pressing Control and C (Ctrl + C) or Command C on a Mac. Now we need to paste that into our Bitbucket account.
Log into your account and click the little avatar image at the top right corner of your dashboard screen, then click "Manage Account", and then click "SSH Keys".
A box should pop up where you can paste (Ctrl +V) your newly copied SSH key. Click the "Add Key" button after you've pasted the key into the appropriate box.
(Bitbucket.org Add SSH key screen)
So far so good. Now we need to create a new repository on Bitbucket. Click the "Create" link and type in the name of your app. You can generally leave the rest of the default fields alone.
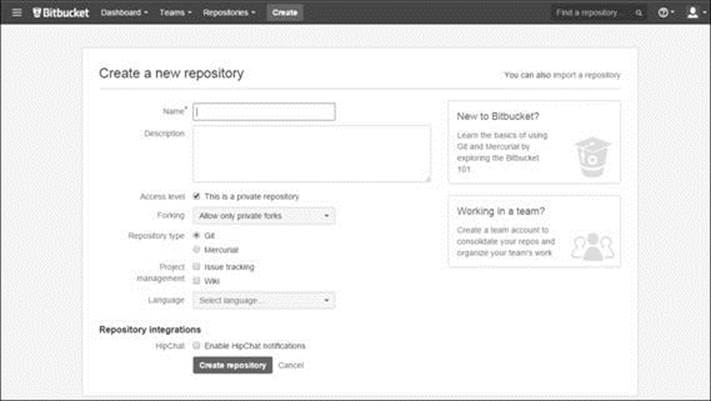
(Bitbucket.org Create Repository Screen)
Now we need to punch in a couple of commands into our terminal back at our c9.io development environment:
1 $ git remote add origin git@bitbucket.org:<username>/pinterested.git
2 $ git push -u origin --all
3
Be sure to change the <username> field to your Bitbucket username, and change the /pinterested.git name to whatever you actually named your app over at Bitbucket.
Done and done.
From now on, whenever you want to save your code and push it to Bitbucket, you'll follow these three commands:
1 $ git add .
2 $ git commit -am 'enter your comment'
3 $ git push
4
We've already seen the first two command, they add your files to your local git repository. It's the third line ($ git push) that actually pushes all that committed code up to Bitbucket.
And now we've got version control completely set up and ready to go!
USING GITHUB
Now we'll go over the steps for using Github. Remember, don't try to use BOTH of these services, you need to pick one or the other.
So the first thing to do is head over to Github.com and sign up for a free account.
After that you'll need to do the same basic steps we just went over for generating a public SSH key for bitbucket:
1 $ cat ~/.ssh/id_rsa.pub
2
That should output a whole bunch of gobblediegook to the screen that looks something like this:
ssh-rsa AAAAB3NzaC1yc2EAAAADAQABAAABAQDg4sk2R4EigtmQ3WLuw03EFMN/fNGkpOQ1hj/HdQ9SI0b/SdGpxK3z9Bz75UFDPCnhjvCNrcYiARzfTN1pqBOjKEq74ZWoVtdwcpjhkePHDnBdVz2upnrgGCWu/BAs14oRhTsVIpZGtt/RsVe8OfsXsc+lIpKGWUAMtg4hwORni6qeY845OWRrdeQLCpx5ZJDrzSeYNtGBx5oHEqAglOaBTSS/aFewwcQe8WuXrWlrQy4C63Oas/+mLgYPhzjirN9eiHrKuRgj35jlv5jYoSK484hBxxAPelia5yLf0grWG0j7hq4vyZM0QNyyKLh2LpURwzmM9b/Ur9hL7OMjGUbp johne4196@gmail.com
That's your public SSH key. Drag your mouse over the whole lot of it to highlight it, then copy it by pressing Control and C (Ctrl + C) or Command C on a mac. Now we need to paste that into our Github account.
Log into your Github account and look around for a little gear icon at the top right hand corner of the page.
Under 'User Settings' click 'SSH Keys'. In the 'Title' field, name this thing...I'd name it c9.io pinterested or something like that. Then paste your SSH key into the 'Key' field and click the add button. You may have to confirm by entering your Github password.
Now you can test things out to make sure everything worked the way it's supposed to work. Pull up the terminal in our development environment and punch in this command:
1 $ ssh -T git@github.com
2
You'll probably see something like this:
1 The authenticity of host 'github.com (207.97.227.239)' can't be established.
2 RSA key fingerprint is 16:27:ac:a5:76:28:2d:36:63:1b:56:4d:eb:df:a6:48.
3 Are you sure you want to continue connecting (yes/no)?
4
That's what you're supposed to see. Type in yes and hit enter. You'll probably see this:
1 Hi username! You've successfully authenticated, but GitHub does not
2 provide shell access.
3
Success! Now we need to create a repository on Github to house your project.
Look for a plus sign ('+') up at the top right hand corner of the screen somewhere. Click it and then click 'New Repository'. Name your repository something short and memorable...like pinterested or something like that.
Next you need to decide whether to make your repository public or private. If you've set up a free account, then you'll need to pick 'public'.
Don't click "Select Initialize this repository with a README." because we've already run $ git init in our development environment.
Click 'Create Repository'.
Now head back to your terminal in our development environment and push your code up to Github:
1 $ git remote add origin git@github.com:[your_username]/[your_repository_name].git
2 $ git push -u origin master
That should do it! Remember, whenever you want to save code and push to Github, you'll need to do these three steps:
1 $ git add .
2 $ git commit -am 'your comment here'
3 $ git push
4
And that's all there is to it!
HOSTING YOUR APP ON HEROKU
So we've got version control set up and running, now we need to talk about hosting your app. One of the great things about Ruby on Rails is Heroku, which is basically a web hosting service for Rails apps.
Normally when you deal with web hosting, you've got to manage servers at some level. Depending on how much horsepower you need, you might be responsible for most of the administration of your web server, including patching and updating the thing, all the way up to security. It can suck.
Heroku is different.
With Heroku, all you have to do is push your code up to Heroku in much the same way that we push it to Bitbucket or Github. In fact, it's just one line on the terminal.
Your code will get pushed to Heroku where it will be automatically installed, configured, and whatever other magic needs to be done to turn your code into a fully functioning website.
Bang zoom, you're done.
You don't have to worry about running a web server, patching software, scaling things, or security. And did I mention Heroku is free?
Yep.
Well...it's free at a basic level. They have a "Pay as you Grow" type of model. Heroku works off something they call a 'dyno', and you can get one dyno for each app you upload for free. One dyno is enough horsepower to get your site up and running, and allow a handful of people to use your app at once.
The more people that use your app at once, the more horsepower and bandwidth you'll need. You'll need to increase the dynos for your app. That's pretty cool, because there's nothing to it. You just log into your account and increase the dynos.
So with the click of a button you can basically scale your website to be as powerful as you want; to handle as much traffic as you want. So basically you only pay for what you need, horsepower wise. That's great for new sites just getting started. As your web app becomes more popular and more people flood to your site, you just increase the dynos to the appropriate level.
Done and done.
It's a great resource, and fairly unique in the world of web hosting. What about price? Right now two dynos will cost you around $35-36 bucks a month. Three dynos will cost around $70 a month. You can check for yourself here:
https://www.heroku.com/pricing
There's a slider on that page that lets you see how much any level of dynos will cost per month and you can do your own research there.
There are certainly other hosting services where you can host your Rails app, but I've never bothered to research any of them. Heroku is the industry leader.
So sign up for a free Heroku account right now, and let's configure our app for Heroku.
Normally, if we were running our development environment on mac/windows/linux, we'd have to download and install the Heroku toolbelt (toolbelt.heroku.com).
But since we're using a virtual cloud development environment, we've already got the toolbelt installed. You can check to make sure by punching in this command into the terminal:
1 $ heroku --version
2
You should see a line output that tells you what version of the Heroku toolbelt is installed.
Now all we have to do is log into Heroku from the terminal:
1 $ heroku login
2
You'll be prompted to enter your email address and password right there on the command line. Go ahead and do so, using the same email address and password that you used to sign up for Heroku.
Next we'll need to add our SSH keys. Unlike Bitbucket or Github though, we don't have to copy and paste them into the website; we can do it from the terminal:
1 $ heroku keys:add
2
Heroku will find your SSH key itself.
Finally, we need to create an actual app on Heroku:
1 $ heroku create
2
Heroku will output a bunch of text on the terminal screen. Take a look, see that URL? That's the URL of our new App. Sure, we haven't pushed our code up to Heroku yet, but when we do, that's where it will sit:
https://intense-caverns-8282.herokuapp.com
It probably looks like a fairly strange URL (they seem to autogenerate them). You can change the URL to something easier to remember. All we have to do is enter a simple command into the terminal.
1 $ heroku rename (pick a name like pinterested12)
2
So if you wanted to name your app pinterested 12, you would type in:
1 $ heroku remane pinterested12
2
I'd suggest you name it pinterested, but the name has to be unique and pinterested has already been taken.
I renamed my app, the URL is now:
https://pinterested99.herokuapp.com
Yours will be whatever you changed your app to.
With Heroku, it's easy to use a custom domain name too; like www.pinterested99.com and I'll show you how to do that towards the end of this book. No need to put the cart before the horse, we can use the whatever.herokuapp.com URL while we're building the thing.
PUSHING CODE TO HEROKU
Now that we have Heroku all set up, it's time to push our code up there. Pushing code to Heroku is very similar to pushing code to Bitbucket or Github, in fact we'll use the same three commands - and then just add a fourth for Heroku:
1 $ git add .
2 $ git commit -am "add your comment"
3 $ git push
4 $ git push heroku master
5
The first three lines are familiar to us already; they just save your changes with git and push up to Bitbucket (or Github if you've chosen to use them). The only difference is the last line: git push heroku master and that simply pushes all your code up to Heroku.
After you run that command, you'll usually have to wait for a minute or two and while you wait you'll see a whole bunch of gobbledigook text outputted to the screen. That's totally normal. Rails is just doing it's thing.
Once it finishes pushing to Heroku, your app is live! You can head over to pinterested99.herokuapp.com (or whatever URL you selected) and see your app live.
Sure, there isn't much there yet. But it'll start to go faster now...
**IMPORTANT**
Before you push your code to Heroku for the first time, we need to make a quick change to our Gemfile. Our app is currently using a lightweight database called sqlite3 which comes installed with Rails. Heroku no longer allows that database, so we need to change our Gemfile. Open the Gemfile and delete the line:
/Gemfile
1 .
2 .
3 gem 'sqlite3'
4 .
5
Just go ahead and remove it completely. Next add this bit of code to the bottom of your Gemfile:
/Gemfile
1 .
2 .
3 group :development, :test do
4 gem 'sqlite3'
5 end
6
7 group :production do
8 gem 'pg', '0.17.1'
9 gem 'rails_12factor', '0.0.2'
10 end
11
If you take a look at that code, you can sort of see that it's telling our app to use the sqlite3 database on our local development environment (and test environment, but we won't be talking about test stuff in this book), and to use pg and rails_12factor for the production environment (Heroku).
PG stands for Postgres, and that's the production level database we'll be using up on Heroku (rails_12factor is something that goes with it).
After you add those changes to the Gemfile, you need to run the bundle install command in the terminal, but slightly differently than usual:
1 $ bundle install --without production
2
That '--without production' flag tells Rails to ignore the postgres stuff.
Now you can save your work and push your code to Heroku for the first time:
1 $ git add .
2 $ git commit -am "add your comment"
3 $ git push
4 $ git push heroku master
MOVING FORWARD AND GETTING HELP
We're almost ready to start doing some real stuff. You'll be surprised how quickly our app comes together.
But before we get started, I wanted to talk very briefly about errors.
They say that computer programming is 90% error fixing. Basically, you're going to spend a little bit of time writing computer code (around 10% of your time), and then 90% of your time fixing the screw-ups that you made in that 10% of writing code.
That certainly seems to hold true in Rails. Lots of things can go wrong, and WILL go wrong. There's no shame in asking for help when you get stumped with a problem you can't solve, in fact - it's essential.
As a coder, you're going to have to get good at searching for help over at Google. Luckily, Rails is pretty good about giving you a heads up about errors. You can usually copy the error summary and then paste it right into Google.
Chances are, someone else had that same problem and has written down how to solve it; either on a message board, or in a blog post, or some other way.
More often than not, when you search for help at Google, you'll come across an answer posted on a website called StackOverflow.com
StackOverflow.com is basically a social network for coders...not just Rails coders, but ALL coders. People go there to ask questions, and answer other people's questions.
It's a real community and I highly suggest you go check it out, sign up for a free account, and scope out the lay of the land because you will definitely need the support of your fellow coders along the way.
As for this book in particular, I highly recommend you sign up for the "Learning Ruby on Rails For Web Development" course at Codemy.com
(http://Codemy.com/rails)
Not only do I walk you through every section of this book in video form, but I'm also available to answer any questions you have along the way. Just post them below any video where you get stuck, and I'll usually respond within an hour or two (I'm there all the time).
The price for one course is usually $97 but I'll knock off $22 as a thank-you for reading this book, just use coupon code amazon when you check out.
The price is kind of a joke when you compare it to the hundreds or thousands of dollars that most online Rails courses charge, but I'm weird like that. I'm less interested in making money and more interested in making sure you learn how to use Rails...otherwise I'd charge $499 for the course!
Either way, get used to asking for help - everyone does (me included!).