Learning Scala (2015)
Part II. Object-Oriented Scala
Chapter 9. Objects, Case Classes, and Traits
In the previous chapter we covered classes, a core component of object-oriented Scala. As you’ll recall, classes are defined once but can be instantiated an unlimited number of times. In this chapter we will discover new components that may be used to complement and embellish classes, or replace some classes entirely, depending on your object-oriented design preferences. Many developers choose the latter, using them in place of “regular” classes when they can. Therefore I highly recommend taking the time to learn about each component, not only because you also may end up preferring them over classes but also because they all have something new to offer most developers.
The three new components—objects, case classes, and traits—are sufficiently discrete that there is little point in writing a common introduction for them. Therefore, in this chapter we will have separate introductions for each component, starting with the section on objects.
Objects
An object is a type of class that can have no more than one instance, known in object-oriented design as a singleton. Instead of creating an instance with a new keyword, just access the object directly by name. An object gets automatically instantiated the first time it is accessed in a running JVM, which also means that until it is accessed the first time it won’t get instantiated.
Java and other languages have the ability to designate certain fields and methods of a class as being “static” or “global,” meaning that they are not tied to an instance’s data and so can be accessed without instantiating a class. Objects provide similar functionality but decouple them from instantiable classes. This separation helps to clarify the difference between global and instance-based fields and methods and provides a safer and more understandable design. With this model there is less chance of accidentally invoking a global method on a class, or of mistakenly storing mutable data in a globally accessible field.
Objects and classes are not completely decoupled. An object can extend another class, making its fields and methods available in a global instance. The reverse is not true, however, because an object cannot itself be extended. This should make sense, because there is no reason to subclass one. If only one of the objects or its subclasses could ever be instantiated, why wouldn’t you just add the features you would have wanted into the object itself?
Use the object keyword, in place of class, to define an object. Objects do not take any parameters (they are automatically instantiated), but you can define the same fields, methods, and internal classes as you can with regular classes.
Syntax: Defining an Object
object <identifier> [extends <identifier>] [{ fields, methods, and classes }]
Let’s design an object that will demonstrate how objects are automatically instantiated:
scala> object Hello { println("in Hello"); def hi = "hi" }
defined object Hello
scala> println(Hello.hi)
in Hello
hi
scala> println(Hello.hi)
hi
The println at the top level of the object is invoked at instantiation/initialization, which only occurs when it is accessed for the first time. Repeating the call to the object’s “hi” method reused the same global instance so there was no additional initialization.
The standard class method is one that reads from or writes to the fields of its instance, providing complementary access points and business logic for the data. Likewise, the kinds of methods best suited for objects are pure functions and the functions that work with external I/O (Input/Output).Pure functions are ones that return results calculated exclusively from their inputs, have no side effects, and are referentially transparent (indistinguishable if replaced by the result of the function). I/O functions are those that work with external data, such as with files, databases, and external services. Neither of these function types are well suited to being class methods because they have little to do with a class’s fields.
As an example, we’ll create an object that provides pure functions as utilities, one of my favorite uses for objects:
scala> object HtmlUtils {
| def removeMarkup(input: String) = {
| input
| .replaceAll("""</?\w[^>]*>""","")
| .replaceAll("<.*>","")
| }
| }
defined object HtmlUtils
scala> val html = "<html><body><h1>Introduction</h1></body></html>"
html: String = <html><body><h1>Introduction</h1></body></html>
scala> val text = HtmlUtils.removeMarkup(html)
text: String = Introduction
Our example utility method, removeMarkup, is a pure function that returns a result based only on the input data. As a member of the object HtmlUtils it is now globally accessible by any other code, available without explicitly initializing a class.
A REFERENTIAL TRANSPARENCY TEST
As a test of referential transparency, we could replace the function with one that just returns the result, “Introduction,” and there would have been no other effect on our system. A class method that reads from one of its fields or an object method that writes to the console could not make the same claim, because they are either dependent on their environment or make a change to the environment. The point is that, when possible, consider using pure functions to reduce dependency problems and make your code self-sufficient.
We have covered the basic use of objects as global (or static, if you prefer) classes, but you can do much more with them than just storing your functions. You can use them as companions to classes of the same name, granting them special permissions, or have them act as entry points for command-line applications. We’ll look at more uses of objects in the next several sections.
Apply Methods and Companion Objects
We have covered the apply method for classes (see Apply Methods), which makes it possible to invoke an instance. The same feature works for objects, making it possible to invoke an object by name. By defining one or more of these methods, your object can be invoked by name, much likeList(1, 2, 3).
In fact, this is how lists are instantiated in Scala. The List object has an apply() method that takes arguments and returns a new collection from them. You have also experienced this feature when creating monadic collections (see Monadic Collections). The apply() method on theOption object takes a single value and returns Some[A] containing the value if it is nonnull or else None. The Future object uses apply() to take your function parameter and invoke it in a background thread. This is known as the factory pattern in object-oriented programming, and is a popular use of the apply() method in objects.
Specifically, the factory pattern is a popular way to generate new instances of a class from its companion object. A companion object is an object that shares the same name as a class and is defined together in the same file as the class. Having a companion object for a class is a common pattern in Scala, but there is also a feature from which they can benefit. Companion objects and classes are considered a single unit in terms of access controls, so they can access each other’s private and protected fields and methods.
Let’s try out the apply() factory pattern and the companion object pattern in the same example. We will use the REPL’s :paste mode to simulate a class and object defined together in the same file, because otherwise the REPL would assume they are separate:
scala> :paste
// Entering paste mode (ctrl-D to finish)
class Multiplier(val x: Int) { def product(y: Int) = x * y }
object Multiplier { def apply(x: Int) = new Multiplier(x) }
// Exiting paste mode, now interpreting.
defined class Multiplier
defined object Multiplier
scala> val tripler = Multiplier(3)
tripler: Multiplier = Multiplier@5af28b27
scala> val result = tripler.product(13)
result: Int = 39
The example class, Multiplier, takes an amount and provides a method, product, that multiplies it by another amount. Our companion object of the same name has an “apply” method with the exact same parameters as the instance, which makes it clear to users that it serves as a factory method for the class.
However, we haven’t yet seen the benefit of a companion object, namely the special access controls that it shares with a companion class. Let’s try this out in a new example where the class accesses private members of its companion object:
scala> :paste
// Entering paste mode (ctrl-D to finish)
object DBConnection {
private val db_url = "jdbc://localhost"
private val db_user = "franken"
private val db_pass = "berry"
def apply() = new DBConnection
}
class DBConnection {
private val props = Map(
"url" -> DBConnection.db_url,
"user" -> DBConnection.db_user,
"pass" -> DBConnection.db_pass
)
println(s"Created new connection for " + props("url"))
}
// Exiting paste mode, now interpreting.
defined object DBConnection
defined class DBConnection
scala> val conn = DBConnection()
Created new connection for jdbc://localhost
conn: DBConnection = DBConnection@4d27d9d
Our new DBConnection object stores the database connection data in private constants, while the class of the same name can read them when creating a connection. The constants are global, because the settings are constant across the application, and safe from being read by any other part of the system.
Another benefit to using the REPL’s paste mode is that both the object and the class are compiled together at the same time. Besides the special companion access to private fields, we could not have entered them in the REPL without paste mode because the class and object refer to each other. A class referring to an undefined object, being compiled without the object, would have led to a compilation error.
In the exercises for previous chapters you may have been writing .scala files executed directly by the scala command. Defining classes and objects together in a .scala file will work, because they are part of the same namespace. And you can add commands to access the classes and objects right inside the .scala file, executed when you run it with scala.
This approach is suitable for testing, but doesn’t make it possible to reuse your code. The scala command will execute the contents of your file as if they were entered in a REPL, but you don’t end up with compiled classes. In order to write reusable, compiled code, you’ll need to compile your classes and objects with the scalac command and then execute them from your own application. In the next section we’ll learn how to write command-line applications with Scala so you can start reusing your classes and objects.
Command-Line Applications with Objects
Most languages have the ability to create command-line applications, ones that can be executed from a shell. At the most basic level they read input arguments, perhaps read from the input stream, and then write to the output stream. More complex applications may work with persistent data such as files and databases, access other computers over a network, or launch new applications.
Scala also supports this feature, using a “main” method in objects as the entry point for the application. To create a command-line application in Scala, add a “main” method that takes an array of strings as input arguments. When you have compiled your code, execute it by running the scalacommand with the name of the object.
Here’s an example of a short command-line application that prints out the current date. Included are steps to create the file, compile it, and execute it as an application, all inside a shell. The entry point is a “main” method defined in an object:
$ cat > Date.scala
object Date {
def main(args: Array[String]) {
println(new java.util.Date)
}
}
$ scalac Date.scala
$ scala Date
Mon Sep 01 22:03:09 PDT 2014
After compiling our “Date” object into .class files (the binary format for JVM classes), we are able to execute it as an application. This example demonstrated the basics of creating, compiling, and executing a command-line application, although it didn’t really demonstrate the use of the input arguments.
Here is a new example that emulates the Unix command cat, which prints the contents of a file to the console. It takes one or more filenames (or paths) and prints each one to the console:
$ cat > Cat.scala
object Cat {
def main(args: Array[String]) {
for (arg <- args) {
println( io.Source.fromFile(arg).mkString )
}
}
}
$ scalac Cat.scala
$ scala Cat Date.scala
object Date {
def main(args: Array[String]) {
println(new java.util.Date)
}
}
This time we’re making use of the input arguments. The fromFile method in the Scala library’s io.Source object (we can call it by its correct name now) is used to read each file, and the collection method mkString is used to convert the lines back into a single String for printing.
In a way, the best command-line applications are like pure functions: they read input, process it, and write output. Like the operations in Scala’s collections they are only good for a single task, but when chained together they create a bounty of new opportunities and possibilities. Command-line applications written in Scala may not replace native tools and shell scripts, because their slower startup time (a known problem in the JVM) and greater memory requirements may make them less desirable for all environments. They do make writing command-line tools more fun, however, and are a great way to learn the language. I recommend taking the time to rewrite some of your favorite (and shorter) shell scripts in Scala. It’s a great way to continue learning and practicing with the language, and you may find your Scala applications to be shorter and more stable than those written in other languages.
To summarize this section, objects are not only a global alternative to instance-based classes and a way to create command-line applications. When paired with classes as companion objects they create a new synergy for creating cleaner, decoupled, and more readable applications.
Now that you have some experience using objects with classes, it’s time to learn how to automate their interaction using case classes.
Case Classes
A case class is an instantiable class that includes several automatically generated methods. It also includes an automatically generated companion object with its own automatically generated methods. All of these methods in the class and in the companion object are based on the class’s parameter list, with the parameters being used to formulate methods like an equals implemention that iteratively compares every field and a toString method that cleanly prints out the class name and all of its field values.
Case classes work great for data transfer objects, the kind of classes that are mainly used for storing data, given the data-based methods that are generated. They don’t work well in hierarchical class structures, however, because inherited fields aren’t used to build its utility methods. And extending a case class with a regular class could lead to invalid results from the generated methods, which can’t take into account fields added by subclasses. However, if you want a class with a definitive set of fields, and these automatically generated methods are useful, then a case class may be right for you.
To create a case class, just add the keyword case before your class definition.
Syntax: Defining a Case Class
case class <identifier> ([var] <identifier>: <type>[, ... ])
[extends <identifier>(<input parameters>)]
[{ fields and methods }]
THE VAL KEYWORD IS ASSUMED FOR CASE CLASS PARAMETERS
By default, case classes convert parameters to value fields so it isn’t necessary to prefix them with the val keyword. You can still use the var keyword if you need a variable field.
Table 9-1 displays the class and object methods that get automatically generated for case classes.
Table 9-1. Generated case class methods
|
Name |
Location |
Description |
|
apply |
Object |
A factory method for instantiating the case class. |
|
copy |
Class |
Returns a copy of the instance with any requested changes. The parameters are the class’s fields with the default values set to the current field values. |
|
equals |
Class |
Returns true if every field in another instance match every field in this instance. Also invocable by the operator ==. |
|
hashCode |
Class |
Returns a hash code of the instance’s fields, useful for hash-based collections. |
|
toString |
Class |
Renders the class’s name and fields to a String. |
|
unapply |
Object |
Extracts the instance into a tuple of its fields, making it possible to use case class instances for pattern matching. |
The methods generated by the Scala compiler for case classes aren’t special in any way, other than that they are automatically generated for you. You could skip using case classes and add the methods and companion object yourself. The benefit that case classes bring is convenience, because writing all of these methods correctly for every data-based class would require a lot of work and maintenance. They also add a certain level of consistency, because all case classes carry the same features.
Now that we have exhaustively reviewed what case classes can do let’s see them in action. In this example we’ll create a case class and see how many of its automatically generated methods we can hit:
scala> case class Character(name: String, isThief: Boolean)
defined class Character
scala> val h = Character("Hadrian", true) ![]()
h: Character = Character(Hadrian,true) ![]()
scala> val r = h.copy(name = "Royce") ![]()
r: Character = Character(Royce,true)
scala> h == r ![]()
res0: Boolean = false
scala> h match {
| case Character(x, true) => s"$x is a thief" ![]()
| case Character(x, false) => s"$x is not a thief"
| }
res1: String = Hadrian is a thief
![]()
Here’s our companion object’s factory method, Character.apply().
![]()
The generated toString method, printed here by the REPL, is a clean and simple representation of the fields in our instance.
![]()
Our second instance shares the same value for the second field, so we only need to specify a new value for the first field in the copy method.
![]()
If both instances are nonnull, the == operator triggers an instance’s equals method, acting as a useful shortcut to the field comparison–based method generated for us.
![]()
The companion object’s unapply method allows us to decompose the instance into its parts, binding the first field (see Matching with Wildcard Patterns) and using a literal value to match the second field.
All of the generated methods we used in the example depended on the case class having two fields, name and isThief, based on the case class parameters. If our case class had extended another class with its own fields, but we hadn’t added the fields as case class parameters, the generated methods wouldn’t have been able to make use of them. This is an important caveat to know about before using case classes.
If your case class doesn’t need to take into account the fields of a parent class, you’ll find case classes to be wildly useful throughout your code. They can reduce the need to write your own boilerplate code, make debugging and logging easier with their helpful toString methods, and overall make object-oriented programming more enjoyable.
I find myself using case classes over classes for data storage, and objects over classes for writing most functions. Well, objects and traits for writing functions, because traits provide convenience for reusing functions in the same way that case classes provide convenience for managing your data. We’ll cover traits, the final type of class to introduce in this chapter, in the next section.
Traits
A trait is a kind of class that enables multiple inheritance. Classes, case classes, objects, and (yes) traits can all extend no more than one class but can extend multiple traits at the same time. Unlike the other types, however, traits cannot be instantiated.
Traits look about the same as any other type of class. However, like objects, they cannot take class parameters. Unlike objects, however, traits can take type parameters, which can help to make them extremely reusable.
To define a trait, use the trait keyword in place of where you would normally use the class keyword.
Syntax: Defining a Trait
trait <identifier> [extends <identifier>] [{ fields, methods, and classes }]
Remember the HtmlUtils object (from Objects) we created as an example? Let’s implement that as a trait instead:
scala> trait HtmlUtils {
| def removeMarkup(input: String) = {
| input
| .replaceAll("""</?\w[^>]*>""","")
| .replaceAll("<.*>","")
| }
| }
defined trait HtmlUtils
scala> class Page(val s: String) extends HtmlUtils {
| def asPlainText = removeMarkup(s)
| }
defined class Page
scala> new Page("<html><body><h1>Introduction</h1></body></html>").asPlainText
res2: String = Introduction
Our Page class can now use the removeMarkup method directly without specifying an object name.
This works pretty well, but a class version of HtmlUtils could have done the same job. Let’s make it more interesting by adding a second trait. This time we’ll use a new keyword, with, which is required for extending the second and later traits:
TRAITS COME AFTER THE PARENT CLASS
If you are extending a class and one or more traits, you will need to extend the class before you can add the traits using the with keyword. A parent class, if specified, must always come before any parent traits.
scala> trait SafeStringUtils {
|
| // Returns a trimmed version of the string wrapped in an Option,
| // or None if the trimmed string is empty.
| def trimToNone(s: String): Option[String] = {
| Option(s) map(_.trim) filterNot(_.isEmpty)
| }
| }
defined trait SafeStringUtils
scala> class Page(val s: String) extends SafeStringUtils with HtmlUtils {
| def asPlainText: String = {
| trimToNone(s) map removeMarkup getOrElse "n/a"
| }
| }
defined class Page
scala> new Page("<html><body><h1>Introduction</h1></body></html>").asPlainText
res3: String = Introduction
scala> new Page(" ").asPlainText
res4: String = n/a
scala> new Page(null).asPlainText
res5: String = n/a
Our new, more robust Page class now extends two traits and can handle null or empty strings by returning the message n/a.
If you’re familiar with the JVM you may be wondering how Scala can support multiple inheritance with traits. After all, JVM classes can only extend one parent class. The answer is that although the language supports multiple inheritance in theory, the compiler actually creates copies of each trait to form a tall, single-column hierarchy of the class and traits. So, a class extending class A and traits B and C is actually extending one class, which extends another class, which extends another class, when compiled to the .class binary file.
This process of taking a horizontal list of a class and traits being extended, and reforming them into a vertical chain of one class extending another, is known as linearization. It is a kind of coping mechanism for supporting multiple inheritance in an execution environment that only supports single inheritance. The fact that the JVM only supports single inheritance ensures that all class hierarchies are nondeterministic and prevents the possibility of confusing two traits that have competing members.
WHAT HAPPENS IF YOU HAVE TRAITS WITH COMPETING MEMBERS?
A class importing two traits that have the same field or method, but lack an override keyword, will fail to compile. The compilation error is the same as if you were extending a class and providing your own version of a method but failed to add an override keyword. In the case of the traits, adding a common base class and then overriding the field or method with theoverride keyword will ensure the traits can be extended by the same class.
The most important point to understand about linearization is in what order the Scala compiler arranges the traits and optional class to extend one another. The multiple inheritance ordering, from the lowest subclass up to the highest base class, is right to left.
Thus, a class defined as class D extends A with B with C, where A is a class and B and C are traits, would be reimplemented by the compiler as class D extends C extends B extends A. The rightmost trait is the immediate parent of the class being defined, and either the class or the first trait becomes the last parent class.
This is a lot to remember, so let’s write a quick test to verify this ordering:
scala> trait Base { override def toString = "Base" }
defined trait Base
scala> class A extends Base { override def toString = "A->" + super.toString }
defined class A
scala> trait B extends Base { override def toString = "B->" + super.toString }
defined trait B
scala> trait C extends Base { override def toString = "C->" + super.toString }
defined trait C
scala> class D extends A with B with C { override def toString = "D->" +
super.toString }
defined class D
scala> new D()
res50: D = D->C->B->A->Base
The toString method overridden in D prints the class name and then appends the output of its parent class’s implementation. Fortunately all of its parent classes also override this method, so we can see the exact ordering of methods called. First the toString in D was invoked, followed by the one in trait C, trait B, class A, and finally the common base class Base.
The process of linearization may seem odd, but it’s a useful compromise between the theory of a language supporting multiple inheritance versus the practice of an environment that doesn’t. It also provides a solid method for determining invocation, because the constructed hierarchy ensures that method handling is decided at compile time and never at runtime.
Another benefit of linearization is that you can write traits to override the behavior of a shared parent class. Here’s an example of a solid base class plus traits that add extra functionality when combined with a subclass. The example is rather lengthy so we’ll cover it in two parts. First, here’s the parent class and two traits that extend it:
scala> class RGBColor(val color: Int) { def hex = f"$color%06X" }
defined class RGBColor
scala> val green = new RGBColor(255 << 8).hex
green: String = 00FF00
scala> trait Opaque extends RGBColor { override def hex = s"${super.hex}FF" }
defined trait Opaque
scala> trait Sheer extends RGBColor { override def hex = s"${super.hex}33" }
defined trait Sheer
The two traits, Opaque and Sheer, extend the RGBColor class and add an opacity level to the red-green-blue color of its parent. The extra byte is often known as an alpha channel in computer graphics, so the traits are convering an RGB color value to an RGBA (a for alpha) color value, in hexadecimal format.
Now let’s put these new traits to use. We’ll extend both the parent class and one of the traits that extends the parent class. If we were just to extend the trait, there wouldn’t be any way to pass a class parameter to RGBColor. Therefore, we’ll extend both the parent class and functionality-adding trait:
scala> class Paint(color: Int) extends RGBColor(color) with Opaque
defined class Paint
scala> class Overlay(color: Int) extends RGBColor(color) with Sheer
defined class Overlay
scala> val red = new Paint(128 << 16).hex
red: String = 800000FF
scala> val blue = new Overlay(192).hex
blue: String = 0000C033
Because trait linearization is ordered from right to left, the hierarchy of “Paint” is “Paint” → “Opaque” → “RGBColor.” The class parameter added to the Paint class is used to initialize the RGBColor class, while the Opaque trait between Paint and RGBColor overrides the hex method to add extra functionality.
In other words, our Paint class will output an opaque color value and our Overlay will output a sheer (i.e., translucent) color value. We were able to take advantage of trait linearization to insert extra functionality.
At this point you should know how to define traits and extend them with classes. Understanding where and when to use them, however, may take some time and experience. Traits look similar to abstract classes, and like an implementation-based version of Java’s interfaces, but it’s important to understand how linearization shapes the hierarchy of any class that extends them.
If you’re still uncertain about using traits, the features we’ll cover in the next two sections may bring you around. We’ll look at a method to restrict traits to only be used with certain classes, in case you want to depend on the fields and methods of a class without directly extending it. We’ll also see how traits can be used not only in class definitions but in class instantiations as well, providing built-in dependency injection.
Self Types
A self type is a trait annotation that asserts that the trait must be mixed in with a specific type, or its subtype, when it is added to a class. A trait with a self type cannot be added to a class that does not extend the specified type. In a way, it is a guarantee that the trait will always be extending that type, while not actually directly extending it.
A popular use of self types is to add functionality with traits to classes that require input parameters. A trait cannot easily extend a class that takes input parameters, because the trait itself cannot take input parameters. However, it can declare itself to be a subtype of that parent class with a self type and then add its functionality.
A self type is added immediately following the opening brace of the trait definition, and includes an identifier, the requested type, and an arrow (=>). A trait with a self type can access fields of that type as if it explicitly extended that type.
Syntax: Defining a Self Type
trait ..... { <identifier>: <type> => .... }
The standard identifier used in self types is “self,” although any other identifier may be used. That is, except for a keyword like this. The benefit of using the common identifier “self” is that it can help to make your code more readable to other Scala developers.
Here is an example of a trait using a self type to ensure that it will always be a subtype of the specified type when mixed into a class:
scala> class A { def hi = "hi" }
defined class A
scala> trait B { self: A => ![]()
| override def toString = "B: " + hi
| }
defined trait B
scala> class C extends B
<console>:9: error: illegal inheritance; ![]()
self-type C does not conform to B's selftype B with A
class C extends B
^
scala> class C extends A with B ![]()
defined class C
scala> new C()
res1: C = B: hi ![]()
![]()
Our trait B has a self type, adding the requirement that the trait can only ever be mixed into a subtype of the specified type, the A class.
![]()
… but just to prove it, let’s try defining a class with trait B but without the requested class. No luck.
![]()
This time, trait B is directly extending its requested type, A, so its self type requirement has been met.
![]()
When our C class is instantiated, B.toString is invoked, which then invokes A.hi. The B trait is indeed used as a subtype of A here and can invoke one of its methods.
This example demonstrated the restrictions that self types add to traits. However, it didn’t really distinguish self types as an important feature, because the trait B could have just extended A directly.
Let’s try an example that demonstrates the benefit of self types. We’ll define a class that requires parameters and then create a trait that should only be used to extend the class:
scala> class TestSuite(suiteName: String) { def start() {} } ![]()
defined class TestSuite
scala> trait RandomSeeded { self: TestSuite => ![]()
| def randomStart() {
| util.Random.setSeed(System.currentTimeMillis)
| self.start()
| }
| }
defined trait RandomSeeded
scala> class IdSpec extends TestSuite("ID Tests") with RandomSeeded { ![]()
| def testId() { println(util.Random.nextInt != 1) }
| override def start() { testId() }
|
| println("Starting...")
| randomStart()
| }
defined class IdSpec
![]()
Here is the base class, TestSuite, which takes an input parameter.
![]()
Our trait needs to invoke TestSuite.start() but cannot extend TestSuite because it would require hardcoding the input parameter. By using a self type, the trait can expect to be a subtype of TestSuite without explicitly being declared as one.
![]()
The test class IdSpec defines our self-typed trait as a subclass, allowing its randomStart() to be invocable.
With self types, a trait can take advantage of extending a class without specifying its input parameters. It is also a safe way to add restrictions and/or requirements to your traits, ensuring they are only used in a specific context.
And now that we have studied a feature that can help to ensure safer and more stable type definitions, lets move on to something crazy: adding type definitions when you instantiate a class.
Instantiation with Traits
In this chapter we have used traits by having classes extend them, using the extends or with keyword in the class definition. The class that extends the trait will pick up the fields and methods of that trait, whether they are implemented by the trait or inherited from its own subtypes.
An alternate method for using traits is to add them to a class when the class is instantiated. A class defined without a dependency on, or even knowledge of, a given trait can take advantage of that trait’s functionality. The only catch is that traits added at a class’s instantiation extend the class, not the other way around. The left-to-right order of trait linearization includes the instantiated class in its ordering, so all of the traits extend the class and not the other way around.
You can add one or more traits to a class using the with keyword. The extends keyword cannot be used here, which is appropriate; your class is not actually extending the traits but instead being extended by them.
Let’s verify that a class instantiated with a trait becomes the base class of that trait, by using the self types we learned about in the previous section. Here is an example of a class extended by a trait with a self type of that class, ensuring that the trait will extend the class:
scala> class A
defined class A
scala> trait B { self: A => }
defined trait B
scala> val a = new A with B
a: A with B = $anon$1@26a7b76d
Our new instance, a, is given the class name $anon$1, a numerically based shortened version of the word “anonymous.” The instance’s class is indeed anonymous, because it contains a combination of a class and trait that are not formally included in any named class definition. More to the point, we created an instance where trait B extended trait A.
The real value in instantiating with traits is in adding new functionality or configurations to existing classes. This feature is commonly known as dependency injection, because the actual functionality the parent class is dependent on isn’t added until after the class definition, so the feature is “injected” into the class when instantiated. This also means that two instances of the class can operate under completely different configurations, because they may have had different configurable traits added during their instantiations.
Java developers may be familiar with the Spring or Google Guice, which perform a similar function via custom Java annotations and initialization modules. Scala’s traits, however, do not require any specific annotations or special packages to make dependency injection work. Just initialize a given class with another trait and you have a dependency-injected class that’s ready to go.
Let’s experiment with dependency injection by taking a data-oriented class common in most applications, User, and altering its output in new and mysterious ways:
scala> class User(val name: String) {
| def suffix = ""
| override def toString = s"$name$suffix"
| }
defined class User
scala> trait Attorney { self: User => override def suffix = ", esq." }
defined trait Attorney
scala> trait Wizard { self: User => override def suffix = ", Wizard" }
defined trait Wizard
scala> trait Reverser { override def toString = super.toString.reverse }
defined trait Reverser
scala> val h = new User("Harry P") with Wizard
h: User with Wizard = Harry P, Wizard
scala> val g = new User("Ginny W") with Attorney
g: User with Attorney = Ginny W, esq.
scala> val l = new User("Luna L") with Wizard with Reverser
l: User with Wizard with Reverser = draziW ,L anuL
Our three new users, who are completely nonfictitious and whose resemblance to fictitious characters is purely coincidental, have acquired either magical new titles or new ways of printing their name. The suffixes of “Wizard” and “esq” were hardcoded in traits, but added to separate user instances at instantiation time.
Adding traits to classes at instantiation time is a kind of replacement shortcut for defining classes to perform the same job. In our example we could have defined three new individual classes that combined the class and traits and used them instead. However, we gained flexibility and simplicity with these instantiation traits, and avoided writing unnecessary code. By adding traits at instantiation time an infinite number of functional combinations becomes available.
Importing Instance Members
In Accessing Packaged Classes we covered the use of the import keyword to add classes from external packages so they could be accessed without their package prefix. To wrap up this chapter on additional object-oriented features (notably objects, case classes, and traits), we’ll look at an additional way to use namespace importing.
The import keyword can also be used to import members of classes and objects into the current namespace. This makes it possible to access them directly without specifying their enclosing instance (for classes) or name (for objects).
The syntax for importing class and object members is the same as importing packaged classes. You can import a single member of a class instance by name, or the entire set of fields and methods with the underscore character. Importing fields and methods does not override privacy controls, so only those that would be normally accessible can be imported.
Here is an example of a case class’s members being imported for better accessibility:
scala> case class Receipt(id: Int, amount: Double, who: String, title: String)
defined class Receipt
scala> {
| val latteReceipt = Receipt(123, 4.12, "fred", "Medium Latte")
| import latteReceipt._
| println(s"Sold a $title for $amount to $who")
| }
Sold a Medium Latte for 4.12 to fred
By importing the fields from a value with a lengthy name, latteReceipt, we could access them directly in our println statement with a much simpler line of code.
Importing class and case class instance members can be tricky, however, when you are working with multiple instances. Importing members from multiple classes would create a naming conflict, so keeping the import statements close to where they are being used is a good practice to follow.
The fields and methods of objects can be imported in the same manner. In fact, we have already seen examples of importing object members in previous chapters. The members of the collection.JavaConverters object were imported in Java and Scala Collection Compatibility to demonstrate Java and Scala compatibility functions. Likewise, the global field of the concurrent.ExecutionContext.Implicits object was imported in Future Collections to enable the creation of new futures.
As an example of object imports, let’s add all of the methods from the util.Random object. This object extends the util.Random class, providing a single global instance that’s useful to use when you don’t need to set a new seed for random number generation:
scala> import util.Random._
import util.Random._
scala> val letters = alphanumeric.take(20).toList.mkString
letters: String = MwDR3EyHa1cr0JqsP9Tf
scala> val numbers = shuffle(1 to 20)
numbers: scala.collection.immutable.IndexedSeq[Int] = Vector(5, 10, 18, 1,
16, 8, 20, 14, 19, 11, 17, 3, 15, 7, 4, 9, 6, 12, 13, 2)
The alphanumeric(): Stream and shuffle(Traversable) methods, members of the util.Random object (and parent class), are here made accessible without their object’s prefix.
Importing instance members is a great way to streamline your code. Care must be taken to avoid naming conflicts, however, as well as any reductions in code readability. If readers of your code will get confused by the source of the imported members you are using, consider locating your import statement closer to the affected code.
Summary
While classes continue to be the core building block of Scala applications, they may be enhanced by traits and complemented or supplanted by objects. By supporting multiple inheritance by classes, traits extend the possibilities of highly reusable code. And based on the ordering of traits, in a class definition or at instantiation time, the possible varieties of functionality are staggering. Objects are less flexible than traits, but provide a built-in singleton mechanism with far less boilerplate than Java’s singleton tricks or its static members and classes.
To be more precise, case classes should be included with classes as the core building block of Scala applications. In many applications case classes are used exclusively in place of classes, because the extra features they bring outweigh their subclassing limitations. To be even more precise, case classes aren’t only classes. They also generate unseen companion objects. You may consider case class instances to be the same as class instances, but case classes overall are more than classes.
Every class instance and literal corresponds to a specific type. In this and the previous chapter you have learned how to create your own types with Scala. But a type is more than just a class. A class that takes a type parameter is a type, but every time it is instantiated with a type parameter, that too is a type. You can consider List, List[Int], and List[String] to all correspond to the same class even though they have different types. The same is true with a given class, and that class mixed in with a trait at instantiation.
In the next chapter we will sort out the difference between classes and types. We’ll also learn about new types that have been hidden by Scala’s expressive syntax, and cover ways to improve the flexibility and specifications of your classes.
Break—Configuring Your First Scala Project
At this point we have covered the main body of content for this chapter. Before starting with the exercises, however, we’ll need a short break to configure your first Scala project. The current approach of editing in the REPL and/or executing .scala files directly won’t work for the applications you’ll need to build.
With the introduction of objects as application entry points we now have a mechanism for executing our compiled code. We can compile classes in different files and packages and then access them from our application.
What we need now is a way to organize these dependencies and manage our project. Any code we run may have external dependencies such as Java and Scala libraries hosted in Maven repositories, local library dependencies, internal dependencies on our own code in other files and packages, and dependencies on the Scala libraries and runtimes. By using a dependency management and build tool, we can compile and execute against these dependencies while letting the tool handle library downloading and path configuration. We can also leverage dependency management to get our project imported into an Integrated Development Environment (or “IDE”), so we can edit and run code from the IDE or command line.
If you worked through the exercises in Chapter 7 (see Exercises) you’ll know what tool I’m talking about. It is the Simple Build Tool (SBT), a Scala-based dependency management and build tool that you can use to configure, compile, and execute the Scala code in your project. If you haven’t installed this tool yet, see Isn’t SBT Hard to Learn? for the instructions.
Now that you have SBT installed, create an empty project directory. To avoid naming your project “MyProject” or “Project1,” let’s use the exciting phrase “HardyHeron” as the project name. You may want to use this as the directory name as well.
Inside this new directory, run the following commands in your shell to add a command-line application and execute it:
[HardyHeron] > mkdir -p src/main/scala
[HardyHeron] > cat > src/main/scala/Hello.scala
object Hello {
def main(args: Array[String]) {
println("Hello from SBT")
}
}
[HardyHeron] > sbt run
[info] Set current project to hardyheron (in build file:~/HardyHeron/)
[info] Updating {file:~/HardyHeron/}hardyheron...
[info] Resolving org.fusesource.jansi#jansi;1.4 ...
[info] Done updating.
[info] Compiling 1 Scala source to ~/HardyHeron/target/scala-2.10/classes...
[info] Running Hello
Hello from SBT
[success] Total time: 3 s, completed June 6, 2014 10:38:08 PM
[HardyHeron] >
Did you notice that we were able to compile and run an application without a build script in place? SBT favors convention over configuration. Without a specific build script it will look for mainstream Scala code under src/main/scala and test-only Scala code under src/test/scala. The command sbt run invokes SBT with the “run” command, which executes any command-line application it can find in the code base.
Now let’s add a build script. Although we clearly don’t need one to compile and run an application, we will need it when we start adding external dependencies, i.e., external Java and Scala libraries. Let’s add it now to simplify the process of adding dependencies later.
SBT supports writing a build script in its own Scala-like script language, stored in the file build.sbt at the root level of the project. It also supports writing a build script in Scala, stored in the “project” directory, containing an object that extends its sbt.Build parent class. Both types of SBT build scripts use some nonstandard Scala operators such as assignments (:=) and dependency grouping (%). Fortunately, when you see them in context they will likely make sense.
As of this writing in 2014, the SBT documentation recommends using the first approach, writing a build.sbt in your project’s root directory. For this tutorial I’m going with the second approach, which may not be recommended but avoids the use of the SBT .sbt file format language in favor of the regular Scala syntax used in the second approach.
At the command line, run these commands to create a Scala-based build script and execute our “Hello” application. We’ll start with one external dependency, the ScalaTest testing framework:
[HardyHeron] > cat > project/HardyHeronBuild.scala
import sbt._ ![]()
import sbt.Keys._
object HardyHeronBuild extends Build ![]()
{
val hardyHeronDependencies = List(
"org.scalatest" % "scalatest_2.11" % "2.2.1" % "test" ![]()
)
val hardyHeronSettings = List( ![]()
name := "HardyHeron",
version := "1.0",
scalaVersion := "2.11.2",
libraryDependencies := hardyHeronDependencies
)
override lazy val settings = super.settings ++ hardyHeronSettings ![]()
}
[HardyHeron] >
[HardyHeron] > sbt compile
[info] Loading project definition from ~/HardyHeron/project
[info] Compiling 1 Scala source to ~/HardyHeron/project/target/scala-2.10/
sbt-0.13/classes...
[info] Set current project to hardyheron (in build file:~/HardyHeron/)
[info] Updating {file:~/HardyHeron/}hardyheron...
[info] Resolving jline#jline;2.12 ...
[info] downloading http://repo1.maven.org/maven2/org/scalatest/ ![]()
scalatest_2.11/2.2.1/scalatest_2.11-2.2.1.jar ...
[info] [SUCCESSFUL ] org.scalatest#scalatest_2.11;2.2.1!scalatest_2.11.jar
(bundle) (5232ms)
[info] Done updating.
[success] Total time: 7 s, completed June 7, 2014 12:49:44 AM
[HardyHeron] > sbt "run Hello" ![]()
[info] Loading project definition from ~/HardyHeron/project
[info] Set current project to hardyheron (in build file:~/HardyHeron/)
[info] Running Hello
Hello from SBT
[success] Total time: 0 s, completed June 7, 2014 12:58:43 AM
[HardyHeron] >
![]()
Import the contents of the sbt package and sbt.Keys at the top of Scala-based build files. This will pick up the Build base class, the property names (aka “settings”) like name and version, and the special SBT operators like :=, %, and %%.
![]()
The name of the object, and the filename, are up to you. SBT is just looking for subclasses of its sbt.Build class here.
![]()
This is the standard format for defining Maven/Ivy library (aka “artifact”) dependencies in SBT. The four components, in order, are the group, artifact, version, and the SBT component to which it applies, in this case to denote the library is for tests only. There are several public Maven repository search engines for finding libraries that include support for formatting the library as a dependency in SBT. The last component to note is the double-percent, %%, which instructs SBT to append _2.11 (the major version of Scala we are using) to the artifact name. Scala libraries are generally compiled for specific major versions of Scala such as 2.10 and 2.11, and this format is a standard Scala addition that denotes the target version of the library.
![]()
This is just a list of settings, using the operator := to define settings based on keys in sbt.Keys._.
![]()
The only field we’re directly overriding is the lazy val settings, a regular List of SBT configurations. We’ll start with the parent class’s settings and then add in our project’s settings.
![]()
Our ScalaTest library is downloaded from the main public Maven repository, installed in a cache in your user directory, and added to the JVM “classpath” when you next execute your application.
![]()
Let’s run “Hello” to verify our build is successful. Because we’ll be running this from the command line we’ll use double quotes to surround run-main Hello so that SBT interprets it as a single argument.
Now that we have a working build script, let’s import the project into an IDE. You’ll gain instant compilation, code analysis, and discoverability in a modern IDE. If you are more familiar with text-editing environments like Sublime Text, Vim, or Emacs, you should spend some time becoming familiar with working in an IDE. Although these text editors have extensions to support Scala development, you’ll likely find greater productivity gains with this statically typed language in an IDE that can anticipate and verify every line you write.
For this tutorial we’ll be using the IntelliJ IDEA 13 (or later) IDE. You can download its excellent community edition for free. Make sure to install at least version 13 and also IntelliJ’s Scala plug-in. You don’t need any third-party SBT plug-ins, because IntelliJ IDEA 13 with Scala can open SBT projects directly.
To import the project, open IntelliJ IDEA and choose “Open Project,” then select our “HardyHeron” project directory. In the “Import Project from SBT project” dialog, select all of the options and set the “Project SDK” to your installation of Java 1.8 (aka Java 8). If it doesn’t appear you may need to click “New…” to configure IntelliJ IDEA to support your Java installation. Figure 9-1 shows how this dialog should appear after you have selected the options.
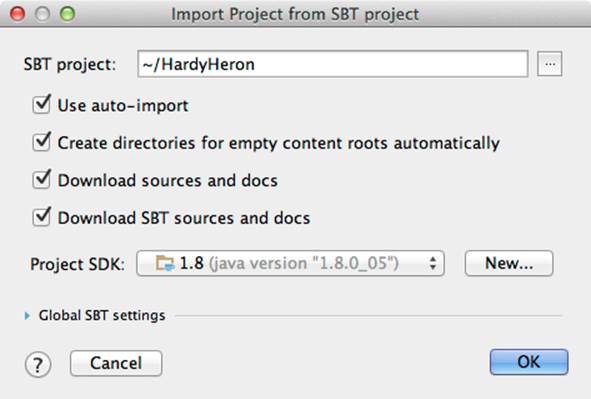
Figure 9-1. The Import Project dialog in IntelliJ IDEA 13
After importing the project, a project window should appear in IntelliJ IDEA. Navigate through the “Project” view (or select it from View → Tool Windows if it is not already open) until you find the Hello.scala file and open it up. You should see a view similar to Figure 9-2, with the project structure in the “Project” view and the source for the “Hello” class appearing with syntax highlighting to its right.

Figure 9-2. Viewing the project in IntelliJ IDEA
Now that we have the source loaded in the IDE, let’s run it from here. Right-click in the “Hello.scala” source view and select Run Hello. You should see the output message from the “Hello” application appear in a new view, “Run,” below the source.
At this point you should have a fully working SBT project up and running inside IntelliJ IDEA, and be able to add and edit your own classes, objects, and traits right here. If you haven’t used this IDE before, you may want to read more about it by visiting the IntelliJ IDEA product website. It has screencasts, tutorials, and guides that will help to explain many of the features you’ll encounter while working on the exercises in this chapter. We’ll just be using the most basic features in the IDE, but understanding how to take advantage of core IDE features can help you to better experiment with and explore the Scala language.
Now that you have Scala running in the IDE, it’s time to start some exercises.
Exercises
1. Let’s cover how to write a unit test in Scala with the ScalaTest framework. This exercise will consist of adding a test to the IDE, executing it, and verifying its successful outcome. If you’re already familiar with executing tests in an IDE this should be a fairly simple exercise. To better understand the ScalaTest framework, I recommend that you take a break from this exercise and browse the official documentation at the ScalaTest website.
We’ll start with the “HtmlUtils” object (see Objects). Create a new Scala class by right-clicking the src/main/scala directory in the IDE and selecting New → Scala Class. Type the name, HtmlUtils, and set the type to an object. Replace the skeleton object with the following source:
object HtmlUtils {
def removeMarkup(input: String) = {
input
.replaceAll("""</?\w[^>]*>""","")
.replaceAll("<.*>","")
}
}
The new HtmlUtils.scala file should be located in src/main/scala, the root directory for source code in our project. Now add a new “HtmlUtilsSpec” class under src/test/scala, creating the directory if necessary. Both SBT and IntelliJ will look for tests in this directory, a counterpart to the main src/main/scala directory. Add the following source to the HtmlUtilsSpec.scala file:
import org.scalatest._
class HtmlUtilsSpec extends FlatSpec with ShouldMatchers {
"The Html Utils object" should "remove single elements" in {
HtmlUtils.removeMarkup("<br/>") should equal("")
}
it should "remove paired elements" in {
HtmlUtils.removeMarkup("<b>Hi</b>") should equal("Hi")
}
it should "have no effect on empty strings" in {
val empty = true
HtmlUtils.removeMarkup("").isEmpty should be(empty)
}
}
We’re only using the FlatSpec and ShouldMatchers types from this package, but we will import everything so we can easily add additional test utilities in the future (such as “OptionValues,” a favorite of mine). The class FlatSpec is one of several different test types you can choose from, modeled after Ruby’s RSpec. ShouldMatchers adds the should and be operators to your test, creating a domain-specific language that can help make your tests more readable.
The first test starts off a bit differently from the other tests. With the FlatSpec, the first test in a file should start with a textual description of what you are testing in this file. Later tests will use the it keyword to refer to this description. This helps to create highly readable test reports.
In the test body, the equal operator ensures that the value preceding should is equal to its argument, here the empty string "". If not equal, it will cause the test to fail and exit immediately. Likewise, the be operator fails the test if the value before should isn’t the same instance, useful for comparing global instances like true, Nil, and None.
Before running the test, open the IntelliJ Plugins preference panel under Preferences and ensure that the “jUnit” plug-in is installed. The plug-in will ensure that your test results will be easily viewable and browsable.
Once you have added the test to your project, go ahead and compile it in the IDE. If it doesn’t compile, or it otherwise complains about the lack of a “ScalaTest” package, make sure your build script has the ScalaTest dependency and that you can view it in the “External Libraries” section of the “Project” view in IntelliJ.
Now we’ll run it. Right-click the test class’s name, HtmlUtilsSpec, and choose Run HtmlUtilsSpec. Executing the test will take no more than a few seconds, and if you entered the test and original application in correctly they will all be successful. Figure 9-3 shows how the test results should appear when the test completes.
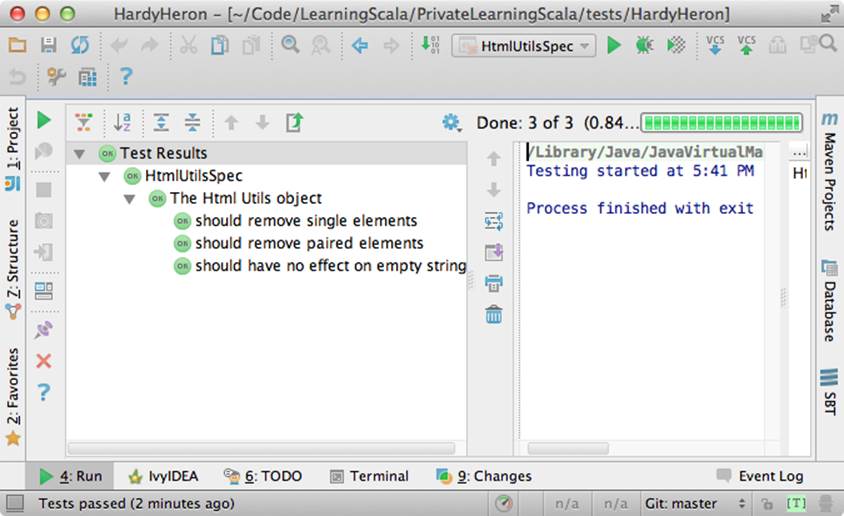
Figure 9-3. The Test Results view in IntelliJ IDEA
Let’s conclude this exercise with an actual exercise for you to implement: add additional tests to our HtmlUtilsSpec test class. Are there there any feature areas that aren’t yet tested? Are all valid HTML markup possibilities supported?
There’s also the question of whether JavaScript contained within “script” tags should be stripped or appear along with the rest of the text. Consider this a bug in the original version of HtmlUtils. Add a test to verify that the JavaScript text will be stripped out and then run the test. When it fails, fix HtmlUtils and rerun the test to verify it has been fixed.
Congratulations, you are now writing tests in Scala! Remember to keep writing tests as you work through the rest of the exercises in this book, using them to assert how your solutions should work and to catch any (unforseeable!) bugs in them.
2. Let’s work on a different example from this chapter. Create a new Scala trait titled “SafeStringUtils” and add the following source:
3. trait SafeStringUtils {
4. // Returns a trimmed version of the string wrapped in an Option,
5. // or None if the trimmed string is empty.
6. def trimToNone(s: String): Option[String] = {
7. Option(s) map(_.trim) filterNot(_.isEmpty)
8. }
}
Verify that the trait compiles in the IDE. If it all works, complete the following steps:
a. Create an object version of the trait.
b. Create a test class, SafeStringUtilsSpec, to test the SafeStringUtils.trimToNone() method. Verify that it trims strings and safely handles null and empty strings. You should have three to five separate tests in your test class. Run the test class and verify it completes successfully.
c. Add a method that safely converts a string to an integer, without throwing an error if the string is unparseable. Write and execute tests for valid and invalid input. What are the most appropriate monadic collections to use in this function?
d. Add a method that safely converts a string to a long, without throwing an error if the string is unparseable. Write and execute tests for valid and invalid input. What are the most appropriate monadic collections to use in this function?
e. Add a method that returns a randomly generated string of the given size, limited to only upper- and lowercase letters. Write and execute tests that verify the correct contents are return and that invalid input is handled. Are there any appropriate monadic collections to use in this function?
9. Write a command-line application that will search and replace text inside files. The input arguments are a search pattern, a regular expression, the replacement text, and one or more files to search.
a. Start by writing a skeleton command-line application that parses the input arguments: the search pattern, the replacement text arguments, and the files to process as a list of strings. Print these out to verify you have captured them correctly.
b. Execute this skeleton application by running it from the command line with sbt "run-main <object name> <input arguments>". The input arguments must be in the same double quotes as the “run-main” argument so that the SBT tool reads it all as a single command. You can also run it from the IDE by selecting Run → Run… and creating a runtime configuration. Runtime configurations allow you to specify the input arguments once, or else to show the entire configuration every time it is executed. Verify that your search pattern, replacement text, and list of files is successfully parsed.
c. Implement the core of the application by reading each input file, searching for and replacing the specified pattern, and then printing the result out to the console. Try this with a few input files to verify your pattern gets replaced.
d. Now write the modified text back to the file it was read from. Here is an example of using the Java library to write a string to a file:
e. import java.io._
f. val writer = new PrintWriter(new File("out.txt"))
g. writer.write("Hello, World!\nHere I am!")
writer.close()
h. Make your application safer to use by having it create a backup of its input files before modifying them. You can create a backup by first writing the unmodified contents out to a file with the input’s name plus .bak. Use new java.io.File(<file name>).exists() to ensure that the backup file’s name does not exist before creating it. You can try incremental numbers such as .bak1 and .bak2" to find unique backup filenames.
i. Create a test class and write tests to verify that your application will work as expected. The core functionality of your application should be invocable as methods without actually launching the application. Make sure the functionality is broken down into methods of a readable and manageable size, and then write individual tests for the core methods as well as the main method. To end the exercise, run your tests and verify they all succeed, then run your application from the command line with a test file.
10.Write an application that summarizes a file. It will take a single text file as input and print an overall summary including the number of characters, words, and paragraphs as well as a list of the top 20 words by usage.
The application should be smart enough to filter out nonwords. Parsing a Scala file should reveal words, for example, and not special characters such as “{” or “//”. It should also be able to count paragraphs that have real content versus empty space.
Write tests that use your own multiline strings to verify the output. Your application should be modularized into discrete methods for easier testing. You should be able to write a test that gives the string “this is is not a test” and receives an instance that will reveal the word “is” as the top used word.
To really test out your knowledge of this chapter’s contents, make sure to use objects, traits, and case classes in your solution.
11.Write an application that reports on the most recently closed issues in a given GitHub project. The input arguments should include the repository name, project name, and an optional number of issues to report with a default value of 10. The output will have a report header and display each issue’s number, title, username, number of comments, and label names. The output should be well-formatted, with fixed-width columns delimited with pipes (|) and a header delimited with equals signs (=).
You’ll need to read in the issues from the GitHub API (see exercise 7 in Exercises for information on reading a URL’s contents), parse the JSON values, and then print a detailed format. Here is an example URL for returning the 10 most recent closed issues from the official Scala project on GitHub:
https://api.github.com/repos/scala/scala/issues?state=closed&per_page=10
We’ll use the Json4s library to parse the JSON response into a list of our own case classes. First, add this dependency to your build script and rebuild the project:
"org.json4s" %% "json4s-native" % "3.2.10"
This can go either before or after the ScalaTest dependency. IntelliJ should pick up the change, download the library, and rebuild your project. If it is not doing so, open the SBT view in IntelliJ and refresh the project, or run sbt clean compile from the command line.
The JSON response from the API is rather large, but you don’t need to parse all of the fields. You should design a case class that contains the exact fields you want to parse from the JSON, using the Option type for nullable or optional fields. When you parse the JSON response, Json4s will insert only the fields you have defined in your case class and ignore the rest.
Here is an example of using Json4s to parse the “labels” array from the larger GitHub issue document. If you study the output from the API for a single record, you should be able to design a series of case classes that will only contain the information you need. Note that the JSON document returned by the API is an array, so you will probably need to invoke the extract method with a List (e.g., extract[List[GithubIssue]]):
import org.json4s.DefaultFormats ![]()
import org.json4s.native.JsonMethods ![]()
val jsonText = """
{
"labels": [
{
"url": "https://api.github.com/repos/scala/scala/labels/tested",
"name": "tested",
"color": "d7e102"
}
]
}
"""
case class Label(url: String, name: String) ![]()
case class LabelDocument(labels: List[Label]) ![]()
implicit val formats = DefaultFormats ![]()
val labelDoc = JsonMethods.parse(jsonText).extract[LabelDocument] ![]()
val labels = labelDoc.labels
val firstLabel = labels.headOption.map(_.name)
![]()
DefaultFormats has support for common date formats as well as numbers and strings.
![]()
We’re using the “native” JSON parser in JsonMethods to parse JSON documents and extract them into case class instances.
![]()
A “Label” is what I’m calling an item in the “labels” JSON array. Note that I didn’t need to specify the “color” field.
![]()
The total JSON document has a single field, “labels,” so we need a case class that represents the document.
![]()
The implicit keyword is one we’ll study in Chapter 10. I’m sorry to spring this on you before we have had a chance to cover it, but you’ll need this line to ensure that Json4s can parse your JSON document.
![]()
JsonMethods parses the JSON text to its own intermediate format, which can then be extracted with a given case class.
12.This exercise depends on the previous exercise being finished. Once you have the completed GitHub report application, let’s work on refactoring it for better reusability and reliability.
a. Start by writing tests for the GitHub report to verify the correct behavior of each component. How much of the logic in the application can you test if your computer lacked an Internet connection? You should be able to test most of the logic without being able to actually connect to the GitHub site.
b. Refactor the JSON handling code out to its own trait, e.g., “JsonSupport.” Write tests to verify that it parses JSON code correctly, and handles exceptions that may be thrown by the Json4s library. Would it be useful to provide an object version of this trait?
c. Do the same for the web handling code. Create your own “HtmlClient” trait and object that can take a URL and return the content as a list of strings. Can you include the server’s status response in a class along with the content? Make sure to write tests to verify the web handling code can prevent any exceptions from being thrown.
d. Finally, refactor your report generation code, the part that handles the clean fixed-width columns, into a reusable trait. Can it take a tuple of any size and print out its contents? Is there a more appropriate data type that it should take, one that supports variable numbers of columns but knows how to print out strings versus double values? Make sure your report generation code takes the maximum line width as an argument.
All materials on the site are licensed Creative Commons Attribution-Sharealike 3.0 Unported CC BY-SA 3.0 & GNU Free Documentation License (GFDL)
If you are the copyright holder of any material contained on our site and intend to remove it, please contact our site administrator for approval.
© 2016-2026 All site design rights belong to S.Y.A.