SketchUp For Dummies (2017)
Part 1
Getting Started with SketchUp
Chapter 2
Getting a Running Start
IN THIS CHAPTER
![]() Starting at the right place in SketchUp
Starting at the right place in SketchUp
![]() Building a simple model
Building a simple model
![]() Changing the way the model looks
Changing the way the model looks
![]() Exporting a JPEG file that you can e-mail
Exporting a JPEG file that you can e-mail
If you can’t wait to get your hands dirty (so to speak), you’ve come to the right chapter. Here we help you make a simple model step by step, spin it around, paint it, and even apply styles and shadows. You don’t need to read another word of this book to be able to follow along, although we do refer you to chapters where you can find out more. Above all, following along with the basic project in this chapter can help you understand how SketchUp’s basic features work together and enable you to produce a knockout model in no time!
So what are you going to build? Perhaps a doghouse. The nice thing about doghouses is that they’re a lot like peoplehouses in the ways that count: They have doors and roofs, and just about everybody has seen one.
 One last thing: Just about every other piece of this book is written so that you can jump around to the bits you need; you don’t have to follow a particular order. This chapter is the exception. If you want to follow along, start on this page and work your way to the end. Otherwise, the steps just won’t make sense.
Setting Up Your Workspace
We know — setup is boring. Who wants to flip through menus and options dialog boxes instead of jumping in? We completely agree, so we keep this short and sweet. This section is just about making sure you start at the right place. That’s it.
Follow these steps to get ready:
1. Launch SketchUp.
The Welcome to SketchUp dialog box appears, as shown in Figure 2-1 . The dialog box looks a little different in SketchUp Make versus SketchUp Pro, but the steps for setting up your workspace work the same in either version.
2. Open the Template area by clicking the arrow next to its name, select one of the Architectural Design templates, and click the Start Using SketchUp button.
A new SketchUp file opens.
If the Welcome to SketchUp dialog box doesn’t appear, someone (maybe you) has told the dialog box not to show up automatically on startup. Choose Help ⇒ Welcome to SketchUp from the menu bar, select an Architectural Design template, and click the Start Using SketchUp button. Then choose File ⇒ New to open a new file with the template you selected.
3. Make sure that you can see the Getting Started toolbar.
Figure 2-2 shows the Getting Started toolbar. If it’s not visible in your modeling window, choose View ⇒ Toolbars ⇒ Getting Started to make it show up. If you’re on a Mac, choose View ⇒ Show Toolbar.
4. Clear your modeling window.
If your computer has run SketchUp already, you may see dialog boxes all over the place. If that’s the case, put everything back where it belongs by resetting your workspace:
1. Choose Window ⇒ Preferences (Microsoft Windows) or SketchUp ⇒ Preferences (Mac OS X).
2. In the Preferences dialog box, select Workspace panel on the left.
3. Click the Reset Workspace button.
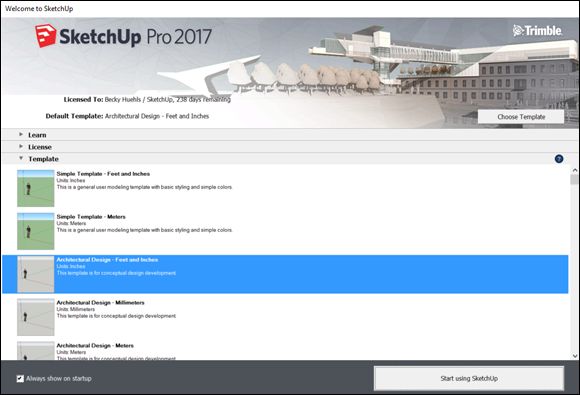
FIGURE 2-1: The Welcome to SketchUp dialog box.
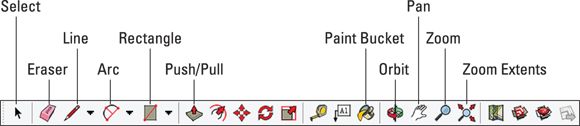
FIGURE 2-2: The Getting Started toolbar lives at the top of your modeling window.
Making a Quick Model
Figure 2-3 shows what your computer screen looks like at this point. You should see a row of tools across the top of your modeling window, a little person, and three colored modeling axes — red, green, and blue lines.
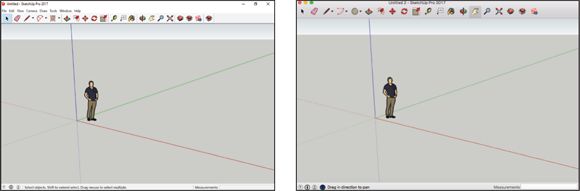
FIGURE 2-3: This is what your screen should look like in Windows (left) and on a Mac (right).
Follow these steps to build a doghouse:
1. ![]() Delete the little person on your screen.
Delete the little person on your screen.
Using the Select tool (the arrow on the far left of your toolbar), click the little person to select him or her. (The person changes with each version of SketchUp. In SketchUp 2016, the person is Lisanne. In SketchUp 2017, you see Chris.) Then choose Edit ⇒ Delete.
2. Choose Camera ⇒ Standard Views ⇒ Iso.
This command switches you to an isometric (3D) view of your model, which allows you to build something without having to “move around.”
3. ![]() Draw a rectangle on the ground.
Draw a rectangle on the ground.
Use the Rectangle tool (refer to Figure 2-2 ) to draw a rectangle by doing the following:
1. Click once to place one corner on the left side of your screen.
2. Click again to place the opposite corner on the right side of your screen.
Remember that you’re in a 3D perspective, or view of the world, so your rectangle looks more like a diamond — 90-degree angles don’t look like 90-degree angles in perspective. Figure 2-4 shows what you should aim for in this step.
 It’s important to draw the right kind of rectangle for this example (or for any model you’re trying to create in Perspective view), so try it a few times until it looks like the rectangle in Figure 2-4 . To go back a step, choose Edit ⇒ Undo Rectangle (or press Ctrl+Z). You can use Undo to go back as many steps as you like.
4. ![]() Select the Push/Pull tool and extrude your rectangle into a box by clicking the rectangle and then clicking again somewhere above the rectangle.
Select the Push/Pull tool and extrude your rectangle into a box by clicking the rectangle and then clicking again somewhere above the rectangle.
At this point, your model should look like Figure 2-5 ; if it doesn’t, use Push/Pull again to make your box look about the right height.
If you’re happily pushing/pulling away on your box and everything suddenly disappears, you pushed/pulled the top of your box all the way to the ground. Just choose Edit ⇒ Undo and keep going.
5. ![]() Select the Line tool and draw two diagonal lines for your roof, as shown in Figure 2-6 .
Select the Line tool and draw two diagonal lines for your roof, as shown in Figure 2-6 .
Here’s a step-by-step explanation of how to draw the lines:
1. Click once at the midpoint of the top of your box’s front face to start your line.
You know you’re at the midpoint when you see a small, light blue dot and the word Midpoint appears. In SketchUp, these tips are called inferences. Move slowly to make sure that you see the Midpoint inference.
2. Click again somewhere along one of the side edges of your box’s front face to end your line.
Wait until you see a red On Edge inference before you click; if you don’t, your new line won’t end on the edge where it needs to be.
3. Repeat the previous two steps to draw a similar but opposite line from the midpoint to the edge on the other side of the face.
Don’t worry about making your diagonal lines symmetrical; for the purposes of this exercise, it’s not important that they are.
6. Push/pull the triangles away to leave a sloped roof.
Use the Push/Pull tool (the same one you use in Step 4) to get rid of the triangular parts of your box, leaving you with a sloped roof. Have a look at Figure 2-7 to see this in action and then follow these steps:
1. Choose Edit ⇒ Select None to make sure you don’t have anything selected in your model. If this menu option is grayed out, you’re good to go.
2. Select the Push/Pull tool and then click the right triangular face once to start the push/pull operation.
3. Move your cursor to the right to push the triangle as far as it will go (so that it’s even with the end of your box).
4. Click again (on the triangle) to end the push/pull operation and to make the triangular face disappear.
5. Still using the Push/Pull tool, double-click the left triangular face to repeat the previous push/pull operation, making that face disappear as well.
7. Draw a rectangle on your front face.
Switch back to the Rectangle tool (which you used in Step 3) and draw a rectangle on the front face of your pointy box. Make sure that the bottom of your rectangle is flush with the bottom of your box by watching for the red On Edge inference to appear before you click. Figure 2-8 shows what your model looks like when you’re done.
Using the Rectangle tool is a two-step process: You click once to place one corner and again to place the opposite corner. Avoid drawing lines and shapes by dragging your cursor. In SketchUp, doing so makes modeling more difficult. Practice clicking once to start an operation, such as drawing a rectangle, and clicking again to stop.
8. ![]() Draw an arc on top of the rectangle you just drew.
Draw an arc on top of the rectangle you just drew.
Use the 2 Point Arc tool to draw an arc on top of your rectangle, as illustrated in Figure 2-9 . Follow these steps to draw an arc:
1. Click the upper-left corner of the rectangle to place one endpoint of your arc. Make sure that you see the green Endpoint inference before you click.
2. Click the upper-right corner of the rectangle to place the other endpoint of your arc.
3. Move your cursor up to bow out the line you’re drawing into an arc and then click when you’re happy with how the arc looks.
9. ![]() Select the Eraser tool and then click the horizontal line between the rectangle and the arc to erase that line.
Select the Eraser tool and then click the horizontal line between the rectangle and the arc to erase that line.
10.Push/pull the doorway inward.
Use the Push/Pull tool (which you’re an old hand with by now) to push in the “doorway” face you created in Steps 7 through 9 just a bit.
Use the Push/Pull tool by clicking a face once to start, moving your cursor to push/pull it in or out, and then clicking again to stop.
11.Erase the horizontal line at the bottom of the doorway by clicking it with the Eraser tool.
This makes the line (and the whole face above it) disappear. Figure 2-10 shows what your finished doghouse looks like.
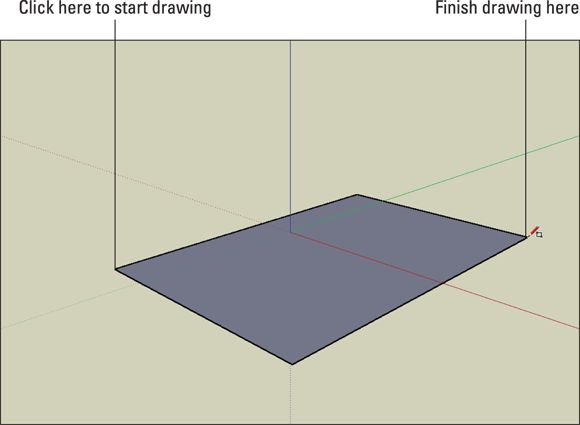
FIGURE 2-4: Draw a 3D rectangle on the ground.
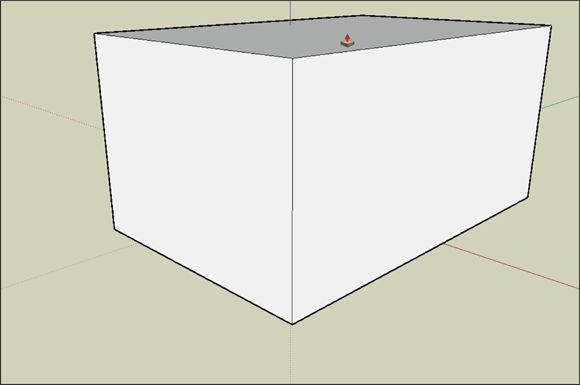
FIGURE 2-5: Use the Push/Pull tool to extrude your rectangle into a box.

FIGURE 2-6: Draw two diagonal lines that will become your peaked roof.
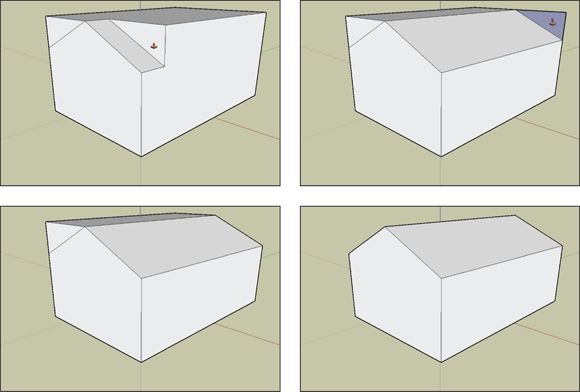
FIGURE 2-7: Use the Push/Pull tool to form a peaked roof on your box.
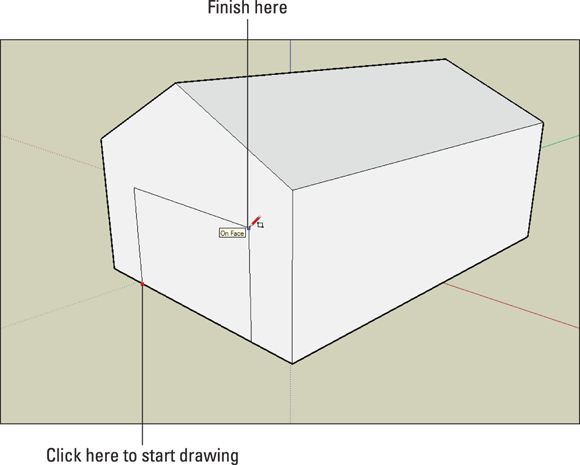
FIGURE 2-8: A rectangle drawn on the front of your pointy box.
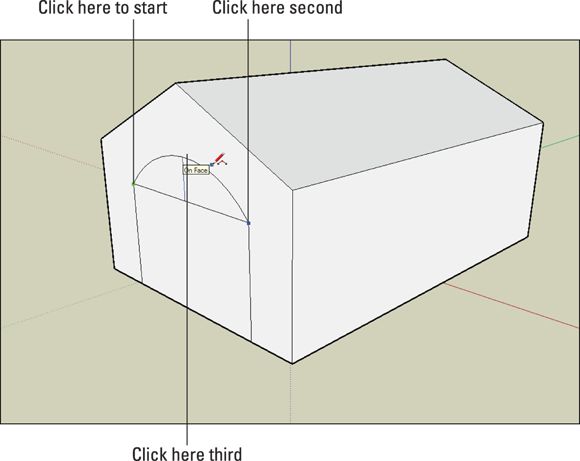
FIGURE 2-9: Draw an arc on top of your rectangle.
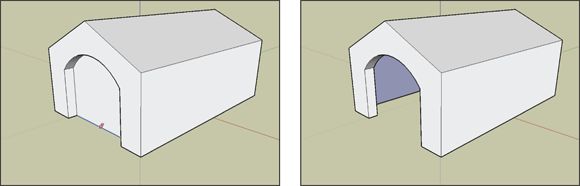
FIGURE 2-10: Create the door opening by erasing its bottom edge.
For a more detailed introduction to drawing lines and working with midpoints, angles, and more, flip to Chapter 3 .
Slapping On Some Paint
We have an ulterior motive for getting you to paint your doghouse: To color it, you have to understand how to spin it around first. Moving around your model is the most important skill to develop when you’re first figuring out SketchUp. Run through these steps to apply colors (and textures) to the faces in your model, and to find out about moving around while you’re doing it:
1. In Windows, open the Materials panel by clicking the right-pointing arrow next to its name in the Default Tray. On a Mac, choose Window ⇒ Materials.
You see the Windows and Mac versions of the Materials panel in Figure 2-11 .
2. Click a color or texture you like.
![]() When you do, you automatically pick up the Paint Bucket tool and fill it with your chosen material.
When you do, you automatically pick up the Paint Bucket tool and fill it with your chosen material.
3. Paint some of the faces in your model by clicking any face with the Paint Bucket tool.
4. Switch materials.
Choose another material from the Materials panel by clicking it.
5. Paint the rest of the faces you can see.
Loop through Steps 2 to 4 for as long as you like. Finding the Materials panel in SketchUp is like getting a brand-new box of crayons when you were little (you know, the big box, with the built-in sharpener).
6. ![]() Select the Orbit tool; it’s on the toolbar, just to the left of the creepy hand (also known as the Pan tool).
Select the Orbit tool; it’s on the toolbar, just to the left of the creepy hand (also known as the Pan tool).
7. Click somewhere on the left side of your screen and drag your cursor over to the right, as shown in Figure 2-12 . Release your mouse button when you’re done.
Your model spins, or orbits! Orbit around some more, just to get the hang of it.
If you’re orbiting, and you’ve dragged your cursor over as far as it will go, and you haven’t orbited as much as you wanted to, don’t fret. Just release the mouse button, move your cursor over to where it was when you started orbiting, and orbit some more by clicking and dragging. To see what you want to see, you usually need a bunch of separate drags (separate orbits, I guess).
8. ![]() Zoom in and out if you need to by selecting the Zoom tool and dragging your cursor up and down in your modeling window.
Zoom in and out if you need to by selecting the Zoom tool and dragging your cursor up and down in your modeling window.
Dragging up zooms in, and dragging down zooms out.
You can also zoom in and out by rolling the scroll wheel on your mouse. If you have a Mac with a Magic Mouse, the scrolling gestures work like a scroll wheel.
9. ![]() If needed, move around in two dimensions with the Pan tool by selecting it and then clicking and dragging the Pan cursor inside your modeling window.
If needed, move around in two dimensions with the Pan tool by selecting it and then clicking and dragging the Pan cursor inside your modeling window.
Use Pan to slide your model around inside your modeling window without spinning it or making it look bigger or smaller. You can pan in any direction.
10.Use the Orbit, Zoom, Pan, and Paint Bucket tools to finish painting your doghouse.
Now that you know how to move around your model, try painting the different parts these specific colors, as shown in Figure 2-13 :
o Paint the exterior walls red-brown.
o Paint the roof light blue.
o Paint the interior yellow-orange.
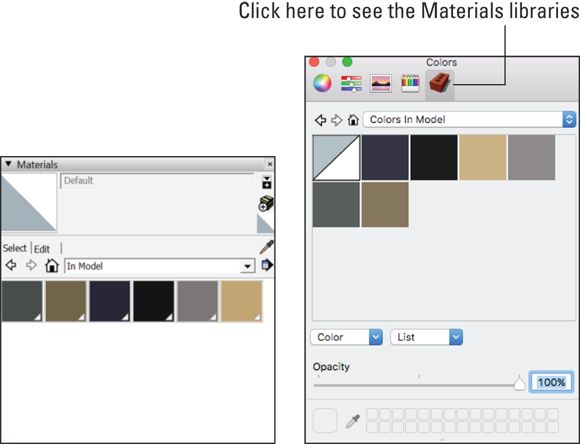
FIGURE 2-11: The Materials panel in Windows (left) and on a Mac (right).
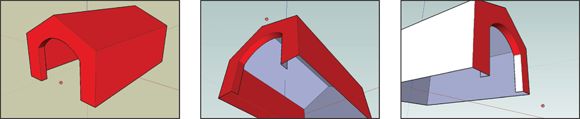
FIGURE 2-12: Choose the Orbit tool and drag your cursor to spin your model.
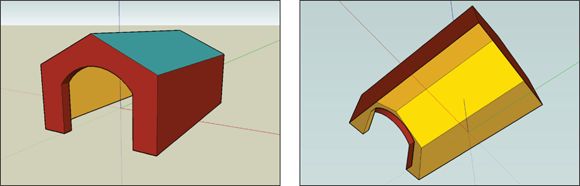
FIGURE 2-13: Orbit (spin) your model to paint all the faces.
When you’re just starting out, you can easily become a little lost with the navigation tools (Orbit, Zoom, and Pan). If you find yourself in a pickle, choose Camera ⇒ Zoom Extents. SketchUp plunks your model right in front of you, as shown in Figure 2-14 . Just so you know, Zoom Extents is also a button on the toolbar; it’s right next to the Zoom tool.
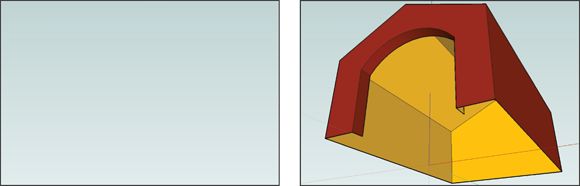
FIGURE 2-14: Use Zoom Extents anytime you can’t figure out where your model went.
For more details about using SketchUp’s drawing tools, Chapter 3 walks you through many basic drawing and modeling skills. After you’re comfortable with the techniques in Chapter 3 , explore the details about modeling buildings in Chapter 4 or the tips on modeling parts and shapes in Chapter 6 .
Giving Your Model Some Style
SketchUp Styles enable you to change your model’s appearance — the way it’s drawn, basically — with just a few mouse clicks. SketchUp also comes with a library of premade styles that you can use without knowing anything about how they work. (After you discover how styles work, you might want to try creating your own, as explained in Chapter 10 .)
Follow these steps to try a couple styles on your doghouse:
1. Open the Styles panel by clicking the right-pointing arrow next to its name in the Default Tray (Windows). Or choose Window ⇒ Styles (Mac).
By default, you see the Select tab, which is where you can browse and select styles. At the top of the Select tab, a drop-down list enables you to open different style libraries. The styles in each library appear in the bottom half of the Select tab.
2. From the drop-down list, choose the Assorted Styles library, as shown in Figure 2-15 .
3. Click a style to see how it changes your model’s whole appearance.
You can click through the different styles to see what your options are. Figure 2-16 shows the doghouse with a few styles applied — can you figure out which ones?
4. ![]() Go back to your original style by clicking the In Model icon and selecting the Architectural Design style.
Go back to your original style by clicking the In Model icon and selecting the Architectural Design style.
In the Styles panel, clicking the In Model icon displays a list of all the styles you’ve applied to your model. The Architectural Design style should be first in the list. Chapter 10 explains styles in more detail.
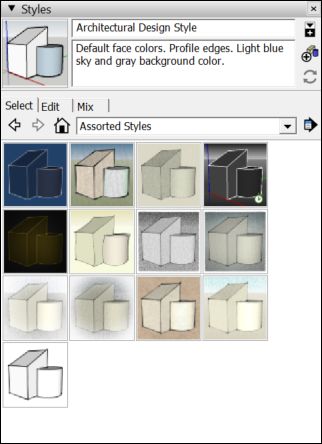
FIGURE 2-15: The Assorted Styles library is a sampler of ready-mixed SketchUp styles.

FIGURE 2-16: The same doghouse with four very different styles applied to it.
Switching On the Sun
You’re about to use what we consider to be one of SketchUp’s best features: Shadows. When you turn on Shadows, you’re activating SketchUp’s built-in sun. The shadows you see in your modeling window are accurate for whatever time and location you set.
Ready to shine light on your model? Follow these steps:
1. Use Orbit, Zoom, and Pan to get an aerial, three-quarter view of your doghouse, sort of like the view shown in Figure 2-17 .
2. Click the right-pointing arrow next to the Shadows panel in the default tray (Windows). Or choose Window ⇒ Shadows (Mac).
You see the Shadow Settings panel. (Refer to Figure 2-17 .)
3. Click the Show/Hide Shadows button (in the upper-left corner) to toggle on the sun.
Your doghouse casts a shadow on the ground.
4. Move the Time slider back and forth.
Changing the time of day means that you’re moving SketchUp’s sun around in the sky. When the sun moves around, so do your shadows. To see accurate shadows, you also have to geolocate your model, which is a fancy way of saying that you give it a latitude. Chapter 10 explains how to create accurate shadow studies.
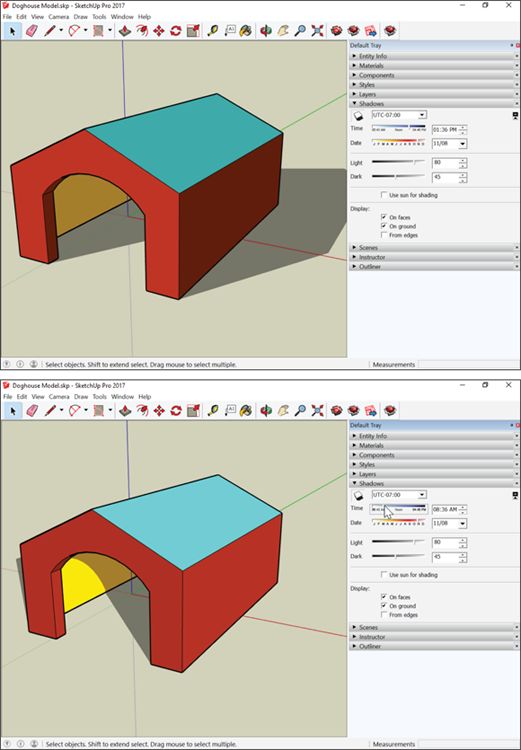
FIGURE 2-17: Use Orbit, Zoom, and Pan to navigate around until your model looks something like this.
Sharing Your Masterpiece
Now that you have a model that looks about the way you want it to, you probably want to show it to someone. The easiest way is to export a JPEG image that you can attach to an e-mail. Follow these steps, and you’re on your way:
1. Navigate around (using Orbit, Zoom, and Pan) until you like the view of your model that you see in your modeling window.
2. Choose File ⇒ Export ⇒ 2D Graphic.
3. In the Export dialog box that opens, choose to export the graphic as a JPEG.
4. Pick a location on your computer and give your exported image a name.
5. Click the Export button to create a JPEG image of what’s visible in your modeling window.
Exporting a JPEG file is just one way to share models. To find out about all your options, see Part 4 , which explains how to share your model on the SketchUp 3D Warehouse, as a printout, as an image or animation, as part of a multipage document, or as a slick presentation that will (hopefully) impress all your friends.
All materials on the site are licensed Creative Commons Attribution-Sharealike 3.0 Unported CC BY-SA 3.0 & GNU Free Documentation License (GFDL)
If you are the copyright holder of any material contained on our site and intend to remove it, please contact our site administrator for approval.
© 2016-2026 All site design rights belong to S.Y.A.