Swift Academy: The Stress Free Way To Learning Swift Inside & Out (2014)
Chapter 3. The Data Types in Swift
This chapter will focus on the data types that you’ll encounter while using Swift. Read this material carefully since it will help you learn the basics of Swift in just 2 weeks.
Type Inference and Type Safety
The Swift programming language is “type safe.” The term “type safe” means you can set specific rules for the values that you can use in your codes. Basically, if your code is set to receive string values, it won’t accept integers that may be entered by mistake.
As a type safe language, Swift conducts a “type check” during code compilation. It will notify you about all the errors present in your codes. This feature helps you to detect and resolve problems even in the earliest parts of the development procedure.
Type-checking becomes extremely important when you are dealing with various kinds of values. It does not mean, however, that you need to indicate the type of each variable or constant that you’ll declare. Swift can use its built-in feature called type inference to identify the correct value types automatically. In this feature, Swift deduces the correct data types by analyzing the values you have entered.
Unlike C and Objective-C, Swift does not need you to declare the data types you are using. It is true that you still need to indicate your variables and constants explicitly. However, the system completes most of the type specification tasks for you.
Integers
An integer is a whole number without any fractional component. You can also use it as a signed or unsigned value.
The Swift language offers signed and unsigned integers in different forms (i.e. 8-bit, 16-bit, 32-bit, and 64-bit forms). Just like in C, integers in Swift are named based on their form (e.g. 8-bit signed integers are called Int8, 16-bit unsigned integers are called UInt16, etc.).
Integer Bounds
You can use the max and min properties of an integer to access its maximum and minimum values.
Int
Often, you don’t have to choose a specific integer size for your codes. The Swift language offers an extra integer type, called “Int,” with a size that is equal to that of the current platform. Basically, Int is equal to Int8 if you are using an 8-bit platform. If you are using a 16-bit platform, on the other hand, Int is equal to Int16.
According to expert programmers, you should use Int to represent integer values in your Swift codes. This approach adds flexibility and consistency to your programs.
UInt
Swift also offers UInt, the unsigned version of Int. UInt’s size is equal to that of the current platform, thus, UInt is equal to UInt16 if you’re using a 16-bit platform.
Important Note: You should only use UInt if you need an unsigned integer that has the same size as the current platform. That means you have to use Int even if the values you are working on are non-negative. Using Int consistently helps in attaining code flexibility, minimal type conversion and better inference for integers.
Floating-Point Numbers
A floating-point number is a number that has a fractional part (e.g. 3.14, 0.5, -1.25, etc.). This data type is better than integers in terms of value-compatibility and storage size. The Swift programming language offers two floating-point numbers, both of which are signed. These floating-point numbers are:
· Float – It represents 32-bit floating-point numbers. In general, you should use a double floating-point number if you don’t need the precision offered by 64-bit systems.
· Double – It represents 64-bit floating-point numbers. This is your best option when working with large values or those that require topnotch precision.
Numeric Literals
In Swift, you can write integer literals as:
· Decimal numbers, without any prefix
· Octal numbers, with 0o (i.e. zero and the letter “o”) as the prefix
· Hexadecimal numbers, with 0x (i.e. zero and the letter “x”) as the prefix
· Binary numbers, with ob (i.e. zero and the letter “b”) as the prefix.
You can write floating-point literals as decimal or hexadecimal numbers. Make sure that all decimal points have numbers on both sides. Additionally, a floating-point literal can include an exponent portion.
Converting Integers
The numbers that you can keep in an integer variable or constant depends on the numeric type that you are dealing with. For example, Int8 variables or constants can keep numbers between 127 and -128. UInt8 variables or constants, on the other hand, can keep numbers from 1 to 255. Swift will consider all numbers that don’t fit into the numeric type as errors.
Since numeric types differ in terms of the value that they can store, you have to implement numeric type conversion using a case-to-case basis. This approach helps in preventing errors and showing type conversions in your codes.
When converting a certain numeric type to another, you should declare a new number that belongs to the type you want to use. The code snippet given below will help you understand this concept.
let oneHundred: UInt16 = 1_00
let two: UInt8 = 2
let oneHundredTwo = oneHundred + UInt16(two)
In this code snippet, the constant named “oneHundred” belongs to the UInt16 type. The constant named “one”, meanwhile, belongs to the UInt8 type. These constants are of different types so you can’t add them together directly. Rather, the code invokes UInt16(two) to generate a new number that belongs to the UInt16 type. Then, it assigns the value of the constant “two” to the newly created number.
Since you are now dealing with numbers that belong to the same type, Swift will allow you to conduct addition. The resulting constant, which is named “oneHundredTwo”, will inherit the value type of its “parents.”
Boolean Values
The Boolean data type that you can use in Swift is called “Bool.” A Boolean value is considered as “logical,” since it can only be either true or false. The Swift language offers two constant values for the Boolean type. These values are “true” and “false.” The example given below will teach you how to initialize Boolean values:
let IamCool = true
let YouAreUgly = false
Swift will consider “IamCool” and “YouAreUgly” as Bool since these constants were created using the Boolean values. Just like UInt and Float, you won’t have to declare variables or constants as Boolean if you will assign the correct values during the initialization process. With the help of type inference, Swift will automatically know that you are initializing Boolean values.
A Boolean value becomes extremely useful when you are dealing with a conditional statement. Here’s an example:
if YouAreUgly {
println(“That’s unfortunate!”)
} else {
println(“Great!”)
Important Note: You’ll learn more about conditional statements in a later chapter.
The language’s built-in “type safety” feature makes sure that non-Boolean values won’t be used as Bool. The code snippet given below will produce an error during compilation:
let m = 6
if m {
// the system cannot compile this code
Tuples
A tuple groups several values into one. In Swift, you can use tuples to combine values of any type.
The code snippet given below creates a tuple named “2 big for you”.
let quote = (2 “big for you”)
// quote belongs to the “Int string” data type and is equal to “2 big for you”.
Swift allows you to create tuples using any type permutation. You can also combine any number of data types in your Swift codes. That means you can create tuples using the following formats: (Bool, Bool, Bool), (Bool, String, Int), (String, Int, Int,) etc.
This programming language lets you divide tuples into their components. Once done, you can access or manipulate each type as usual. The following example will illustrate this idea:
let (number, text) = quote
println(1 + 1 = \(number))
//prints 1 + 1 = 2
println(“That shirt is too \(text)”)
// prints “That shirt is too big for you”
Optionals
Programmers use Optionals when working with values that may not be present. Basically, an optional states that:
· A value exists and it is equal to n
or
· No value exists
Important Note: Other programming languages (e.g. C, Java, Objective-C, etc.) don’t have this feature.
If Statements and Optionals
Swift allows you to use “if statements” to check if an Optional holds a value. If the optional is holding a value, the statement will return “true”. If the optional doesn’t hold any value, however, the “if statement” will return “false”.
After ascertaining that a value exists inside an Optional, you may access that value by appending “!” to the last character of the Optional’s identifier. The Swift language reads “!” as: the optional has a value; that value should be used. iOS programmers refer to this feature as “forced unwrapping.”
How to Bind an Optional
You may bind an optional to determine if it holds a value or not. If the optional is holding a value, you may convert that value into a temporary variable or constant. Most programmers combine this feature with “switch” and “if” statements to determine the existence of a value inside an optional and to use that value as a variable or constant. You’ll learn more about switch statements later in this book.
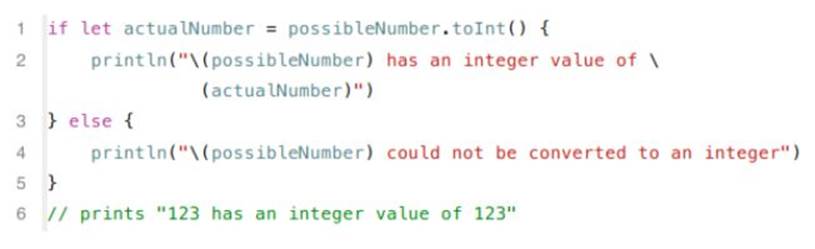
When writing an optional binding for an “if statement,” use the following syntax:
if let name_of_the_constant = name_of_the_optional {
the_statements_you_want_to_use
}
Here’s an example:
All materials on the site are licensed Creative Commons Attribution-Sharealike 3.0 Unported CC BY-SA 3.0 & GNU Free Documentation License (GFDL)
If you are the copyright holder of any material contained on our site and intend to remove it, please contact our site administrator for approval.
© 2016-2026 All site design rights belong to S.Y.A.