Automate the Boring Stuff with Python: Practical Programming for Total Beginnerso (2015)
Part II. Automating Tasks
Chapter 18. Controlling the Keyboard and Mouse with GUI Automation
Knowing various Python modules for editing spreadsheets, downloading files, and launching programs is useful, but sometimes there just aren’t any modules for the applications you need to work with. The ultimate tools for automating tasks on your computer are programs you write that directly control the keyboard and mouse. These programs can control other applications by sending them virtual keystrokes and mouse clicks, just as if you were sitting at your computer and interacting with the applications yourself. This technique is known as graphical user interface automation, or GUI automation for short. With GUI automation, your programs can do anything that a human user sitting at the computer can do, except spill coffee on the keyboard.
Think of GUI automation as programming a robotic arm. You can program the robotic arm to type at your keyboard and move your mouse for you. This technique is particularly useful for tasks that involve a lot of mindless clicking or filling out of forms.
The pyautogui module has functions for simulating mouse movements, button clicks, and scrolling the mouse wheel. This chapter covers only a subset of PyAutoGUI’s features; you can find the full documentation at http://pyautogui.readthedocs.org/.
Installing the pyautogui Module
The pyautogui module can send virtual keypresses and mouse clicks to Windows, OS X, and Linux. Depending on which operating system you’re using, you may have to install some other modules (called dependencies) before you can install PyAutoGUI.
§ On Windows, there are no other modules to install.
§ On OS X, run sudo pip3 install pyobjc-framework-Quartz, sudo pip3 install pyobjc-core, and then sudo pip3 install pyobjc.
§ On Linux, run sudo pip3 install python3-xlib and sudo apt-get scrot. (Scrot is a screenshot program that PyAutoGUI uses.)
After these dependencies are installed, run pip install pyautogui (or pip3 on OS X and Linux) to install PyAutoGUI.
Appendix A has complete information on installing third-party modules. To test whether PyAutoGUI has been installed correctly, run import pyautogui from the interactive shell and check for any error messages.
Staying on Track
Before you jump in to a GUI automation, you should know how to escape problems that may arise. Python can move your mouse and type keystrokes at an incredible speed. In fact, it might be too fast for other programs to keep up with. Also, if something goes wrong but your program keeps moving the mouse around, it will be hard to tell what exactly the program is doing or how to recover from the problem. Like the enchanted brooms from Disney’s The Sorcerer’s Apprentice, which kept filling — and then overfilling — Mickey’s tub with water, your program could get out of control even though it’s following your instructions perfectly. Stopping the program can be difficult if the mouse is moving around on its own, preventing you from clicking the IDLE window to close it. Fortunately, there are several ways to prevent or recover from GUI automation problems.
Shutting Down Everything by Logging Out
Perhaps the simplest way to stop an out-of-control GUI automation program is to log out, which will shut down all running programs. On Windows and Linux, the logout hotkey is CTRL-ALT-DEL. On OS X, it is ![]() -SHIFT-OPTION-Q. By logging out, you’ll lose any unsaved work, but at least you won’t have to wait for a full reboot of the computer.
-SHIFT-OPTION-Q. By logging out, you’ll lose any unsaved work, but at least you won’t have to wait for a full reboot of the computer.
Pauses and Fail-Safes
You can tell your script to wait after every function call, giving you a short window to take control of the mouse and keyboard if something goes wrong. To do this, set the pyautogui.PAUSE variable to the number of seconds you want it to pause. For example, after setting pyautogui.PAUSE = 1.5, every PyAutoGUI function call will wait one and a half seconds after performing its action. Non-PyAutoGUI instructions will not have this pause.
PyAutoGUI also has a fail-safe feature. Moving the mouse cursor to the upper-left corner of the screen will cause PyAutoGUI to raise the pyautogui.FailSafeException exception. Your program can either handle this exception with try and except statements or let the exception crash your program. Either way, the fail-safe feature will stop the program if you quickly move the mouse as far up and left as you can. You can disable this feature by setting pyautogui.FAILSAFE = False. Enter the following into the interactive shell:
>>> import pyautogui
>>> pyautogui.PAUSE = 1
>>> pyautogui.FAILSAFE = True
Here we import pyautogui and set pyautogui.PAUSE to 1 for a one-second pause after each function call. We set pyautogui.FAILSAFE to True to enable the fail-safe feature.
Controlling Mouse Movement
In this section, you’ll learn how to move the mouse and track its position on the screen using PyAutoGUI, but first you need to understand how PyAutoGUI works with coordinates.
The mouse functions of PyAutoGUI use x- and y-coordinates. Figure 18-1 shows the coordinate system for the computer screen; it’s similar to the coordinate system used for images, discussed in Chapter 17. The origin, where x and y are both zero, is at the upper-left corner of the screen. The x-coordinates increase going to the right, and the y-coordinates increase going down. All coordinates are positive integers; there are no negative coordinates.
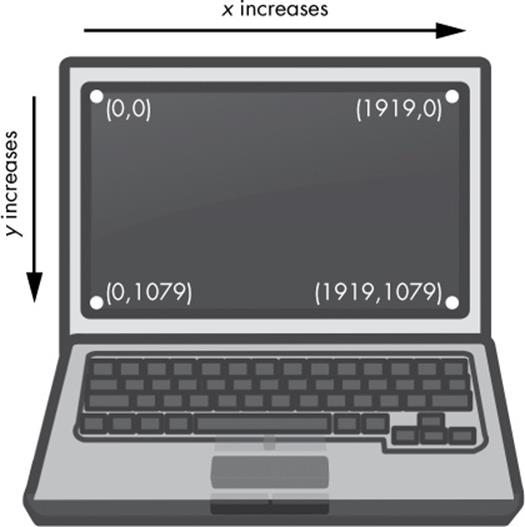
Figure 18-1. The coordinates of a computer screen with 1920×1080 resolution
Your resolution is how many pixels wide and tall your screen is. If your screen’s resolution is set to 1920×1080, then the coordinate for the upper-left corner will be (0, 0), and the coordinate for the bottom-right corner will be (1919, 1079).
The pyautogui.size() function returns a two-integer tuple of the screen’s width and height in pixels. Enter the following into the interactive shell:
>>> import pyautogui
>>> pyautogui.size()
(1920, 1080)
>>> width, height = pyautogui.size()
pyautogui.size() returns (1920, 1080) on a computer with a 1920×1080 resolution; depending on your screen’s resolution, your return value may be different. You can store the width and height from pyautogui.size() in variables like width and height for better readability in your programs.
Moving the Mouse
Now that you understand screen coordinates, let’s move the mouse. The pyautogui.moveTo() function will instantly move the mouse cursor to a specified position on the screen. Integer values for the x- and y-coordinates make up the function’s first and second arguments, respectively. An optional duration integer or float keyword argument specifies the number of seconds it should take to move the mouse to the destination. If you leave it out, the default is 0 for instantaneous movement. (All of the duration keyword arguments in PyAutoGUI functions are optional.) Enter the following into the interactive shell:
>>> import pyautogui
>>> for i in range(10):
pyautogui.moveTo(100, 100, duration=0.25)
pyautogui.moveTo(200, 100, duration=0.25)
pyautogui.moveTo(200, 200, duration=0.25)
pyautogui.moveTo(100, 200, duration=0.25)
This example moves the mouse cursor clockwise in a square pattern among the four coordinates provided a total of ten times. Each movement takes a quarter of a second, as specified by the duration=0.25 keyword argument. If you hadn’t passed a third argument to any of thepyautogui.moveTo() calls, the mouse cursor would have instantly teleported from point to point.
The pyautogui.moveRel() function moves the mouse cursor relative to its current position. The following example moves the mouse in the same square pattern, except it begins the square from wherever the mouse happens to be on the screen when the code starts running:
>>> import pyautogui
>>> for i in range(10):
pyautogui.moveRel(100, 0, duration=0.25)
pyautogui.moveRel(0, 100, duration=0.25)
pyautogui.moveRel(-100, 0, duration=0.25)
pyautogui.moveRel(0, -100, duration=0.25)
pyautogui.moveRel() also takes three arguments: how many pixels to move horizontally to the right, how many pixels to move vertically downward, and (optionally) how long it should take to complete the movement. A negative integer for the first or second argument will cause the mouse to move left or upward, respectively.
Getting the Mouse Position
You can determine the mouse’s current position by calling the pyautogui.position() function, which will return a tuple of the mouse cursor’s x and y positions at the time of the function call. Enter the following into the interactive shell, moving the mouse around after each call:
>>> pyautogui.position()
(311, 622)
>>> pyautogui.position()
(377, 481)
>>> pyautogui.position()
(1536, 637)
Of course, your return values will vary depending on where your mouse cursor is.
Project: “Where Is the Mouse Right Now?”
Being able to determine the mouse position is an important part of setting up your GUI automation scripts. But it’s almost impossible to figure out the exact coordinates of a pixel just by looking at the screen. It would be handy to have a program that constantly displays the x- and y-coordinates of the mouse cursor as you move it around.
At a high level, here’s what your program should do:
§ Display the current x- and y-coordinates of the mouse cursor.
§ Update these coordinates as the mouse moves around the screen.
This means your code will need to do the following:
§ Call the position() function to fetch the current coordinates.
§ Erase the previously printed coordinates by printing \b backspace characters to the screen.
§ Handle the KeyboardInterrupt exception so the user can press CTRL-C to quit.
Open a new file editor window and save it as mouseNow.py.
Step 1: Import the Module
Start your program with the following:
#! python3
# mouseNow.py - Displays the mouse cursor's current position.
import pyautogui
print('Press Ctrl-C to quit.')
#TODO: Get and print the mouse coordinates.
The beginning of the program imports the pyautogui module and prints a reminder to the user that they have to press CTRL-C to quit.
Step 2: Set Up the Quit Code and Infinite Loop
You can use an infinite while loop to constantly print the current mouse coordinates from mouse.position(). As for the code that quits the program, you’ll need to catch the KeyboardInterrupt exception, which is raised whenever the user presses CTRL-C. If you don’t handle this exception, it will display an ugly traceback and error message to the user. Add the following to your program:
#! python3
# mouseNow.py - Displays the mouse cursor's current position.
import pyautogui
print('Press Ctrl-C to quit.')
try:
while True:
# TODO: Get and print the mouse coordinates.
➊ except KeyboardInterrupt:
➋ print('\nDone.')
To handle the exception, enclose the infinite while loop in a try statement. When the user presses CTRL-C, the program execution will move to the except clause ➊and Done. will be printed in a new line ➋.
Step 3: Get and Print the Mouse Coordinates
The code inside the while loop should get the current mouse coordinates, format them to look nice, and print them. Add the following code to the inside of the while loop:
#! python3
# mouseNow.py - Displays the mouse cursor's current position.
import pyautogui
print('Press Ctrl-C to quit.')
--snip--
# Get and print the mouse coordinates.
x, y = pyautogui.position()
positionStr = 'X: ' + str(x).rjust(4) + ' Y: ' + str(y).rjust(4)
--snip--
Using the multiple assignment trick, the x and y variables are given the values of the two integers returned in the tuple from pyautogui.position(). By passing x and y to the str() function, you can get string forms of the integer coordinates. The rjust() string method will right-justify them so that they take up the same amount of space, whether the coordinate has one, two, three, or four digits. Concatenating the right-justified string coordinates with 'X: ' and ' Y: ' labels gives us a neatly formatted string, which will be stored in positionStr.
At the end of your program, add the following code:
#! python3
# mouseNow.py - Displays the mouse cursor's current position.
--snip--
print(positionStr, end='')
➊ print('\b' * len(positionStr), end='', flush=True)
This actually prints positionStr to the screen. The end='' keyword argument to print() prevents the default newline character from being added to the end of the printed line. It’s possible to erase text you’ve already printed to the screen — but only for the most recent line of text. Once you print a newline character, you can’t erase anything printed before it.
To erase text, print the \b backspace escape character. This special character erases a character at the end of the current line on the screen. The line at ➊ uses string replication to produce a string with as many \b characters as the length of the string stored in positionStr, which has the effect of erasing the positionStr string that was last printed.
For a technical reason beyond the scope of this book, always pass flush=True to print() calls that print \b backspace characters. Otherwise, the screen might not update the text as desired.
Since the while loop repeats so quickly, the user won’t actually notice that you’re deleting and reprinting the whole number on the screen. For example, if the x-coordinate is 563 and the mouse moves one pixel to the right, it will look like only the 3 in 563 is changed to a 4.
When you run the program, there will be only two lines printed. They should look like something like this:
Press Ctrl-C to quit.
X: 290 Y: 424
The first line displays the instruction to press CTRL-C to quit. The second line with the mouse coordinates will change as you move the mouse around the screen. Using this program, you’ll be able to figure out the mouse coordinates for your GUI automation scripts.
Controlling Mouse Interaction
Now that you know how to move the mouse and figure out where it is on the screen, you’re ready to start clicking, dragging, and scrolling.
Clicking the Mouse
To send a virtual mouse click to your computer, call the pyautogui.click() method. By default, this click uses the left mouse button and takes place wherever the mouse cursor is currently located. You can pass x- and y-coordinates of the click as optional first and second arguments if you want it to take place somewhere other than the mouse’s current position.
If you want to specify which mouse button to use, include the button keyword argument, with a value of 'left', 'middle', or 'right'. For example, pyautogui.click(100, 150, button='left') will click the left mouse button at the coordinates (100, 150), while pyautogui.click(200, 250, button='right') will perform a right-click at (200, 250).
Enter the following into the interactive shell:
>>> import pyautogui
>>> pyautogui.click(10, 5)
You should see the mouse pointer move to near the top-left corner of your screen and click once. A full “click” is defined as pushing a mouse button down and then releasing it back up without moving the cursor. You can also perform a click by calling pyautogui.mouseDown(), which only pushes the mouse button down, and pyautogui.mouseUp(), which only releases the button. These functions have the same arguments as click(), and in fact, the click() function is just a convenient wrapper around these two function calls.
As a further convenience, the pyautogui.doubleClick() function will perform two clicks with the left mouse button, while the pyautogui.rightClick() and pyautogui.middleClick() functions will perform a click with the right and middle mouse buttons, respectively.
Dragging the Mouse
Dragging means moving the mouse while holding down one of the mouse buttons. For example, you can move files between folders by dragging the folder icons, or you can move appointments around in a calendar app.
PyAutoGUI provides the pyautogui.dragTo() and pyautogui.dragRel() functions to drag the mouse cursor to a new location or a location relative to its current one. The arguments for dragTo() and dragRel() are the same as moveTo() and moveRel(): the x-coordinate/horizontal movement, the y-coordinate/vertical movement, and an optional duration of time. (OS X does not drag correctly when the mouse moves too quickly, so passing a duration keyword argument is recommended.)
To try these functions, open a graphics-drawing application such as Paint on Windows, Paintbrush on OS X, or GNU Paint on Linux. (If you don’t have a drawing application, you can use the online one at http://sumopaint.com/.) I will use PyAutoGUI to draw in these applications.
With the mouse cursor over the drawing application’s canvas and the Pencil or Brush tool selected, enter the following into a new file editor window and save it as spiralDraw.py:
import pyautogui, time
➊ time.sleep(5)
➋ pyautogui.click() # click to put drawing program in focus
distance = 200
while distance > 0:
➌ pyautogui.dragRel(distance, 0, duration=0.2) # move right
➍ distance = distance - 5
➎ pyautogui.dragRel(0, distance, duration=0.2) # move down
➏ pyautogui.dragRel(-distance, 0, duration=0.2) # move left
distance = distance - 5
pyautogui.dragRel(0, -distance, duration=0.2) # move up
When you run this program, there will be a five-second delay ➊ for you to move the mouse cursor over the drawing program’s window with the Pencil or Brush tool selected. Then spiralDraw.py will take control of the mouse and click to put the drawing program in focus ➋. A window is infocus when it has an active blinking cursor, and the actions you take — like typing or, in this case, dragging the mouse — will affect that window. Once the drawing program is in focus, spiralDraw.py draws a square spiral pattern like the one in Figure 18-2.
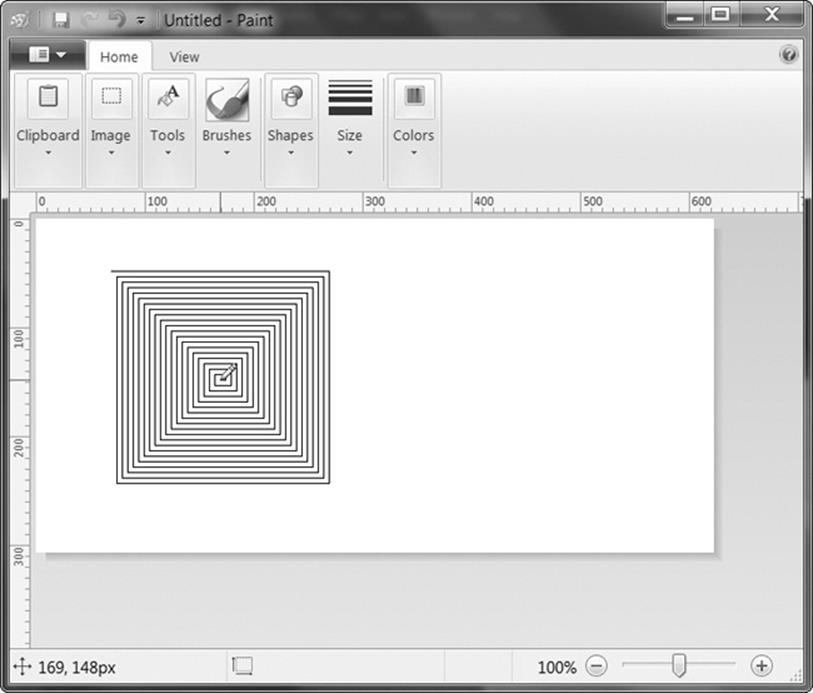
Figure 18-2. The results from the pyautogui.dragRel() example
The distance variable starts at 200, so on the first iteration of the while loop, the first dragRel() call drags the cursor 200 pixels to the right, taking 0.2 seconds➌. distance is then decreased to 195 ➍, and the second dragRel() call drags the cursor 195 pixels down ➎. The third dragRel() call drags the cursor –195 horizontally (195 to the left) ➏, distance is decreased to 190, and the last dragRel() call drags the cursor 190 pixels up. On each iteration, the mouse is dragged right, down, left, and up, and distance is slightly smaller than it was in the previous iteration. By looping over this code, you can move the mouse cursor to draw a square spiral.
You could draw this spiral by hand (or rather, by mouse), but you’d have to work slowly to be so precise. PyAutoGUI can do it in a few seconds!
NOTE
You could have your code draw the image using the pillow module’s drawing functions — see Chapter 17 for more information. But using GUI automation allows you to make use of the advanced drawing tools that graphics programs can provide, such as gradients, different brushes, or the fill bucket.
Scrolling the Mouse
The final PyAutoGUI mouse function is scroll(), which you pass an integer argument for how many units you want to scroll the mouse up or down. The size of a unit varies for each operating system and application, so you’ll have to experiment to see exactly how far it scrolls in your particular situation. The scrolling takes place at the mouse cursor’s current position. Passing a positive integer scrolls up, and passing a negative integer scrolls down. Run the following in IDLE’s interactive shell while the mouse cursor is over the IDLE window:
>>> pyautogui.scroll(200)
You’ll see IDLE briefly scroll upward — and then go back down. The downward scrolling happens because IDLE automatically scrolls down to the bottom after executing an instruction. Enter this code instead:
>>> import pyperclip
>>> numbers = ''
>>> for i in range(200):
numbers = numbers + str(i) + '\n'
>>> pyperclip.copy(numbers)
This imports pyperclip and sets up an empty string, numbers. The code then loops through 200 numbers and adds each number to numbers, along with a newline. After pyperclip.copy(numbers), the clipboard will be loaded with 200 lines of numbers. Open a new file editor window and paste the text into it. This will give you a large text window to try scrolling in. Enter the following code into the interactive shell:
>>> import time, pyautogui
>>> time.sleep(5); pyautogui.scroll(100)
On the second line, you enter two commands separated by a semicolon, which tells Python to run the commands as if they were on separate lines. The only difference is that the interactive shell won’t prompt you for input between the two instructions. This is important for this example because we want to the call to pyautogui.scroll() to happen automatically after the wait. (Note that while putting two commands on one line can be useful in the interactive shell, you should still have each instruction on a separate line in your programs.)
After pressing ENTER to run the code, you will have five seconds to click the file editor window to put it in focus. Once the pause is over, the pyautogui.scroll() call will cause the file editor window to scroll up after the five-second delay.
Working with the Screen
Your GUI automation programs don’t have to click and type blindly. PyAutoGUI has screenshot features that can create an image file based on the current contents of the screen. These functions can also return a Pillow Image object of the current screen’s appearance. If you’ve been skipping around in this book, you’ll want to read Chapter 17 and install the pillow module before continuing with this section.
On Linux computers, the scrot program needs to be installed to use the screenshot functions in PyAutoGUI. In a Terminal window, run sudo apt-get install scrot to install this program. If you’re on Windows or OS X, skip this step and continue with the section.
Getting a Screenshot
To take screenshots in Python, call the pyautogui.screenshot() function. Enter the following into the interactive shell:
>>> import pyautogui
>>> im = pyautogui.screenshot()
The im variable will contain the Image object of the screenshot. You can now call methods on the Image object in the im variable, just like any other Image object. Enter the following into the interactive shell:
>>> im.getpixel((0, 0))
(176, 176, 175)
>>> im.getpixel((50, 200))
(130, 135, 144)
Pass getpixel() a tuple of coordinates, like (0, 0) or (50, 200), and it’ll tell you the color of the pixel at those coordinates in your image. The return value from getpixel() is an RGB tuple of three integers for the amount of red, green, and blue in the pixel. (There is no fourth value for alpha, because screenshot images are fully opaque.) This is how your programs can “see” what is currently on the screen.
Analyzing the Screenshot
Say that one of the steps in your GUI automation program is to click a gray button. Before calling the click() method, you could take a screenshot and look at the pixel where the script is about to click. If it’s not the same gray as the gray button, then your program knows something is wrong. Maybe the window moved unexpectedly, or maybe a pop-up dialog has blocked the button. At this point, instead of continuing — and possibly wreaking havoc by clicking the wrong thing — your program can “see” that it isn’t clicking on the right thing and stop itself.
PyAutoGUI’s pixelMatchesColor() function will return True if the pixel at the given x- and y-coordinates on the screen matches the given color. The first and second arguments are integers for the x- and y-coordinates, and the third argument is a tuple of three integers for the RGB color the screen pixel must match. Enter the following into the interactive shell:
>>> import pyautogui
>>> im = pyautogui.screenshot()
➊ >>> im.getpixel((50, 200))
(130, 135, 144)
➋ >>> pyautogui.pixelMatchesColor(50, 200, (130, 135, 144))
True
➌ >>> pyautogui.pixelMatchesColor(50, 200, (255, 135, 144))
False
After taking a screenshot and using getpixel() to get an RGB tuple for the color of a pixel at specific coordinates ➊, pass the same coordinates and RGB tuple to pixelMatchesColor() ➋, which should return True. Then change a value in the RGB tuple and call pixelMatchesColor() again for the same coordinates➌. This should return false. This method can be useful to call whenever your GUI automation programs are about to call click(). Note that the color at the given coordinates must exactly match. If it is even slightly different — for example, (255, 255, 254) instead of(255, 255, 255) — then pixelMatchesColor() will return False.
Project: Extending the mouseNow Program
You could extend the mouseNow.py project from earlier in this chapter so that it not only gives the x- and y-coordinates of the mouse cursor’s current position but also gives the RGB color of the pixel under the cursor. Modify the code inside the while loop of mouseNow.py to look like this:
#! python3
# mouseNow.py - Displays the mouse cursor's current position.
--snip--
positionStr = 'X: ' + str(x).rjust(4) + ' Y: ' + str(y).rjust(4)
pixelColor = pyautogui.screenshot().getpixel((x, y))
positionStr += ' RGB: (' + str(pixelColor[0]).rjust(3)
positionStr += ', ' + str(pixelColor[1]).rjust(3)
positionStr += ', ' + str(pixelColor[2]).rjust(3) + ')'
print(positionStr, end='')
--snip--
Now, when you run mouseNow.py, the output will include the RGB color value of the pixel under the mouse cursor.
Press Ctrl-C to quit.
X: 406 Y: 17 RGB: (161, 50, 50)
This information, along with the pixelMatchesColor() function, should make it easy to add pixel color checks to your GUI automation scripts.
Image Recognition
But what if you do not know beforehand where PyAutoGUI should click? You can use image recognition instead. Give PyAutoGUI an image of what you want to click and let it figure out the coordinates.
For example, if you have previously taken a screenshot to capture the image of a Submit button in submit.png, the locateOnScreen() function will return the coordinates where that image is found. To see how locateOnScreen() works, try taking a screenshot of a small area on your screen; then save the image and enter the following into the interactive shell, replacing 'submit. png' with the filename of your screenshot:
>>> import pyautogui
>>> pyautogui.locateOnScreen('submit.png')
(643, 745, 70, 29)
The four-integer tuple that locateOnScreen() returns has the x-coordinate of the left edge, the y-coordinate of the top edge, the width, and the height for the first place on the screen the image was found. If you’re trying this on your computer with your own screenshot, your return value will be different from the one shown here.
If the image cannot be found on the screen, locateOnScreen() will return None. Note that the image on the screen must match the provided image perfectly in order to be recognized. If the image is even a pixel off, locateOnScreen() will return None.
If the image can be found in several places on the screen, locateAllOnScreen() will return a Generator object, which can be passed to list() to return a list of four-integer tuples. There will be one four-integer tuple for each location where the image is found on the screen. Continue the interactive shell example by entering the following (and replacing 'submit.png' with your own image filename):
>>> list(pyautogui.locateAllOnScreen('submit.png'))
[(643, 745, 70, 29), (1007, 801, 70, 29)]
Each of the four-integer tuples represents an area on the screen. If your image is only found in one area, then using list() and locateAllOnScreen() just returns a list containing one tuple.
Once you have the four-integer tuple for the area on the screen where your image was found, you can click the center of this area by passing the tuple to the center() function to return x- and y-coordinates of the area’s center. Enter the following into the interactive shell, replacing the arguments with your own filename, four-integer tuple, and coordinate pair:
>>> pyautogui.locateOnScreen('submit.png')
(643, 745, 70, 29)
>>> pyautogui.center((643, 745, 70, 29))
(678, 759)
>>> pyautogui.click((678, 759))
Once you have center coordinates from center(), passing the coordinates to click() should click the center of the area on the screen that matches the image you passed to locateOnScreen().
Controlling the Keyboard
PyAutoGUI also has functions for sending virtual keypresses to your computer, which enables you to fill out forms or enter text into applications.
Sending a String from the Keyboard
The pyautogui.typewrite() function sends virtual keypresses to the computer. What these keypresses do depends on what window and text field have focus. You may want to first send a mouse click to the text field you want in order to ensure that it has focus.
As a simple example, let’s use Python to automatically type the words Hello world! into a file editor window. First, open a new file editor window and position it in the upper-left corner of your screen so that PyAutoGUI will click in the right place to bring it into focus. Next, enter the following into the interactive shell:
>>> pyautogui.click(100, 100); pyautogui.typewrite('Hello world!')
Notice how placing two commands on the same line, separated by a semicolon, keeps the interactive shell from prompting you for input between running the two instructions. This prevents you from accidentally bringing a new window into focus between the click() and typewrite() calls, which would mess up the example.
Python will first send a virtual mouse click to the coordinates (100, 100), which should click the file editor window and put it in focus. The typewrite() call will send the text Hello world! to the window, making it look like Figure 18-3. You now have code that can type for you!
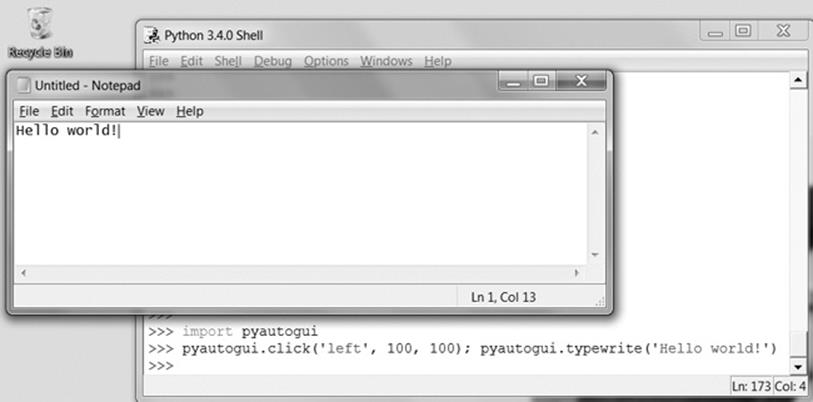
Figure 18-3. Using PyAutogGUI to click the file editor window and type Hello world! into it
By default, the typewrite() function will type the full string instantly. However, you can pass an optional second argument to add a short pause between each character. This second argument is an integer or float value of the number of seconds to pause. For example,pyautogui.typewrite('Hello world!', 0.25) will wait a quarter-second after typing H, another quarter-second after e, and so on. This gradual typewriter effect may be useful for slower applications that can’t process keystrokes fast enough to keep up with PyAutoGUI.
For characters such as A or !, PyAutoGUI will automatically simulate holding down the SHIFT key as well.
Key Names
Not all keys are easy to represent with single text characters. For example, how do you represent SHIFT or the left arrow key as a single character? In PyAutoGUI, these keyboard keys are represented by short string values instead: 'esc' for the ESC key or 'enter' for the ENTER key.
Instead of a single string argument, a list of these keyboard key strings can be passed to typewrite(). For example, the following call presses the A key, then the B key, then the left arrow key twice, and finally the X and Y keys:
>>> pyautogui.typewrite(['a', 'b', 'left', 'left', 'X', 'Y'])
Because pressing the left arrow key moves the keyboard cursor, this will output XYab. Table 18-1 lists the PyAutoGUI keyboard key strings that you can pass to typewrite() to simulate pressing any combination of keys.
You can also examine the pyautogui.KEYBOARD_KEYS list to see all possible keyboard key strings that PyAutoGUI will accept. The 'shift' string refers to the left SHIFT key and is equivalent to 'shiftleft'. The same applies for 'ctrl', 'alt', and 'win' strings; they all refer to the left-side key.
Table 18-1. PyKeyboard Attributes
|
Keyboard key string |
Meaning |
|
'a', 'b', 'c', 'A', 'B', 'C', '1', '2', '3', '!', '@', '#', and so on |
The keys for single characters |
|
'enter' (or 'return' or '\n') |
The ENTER key |
|
'esc' |
The ESC key |
|
'shiftleft', 'shiftright' |
The left and right SHIFT keys |
|
'altleft', 'altright' |
The left and right ALT keys |
|
'ctrlleft', 'ctrlright' |
The left and right CTRL keys |
|
'tab' (or '\t') |
The TAB key |
|
'backspace', 'delete' |
The BACKSPACE and DELETE keys |
|
'pageup', 'pagedown' |
The PAGE UP and PAGE DOWN keys |
|
'home', 'end' |
The HOME and END keys |
|
'up', 'down', 'left', 'right' |
The up, down, left, and right arrow keys |
|
'f1', 'f2', 'f3', and so on |
The F1 to F12 keys |
|
'volumemute', 'volumedown', 'volumeup' |
The mute, volume down, and volume up keys (some keyboards do not have these keys, but your operating system will still be able to understand these simulated keypresses) |
|
'pause' |
The PAUSE key |
|
'capslock', 'numlock', 'scrolllock' |
The CAPS LOCK, NUM LOCK, and SCROLL LOCK keys |
|
'insert' |
The INS or INSERT key |
|
'printscreen' |
The PRTSC or PRINT SCREEN key |
|
'winleft', 'winright' |
The left and right WIN keys (on Windows) |
|
'command' |
The Command ( |
Pressing and Releasing the Keyboard
Much like the mouseDown() and mouseUp() functions, pyautogui.keyDown() and pyautogui.keyUp() will send virtual keypresses and releases to the computer. They are passed a keyboard key string (see Table 18-1) for their argument. For convenience, PyAutoGUI provides thepyautogui.press() function, which calls both of these functions to simulate a complete keypress.
Run the following code, which will type a dollar sign character (obtained by holding the SHIFT key and pressing 4):
>>> pyautogui.keyDown('shift'); pyautogui.press('4'); pyautogui.keyUp('shift')
This line presses down SHIFT, presses (and releases) 4, and then releases SHIFT. If you need to type a string into a text field, the typewrite() function is more suitable. But for applications that take single-key commands, the press() function is the simpler approach.
Hotkey Combinations
A hotkey or shortcut is a combination of keypresses to invoke some application function. The common hotkey for copying a selection is CTRL-C (on Windows and Linux) or⌘-C (on OS X). The user presses and holds the CTRL key, then presses the C key, and then releases the C and CTRLkeys. To do this with PyAutoGUI’s keyDown() and keyUp() functions, you would have to enter the following:
pyautogui.keyDown('ctrl')
pyautogui.keyDown('c')
pyautogui.keyUp('c')
pyautogui.keyUp('ctrl')
This is rather complicated. Instead, use the pyautogui.hotkey() function, which takes multiple keyboard key string arguments, presses them in order, and releases them in the reverse order. For the CTRL-C example, the code would simply be as follows:
pyautogui.hotkey('ctrl', 'c')
This function is especially useful for larger hotkey combinations. In Word, the CTRL-ALT-SHIFT-S hotkey combination displays the Style pane. Instead of making eight different function calls (four keyDown() calls and four keyUp() calls), you can just call hotkey('ctrl', 'alt', 'shift', 's').
With a new IDLE file editor window in the upper-left corner of your screen, enter the following into the interactive shell (in OS X, replace 'alt' with 'ctrl'):
>>> import pyautogui, time
>>> def commentAfterDelay():
➊ pyautogui.click(100, 100)
➋ pyautogui.typewrite('In IDLE, Alt-3 comments out a line.')
time.sleep(2)
➌ pyautogui.hotkey('alt', '3')
>>> commentAfterDelay()
This defines a function commentAfterDelay() that, when called, will click the file editor window to bring it into focus ➊, type In IDLE, Atl-3 comments out a line ➋, pause for 2 seconds, and then simulate pressing the ALT-3 hotkey (or CTRL-3 on OS X) ➌. This keyboard shortcut adds two #characters to the current line, commenting it out. (This is a useful trick to know when writing your own code in IDLE.)
Review of the PyAutoGUI Functions
Since this chapter covered many different functions, here is a quick summary reference:
§ moveTo(x, y). Moves the mouse cursor to the given x and y coordinates.
§ moveRel(xOffset, yOffset). Moves the mouse cursor relative to its current position.
§ dragTo(x, y). Moves the mouse cursor while the left button is held down.
§ dragRel(xOffset, yOffset). Moves the mouse cursor relative to its current position while the left button is held down.
§ click(x, y, button). Simulates a click (left button by default).
§ rightClick(). Simulates a right-button click.
§ middleClick(). Simulates a middle-button click.
§ doubleClick(). Simulates a double left-button click.
§ mouseDown(x, y, button). Simulates pressing down the given button at the position x, y.
§ mouseUp(x, y, button). Simulates releasing the given button at the position x, y.
§ scroll(units). Simulates the scroll wheel. A positive argument scrolls up; a negative argument scrolls down.
§ typewrite(message). Types the characters in the given message string.
§ typewrite([key1, key2, key3]). Types the given keyboard key strings.
§ press(key). Presses the given keyboard key string.
§ keyDown(key). Simulates pressing down the given keyboard key.
§ keyUp(key). Simulates releasing the given keyboard key.
§ hotkey([key1, key2, key3]). Simulates pressing the given keyboard key strings down in order and then releasing them in reverse order.
§ screenshot(). Returns a screenshot as an Image object. (See Chapter 17 for information on Image objects.)
Project: Automatic Form Filler
Of all the boring tasks, filling out forms is the most dreaded of chores. It’s only fitting that now, in the final chapter project, you will slay it. Say you have a huge amount of data in a spreadsheet, and you have to tediously retype it into some other application’s form interface — with no intern to do it for you. Although some applications will have an Import feature that will allow you to upload a spreadsheet with the information, sometimes it seems that there is no other way than mindlessly clicking and typing for hours on end. You’ve come this far in this book; you know that of course there’s another way.
The form for this project is a Google Docs form that you can find at http://nostarch.com/automatestuff. It looks like Figure 18-4.
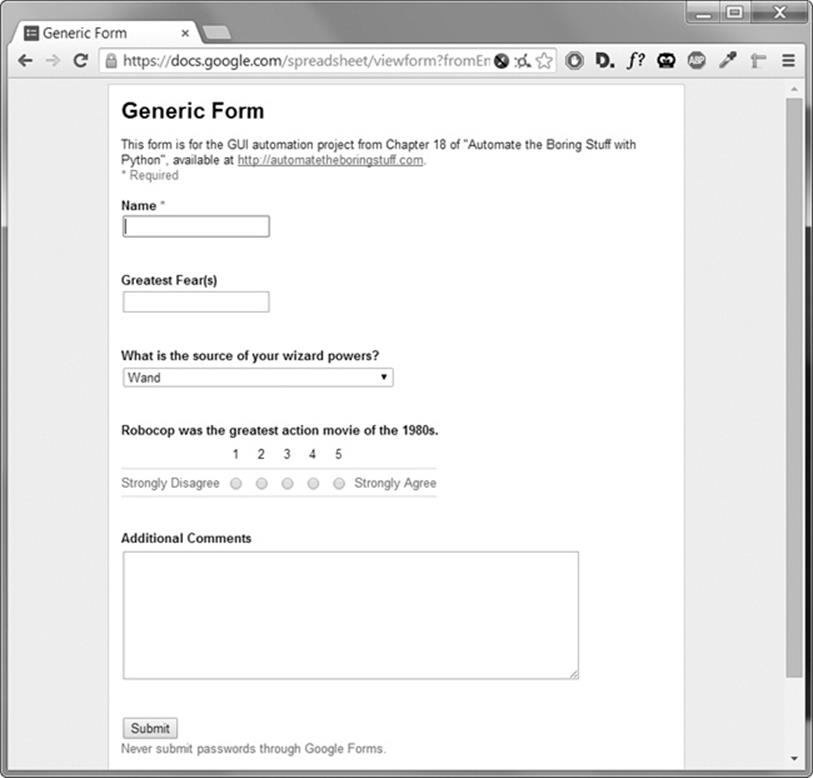
Figure 18-4. The form used for this project
At a high level, here’s what your program should do:
§ Click the first text field of the form.
§ Move through the form, typing information into each field.
§ Click the Submit button.
§ Repeat the process with the next set of data.
This means your code will need to do the following:
§ Call pyautogui.click() to click the form and Submit button.
§ Call pyautogui.typewrite() to enter text into the fields.
§ Handle the KeyboardInterrupt exception so the user can press CTRL-C to quit.
Open a new file editor window and save it as formFiller.py.
Step 1: Figure Out the Steps
Before writing code, you need to figure out the exact keystrokes and mouse clicks that will fill out the form once. The mouseNow.py script in Project: “Where Is the Mouse Right Now?” can help you figure out specific mouse coordinates. You need to know only the coordinates of the first text field. After clicking the first field, you can just press TAB to move focus to the next field. This will save you from having to figure out the x- and y-coordinates to click for every field.
Here are the steps for entering data into the form:
1. Click the Name field. (Use mouseNow.py to determine the coordinates after maximizing the browser window. On OS X, you may need to click twice: once to put the browser in focus and again to click the Name field.)
2. Type a name and then press TAB.
3. Type a greatest fear and then press TAB.
4. Press the down arrow key the correct number of times to select the wizard power source: once for wand, twice for amulet, three times for crystal ball, and four times for money. Then press TAB. (Note that on OS X, you will have to press the down arrow key one more time for each option. For some browsers, you may need to press the ENTER key as well.)
5. Press the right arrow key to select the answer to the Robocop question. Press it once for 2, twice for 3, three times for 4, or four times for 5; or just press the spacebar to select 1 (which is highlighted by default). Then press TAB.
6. Type an additional comment and then press TAB.
7. Press the ENTER key to “click” the Submit button.
8. After submitting the form, the browser will take you to a page where you will need to click a link to return to the form page.
Note that if you run this program again later, you may have to update the mouse click coordinates, since the browser window might have changed position. To work around this, always make sure the browser window is maximized before finding the coordinates of the first form field. Also, different browsers on different operating systems might work slightly differently from the steps given here, so check that these keystroke combinations work for your computer before running your program.
Step 2: Set Up Coordinates
Load the example form you downloaded (Figure 18-4) in a browser and maximize your browser window. Open a new Terminal or command line window to run the mouseNow.py script, and then mouse over the Name field to figure out its the x- and y-coordinates. These numbers will be assigned to the nameField variable in your program. Also, find out the x- and y-coordinates and RGB tuple value of the blue Submit button. These values will be assigned to the submitButton and submitButtonColor variables, respectively.
Next, fill in some dummy data for the form and click Submit. You need to see what the next page looks like so that you can use mouseNow.py to find the coordinates of the Submit another response link on this new page.
Make your source code look like the following, being sure to replace all the values in italics with the coordinates you determined from your own tests:
#! python3
# formFiller.py - Automatically fills in the form.
import pyautogui, time
# Set these to the correct coordinates for your computer.
nameField = (648, 319)
submitButton = (651, 817)
submitButtonColor = (75, 141, 249)
submitAnotherLink = (760, 224)
# TODO: Give the user a chance to kill the script.
# TODO: Wait until the form page has loaded.
# TODO: Fill out the Name Field.
# TODO: Fill out the Greatest Fear(s) field.
# TODO: Fill out the Source of Wizard Powers field.
# TODO: Fill out the Robocop field.
# TODO: Fill out the Additional Comments field.
# TODO: Click Submit.
# TODO: Wait until form page has loaded.
# TODO: Click the Submit another response link.
Now you need the data you actually want to enter into this form. In the real world, this data might come from a spreadsheet, a plaintext file, or a website, and it would require additional code to load into the program. But for this project, you’ll just hardcode all this data in a variable. Add the following to your program:
#! python3
# formFiller.py - Automatically fills in the form.
--snip--
formData = [{'name': 'Alice', 'fear': 'eavesdroppers', 'source': 'wand',
'robocop': 4, 'comments': 'Tell Bob I said hi.'},
{'name': 'Bob', 'fear': 'bees', 'source': 'amulet', 'robocop': 4,
'comments': 'n/a'},
{'name': 'Carol', 'fear': 'puppets', 'source': 'crystal ball',
'robocop': 1, 'comments': 'Please take the puppets out of the
break room.'},
{'name': 'Alex Murphy', 'fear': 'ED-209', 'source': 'money',
'robocop': 5, 'comments': 'Protect the innocent. Serve the public
trust. Uphold the law.'},
]
--snip--
The formData list contains four dictionaries for four different names. Each dictionary has names of text fields as keys and responses as values. The last bit of setup is to set PyAutoGUI’s PAUSE variable to wait half a second after each function call. Add the following to your program after theformData assignment statement:
pyautogui.PAUSE = 0.5
Step 3: Start Typing Data
A for loop will iterate over each of the dictionaries in the formData list, passing the values in the dictionary to the PyAutoGUI functions that will virtually type in the text fields.
Add the following code to your program:
#! python3
# formFiller.py - Automatically fills in the form.
--snip--
for person in formData:
# Give the user a chance to kill the script.
print('>>> 5 SECOND PAUSE TO LET USER PRESS CTRL-C <<<')
➊ time.sleep(5)
# Wait until the form page has loaded.
➋ while not pyautogui.pixelMatchesColor(submitButton[0], submitButton[1],
submitButtonColor):
time.sleep(0.5)
--snip--
As a small safety feature, the script has a five-second pause ➊ that gives the user a chance to hit CTRL-C (or move the mouse cursor to the upper-left corner of the screen to raise the FailSafeException exception) to shut the program down in case it’s doing something unexpected. Then the program waits until the Submit button’s color is visible ➋, letting the program know that the form page has loaded. Remember that you figured out the coordinate and color information in step 2 and stored it in the submitButton and submitButtonColor variables. To use pixelMatchesColor(), you pass the coordinates submitButton[0] and submitButton[1], and the color submitButtonColor.
After the code that waits until the Submit button’s color is visible, add the following:
#! python3
# formFiller.py - Automatically fills in the form.
--snip--
➊ print('Entering %s info...' % (person['name']))
➋ pyautogui.click(nameField[0], nameField[1])
# Fill out the Name field.
➌ pyautogui.typewrite(person['name'] + '\t')
# Fill out the Greatest Fear(s) field.
➍ pyautogui.typewrite(person['fear'] + '\t')
--snip--
We add an occasional print() call to display the program’s status in its Terminal window to let the user know what’s going on ➊.
Since the program knows that the form is loaded, it’s time to call click() to click the Name field ➋ and typewrite() to enter the string in person['name'] ➌. The '\t' character is added to the end of the string passed to typewrite() to simulate pressing TAB, which moves the keyboard focus to the next field, Greatest Fear(s). Another call to typewrite() will type the string in person['fear'] into this field and then tab to the next field in the form ➍.
Step 4: Handle Select Lists and Radio Buttons
The drop-down menu for the “wizard powers” question and the radio buttons for the Robocop field are trickier to handle than the text fields. To click these options with the mouse, you would have to figure out the x- and y-coordinates of each possible option. It’s easier to use the keyboard arrow keys to make a selection instead.
Add the following to your program:
#! python3
# formFiller.py - Automatically fills in the form.
--snip--
# Fill out the Source of Wizard Powers field.
➊ if person['source'] == 'wand':
➋ pyautogui.typewrite(['down', '\t'])
elif person['source'] == 'amulet':
pyautogui.typewrite(['down', 'down', '\t'])
elif person['source'] == 'crystal ball':
pyautogui.typewrite(['down', 'down', 'down', '\t'])
elif person['source'] == 'money':
pyautogui.typewrite(['down', 'down', 'down', 'down', '\t'])
# Fill out the Robocop field.
➌ if person['robocop'] == 1:
➍ pyautogui.typewrite([' ', '\t'])
elif person['robocop'] == 2:
pyautogui.typewrite(['right', '\t'])
elif person['robocop'] == 3:
pyautogui.typewrite(['right', 'right', '\t'])
elif person['robocop'] == 4:
pyautogui.typewrite(['right', 'right', 'right', '\t'])
elif person['robocop'] == 5:
pyautogui.typewrite(['right', 'right', 'right', 'right', '\t'])
--snip--
Once the drop-down menu has focus (remember that you wrote code to simulate pressing TAB after filling out the Greatest Fear(s) field), pressing the down arrow key will move to the next item in the selection list. Depending on the value in person['source'], your program should send a number of down arrow keypresses before tabbing to the next field. If the value at the 'source' key in this user’s dictionary is 'wand' ➊, we simulate pressing the down arrow key once (to select Wand) and pressing TAB ➋. If the value at the 'source' key is 'amulet', we simulate pressing the down arrow key twice and pressing TAB, and so on for the other possible answers.
The radio buttons for the Robocop question can be selected with the right arrow keys — or, if you want to select the first choice ➌, by just pressing the spacebar ➍.
Step 5: Submit the Form and Wait
You can fill out the Additional Comments field with the typewrite() function by passing person['comments'] as an argument. You can type an additional '\t' to move the keyboard focus to the next field or the Submit button. Once the Submit button is in focus, callingpyautogui.press('enter') will simulate pressing the ENTER key and submit the form. After submitting the form, your program will wait five seconds for the next page to load.
Once the new page has loaded, it will have a Submit another response link that will direct the browser to a new, empty form page. You stored the coordinates of this link as a tuple in submitAnotherLink in step 2, so pass these coordinates to pyautogui.click() to click this link.
With the new form ready to go, the script’s outer for loop can continue to the next iteration and enter the next person’s information into the form.
Complete your program by adding the following code:
#! python3
# formFiller.py - Automatically fills in the form.
--snip--
# Fill out the Additional Comments field.
pyautogui.typewrite(person['comments'] + '\t')
# Click Submit.
pyautogui.press('enter')
# Wait until form page has loaded.
print('Clicked Submit.')
time.sleep(5)
# Click the Submit another response link.
pyautogui.click(submitAnotherLink[0], submitAnotherLink[1])
Once the main for loop has finished, the program will have plugged in the information for each person. In this example, there are only four people to enter. But if you had 4,000 people, then writing a program to do this would save you a lot of time and typing!
Summary
GUI automation with the pyautogui module allows you to interact with applications on your computer by controlling the mouse and keyboard. While this approach is flexible enough to do anything that a human user can do, the downside is that these programs are fairly blind to what they are clicking or typing. When writing GUI automation programs, try to ensure that they will crash quickly if they’re given bad instructions. Crashing is annoying, but it’s much better than the program continuing in error.
You can move the mouse cursor around the screen and simulate mouse clicks, keystrokes, and keyboard shortcuts with PyAutoGUI. The pyautogui module can also check the colors on the screen, which can provide your GUI automation program with enough of an idea of the screen contents to know whether it has gotten offtrack. You can even give PyAutoGUI a screen-shot and let it figure out the coordinates of the area you want to click.
You can combine all of these PyAutoGUI features to automate any mindlessly repetitive task on your computer. In fact, it can be downright hypnotic to watch the mouse cursor move on its own and see text appear on the screen automatically. Why not spend the time you saved by sitting back and watching your program do all your work for you? There’s a certain satisfaction that comes from seeing how your cleverness has saved you from the boring stuff.
Practice Questions
|
Q: |
1. How can you trigger PyAutoGUI’s fail safe to stop a program? |
|
Q: |
2. What function returns the current resolution()? |
|
Q: |
3. What function returns the coordinates for the mouse cursor’s current position? |
|
Q: |
4. What is the difference between pyautogui.moveTo() and pyautogui.moveRel()? |
|
Q: |
5. What functions can be used to drag the mouse? |
|
Q: |
6. What function call will type out the characters of "Hello world!"? |
|
Q: |
7. How can you do keypresses for special keys such as the keyboard’s left arrow key? |
|
Q: |
8. How can you save the current contents of the screen to an image file named screenshot.png? |
|
Q: |
9. What code would set a two second pause after every PyAutoGUI function call? |
Practice Projects
For practice, write programs that do the following.
Looking Busy
Many instant messaging programs determine whether you are idle, or away from your computer, by detecting a lack of mouse movement over some period of time — say, ten minutes. Maybe you’d like to sneak away from your desk for a while but don’t want others to see your instant messenger status go into idle mode. Write a script to nudge your mouse cursor slightly every ten seconds. The nudge should be small enough so that it won’t get in the way if you do happen to need to use your computer while the script is running.
Instant Messenger Bot
Google Talk, Skype, Yahoo Messenger, AIM, and other instant messaging applications often use proprietary protocols that make it difficult for others to write Python modules that can interact with these programs. But even these proprietary protocols can’t stop you from writing a GUI automation tool.
The Google Talk application has a search bar that lets you enter a username on your friend list and open a messaging window when you press ENTER. The keyboard focus automatically moves to the new window. Other instant messenger applications have similar ways to open new message windows. Write a program that will automatically send out a notification message to a select group of people on your friend list. Your program may have to deal with exceptional cases, such as friends being offline, the chat window appearing at different coordinates on the screen, or confirmation boxes that interrupt your messaging. Your program will have to take screen-shots to guide its GUI interaction and adopt ways of detecting when its virtual keystrokes aren’t being sent.
NOTE
You may want to set up some fake test accounts so that you don’t accidentally spam your real friends while writing this program.
Game-Playing Bot Tutorial
There is a great tutorial titled “How to Build a Python Bot That Can Play Web Games” that you can find at http://nostarch.com/automatestuff/. This tutorial explains how to create a GUI automation program in Python that plays a Flash game called Sushi Go Round. The game involves clicking the correct ingredient buttons to fill customers’ sushi orders. The faster you fill orders without mistakes, the more points you get. This is a perfectly suited task for a GUI automation program — and a way to cheat to a high score! The tutorial covers many of the same topics that this chapter covers but also includes descriptions of PyAutoGUI’s basic image recognition features.