Black Hat Python: Python Programming for Hackers and Pentesters (2014)
Chapter 3. The Network: Raw Sockets and Sniffing
Network sniffers allow you to see packets entering and exiting a target machine. As a result, they have many practical uses before and after exploitation. In some cases, you’ll be able to use Wireshark (http://wireshark.org/) to monitor traffic, or use a Pythonic solution like Scapy (which we’ll explore in the next chapter). Nevertheless, there’s an advantage to knowing how to throw together a quick sniffer to view and decode network traffic. Writing a tool like this will also give you a deep appreciation for the mature tools that can painlessly take care of the finer points with little effort on your part. You will also likely pick up some new Python techniques and perhaps a better understanding of how the low-level networking bits work.
In the previous chapter, we covered how to send and receive data using TCP and UDP, and arguably this is how you will interact with most network services. But underneath these higher-level protocols are the fundamental building blocks of how network packets are sent and received. You will use raw sockets to access lower-level networking information such as the raw IP and ICMP headers. In our case, we are only interested in the IP layer and higher, so we won’t decode any Ethernet information. Of course, if you intend to perform any low-level attacks such as ARP poisoning or you are developing wireless assessment tools, you need to become intimately familiar with Ethernet frames and their use.
Let’s begin with a brief walkthrough of how to discover active hosts on a network segment.
Building a UDP Host Discovery Tool
The main goal of our sniffer is to perform UDP-based host discovery on a target network. Attackers want to be able to see all of the potential targets on a network so that they can focus their reconnaissance and exploitation attempts.
We’ll use a known behavior of most operating systems when handling closed UDP ports to determine if there is an active host at a particular IP address. When you send a UDP datagram to a closed port on a host, that host typically sends back an ICMP message indicating that the port is unreachable. This ICMP message indicates that there is a host alive because we’d assume that there was no host if we didn’t receive a response to the UDP datagram. It is essential that we pick a UDP port that will not likely be used, and for maximum coverage we can probe several ports to ensure we aren’t hitting an active UDP service.
Why UDP? There’s no overhead in spraying the message across an entire subnet and waiting for the ICMP responses to arrive accordingly. This is quite a simple scanner to build with most of the work going into decoding and analyzing the various network protocol headers. We will implement this host scanner for both Windows and Linux to maximize the likelihood of being able to use it inside an enterprise environment.
We could also build additional logic into our scanner to kick off full Nmap port scans on any hosts we discover to determine if they have a viable network attack surface. These are exercises left for the reader, and I look forward to hearing some of the creative ways you can expand this core concept. Let’s get started.
Packet Sniffing on Windows and Linux
Accessing raw sockets in Windows is slightly different than on its Linux brethren, but we want to have the flexibility to deploy the same sniffer to multiple platforms. We will create our socket object and then determine which platform we are running on. Windows requires us to set someadditional flags through a socket input/output control (IOCTL),[7] which enables promiscuous mode on the network interface. In our first example, we simply set up our raw socket sniffer, read in a single packet, and then quit.
import socket
import os
# host to listen on
host = "192.168.0.196"
# create a raw socket and bind it to the public interface
if os.name == "nt":
➊ socket_protocol = socket.IPPROTO_IP
else:
socket_protocol = socket.IPPROTO_ICMP
sniffer = socket.socket(socket.AF_INET, socket.SOCK_RAW, socket_protocol)
sniffer.bind((host, 0))
# we want the IP headers included in the capture
➋ sniffer.setsockopt(socket.IPPROTO_IP, socket.IP_HDRINCL, 1)
# if we're using Windows, we need to send an IOCTL
# to set up promiscuous mode
➌ if os.name == "nt":
sniffer.ioctl(socket.SIO_RCVALL, socket.RCVALL_ON)
# read in a single packet
➍ print sniffer.recvfrom(65565)
# if we're using Windows, turn off promiscuous mode
➎ if os.name == "nt":
sniffer.ioctl(socket.SIO_RCVALL, socket.RCVALL_OFF)
We start by constructing our socket object with the parameters necessary for sniffing packets on our network interface ➊. The difference between Windows and Linux is that Windows will allow us to sniff all incoming packets regardless of protocol, whereas Linux forces us to specify that we are sniffing ICMP. Note that we are using promiscuous mode, which requires administrative privileges on Windows or root on Linux. Promiscuous mode allows us to sniff all packets that the network card sees, even those not destined for your specific host. Next we set a socket option ➋ that includes the IP headers in our captured packets. The next step ➌ is to determine if we are using Windows, and if so, we perform the additional step of sending an IOCTL to the network card driver to enable promiscuous mode. If you’re running Windows in a virtual machine, you will likely get a notification that the guest operating system is enabling promiscuous mode; you, of course, will allow it. Now we are ready to actually perform some sniffing, and in this case we are simply printing out the entire raw packet ➍ with no packet decoding. This is just to test to make sure we have the core of our sniffing code working. After a single packet is sniffed, we again test for Windows, and disable promiscuous mode ➎ before exiting the script.
Kicking the Tires
Open up a fresh terminal or cmd.exe shell under Windows and run the following:
python sniffer.py
In another terminal or shell window, you can simply pick a host to ping. Here, we’ll ping nostarch.com:
ping nostarch.com
In your first window where you executed your sniffer, you should see some garbled output that closely resembles the following:
('E\x00\x00:\x0f\x98\x00\x00\x80\x11\xa9\x0e\xc0\xa8\x00\xbb\xc0\xa8\x0
0\x01\x04\x01\x005\x00&\xd6d\n\xde\x01\x00\x00\x01\x00\x00\x00\x00\x00\
x00\x08nostarch\x03com\x00\x00\x01\x00\x01', ('192.168.0.187', 0))
You can see that we have captured the initial ICMP ping request destined for nostarch.com (based on the appearance of the string nostarch.com). If you are running this example on Linux, then you would receive the response from nostarch.com. Sniffing one packet is not overly useful, so let’s add some functionality to process more packets and decode their contents.
Decoding the IP Layer
In its current form, our sniffer receives all of the IP headers along with any higher protocols such as TCP, UDP, or ICMP. The information is packed into binary form, and as shown above, is quite difficult to understand. We are now going to work on decoding the IP portion of a packet so that we can pull useful information out such as the protocol type (TCP, UDP, ICMP), and the source and destination IP addresses. This will be the foundation for you to start creating further protocol parsing later on.
If we examine what an actual packet looks like on the network, you will have an understanding of how we need to decode the incoming packets. Refer to Figure 3-1 for the makeup of an IP header.
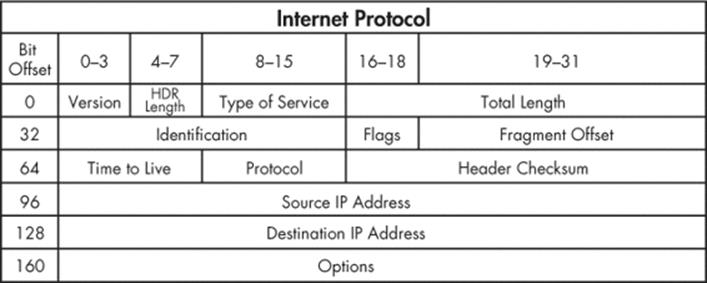
Figure 3-1. Typical IPv4 header structure
We will decode the entire IP header (except the Options field) and extract the protocol type, source, and destination IP address. Using the Python ctypes module to create a C-like structure will allow us to have a friendly format for handling the IP header and its member fields. First, let’s take a look at the C definition of what an IP header looks like.
struct ip {
u_char ip_hl:4;
u_char ip_v:4;
u_char ip_tos;
u_short ip_len;
u_short ip_id;
u_short ip_off;
u_char ip_ttl;
u_char ip_p;
u_short ip_sum;
u_long ip_src;
u_long ip_dst;
}
You now have an idea of how to map the C data types to the IP header values. Using C code as a reference when translating to Python objects can be useful because it makes it seamless to convert them to pure Python. Of note, the ip_hl and ip_v fields have a bit notation added to them (the :4part). This indicates that these are bit fields, and they are 4 bits wide. We will use a pure Python solution to make sure these fields map correctly so we can avoid having to do any bit manipulation. Let’s implement our IP decoding routine into sniffer_ip_header_decode.py as shown below.
import socket
import os
import struct
from ctypes import *
# host to listen on
host = "192.168.0.187"
# our IP header
➊ class IP(Structure):
_fields_ = [
("ihl", c_ubyte, 4),
("version", c_ubyte, 4),
("tos", c_ubyte),
("len", c_ushort),
("id", c_ushort),
("offset", c_ushort),
("ttl", c_ubyte),
("protocol_num", c_ubyte),
("sum", c_ushort),
("src", c_ulong),
("dst", c_ulong)
]
def __new__(self, socket_buffer=None):
return self.from_buffer_copy(socket_buffer)
def __init__(self, socket_buffer=None):
# map protocol constants to their names
self.protocol_map = {1:"ICMP", 6:"TCP", 17:"UDP"}
➋ # human readable IP addresses
self.src_address = socket.inet_ntoa(struct.pack("<L",self.src))
self.dst_address = socket.inet_ntoa(struct.pack("<L",self.dst))
# human readable protocol
try:
self.protocol = self.protocol_map[self.protocol_num]
except:
self.protocol = str(self.protocol_num)
# this should look familiar from the previous example
if os.name == "nt":
socket_protocol = socket.IPPROTO_IP
else:
socket_protocol = socket.IPPROTO_ICMP
sniffer = socket.socket(socket.AF_INET, socket.SOCK_RAW, socket_protocol)
sniffer.bind((host, 0))
sniffer.setsockopt(socket.IPPROTO_IP, socket.IP_HDRINCL, 1)
if os.name == "nt":
sniffer.ioctl(socket.SIO_RCVALL, socket.RCVALL_ON)
try:
while True:
# read in a packet
➌ raw_buffer = sniffer.recvfrom(65565)[0]
# create an IP header from the first 20 bytes of the buffer
➍ ip_header = IP(raw_buffer[0:20])
# print out the protocol that was detected and the hosts
➎ print "Protocol: %s %s -> %s" % (ip_header.protocol, ip_header.src_
address, ip_header.dst_address)
# handle CTRL-C
except KeyboardInterrupt:
# if we're using Windows, turn off promiscuous mode
if os.name == "nt":
sniffer.ioctl(socket.SIO_RCVALL, socket.RCVALL_OFF)
The first step is defining a Python ctypes structure ➊ that will map the first 20 bytes of the received buffer into a friendly IP header. As you can see, all of the fields that we identified and the preceding C structure match up nicely. The __new__ method of the IP class simply takes in a raw buffer (in this case, what we receive on the network) and forms the structure from it. When the __init__ method is called, __new__ is already finished processing the buffer. Inside __init__, we are simply doing some housekeeping to give some human readable output for the protocol in use and the IP addresses ➋.
With our freshly minted IP structure, we now put in the logic to continually read in packets and parse their information. The first step is to read in the packet ➌ and then pass the first 20 bytes ➍ to initialize our IP structure. Next, we simply print out the information that we have captured ➎. Let’s try it out.
Kicking the Tires
Let’s test out our previous code to see what kind of information we are extracting from the raw packets being sent. I definitely recommend that you do this test from your Windows machine, as you will be able to see TCP, UDP, and ICMP, which allows you to do some pretty neat testing (open up a browser, for example). If you are confined to Linux, then perform the previous ping test to see it in action.
Open a terminal and type:
python sniffer_ip_header_decode.py
Now, because Windows is pretty chatty, you’re likely to see output immediately. I tested this script by opening Internet Explorer and going to www.google.com, and here is the output from our script:
Protocol: UDP 192.168.0.190 -> 192.168.0.1
Protocol: UDP 192.168.0.1 -> 192.168.0.190
Protocol: UDP 192.168.0.190 -> 192.168.0.187
Protocol: TCP 192.168.0.187 -> 74.125.225.183
Protocol: TCP 192.168.0.187 -> 74.125.225.183
Protocol: TCP 74.125.225.183 -> 192.168.0.187
Protocol: TCP 192.168.0.187 -> 74.125.225.183
Because we aren’t doing any deep inspection on these packets, we can only guess what this stream is indicating. My guess is that the first couple of UDP packets are the DNS queries to determine where google.com lives, and the subsequent TCP sessions are my machine actually connecting and downloading content from their web server.
To perform the same test on Linux, we can ping google.com, and the results will look something like this:
Protocol: ICMP 74.125.226.78 -> 192.168.0.190
Protocol: ICMP 74.125.226.78 -> 192.168.0.190
Protocol: ICMP 74.125.226.78 -> 192.168.0.190
You can already see the limitation: we are only seeing the response and only for the ICMP protocol. But because we are purposefully building a host discovery scanner, this is completely acceptable. We will now apply the same techniques we used to decode the IP header to decode the ICMP messages.
Decoding ICMP
Now that we can fully decode the IP layer of any sniffed packets, we have to be able to decode the ICMP responses that our scanner will elicit from sending UDP datagrams to closed ports. ICMP messages can vary greatly in their contents, but each message contains three elements that stay consistent: the type, code, and checksum fields. The type and code fields tell the receiving host what type of ICMP message is arriving, which then dictates how to decode it properly.
For the purpose of our scanner, we are looking for a type value of 3 and a code value of 3. This corresponds to the Destination Unreachable class of ICMP messages, and the code value of 3 indicates that the Port Unreachable error has been caused. Refer to Figure 3-2 for a diagram of aDestination Unreachable ICMP message.
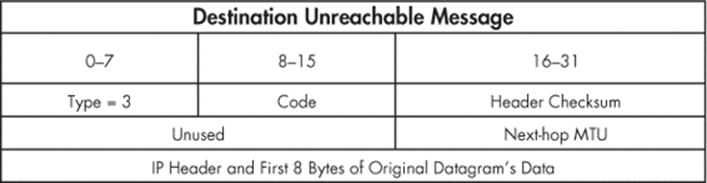
Figure 3-2. Diagram of Destination Unreachable ICMP message
As you can see, the first 8 bits are the type and the second 8 bits contain our ICMP code. One interesting thing to note is that when a host sends one of these ICMP messages, it actually includes the IP header of the originating message that generated the response. We can also see that we will double-check against 8 bytes of the original datagram that was sent in order to make sure our scanner generated the ICMP response. To do so, we simply slice off the last 8 bytes of the received buffer to pull out the magic string that our scanner sends.
Let’s add some more code to our previous sniffer to include the ability to decode ICMP packets. Let’s save our previous file as sniffer_with_icmp.py and add the following code:
--snip
--class IP(Structure):
--snip--
➊ class ICMP(Structure):
_fields_ = [
("type", c_ubyte),
("code", c_ubyte),
("checksum", c_ushort),
("unused", c_ushort),
("next_hop_mtu", c_ushort)
]
def __new__(self, socket_buffer):
return self.from_buffer_copy(socket_buffer)
def __init__(self, socket_buffer):
pass
--snip-
print "Protocol: %s %s -> %s" % (ip_header.protocol, ip_header.src_
address, ip_header.dst_address)
# if it's ICMP, we want it
➋ if ip_header.protocol == "ICMP":
# calculate where our ICMP packet starts
➌ offset = ip_header.ihl * 4
buf = raw_buffer[offset:offset + sizeof(ICMP)]
# create our ICMP structure
➍ icmp_header = ICMP(buf)
print "ICMP -> Type: %d Code: %d" % (icmp_header.type, icmp_header.
code)
This simple piece of code creates an ICMP structure ➊ underneath our existing IP structure. When the main packet-receiving loop determines that we have received an ICMP packet ➋, we calculate the offset in the raw packet where the ICMP body lives ➌ and then create our buffer ➍ and print out the type and code fields. The length calculation is based on the IP header ihl field, which indicates the number of 32-bit words (4-byte chunks) contained in the IP header. So by multiplying this field by 4, we know the size of the IP header and thus when the next network layer — ICMP in this case — begins.
If we quickly run this code with our typical ping test, our output should now be slightly different, as shown below:
Protocol: ICMP 74.125.226.78 -> 192.168.0.190
ICMP -> Type: 0 Code: 0
This indicates that the ping (ICMP Echo) responses are being correctly received and decoded. We are now ready to implement the last bit of logic to send out the UDP datagrams, and to interpret their results.
Now let’s add the use of the netaddr module so that we can cover an entire subnet with our host discovery scan. Save your sniffer_with_icmp.py script as scanner.py and add the following code:
import threading
import time
from netaddr import IPNetwork,IPAddress
--snip--
# host to listen on
host = "192.168.0.187"
# subnet to target
subnet = "192.168.0.0/24"
# magic string we'll check ICMP responses for
➊ magic_message = "PYTHONRULES!"
# this sprays out the UDP datagrams
➋ def udp_sender(subnet,magic_message):
time.sleep(5)
sender = socket.socket(socket.AF_INET, socket.SOCK_DGRAM)
for ip in IPNetwork(subnet):
try:
sender.sendto(magic_message,("%s" % ip,65212))
except:
pass
--snip--
# start sending packets
➌ t = threading.Thread(target=udp_sender,args=(subnet,magic_message))
t.start()
--snip--
try:
while True:
--snip--
#print "ICMP -> Type: %d Code: %d" % (icmp_header.type, icmp_header.
code)
# now check for the TYPE 3 and CODE
if icmp_header.code == 3 and icmp_header.type == 3:
# make sure host is in our target subnet
➍ if IPAddress(ip_header.src_address) in IPNetwork(subnet):
# make sure it has our magic message
➎ if raw_buffer[len(raw_buffer)-len(magic_message):] ==
magic_message:
print "Host Up: %s" % ip_header.src_address
This last bit of code should be fairly straightforward to understand. We define a simple string signature ➊ so that we can test that the responses are coming from UDP packets that we sent originally. Our udp_sender function ➋ simply takes in a subnet that we specify at the top of our script, iterates through all IP addresses in that subnet, and fires UDP datagrams at them. In the main body of our script, just before the main packet decoding loop, we spawn udp_sender in a separate thread ➌ to ensure that we aren’t interfering with our ability to sniff responses. If we detect the anticipated ICMP message, we first check to make sure that the ICMP response is coming from within our target subnet ➍. We then perform our final check of making sure that the ICMP response has our magic string in it ➎. If all of these checks pass, we print out the source IP address of where the ICMP message originated. Let’s try it out.
Kicking the Tires
Now let’s take our scanner and run it against the local network. You can use Linux or Windows for this as the results will be the same. In my case, the IP address of the local machine I was on was 192.168.0.187, so I set my scanner to hit 192.168.0.0/24. If the output is too noisy when you run your scanner, simply comment out all print statements except for the last one that tells you what hosts are responding.
THE NETADDR MODULE
Our scanner is going to use a third-party library called netaddr, which will allow us to feed in a subnet mask such as 192.168.0.0/24 and have our scanner handle it appropriately. Download the library from here: http://code.google.com/p/netaddr/downloads/list
Or, if you installed the Python setup tools package in Chapter 1, you can simply execute the following from a command prompt:
easy_install netaddr
The netaddr module makes it very easy to work with subnets and addressing . For example, you can run simple tests like the following using the IPNetwork object:
ip_address = "192.168.112.3"
if ip_address in IPNetwork("192.168.112.0/24"):
print True
Or you can create simple iterators if you want to send packets to an entire network:
for ip in IPNetwork("192.168.112.1/24"):
s = socket.socket()
s.connect((ip, 25))
# send mail packets
This will greatly simplify your programming life when dealing with entire networks at a time, and it is ideally suited for our host discovery tool . After it’s installed, you are ready to proceed.
c:\Python27\python.exe scanner.py
Host Up: 192.168.0.1
Host Up: 192.168.0.190
Host Up: 192.168.0.192
Host Up: 192.168.0.195
For a quick scan like the one I performed, it only took a few seconds to get the results back. By cross-referencing these IP addresses with the DHCP table in my home router, I was able to verify that the results were accurate. You can easily expand what you’ve learned in this chapter to decode TCP and UDP packets, and build additional tooling around it. This scanner is also useful for the trojan framework we will begin building in Chapter 7. This would allow a deployed trojan to scan the local network looking for additional targets. Now that we have the basics down of how networks work on a high and low level, let’s explore a very mature Python library called Scapy.
[7] An input/output control (IOCTL) is a means for userspace programs to communicate with kernel mode components. Have a read here: http://en.wikipedia.org/wiki/Ioctl.