Beginning Python Games Development With Pygame (2015)
CHAPTER 5
Making Things Move
In the real world, objects move in a variety of different ways, depending on what they are doing, and a game must approximate those motions to create a convincing virtual representation. A few games can get away with unrealistic motion—Pac-Man, for example, moves in a straight line with a constant speed and can change direction in an instant, but if you applied that kind of motion to a car in a driving game it would destroy the illusion. After all, in a driving game you would expect the car to take some time to reach full speed and it definitely shouldn’t be able to turn 180 degrees in an instant!
For games with a touch of realism, the game programmer has to take into account what is making things move. Let’s look at a typical driving game. Regardless of whether the vehicle is a bike, a rally car, or a semi-truck, there is a force from the engine driving it forward. There are also other forces acting on it. Resistance from the wheels will vary depending on the surface you are driving on, so a vehicle will handle differently on mud than it will on tarmac. And of course there is gravity, which is constantly pulling the car toward the earth (something that the player may not notice until he tries to jump a canyon)! In actual fact there are probably hundreds of other forces that combine to create the motion of a vehicle.
Fortunately for us game programmers, we only have to simulate a few of these forces in order to create the convincing illusion of movement. Once our simulation code is written, we can apply it to many objects in the game. Gravity, for example, will affect everything (unless the game is set in space), so we can apply the gravity-related code to any object, whether it is a tossed hand grenade, a tank falling from a cliff, or an axe flying through the air.
This chapter describes how to move objects about the screen in a predictable fashion, and how to make that movement consistent on other people’s computers.
Understanding Frame Rate
The first thing we need to know about movement in a computer game is that nothing really moves—at least not in any physical sense. A computer screen or television set presents us with a sequence of images, and when the time between the images is short enough, our brain blends the images to create the illusion of fluid motion, like a flip-book. The number of images, or frames, required to produce smooth motion can vary from person to person. Movies use 24 frames per second, but computer games tend to require a faster frame rate. Thirty frames per second is a good rate to aim for, but generally speaking the higher the frame rate, the smoother the motion will look—although after about 70 frames per second, few people can detect any improvement, even if they claim they can!
The frame rate for a game is also limited by the number of times per second that the display device (such as your monitor) can refresh. For instance, my LCD monitor has a refresh rate of 60 hertz, which means it refreshes the display 60 times every second. Generating frames faster than the refresh rate can lead to what is known as “tearing,” where part of the next frame is combined with a previous frame.
Obtaining a good frame rate generally means compromising on visual effects, because the more work your computer is doing, the slower the frame rate will be. The good news is that the computer on your desktop is probably more than fast enough to generate the visuals you want.
Moving in a Straight Line
Let’s start out by examining simple straight-line movement. If we move an image by a fixed amount each frame, then it will appear to move. To move it horizontally, we would add to the x coordinate, and to move it vertically we would add to the y coordinate. Listing 5-1 demonstrates how to move an image horizontally. It draws an image at a specified x coordinate and then adds the value of 10.0 to each frame, so that on the next frame it will have shifted a little to the right. When the x coordinate passes over the right edge of the screen, it is set back to 0 so that it doesn’t disappear completely. Moving 2D images are often referred to as sprites.
Listing 5-1. Simple Straight-Line Movement (simplemove.py)
import pygame
from pygame.locals import *
from sys import exit
background_image_filename = 'sushiplate.jpg'
sprite_image_filename = 'fugu.png'
pygame.init()
screen = pygame.display.set_mode((640, 480), 0, 32)
background = pygame.image.load(background_image_filename).convert()
sprite = pygame.image.load(sprite_image_filename)
# The x coordinate of our sprite
x = 0.
while True:
for event in pygame.event.get():
if event.type == QUIT:
pygame.quit()
exit()
screen.blit(background, (0,0))
screen.blit(sprite, (x, 100))
x += 1
# If the image goes off the end of the screen, move it back
if x > 640:
x -= 640
pygame.display.update()
If you run Listing 5-1, you will see the fugu image sliding from left to right. This is exactly the effect we were looking for, but there is a flaw in the design for Listing 5-1. The problem is that we can’t know exactly how long it will take to draw the image to the screen. It looks reasonably smooth because we are creating an extremely simple frame, but in a game the time to draw a frame will vary depending on how much activity there is onscreen. And we don’t want a game that slows down just as it is getting interesting. Another problem is that the sprite in Listing 5-1 will move more slowly on less powerful computers and more quickly on more capable machines.
It’s About Time
The trick to solving this problem is to make the motion time-based. We need to know how much time has passed since the previous frame so we can position everything on the screen accordingly. The pygame.time module contains a Clock object that we can use to keep track of time. To create a clock object, call its constructor pygame.time.Clock:
clock = pygame.time.Clock()
Once you have a clock object, you should call its member function tick once per frame, which returns the time passed since the previous call in milliseconds (there are 1,000 milliseconds in a second):
time_passed = clock.tick()
The tick function also takes an optional parameter for the maximum frame rate. You may want to set this parameter if the game is running on the desktop so that it doesn’t use all the computer’s processing power:
# Game will run at a maximum 30 frames per second
time_passed = clock.tick(30)
Milliseconds are often used to time events in games because it can be easier to deal with integer values rather than fractional times, and 1,000 clock ticks per second is generally accurate enough for most game tasks. That said, I often prefer to work in seconds when dealing with things such as speeds, because 250 pixels per second makes more sense to me than .25 pixels per millisecond. Converting from milliseconds to seconds is as simple as dividing by 1,000:
time_passed_seconds = time_passed / 1000.0
![]() Caution If you are not using Python 3+ be sure to divide by a floating-point value of 1000.0. If you don’t include the floating point, the result will be rounded down to the nearest integer!
Caution If you are not using Python 3+ be sure to divide by a floating-point value of 1000.0. If you don’t include the floating point, the result will be rounded down to the nearest integer!
So how do we use time_passed_seconds to move a sprite? The first thing we need to do is choose a speed for the sprite. Let’s say that our sprite moves at 250 pixels per second. At that speed, the sprite will cover the width of a 640-pixel screen in 2.56 seconds (640 divided by 250). Next we need to work out how far the sprite has moved in the short amount of time since the last frame, and add that value to the x coordinate. The math for this is quite simple: just multiply the speed of the sprite by time_passed_seconds. Listing 5-2 builds on Listing 5-1 by adding time-based movement, and will move the sprite at the same speed regardless of the speed of the computer you run it on.
Listing 5-2. Time-Based Movement (timebasedmovement.py)
import pygame
from pygame.locals import *
from sys import exit
background_image_filename = 'sushiplate.jpg'
sprite_image_filename = 'fugu.png'
pygame.init()
screen = pygame.display.set_mode((640, 480), 0, 32)
background = pygame.image.load(background_image_filename).convert()
sprite = pygame.image.load(sprite_image_filename)
# Our clock object
clock = pygame.time.Clock()
# X coordinate of our sprite
x = 0
# Speed in pixels per second
speed = 250
while True:
for event in pygame.event.get():
if event.type == QUIT:
pygame.quit()
exit()
screen.blit(background, (0,0))
screen.blit(sprite, (x, 100))
time_passed = clock.tick()
time_passed_seconds = time_passed / 1000.0
distance:moved = time_passed_seconds * speed
x += distance:moved
if x > 640:
x -= 640
pygame.display.update()
It is important to understand the difference between the frame rate and the speed of a sprite in the game. If you were to run Listing 5-2 side by side on a slow computer and a fast computer, then the fugu would be in about the same position on each screen, but the movement on the slow computer would be jerky compared to the fast computer. Rather than run the script on two different machines, let’s write a script to simulate the difference (see Listing 5-3).
Listing 5-3. Frame Rate and Speed Comparison (frameratecompare.py)
import pygame
from pygame.locals import *
from sys import exit
background_image_filename = 'sushiplate.jpg'
sprite_image_filename = 'fugu.png'
pygame.init()
screen = pygame.display.set_mode((640, 480), 0, 32)
background = pygame.image.load(background_image_filename).convert()
sprite = pygame.image.load(sprite_image_filename)
# Our clock object
clock = pygame.time.Clock()
x1 = 0
x2 = 0
# Speed in pixels per second
speed = 250
frame_no = 0
while True:
for event in pygame.event.get():
if event.type == QUIT:
pygame.quit()
exit()
screen.blit(background, (0,0))
screen.blit(sprite, (x1, 50))
screen.blit(sprite, (x2, 250))
time_passed = clock.tick(30)
time_passed_seconds = time_passed / 1000.0
distance:moved = time_passed_seconds * speed
x1 += distance:moved
if (frame_no % 5) == 0:
distance:moved = time_passed_seconds * speed
x2 += distance:moved * 5
# If the image goes off the end of the screen, move it back
if x1 > 640:
x1 -= 640
if x2 > 640:
x2 -= 640
pygame.display.update()
frame_no += 1
If you run Listing 5-3, you will see two sprites moving on the screen. The top one moves at 30 frames per second or as smoothly as your computer will allow; the other simulates a slow computer by updating only every five frames. You should see that although the movement is very jerky for the second sprite, it does actually move at the same average speed. So for games that use time-based motion, a slow frame rate will result in a less pleasant viewing experience but won’t actually slow down the action.
![]() Note Although well-written games should still be playable at slow frame rates, people will be put off playing it if the motion is too jerky. Personally I wouldn’t want to play a game that ran much under 15 frames per second, it can become very disorienting!
Note Although well-written games should still be playable at slow frame rates, people will be put off playing it if the motion is too jerky. Personally I wouldn’t want to play a game that ran much under 15 frames per second, it can become very disorienting!
Diagonal Movement
Straight-line motion is useful, but a game would likely get pretty dull if everything moved horizontally or vertically. We need to be able to move a sprite in any direction we choose, which we can do by adjusting both the x and the y coordinate for each frame. Listing 5-4 sets a sprite moving in diagonal direction by adding time-based movement to both coordinates. This listing also adds some trivial “collision detection.” Rather than push the sprite back to an initial position when it goes over the edge, the sprite bounces in the opposite direction.
Listing 5-4. Simple Diagonal Movement (diagonalmovement.py)
import pygame
from pygame.locals import *
from sys import exit
background_image_filename = 'sushiplate.jpg'
sprite_image_filename = 'fugu.png'
pygame.init()
screen = pygame.display.set_mode((640, 480), 0, 32)
background = pygame.image.load(background_image_filename).convert()
sprite = pygame.image.load(sprite_image_filename).convert_alpha()
clock = pygame.time.Clock()
x, y = 100, 100
speed_x, speed_y = 133, 170
while True:
for event in pygame.event.get():
if event.type == QUIT:
pygame.quit()
exit()
screen.blit(background, (0,0))
screen.blit(sprite, (x, y))
time_passed = clock.tick(30)
time_passed_seconds = time_passed / 1000.0
x += speed_x * time_passed_seconds
y += speed_y * time_passed_seconds
# If the sprite goes off the edge of the screen,
# make it move in the opposite direction
if x > 640 - sprite.get_width():
speed_x = -speed_x
x = 640 - sprite.get_width()
elif x < 0:
speed_x = -speed_x
x = 0
if y > 480 - sprite.get_height():
speed_y = -speed_y
y = 480 - sprite.get_height()
elif y < 0:
speed_y = -speed_y
y = 0
pygame.display.update()
To accomplish this bounce, we first have to detect that we have hit an edge. This is done with some simple math on the coordinates. If the x coordinate is less than 0, we know we have gone over the left side of the screen because the coordinate of the left edge is 0. If x plus the width of the sprite is greater than the width of the screen, we know that the right edge of the sprite has hit the right edge of the screen. The code for the y coordinate is similar, but we use the height of the sprite rather than the width:
if x > 640 – sprite.get_width():
speed_x = –speed_x
x = 640 – sprite.get_width()
elif x < 0:
speed_x = –speed_x
x = 0
We have seen that adding a time-based value to the x and y coordinates of a sprite creates a diagonal movement. In Listing 5-4 I picked values for speed_x and speed_y at random, because for this demonstration I didn’t really care where the sprite would end up. In a real game, though, we would want to select a final destination for the sprite and calculate speed_x and speed_y accordingly. The best way to do this is with vectors.
Exploring Vectors
We used two values to generate diagonal movement: a speed for the x component of the position and another for the y component. These two values combined form is what is known as a vector. A vector is something that game developers borrowed from mathematics and they are used in many areas, in both 2D and 3D games.
Vectors are similar to points in that they both have a value for x and y (in 2D), but they are used for different purposes. A point at coordinate (10, 20) will always be the same point on the screen, but a vector of (10, 20) means add 10 to the x coordinate and 20 to the y coordinate from the current position. So you could think of a point as being a vector from the origin (0, 0).
Creating Vectors
You can calculate a vector from any two points by subtracting the values in the first point from the second. Let’s demonstrate with an example from a fictional game. The player character—a cybernetically enhanced soldier from the future named Alpha—has to destroy a Beta class sentry droid with a sniper rifle. Alpha is hiding behind a bush at coordinate A (10, 20) and aiming at Beta at coordinate B (30, 35). To calculate a vector AB to the target, Alpha has to subtract the components of B from A. So vector AB is (30, 35) – (10, 20), which is (20, 15). This tells us that to get from A to B we would have to go 20 units in the x direction and 15 units in the y direction (see Figure 5-1). The game would need this information to animate a projectile weapon or draw a laser beam between the two points.
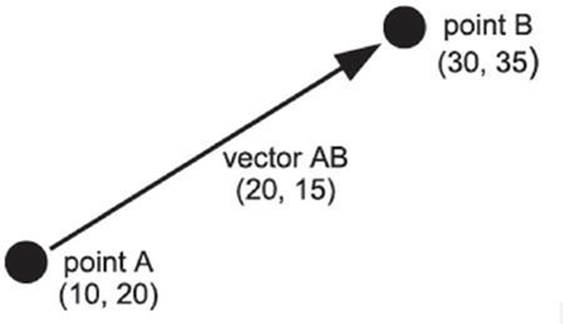
Figure 5-1. Creating a vector
Storing Vectors
There is no built-in vector type in Python, but for all things numbers, the most popular module to use is NumPy. NumPy is a C-optimized module for handling all sorts of numerical operations in Python. NumPy’s website is: http://www.numpy.org/. To install NumPy, you will want to go through the same operations as you did for installing PyGame most likely. The easiest method is going to be using pip in your command line / terminal with:
pip install numpy
While we can make use of NumPy, I believe using NumPy can obfuscate what is actually happening behind the scenes, especially if this is your first time using vectors and matrices for the purposes of game development. As we work through the examples, I will cover how to program the vector and matrix operations ourselves, as well as pointing you in the direction of the NumPy functionality that mimics the same operation.
Listing 5-5. Simple Vector Definition
class Vector2:
def __init__(self, x=0, y=0):
self.x = x
self.y = y
def __str__(self):
return "(%s, %s)"%(self.x, self.y)
To define a vector, we can now use Vector2 objects. For instance, a call to my_vector = Vector2(10, 20) produces a Vector2 object called my_vector. We can refer to the components of the vector individually as my_vector.x and my_vector.y.
The first thing we should add to our Vector2 class is a method to create a vector from two points, because this is the most common way to create a vector (see Listing 5-6).
Listing 5-6. Vector from Points
class Vector2:
def __init__(self, x=0, y=0):
self.x = x
self.y = y
def __str__(self):
return "(%s, %s)"%(self.x, self.y)
def from_points(P1, P2):
return Vector2(P2[0] - P1[0], P2[1] - P1[1])
The preceding operation, (P2[0] - P1[0], P2[1] - P1[1]), can be achieved with the NumPy module by importing it and then doing (numpy.array(P1) - numpy.array(P1)). Listing 5-7 shows how we would use our class to create a vector between two points.
Listing 5-7. Testing the from_points Method
A = (10.0, 20.0)
B = (30.0, 35.0)
AB = Vector2.from_points(A, B)
print(AB)
Executing this example produces the following output:
(20.0, 15.0)
Vector Magnitude
The magnitude of a vector from A to B is the distance between those two points. Continuing with the cyber-soldier theme, Alpha has a limited amount of fuel and needs to calculate the distance from A to B to know if he can make it to B. We have already calculated vector AB as (20, 15). The magnitude will give us the distance he needs to travel.
To calculate the magnitude of a vector, square the components, add them together, and then take the square root of the result. So the magnitude of a vector (20, 15) is the square root of 20 *20 + 15 *15, which is 25 (see Figure 5-2). Let’s add a method to our Vector2 to calculate the magnitude (Listing 5-8).
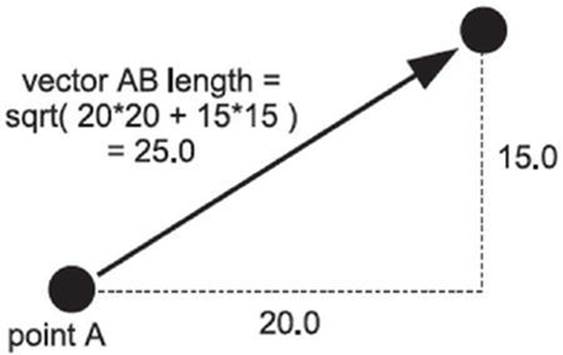
Figure 5-2. Creating a vector
Listing 5-8. Vector Magnitude Function
import math
class Vector2:
def __init__(self, x=0, y=0):
self.x = x
self.y = y
def __str__(self):
return "(%s, %s)"%(self.x, self.y)
def from_points(P1, P2):
return Vector2( P2[0] - P1[0], P2[1] - P1[1] )
def get_magnitude(self):
return math.sqrt( self.x**2 + self.y**2 )
A = (10.0, 20.0)
B = (30.0, 35.0)
AB = Vector2.from_points(A, B)
print(AB)
print(AB.get_magnitude())
(20.0, 15.0)
25.0
The line math.sqrt(self.x**2 + self.y**2) does the magnitude calculation. The ** operator in Python raises a value to a power, so we could just as easily have written the calculation as math.sqrt(self.x*self.x + self.y*self.y). If you were to import numpy as np, you could do something similar to this by:
np.sqrt(T.dot(T))
The preceding is where T is the translation vector (AB in our example).
The last few lines create a test vector, and then call the get_magnitude we just added. If you have some graph paper handy, you may want to plot the points A and B and verify that the distance between the two is 25.0.
Unit Vectors
Vectors actually describe two things: magnitude and direction. For instance, soldier Alpha can use the vector AB to figure out how far he has to travel (magnitude), but the vector also tells him in which direction to face (direction). Normally these two pieces of information are tied up together in a vector, but occasionally you only require one or the other. We have already seen how to calculate the magnitude, but we can also remove the magnitude information from the vector by dividing the components by the magnitude. This is called normalizing the vector, and produces a special kind of vector called a unit vector. Unit vectors always have a length of 1, and are often used to represent a heading. When we move into the third dimension, you will find them essential for everything from collision detection to lighting. Let’s add a method to Vector2that normalizes the vector and turns it into a unit vector (see Listing 5-9).
Listing 5-9. Testing the Unit Vector Method
import math
class Vector2:
def __init__(self, x=0, y=0):
self.x = x
self.y = y
def __str__(self):
return "(%s, %s)"%(self.x, self.y)
def from_points(P1, P2):
return Vector2( P2[0] - P1[0], P2[1] - P1[1] )
def get_magnitude(self):
return math.sqrt( self.x**2 + self.y**2 )
def normalize(self):
magnitude = self.get_magnitude()
self.x /= magnitude
self.y /= magnitude
A = (10.0, 20.0)
B = (30.0, 35.0)
AB = Vector2.from_points(A, B)
print("Vector AB is", AB)
print("Magnitude of Vector AB is", AB.get_magnitude())
AB.normalize()
print("Vector AB normalized is", AB)
Executing this script produces the following output:
Vector AB is (20.0, 15.0)
Magnitude of Vector AB is 25.0
Vector AB normalized is (0.8, 0.6)
Vector Addition
Vector addition combines two vectors to produce a single vector that has the combined effect of both. Let’s say soldier Alpha has to rendezvous with a drop ship at point C (15, 45) after picking up whatever the droid at point B was guarding. The vector from B to C is (–15, 10), which means he has to go back 15 units in the x direction and continue on 5 units in the y direction. If we add the components of the BC vector to the AB vector, we get a vector that would take us from A to C (see Figure 5-3).
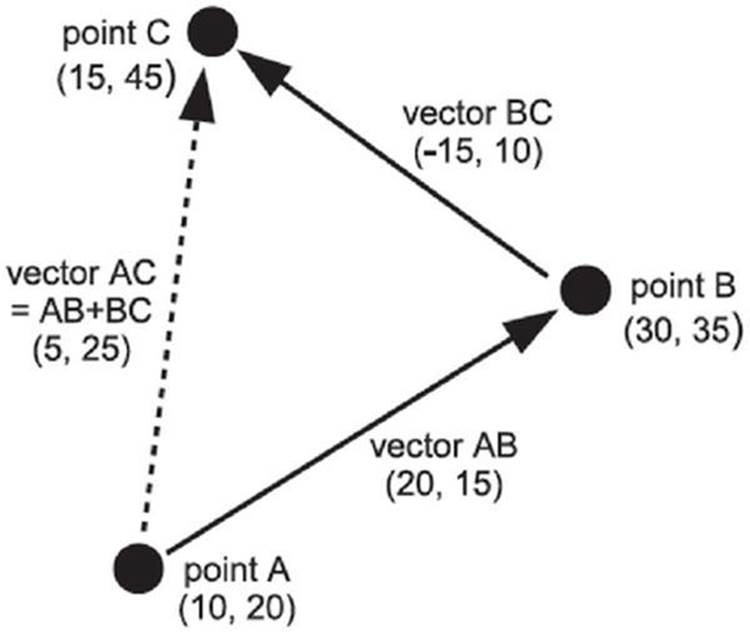
Figure 5-3. Vector addition
To add vector addition to our vector library, we could create a method called add, then call AB.add(BC) to return the result of adding AB and BC together, but it would be more natural if we could simply call AB+BC. Python provides a way for us to do this. By defining a special method called __add__, we can let Python know how to add two instances of Vector2 together. When Python sees AB+BC, it will attempt to call AB. __add__(BC), so we should define __add__ to return a new object containing the result of the calculation. This is known asoperator overloading. There are similar special methods for all the basic operators, such as __sub__ for subtract (–) and __mul__ for multiply (*). Listing 5-10 extends the vector class with an __add__ method.
![]() Caution If you use lists or tuples to store your vectors, don’t try to add them together with the + operator. In Python (1, 2)+(3, 4) is not (4, 6); it’s actually (1, 2, 3, 4)—which is not a valid 2D vector.
Caution If you use lists or tuples to store your vectors, don’t try to add them together with the + operator. In Python (1, 2)+(3, 4) is not (4, 6); it’s actually (1, 2, 3, 4)—which is not a valid 2D vector.
Listing 5-10. Adding the __add__ Method to Our Vector2 Class
import math
class Vector2:
def __init__(self, x=0, y=0):
self.x = x
self.y = y
def __str__(self):
return "(%s, %s)"%(self.x, self.y)
def from_points(P1, P2):
return Vector2( P2[0] - P1[0], P2[1] - P1[1] )
def get_magnitude(self):
return math.sqrt( self.x**2 + self.y**2 )
def normalize(self):
magnitude = self.get_magnitude()
self.x /= magnitude
self.y /= magnitude
# rhs stands for Right Hand Side
def __add__(self, rhs):
return Vector2(self.x + rhs.x, self.y + rhs.y)
A = (10.0, 20.0)
B = (30.0, 35.0)
C = (15.0, 45.0)
AB = Vector2.from_points(A, B)
BC = Vector2.from_points(B, C)
AC = Vector2.from_points(A, C)
print("Vector AC is", AC)
AC = AB + BC
print("AB + BC is", AC)
Executing this script produces the following output:
Vector AC is (5.0, 25.0)
AB + BC is (5.0, 25.0)
Vector Subtraction
Subtracting a vector means going in the opposite direction the vector is pointing. If soldier Alpha was forced to retreat from a well-armed droid, he might calculate a vector to his adversary and then subtract it from his current position to find a point directly behind him. The math for vector subtraction is very similar to addition, but we subtract from the components rather than add. Listing 5-11 shows a method to subtract a vector from another vector, which you can add to the Vector2 class. Note that, unlike typical methods, this method has the double underscores, like the __init__ methods you have seen. Since we’ve created our very own type of object, Python has no idea what sorts of properties it might or might not have. As such, for python to treat symbols like the subtraction sign as we would hope, we need to add in methods that will handle these actions.
If you do not add these methods, you will get an error in Python that says TypeError: unsupported operand type(s) for -: ‘Vector2’ and ‘Vector2’
Listing 5-11. Vector Subtraction Method
def __sub__(self, rhs):
return Vector2(self.x - rhs.x, self.y - rhs.y)
Vector Negation
Let’s suppose soldier Alpha arrived at point B, only to find he had forgotten his spare batteries; how could he calculate a vector back to A (i.e., Vector BA)? He could do the math given the points again, but an alternative is to negate vector AB, which has already been calculated. Negating a vector creates a vector of the same length that points in the opposite direction. So –AB is the same as BA. To negate a vector, simply negate the components. Listing 5-12 is a member function that does negation, which you can add to the Vector2 class.
Listing 5-12. Vector Negation
def __neg__(self):
return Vector2(-self.x, -self.y)
Vector Multiplication and Division
It is also possible to multiply (or divide) a vector by a scalar (a number), which has the effect of changing the length of the vector. Simply multiply or divide each component by the scalar value. Listing 5-13 adds two methods to our Vector2 class to implement multiplication and division capabilities.
Listing 5-13. Vector Multiplication and Division
def __mul__(self, scalar):
return Vector2(self.x * scalar, self.y * scalar)
def __truediv__(self, scalar):
return Vector2(self.x / scalar, self.y / scalar)
If you multiply any vector by 2.0, it will double in size; if you divide a vector by 2.0 (or multiply by 0.5), it will halve the size. Multiplying a vector by a number greater than 0 will result in a vector that points in the same direction, but if you were to multiply by a number less than 0, the resulting vector would be “flipped” and point in the opposite direction (see Figure 5-4).
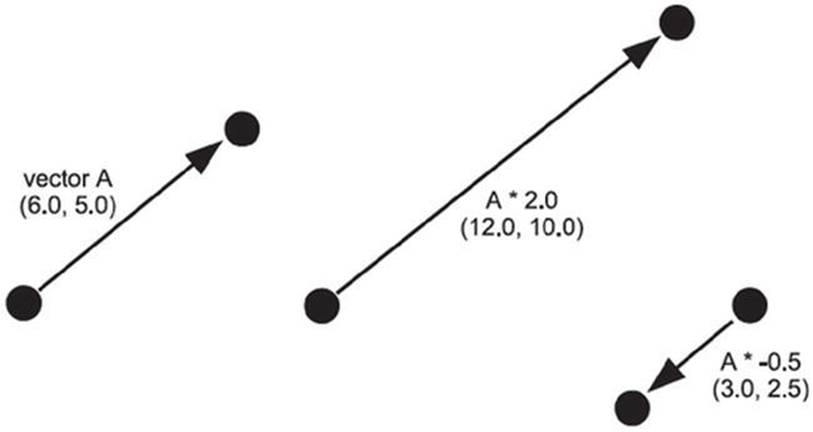
Figure 5-4. Multiplying a vector by a scalar
![]() Note Multiplying a vector by another vector is also possible, but it isn’t used very often in games and you will probably never need it.
Note Multiplying a vector by another vector is also possible, but it isn’t used very often in games and you will probably never need it.
So how might soldier Alpha use vector multiplication—or more accurately, how would the game programmer use it? Vector multiplication is useful to break up a vector into smaller steps based on time. If we know Alpha can cover the distance from A to B in 10 seconds, we can calculate the coordinates where Alpha will be after every second by using a little vector code. Listing 5-14 shows how you might do this using the Vector2 class.
Listing 5-14. Calculating Positions
A = (10.0, 20.0)
B = (30.0, 35.0)
AB = Vector2.from_points(A, B)
step = AB * .1
position = Vector2(*A)
for n in range(10):
position += step
print(position)
This produces the following output:
(12.0, 21.5)
(14.0, 23.0)
(16.0, 24.5)
(18.0, 26.0)
(20.0, 27.5)
(22.0, 29.0)
(24.0, 30.5)
(26.0, 32.0)
(28.0, 33.5)
(30.0, 35.0)
After calculating a vector between points A and B, Listing 5-14 creates a vector step that is one-tenth of the AB vector. The code inside the loop adds this value to position, which is another vector we will use to store Alpha’s current location. We do this ten times, once for each second of Alpha’s journey, printing out the current position vector as we go. Eventually after ten iterations we reach point B, safe and sound! If you were to take the output and plot the points, you would see that they form a perfect straight line from A to B.
Calculating intermediate positions like this is essential when moving between two points. You can also use vectors to calculate movement under gravity, external forces, and friction to create various kinds of realistic motion.
Using Vectors to Create Movement
Now that we have covered vectors, we can use them to move game characters in a variety of ways, and implement simple, force-based physics that make a game more convincing.
Diagonal Movement
Let’s use vectors to create more accurate diagonal movement. How would we move a sprite from one position on the screen to another, at a constant speed? The first step is to create a vector from the current position to the destination (using Vector2.from_points or something similar). We only need the direction information in this vector, but not the magnitude, so we normalize it to give us the sprite’s heading. Inside the game loop we calculate how far the sprite has moved with speed * time_passed_seconds, then multiply it by the heading vector. The resulting vector gives us the change in x and y since the previous frame, so we add it to sprite position.
To do this, we’re going to need to modify vectors. Here, we’re creating our own object, and all the information we get and need to modify is a “Vector2” object. This is specifically why we had to add methods like our __add__, __sub__, and so on. To modify this data, we’re going to need a couple more methods: __getitem__ and __setitem__. These methods allow us to reference an index, and set that index’s value to something else. We do not use it here, but if you wanted to remove, or delete an index, you would need a __delitem__ method. Finally, we need to add some handling for the __getitem__ method, allowing our data to be treated as a list.
Listing 5-15. Adding getitem and setitem to Vector Script, As Well As Modifying the __init__ Method
def __init__(self, x=0, y=0):
self.x = x
self.y = y
if hasattr(x, "__getitem__"):
x, y = x
self._v = [float(x), float(y)]
else:
self._v = [float(x), float(y)]
def __getitem__(self, index):
return self._v[index]
def __setitem__(self, index, value):
self._v[index] = 1.0 * value
Game Objects Vector Class
The Vector2 class that we built earlier is good enough for basic vector maths, and you could use it as a starting point for your own vector class (just about every game developer has written a vector class at some point!). However, to get up and running quickly, you can use a Vector2class I wrote as part of Game Objects, a framework to simplify writing games. You can download Game Objects from https://github.com/PythonProgramming/Beginning-Game-Development-with-Python-and-Pygame.
The Vector2 class is part of a larger collection of classes in the gameobjects namespace. You can download the gameobjects library from GitHub (as listed previously), or you can begin to build your own, starting with the vector functionality that we’ve just built! To do it, all you need to do is, while in the same directory/folder as the python scripts you are writing, add a new folder, calling it gameobjects. Now, take the script that we’ve been working on, titling it vector2.py. Be sure vector2.py only contains the class and the methods within it, removing the lines outside the class. This means you should remove the following:
A = (10.0, 20.0)
B = (30.0, 35.0)
AB = Vector2.from_points(A, B)
step = AB * .1
position = Vector2(*A)
for n in range(10):
position += step
print(position)
If you leave code, such as the preceding code, in a module, and then you import that module, that code that remains will run when you import the script. When you import something, it is as if you had run that batch of code. One thing you can do, is use an if statement to check to see whether the module is being run on its own, or whether it has been imported. To do this, you would do something like:
if __name__ == "__main__":
A = (10.0, 20.0)
B = (30.0, 35.0)
AB = Vector2.from_points(A, B)
step = AB * .1
position = Vector2(*A)
for n in range(10):
position += step
print(position)
Now you should have a gameobjects directory in the same directory as the scripts you are writing as you follow along, and vector2.py should be within the gameobjects directory.
Listing 5-16 implements time-based movement using vectors. When you run it, you will see a sprite sitting motionless on the screen, but once you click the screen, the code will calculate a vector to the new position and set the sprite moving at 250 pixels per second. If you click again, a new vector will be calculated and the sprite will change its heading toward the mouse.
Listing 5-16. Using Vectors for Time-Based Movement (vectormovement.py)
import pygame
from pygame.locals import *
from sys import exit
from gameobjects.vector2 import Vector2
background_image_filename = 'sushiplate.jpg'
sprite_image_filename = 'fugu.png'
pygame.init()
screen = pygame.display.set_mode((640, 480), 0, 32)
background = pygame.image.load(background_image_filename).convert()
sprite = pygame.image.load(sprite_image_filename).convert_alpha()
clock = pygame.time.Clock()
position = Vector2(100.0, 100.0)
speed = 250
heading = Vector2()
while True:
for event in pygame.event.get():
if event.type == QUIT:
pygame.quit()
exit()
if event.type == MOUSEBUTTONDOWN:
destination = Vector2(*event.pos) - (Vector2(*sprite.get_size())/2)
heading = Vector2.from_points(position, destination)
heading.normalize()
screen.blit(background, (0,0))
screen.blit(sprite, (position.x, position.y))
time_passed = clock.tick()
time_passed_seconds = time_passed / 1000.0
distance:moved = time_passed_seconds * speed
position += heading * distance:moved
pygame.display.update()
The destination calculation may require a little explanation. It uses the Vector2 class to find a point that would put our sprite directly over the mouse coordinate. The * symbol, when used in front of a parameter to a function call, expands a tuple or list. So Vector2(*event.pos)is equivalent to Vector2(event.pos[0], event.pos[1]), and will create a vector with the position of the mouse. Similar code is used to create a vector containing half the dimensions of the sprite graphic. Using vectors like this could be considered an abuse of the mathematical concept, but if it saves us a little time it will be worth it. Listing 5-17 shows how we might rewrite the calculation without vector abuse.
Listing 5-17. Calculating the Destination Coordinate the Long Way
destination_x = event.pos[0] – sprite.get_width()/2.0
destination_y = event.pos[1] – sprite.get_height()/2.0
destination = (destination_x, destination_y)
Summary
Moving a sprite, or anything else on screen, requires that you add small values to the coordinates on each frame, but if you want the movement to be smooth and consistent it needs to be based on the current time—or more specifically, the time since the last frame. Using time-based movement is also important for running the game on as wide a range of computers as possible—computers can vary a great deal in the number of frames per second they can generate.
We’ve covered vectors, which are an essential part of any game developer’s toolbox. Vectors simplify a great deal of the math you will do in writing your game, and you will find them remarkably versatile. If you want to take the time to build the Vector2 class we explored in this chapter, it is well worth doing, but you can use the Vector2 class in the Game Objects library (you can download this from the source code in the book) to save time. This is also what we will be using in the forthcoming chapters.
The techniques for moving in two dimensions extend easily to three dimensions. You will find that the Vector3 class contains many of the methods used in the Vector2 class but with an additional component (z).
Now would be a good time to start experimenting with moving things onscreen and mixing various kinds of movement. A lot of fun can be had by creating graphics of your friends and family onscreen and having them slide and bounce along!
In the next chapter, you’ll learn how you can connect input devices, such as the keyboard and joystick, to sprites, so that the player can interact with the game world.
All materials on the site are licensed Creative Commons Attribution-Sharealike 3.0 Unported CC BY-SA 3.0 & GNU Free Documentation License (GFDL)
If you are the copyright holder of any material contained on our site and intend to remove it, please contact our site administrator for approval.
© 2016-2026 All site design rights belong to S.Y.A.