Teach Your Kids to Code: A Parent-Friendly Guide to Python Programming (2015)
Chapter 9. User Interaction: Get into the Game
In Chapter 8, we used some of the Pygame library’s features to draw shapes and images on the screen. We were also able to create animation by drawing shapes in different locations over time. Unfortunately, we weren’t able to interact with our animated objects like we might in a game; we expect to be able to click, drag, move, hit, or pop objects on the screen to affect or control the elements of a game while it runs.
Interactive programs give us this sense of control in an app or game, because we can move or interact with a character or other object in the program. That’s exactly what you’ll learn to do in this chapter: we’ll use Pygame’s ability to handle user interaction from the mouse to make our programs more interactive and more engaging for the user.
Adding Interaction: Click and Drag
Let’s add user interaction by developing two programs that will allow the user to draw interactively on the screen. First, we’ll build on our Pygame foundation to handle events like mouse-button clicks and to enable the user to draw dots on the screen. Then, we’ll add logic to handle mouse-button presses and releases separately and let the user drag the mouse with the button pressed to draw, like in a paint program.
Clicking for Dots
We’ll build our ClickDots.py program using the same steps as in ShowPic.py (Exiting the Program) with a setup, a game loop, and an exit. Pay extra attention to the event-handling portion of the game loop, since that’s where we’ll add the if statement that will process mouse clicks.
Setup
Here are our first few lines of setup. Start a new file and save it as ClickDots.py (the final program is shown in Putting It All Together).
import pygame # Setup
pygame.init()
screen = pygame.display.set_mode([800,600])
pygame.display.set_caption("Click to draw")
Our setup begins with import pygame and pygame.init() as usual, and then we create a screen object as our drawing window display. This time, though, we’ve added a title, or caption, to the window with pygame.display.set_caption(). This lets the user know what the program is. The argument we pass to set_caption() is a string of text that will appear on the title bar of the window, as shown at the top of Figure 9-1.

Figure 9-1. The title bar at the top of ClickDots.py tells the user, “Click to draw.”
The rest of our setup creates our game loop variable, keep_going; sets a color constant (we’ll draw in red for this program); and creates a radius for our drawing dots:
keep_going = True
RED = (255,0,0) # RGB color triplet for RED
radius = 15
Now let’s move on to our game loop.
Game Loop: Handling Mouse Clicks
In our game loop, we need to tell the program when to quit and how to handle mouse-button presses:
while keep_going: # Game loop
for event in pygame.event.get(): # Handling events
➊ if event.type == pygame.QUIT:
keep_going = False
➋ if event.type == pygame.MOUSEBUTTONDOWN:
➌ spot = event.pos
➍ pygame.draw.circle(screen, RED, spot, radius)
At ➊, we handle the pygame.QUIT event by setting our loop variable keep_going to False.
The second if statement, at ➋, handles a new event type: the pygame.MOUSEBUTTONDOWN event that tells us that the user has pressed one of the mouse buttons. Whenever the user presses a mouse button, this event will appear in the list of events that our program gets from pygame.event.get(), and we can use an if statement both to check for the event and to tell the program what to do when the event occurs. At ➌, we create a variable called spot to hold the x- and y-coordinates of the mouse’s position. We can get the location of the mouse-click event with event.pos; event is the current event in our for loop. Our if statement has just verified that this particular event is of type pygame.MOUSEBUTTONDOWN, and mouse events have a pos attribute (in this case, event.pos) that stores the (x, y) coordinate pair telling us where the mouse event occurred.
Once we know the location on the screen where the user clicked the mouse button, at ➍ we tell the program to draw a filled circle on the screen surface, in the RED color from our setup, at the location spot, with the radius of 15 we specified in our setup.
Putting It All Together
The only thing left to do is update the display and tell our program what to do when it’s time to exit. Here’s the full program for ClickDots.py.
ClickDots.py
import pygame # Setup
pygame.init()
screen = pygame.display.set_mode([800,600])
pygame.display.set_caption("Click to draw")
keep_going = True
RED = (255,0,0) # RGB color triplet for RED radius = 15
while keep_going: # Game loop
for event in pygame.event.get(): # Handling events
if event.type == pygame.QUIT:
keep_going = False
if event.type == pygame.MOUSEBUTTONDOWN:
spot = event.pos
pygame.draw.circle(screen, RED, spot, radius)
pygame.display.update() # Update display
pygame.quit() # Exit
This program is short but enables the user to draw pictures one dot at a time, as shown back in Figure 9-1. If we want to draw continuously as we drag the mouse with the button pressed, we just need to handle one more type of mouse event, pygame.MOUSEBUTTONUP. Let’s give that a try.
Dragging to Paint
Now let’s create a more natural drawing program, DragDots.py, that lets the user click and drag to draw smoothly, as with a paintbrush. We’ll get a smooth, interactive drawing app, as shown in Figure 9-2.
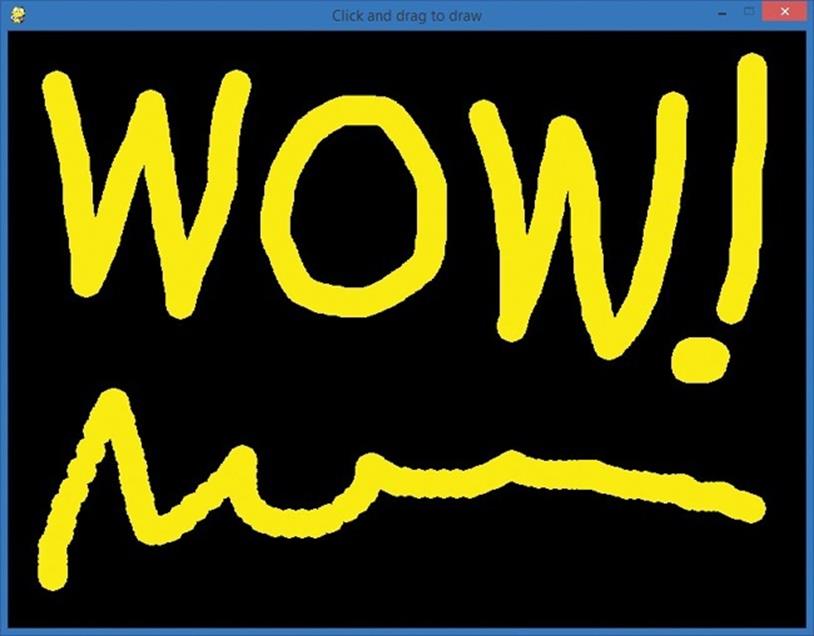
Figure 9-2. Our DragDots.py program is a fun way to paint!
To create this effect, we need to change the logic of our program. In ClickDots.py, we handled MOUSEBUTTONDOWN events by just drawing a circle at the location of the mouse button click event. To draw continuously, we need to recognize both the MOUSEBUTTONDOWN and MOUSEBUTTONUP events; in other words, we want to separate mouse button clicks into presses and releases so that we know when the mouse is being dragged (with the button down) versus just being moved with the button up.
One way to accomplish this is with another Boolean flag variable. We can set a Boolean called mousedown to True whenever the user presses the mouse button and to False whenever the user releases the mouse button. In our game loop, if the mouse button is down (in other words, whenmousedown is True), we can get the mouse’s location and draw a circle on the screen. If the program is fast enough, the drawing should be smooth like in a paintbrush app.
Setup
Make the setup section of your code look like this:
import pygame # Setup
pygame.init()
screen = pygame.display.set_mode([800,600])
➊ pygame.display.set_caption("Click and drag to draw")
keep_going = True
➋ YELLOW = (255,255,0) # RGB color triplet for YELLOW
radius = 15
➌ mousedown = False
The setup portion of our app looks like ClickDots.py, except for the different window caption ➊, the YELLOW color we’ll be drawing with ➋, and the very last line ➌. The Boolean variable mousedown will be our flag variable to signal to the program that the mouse button is down, or pressed.
Next, we’ll add event handlers to our game loop. These event handlers will set mousedown to True if the user is holding down the mouse and False if not.
Game Loop: Handling Mouse Presses and Releases
Make your game loop look like this:
while keep_going: # Game loop
for event in pygame.event.get(): # Handling events
if event.type == pygame.QUIT:
keep_going = False
➊ if event.type == pygame.MOUSEBUTTONDOWN:
➋ mousedown = True
➌ if event.type == pygame.MOUSEBUTTONUP:
➍ mousedown = False
➎ if mousedown: # Draw/update graphics
➏ spot = pygame.mouse.get_pos()
➐ pygame.draw.circle(screen, YELLOW, spot, radius)
➑ pygame.display.update() # Update display
The game loop starts just like our other Pygame apps, but at ➊, when we check to see whether the user has pressed one of the mouse buttons, instead of drawing immediately, we set our mousedown variable to True ➋. This will be the signal our program needs to begin drawing.
The next if statement at ➌ checks whether the user has released the mouse button. If so, the line at ➍ changes mousedown back to False. This will let our game loop know to stop drawing whenever the mouse button is up.
At ➎, our for loop is over (as we can see by the indentation), and our game loop continues by checking whether the mouse button is currently pressed (that is, if mousedown is True). If the mouse button is down, the mouse is currently being dragged, so we want to allow the user to draw on thescreen.
At ➏, we get the current location of the mouse directly, with spot = pygame.mouse.get_pos(), rather than pulling the position of the last click, because we want to draw wherever the user is dragging the mouse, not just at the location where they first pressed the button. At ➐, we draw the current circle on the screen surface, in the color specified by YELLOW, at the (x, y) location spot where the mouse is currently being dragged, with the radius of 15 that we specified in the setup section of our code. Finally, we finish the game loop at ➑ by updating the display window withpygame.display.update().
Putting It All Together
The last step is to end the program with pygame.quit() as usual. Here’s the full program.
DragDots.py
import pygame # Setup
pygame.init()
screen = pygame.display.set_mode([800,600])
pygame.display.set_caption("Click and drag to draw")
keep_going = True
YELLOW = (255,255,0) # RGB color triplet for YELLOW
radius = 15
mousedown = False
while keep_going: # Game loop
for event in pygame.event.get(): # Handling events
if event.type == pygame.QUIT:
keep_going = False
if event.type == pygame.MOUSEBUTTONDOWN:
mousedown = True
if event.type == pygame.MOUSEBUTTONUP:
mousedown = False
if mousedown: # Draw/update graphics
spot = pygame.mouse.get_pos()
pygame.draw.circle(screen, YELLOW, spot, radius)
pygame.display.update() # Update display
pygame.quit() # Exit
The DragDots.py app is so fast and responsive that it almost feels like we’re painting with a continuous brush instead of a series of dots; we have to drag the mouse pretty quickly to see the dots drawn separately. Pygame allows us to build much faster and more fluid games and animation than the turtle graphics we drew in previous chapters.
Even though the for loop handles every event during every pass through the while loop that keeps our app open, Pygame is efficient enough to do this dozens or even hundreds of times per second. This gives the illusion of instantaneous motion and reaction to our every movement and command — an important consideration as we build animations and interactive games. Pygame is up to the challenge and is the right toolkit for our graphics-intensive needs.
Advanced Interaction: Smiley Explosion
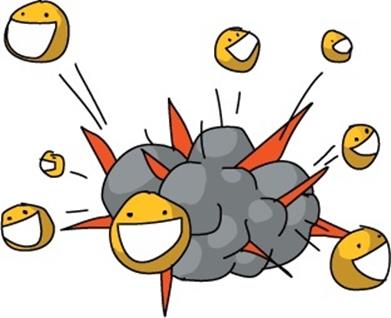
One fun animation that my students and my sons enjoy building is a scaled-up version of SmileyBounce2.py called SmileyExplosion.py. It takes the bouncing smiley to a fun new level by allowing the user to click and drag to create hundreds of bouncing smiley faces of random sizes that travel in random directions at random speeds. The effect looks like Figure 9-3. We’ll build this program step by step; the final version is in Putting It All Together.
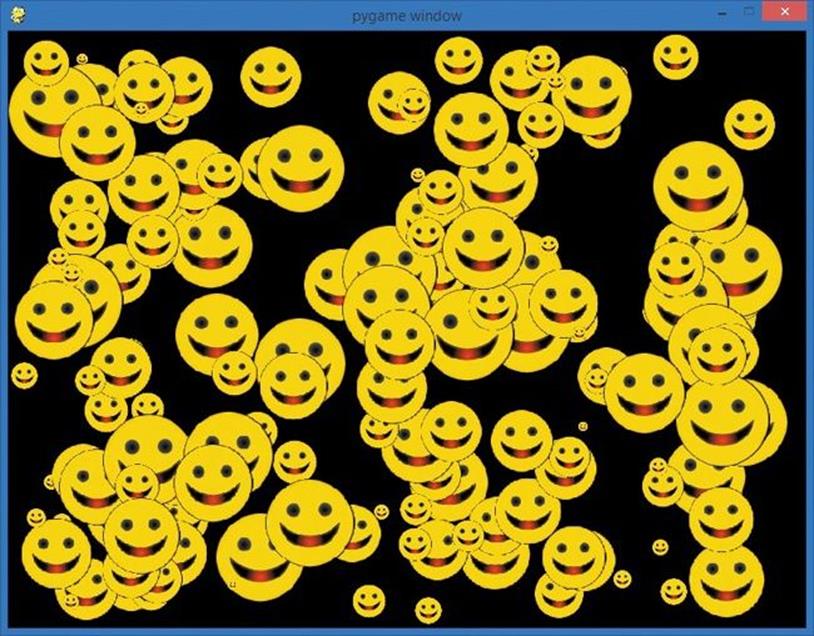
Figure 9-3. Our next app looks like an explosion of smiley face balloons bouncing all over the screen.
As you can see, we will have dozens to hundreds of smiley balloons bouncing all over the screen at any given time, so we’re going to need to draw graphics quickly and smoothly for hundreds of objects per frame. To achieve this, we’re going to add one more tool to our toolkit: sprite graphics.
Smiley Sprites
The term sprite goes back to the early days of video games. Moving graphical objects on the screen were called sprites because they floated over the background, like the imaginary fairy sprites they were named after. These light, fast sprite graphics enabled the quick, smooth animation that made video games so popular.
Pygame includes support for sprite graphics through its pygame.sprite.Sprite class. Remember from Chapter 8 that a class is like a template that can be used to create reusable objects, each with its own full set of functions and properties. In SmileyMove.py, we used the Clock class, along with its tick() method, to make our animations smooth and predictable. In the smiley explosion app, we’ll use a few handy Pygame classes, and we’ll build a class of our own to keep track of each individual smiley face as it moves around the screen.
More on Classes and Objects
In Chapter 8 you learned that classes are like cookie cutters, and objects are like the cookies we create using a particular cookie cutter. Whenever we need several items with similar functions and characteristics (like moving smiley face images with various sizes and locations), and especially when we need each item to contain different information (like the size, location, and speed of each smiley), a class can provide the template to create as many objects of that type as we need. We say that objects are instances of a particular class.
The Pygame library has dozens of reusable classes, and each class has its own methods (what we call a class’s functions) and attributes or data, the variables and values stored in each object. In the Clock class in Chapter 8, the tick() method was our function for making animation happen at a certain frame rate. For the floating smiley Sprite objects in this app, the attributes we care about are each smiley’s location on the screen, its size, and the speed it’s moving in the x- and y-directions, so we’ll create a Smiley class with those attributes. We can create our own classes whenever we need a reusable template.
Breaking a problem or program down into objects, and then building classes that create those objects, is the foundation of object-oriented programming. Object-oriented programming is a way of solving problems using objects. It is one of the most popular approaches used in software development, and one reason for that popularity is the concept of code reuse. Reusability means that once we write a useful class for one programming project, we can often reuse that class in another program instead of starting from scratch. For example, a game company can write a Cardclass to represent the cards in a standard deck. Then, every time the company programs a new game — like Blackjack, War, Poker, Go Fish, and so on — it can reuse that Card class, saving time and money by using the same code in future apps.
The Sprite class in Pygame is a great example. The Pygame team wrote the Sprite class to contain many of the features we need when we program a game object, from a running character to a spaceship to a floating smiley face. By using the Sprite class, programmers like us no longer need to write all the basic code to draw an object on the screen, detect when objects collide with one another, and so on. The Sprite class handles many of those functions for us, and we can focus on building the unique qualities of our app on top of that foundation.
Another handy Pygame class we’ll use is the Group class. Group is a container class that lets us store Sprite objects together as a group. The Group class helps us keep all our sprites together in one place (accessible through a single Group object), and that’s important when we have dozens or possibly hundreds of sprites floating around the screen. The Group class also has convenient methods for updating all the sprites in a group (such as moving the Sprite objects to each of their new locations each frame), adding new Sprite objects, removing Sprite objects from the Group, and so on. Let’s see how we can use these classes to build our smiley explosion app.
Using classes to Build our app
We’re going to create Sprite objects for our smiley face balloons that take advantage of the Sprite class’s properties to produce quick animation around the screen, even when hundreds of sprites are being moved in the same frame. I mentioned that Pygame also has support for groups of sprites that can all be drawn and handled as a collection; this group of sprites will be of type pygame.sprite.Group(). Let’s look at the setup section of our app:
import pygame
import random
BLACK = (0,0,0)
pygame.init()
screen = pygame.display.set_mode([800,600])
pygame.display.set_caption("Smiley Explosion")
mousedown = False
keep_going = True
clock = pygame.time.Clock()
pic = pygame.image.load("CrazySmile.bmp")
colorkey = pic.get_at((0,0))
pic.set_colorkey(colorkey)
➊ sprite_list = pygame.sprite.Group()
The setup looks like SmileyBounce2.py, but we’re adding a variable called sprite_list at ➊ that will contain our group of smiley face sprites. Storing the sprites in a Group will make it faster and easier to do things like draw all the smileys on the screen every frame, move all the smileys for each step of the animation, and even check to see if the smiley sprites are colliding with objects or with one another.
To create sprite objects for complex animations and games, we will create our own Sprite class that extends, or builds on, Pygame’s Sprite class, adding the variables and functions that we want for our custom sprites. We’ll name our sprite class Smiley, and we’ll add variables for the position of each smiley (pos), its x- and y-velocity (xvel and yvel; remember velocity is another word for speed), and its scale, or how big each smiley will be (scale):
class Smiley(pygame.sprite.Sprite):
pos = (0,0)
xvel = 1
yvel = 1
scale = 100
Our Smiley class definition starts with the keyword class, followed by the name we want for our class, plus the type we’re extending (pygame.sprite.Sprite).
Setting Up Sprites
The next step after starting our Smiley class and listing the data variables that we’d like each smiley sprite object to remember is called initialization, sometimes also referred to as the constructor for our class. This will be a special function that is called every time a new object of our Smileyclass is created, or constructed, in our program. Just like initializing a variable gives it a starting value, the initialization function, __init__(), in our Smiley class will set up all the starting values we need in our sprite object. The two underscores on either side of the __init__() function name have special meaning in Python. In this case, __init__() is the special function name that is used to initialize a class. We tell Python how each Smiley object should be initialized in this function, and every time we create a Smiley, this special __init__() function does its job behind the scenes, setting up variables and more for each Smiley object.
There are a number of items we need to set up in our __init__() function. First, we’ll determine what parameters we need to pass to our __init__() function. For our random smiley faces, we might pass in a position and the starting x- and y-velocities. Because our Smiley is a class and all our smiley face sprites will be objects of the Smiley type, the first parameter in all the functions in the class will be the smiley sprite object itself. We label this parameter self, because it connects __init__() and the other functions to the object’s own data. Look at the code for our __init__()function:
def __init__(self, pos, xvel, yvel):
➊ pygame.sprite.Sprite.__init__(self)
➋ self.image = pic
self.rect = self.image.get_rect()
➌ self.pos = pos
➍ self.rect.x = pos[0] - self.scale/2
self.rect.y = pos[1] - self.scale/2
➎ self.xvel = xvel
self.yvel = yvel
The four parameters for our __init__() function are the object itself, self; the position where we want the smiley to appear, pos; and xvel and yvel, its horizontal and vertical speed values. Next, at ➊, we call the initialization function for the main Sprite class so that our object can take advantage of the properties of sprite graphics without coding them from scratch. At ➋, we set the image of the sprite object (self.image) to the pic graphic that we loaded from disk (CrazySmile.bmp — you’ll need to make sure that file is still in the same folder as this new program), and we get the dimensions of the rectangle that contains the 100×100 picture.
At ➌, the statement self.pos = pos stores the position that was passed into the __init__() function in the object’s own pos variable. Then, at ➍, we set the x- and y-coordinates of the sprite’s drawing rectangle to the x- and y-coordinates stored in pos, shifted by half the size of the image (self.scale/2) so that the smiley is centered on the spot the user clicked with the mouse. Finally, we store the x- and y-velocities that were passed to the __init__() function in the object’s xvel and yvel variables (self.xvel and self.yvel) at ➎.
This __init__() constructor function will set up everything we need for drawing each smiley face on the screen, but it doesn’t handle the animation needed to move our sprites around the screen. For that, we’ll add another handy function for our sprites, update().
Updating Sprites
Sprites are built for animation, and we’ve learned that animation means updating the location of a graphic each frame (each time we pass through the game loop). Pygame sprites have an update() function built in, and we can override, or customize, this function to program the behavior that we want from our custom sprites.
Our update() function is pretty simple; the only updates to our bouncing smiley sprites for each frame are changing the position of each sprite according to its speed and checking to see whether it has collided with the edge of the screen:
def update(self):
self.rect.x += self.xvel
self.rect.y += self.yvel
if self.rect.x <= 0 or self.rect.x > screen.get_width() - self.scale:
self.xvel = -self.xvel
if self.rect.y <= 0 or self.rect.y > screen.get_height() - self.scale:
self.yvel = -self.yvel
The update() function takes one parameter — the sprite object itself, self — and the code for moving the sprite looks a lot like our animation code from SmileyBounce2.py. The only real difference is that we refer to the sprite’s (x, y) location with self.rect.x and self.rect.y, and the x- and y-velocities as self.xvel and self.yvel. Our collision detections for the boundaries of the screen also make use of screen.get_width() and screen.get_height() so they can function for any size window.
Bigger and Smaller Smileys
The last feature we’ll add to this first version of the app is changing the scale, or size, of the image. We’ll make this modification to our __init__() function right after setting self.image to pic. First, we’ll change our object’s scale variable to a random number between 10 and 100 (for a finished smiley sprite that measures between 10×10 and 100×100 pixels in size). We’ll apply this change in scale, also known as a transformation, by using the pygame.transform.scale() function, as follows:
self.scale = random.randrange(10,100)
self.image = pygame.transform.scale(self.image, (self.scale,self.scale))
Pygame’s transform.scale() function takes an image (our self.image of the smiley graphic) and the new dimensions (our new random self.scale value as the width and height of the transformed image), and it returns the scaled (up or down, bigger or smaller) image, which we’re storing as the new self.image.
With this last change, we should now be able to use our Smiley sprite class to draw smiley faces of random sizes and speeds all over our screen with drawing code similar to our DragDots.py drawing app, plus a few changes.
Putting It All Together
Here’s our full SmileyExplosion.py app:
SmileyExplosion.py
import pygame
import random
BLACK = (0,0,0)
pygame.init()
screen = pygame.display.set_mode([800,600])
pygame.display.set_caption("Smiley Explosion")
mousedown = False
keep_going = True
clock = pygame.time.Clock()
pic = pygame.image.load("CrazySmile.bmp")
colorkey = pic.get_at((0,0))
pic.set_colorkey(colorkey)
sprite_list = pygame.sprite.Group()
class Smiley(pygame.sprite.Sprite):
pos = (0,0)
xvel = 1
yvel = 1
scale = 100
def __init__(self, pos, xvel, yvel):
pygame.sprite.Sprite.__init__(self)
self.image = pic
self.scale = random.randrange(10,100)
self.image = pygame.transform.scale(self.image, (self.scale,self.scale))
self.rect = self.image.get_rect()
self.pos = pos
self.rect.x = pos[0] - self.scale/2
self.rect.y = pos[1] - self.scale/2
self.xvel = xvel
self.yvel = yvel
def update(self):
self.rect.x += self.xvel
self.rect.y += self.yvel
if self.rect.x <= 0 or self.rect.x > screen.get_width() - self.scale:
self.xvel = -self.xvel
if self.rect.y <= 0 or self.rect.y > screen.get_height() - self.scale:
self.yvel = -self.yvel
while keep_going:
for event in pygame.event.get():
if event.type == pygame.QUIT:
keep_going = False
if event.type == pygame.MOUSEBUTTONDOWN:
mousedown = True
if event.type == pygame.MOUSEBUTTONUP:
mousedown = False
screen.fill(BLACK)
➊ sprite_list.update()
➋ sprite_list.draw(screen)
clock.tick(60)
pygame.display.update()
if mousedown:
speedx = random.randint(-5, 5)
speedy = random.randint(-5, 5)
➌ newSmiley = Smiley(pygame.mouse.get_pos(),speedx,speedy)
➍ sprite_list.add(newSmiley)
pygame.quit()
The code for the game loop in SmileyExplosion.py is similar to our drawing app DragDots.py, with a few notable changes. At ➊, we’re calling the update() function on the list of smiley sprites stored in sprite_list; this single line will call the update function to move every smiley face on the screen and check for edge bounces. Similarly, the code at ➋ will draw every smiley face on the screen in its proper location. It takes only two lines of code to animate and draw potentially hundreds of sprites — that’s a huge time savings, and it’s just part of the power of sprite graphics in Pygame.
In our mousedown drawing code, we generate a random speedx and speedy for the horizontal and vertical speed of each new smiley face, and at ➌, we create a new smiley face, newSmiley, by calling the constructor for our class Smiley. Notice that we don’t have to use the function name__init__(); rather, we use the name of the class, Smiley, whenever we’re constructing or creating a new object of the Smiley class or type. We pass the constructor function the position of the mouse, along with the random speed we just created. Finally, at ➍, we take our newly created smiley face sprite, newSmiley, and add it to our Group of sprites called sprite_list.
We’ve just created a fast, fluid, interactive animation for dozens or even hundreds of smiley face sprite graphics, floating around the screen like balloons of various sizes, traveling at random speeds in every direction. In the final upgrade to this app, we’ll see an even more impressive and powerful feature of sprite graphics that handles detecting collisions.
SmileyPop, Version 1.0
For our closing example, we’ll add one crucial bit of fun to the SmileyExplosion.py program: the ability to “pop” the smiley balloons/bubbles by clicking the right mouse button (or by pressing the CONTROL key and clicking on a Mac). The effect is like a balloonpopping game or Ant Smasher, Whack-a-Mole, and so on. We’ll be able to create smiley balloons by dragging the left mouse button, and we’ll pop them (that is, remove them from the screen) by clicking the right mouse button over one or more of the smiley sprites.
Detecting Collisions and Removing Sprites
The great news is that the Sprite class in Pygame comes with collision detection built in. We can use the function pygame.sprite.collide_rect() to check whether the rectangles holding two sprites have collided; we can use the collide_circle() function to check whether two round sprites are touching; and if we’re just checking to see whether a sprite has collided with a single point (like the pixel where the user just clicked the mouse), we can use a sprite’s rect.collidepoint() function to check whether a sprite overlaps, or collides with, that point on the screen.
If we’ve determined that the user clicked a point that touches one or more sprites, we can remove each of those sprites from our sprite_list group by calling the remove() function. We can handle all the logic for popping smiley balloons in our MOUSEBUTTONDOWN event handler code. To turnSmileyExplosion.py into SmileyPop.py, we’ll just replace these two lines:
if event.type == pygame.MOUSEBUTTONDOWN:
mousedown = True
with the following seven lines of code:
if event.type == pygame.MOUSEBUTTONDOWN:
➊ if pygame.mouse.get_pressed()[0]: # Regular left mouse button, draw
mousedown = True
➋ elif pygame.mouse.get_pressed()[2]: # Right mouse button, pop
➌ pos = pygame.mouse.get_pos()
➍ clicked_smileys = [s for s in sprite_list if s.rect.collidepoint(pos)]
➎ sprite_list.remove(clicked_smileys)
The if statement for MOUSEBUTTONDOWN events remains the same, but now, we’re interested in which button was pressed. At ➊, we check to see if the left mouse button was pressed (the first button, at index [0]); if so, we turn on the mousedown Boolean flag, and the game loop will draw new smiley faces. At ➋, we see if the right mouse button is pressed, beginning the logic to check whether the mouse was clicked over one or more smileys in our sprite_list.
First, at ➌, we get the mouse’s location and store it in the variable pos. At ➍, we use a programming shortcut to generate a list of sprites from sprite_list that collide with, or overlap, the point the user clicked at pos. If a sprite s in the group sprite_list has a rectangle that collides with the point pos, group it together as a list [s] and store the list as clicked_smileys. That ability to create one list, collection, or array from another based on an if condition is a powerful feature of Python, and it makes our code much shorter for this app.
Finally, at ➎, we call the handy remove() function on our Group of sprites called sprite_list. This remove() function is different from Python’s regular remove() function, which removes a single item from a list or collection. The pygame.sprite.Group.remove() function will remove any number of sprites from a list. In this case, it will remove all the sprites from our sprite_list that collide with the point the user clicked on the screen. Once these sprites are removed from sprite_list, when sprite_list is drawn to the screen in our game loop, the clicked sprites are no longer in the list, so they don’t get drawn. It’s like they’ve disappeared — or we’ve popped them like balloons or bubbles!
Putting It All Together
Here’s the complete SmileyPop.py code.
SmileyPop.py
import pygame
import random
BLACK = (0,0,0)
pygame.init()
screen = pygame.display.set_mode([800,600])
pygame.display.set_caption("Pop a Smiley")
mousedown = False
keep_going = True
clock = pygame.time.Clock()
pic = pygame.image.load("CrazySmile.bmp")
colorkey = pic.get_at((0,0))
pic.set_colorkey(colorkey)
sprite_list = pygame.sprite.Group()
class Smiley(pygame.sprite.Sprite):
pos = (0,0)
xvel = 1
yvel = 1
scale = 100
def __init__(self, pos, xvel, yvel):
pygame.sprite.Sprite.__init__(self)
self.image = pic
self.scale = random.randrange(10,100)
self.image = pygame.transform.scale(self.image, (self.scale,self.scale))
self.rect = self.image.get_rect()
self.pos = pos
self.rect.x = pos[0] - self.scale/2
self.rect.y = pos[1] - self.scale/2
self.xvel = xvel
self.yvel = yvel
def update(self):
self.rect.x += self.xvel
self.rect.y += self.yvel
if self.rect.x <= 0 or self.rect.x > screen.get_width() - self.scale:
self.xvel = -self.xvel
if self.rect.y <= 0 or self.rect.y > screen.get_height() - self.scale:
self.yvel = -self.yvel
while keep_going:
for event in pygame.event.get():
if event.type == pygame.QUIT:
keep_going = False
if event.type == pygame.MOUSEBUTTONDOWN:
if pygame.mouse.get_pressed()[0]: # Regular left mouse button, draw
mousedown = True
elif pygame.mouse.get_pressed()[2]: # Right mouse button, pop
pos = pygame.mouse.get_pos()
clicked_smileys = [s for s in sprite_list if s.rect.collidepoint(pos)]
sprite_list.remove(clicked_smileys)
if event.type == pygame.MOUSEBUTTONUP:
mousedown = False
screen.fill(BLACK)
sprite_list.update()
sprite_list.draw(screen)
clock.tick(60)
pygame.display.update()
if mousedown:
speedx = random.randint(-5, 5)
speedy = random.randint(-5, 5)
newSmiley = Smiley(pygame.mouse.get_pos(),speedx,speedy)
sprite_list.add(newSmiley)
pygame.quit()
Remember that you’ll have to have the CrazySmile.bmp image file stored in the same folder or directory as the code to make it work. Once it does work, this program is so much fun to play with, it’s almost addictive! In the next chapter, we’ll learn about the elements of game design that make games fun, and we’ll build a complete game from scratch!
What You Learned
In this chapter, we combined user interaction with animation to create an explosion of smileys on the screen, and we used sprite graphics to make even hundreds of smiley images easy and fast to animate. We learned how to build our own Sprite class so that we could customize sprites with the features and behaviors we wanted, including data variables, an initialization function, and a custom update function. We also learned how to scale images in Pygame so that our smileys could come in all different shapes and sizes, and we learned the advantages of usingpygame.sprite.Group() to store all our sprites for quick updating and drawing on the screen.
In our closing example, we added sprite-based collision detection to see whether the user right-clicked the mouse over one or more smiley sprites. We saw how to check for events on the left mouse button separately from the right mouse button. We learned that Python has powerful features for selecting items out of a list based on an if condition, and we saw how to remove sprites from a Group using the remove() function.
We created fun apps in this chapter, topped off by a SmileyPop app that we’ll make even more game-like in Chapter 10. Pygame has given us the final skills we need to program awesome games!
Programming the cool apps in this chapter has given us the skills to do the following:
§ Use sprite graphics by customizing the pygame.sprite.Sprite() class.
§ Access, modify, update, and draw a list of sprites using pygame.sprite.Group() and its functions.
§ Transform an image by applying the pygame.trasform.scale() function to increase or decrease the image’s size in pixels.
§ Detect sprite collisions using rect.collidepoint() and similar functions from the Sprite class.
§ Remove sprites from a Group using the remove() function.
PROGRAMMING CHALLENGES
Here are three challenge problems to extend the skills developed in this chapter. For sample answers to these challenges, go to http://www.nostarch.com/teachkids/.
#1: RANDOMLY COLORED DOTS
Start by choosing your own color triplet to use in the DragDots.py program. Then modify the program to draw randomly colored dots by creating a triplet of three random numbers between 0 and 255 to use as your colors. Call your new creation RandomPaint.py.
#2: PAINTING IN COLORS
Let the user draw in two or more consistent colors using any of the following options:
§ Change the current drawing color each time the user presses a key, either to a random color each time or to a specific color for certain keys (like red for R, blue for B, and so on).
§ Draw with different colors for each of the mouse buttons (red for the left mouse button, green for the middle button, and blue for the right mouse button, for example).
§ Add some colored rectangles to the bottom or side of the screen, and modify the program so that if the user clicks in a rectangle, the drawing color changes to the same color as the rectangle.
Try one approach, or all three, and save your new file as ColorPaint.py.
#3: THROWING SMILEYS
Pygame has a function called pygame.mouse.get_rel() that will return the amount of relative motion, or how much the mouse’s position has changed in pixels since the last call to get_rel(), in the x- and y-directions. Modify your SmileyExplosion.py file to use the amount of relative mouse motion in the x- and y-directions as the horizontal and vertical speeds of each smiley (instead of generating a pair of random speedx and speedy values). This will look like the user is throwing smileys because they will speed off in the direction the user is dragging the mouse!
To add another realistic effect, slow the smileys slightly by multiplying xvel and yvel by a number smaller than 1.0 (like 0.95) in the update(self) section every time the smileys bounce off an edge of the screen. The smileys will slow down over time, as if friction from each wall bounce is making them move slower and slower. Save your new app as SmileyThrow.py.
All materials on the site are licensed Creative Commons Attribution-Sharealike 3.0 Unported CC BY-SA 3.0 & GNU Free Documentation License (GFDL)
If you are the copyright holder of any material contained on our site and intend to remove it, please contact our site administrator for approval.
© 2016-2026 All site design rights belong to S.Y.A.