EnCase Computer Forensics (2012)
Appendix B
Creating Paperless Reports
In the not too distant past, computer forensics reports were typically printed documents. As the volume and complexity of computing in general has grown, computer forensics reports have likewise grown and evolved. The current trend is toward paperless web page-style reports that are contained on CDs or DVDs. As media continues to grow in size and with it the size of cases and their reports, you may find that you are exceeding the capacity of high-capacity DVDs. In those cases, you may need to package your report on external hard disks.
![]()
Often is the case that you must deliver your electronic report securely, which usually translates into encrypted reports. When your reader is nontechnical, submitting encrypted data often does not work because the reader simply lacks the skill set to work with encrypted data. Aegis Padlock Pro is a great solution for delivering secure reports. The data on the drive is encrypted using the firmware in the drive housing. Simply plug it in, press a couple of buttons, enter a PIN on a keypad, and press the unlock button. If your reader can use an ATM, they can work with this device. The device comes in several different capacities to suit your needs.
EnCase’s web page reports provide a powerful tool to convey your findings. They are extremely flexible; you create the hierarchy and structure when you create your bookmarks. The more organized and articulate you are as you create folder structures and names, the better your reports will appear in either format, but especially in the web page version.
Although content is always important, presentation is probably even more important. It is the first thing seen by everyone, and it is the medium by which your content is delivered. You may be the sharpest examiner around, and every examination you do may be the epitome of computer forensics, but if your report is ugly and technically intimidating, case agents and prosecutors will shy away. Your challenge is to package your technical findings into a report that looks good, that is easy to read, and that tells a story with links to technical findings.
If you are to be a successful examiner, at some point you will have to convey your findings to a third party who has very little understanding of computers. These third parties are typically case investigators, attorneys, judges, hearing boards, juries, and the like. You will have to explain, verbally and in written reports, very technical concepts in terms that the layperson can understand. It takes time, practice, skill, experience, and creativity. Most of all, it requires that you be willing to take the extra effort to make it happen. When you create reports that your readers can easily read and understand, the results you see will speak for themselves.
It is beyond the scope of this book to transform you into a brilliant technical writer, but I can provide you with a presentation-grade template that you can adapt that will greatly improve the appearance and readability of your reports. I’ll also give you some ideas and suggestions that can help you with your reports. The template you will adapt is one that has its roots in a template developed by Roy Rector a few years ago. Rector is a police officer in Austin, Texas, and a part-time instructor with Guidance Software, Inc. In the latter capacity, he shared this template with the many classes he taught.
I have made many changes to the original template, but the most significant change was that of making it easily adaptable for other users to employ. To make it work for you, you need only rename your agency seal filename to agency.jpg, insert your signature in place of mine, change the agency name and address information on the headers, and insert your biographical information in place of mine. Assuming your bio is relatively current, all the changes can be done in minutes.
When done, this template gives you an organized and attractive shell in which to write your narrative and create links to the EnCase report. In this manner, the reader can read a narrative in which you explain what you did and what you found. As you describe significant findings, you will create hyperlinks to the EnCase report where the actual evidence exists. The reader can follow the link, view the evidence, and return to reading your narrative. It makes reading and navigating your report a pleasure.
In addition, the shell or template has separate pages on which to describe your hardware analysis, which can be accessed by hyperlinks. If terminology is an issue, there is a glossary page that can be accessed via hyperlinks. There is also a page on which you can place your bio so it is readily viewable.
At the center of these pages is your EnCase report, which will have links to it from many different sources. You can add third-party reports and provide links to them as you want. It is almost limitless what you can do when you create your reports in this manner. When this appendix concludes, I’ll show you how to arrange your files for placement on a CD or DVD (or external hard drive), including a couple of files needed to automatically run your media when placed in the drive. Once you’ve created and submitted one paperless report, both you and your readers will insist on them in the future.
Exporting the Web Page Report
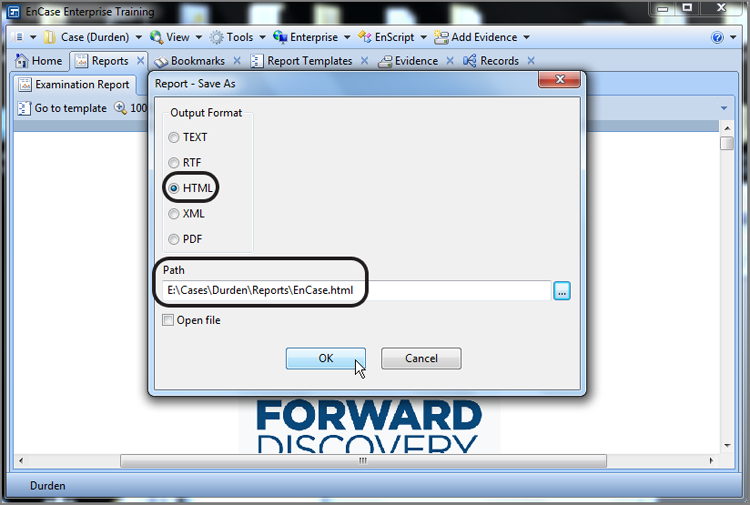
After you have bookmarked all of your findings and your report is finished, fully reflecting your findings and formatted to appear to your liking, it is time to export your report. From the Report view, right-click the report body and choose Save As. When you do, you’ll see the Report - Save As dialog box, as shown in Figure B-1. Use the HTML format and direct the output to a folder named Reports, which you will create in the root of your case folder.
Figure B-1: Report - Save As menu with HTML format selected and being directed to a folder named Reports
When done, you can open your report in your browser. In this case, the filename I used to contain my report was named EnCase.html. EnCase will create a folder named EnCase_files in which it will place any files needed in support of the report. Figure B-2 shows the file and folder created for the exported case report.
Figure B-2: File and folder created for EnCase case report
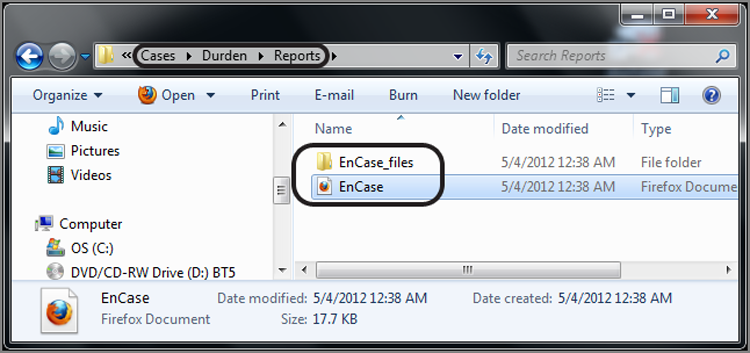
Now that you understand the files created by an EnCase web page report, you are ready to create a report around them. Before going further, it is always a good idea to launch the EnCase report by double-clicking the EnCase.htmlfile, as shown in Figure B-2, and reviewing the contents in your browser. Make sure everything is the way you want it to appear before going further. If there are problems, fix them in EnCase now, and export the file again.
If your full report file is excessively large, it may take a long time to load in your browser. If the load time is long on your forensics machine with robust resources, you need to consider what the load time is going to be on your reader’s machine, which usually has minimal resources. If that is a concern, now is the time to go back into EnCase and export your report in as many sections as it takes to make it manageable in a browser. Place the first section in the folder Reports, the second in folder Reports2, and so forth. You can tie them together later with hyperlinks in an index.
Creating Your Container Report
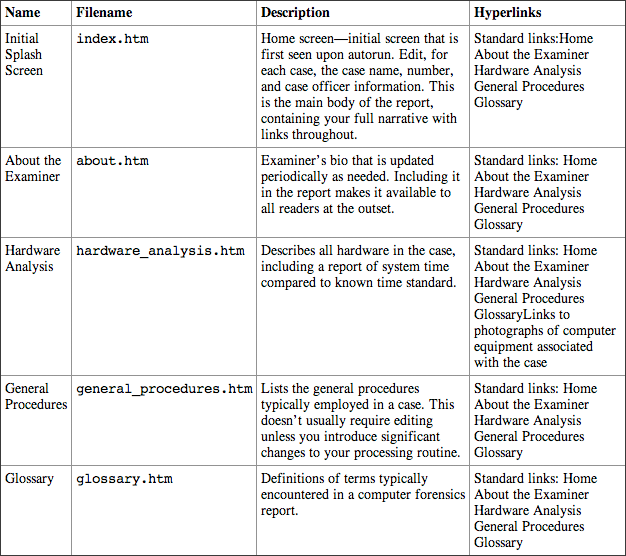
Now that you have created and exported your EnCase report, it is time to place it within your container report. This container report is the polished gateway or front end to your EnCase report. It contains the splash screen/full narrative report, hardware analysis report, general procedures, a glossary, and the examiner’s bio. Each of these reports, pages, or tabs, or whatever you prefer to call them, has a standard format and a standard set of navigation menus. Table B-1 lists each report, page, or tab by filename, along with its description and a listing of standard and suggested or optional hyperlinks found within it.
Table B-1: Individual reports found in the container report
Before going further, it is important to understand that you will be editing web pages that contain Hypertext Markup Language (HTML) as its source code. This is the language of the Web. It is not necessary to edit raw code, nor is it particularly desirable to do so even if you have the requisite skills, because coding is slow and tedious. Rather, you should use a full-featured HTML editor so that you can quickly get the job done. Many such editors are available, and some are free. You can use Microsoft Word as an HTML editor, but it is not the best tool for this task. I used Microsoft FrontPage to create the narrative and links shown in this section, but a newer product from Microsoft is Microsoft Expression Studio. Either will do a great job.
![]()
Examiners should be aware that FrontPage uses a Temp folder under the Local Settings folder of the user account on the examination machine. This can be an issue if working with contraband or sensitive files and may require cleanup. Some examiners use a clean restoration of their examination machine for each case to mitigate such concerns.
Before you start editing, you need to get all your folders and files in place so that the paths you create with your hyperlinks will remain intact. On the publisher’s website for this book, locate the CD Container Report. Figure B-3shows the files and folders contained in that folder. You should create a folder, name it with your case name, and copy these files and folders into that folder.
Figure B-3: Files and folders needed for paperless report
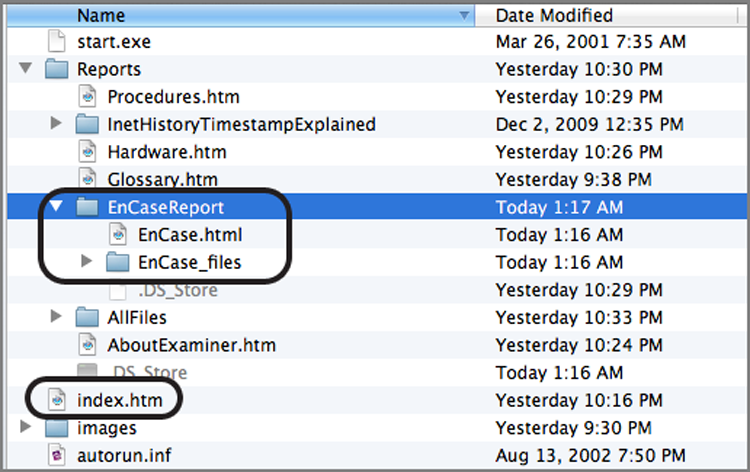
Once you have created a folder dedicated to your report and have copied the container report files and folders into it, you should locate the folder named Reports in your EnCase case folder. The EnCaseReport folder contains the EnCase web report you exported. There is a folder by the same name (Reports) in the container report files and folders. Your final step in organizing and setting up your files and folders is to copy all files and folders (see Figure B-2) in the EnCase web report folder named Reports into the folder by the same name (Reports) located in the folder you named to contain your paperless report.
![]()
On the publisher’s website for this book is a Reports folder already containing the files and folders from the EnCaseReport folder (see circled area in Figure B-3) to show you the finished product. Ordinarily you should keep this folder empty after you create your working template to avoid the possibility of mixing report files from old cases.
Once you have the folder created and it contains the files and folders shown in Figure B-3, and once the Reports folder contains the files and folders from the EnCase web report folder (named EnCaseReport), you are ready to edit and prepare your paperless report.
If this is the first time you’ve set up your paperless report, take a couple of minutes to customize this report for you and your agency. You will need to do the following:
1. Obtain your agency seal in a JPEG format. Name it agency.jpg, and place it in the images folder of the paperless report, overwriting the one there by the same name. The sample agency seal is 188 pixels wide and 133 pixels high. If you keep your agency seal size within these parameters, it should fit nicely with little or no adjustment.
2. Scan your signature, and save it as a GIF file with the name signature.gif, placing it in the images folder, again overwriting the one there by the same name. The present signature is 559 pixels wide and 259 pixels high. If you keep your signature size within these parameters, it should fit nicely with little or no adjustment.
3. Using FrontPage or your editor, open the file index.htm. Edit the top-right section, entering your agency, name, address, and contact information in place of the generic information. Copy this block to your Clipboard. Save your changes to index.htm. Make the same changes (pasting from the Clipboard) to the following files: about.htm, general_procedures.htm, hardware_analysis.htm, and glossary.htm. As you make the changes, save each file, and close it.
4. Using FrontPage, open the file about.htm. Place your bio information on this page, overwriting the current bio information. Save this file when complete.
5. Using FrontPage, open the file index.htm. Place your name and information under the signature on this page, overwriting the current information. Save this file when complete.
6. You have now completed customizing the container report for your paperless report. Create a folder on your desktop, and name it Paperless Report Template. Copy the files and folders in Figure B-3 into this template folder. Open index.htm and hardware_analysis.htm. Remove information that is specific to the example case (very little actually), leaving behind all the generic information that you want to remain in your template. Save your changes as you go. Delete the folders and files in the Reports folder in order to leave it empty and clean for your subsequent case reports.
With little effort, you have customized the current paperless report for you and your agency. Further, by copying your work into a separate folder, you have created a template to use for future reports that is ready to be copied and used as is.
For each report you create, as a matter of routine, you will place case-specific information in each of the following files: index.htm and hardware_analysis.htm. You will, from time to time, update your bio (about.htm). You probably won’t change the general procedures or glossary files often.
Now turn your attention back to the paperless report you are creating. For the most part, you are ready to use FrontPage or your editor to create your narrative in the narrative report (index.htm) that describes your examination process and findings. It is beyond the scope of this book to delve into technical writing or style issues. To help you complete your report, I need to address two issues: creating bookmarks and hyperlinks, and burning your final report to a CD that will run automatically.
Bookmarks and Hyperlinks
Turn your attention now to creating bookmarks and hyperlinks, which are the features that truly make paperless reports appealing. A bookmark in an HTML document is different from a bookmark created in EnCase. A bookmark is a Microsoft term for the HTML code or tag that is called an anchor. An anchor, or bookmark, simply creates a specific point in a document to which you can direct a hyperlink. Instead of saying “See EnCase report for details,” you’ll create a significant number of bookmarks within the EnCase report pointing the various pieces of evidence contained within it. As you write your report narrative, you’ll create hyperlinks pointing to these bookmarks (document anchors) that will allow the reader to click the hyperlink and be immediately taken to the section of the EnCase report that provides the evidence described in the narrative.
![]()
I have placed an extra folder in the reports folder named Reports, which holds the EnCase 6 report from the following referenced case. It is included only for the purposes of allowing you to practice creating bookmarks (anchors) with the following referenced files. When you are done, remove it completely because it serves no other purpose. The folder EnCaseReport holds a shell EnCase 7 report so you can launch it, look over the format, and leave it there as a placeholder.
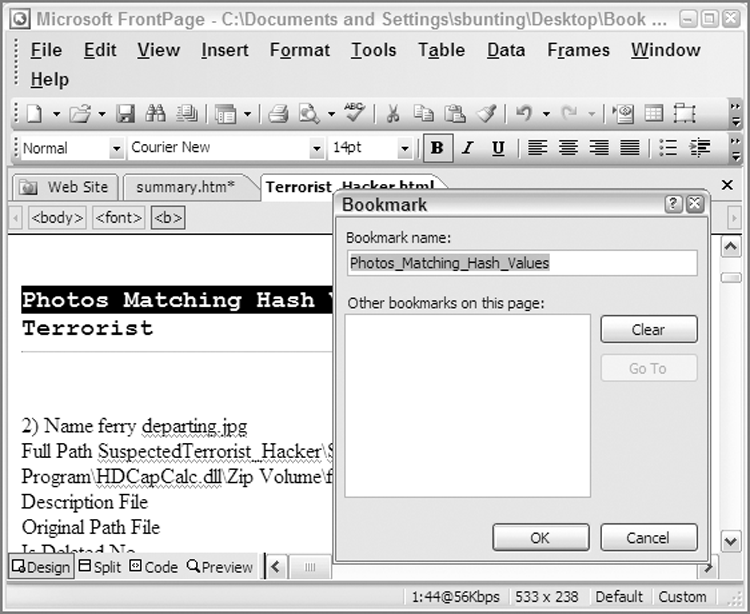
Let’s create a bookmark. Using FrontPage, open the file Terrorist_Hacker.html, which is located in the Reports folder and contains the main body of the EnCase report. You want to take your reader directly to the files that were found to match the hash values from another system under examination in a possible terrorism case. With experience, you’ll quickly determine where to place bookmarks. It is both an art and a technical skill.
In this case, say you have decided to create a bookmark on the title leading to these images. Select the text where you want to create your bookmark and choose Insert > Bookmark (press Ctrl+G when you’re using FrontPage 2003). Figure B-4 shows the selected text and the dialog box that opens when you insert a bookmark. You should note that the bookmark name is, by default, the selected text with underscores inserted where spaces existed. If your HTML editor doesn’t insert underscores for spaces, it is a good practice to insert them. Click OK to create your bookmark. For you to be able to create a hyperlink to this newly created bookmark, you must save the file in FrontPage first by choosing File > Save or pressing Ctrl+S.
Now that you have created a bookmark or anchor, let’s create a hyperlink to it. In this sample case, finding image files that match image files on another possible terrorist’s computer is a significant finding and one you decide is worthy of placement on your summary page. Using FrontPage, open the file index.htm, which is your full narrative report page. You’ll use this report page to provide a full report and statement of findings. It is a place for the reader to go to read the findings in a case. After creating the text for the report page, you have decided you want to create a hyperlink in the sentence where you described having found images matching the hash values in another case. In this manner, the reader can read about your findings and follow a link to see the images right away.
Figure B-4: Inserting a bookmark
![]()
I have inserted the paragraph shown in Figures B-5 and B-7 that starts off reading “Abbreviated Findings: Upon hash analysis, four images were found” into the file index.htm. You won’t miss it! You should later delete this paper from your template. It is included only to assist you in practicing creating hyperlinks, as described next.
Generally, it is not considered good style to hyperlink entire sentences within a body of text. Rather, you should select brief phrases or strings of words within a sentence for your hyperlink. These words should readily describe what could be found at the hyperlink. You can start to see that you need to carefully compose your sentences to accommodate your hyperlinks. You will develop this style and technique with practice.
Let’s create a hyperlink using the two words four images. As shown in Figure B-5, select those two words, and then choose Insert > Hyperlink or press Ctrl+K to open the Insert Hyperlink dialog box. This bookmark is contained in the file Reports\Terrorist_Hacker.html, so navigate to and highlight that file, as shown in Figure B-5.
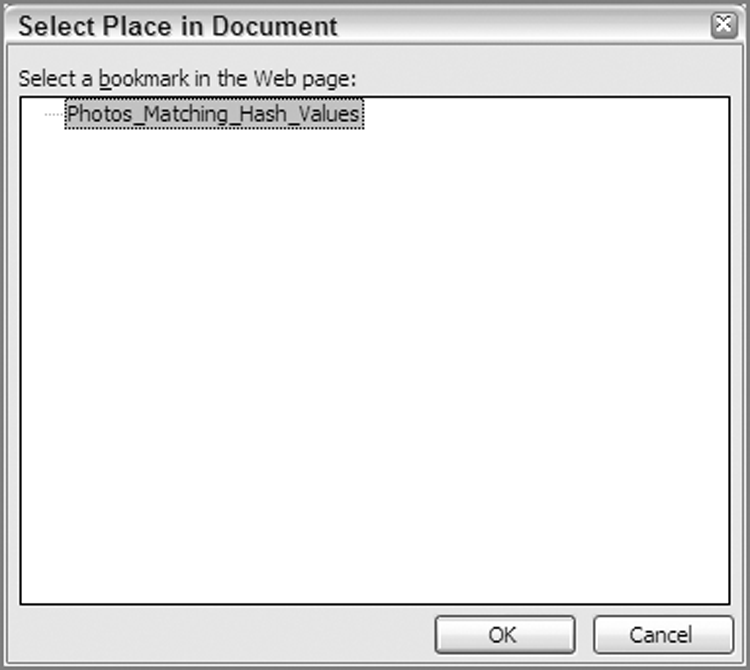
At this stage, if you clicked OK, you would create a hyperlink to the file. A hyperlink to a file will take you to the beginning of a file. Since you want to take your reader to a specific point in a very large file, you must point the hyperlink to a bookmark or anchor contained within the file. To do so, highlight the file containing the bookmark, and click the Bookmark button on the right side of the Insert Hyperlink dialog box. Figure B-6 shows the Select Place In Document dialog box that results from clicking the Bookmark button. Select the name of the bookmark, click OK to close this dialog box, and then click OK again to close the Insert Hyperlink dialog box.
Figure B-5: The Insert Hyperlink dialog box in Microsoft FrontPage 2003
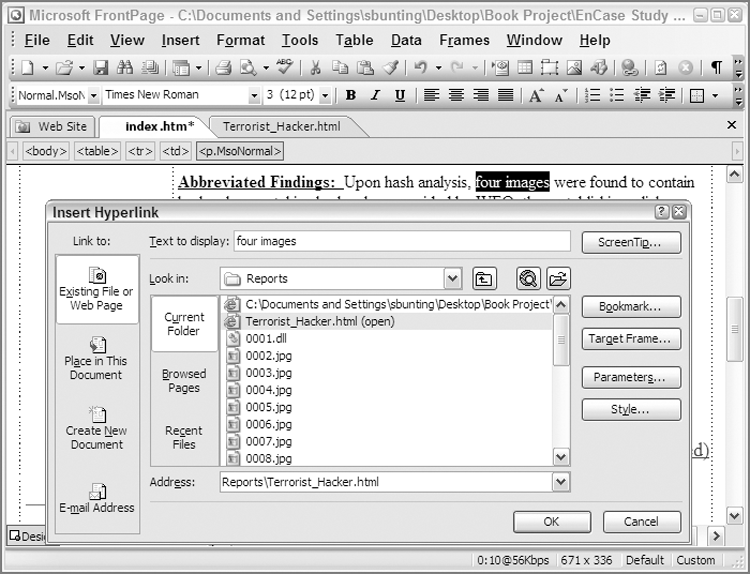
Figure B-6: The Select Place In Document dialog box enables you to create a hyperlink to a bookmark within a file.
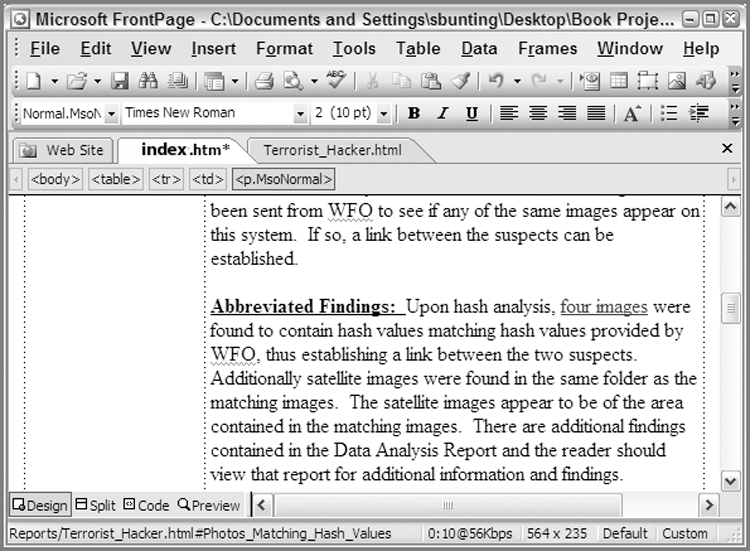
You have created your hyperlink, and as you can see, the two words four images appear in blue and are underscored, indicating a hyperlink. If you place your cursor over the hyperlink, you can see the path for the hyperlink in the lower left of the FrontPage window, as shown in Figure B-7. In this example, the path is Reports/Terrorist_Hacker.html#Photos_Matching_Hash_Values, where Reports is the folder name containing the file named Terrorist_Hacker.html. The # sign denotes an anchor or bookmark, which in this example is named Photos_Matching_Hash_Values.
Figure B-7: A hyperlink and its path in Microsoft FrontPage
If you want to test your hyperlink, you can save your file in FrontPage and then open the file summary.htm with your browser. If you click your new hyperlink, it will take you directly the bookmark you created in your EnCase web report.
The next step is to complete your various reports using a combination of bookmarks and hyperlinks to allow readers to quickly view exhibits and evidence and then use their browser’s Back button to continue reading. Once your report is done, you are ready to burn your paperless report to a CD or DVD.
Burning the Report to CD or DVD
The final step is the easiest part. The more difficult task is making sure your report is complete and accurate and that all the hyperlinks work before committing it to a CD or DVD. It is good practice to have another examiner in your office walk through the report when you are finished. When you are ready, you simply need to start your favorite CD- or DVD-burning software and create a data CD or DVD. The files and folders that you need to place on your CD or DVD are all of those files and folders in the folder you created to contain your paperless report. Figure B-8 shows the files and folders in Nero Express as they are about to be burned to a CD.
Figure B-8: Files and folders needed on the CD for a paperless report
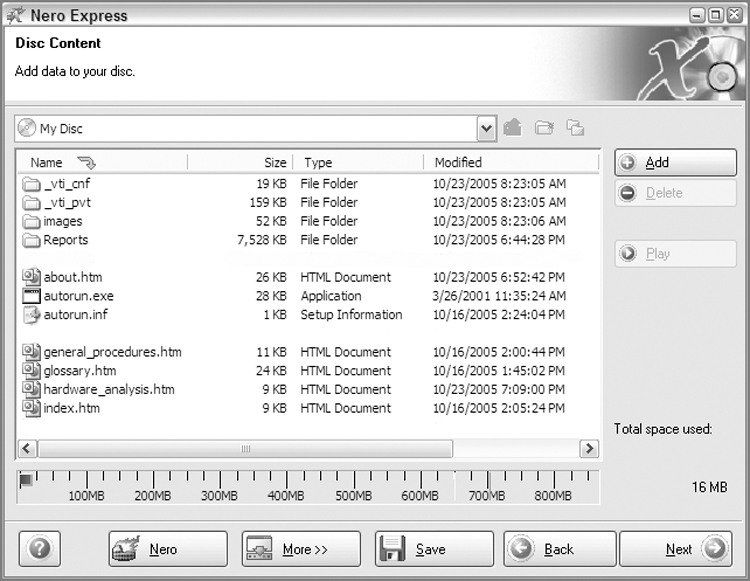
Most of the files and folders have been thoroughly discussed thus far. The HTML documents are simply the various reports you have been editing and are described in Table B-1. The EnCaseReport folder contains the EnCase web-based report. The images folder contains the various images needed to display the container report. The _vti_cnf and _vti_pvt folders contain metadata used by FrontPage. You need them, but they are best left alone. There are two files in the root of the CD needed for the CD to autorun when inserted: autorun.exe and autorun.inf. You need not do anything with them other than make sure they are present. They work in unison to open your CD, launching the file index.htm when the CD autoruns.
At this point, once you finish burning your CD or DVD, your paperless report is complete. It is advisable to burn one CD or DVD and test it thoroughly before continuing. When you are satisfied, burn as many copies as are needed. If your reader’s machine is configured to allow CDs or DVDs to autorun, they need only to insert the media and start following links. For those whose autorun capability has been disabled, they will need to know on which file to click to run your report. For those readers, I simply affix a label to the CD case advising to click the file index.htm to begin the report if it doesn’t autorun.
The entire set of files and folders shown in Figure B-8, which are about to be burned to a CD by Nero Express, are included on the publisher’s website for this book in the folder CD Container Report. If you burn those folders to a CD, you will have the paperless report that I just showed how to create in this appendix. You can read it, see how it works, and get ideas for your own paperless reports. Best of all, you can use it as a template with just a few minor adjustments. Once you start submitting paperless reports of this caliber, your readers will prefer them, as will you.
All materials on the site are licensed Creative Commons Attribution-Sharealike 3.0 Unported CC BY-SA 3.0 & GNU Free Documentation License (GFDL)
If you are the copyright holder of any material contained on our site and intend to remove it, please contact our site administrator for approval.
© 2016-2026 All site design rights belong to S.Y.A.