HOW TO HACK: HACKING SECRETS EXPOSED: A BEGINNER'S GUIDE (2014)
Chapter 6. Scanning
After gathering a variety of information about the target through footprinting, it is time to move on to the next step called scanning. Scanning is the second step in the intelligence gathering process of a hacker where information about specific IP addresses, operating systems, their architecture and services running on computers can be obtained. Unlike footprinting which gathers information passively from various third party sources, scanning involves actively engaging with the target to obtain information.
DETECTING LIVE SYSTEMS
The first step in the process of scanning is to determine whether the target is alive or not. This can be done using the ping tool that is readily available on both Windows and Linux computers. Just open the command prompt if you are on Windows or terminal window if you are on Linux and type ping followed by the target IP address as shown below:
ping 173.252.120.6
If the target is alive and online, you should get a reply from the target or you if the target is not alive you will get a response saying "ping request cannot find the host".
Angry IP Scanner
You can even ping a range of IP addresses all at once using a nice tool called "Angry IP Scanner". It is an open-source cross-platform network scanner tool packed with several useful features.
All you need to do is enter the starting and the ending IP of the range that you want to ping and click on the "Start" button as shown in the below figure. This should tell you which of those IPs are available and which are not.
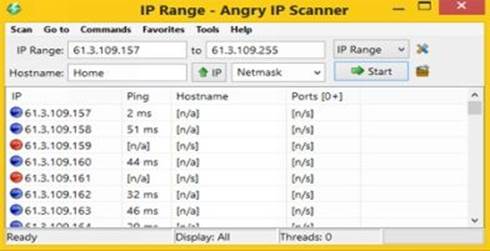
Figure 6. 1
Angry IP Scanner is available for both Windows and Linux operating systems and can be downloaded from the link below:
Angry IP Scanner: http://angryip.org/download/
Online Ping Tool
If you would like to ping the target using a third party computer instead of yours, you can do so using online tools like Just-Ping which pings the target from 90 different geo locations worldwide. You can access Just-Ping tool from the link below:
Just-Ping: http://cloudmonitor.ca.com/en/ping.php
The following figure 6.2 on the next page shows a sample ping test conducted using the Just-Ping tool:
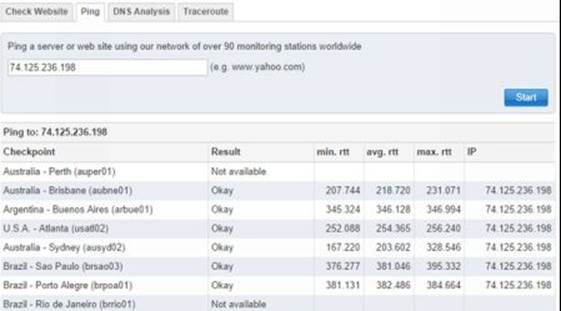
Figure 6. 2
TYPES OF SCANNING
Now, let us discuss one by one some of the different types of scanning that are in place.
Port Scanning
Port scanning involves sending a series of messages to the target computer to discover the types of network services running on it. Since each service is associated with a "well known" port number, performing a port scan on the target will reveal the ports that are open. So, when a port is said to be open the service associated with it is said to be active and running, thereby opening up the opportunity for the attacker to break into it.
For example, if a port scan on the target shows that port 80 and port 25 are open, that means the target computer has a HTTP service (web server) and an SMTP service (email service) running on it respectively.
Network Scanning
Network scanning is a procedure for identifying active hosts on the target network either for the purpose of attacking them or for security assessment. In this way it would be possible for the hacker to make a list of vulnerable hosts for direct attack or to use them indirectly to attack other hosts.
Vulnerability Scanning
Vulnerability scanning involves the use of automated tools known as vulnerability scanners to proactively identify security vulnerabilities of computer systems in a network. These tools will scan the target to find out the presence of known flaws that are susceptible to exploits.
TOOLS FOR SCANNING
The following are some of the popular tools available for scanning:
Nmap
Nmap is a popular open-source tool for network discovery and security auditing that works on different platforms like Linux, Windows and Mac. It basically comes in the form of a command line interface; however, to facilitate the ease of use it is also available in a GUI format calledZenmap. For Windows machines, you can install the "self-installer" version of Nmap that comes in the ".exe" format. The download link for the same in available below:
Nmap Download: http://nmap.org/download.html
After installing the tool, run the desktop shortcut to open the Zenmap window which typically looks as shown below:
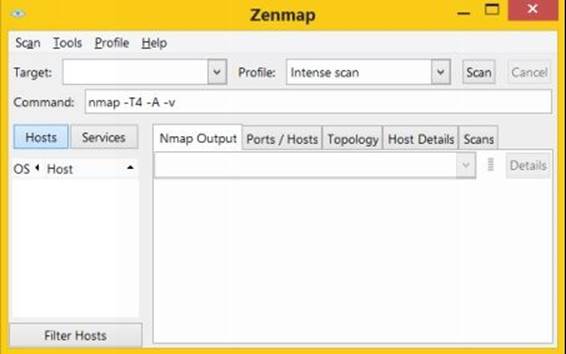
Figure 6. 3
The "Target" box needs to be filled with the target IP address or domain name on which you want to perform the scan. It also comes pre loaded with 10 different scan profiles that you can select from.
Intense Scan
This scan type should be reasonably quick as it only scans TCP ports. Additionally, it makes an attempt to detect the OS type, various services and their version numbers that are running on the target machine.
Intense Scan Plus UDP
It is the same Intense scan as described above but also includes scanning of UDP ports.
Intense Scan, all TCP Ports
Unlike the normal Intense scan which only scans a list of 1000 most common ports, the "Intense scan, all TCP ports" scans all available 65535 ports.
Intense Scan, No Ping
This option will exclude pinging the target from the Intense scan. You may use this option when you already know that the target is up or is blocking ping requests.
Ping Scan
This option will only ping the target but does not perform port scanning of any type.
Quick Scan
Scans faster than the Intense scan by limiting the number of TCP ports scanned to only the top 100 most common TCP ports.
Quick Scan Plus
Quick scan plus adds OS detection and a bit of version detection features to Quick scan.
Quick Traceroute
This option will show you the route that the packets take to reach the target starting with the localhost (source or your own computer).
Regular Scan
This will perform the ping and TCP port scan of 1000 default ports on the target.
Slow Comprehensive Scan
This scan will try all possible options to uncover as much information as it can about the target. It uses three different protocols: TCP, UDP and SCTP in order to detect hosts.
Out of all the 10 scanning options, I reckon Intense Scan to be appropriate under most conditions. Just fill the "Target" box, select the "Intense scan" profile and hit the "Scan" button. Let us now analyze the Nmap result output by running it on a sample target.
After the scan is completed the "Nmap Output" tab displays the raw output of all the scan operations such as the date and time it was performed, the results from ping scan, discovered open ports, target OS and traceroute results as shown below:
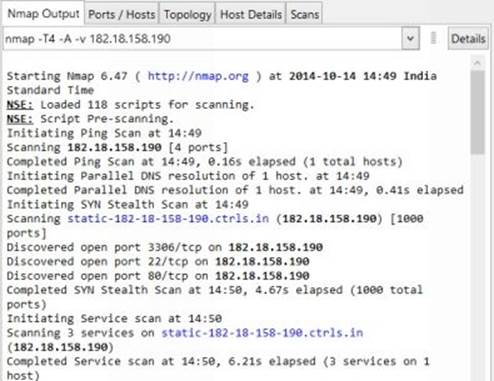
Figure 6. 4
The other tabs split the same results into an organized manner so as to display them in a more user friendly manner using GUI interface. The "Ports/Hosts" tab will display a list of discovered ports, their status as to whether they are closed or open, the protocol associated and the services running on them. A snapshot of the sample output is shown below:
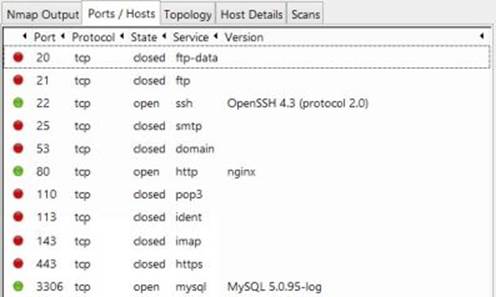
Figure 6. 5
The "Topology" tab displays the result of traceroute command in a graphical manner showing each hop involved in the path.
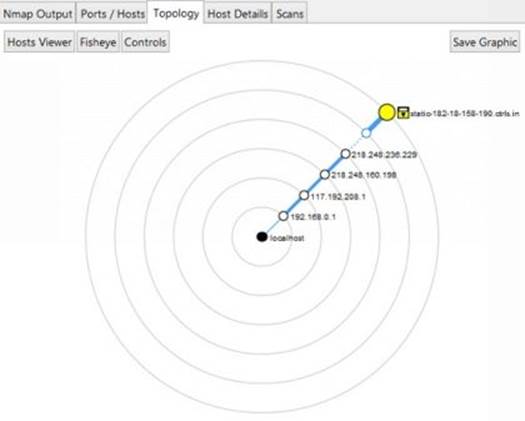
Figure 6. 6
The "Host Details" tab shows the status of the host, its name, number of ports scanned, uptime, last boot time, type of operating system running including its version number and many other details as shown in the below figure:
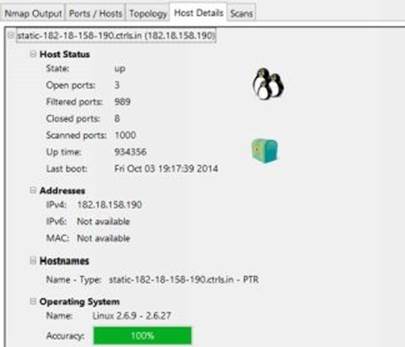
Figure 6. 7
NetScanTools Pro
NetScanTools Pro is another wonderful program for Windows that has a powerful set of over 50 network tools including both automated and manual ways to retrieve information from the target.
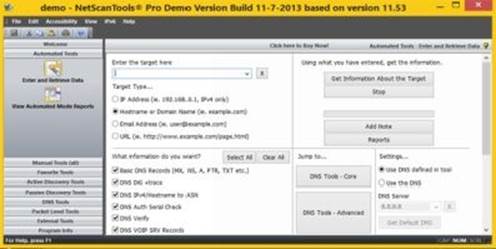
Figure 6. 8
You can use the "Automated Tools" to quickly perform port scan and grab vital information about the target such as DNS records, Whois data, Traceroute details all from a single place. On the other hand the "Manual Tools" section contains individual tools specially crafted to give more control in the scanning process for advanced users.
Online Tools
You can also make use of online tools to perform port scan and discover important information about the target. The following are some of the links useful online network tools that are worth considering:
· PenTest-Tools
· YouGetSignal
Other Popular Tools
Here is a list of some of the other popular tools that you may want to explore:
· SuperScan
· ipEye
OS FINGERPRINTING
OS fingerprinting is the process of detecting the operating system of the target host or a network. The following are some of the commonly used OS fingerprinting methods.
Active Fingerprinting
Active fingerprinting is the method in which specially crafted packets are sent to the target system and the response is noted. Since different operating systems respond to source packets in different ways, this response can be analyzed to determine the target OS. One of the simple example is the use of Nmap tool as discussed in the previous section which employs active fingerprinting method to determine the target OS.
Banner Grabbing
Another commonly used method of active fingerprinting is called banner grabbing. This can be done using a simple tool called telnet. Telnet is readily available on Windows XP and previous versions. For Windows Vista, 7 and 8 machines you need to activate the in-built telnet tool before you can use it. Just search for "how to enable telnet on windows" on Google to find detailed instructions for enabling telnet client on your computer.
Once you have enabled the telnet client on your computer, banner grabbing is pretty simple. Just type the following command in the command prompt to detect the operating system running on the target:
telnet target-domain-or-IP 80
This will open the connection with the target. Next type the text exactly as follows HEAD / HTTP/1.1 and hit the Enter key twice. This should fetch results where there is a possibility of the target OS being mentioned as shown in the below figure.

Figure 6. 9
Passive Fingerprinting
Passive fingerprinting is a technique that uses indirect methods to determine the target operating system. Unlike active fingerprinting which sends packets to the target, passive fingerprinting on the other hand uses sniffing technique to analyze the target network traffic and determine the operating system. It is less accurate than active fingerprinting. You can use online tools like Netcraft to perform passive fingerprinting.
Netcraft Tool: http://toolbar.netcraft.com/site_report
Just visit the above link to access the Netcraft tool and enter the target domain or IP address to know the target operating system, possible vulnerabilities, its risk rating and other useful information.
CONCEALING YOUR IDENTITY
Concealing you true identity during the processes like footprinting and scanning is very much necessary as there is a real chance of the target tracing back to you. Some of the methods that you can employ to conceal your identity are discussed below.
Using a Proxy
A proxy server can be used to conceal your real IP address while performing scanning and hack attempts on the target. Since the IP address tells everything about you, concealing it using a proxy can be highly effective in hiding your origin.
Even though there are different types of proxies available, I recommend using a VPN proxy service to hide your IP address. VPN services are fast and provide reliable ways not only to hide your IP address but also to protect your data and identity over the Internet. Here are a few popular VPN services that you can try:
· HideMyAss Proxy
· VyprVPN Proxy
Alternatively you can also use a chain of public proxies to further enhance your stealth operation using free tools like Proxifier and SocksChain. Please note that using public proxies can slow down your speed and hence VPN proxies are more recommended as they best serve the purpose.
The other way to hide your identity is by using online tools for pinging and scanning the target. During the use of online tools, the IP address of the server hosting the tools is exposed to the target and not the one that belongs to the actual attacker.
Once you have gathered a long list of information about the target through footprinting and scanning, it is time to analyze them for possible vulnerabilities in the operating system, technologies or services running on the target. You can make use of the following websites to find information about latest vulnerabilities and exploits:
1. http://www.securiteam.com
2. http://www.zone-h.org
3. http://www.securityfocus.com
4. http://www.packetstormsecurity.com
5. http://www.cybercrime.gov
COUNTERMEASURES
So far, you have learnt different scanning techniques to discover information about the target. Now let us look into some of the countermeasures that one can take to prevent vital information from leaking into the hands of an attacker.
· Configure web servers to prevent information leakage.
· Disable unwanted/unused services and protocols.
· Use an Intrusion Detection System (IDS) to detect and log port scans.