HOW TO HACK: HACKING SECRETS EXPOSED: A BEGINNER'S GUIDE (2014)
Chapter 8. Hacking Windows
Being one of the most popular operating systems in the world, Windows has its presence on almost every computer system today. So, in the field of ethical hacking understanding the techniques to hack into Windows systems becomes highly significant. Let us now look into some of these techniques using which you can successfully manage to hack any Windows computer.
GAINING ACCESS TO THE SYSTEM
Gaining access to a password protected user account especially the one with "administrator privileges" forms the key element in hacking Windows. The following are the two important techniques using which you can gain access to any protected account on Windows without actually knowing the password.
Resetting the Windows Password
If you wish to gain access to a Windows computer whose account is password protected, resetting the password is an easy option. Windows stores all its account information and encrypted passwords in a file called "SAM". By modifying the "SAM" file it is possible to reset the password of any user account including that of the "administrator". You can accomplish this task using a small open-source tool known as Offline NT Password & Registry Editor. This utility works offline, that means you need to shut down and boot up the target computer using a CD or USB device such as thumb drive. The tool has the following features:
· You do not need to know the old password to set a new one.
· This tool will allow you to reset the password of any user account.
· This tool can also detect and unlock locked or disabled out user accounts.
You can download the tool from the link below:
Download: http://pogostick.net/~pnh/ntpasswd/
Resources to create a bootable CD and bootable USB device are available for download separately. Both works similarly and is a matter of your convenience. However, in this book I will give a demonstration of the USB version to reset the existing password. To create a bootable USB drive, download and unzip the USB version of the tool from the above link by following the simple instructions given in the readme.txt file.
Once you have the bootable USB device in your hand, plug-in the device and boot from it. Make sure that you have enabled the USB boot option and set the top boot priority for your USB device in BIOS. Step-by-step instructions to complete the password reset process is given below:
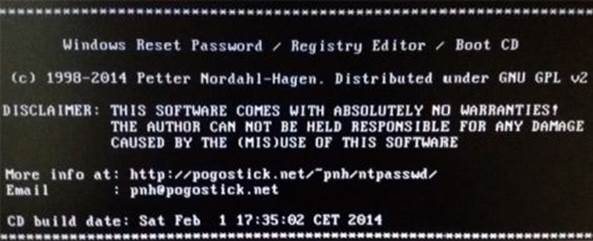
Figure 8. 1
Once the tool is running from your USB device, you should see the screen similar to the one shown above. Just follow the screen instructions and the tool will automatically detect the partition on which the Windows is installed. Usually the right options are preloaded in the square bracket as shown in the below snapshot. So, just pressing Enter key should work.
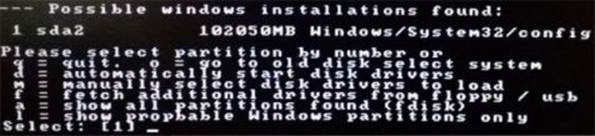
Figure 8. 2
In the next step, you will be asked to "select which part of the registry to load". You need to select the option-1 that is "Password rest [sam]" which is preloaded by default as shown below. So just press Enter to proceed.

Figure 8. 3
In the next step, select the option-1 which is "Edit user data and passwords" as shown below and hit Enter.
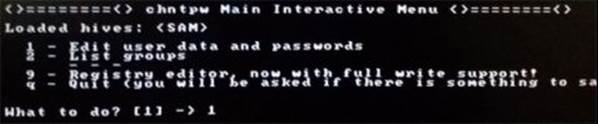
Figure 8. 4
Now, you should see a list of "Usernames" and their "Admin" status being displayed. Select the user who has administrator privilege and hit Enter.

Figure 8. 5
In the next screen you will be asked to select from a list of options that you may want to perform on the selected user. Here, just select the option-1 which is "Clear (blank) user password" and hit Enter.

Figure 8. 6
This should reset the password for the user account to make it go blank, so that the next time you reboot your Windows you should be able to login automatically as if there was no password set for that user account.
Now quit editing user by pressing q and hit Enter until you proceed to the screen where you will be asked to confirm "writing back changes" to the SAM file. This step is very important where you need to press y and hit Enter as shown in the snapshot below. If you accidentally press Enterkeeping the default option which is n, the reset process will fail and the whole procedure will have to be repeated again from the beginning. So, changing the default option from n to y before pressing Enter is very important.

Figure 8. 7
This will complete the reset process where the existing password will be removed and set to blank. Disconnect the USB device and press CTRL+ALT+DEL to reboot the computer. Now, the Windows should let you login to the system without insisting to enter the password.
Restoring the Password After Breach
Resetting the password is a wonderful option to easily gain access to the password protected accounts. However, this method has a clear drawback as the password reset process is permanent. The administrator of the target machine will easily come to know about the security breach as thereafter no password will be asked during the login process.
To overcome this drawback, we will have to device a means to restore everything back to normal once the purpose of breach is completed. For this we will have to take a backup of the original SAM file before modifying it in the password reset process and safely restore it back to make everything look normal.
The SAM file is located in the drive where the Windows is installed (usually C:) under the following path: \windows\system32\config. You can easily access this location by booting up the computer from your live Kali Linux DVD. Once the Kali DVD is loaded, double-click the "Computer Icon" present on the desktop to open up the explorer window. Now, navigate to the above location to find the SAM file and back it up to a different location such as a different drive or to your own USB device.
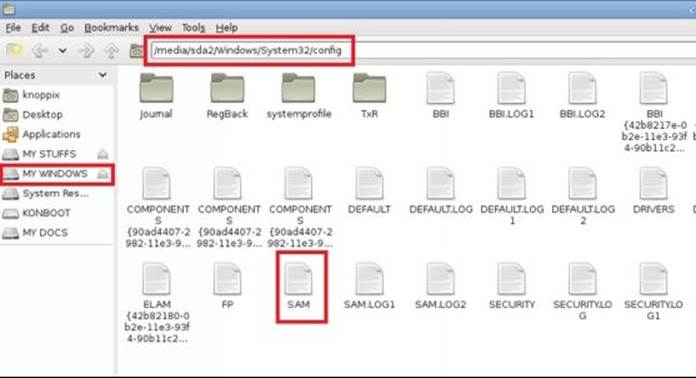
Figure 8. 8
Now reboot the system and perform the password reset process as discussed earlier. Once you are done with your work, reboot the system again with Kali DVD and navigate to the location of SAM file. Rename the existing file to SAM.OLD and restore the original SAM file from the backup location. This should bring everything back to normal and avoid suspicion.
Bypassing the Windows Authentication Process
In the previous section we had discussed on how to reset the password to gain access to the system. But there is another smart way to gain access to the Windows system by silently bypassing the authentication process itself. This is done by applying temporary changes to the Windows kernel on the fly (while booting) to disable the authentication process. A tool called Kon-Boot allows you to accomplish this task. You can download it from the link below:
Kon-Boot: http://www.piotrbania.com/all/kon-boot/
Kon-Boot is a handy tool that allows you to enter any password protected Windows user account without having to enter the password during the log-in process. The tool allows you to create a bootable CD or a USB drive. Once you boot the target computer from this bootable device, it will virtually modify parts of Windows kernel to load the operating system in a special mode where you will not be insisted to enter the password. The advantage of this tool is that all the changes are temporary and disappear after reboot, so that everything looks normal thereafter and does not arouse suspicion of a possible security breach.
DUMPING THE PASSWORD HASHES
After understanding some of the techniques to gain access to the system without knowing the password, it is time to move on one step further and find out a means to crack the actual password itself. If it is required to gain access to the target system multiple times over a period, it is always a good idea to unveil the password by cracking it so that you can easily login to the system by entering the password thereby eliminating the need to reset the password each time you want to gain access.
Windows user account passwords are converted into a cryptographic hash format called NTLM (NT LAN MANAGER) hash. This NTLM hash along with the user profile details is stored in a special file called Security Accounts Manager or SAM. The SAM file is further encrypted with the syskey which is stored in a file called SYSTEM. Both SAM and SYSTEM are located in the drive where the Windows in installed (usually C:) under the following path: \windows\system32\config.
In order to crack the password, it is necessary to extract the NTLM hash and user accounts details stored in the SAM file from the target system which is known as dumping. The dumped details are transferred to the hacker's computer and the password is cracked using an offline password cracking tool. The following are the two ways to dump password hashes:
Dumping Hashes With Administrator Access
If you have administrator access to the system on which you want to dump password hashes, you can use a handy tool called PWDUMP. This is an open-source command-line tool to quickly dump password hashes onto a text file. The tool can be downloaded from the link below:
PWDUMP: http://www.tarasco.org/security/pwdump_7/
This is a very small tool which is less than a MB in size and can be carried to the target location in a USB thumb drive. To dump the hashes, just open the command prompt with administrator rights, navigate to the location of the tool (PwDump7.exe) and run the following command:
PwDump7.exe >> targetfilename.txt
As shown in the below snapshot, I am running the PwDump.exe from my USB thumb drive (M:) and dumping the hash details in a file called hash.txt. This file should get created in the same directory from which PwDump.exe is running.
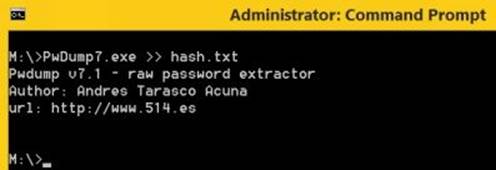
Figure 8. 9
The hash.txt file contains a list of existing user accounts on the machine and their corresponding NTLM hashes as shown below:

Figure 8. 10
Dumping Hashes Without Administrator Access
The previous section shows how to dump password hashes when you already have administrator access to the target machine. What if you do not have administrator access? In this case, you can use your Kali Linux Live DVD to boot up the system and load the Linux. From here, access the drive on which the Windows OS is installed and navigate to \windows\system32\config\. From here copy the two files SAM and SYSTEM on to your USB device so that you can carry them to your computer for offline password cracking.
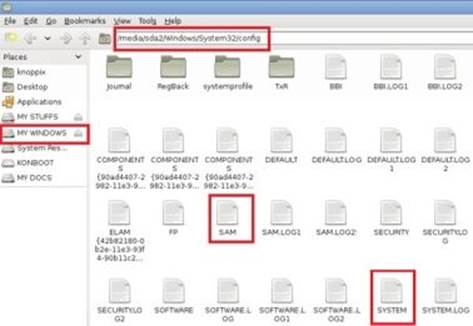
Figure 8. 11
CRACKING THE WINDOWS PASSWORD
After successfully dumping the password hashes, we can now easily crack them using different tools and approaches as mentioned below:
Using Rainbow Tables
As discussed in the previous chapter, a rainbow table contains a list of pre-computed hashes that can be instantly compared against the dumped password hash to crack the password. This is so far the best and the fasted method to successfully crack the Windows password. For this we will use an open-source tool called Ophcrack that can be downloaded from the link below:
Ophcrack Website : http://ophcrack.sourceforge.net/
From the above link, download the installable version of Ophcrack (not the Live CD version) and install it on your system. During the installation process, when the option comes up to download rainbow tables, uncheck them all and just install the program. It is always better to download the rainbow tables separately.
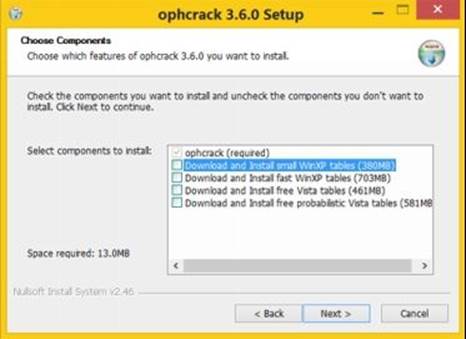
Figure 8. 12
Once you have it installed on your system, go to the Ophcrack website from the above link and click on Tables in the navigation menu. Here you should see a list of rainbow tables you can download.
If you want to crack the passwords of Windows XP and prior operating systems download the tables from the LM hashes section. For operating systems after XP such as Windows Vista, 7 and 8 download the tables from the NT hashes section.
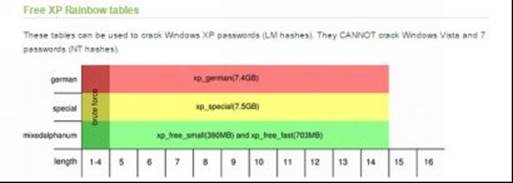
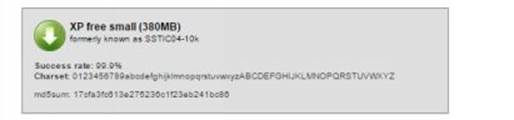
Figure 8. 13
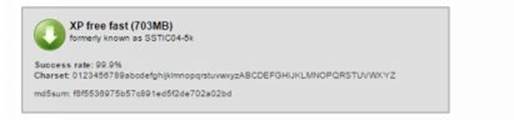

Figure 8. 14
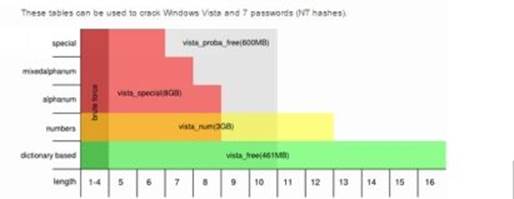
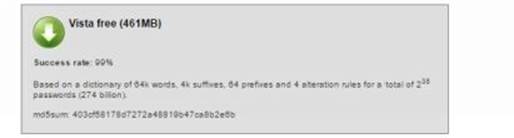
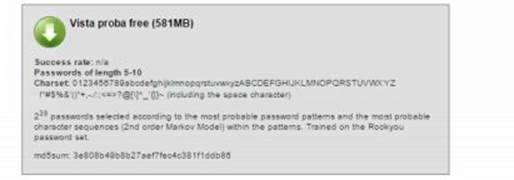
Figure 8. 15
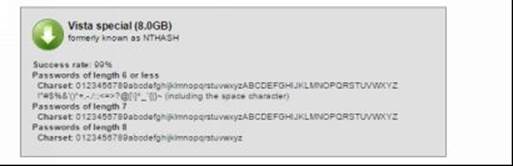
Figure 8. 16
As shown in the above snapshots, as the character set increases the size of the table grows bigger. Bigger the table higher the chance of successful cracking. You can download the one that best matches your needs. For the purpose of demonstration, I am using the "Vista proba free" table on my Windows 8 machine with Ophcrack. Here is a step-by-step guide on how to use this tool to crack passwords.
1. Open the Ophcrack tool by double-clicking the icon on the desktop.
2. From the main Ophcrack window, click on "Tables" button and select the table that you have downloaded from the list. Now click on "Install" button, load the folder that contains the downloaded tables and click on "OK".
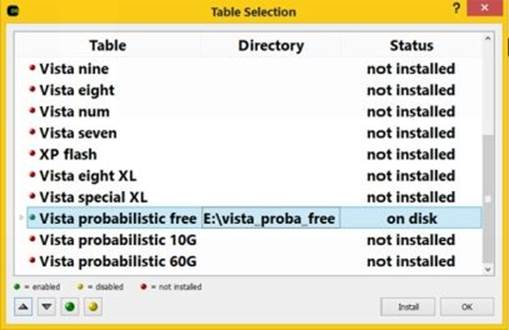
Figure 8. 17
3. Next, to load the dumped password hashes, click on "Load" button, select "PWDUMP file" option and load the hash.txt file obtained by running the PWDUMP tool on target machine. If you have SAM and SYSTEM files instead of hash.txt, you can choose the option Encrypted SAM instead of "PWDUMP file" and select the folder which contains those two files.
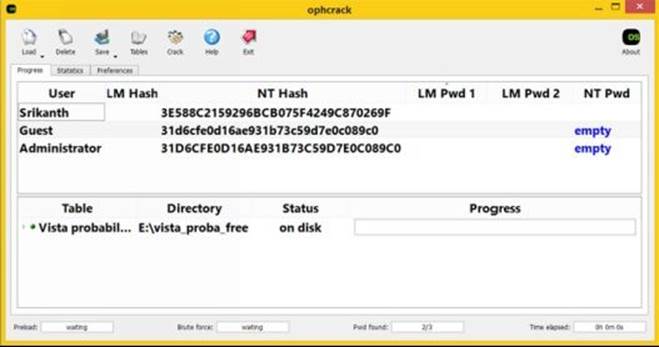
Figure 8. 18
4. When everything is loaded and ready as shown in the above snapshot, click on "Crack" button and site back patiently. The cracking process will take from anywhere between few minutes to few hours to complete depending upon the size of the table and strength of the password. If it is successful, the cracked password will be displayed along with the time taken to crack as shown below:
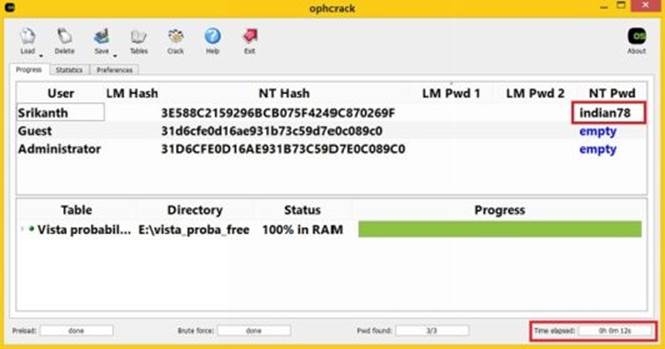
Figure 8. 19
If you become unsuccessful in cracking the password, you may try a different rainbow table that covers more characters and long passwords.
Using Brute-Force Approach
Even though using rainbow tables is by far the fastest and the best approach to crack passwords, it may not be successful for long and strong passwords as hash tables for such passwords are hard to find. So, brute-force approach becomes inevitable under these situations. But remember it may take a very long time ranging from a few hours to few days to complete the cracking process. Since Ophcrack is not so effective for the brute-force approach, we will use another powerful tool called L0phtCrack which is available from the link below:
L0PhtCrack Download: http://www.l0phtcrack.com/download.html
After installing L0phtCrack, Click on "Import hashes" button from the main window to load the hashes. You have the option to load the hashes from both the "PWDUMP file" as well as "SAM file".
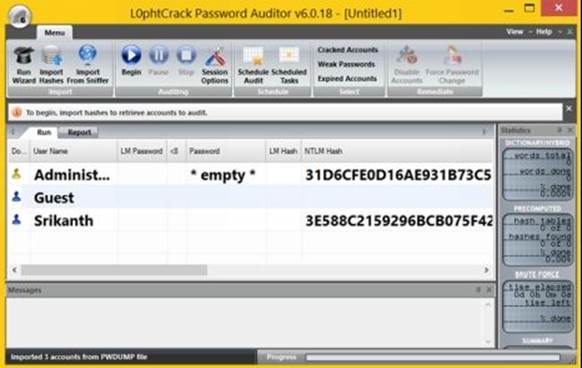
Figure 8. 20
Click on the "Session Options" button to further configure different auditing options such as dictionary and brute-force attacks. You can enable or disable specific attacks and also customize character set, password length and range options for brute-force approach. Configuring the auditing options wisely can avoid unnecessary time delay and thereby speed up the password cracking process.
Once you are done with loading the hashes and configuring the options, click on the "Begin" button. This will initiate the cracking process and the time consumed to crack the password depends on various factors like the password strength (length + presence of alphanumeric + special characters), type of attack (dictionary, hybrid or brute-force) and the speed of your computer.
If the password cracking process is successful you should see the cracked password next to the user name in the L0phtCrack window as shown below:
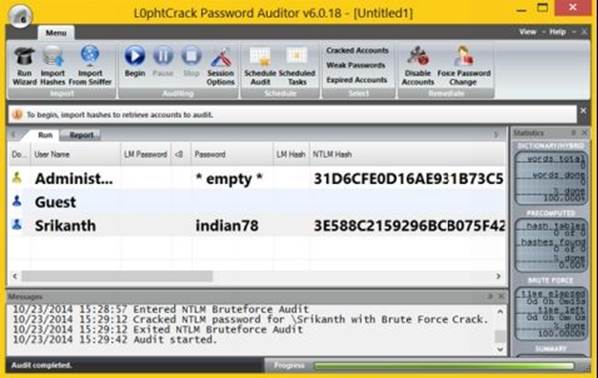
Figure 8. 21
Sniffing Password Hashes on a Network
If your computer is on a network such as office or school, it is possible to remotely import the password hashes of other computers on the network without the need to gain physical access to them. This method is called sniffing and L0phtCrack 6 and above supports this option.
To sniff password hashes from other computers, just click on the "Import From Sniffer" button on the main window. If more than one network interface is detected, the "Select Network Interface" dialog box allows you to choose the interface to sniff on. After choosing your interface, the "SMB Packet Capture Output" dialog box appears where you need to click on "Start Sniffing".
If the hashes are captured, they are immediately displayed in the dialog box after which you can hit "Stop Sniffing" and click on "Import" button to load the password hashes for cracking.
COUNTERMEASURES
In order to secure your Windows computer from all those possible attacks as mentioned in this chapter, the following are some of the countermeasures that you need to follow:
· Do not allow strangers to access your computer during your absence.
· If the computer is on a public network such as school or office, password protect those accounts with administrator access and only give limited accounts to the users.
· Always use a strong password that is hard to guess. Strong passwords contain a mix of alphanumeric and special characters that are long enough to avoid rainbow table and brute-force approaches.
· Disable access to CD/DVD drives and USB devices on public networks.
· Configure BIOS to disable booting from USB, CD/DVD and other portable devices.
· Password protect your computer BIOS so that it would not be possible for an attacker to modify its settings and gain access.
All materials on the site are licensed Creative Commons Attribution-Sharealike 3.0 Unported CC BY-SA 3.0 & GNU Free Documentation License (GFDL)
If you are the copyright holder of any material contained on our site and intend to remove it, please contact our site administrator for approval.
© 2016-2026 All site design rights belong to S.Y.A.