Information Security Management Handbook, Sixth Edition (2012)
DOMAIN 9: LEGAL, REGULATIONS, COMPLIANCE, AND INVESTIGATIONS
Incident Handling
Chapter 29. Virtualization Forensics
Paul A. Henry
A Brief Virtualization Technology Review
Virtualization is one of the most rapidly growing and evolving fields in information technology today. At its heart, virtualization represents the abstraction of computing resources from the physical hardware layer. A number of different types of virtualization technologies exist:
![]() Server virtualization: Server operating platforms, such as Microsoft Windows 2003 Server and Red Hat Enterprise Linux, are installed as virtual images on top of a “Hyper Visor” that imitates the underlying hardware layer. In this manner, multiple virtual servers can be simultaneously run on one physical platform.
Server virtualization: Server operating platforms, such as Microsoft Windows 2003 Server and Red Hat Enterprise Linux, are installed as virtual images on top of a “Hyper Visor” that imitates the underlying hardware layer. In this manner, multiple virtual servers can be simultaneously run on one physical platform.
![]() Application virtualization: Applications are virtualized and encapsulated from the underlying operating platform, as well as the hardware.
Application virtualization: Applications are virtualized and encapsulated from the underlying operating platform, as well as the hardware.
![]() Desktop virtualization: Similar to server virtualization, but focused on desktop operating environments such as Microsoft Windows XP
Desktop virtualization: Similar to server virtualization, but focused on desktop operating environments such as Microsoft Windows XP
![]() Storage virtualization: Physical storage devices are abstracted to represent a virtual storage platform.
Storage virtualization: Physical storage devices are abstracted to represent a virtual storage platform.
This chapter focuses on server virtualization, as this is the primary use of virtualization in most enterprises today. The major server virtualization vendors currently include VMware (vSphere), Microsoft (Hyper-V), and Citrix (XenServer). This chapter focuses on VMware’s product line.
Throughout this chapter, several terms have constantly been used, so we need to define them up front.
In the realm of server virtualization, the host is the underlying server virtualization platform that will be used to provide virtual hardware layers to the virtual servers. The virtual systems can be located directly on the host’s local storage device or on a network storage device (or devices).
The virtual guest comprises a set of files that represent the virtual server itself. These files will be covered in more detail later in the chapter, but each serves a specific purpose in interacting with the host software and the underlying hardware that the host is installed on.
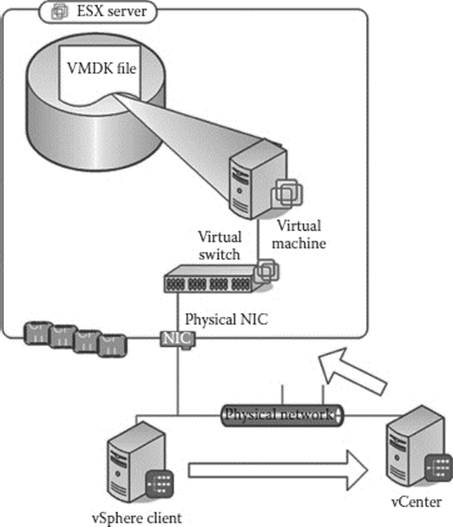
Figure 29.1 Components of VMware infrastructure.
The hypervisor is the primary component of any server virtualization platform. Often referred to as the virtual machine monitor (VMM), the hypervisor is the central nervous system within a virtual infrastructure. It manages the host’s underlying hardware resources and handles all guest-initiated operating system and application requests for CPU, memory, I/O, and disk resources.
Two types of hypervisors are commonly found today:
![]() Type 1 hypervisors are essentially their own self-contained operating platforms and are installed on the “bare metal” of the host hardware. Guest systems run at a level “above” the hardware, allowing for more complete isolation. A LinuxRedHat6.2 of this type of hypervisor would be VMware’s ESX Server.
Type 1 hypervisors are essentially their own self-contained operating platforms and are installed on the “bare metal” of the host hardware. Guest systems run at a level “above” the hardware, allowing for more complete isolation. A LinuxRedHat6.2 of this type of hypervisor would be VMware’s ESX Server.
![]() Type 2 hypervisors are applications that run on an existing operating system platform. LinuxRedHat6.2s of a Type 2 hypervisor would be VMware Workstation or VMware Fusion.
Type 2 hypervisors are applications that run on an existing operating system platform. LinuxRedHat6.2s of a Type 2 hypervisor would be VMware Workstation or VMware Fusion.
Components of VMware Infrastructure 4 (Figure 29.1):
1. ESX/ESXi Server
2. Virtual switch
3. vCenter
4. vSphere Client(s)
5. Virtual machines (VMs)
6. Storage
Where Are the VM Files Stored?
The most powerful features of VMware, such as vMotion, HA, and DRS, require the use of “Shared Storage,” which is a centralized storage that is shared between multiple VMs. That being said, most rack-mounted servers do include a hard disk; however, it is typically only used for ISO storage and templates.
The most common type of shared storage types include:
![]() Network-Attached Storage (NAS) using Network File System (NFS)
Network-Attached Storage (NAS) using Network File System (NFS)
![]() SAN using Fibre Channel
SAN using Fibre Channel
![]() SAN using iSCSI
SAN using iSCSI
In all likelihood, the VM files you will need to image are stored on a large shared storage device.
Virtual Machine File System and Virtual Machine Disk Format Considerations
It is important to note that the specifications for the powerful journaling files system created by VMware called Virtual Machine File System (VMFS) have not been released yet. As of the date of this writing, there are no commercial forensic tools that provide for the recovery or analysis of the media that utilize VMware’s VMFS. This creates serious issues, as it is unlikely that the files deleted by a malicious party will be able to be recovered by a forensic expert from a VMFS formatted disk. Further, as the file system is proprietary, the forensic expert is restrained to working with VMFS from within VMware. Although this is somewhat limiting, it is not a showstopper as a VM is typically stored within a container called a Virtual Machine Disk Format (VMDK) on top of VMFS. The VMDK “container” contains the complete abstraction of the VM and is supported by multiple forensic analysis tools. The VMDK can be copied from the VMFS-based storage from within VMware; or, if an image of the hard disk containing the VMFS is available using an open source tool called “Open Source Virtual Machine File System,” a copy of the VMDK can be made in Windows or Linux using either a command line interface or WebDav GUI. The open source tool referenced above can be downloaded from this Web site: http://code.google.com/p/vmfs/.
Is there really any need to capture an entire VMFS to acquire a forensic image of a VM?
![]() Hundreds, if not thousands, of VMs potentially impacted
Hundreds, if not thousands, of VMs potentially impacted
![]() Privacy considerations
Privacy considerations
![]() Scope of search warrant issues
Scope of search warrant issues
Probability of recovery of any deleted materials is low, so why not focus on the VMDK for the VM that is the focus of the investigation.
VMDK Details
VMDK files represent physical hard drives for VMs, so as many as 60 VMDK files can be allocated for a VM, with a hard limit of 2TB for each.
There are four different categories of virtual disks that can be allocated:
![]() Zeroed thick: This is the default VMDK type, created with the stand-alone vSphere Client, the vSphere Client, and the vCenter, or at the Service Console with the “vmkfstools-c” command. This disk type allocates all needed space up front and writes random data over any accessed areas the first time a VM tries to access them. This disk type strikes a good balance between performance, efficiency, and security.
Zeroed thick: This is the default VMDK type, created with the stand-alone vSphere Client, the vSphere Client, and the vCenter, or at the Service Console with the “vmkfstools-c” command. This disk type allocates all needed space up front and writes random data over any accessed areas the first time a VM tries to access them. This disk type strikes a good balance between performance, efficiency, and security.
![]() Eager zeroed thick: This can only be created using the “vmkfstools-d eager zeroed thick” command or by selecting the virtual disks that support clustering and Fault Tolerance (FT) options. The major difference with this disk type versus the “zeroed thick” disk type is that eager zeroed thick disks overwrite all disk space with zeros upon initial creation.
Eager zeroed thick: This can only be created using the “vmkfstools-d eager zeroed thick” command or by selecting the virtual disks that support clustering and Fault Tolerance (FT) options. The major difference with this disk type versus the “zeroed thick” disk type is that eager zeroed thick disks overwrite all disk space with zeros upon initial creation.
![]() Thick: Preexisting data on the drive where this is allocated is never wiped out. This is a HUGE security risk, and as such this VMDK type should never be used.
Thick: Preexisting data on the drive where this is allocated is never wiped out. This is a HUGE security risk, and as such this VMDK type should never be used.
![]() Thin: Thin VMDK files are both allocated and zeroed at the time of access, which is very efficient but also consumes more resources in real time. This is the default disk type for VMDKs created on NFS volumes, as well as VMDKs created in VMware Workstation.
Thin: Thin VMDK files are both allocated and zeroed at the time of access, which is very efficient but also consumes more resources in real time. This is the default disk type for VMDKs created on NFS volumes, as well as VMDKs created in VMware Workstation.
Two modes can be configured for VMDK disks:
![]() Persistent: Default mode, VMDK behaves like a standard physical disk. Changes are written to disk.
Persistent: Default mode, VMDK behaves like a standard physical disk. Changes are written to disk.
![]() Nonpersistent: Once set as nonpersistent, no changes are saved.
Nonpersistent: Once set as nonpersistent, no changes are saved.
Exactly What Files Are Associated with a VM?
When we create a VM called “LinuxRedHat6.2,” the following files would be created and placed in the respective VMDK container:
![]() LinuxRedHat6.2.vmx: VM configuration file
LinuxRedHat6.2.vmx: VM configuration file
![]() LinuxRedHat6.2.vmdk: Virtual disk configuration file
LinuxRedHat6.2.vmdk: Virtual disk configuration file
![]() LinuxRedHat6.2-flat.vmdk: Actual VM hard disk
LinuxRedHat6.2-flat.vmdk: Actual VM hard disk
![]() LinuxRedHat6.2.nvram: VM’s BIOS file
LinuxRedHat6.2.nvram: VM’s BIOS file
![]() LinuxRedHat6.2*.log: VM log
LinuxRedHat6.2*.log: VM log
![]() LinuxRedHat6.2.vswp: The VM Swap file
LinuxRedHat6.2.vswp: The VM Swap file
![]() LinuxRedHat6.2.vmsn/vmsd: VM snapshot metadata
LinuxRedHat6.2.vmsn/vmsd: VM snapshot metadata
![]() LinuxRedHat6.20000001-delta.vmdk: Real-time snapshot write file
LinuxRedHat6.20000001-delta.vmdk: Real-time snapshot write file
![]() LinuxRedHat6.2-***.vmss: Suspended VM memory data
LinuxRedHat6.2-***.vmss: Suspended VM memory data
The primary focus of a forensic investigation of a VM would be on the respective flat.vmdk file; however, it is suggested to copy all of the available files from within the VMDK to be certain that potential valuable evidence is not missed.
VMDK State Considerations
A copy of a VMDK file can be made while the respective VM is in any one of the following states:
![]() On
On
– I have used this in IR-related cases without issue, but others have reported errors from VMware when copying a running VM.
– This method is useless from a forensics perspective, as the disk is constantly changing; hence, it would be impossible to verify the forensic soundness of any copy.
![]() Off
Off
– Traditional state for forensic imaging
![]() Suspended
Suspended
– When you suspend a VM, you also get a copy of what was in the memory at the moment it was suspended as a bonus.
![]() Snapshot
Snapshot
– The VMDK is no longer changing as all data is being written to the new snapshot disk and you get the added bonus of collecting an image of the RAM at the time of the snapshot.
When you create a snapshot, you are basically telling VMware you are going to create a new disk for this VM, so from now on only write to this new disk and no longer write to the original disk. This is great if you are only going to create a single snapshot (Figure 29.2) but can get very complex very quickly with multiple snapshots (Figure 29.3). Today, there are no tools to analyze an individual snapshot’s delta file. The only available work around is to restore and analyze each snapshot sequentially.
It is important to consider that when you consolidate your snapshots, you are effectively sequentially applying each snapshot and the respective changes contained within that snapshot to the original VMDK. Valuable evidence could potentially be found literally in between snapshot events. Therefore, it is important to analyze the VMDK after each individual snapshot is restored.
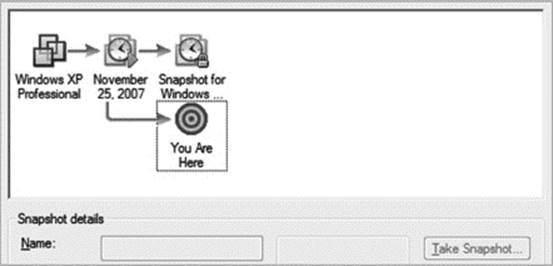
Figure 29.2 A single snapshot. When you create a snapshot you are basically telling VMware I am going to create a new disk for this VM, so from now on only write to this new disk and no longer write to the original disk. This is great if you are only going to create a single snapshot, but can get very complex very quickly with multiple snapshots.
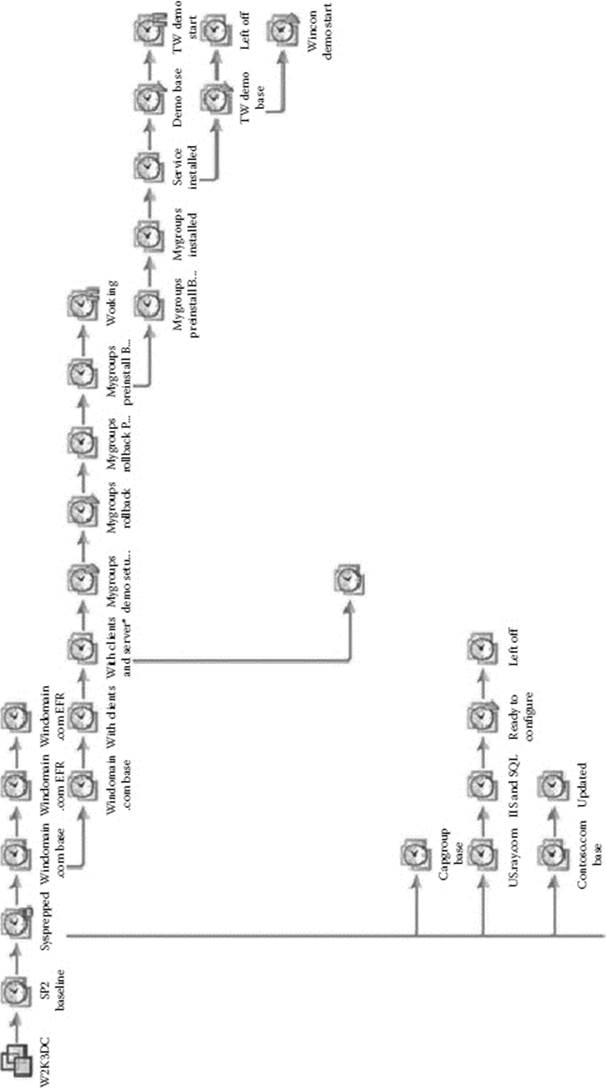
Figure 29.3 Multiple snapshots.
Suggested Steps for Sound Forensic Imaging of a VMware VMDK
1. Enable the remote console mode (Figure 29.4) and remote SSH (Figure 29.5) in ESXi.
2. Suspend the respective VM using the vCenter Client (Figure 29.6).
3. Log in to ESXi via SSH.
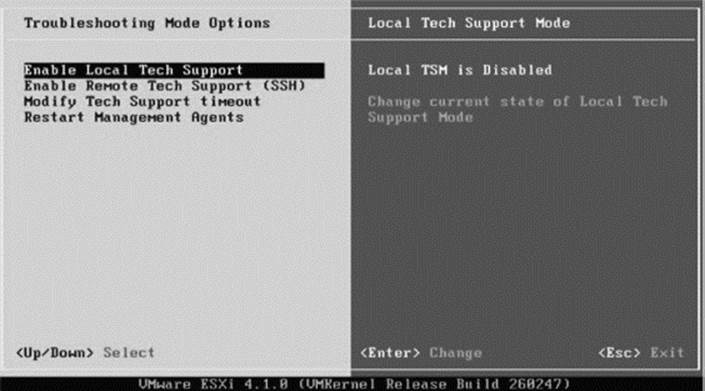
Figure 29.4 Step 1A for sound forensic imaging of a VMware VMDK: Enable remote console mode in ESXi.
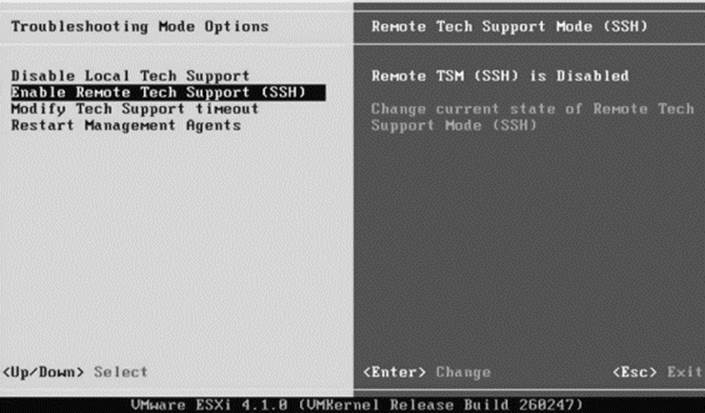
Figure 29.5 Step 1B: Enable remote SSH in ESXi.

Figure 29.6 Step 2: Suspend the respective VM using the vCenter Client.
4. Navigate to the storage medium using the remote console and hash the respective VMDK and VMSS (Figure 29.7).
5. Connect a remote NAS device to receive a copy of VMDK (Figure 29.8).
6. Copy the LinuxRedhat6.2 VMDK (Figure 29.9) and LinuxRedHat6.2 VMSS files (Figure 29.10) to a removable temporary NAS device using DD.
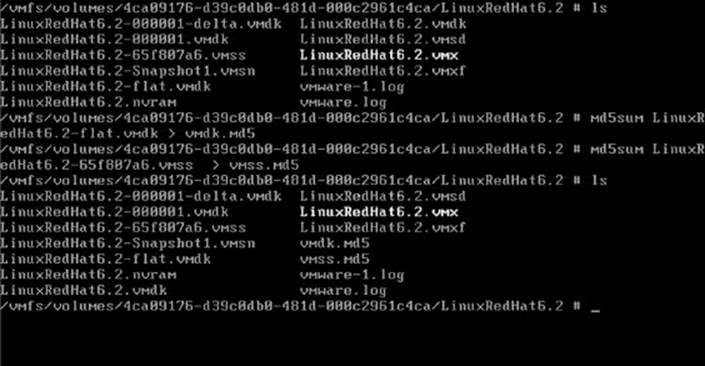
Figure 29.7 Step 4: Navigate to the storage medium using the remote console and hash the respective VMDK and VMSS.
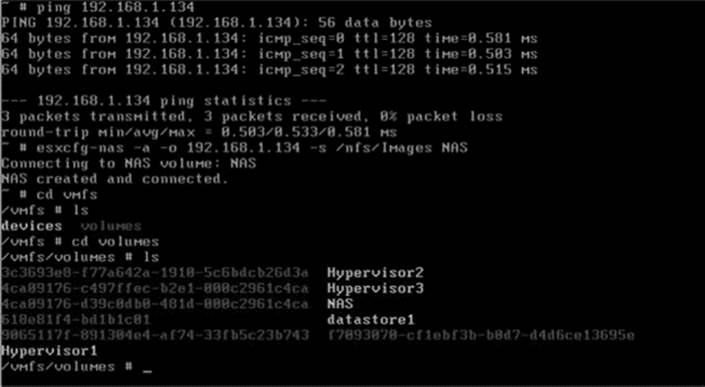
Figure 29.8 Step 5: Connect a remote NAS device to receive a copy of VMDK.
7. Hash the copies and verify that the hashes match the original.
8. Resume the VM to place the VM back in service.
Summary
Current incident response and forensics practices must be updated to meet the new constraints of the virtual realm. The age-old practice of simply pulling the plug on a potentially compromised server and imaging the hard drive to begin the incident analysis has now been replaced with shutting down, suspending, or snap-shooting the impacted VM and imaging the respective container (VMDK) within the shared storage. The large numbers of individual servers that could potentially belong to separate and individual unrelated entities that operate from the shared disk storage of the virtual realm also introduce privacy and scope issues for subpoenas that have yet to be fully addressed within the legal community. Today, using commonly available forensic tools, a complete and thorough analysis can be produced for an existing specific server operating as a VM by operating on the respective files contained within the VMDK. With that being said, although most forensic tools vendors have solutions for working within the VMs container (VMDK), none as of this writing can properly process and analyze the underlying file system (VMFS). Hence, the analysis of VMs that have been deleted from VMFS is currently problematic at best, as we simply lack the ability to reliably recover the deleted file structures from this popular underlying file system.
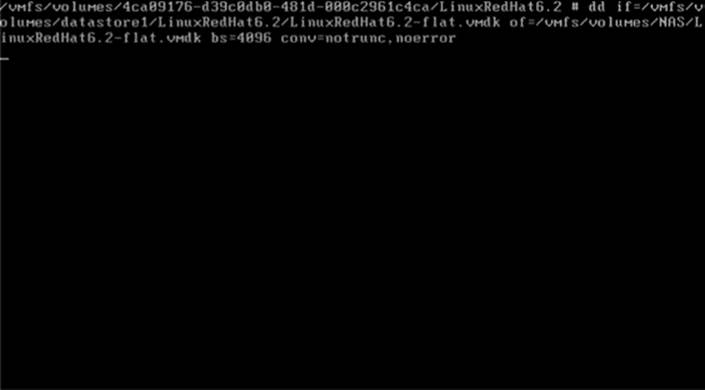
Figure 29.9 Step 6A: Copy the LinuxRedhat6.2 VMDK to a removable temporary NAS device using DD.
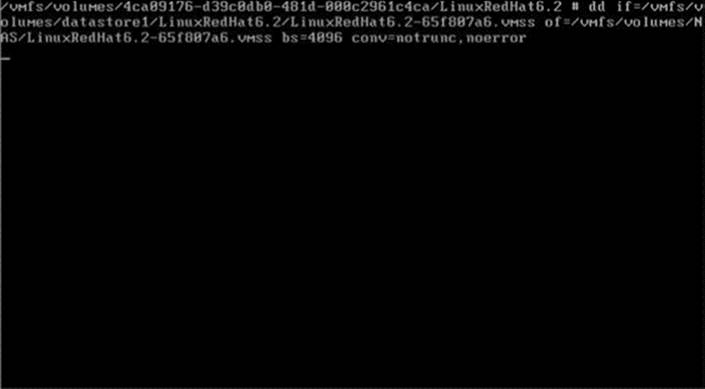
Figure 29.10 Step 6B: Copy the LinuxRedHat6.2 VMSS files to a removable temporary NAS device using DD.