Cyber Operations: Building, Defending, and Attacking Modern Computer Networks (2015)
12. IIS and ModSecurity
Mike O’Leary1
(1)
Department of Mathematics, Towson University, Towson, MD, US
Introduction
Microsoft Internet Information Services (IIS) is a web server available on all versions of Windows Server, as well as on the various Windows desktop systems. It is considered a server role, and is installed using the roles and features components on Windows Server. As a web server, IIS can run multiple web sites on multiple ports using multiple protocols. It can also be managed locally or remotely through the graphical tool IIS Manager. Configuration information is stored in .xml configuration files, which can be manipulated with command-line tools. Access to IIS web sites can be controlled in a number of ways, including filtering by properties of the client or the request. Authentication of remote clients can be done via HTTP basic authentication, but can also take place using Windows authentication methods. Web sites can be protected by SSL/TLS, using either self-signed certificates, certificates signed by a local signing server, or by a commercial CA. Customizable logging to plain text log files is provided, and PowerShell can be used to parse these logs.
ModSecurity is a web application firewall that can be installed and configured on Windows Server 2008 R2, 2012, and 2012 R2; it functions in much the same fashion as ModSecurity on Linux systems.
Installation
Different versions of IIS are available with different versions of Windows. Though the focus of this chapter is IIS on Windows Servers, IIS is available on desktop versions of Windows as a Windows feature (Control Panel ➤ Programs ➤ Turn Windows features on or off). Different versions of Windows provide different versions of IIS:
· IIS 7.0 on Windows Server 2008
· IIS 7.5 on Windows Server 2008 R2 (and Windows 7)
· IIS 8.0 on Windows Server 2012 (and Windows 8)
· IIS 8.5 on Windows Server 2012 R2 (and Windows 8.1)
The installation of IIS on Windows 2008 Server or Windows 2012 server is done by adding a new role to the server; this is the same technique used to install Active Directory (Chapter 5) or Windows file servers (Chapter 9). To install IIS, from Initial Configuration Tasks or from Server Manager, select Add Roles, then choose Web Server (IIS). Windows Server 2008 prompts the user to add the required Windows Process Activation Service as a feature. Windows Server 2012 and 2012 R2 prompt the user to install the optional IIS Management console. Though it is possible to manage IIS remotely through another instance of the IIS Management console, it is reasonable to install it on the server alongside IIS.
The IIS installation process prompts the user to select from a wide range of IIS roles, and these vary between versions of IIS. In addition to the defaults, an appropriate collection of additional role services includes the following:
· HTTP Redirection
· Custom Logging
· Logging Tools
· Request Monitor
· Basic Authentication
· IP and Domain Restrictions
· URL Authorization
· Windows Authentication
· Management Service (user is prompted to add additional required components)
These are included on the example servers presented in this chapter. On a production system, only those additional role services that are required should be installed.
IIS Configuration
The primary tool to manage an IIS web site is the IIS Manager (Figure 12-1). It can be launched from the start menu via Administrative Tools or from Server Manager. On Windows Server 2012 or 2012 R2, from Server Manager navigate Tools ➤ Internet Information Services (IIS) Manager; on Windows Server 2008 or 2008 R2 from Server Manager expand Roles ➤ Web Server ➤ Internet Information Services.
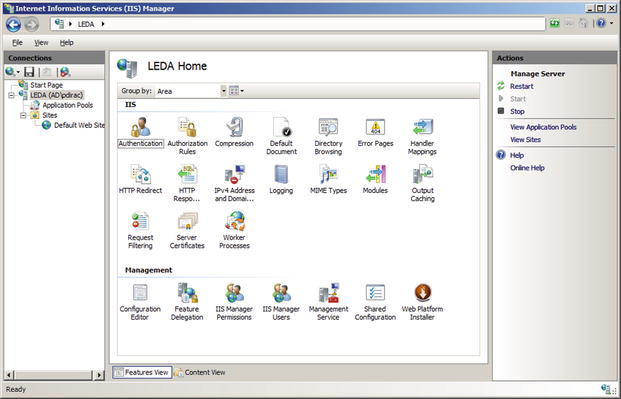
Figure 12-1.
Internet Information Services (IIS) Manager on Windows Server 2008
When IIS Manager launches on Windows Server 2012 or 2012 R2, the user is asked if they want to remain connected to the latest web platform components.
The navigation pane initially connects to the local server and shows the sites enabled on that server. Some settings, such as those for worker processes are only global, but most can be set either globally, on a per-site basis, or on a per-directory basis.
It is possible to manage multiple web servers from a single instance of the IIS manager. To allow a system to be remotely managed, from IIS manager select the server name in the navigation pane, then double-click on Management Service (Figure 12-2). Check the box “Enable Remote Connections” and select how IIS Manager authenticates users. Remote users that attempt to connect to IIS can be authenticated with their user credentials; it is also possible to create separate IIS Manager users with their own credentials. Access to the management service can be restricted by IP address. Once the changes have been made, apply the result and start the service; this automatically opens the proper firewall port (TCP/8172).
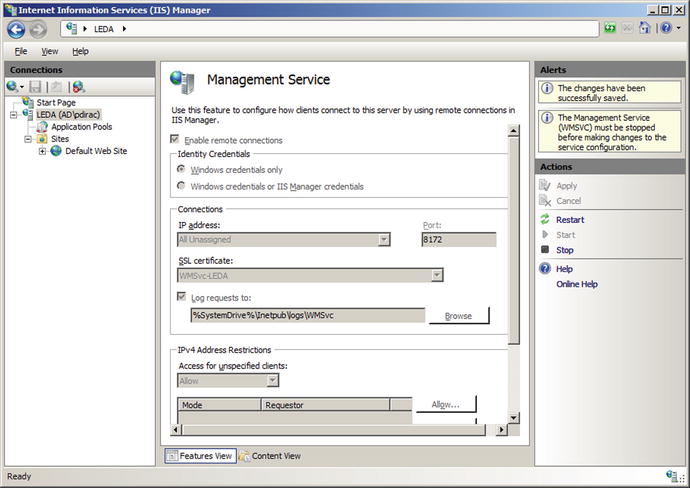
Figure 12-2.
Configuring the Web Management Service on Windows Server 2008
Though this process starts the web management service, it does not configure the service to start on boot. To do so on Windows Server 2012 and 2012 R2, launch Services from the Tools menu on Server Manager. Double-click on the entry for Web Management Service, and change the Startup type to Automatic. On Windows Server 2008 or 2008 R2, from the start menu navigate Administrative Tools ➤Services, select the Web Management Service and change the startup type to automatic.
To manage a remote server, from IIS Manager select File ➤ Connect to a Server. Provide the required credentials (specifying the domain for the user name if appropriate). In the default setting, the server uses SSL/TLS with a self-signed certificate to protect the communication. A user that connects is warned that the certificate was issued to a different server. The user has the option of connecting to the remote server; the user can also view the remote certificate and install it locally as trusted. Depending on the remote server, the user may be prompted to add one or more additional features, including the Microsoft web management client. Connections can be saved; from the File menu select File ➤ Save Connections. Once the connection is made, a node for the new web server appears in the IIS manager navigation pane. The ability of IIS Manager on Windows Server 2008 to manage newer systems is limited.
Web Sites
Windows IIS includes a default web site when it is installed with the name “Default Web Site”; it appears in the IIS manager navigation pane under the Sites node. The web site name can be changed by right-clicking on the site in IIS Manager then selecting Rename. The contents of the web site can be seen by changing IIS Manager to content view at the bottom of the page. The contents of the default web site are stored in the directory C:\inetpub\wwwroot\. One of the entries in the action pane for a web site in IIS manager is Explore; this brings up Windows File Manager opened to the directory in the file system that contains the web site. User access controls (UAC) prevent most simple techniques to edit the contents of the default directory. Even a domain administrator cannot simply right-click in File Explorer to create a new file in C:\inetpub\wwwroot, nor can they edit an existing document in that directory in Notepad and save it back.1
IIS can run multiple web sites on the same server; configuration options include the following:
· Single IP address, single hostname, single web site
· Single IP address, single hostname, multiple ports, multiple web sites
· Single IP address, multiple hostnames, multiple web sites
· Multiple IP addresses, multiple hostnames, multiple web sites
An administrator that wants to configure IIS to serve a second web site can start from IIS manager, right-click on the name of the server in the navigation pane, and select Add Web Site (Figure 12-3). A name for the web site needs to be chosen; this is the name that appears in IIS manager. The physical path is the location of the web site in the file system. This directory needs to be manually created; one reasonable location is inside the directory C:\inetpub\. When a web site is created, IIS can be configured to access the web site as a particular user, however the default, which uses pass-through authentication, is reasonable.
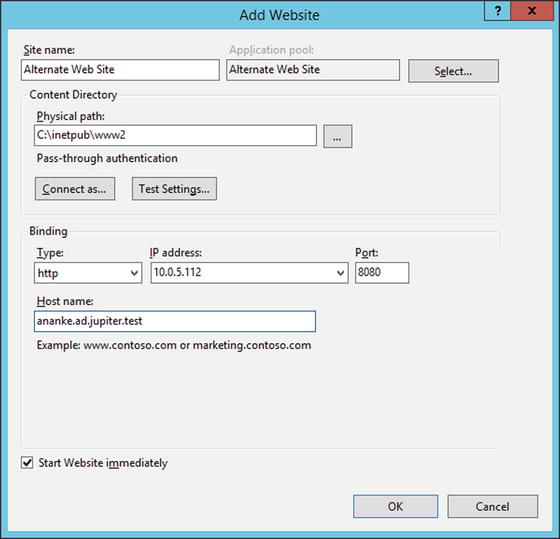
Figure 12-3.
Adding a second web site named Alternate Web Site running on TCP/8080 on Windows Server 2012 R2
A site’s bindings include the protocol (http or https), IP address, port, and host name. All of these must match a request for the page to be served. In particular, if the host name is specified in a binding (as in Figure 12-3) and the server receives a request by IP address (and so without a host name), then IIS returns a 400 Bad Request error to the client.
Bindings can be configured with wild cards. If the host name is omitted in a binding, it matches any host name. When specifying an IP address, the administrator can select “All Unassigned,” which matches any IP address not in use by another site. Once a web site is created, it is possible to modify the bindings by right-clicking on the web site in IIS manager and selecting Edit Bindings. A single web site can have multiple bindings.
Creating a web site on a nonstandard port does not automatically open the port in the firewall; this needs to be done manually.
If a server has multiple external IP addresses, then IIS can serve separate web sites on each address. Suppose, for example, that a host has two IP addresses: 10.0.5.112 with the DNS name ananke.ad.jupiter.test, and 10.0.5.114 with the DNS name thebe.ad.jupiter.test. To create a web site for thebe.ad.jupiter.test, right-click on the name of the server in the IIS manager navigation pane, select Add Web Site, then add a new site, specifying the site name (Thebe), physical path (C:\inetpub\www-thebe), binding type (http), the IP address (10.0.5.114), and the port (TCP/80). A client that browses to ananke.ad.jupiter.test gets the IP address 10.0.5.112 from their DNS server, and then gets the web page for ananke; a client that browses to thebe.ad.jupiter.test gets the IP address 10.0.5.114 from their DNS server, and then gets the web page for thebe.
Basic Settings
If no document is specified in a URL, then IIS attempts to return a default document. There are five default documents: in order, they are Default.htm, Default.asp, index.htm, index.html, and then iisstart.htm. When IIS looks for a default document, it looks through this list in the specified order. It does not go on to the next item in the list until it is satisfied that the current list item does not exist. An administrator can change the default documents and their order, either server wide or for just a particular web site. From IIS manager, navigate to either the server or the site, double-click on Default Document, and make the desired changes.
If a directory is requested and no default page exists, then IIS returns a 403 error. This behavior can be changed at the server or site level through IIS Manager via Directory Browsing. IIS allows the administrator to return a directory listing instead of the 403 error, and can select which information is included in the directory listing, including the date, time, size, and extension for each file.
When IIS needs to return an error to the client, by default it returns different error messages for local requests and remote requests. This behavior is configured through IIS manager, in the Error Pages setting. The action pane hyperlink Edit Feature Settings allows the administrator to send detailed errors, custom errors, or vary depending on the request source. The main body in the setting links to the various, language-specific custom error pages. By default, these are located in C:\inetpub\custerr\, with separate subdirectories depending on the language. The difference between the detailed errors used locally and the custom errors used for remote requests is significant. Figure 12-4 shows the difference in the returned error messages when a client makes a request of a directory without a default document on a site where directory browsing is not enabled. Both clients receive the 403 error, but the local user also sees the most likely causes of the error and suggestions on how to correct the underlying issue.
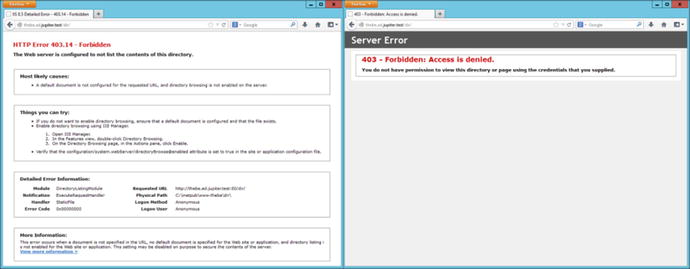
Figure 12-4.
Two errors for the same web site. The left shows the detailed errors available by default only on the local server. The right shows the custom error page for remote requests
A virtual directory is a URL path that is mapped to a portion of the file system. One way to create a virtual directory for a site is to select the site from the navigation pane of IIS Manager, then use the hyperlink View Virtual Directories from the action pane. This presents a page that shows all of the virtual directories for the site; the action pane then has hyperlinks to view the settings for existing virtual directories or to create a new virtual directory. To create a new virtual directory, choose the physical path that points to the location in the file system, as well as the alias for the virtual directory. This is the path clients take to reach the directory. As an example, if an administrator on the site server.test creates a virtual directory with the physical path c:\WebData and the alias Subdirectory, then the URL http://server.test/Subdirectory/page.htm serves its content from the file c:\WebData\page.htm.
It is possible that a single directory in the file system is mapped to multiple virtual directories in multiple web sites, all with different URLs.
Command-Line Tools
Windows includes the command-line tool appcmd.exe to administer Windows IIS from the command line. This tool is not located in the system path, but resides at c:\Windows\System32\inetsrv\appcmd.exe. The tool requires administrative privileges, and must be run from an elevated command prompt.
The tool takes a verb and a noun (Table 12-1), so for example to view all of the sites currently available on the server, run the command
Table 12-1.
Allowable verb and noun combinations for appcmd.exe on Windows Server 2008
|
Verbs |
Noun |
|
list set add delete start stop |
site |
|
list set add delete |
app |
|
list set add delete start stop recycle |
apppool |
|
list set add delete |
vdir (virtual directories) |
|
list set search lock unlock clear reset migrate |
config |
|
list |
wp (worker processes) |
|
list |
request |
|
list set add delete install uninstall |
module (web server modules) |
|
list add delete restore |
backup |
|
list configure inspect |
trace |
C:\Windows\System32\inetsrv>appcmd.exe list site
SITE "Default Web Site" (id:1,bindings:http/*:80:,state:Started)
SITE "Alternate Web Site" (id:2,bindings:http/10.0.5.112:8080:ananke.ad.jupiter.test,state:Started)
SITE "Thebe" (id:3,bindings:http/10.0.5.114:80:,state:Started)
This server is running three web sites. The first is the default, listening on all unassigned addresses on TCP/80. The second is the alternate web site, listening only on 10.0.5.112, TCP/8080. The third web site is listening on the server’s second IP address 10.0.5.114 on TCP/80.
An administrator that wants to stop the third site can run the command
C:\Windows\System32\inetsrv>appcmd.exe stop site "Thebe"
"Thebe" successfully stopped
C:\Windows\System32\inetsrv>appcmd.exe list site
SITE "Default Web Site" (id:1,bindings:http/*:80:,state:Started)
SITE "Alternate Web Site" (id:2,bindings:http/10.0.5.112:8080:ananke.ad.jupiter.test,state:Started)
SITE "Thebe" (id:3,bindings:http/10.0.5.114:80:,state:Stopped)
The list config command shows the configuration of the web server.
C:\Windows\System32\inetsrv>appcmd.exe list config
<system.webServer>
<httpCompression directory="%SystemDrive%\inetpub\temp\IIS Temporary Compressed Files">
<staticTypes>
<add mimeType="text/*" enabled="true" />
<add mimeType="message/*" enabled="true" />
<add mimeType="application/javascript" enabled="true" />
<add mimeType="application/atom+xml" enabled="true" />
<add mimeType="application/xaml+xml" enabled="true" />
<add mimeType="*/*" enabled="false" />
</staticTypes>
<dynamicTypes>
... Output Deleted ...
Changes can be made to the configuration via set config. For example, to configure the web site Thebe so that the default document has the name home.html, run the command
C:\Windows\System32\inetsrv>appcmd.exe set config "Thebe" /section:defaultDocument /enabled:true /+files.[value=’home.html’]
Applied configuration changes to section "system.webServer/defaultDocument" for
"MACHINE/WEBROOT/APPHOST/Thebe" at configuration commit path "MACHINE/WEBROOT/APPHOST/Thebe"
From IIS manager, navigate to the Thebe web site and view the list of default documents to see that home.html has been added to the top of the list.
As a second example, to enable directory browsing on the alternate web site and to display the time, size, extension, and data for each file, run the command
C:\Windows\System32\inetsrv>appcmd.exe set config "Alternate Web Site" /section:
system.webServer/directoryBrowse /enabled:"True" /showFlags:"Date, Time, Size, Extension"
Applied configuration changes to section "system.webServer/directoryBrowse" for "MACHINE/WEBROOT/APPHOST/Alternate Web Site" at configuration commit path "MACHINE/WEBROOT/APPHOST/Alternate Web Site"
Navigate to alternate web site in IIS Manager and examine the settings for directory browsing to confirm that the changes have been made.
The configuration files themselves are .xml files; the primary configuration file is C:\Windows\System32\inetsrv\config\applicationHost.cfg. Each web site has a configuration file named web.config in its root directory if its configuration differs from the default. For example, after making the previous changes to the web site Thebe, the configuration file in its root directory (C:\inetpub\www-thebe\web.config) has the content
<?xml version="1.0" encoding="UTF-8"?>
<configuration>
<system.webServer>
<defaultDocument enabled="true">
<files>
<add value="home.html" />
</files>
</defaultDocument>
</system.webServer>
</configuration>
Access Control
An administrator can deny access to the server, a web site, or a directory (including a virtual directory) by IP address range. This is done via the IP and Domain Restrictions role; this role must be manually added during IIS installation. Navigate to the component (server, site, or directory) in IIS manager, then select IP Address and Domain Restrictions (on Windows Server 2008 select IPv4 Address and Domain Restrictions).
The action pane hyperlink Edit Feature Settings is used to determine the default response; this is set to allow access by unspecified clients by default. Access can be allowed or denied, either by IP address or by IP address range.
Care must be taken when using this feature. Figure 12-5 shows a Windows 2012 R2 server configured to deny access to all systems on the 10.0.2.0/24 subnet and to allow access to clients at 10.0.2.28. Windows applies these rules in order from first to last, and so an administrator might expect that this configuration allows access to clients at 10.0.2.28. In fact, Windows may, or may not allow access. Although Windows does apply the rules in order, the default screen in Figure 12-5 does not show that order. An administrator must use the action pane hyperlink View Ordered List to see the actual ordering of the rules. If the deny rule is first in the ordered list, then access from 10.0.2.28 is denied, while if the allow rule is first then access from 10.0.2.28 is allowed.
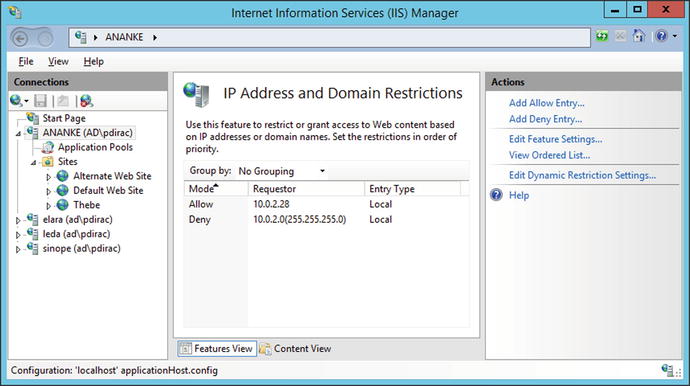
Figure 12-5.
IP Address and Domain Restrictions on Windows Server 2012 R2
On Windows Server 2008 and 2008 R2 systems, if IP address and domain restrictions deny a request, then the client receives a 403 Forbidden error. On Windows Server 2012 and 2012 R2, the Edit Feature Settings hyperlink in the action pane allows the administrator to set the deny action type as well as the default access policy. Choices include Unauthorized (returns 401 Unauthorized), Forbidden (returns 403 Forbidden), Not Found (returns 404 Not Found), or Abort (which resets the connection).
Windows Server 2012 and 2012 R2 also allow for dynamic IP address restrictions. A client’s IP address can be blocked if they exceed a specified number of concurrent requests, or if they exceed a number of requests in a specified time period. These settings are available from the action pane through the hyperlink Edit Dynamic Resolution Settings.
An administrator can configure IIS to filter requests based on the URL, the HTTP verb (e.g., GET, POST, HEAD, PUT) or even portions of the file system using request filtering. This is installed by default on Windows Server 2008 R2, 2012, and 2012 R2. Request filtering is also installed by default on Windows Server 2008, but lacks the interface in IIS manager to configure it. The IIS Administration Pack (http://www.iis.net/downloads/microsoft/administration-pack ), includes the necessary Windows 2008 user interface.
To use request filtering, navigate IIS manager to the server, the site or directory, then select Request Filtering (Figure 12-6). In the default configuration, IIS includes one hidden segment, with the value web.config. The file web.config is the XML file that contains the settings for the web site if they are different from the default; it is located in the same directory as the contents of the web site. This request filter prevents this configuration file from being served to clients; requests for the file are met with a 404 Not Found error.
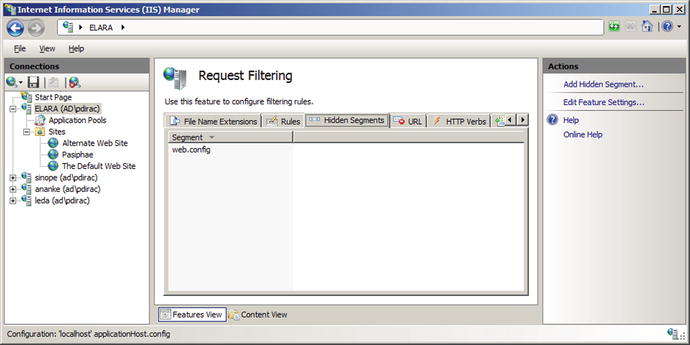
Figure 12-6.
Request filtering, from IIS Manager on Windows Server 2008 R2
Beginning with Windows Server 2008 R2, it is also possible to create rules that scan the URL or the query string in a request and block the request. For example, from the request filtering page in IIS manager, select the rules tab in the main pane, then choose Add Filtering Rule from the action pane. An administrator that wants to block any request where the query contains a null byte can do so by providing the name of the new filter (say Null Byte Check), checking the Scan query string box, and including the string %00 in the list of Deny Strings (Figure 12-7). Any client that requests a page from the server that includes a null byte in the query receives a 404 Not Found error rather than the page.
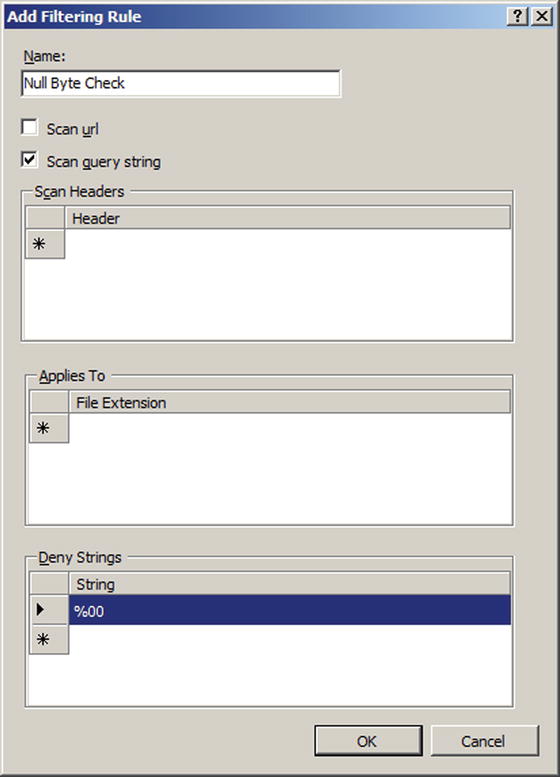
Figure 12-7.
Request filtering for null bytes in a query, from Windows Server 2008 R2
Whenever a client makes a request of IIS, the server makes an authentication decision to determine if the client is granted access to the resource. These settings can be modified at the server, site, or directory level from IIS manager using the Authentication settings. Navigate IIS manager and select a server, site or directory, then open the Authentication feature. In these examples, both basic authentication and Windows authentication were added as IIS server roles, so Windows Server 2008 and Windows Server 2008 R2 include anonymous authentication, basic authentication, and Windows authentication. Windows Server 2012 and 2012 R2 also include ASP.NET impersonation. At least one authentication mechanism must succeed for a client to be granted access to a requested resource.
Anonymous authentication is the simplest; it provides an identity for anonymous users; by default it uses the built-in IUSR account. If a portion of a site is not meant to be accessed by anonymous users, then anonymous authentication must be disabled for that portion of the site.
Basic authentication is the same RFC 2617 method described in Chapter 11 for Apache systems. In particular, credentials are passed by in essentially plain text by Base64 encoding both the user name and password. Basic authentication provides two options; the first is the authentication realm which plays the same role it did on Apache. The second is the default domain used for authentication. If no domain is specified, then windows domain users may need to include their domain name (domain\username) when authenticating.
Windows authentication uses Windows techniques (NTLM or Kerberos) for authentication; these use a challenge-response system that make them more resistant to sniffing and replay attacks.
SSL/TLS
To build a web site that supports SSL/TLS, an administrator must first select or create a certificate. To see the collection of available web server certificates, from IIS manager, navigate to the server (not a site or directory) and select Server Certificates (Figure 12-8). By default, one certificate is present, issued to the host. On Windows Server 2012 and 2012 R2, it is named WMSVC; on Windows Server 2008 and 2008 R2 it is unnamed.
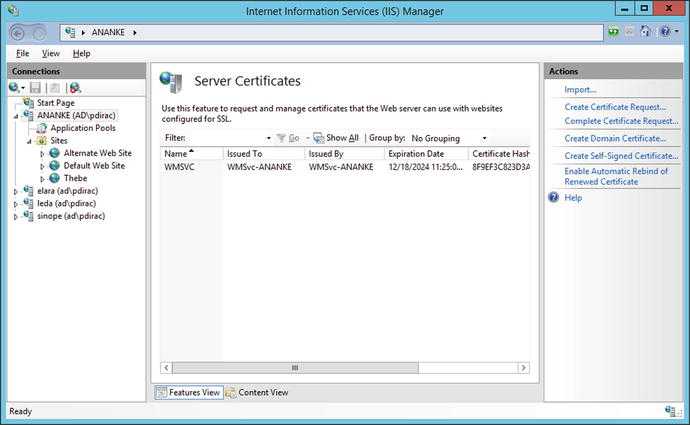
Figure 12-8.
Default server certificates on Windows Server 2012 R2
The action pane allows an administrator to create a self-signed certificate. On Windows Server 2008 and 2008 R2, all that needs to be specified is the name of the certificate. Windows Server 2012 and 2012 R2 also allow the certificate to be stored either in the Personal store or a Web Hosting store. Although a server can listen on multiple IP addresses with different DNS names, the process of generating a self-signed certificate only generates a certificate for the system’s Windows host name.
To build a web site that uses SSL/TLS, the system administrator creates a new web site, but chooses https instead of http for the protocol type when selecting the binding. A drop-down box appears that enables the administrator to choose the SSL/TLS certificate.
Certificates on Windows systems can be managed through the Microsoft management console (MMC), c:\Windows\System32\mmc.exe. Start MMC, and from the main menu navigate File ➤ Add/Remove Snap-in. From the list of snap-ins, select Certificates, then Add. Microsoft manages certificates for the computer account, service accounts, and user accounts separately; when the certificates snap-in is added, the user selects which collection of certificates to manage. Manage the certificates for the computer account, then navigate Certificates (Local Computer) ➤ Trusted Root Certification Authorities ➤ Certificates to see the self-signed certificate (Figure 12-9). Double-click on a certificate to see the details; to export the certificate to a range of other formats, right-click on the certificate, selecting All Tasks ➤ Export. These options are both also available from the server certificates component of IIS manager.
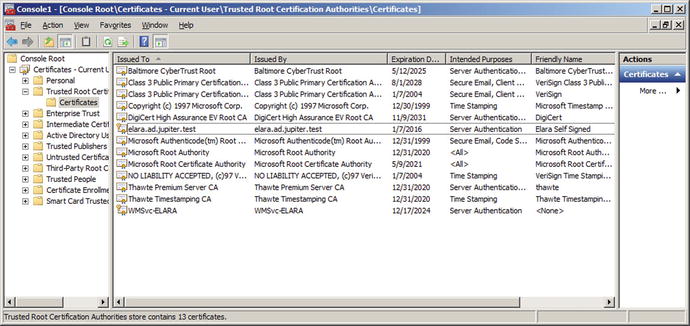
Figure 12-9.
MMC with the certificate snap-in for the local computer on the Windows Server 2008 R2 host elara.ad.jupiter.test, showing its original certificate (WMSvc-ELARA) and a newly created self-signed certificate named Elara Self Signed
To create an SSL/TLS web site that uses a certificate signed by a local signing server (Chapter 11), the first step is to configure the Windows server to trust the signing server. Copy the certificate (named ca.crt in Chapter 11) from the signing server to the web server. From the certificates MMC snap-in for the local computer account, right-click on Trusted Root Certification Authorities, then navigate All Tasks ➤ Import to start the Certificate Import Wizard. Select the certificate from the signing server, and import the certificate into the Trusted Root Certification Authorities. On Windows Server 2012 and 2012 R2, this can also be accomplished by right-clicking on the certificate, and selecting Install Certificate; be sure to choose the local machine as the store location. Right-clicking on the certificate in Windows Server 2008 and 2008 R2 also allows the certificate to be installed, but only for the current user rather than the local machine; this is insufficient for what follows.
To create a signed certificate, from the server certificates page for the server in IIS manager, select the hyperlink Create Certificate Request from the action pane. The administrator provides the data for the request, beginning with the common name, which should match the DNS name of the server. The administrator chooses a cryptographic service; RSA with 2048 bits is a reasonable choice.
This certificate signing request can be sent to a commercial CA for signing; it can also be signed by the local signing server as was done in Chapter 11.
[root@dubhe ∼]# openssl x509 -req -days 365 -in /etc/pki/CA/Thebe.csr -CA /etc/pki/CA/certs/ca.crt -CAkey /etc/pki/CA/private/ca.key -out /etc/pki/CA/newcerts/Thebe.crt
Signature ok
subject=/C=US/ST=Maryland/L=Towson/O=Towson University/OU=None/CN=thebe.ad.jupiter.test
Getting CA Private Key
Enter pass phrase for /etc/pki/CA/private/ca.key:
Once the certificate is signed, return it to the server. To complete the process, from the server certificates page for the server in IIS manager select the hyperlink Complete Certificate Request. Provide the certificate file (Thebe.crt in the example) and a name for the certificate. This certificate can be used in a new SSL/TLS protected web site, or by editing the bindings it can replace an already existing certificate, self-signed or otherwise.
It is possible to customize the protocols and cipher suites used by Windows Server. The configuration information is stored in the registry, in the key HKEY_LOCAL_MACHINE\SYSTEM\CurrentControlSet\Control\SecurityProviders\SCHANNEL. For example, to disable the use of SSL 2.0 by default on the server, set the value of HKEY_LOCAL_MACHINE\SYSTEM\CurrentControlSet\Control\SecurityProviders\SCHANNEL\Protocols\SSL 2.0\Server\DisabledByDefault to the DWORD 1. However, many of the registry values that control these settings are not included by default and must be manually added; this is the case for the previous value. Fortunately, there is a free graphical tool named IISCrypto (Figure 12-10) available from Nartac Software at https://www.nartac.com/Products/IISCrypto/ that provides a graphical way to set the protocols, ciphers, hashes, and key exchange methods. It provides pre-set templates, including a best practices template.
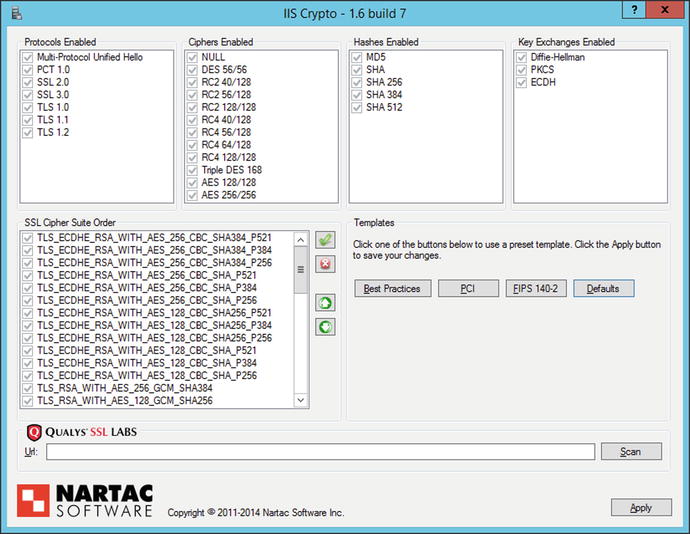
Figure 12-10.
IIS Crypto, running on Windows Server 2012 R2
Decrypting SSL/TLS Traffic
By default, IIS does not use ephemeral keys to protect SSL/TLS traffic. As a consequence, a user with access to the private key from the server can decode and view the traffic in Wireshark.
To extract the private key, from IIS Manager navigate to the server and select server certificates. Select the certificate that is used to protect the connection; right-click, then select export. Choose a name for the exported certificate and provide a password. This process creates a .pfx file that contains the key. Copy the key to a system with OpenSSL (say a Kali system), and extract the private key with the command
root@kali:∼/Desktop# openssl pkcs12 -in Thebe.pfx -out thebe.key -nodes
Enter Import Password:
MAC verified OK
A quick check verifies that this is a private key
root@kali:∼/Desktop# openssl rsa -text -noout -in thebe.key
Private-Key: (2048 bit)
modulus:
00:ca:f7:8e:b2:4a:74:06:40:be:af:b6:cc:ae:6b:
e5:82:26:cd:ba:88:9e:b3:43:22:96:2d:6c:80:c6:
... Output Deleted ...
Next, the key must be imported into Wireshark to enable it to decode the SSL/TLS traffic. From Wireshark, navigate Edit ➤ Preferences; from the preferences dialog navigate Protocols ➤ SSL/TLS. The subsequent process depends on the version of Wireshark. Later versions of Wireshark provide a dialog box where the RSA keys can be provided (Figure 12-11).
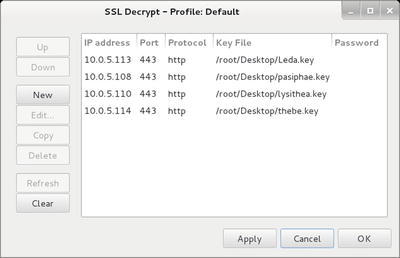
Figure 12-11.
Providing private RSA keys to Wireshark 1.10.2 running on Kali
Older versions of Wireshark require the user to enter the information in a text box in the form
10.0.5.113,443,http,/home/cgauss/Desktop/Leda.key
In either case, the user provides the IP address of the server, the port on which the decoding is to occur, the underlying protocol, and name of the file containing the key.
Once Wireshark has been configured, the decoding of SSL/TLS traffic occurs transparently. Consider Figure 12-12, which shows a Wireshark packet capture of SSL/TLS traffic. The initial SSL/TLS connection between client and server is seen in the packet list, with hello and the exchange of keys and ciphers. Following that is the corresponding traffic. The highlighted packet in the packet list is marked HTTP, but examination of the packet data itself shows that it comes from TCP/443 on the server and consists of two encrypted SSL/TLS segments. Wireshark decoded the SSL/TLS segments, and the HTML contents of the web page are visible.
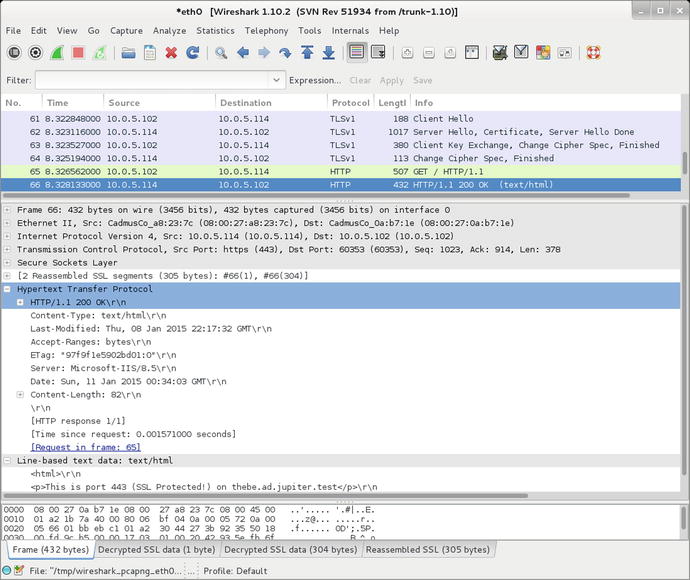
Figure 12-12.
Decoding SSL/TLS traffic from IIS 8.5 on Windows Server 2012 R2 using Wireshark (1.10.2) on Kali
Redirection
An administrator running a site exclusively on SSL/TLS can redirect requests made to the server for http sites to the SSL/TLS protected https site. To do so, the administrator first creates a web site running on port 80. From IIS manager, navigate to the port 80 web site, then select HTTP Redirect (Figure 12-13). Redirect requests made on port 80 to the corresponding https server.
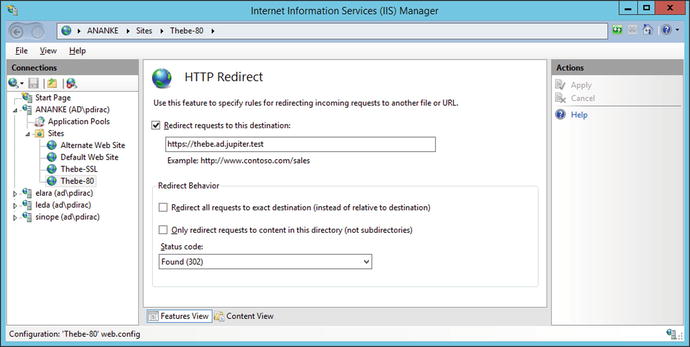
Figure 12-13.
Configuring redirection on Windows Server 2012 R2
In the example shown in Figure 12-13, the administrator running the SSL/TLS protected web site https://thebe.ad.jupiter.test wants to ensure that requests made for http://thebe.ad.jupiter.test are redirected to the SSL/TLS protected web page. A new web site is created (Thebe-80) running on TCP/80 for the IP address for thebe.ad.jupiter.test that redirects all requests to the corresponding SSL/TLS protected site.
Logging
Logging can be configured at the server level or at the site level. To determine the level at which logs are kept, from IIS Manager navigate to the server and select Logging (Figure 12-14). The first option determines whether there is one log file per web site (the default) or one log file for the entire server.
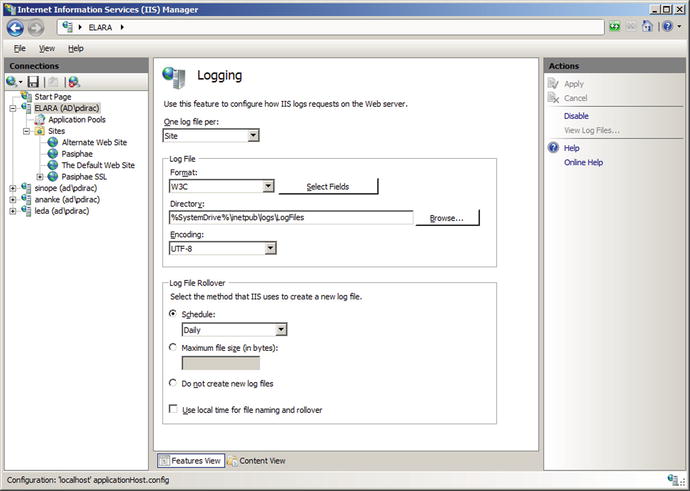
Figure 12-14.
Configuring logging for IIS on Windows Server 2008 R2
The log files themselves are plain text files, encoded either as UTF-8 or with the older ANSI encoding. The default location for the log file for the first web site is C:\inetpub\logs\LogFiles\W3SVC1\, with the second at C:\inetpub\logs\LogFiles\W3SVC2\ and so on. Navigate to the sites node in the navigation pane for IIS manager to see the ID number for each web site. A typical log has the name u_ex150109.log, which is a UTF-8 encoded log using the W3C extended format from January 9, 2015.
Log files can be stored in a variety of formats including the default W3C format. The NCSA format is a fixed format that records remote host name, user name, date, time, request type, HTTP status code, and the number of bytes sent by the server. Items are separated by spaces; time is recorded as local time. The IIS format is an extension of NCSA that also records elapsed time, number of bytes sent, action and target file. The items are separated by commas.
The default W3C format allows the administrator to specify which fields are recorded; allowable fields are shown in Table 12-2.
Table 12-2.
Standard fields for the W3C logging format. Fields marked in italic are selected by default
|
Date |
Server name |
URI query |
Bytes received |
Cookie |
|
Time |
Server IP |
Protocol status |
Time taken |
Referer |
|
Client IP |
Server port |
Protocol substatus |
Protocol version |
|
|
User name |
Method |
Win32 status |
Host |
|
|
Service name |
URI stem |
Bytes sent |
User agent |
Windows Server 2012 and 2012 R2 also allow the administrator to add additional custom fields taken from the request header, the response header, or server variables.
Because the W3C format allows for customized fields, the log file includes the recorded fields at the start of the file. A typical W3C log has the content
#Software: Microsoft Internet Information Services 8.5
#Version: 1.0
#Date: 2015-01-09 15:47:57
#Fields: date time s-ip cs-method cs-uri-stem cs-uri-query s-port cs-username c-ip cs(User-Agent) cs(Referer) sc-status sc-substatus sc-win32-status time-taken
2015-01-09 15:48:11 10.0.5.112 GET / - 80 - 10.0.5.101 Mozilla/5.0+(X11;+U;+Linux+i686;+en-US;+r v:1.9.1.3)+Gecko/20091020+Ubuntu/9.10+(karmic)+Firefox/3.5.3 - 200 0 0 0
2015-01-09 15:51:24 10.0.5.112 GET / - 80 - 10.0.5.103 Mozilla/5.0+(X11;+U;+Linux+i686;+en-US;+r v:1.9.0.18)+Gecko/2010021718+CentOS/3.0.18-1.el5.centos+Firefox/3.0.18 - 200 0 0 0
... Output Deleted ...
The logs show two GET requests: one from an apparent Ubuntu system at 10.0.5.101, and one from an apparent CentOS system at 10.0.5.103. Both requests were for the root directory, and the 200 status code shows that both requests were successfully served.
One field that is included by default in the W3C format is the protocol substatus code. The protocol status code is the HTTP status code http://www.iana.org/assignments/http-status-codes/http-status-codes.xhtml , however the protocol substatus is an IIS specific extension. As an example, if a request is blocked by a filtering rule, then not only does the client receive a 404 Not Found response, but the server records this with substatus code 19.
Because the logs are recorded in plain text, an administrator can parse them using PowerShell scripts. Suppose an administrator wants to determine the requests blocked by a filtering rule. This can be done with a PowerShell script that looks for status code 404 with substatus code 19.
Program 12-1. PowerShell script IISLogAnalysis.ps1 to search IIS W3C format logs for requests blocked by a filtering rule (404.19)
$log_file_name = "C:\inetpub\logs\LogFiles\W3SVC1\u_ex150109.log"
# Assumes data elements occur in the following order
$field = @{"date" = 0;
"time" = 1;
"s-ip" = 2;
"cs-method" = 3;
"cs-uri-stem" = 4;
"cs-uri-query" = 5;
"s-port" = 6;
"cs-username" = 7;
"c-ip" = 8;
"cs(User-Agent)" = 9;
"cs(Referer)" = 10;
"sc-status" = 11;
"sc-substatus" = 12;
"sc-win32-status" = 13;
"time-taken" = 14}
foreach ($line in [System.IO.File]::ReadLines($log_file_name)){
if ($line.StartsWith("#")) {
# Nothing to do; this is a comment line.
}
else {
$log = $line.split()
if( $log[$field["sc-status"]] -eq 404) {
if( $log[$field["sc-substatus"]] -eq 19) {
$line
}
}
}
}
Running this script yields a result like
PS C:\Windows\system32> C:\Users\pdirac\Desktop\IISLogAnalysis.ps1
2015-01-09 19:13:34 10.0.5.112 GET / x=%00 80 - 10.0.5.103 Mozilla/5.0+(X11;+U;+Linux+i686;+e
n-US;+rv:1.9.0.18)+Gecko/2010021718+CentOS/3.0.18-1.el5.centos+Firefox/3.0.18 - 404 19 0 0
ModSecurity
ModSecurity is available for IIS installations. To install the current version (ModSecurity 2.8.0), the first step is to download and install the Visual C++ Redistributable for Visual Studio 2013; it is available from Microsoft either from http://www.visualstudio.com/downloads/download-visual-studio-vs or from http://www.microsoft.com/en-us/download/details.aspx?id=40784 . The redistributable is not available for Windows Server 2008 before Service Pack 2; it is available for Windows Server 2008 R2, 2012, and 2012 R2.
ModSecurity for Windows is available as a Windows binary installer (.msi) from http://www.modsecurity.org/download.html ; it installs ModSecurity in the directory C:\Program Files\ModSecurity IIS. This directory contains the primary configuration file C:\Program Files\ModSecurity IIS\modescurity.conf, which has the same structure seen earlier on Apache installations (Chapter 11). To test the installation, update the configuration file by changing the value of SecRuleEngine
#SecRuleEngine DetectionOnly
SecRuleEngine On
Add the previously used testing rule
SecRule ARGS, "zzz" phase:1,log,deny,status:503,id:1
This testing rule denies access to any page with a 503 error if any of the request’s arguments contains the string “zzz.” Note that files in the directory C:\Program Files\ModSecurity IIS\ are protected by user access controls (UAC).
Once installed, ModSecurity begins to function and protects all of the IIS web sites on the server. Visit a site on the web server and pass the string “zzz” as an argument, for example, by making the GET request http://elara.ad.jupiter.test/Default.htm?x=zzz. The request should be denied, with the client receiving a 503 access denied error. The blocked request is noted in the Windows application log; see Figure 12-15.
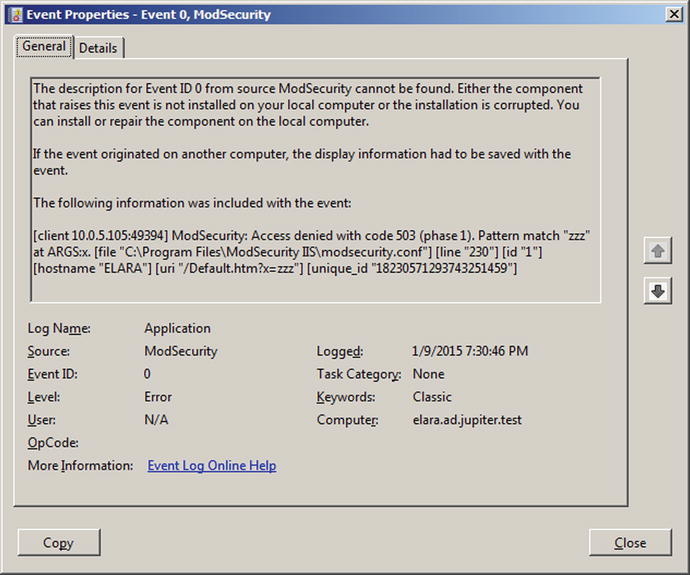
Figure 12-15.
Message from ModSecurity in the Windows application log indicating that a request was blocked. Taken from a Windows Server 2008 R2 system
The configuration file C:\Program Files\ModSecurity IIS\modsecurity_iis.conf contains the include directives that specify which configuration files are to be used. By default, it has the content
Include modsecurity.conf
Include modsecurity_crs_10_setup.conf
Include owasp_crs\base_rules\*.conf
The binary installer for ModSecurity includes the OWASP Common Rule Set (CRS) in the directory C:\Program Files\ModSecurity IIS\owasp_crs, and all of the base rules are loaded by default. Other rules can be included either by modifying the configuration file.
It is possible to use PowerShell to parse the Windows application log for ModSecurity denies. As a simple example, consider
Program 12-2. PowerShell script ModSecurity.ps1 to search the Windows security log for ModSecurity alerts
$logs = Get-EventLog -LogName application -Source ModSecurity
foreach ($entry in $logs) {
if( $entry.("Message").Contains("Access denied")){
$entry.("Message")
}
}
When run, this returns
PS C:\Windows\system32> C:\Users\pdirac\Desktop\ModSecurity.ps1
The description for Event ID ’0’ in Source ’ModSecurity’ cannot be found. The localcomputer may not have the necessary registry information or message DLL files to display the message, or you may not have permission to access them. The following information is part of the event: ’[client 10.0.5.105:49394] ModSecurity: Access denied with code 503 (phase 1). Pattern match"zzz" at ARGS:x. [file "C:\Program Files\ModSecurity IIS\modsecurity.conf"] [line "230"] [id "1"] [hostname "ELARA"] [uri "/Default.htm?x=zzz"] [unique_id "18230571293743251459"] ’
Compare this result to Figure 12-15.
EXERCISES
1.
Determine the appcmd.exe syntax to add a new web site from the command line by running the command
C:\Windows\System32\inetsrv>appcmd.exe add site /?
Add a new web site with appcmd.exe.
2.
Use OpenSSL on a Kali system to connect to a Windows server running the remote management service (TCP/8172 by default). What is the server’s public certificate? How long is the server’s private key? Can you communicate with the service? What happens if you visit that server in a browser?
3.
The Windows Management Service uses SSL/TLS to protect its communications but without an ephemeral key. When the Management Service is configured, a certificate is specified (c.f. Figure 12-2). Launch Certificate Manager and locate the certificate; it is stored in Trusted Root Certification Authorities. Export the key, being sure to include the private key. Collect traffic that includes a connection using IIS Manager to a remote IIS server. Open that packet capture in Wireshark and decode the traffic. Verify that Microsoft uses HTTP basic authentication inside the SSL/TLS stream to authenticate the user. Locate the Base64 encoded username and password, then identify the username and password. What are the implications for an attacker trying to move laterally across a domain?
4.
Use the tool SSLyze to analyze the SSL/TLS configuration of an IIS server. The tool is available for download from https://github.com/nabla-c0d3/sslyze .
5.
Consider an IIS installation with multiple web sites. Configure ModSecurity so that it only analyzes traffic to/from one web site. Hint: Read the README file that comes with ModSecurity for IIS.
6.
Add an FTP server to an existing IIS installation on Windows Server 2008 R2, 2012, or 2012 R2. Create an FTP site that allows for anonymous read (but not write) access. A reasonable location for the physical path is C:\inetpub\ftproot. Test the site.2 How is Windows Server 2008 different? Does Windows Server 2008 support passive mode FTP? What changes, if any need to be made on the client’s firewall?
Notes and References
Detailed information about the SSL/TLS settings is available from Microsoft, at http://technet.microsoft.com/en-us/library/dn786418.aspx .
The following list of IIS status subcodes is taken from Microsoft, at http://support.microsoft.com/kb/943891 .
· 400 Bad Request
· 400.1 - Invalid Destination Header
· 400.2 - Invalid Depth Header
· 400.3 - Invalid If Header
· 400.4 - Invalid Overwrite Header
· 400.5 - Invalid Translate Header
· 400.6 - Invalid Request Body
· 400.7 - Invalid Content Length
· 400.8 - Invalid Timeout
· 400.9 - Invalid Lock Token
· 401 Unauthorized
· 401.1 - Logon failed
· 401.2 - Logon failed due to server configuration
· 401.3 - Unauthorized due to ACL on resource
· 401.4 - Authorization failed by filter
· 401.5 - Authorization failed by ISAPI/CGI application
· 403 Forbidden
· 403.1 - Execute access forbidden
· 403.2 - Read access forbidden
· 403.3 - Write access forbidden
· 403.4 - SSL/TLS required
· 403.5 - SSL/TLS 128 required
· 403.6 - IP address rejected
· 403.7 - Client certificate required
· 403.8 - Site access denied
· 403.9 - Forbidden: Too many clients are trying to connect to the web server
· 403.10 - Forbidden: Web server is configured to deny Execute access
· 403.11 - Forbidden: Password has been changed
· 403.12 - Mapper denied access
· 403.13 - Client certificate revoked
· 403.14 - Directory listing denied
· 403.15 - Forbidden: Client access licenses have exceeded limits on the web server
· 403.16 - Client certificate is untrusted or invalid
· 403.17 - Client certificate has expired or is not yet valid
· 403.18 - Cannot execute requested URL in the current application pool
· 403.19 - Cannot execute CGI applications for the client in this application pool
· 403.20 - Forbidden: Passport logon failed
· 403.21 - Forbidden: Source access denied
· 403.22 - Forbidden: Infinite depth is denied
· 403.502 - Forbidden: Too many requests from the same client IP; Dynamic IP Restriction limit reached
· 404 Not Found
· 404.0 - Not found
· 404.1 - Site Not Found
· 404.2 - ISAPI or CGI restriction
· 404.3 - MIME type restriction
· 404.4 - No handler configured
· 404.5 - Denied by request filtering configuration
· 404.6 - Verb denied
· 404.7 - File extension denied
· 404.8 - Hidden namespace
· 404.9 - File attribute hidden
· 404.10 - Request header too long
· 404.11 - Request contains double escape sequence
· 404.12 - Request contains high-bit characters
· 404.13 - Content length too large
· 404.14 - Request URL too long
· 404.15 - Query string too long
· 404.16 - DAV request sent to the static file handler
· 404.17 - Dynamic content mapped to the static file handler via a wildcard MIME mapping
· 404.18 - Querystring sequence denied
· 404.19 - Denied by filtering rule
· 404.20 - Too Many URL Segments
· 500 Internal Server Error
· 500.0 - Module or ISAPI error occurred
· 500.11 - Application is shutting down on the web server
· 500.12 - Application is busy restarting on the web server
· 500.13 - Web server is too busy
· 500.15 - Direct requests for Global.asax are not allowed
· 500.19 - Configuration data is invalid
· 500.21 - Module not recognize
· 500.22 - An ASP.NET httpModules configuration does not apply in Managed Pipeline mode
· 500.23 - An ASP.NET httpHandlers configuration does not apply in Managed Pipeline mode
· 500.24 - An ASP.NET impersonation configuration does not apply in Managed Pipeline mode
· 500.50 - A rewrite error occurred during RQ_BEGIN_REQUEST notification handling. A configuration or inbound rule execution error occurred
· 500.51 - A rewrite error occurred during GL_PRE_BEGIN_REQUEST notification handling. A global configuration or global rule execution error occurred
· 500.52 - A rewrite error occurred during RQ_SEND_RESPONSE notification handling. An outbound rule execution occurred
· 500.53 - A rewrite error occurred during RQ_RELEASE_REQUEST_STATE notification handling. An outbound rule execution error occurred. The rule is configured to be executed before the output user cache gets updated
· 500.100 - Internal ASP error
· 502 Bad Gateway
· 502.1 - CGI application timeout
· 502.2 - Bad gateway: Premature Exit
· 502.3 - Bad Gateway: Forwarder Connection Error (ARR)
· 502.4 - Bad Gateway: No Server (ARR)
· 503 Service Unavailable
· 503.0 - Application pool unavailable
· 503.2 - Concurrent request limit exceeded
· 503.3 - ASP.NET queue full
Footnotes
1
It is possible if Notepad is started as an Administrator, though.
2
Although the installation process correctly sets the (server) firewall rules, these may not function correctly, and a system reboot may be required.
© Mike O'Leary 2015
Mike O'LearyCyber Operations10.1007/978-1-4842-0457-3_13