The Basics of Hacking and Penetration Testing: Ethical Hacking and Penetration Testing Made Easy, Second Edition (2013)
CHAPTER 2. Reconnaissance
Information in This Chapter:
![]() HTTrack: Website Copier
HTTrack: Website Copier
![]() Google Directives: Practicing Your Google-Fu
Google Directives: Practicing Your Google-Fu
![]() The Harvester: Discovering and Leveraging E-mail Addresses
The Harvester: Discovering and Leveraging E-mail Addresses
![]() Whois
Whois
![]() Netcraft
Netcraft
![]() Host
Host
![]() Fierce and Other Tools to Extract Information from DNS
Fierce and Other Tools to Extract Information from DNS
![]() Extracting Information From E-mail Servers
Extracting Information From E-mail Servers
![]() MetaGooFil
MetaGooFil
![]() ThreatAgent: Attack of the Drones
ThreatAgent: Attack of the Drones
![]() Social Engineering
Social Engineering
![]() Sifting through the Intel to Finding Attackable Targets
Sifting through the Intel to Finding Attackable Targets

Introduction
In most cases, people who attend hacking workshops or classes have a basic understanding of a few security tools. Typically, these students have used a port scanner to examine a system or maybe they have used Wireshark to examine network traffic. Some have even played around with exploit tools like Metasploit. Unfortunately, most beginners do not understand how these tools fit into the grand scheme of a penetration test. As a result, their knowledge is incomplete. Following a methodology ensures that you have a plan and know what to do next.
To stress the importance of using and following a methodology, it is often beneficial to describe a scenario that helps demonstrate both the importance of this step and the value of following a complete methodology when conducting a penetration test.
Assume you are an ethical penetration tester working for a security company. Your boss walks over to your office and hands you a piece of paper. “I just got off the phone with the CEO of that company. She wants my best employee to Pen Test her company—that’s you. Our Legal Department will be sending you an e-mail confirming we have all of the proper authorizations and insurance.” You nod, accepting the job. He leaves. You flip over the paper, a single word is written on the paper, “Syngress”. It is a company you have never heard of before, and no other information is written on the paper.
What now?
The first step in every job is research. The more thoroughly you prepare for a task, the more likely you are to succeed. The guys who created Backtrack and Kali Linux are fond of quoting Abraham Lincoln who said, “If I had 6 h to chop down a tree, I’d spend the first four of them sharpening my axe.” This is a perfect introduction to both penetration testing and the reconnaissance phase.
Reconnaissance, also known as information gathering, is arguably the most important of the four phases we will discuss. The more time you spend collecting information on your target, the more likely you are to be successful in the later phases. Ironically, recon is also one of the most overlooked, underutilized, and misunderstood steps in penetration testing (PT) methodologies today.
It is possible that this phase is overlooked because newcomers are never formally introduced to the concept, its rewards, or how the results of good information gathering can be vital in later steps. It is also possible that this phase is overlooked because it is the least “technical” and often the least exciting. Oftentimes, people who are new to hacking tend to view this phase as boring and unchallenging. Nothing could be further from the truth.
Although it is true that there are very few good, automated tools that can be used to complete recon, once you understand the basics it is like an entirely new way of looking at the world. A good information gatherer is made up of equal parts: hacker, social engineer, and private investigator. The absence of well-defined rules of engagement also distinguishes this phase from all others. This is in stark contrast to the remaining steps in our methodology. For example, when we discuss scanning in Chapter 3, there is a specific order and a clear series of steps that need to be followed in order to properly port scan a target.
Learning how to conduct digital reconnaissance is a valuable skill for anyone living in today’s world. For penetration testers and hackers, it is invaluable. The penetration testing world is filled with great examples and stories of how good recon single-handedly allowed the tester to fully compromise a network or system.
Consider the following example: assume we have two different criminals who are planning to rob a bank. The first criminal buys a gun and runs into the first bank he finds yelling “Hands Up! Give Me All Your Money!” It is not hard to imagine that the scene would be complete chaos and even if the bungling burglar managed to get away, it probably would not take long for the police to find him, arrest him, and send him to prison. Contrast this to nearly every Hollywood movie in existence today, where criminals spend months planning, scheming, organizing, and reviewing details before the heist. They spend time getting weapons anonymously, planning escape routes, and reviewing schematics of the building. They visit the bank to determine the position of the security cameras, make note of the guards, and determine when the bank has the most money or is the most vulnerable. Clearly, the second criminal has the better chance of getting away with the money.
It should be obvious that the difference between these two examples is preparation and homework. Hacking and penetration testing are the same—you cannot just get an Internet protocol (IP) address and start running Metasploit (well you can, but you are probably not going to be very effective).
Recall the example used to begin this chapter. You had been assigned to complete a penetration test but were given very little information to go on. As a matter of fact, you were given only the company name, one word. The million-dollar question for every aspiring hacker is, “How do I go from a single company name to owning the systems inside the network?” When we begin, we know virtually nothing about the organization; we do not know their website, physical address, or number of employees. We do not know their public IP addresses or internal IP schemes; we know nothing about the technology deployed, operating systems (OSs) used, or defenses in place.
Step 1 begins by conducting a thorough search of public information; some organizations call this Open-Source Intelligence (OSINT). The great thing about this phase is that in most cases, we can gather a significant amount of data without ever sending a single packet to the target. Although it should be pointed out that some tools or techniques used in reconnaissance do in fact send information directly to the target, it is important to know the difference between which tools do and which tools do not touch the target. There are two main goals in this phase: first, we need to gather as much information as possible about the target; second, we need to sort through all the information gathered and create a list of attackable IP addresses or uniform resource locators (URLs).
In Chapter 1, it was pointed out that a major difference between black hat and white hat attackers is authorization. Step 1 provides us with a prime example of this. Both types of hackers conduct exhaustive reconnaissance on their targets. Unfortunately, malicious hackers are bound by neither scope nor authorization.
When ethical hackers conduct research, they are required to stay within the confines of the test (i.e. scope). During the information gathering process, it is not unheard-of for a hacker to uncover a vulnerable system that is related to the target but not owned by the target. Even if the related target could provide access into the original organization, without prior authorization, a white hat hacker is not allowed to use or explore this option. For example, let us assume that you are doing a penetration test against a company and you determine that their web server (which contains customer records) is outsourced or managed by a third party. If you find a serious vulnerability on the customer’s website, but you have not been explicitly authorized to test and use the website, you must ignore it. The black hat attackers are bound by no such rules and will use any means possible to access the target systems. In most cases, because you were not authorized to test and examine these outside systems, you will not be able to provide a lot of detail; however, your final report must include as much information as possible about any systems that you believe put the organization at risk.
ADDITIONAL INFORMATION
As a penetration tester, when you uncover risks that fall outside the scope of your current engagement, you should make every effort to obtain proper authorization and expand the scope of your test. Oftentimes, this will require you to work closely with your client and their vendors in order to properly explain potential risks.
To be successful at reconnaissance, you must have a strategy. Nearly all facets of information gathering leverage the power of the Internet. A typical strategy needs to include both active and passive reconnaissance.
Active reconnaissance includes interacting directly with the target. It is important to note that during this process, the target may record our IP address and log our activity. This has a higher likelihood of being detected if we are attempting to perform a PT in a stealth fashion.
Passive reconnaissance makes use of the vast amount of information available on the web. When we are conducting passive reconnaissance, we are not interacting directly with the target and as such, the target has no way of knowing, recording, or logging our activity.
As mentioned, the goal of reconnaissance is to collect as much information as possible on your target. At this point in the penetration test, no detail should be overlooked regardless of how innocuous it may seem. While you are gathering information, it is important to keep your data in a central location. Whenever possible, it is helpful to keep the information in electronic format. This allows for quick and accurate searches later on. Digital records can be easily sorted, edited, copied, imported, pruned, and mined. Even so, every hacker is a bit different and there are still some penetration testers who prefer to print out all the information they gather. Each piece of paper is carefully cataloged and stored in a folder. If you are going to use the traditional paper method, be sure to carefully organize your records. Paper-based information gathering binders on a single target can quickly grow to several hundred pages.
In most cases, the first activity is to locate the target’s website. In our example, we would use a search engine to look for “Syngress”.
ALERT!
Even though we recently discussed the importance of creating and using a “sandboxed hacking lab” to ensure no traffic leaves your network, practicing reconnaissance requires a live Internet connection! If you want to follow along with the tools and examples in this chapter, you will need to connect your attack machine to the Internet.
HTTrack: Website Copier
Typically, we begin Step 1 by closely reviewing the target’s website. In some cases, it maybe helpful to use a tool called HTTrack to make a page-by-page copy of the website. HTTrack is a free utility that creates an identical, offline copy of the target website. The copied website will include all the pages, links, pictures, and code from the original website; however, it will reside on your local computer. Utilizing a website-copying tool like HTTrack allows us to explore and thoroughly mine the website “offline” without having to spend additional time traipsing around on the company’s web server.
ADDITIONAL INFORMATION
It is important to understand that the more time you spend navigating and exploring the target website, the more likely it is that your activity can be tracked or traced (even if you are simply browsing the site). Remember anytime you interact directly with a resource owned by the target, there is a chance you will leave a digital fingerprint behind.
Advanced penetration testers can also run automated tools to extract additional or hidden information from a local copy of a website.
HTTrack can be downloaded directly from the company’s website at http://www.httrack.com/. Installing for Windows is as simple as downloading the installer .exe and clicking next. If you want to install HTTrack in Kali or your Linux attack machine, you can connect to the Internet as we described in Chapter 1, open a terminal, and type
apt-get install httrack
Please note, there is also a graphical user interface (GUI) version of HTTrack but for now we will focus on the terminal version. If you prefer to use the GUI you can always install it at a later date.
Once the program is installed, you can run it by opening a terminal and typing
httrack
Before proceeding, it is important to understand that cloning a website is easy to trace and often considered highly offensive. Never run this tool without prior authorization. After starting HTTrack from the terminal, the program will guide you through a series of basic questions before it begins to copy the target’s website. In most cases you can simply hit the “Enter” key to accept the default answers. At a minimum, you will need to enter a project name and a valid URL to copy. Be sure to take a little time and read each question before answering or blindly accepting the default answer. When you are done answering the questions you will need to enter “Y” to begin the cloning process. Depending on the size of the target website, this can take anywhere from a few seconds to several hours. Remember, because you are creating an exact replica of the website, the amount of available disk space on your local computer needs to be considered. Large websites can require extensive hard drive space. Always be sure you have enough room before beginning your copy.
When HTTrack completes the process, you will be presented with a message in the terminal that says “Done. Thanks for using HTTrack!” If you are using Kali and accepted the default options, HTTrack will place the cloned site into the directory/root/websites/<project_name> you can now open Firefox and enter the address: /root/websites/<project_name> into the URL bar. Note the <project_name> will need to be substituted for the name you used when setting up your copy. You can interact with the copied website by clicking on the links in the browser. A good place to start is usually the index.html file.
Firefox can be found by navigating the application menu/icon on the desktop or by opening a terminal and typing
firefox
Whether you make a copy of the target website or you simply browse the target in real time, it is important to pay attention to details. You should begin by closely reviewing and recording all the information you find on the target’s website. Oftentimes, with very little digging, you will be able to make some significant findings including physical address and locations, phone numbers, e-mail addresses, hours of operation, business relationships (partnerships), employee names, social media connections, and other public tidbits.
When conducting a penetration test, it is important to pay special attention to things like “News” or “Announcements”. Companies are often proud of their achievements and unintentionally leak useful information through these stories. Company mergers and acquisitions can also yield valuable data; this is especially important for expanding the scope and adding additional targets to our penetration test. Even the smoothest of acquisitions creates change and disarray in an organization. There is always a transition period when companies merge. This transition period provides us with unique opportunities to take advantage of the change and confusion. Even if the merger is old news or goes off without a hitch, the information still provides value by giving us additional targets. Merged or sibling companies should be authorized and included in the original target list, as they provide a potential gateway into the organization.
Finally, it is important to search and review any open job postings for the target company. Technical job postings often reveal very detailed information about the technology being used by an organization. Many times you will find specific hardware and software listed on the job opening. Do not forget to search for your target in the nationwide job banks as well. For example, assume you come across a job requisition looking for a Network Administrator with Cisco ASA experience. From this post, you can draw some immediate conclusions and make some educated guesses. First, you can be certain that the company either uses or is about to use a Cisco ASA firewall. Second, depending on the size of the organization, you maybe able to infer that the company does not have, or is about to lose, someone with knowledge of how to properly use and configure a Cisco ASA firewall. In either case, you have gained valuable knowledge about the technology in place.
In most cases, once we have thoroughly examined the target’s website, we should have a solid understanding of the target including who they are, what they do, where they are located, and a solid guess about the technology they use.
Armed with this basic information about the target, we can conduct some passive reconnaissance. It is very difficult, if not impossible, for a company to determine when a hacker or penetration tester is conducting passive reconnaissance. This activity offers a low-risk, high-reward situation for attackers. Recall that passive reconnaissance is conducted without ever sending a single packet to the target systems. Once again, our weapon of choice to perform this task is the Internet. We begin by performing exhaustive searches of our target in the various search engines available.
Although there are many great search engines available today, when covering the basics of hacking and penetration testing, we will focus on Google. Google is very, very good at its job. There is a reason why the company’s stock trades for $400−600 a share. Spiders from the company aggressively and repeatedly scour all corners of the Internet cataloging information and send it back to the Google servers. The company is so efficient at its job, that oftentimes hackers can perform an entire penetration test using nothing but Google.
At Defcon 13, Johnny Long rocked the hacker community by giving a talk titled “Google Hacking for Penetration Testers”. The talk by Johnny was followed up by a book that went even deeper into the art of Google Hacking.
ADDITIONAL INFORMATION
If you are interested in penetration testing, it is highly suggested that you watch Johnny Long’s video and take a look at the Google Hacking book. You can see the video for free online by searching the Defcon media archive available athttp://www.defcon.org/html/links/dc-archives.html. Johnny’s book is published by Syngress and available nearly anywhere. His discoveries and their continued evolvement have changed penetration testing and security forever. Johnny’s material is awesome and well worth your time.
Although we will not dive into the specifics of Google hacking, a solid understanding of how to use Google properly is vital to becoming a skilled penetration tester. If you ask people “How do you use Google?”, they typically respond by saying “Well it’s simple… You fire up a web browser, navigate to google.com, and type what you’re searching for into the box.”
While this answer is fine for 99% of the planet, it is not good enough for aspiring hackers and penetration testers. You have to learn to search in a smarter way and maximize the return results. In short, you must cultivate your Google-Fu. Learning how to use a search engine like Google properly will save you time and allow you to find the hidden gems that are buried in the trillions of web pages in the Internet today.
Google Directives: Practicing Your Google-Fu
Luckily for us, Google provides “directives” that are easy to use and help us get the most out of every search. These directives are keywords that enable us to more accurately extract information from the Google Index.
Consider the following example: assume you are looking for information on the Dakota State University (DSU) website (dsu.edu) about me. The simplest way to perform this search is to enter the following terms in a Google search box: pat engebretson dsu. This search will yield a fair number of hits. However (at the time of this writing), only four of the first 10 websites returned were pulled directly from the DSU website.
By utilizing Google directives, we can force the Google index to do our bidding. In the example above, we know both the target website and the keywords we want to search. More specifically, we are interested in forcing Google to return only results that are pulled directly from the target (dsu.edu) domain. In this case, our best choice is to utilize the “site:” directive. Using the “site:” directive forces Google to return only hits that contain the keywords we used and come directly from the specified website.
To properly use a Google directive, you need three things:
1. The name of the directive you want to use
2. A colon
3. The term you want to use in the directive.
After you have entered the three pieces of information above, you can search as you normally would. To utilize the “site:” directive, we need to enter the following into a Google search box:
site:domain term(s) to search
Note that there is no space between the directive, colon, and domain. In our earlier example, we wanted to conduct a search for Pat Engebretson on the DSU website. To accomplish this, we would enter the following command into the Google search bar:
site:dsu.edu pat engebretson
Running this search provides us with drastically different results than our initial attempt. First, we have trimmed the overall number of hits from 12,000+ down to more manageable 155. There is little doubt that a person can sort through and gather information from 155 hits much quicker than 12,000. Second and possibly more importantly, every single returned result comes directly from the target website. Utilizing the “site:” directive is a great way to search a specific target and look for additional information. This directive allows you to avoid search overload and to focus your search.
ALERT!
It is worth noting that all searches in Google are case insensitive so “pat”, “Pat”, and “PAT” will all return the same results!
Another good Google directive to use is “intitle:” or “allintitle:”. Adding either of these to your search causes only websites that have your search words in the title of the web page to be returned. The difference between “intitle:” and “allintitle:” is straightforward. “allintitle:” will only return websites that contain all the keywords in the web page title. The “intitle:” directive will return any page whose title contains at least one of the keywords you entered.
A classic example of putting the “allintitle:” Google hack to work is to perform the following search:
allintitle:index of
Performing this search will allow us to view a list of any directories that have been indexed and are available via the web server. This is often a great place to gather reconnaissance on your target.
If we want to search for sites that contain specific words in the URL, we can use the “inurl:” directive. For example, we can issue the following command to locate potentially interesting pages on our target’s web page:
inurl:admin
This search can be extremely useful in revealing administrative or configuration pages on your target’s website.
It can also be very valuable to search the Google cache rather than the target’s website. This process not only reduces your digital footprints on the target’s server, making it harder to catch you, it also provides a hacker with the occasional opportunity to view web pages and files that have been removed from the original website. The Google cache contains a stripped-down copy of each website that the Google bots have spidered and cataloged. It is important to understand that the cache contains both the code used to build the site and many of the files that were discovered during the spidering process. These files can be portable document formats (PDFs), MS Office documents like Word and Excel, text files, and more.
It is not uncommon today for information to be placed on the Internet by mistake. Consider the following example. Suppose you are a network administrator for a company. You use MS Excel to create a simple workbook containing all the IP addresses, computer names, and locations of the personal computers (PCs) in your network. Rather than carrying this Excel spreadsheet around, you decide to publish it to your company’s intranet where it will be accessible only by people within your organization. However, rather than publishing this document to the intranet website, you mistakenly publish it to the company Internet website. If the Google bots spider your site before you take this file down, it is possible that the document will live on in the Google cache even after you have removed it from your site. As a result, it is important to search the Google cache too.
We can use the cache: directive to limit our search results and show only information pulled directly from the Google cache. The following search will provide us with the cached version of the Syngress homepage:
cache:syngress.com
It is important that you understand that clicking on any of the URLs will bring you to the live website, not the cached version. If you want to view specific cached pages, you will need to modify your search.
The last directive we will cover here is “filetype:”. We can utilize “filetype:” to search for specific file extensions. This is extremely useful for finding specific types of files on your target’s website. For example, to return only hits that contain PDF documents, you would issue the following command:
filetype:pdf
This powerful directive is a great way to find links to specific files like .doc, xlsx, ppt, txt, and many more. Your options are nearly limitless.
For additional flexibility, we can combine multiple directives into the same search. For example, if we want to find all the PowerPoint presentations on the DSU website, you would enter the following command into the search box:
site:dsu.edu filetype:pptx
In this case, every result that is returned is a PowerPoint file and comes directly from the dsu.edu domain! Figure 2.1 shows a screenshot of two searches: the first utilizes Google directives and the second shows the results from a traditional search. Utilizing Google directives has drastically reduced the number of hits (by 186,950!).
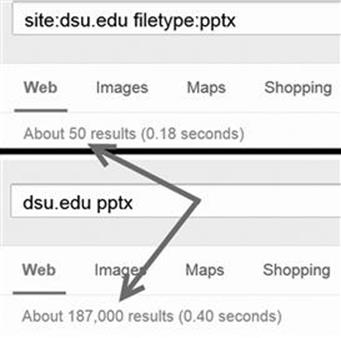
FIGURE 2.1 The power of Google directives.
Oftentimes, Google Hacking can also be referred to as “Google Dorks”. When an application has a specific vulnerability, hackers and security researchers will typically place a Google Dork in the exploit, which allows you to search for vulnerable versions utilizing Google. The exploit-db.com website which is run by the folks who created BackTrack and Kali Linux (Offensive-Security) has an extensive list of Google Dorks and additional Google Hacking Techniques. If you visit http://www.exploit-db.com and go to the Google Hacking Database (GHDB) link (Figure 2.2):

FIGURE 2.2 Utilizing the exploit-db to access the GHDB.
You can select what to look for and use the large repository within the exploit-db.com website to help aid you in your target (Figure 2.3).
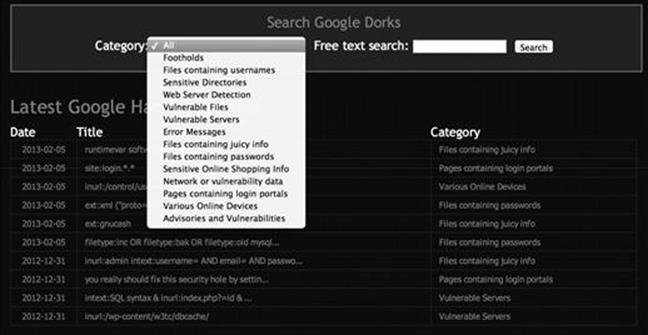
FIGURE 2.3 Selecting a category from the GHDB.
Some other ones that often have a high yield of success with Google are the following:
inurl:login
or the following:
Logon
Signin
Signon
Forgotpassword
Forgot
Reset
These will help you find common login or similar pages that may have dynamic content. A lot of times you can find vulnerabilities within these pages.
site:syngress.com intitle:"index of"
This one will list any directory browsing which will list everything within a directory. Syngress does not have any of these vulnerabilities exposed however, is a common way to find additional files that may not be normally accessed through web pages.
There are many other types of directives and Google hacks that you should become familiar with. Along with Google, it is important that you become efficient with several other search engines as well. Oftentimes, different search engines will provide different results, even when you search for the same keywords. As a penetration tester conducting reconnaissance, you want to be as thorough as possible. It is worth your time to learn how to leverage the search capabilities of Yahoo, Bing, Ask, Dogpile, and many more.
As a final warning, it should be pointed out that these passive searches are only passive as long as you are searching. Once you make a connection with the target system (by clicking on any of the links), you are back to active mode. Be aware that active reconnaissance without prior authorization could be viewed as an illegal activity.
Once you have thoroughly reviewed the target’s web page and conducted exhaustive searches utilizing Google and other search engines, it is important to explore other corners of the Internet. Newsgroups and Bulletin Board Systems like UseNet and Google Groups can be very useful for gathering information about a target. Support forums, Internet Relay Chart, and even “live chat” features that allow you to talk to a representative of the company can be useful in extracting information. It is not uncommon for people to use discussion boards and support forums to post and receive help with technical issues. Unfortunately (or fortunately, depending on which side of the coin you are looking at), employees often post very detailed questions including sensitive and confidential information. For example, consider a network administrator who is having trouble getting his firewall properly configured. It is not uncommon to find discussions on public forums where these admins will post entire, unredacted sections of their config files. To make matters worse, many people create posts using their company e-mail address. This information is a virtual gold mine for an attacker.
Even if our network admin is smart enough not to post detailed configuration files, it is hard to get support from the community without inadvertently leaking some information. Reading even carefully scrubbed and redacted posts will often reveal specific software version, hardware models, current configuration information, and the like about internal systems. All this information should be filed away for future use in the PT.
Public forums are an excellent way to share information and receive technical help. However, when using these resources, be careful to use a slightly more anonymous e-mail address like Gmail or Hotmail, rather than your corporate address.
The explosive growth in social media like Facebook and Twitter provides us with new avenues to mine data about our targets. When performing reconnaissance, it is a good idea to use these sites to our advantage. Consider the following fictitious example. You are conducting a penetration test against a small company. Your reconnaissance has led you to discover that the network administrator for the company has a Twitter, Facebook, and Steam account. Utilizing a little social engineering, you befriend the unsuspecting admin and follow him on both Facebook and Twitter. After a few weeks of boring posts, you strike the jackpot. He makes a post on Facebook that says “Great. Firewalled died without warning today. New one being sent over-night. Looks like I’ll be pulling an all-nighter tomorrow to get things back to normal.”
Another example would be a PC tech who posts, “Problem with latest Microsoft patch, had to uninstall. Will call MS in the morning.”
Or even the following, “Just finished the annual budget process. Looks like I’m stuck with that Win2K server for another year.”
Although these examples may seem a bit over the top, you will be surprised at the amount of information you can collect by simply monitoring what employees post online.
The Harvester: Discovering and Leveraging E-mail Addresses
An excellent tool to use in reconnaissance is the Harvester. The Harvester is a simple but highly effective Python script written by Christian Martorella at Edge Security. This tool allows us to quickly and accurately catalog both e-mail addresses and subdomains that are directly related to our target.
It is important to always use the latest version of the Harvester as many search engines regularly update and change their systems. Even subtle changes to a search engine’s behavior can render automated tools ineffective. In some cases, search engines will actually filter the results before returning information to you. Many search engines also employ throttling techniques that will attempt to prevent you from running automated searches.
The Harvester can be used to search Google, Bing, and PGP servers for e-mails, hosts, and subdomains. It can also search LinkedIn for user names. Most people assume their e-mail address is benign. We have already discussed the dangers of posting to public forums using your corporate e-mail address; however, there are additional hazards you should be aware of. Let us assume during your reconnaissance you discover the e-mail address of an employee from your target organization. By twisting and manipulating the information before the “@” symbol, we should be able to create a series of potential network user names. It is not uncommon for organizations to use the exact, same user names and e-mail addresses (before the “@” symbol). With a handful of prospective user names, we can attempt to brute force our way into any services, like Secure Shell, Virtual Private Networks (VPNs), or File Transfer Protocol (FTP), that we (will) discover during Step 2 (scanning).
The Harvester is built into Kali. The quickest way to access the Harvester is to open a terminal window and issue the command: theharvester. If you need the full path to the program and you are using Kali, the Harvester (and nearly all other tools) can be found in the /usr/bin/ directory. However, recall that one major advantage to Kali is that you no longer need to specify the full path to run these tools. Simply opening the terminal and entering the tool’s start command will invoke it. For example, to run theharvester, open a terminal and issuing the following command:
theharvester
You could also issue the full path to run the program:
/usr/bin/theharvester
If you are using a different version of Backtrack or Kali or are unable to find the Harvester (or any tool discussed in this book) at the specified path, you can use the locate command to help find where the tool is installed. In order to use the locate command you need to first run the updatedb command. To find out where the Harvester is installed on your system, open a terminal and type the command:
updatedb
Followed by the command:
locate theharvester
The output from the locate command can be very verbose, but careful review of the list should help you determine where the missing tool is installed. As previously mentioned, nearly all the penetration testing tools in Kali are located in a subdirectory of the /usr/bin/ folder.
ALERT!
If you are using an OS other than Kali, you can download the tool directly from Edge Security at http://www.edge-security.com. Once you have got it downloaded, you can unpack the downloaded tar file by running the following command in a terminal:
tar xf theHarvester
Please note the capital “H” that is used when untarring the code. Linux is case-sensitive, so the OS sees a difference between “theHarvester” and “theharvester”. You will need to pay attention to the executable to determine if you should use a capital or lowercase “h”. If the cases do not match exactly, you will typically get a message saying “no such file or directory”. This is a good indication that you have mistyped the name of the file.
Regardless of whether you have downloaded the Harvester or used the version preinstalled on your attack machine, we will use it to collect additional information about our target. Be sure you are in theHarvester folder and run the following command:
./theharvester.py –dsyngress.com –l 10 –b google
This command will search for e-mails, subdomains, and hosts that belong to syngress.com. Figure 2.4 shows our results.

FIGURE 2.4 Output of the Harvester.
Before discussing the results of our tool, let us examine the command a little closer. “./theHarvester.py” is used to invoke the tool. A lowercase “–d” is used to specify the target domain. A lowercase “–l” (that is an L not an 1) is used to limit the number of results returned to us. In this case, the tool was instructed to return only 10 results. The “–b” is used to specify what public repository we want to search. We can choose from a wide variety including Google, Bing, PGP, LinkedIn, and more—for this example, we chose to search using Google. If you are not sure which data source to use for your search, you can also use the –b all switch to simultaneously search all the repositories that the Harvester can use.
Now that you fully understand the command used to run the tool, let us take a look at the results.
As you can see, the Harvester was effective in locating several e-mail addresses that could be of value to us. Please note that the e-mail addresses in the screenshot have been obfuscated. The Harvester was also successful in finding two subdomains. Both “booksite.syngress.com” and “www.syngress.com” need to be fully recon’d. We simply add these new domains to our target list and begin the reconnaissance process again.
Step 1 of reconnaissance is very cyclical because in-depth reconnaissance often leads to the discovery of new targets, which, in turn, lead to additional reconnaissance. As a result, the amount of time to complete this phase will vary from several hours to several weeks. Remember, a determined malicious hacker understands not only the power of good reconnaissance but often has the ability to spend a nearly limitless amount of time. As an aspiring penetration tester, you should devote as much time as possible to practicing and conducting information gathering.
Whois
A very simple but effective means for collecting additional information about our target is Whois. The Whois service allows us to access specific information about our target including the IP addresses or host names of the company’s Domain Name Systems (DNS) servers and contact information which usually contains an address and a phone number.
Whois is built into the Linux OS. The simplest way to use this service is to open a terminal and enter the following command:
whois target_domain
For example, to find out information about Syngress, we would issue the following command: whois syngress.com. Figure 2.5 shows a partial output from the result of this tool.

FIGURE 2.5 Partial output from a Whois query.
It is important to record all the information and pay special attention to the DNS servers. If the DNS servers are listed by name only, as shown in Figure 2.5, we will use the Host command to translate those names into IP addresses. We will discuss the host command in the next section. You can also use a web browser to search Whois. By navigating to http://www.whois.net, you can search for your target in the “WHOIS Lookup” box as shown in Figure 2.6.

FIGURE 2.6 Whois.net a web-based Lookup tool.
Again it is important to closely review the information you are presented with. Sometimes, the output will not provide many details. We can often access these additional details by querying the specific whois server listed in the output of our original search.Figure 2.7 shows an example of this.
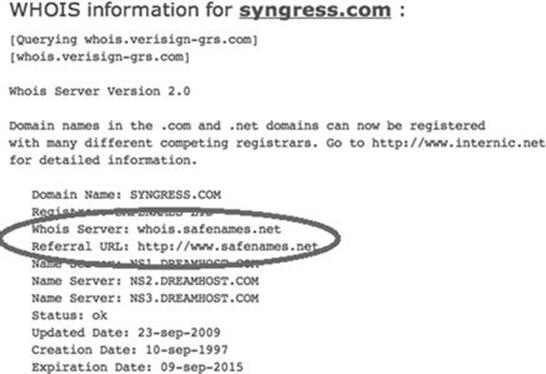
FIGURE 2.7 Whois output showing where to go for additional details.
When available, we can conduct a further Whois search by following the link provided in the “Referral URL:” field. You may have to search the web page for a link to their Whois service. By using Safename’s Whois service, we can extract a significantly larger amount of information as shown here:
The Registry database contains ONLY .COM, .NET, .EDU domains and
Registrars.[whois.safenames.net]
Safenames Whois Server Version 2.0
Domain Name: SYNGRESS.COM
[REGISTRANT]
Organisation Name: Elsevier Ltd
Contact Name: Domain Manager
Address Line 1: The Boulevard
Address Line 2: Langford Lane, Kidlington
City/Town: Oxfordshire
State/Province:
Zip/Postcode: OX5 1GB
Country: UK
Telephone: +44 (18658) 43830
Fax: +44 (18658) 53333
Email: domainsupport@elsevier.com
[ADMIN]
Organisation Name: Safenames Ltd
Contact Name: International Domain Administrator
Address Line 1: PO Box 5085
Address Line 2:
City/Town: Milton Keynes MLO
State/Province: Bucks
Zip/Postcode: MK6 3ZE
Country: UK
Telephone: +44 (19082) 00022
Fax: +44 (19083) 25192
Email: hostmaster@safenames.net
[TECHNICAL]
Organisation Name: International Domain Tech
Contact Name: International Domain Tech
Address Line 1: PO Box 5085
Address Line 2:
City/Town: Milton Keynes MLO
State/Province: Bucks
Zip/Postcode: MK6 3ZE
Country: UK
Telephone: +44 (19082) 00022
Fax: +44 (19083) 25192
Email: tec@safenames.net
Netcraft
Another great source of information is Netcraft. You can visit their site at http://news.netcraft.com. Start by searching for your target in the “What’s that site Running?” textbox as shown in Figure 2.8.
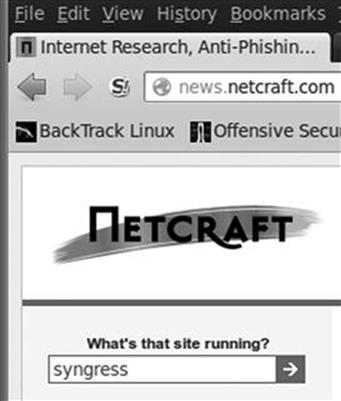
FIGURE 2.8 Netcraft search option.
Netcraft will return any websites it is aware of that contain your search words. In our example, we are presented with three sites: syngress.com, www.syngress.com, and booksite.syngress.com. If any of these sites have escaped our previous searches, it is important to add them to our potential target list. The returned results page will allow us to click on a “Site Report”. Viewing the site report should provide us with some valuable information as shown in Figure 2.9.
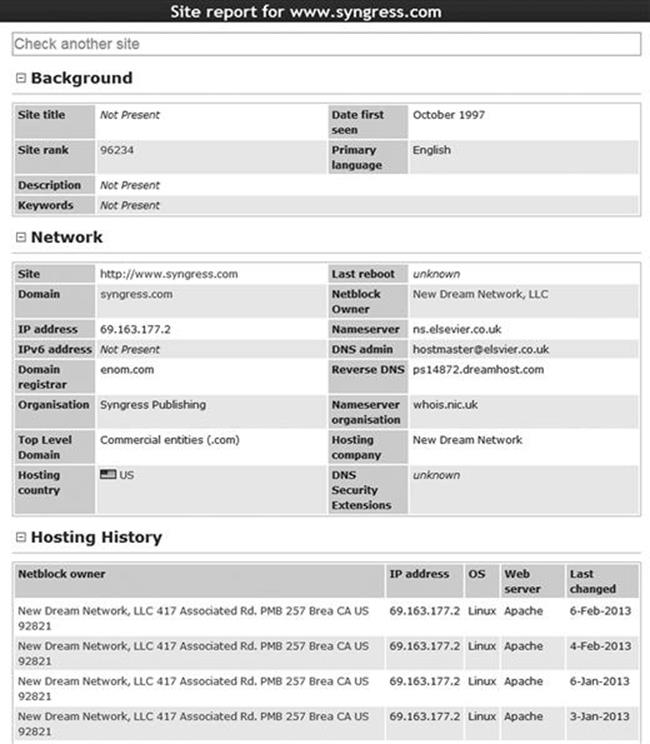
FIGURE 2.9 Site report for Syngress.com.
As you can see, the site report provides us with some great information about our target including the IP address and OS of the web server as well as the DNS server. Once again all this information should be cataloged and recorded.
Host
Oftentimes, our reconnaissance efforts will result in host names rather than IP addresses. When this occurs, we can use the “host” tool to perform a translation for us. The host tool is built into most Linux systems including Kali. We can access it by opening a terminal and typing:
host target_hostname
Suppose in our previous searches, we uncovered a DNS server with the host name “ns1.dreamhost.com”. To translate this into an IP address, we would enter the following command in a terminal:
host ns1.dreamhost.com
Figure 2.10 shows the result of this tool.
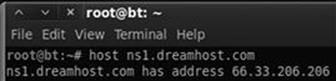
FIGURE 2.10 Host command output.
The host command can also be used in reverse. It can be used to translate IP addresses into host names. To perform this task, simply enter
host IP_address
Using the “–a” switch will provide you with verbose output and possibly reveal additional information about your target. It is well worth your time to review the “host” documentation and help files. You can do so by issuing the “man host” command in a terminal window. This help file will allow you to become familiar with the various options that can be used to provide additional functionality to the “host” tool.
Extracting Information from DNS
DNS servers are an excellent target for hackers and penetration testers. They usually contain information that is considered highly valuable to attackers. DNS is a core component of both our local networks and the Internet. Among other things, DNS is responsible for the process of translating domain names to IP addresses. As humans, it is much easier for us to remember “google.com” rather than http://74.125.95.105. However, machines prefer the reverse. DNS serves as the middle man to perform this translation process.
As penetration testers, it is important to focus on the DNS servers that belong to our target. The reason is simple. In order for DNS to function properly, it needs to be aware of both the IP address and the corresponding domain name of each computer on its network. In terms of reconnaissance, gaining full access to a company’s DNS server is like finding a pot of gold at the end of a rainbow. Or maybe, more accurately, it is like finding a blueprint to the organization. But in this case, the blueprint contains a full listing of internal IP addresses and host names that belong to our target. Remember one of the key elements of information gathering is to collect IP addresses that belong to the target.
Aside from the pot of gold, another reason why picking on DNS is so enjoyable is that in many cases these servers tend to operate on the “if it isn’t broke, don’t touch it” principle.
Inexperienced network administrators often regard their DNS servers with suspicion and mistrust. Oftentimes, they choose to ignore the box completely because they do not fully understand it. As a result, patching, updating, or changing configurations on the DNS server is often a low priority. Add this to the fact that most DNS servers appear to be very stable (as long as the administrator is not monkeying with it) and you have a recipe for a security disaster. These admins wrongly learn early in their career that the less they mess with their DNS servers, the less trouble it seemed to cause them.
As a penetration tester, given the number of misconfigured and unpatched DNS servers that abound today, it is natural to assume that many current network admins operate under the same principle.
If the above statements are true in even a small number of organizations, we are left with valuable targets that have a high probability of being unpatched or out of date. So the next logical question becomes, how do we access this virtual pot of gold? Before we can begin the process of examining a DNS server, we need an IP address. Earlier in our reconnaissance, we came across several references to DNS. Some of these references were by host names, whereas others were by IP addresses. Using the host command, we can translate any host names into IP addresses and add these IPs to the potential target list. Again, you must be sure to double- and triple-check that the IP you collect is within your authorized scope before continuing.
Now that we have a list of DNS IP addresses that belong to or (serve our target) we can begin the process of interrogating DNS to extract information. Although it is becoming rarer to find, one of our first tasks when interacting with a target DNS is to attempt a zone transfer.
Recall that DNS servers contain a series of records that match up the IP address and host name for all the devices that the servers are aware of. Many networks deploy multiple DNS servers for the sake of redundancy or load balancing. As a result, DNS servers need a way to share information. This “sharing” process occurs through the use of a zone transfer. During a zone transfer, also commonly referred to as AXFR, one DNS server will send all the host-to-IP mappings it contains to another DNS server. This process allows multiple DNS servers to stay in sync.
Even if we are unsuccessful in performing a zone transfer, we should still spend time investigating any DNS servers that fall within our authorized scope.
nslookup
The first tool we will use to examine DNS is nslookup. nslookup is a tool that can be used to query DNS servers and potentially obtain records about the various hosts of which it is aware. nslookup is built into many versions of Linux including Kali and is even available for Windows. nslookup operates very similarly between the various OSs; however, you should always review the specifics for your particular system. You can do so in Linux by reviewing the nslookup man page. This is accomplished by opening a terminal and typing
man nslookup
ALERT!
A software’s man page is a text-based documentation system that describes a particular tool, including its basic and advanced uses, and other details about how the program functions. Most Linux-based tools include a man page. This can be extremely helpful when attempting to run a new program or troubleshoot issues. To view the man page for a tool, open a terminal and enter the command:
man tool_name
Obviously you will need to replace “tool_name” with the program name you are attempting to read about.
nslookup is a tool that can be run in interactive mode. This simply means we will first invoke the program and then feed it the particular switches we need to make it function properly. We begin using nslookup by opening a terminal and entering:
nslookup
By issuing the “nslookup” command, we start the nslookup tool from the OS. After typing “nslookup” and hitting enter, your usual “#” prompt will be replaced with a “>” prompt. At this point, you can enter the additional information required for nslookup to function.
We begin feeding commands to nslookup by entering the “server” keyword and an IP address of the DNS server you want to query. An example follows:
server 8.8.8.8
nslookup will simply accept the command and present you with another “>” prompt. Next, we specify the type of record we are looking for. During the reconnaissance process, there are many types of records that you maybe interested in. For a complete listing of the various DNS record types and their description, you can use your newly acquired Google skills! If you are looking for general information, you should set the type to any by using the keyword “any”:
set type = any
Be sure to pay special attention to the spacing or you will get an error message. If you are looking for specific information from the DNS server such as the IP address of the mail server that handles e-mail for the target organization, you would use the “set type = mx”.
We wrap up our initial DNS interrogation with nslookup by entering the target domain after the next “>” prompt.
Suppose you wanted to know what mail server is used to handle the e-mail for Syngress. In a previous example, we determined that one of Syngress’s name servers was “ns1.dreamhost.com”. Here again, we can use the host tool to quickly determine what IP address is associated with ns1.dreamhost.com. With this information in hand, we can use nslookup to query DNS and find mail server for Syngress. Figure 2.11 shows an example of this process; the name of the e-mail server has been highlighted (in the bottom right of the screenshot) and now needs to be added to our potential target list.
ADDITIONAL INFORMATION
Utilizing the set type = any option in nslookup will provide us with a more complete DNS record including the information in Figure 2.11.
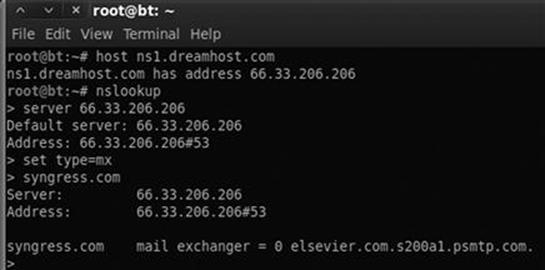
FIGURE 2.11 Combining host and nslookup to determine the address of our target’s e-mail server (MX record).
Dig
Another great tool for extracting information from DNS is “dig”. To work with dig, we simply open a terminal and enter the following command:
dig @target_ip
Naturally, you will need to replace the “target_ip” with the actual IP address of your target. Among other things, dig makes it very simple to attempt a zone transfer. Recall that a zone transfer is used to pull multiple records from a DNS server. In some cases, a zone transfer can result in the target DNS server sending all the records it contains. This is especially valuable if your target does not distinguish between internal and external IPs when conducting a zone transfer. We can attempt a zone transfer with dig by using the “–t AXFR” switch.
If we wanted to attempt a zone transfer against a fictitious DNS server with an IP address of 192.168.1.23 and a domain name of “example.com” we would issue the following command in a terminal window:
dig @192.168.1.23example.com –t AXFR
If zone transfers are allowed and not restricted, you will be presented with a listing of host and IP addresses from the target DNS server that relate to your target domain.
Fierce: What to Do When Zone Transfers Fail
As we have previously discussed, most administrators today are savvy enough to prevent random people from completing an unauthorized zone transfer. However, all is not lost. If your zone transfer fails, there are dozens of good DNS interrogation tools. Fierce is an easy to use, powerful Perl script that can provide you with dozens of additional targets.
In Kali, you can find Fierce in the /usr/bin/ directory. Once again, you can simply open a terminal and issue the “fierce” command (along with the required switches) or you can move into the /usr/bin/ directory. If you prefer to run Fierce from the /usr/bin directory, you will need to open a terminal and issuing the following command:
cd /usr/bin/fierce
Inside the Fierce directory, you can run the tool by executing the fierce.pl script and utilizing the –dns switch followed by your target domain.
./fierce.pl –dns trustedsec.com
Pay special attention to the “./” in front of the tool name. This is required and tells Linux to execute the file in the local directory. The script will begin by attempting to complete a zone transfer from the specified domain. In the event the process fails, Fierce will attempt to brute-force host names by sending a series of queries to the target DNS server. This can be an extremely effective method for uncovering additional targets. The general idea is that if Dave owns “trustedsec.com” (which he does, please do not scan or interrogate), he may also own support.trustedsec.com, citrix.trustedsec.com, print.trustedsec.com, or many others.
ADDITIONAL INFORMATION
If you are using an attack machine which does not have Fierce preinstalled you can get it by running the command:
apt-get install fierce
There are many additional tools that can be used to interact with DNS. These tools should be explored and utilized once you have a solid understanding of how DNS works. Please see the end of this chapter for a brief discussion of some additional tools you may want to use when conducting a penetration test involving DNS.
Extracting Information from E-mail Servers
E-mail servers can provide a wealth of information for hackers and penetration testers. In many ways, e-mail is like a revolving door to your target’s organization. Assuming your target is hosting their own e-mail server, this is often a great place to attack. It is important to remember, “You can’t block what you must let in.” In other words, for e-mail to function properly, external traffic must pass through your border devices like routers and firewalls, to an internal machine, typically somewhere inside your protected networks.
As a result of this, we can often gather significant pieces of information by interacting directly with the e-mail sever. One of the first things to do when attempting to recon an e-mail server is to send an e-mail to the organization with an empty .bat file or a nonmalicious .exe file like calc.exe. In this case, the goal is to send a message to the target e-mail server inside the organization in the hope of having the e-mail server inspect, and then reject the message.
Once the rejected message is returned back to us, we can attempt to extract information about the target e-mail server. In many cases, the body of the message will include a precanned write-up explaining that the server does not accept e-mails with potentially dangerous extensions. This message often indicates the specific vendor and version of antivirus that was used to scan the e-mail. As an attacker, this is a great piece of information to have.
Having a return message from a target e-mail server also allows us to inspect the headers of the e-mail. Inspecting the Internet headers will often allow us to extract some basic information about the e-mail server, including IP addresses and the specific software versions or brand of e-mail server running. Knowing the IP address and software versions can be incredibly useful when we move into the exploitation phase (Step 3).
MetaGooFil
Another excellent information gathering tools is “MetaGooFil”. MetaGooFil is a metadata extraction tool that is written by the same folks who brought us the Harvester. Metadata is often defined as “data about data”. When you create a document like Microsoft Word or a PowerPoint presentation, additional data are created and stored within your file. These data often include various pieces of information that describe the document including the file name, the file size, the file owner or user name of the person who created the file, and the location or path where the file was saved. This process occurs automatically without any user input or interaction.
The ability of an attacker to read this information may present some unique insights into the target organization including user names, computer or server names, network paths, files shares, and other goodies. MetaGooFil is a tool that scours the Internet looking for documents that belong to your target. After finding these documents, MetaGooFil downloads them and attempts to extract useful metadata.
MetaGooFil is built into Kali and can be invoked by opening a terminal window and running the “metagoofil” command (along with the appropriate switches) or by navigating to the MetaGooFil executable which is located in the /usr/bin directory. This can be accomplished by entering the following command:
cd /usr/bin/metagoofil
After navigating to the MetaGooFil directory, it is a good idea to create a “files” folder. The purpose of this folder is to hold all the target files that will be downloaded; this keeps the original directory clean. You can create a new folder by entering:
mkdir files
With this directory setup, you can run MetaGooFil by issuing the following command:
./metagoofil.py -d syngress.com –t pdf,doc,xls,pptx –n 20 -o files –f results.html
Let us examine the details of this command. “./metagoofil.py” is used to invoke the MetaGooFil python script. Once again, do not forget to put the “./” in front of the command. The “–d” switch is used to specify the target domain to be searched. The “–t” switch is used to specify which type or types of files you want MetaGooFil to attempt to locate and download. At the time of this writing, MetaGooFil was capable of extracting metadata from the following formats: pdf, doc, xls, ppt, odp, ods, docx, xlsx, and pptx. You can enter multiple file types by separating each type with a comma (but no spaces). The “–n” switch is used to specify how many files of each type you would like to download for examination. You can also specify individual file types to limit the returned results. We use the “–o” switch to specify the folder where we want to store each of the files that MetaGooFil locates and downloads. In an earlier step, we created a “files” directory; as a result, our command “–o files” will save each of the discovered documents into this folder. Lastly we use the “–f” switch to specify an output file. This command will produce a formatted document for easy review and cataloging. By default MetaGooFil will also display any findings in the terminal.
While the output from MetaGooFil against Syngress reveals nothing, below you will find a sample of the tool’s output from a recent penetration test that clearly provides additional value and should be included with our reconnaissance data.
C:\Documents and Settings\dennisl\My Documents\
This example is rich with information. First, it provides us with a valid network user name “dennisl”. Second, it clearly shows that Dennis uses a Windows machine.
ThreatAgent: Attack of the Drones
Another option for reconnaissance, which includes several information gathering tools built into one, is called ThreatAgent Drone. This tool was developed by Marcus Carey. You can sign up for a free account at https://www.threatagent.com as shown inFigure 2.12:
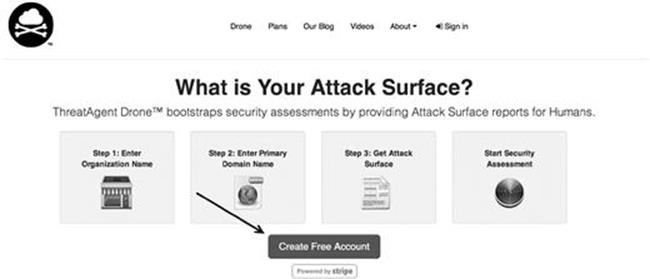
FIGURE 2.12 Signing up for a free ThreatAgent account.
ThreatAgent takes OSINT gathering to the next level by using a number of different sites, tools, and technologies to create an entire dossier for you about your target. The only thing you need is the organization name (Syngress) and a domain name such assyngress.com as shown in Figure 2.13.

FIGURE 2.13 Starting a search with ThreatAgent.
Once the drone is finished extracting all the information from the various websites, it will present a report to you including IP address ranges, e-mail addresses, points of contact within the organization, ports that are open (through Shodan), and much more. Interesting enough, when doing a search for Syngress, I came up as the first result (not faked!) as shown in Figure 2.14.
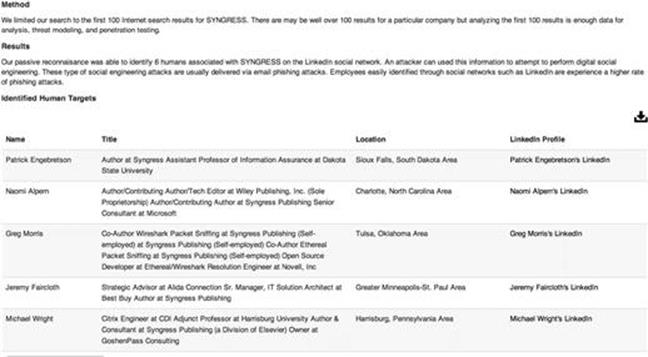
FIGURE 2.14 ThreatAgent results.
From the results, you can parse names from LinkedIn, Jigsaw, and a number of other public sites and find a large list of e-mail addresses that get extracted and added through tools like theHarvester as shown in Figure 2.15.
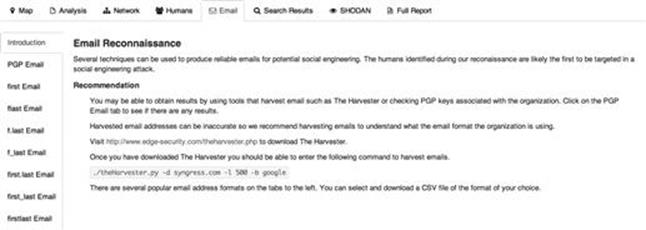
FIGURE 2.15 Additional attack vectors identified by ThreatAgent.
This is one awesome tool for penetration testers, and something that I highly recommend if you are performing reconnaissance on an organization or company.
Social Engineering
No discussion of reconnaissance or hacking would be complete without including social engineering. Many people would argue that social engineering is one of the most simple and effective means for gathering information about a target.
Social engineering is the process of exploiting the “human” weakness that is inherent in every organization. When utilizing social engineering, the attacker’s goal is to get an employee to divulge some information that should be kept confidential.
Let us assume you are conducting a penetration test on an organization. During your early reconnaissance, you discover an e-mail address for one of the company’s sales people. You understand that sales people are highly likely to return product inquiry e-mails. As a result, you sent an e-mail from an anonymous address feigning interest in a particular product. In reality, you did not care about the product. The real purpose of sending the e-mail is to get a reply from the sales person so you can review the e-mail headers contained in the response. This process will allow you to gather additional information about the company’s internal e-mail servers.
Let us take our social engineering example one step further. Suppose our salesman’s name is Ben Owned (we found this information during our reconnaissance of the company website and in the signature of his e-mail response). Let us assume that in this example, when you sent the employee the product inquiry e-mail, you received an automatic reply with the notification that Ben Owned was “currently out of the office travelling overseas” and “would be gone for two weeks with only limited e-mail access.”
A classic example of social engineering would be to impersonate Ben Owned and call the target company’s tech support number asking for help resetting your password because you are overseas and cannot access your web mail. If you are lucky, the tech support people will believe your story and reset the password. Assuming they use the same password, you now have access to Ben Owned’s e-mail and other network resources like VPN for remote access, or FTP for uploading sales figures and customer orders.
Social engineering, like reconnaissance in general, takes both time and practice. Not everyone makes a good social engineer. In order to be successful, you must be supremely confident, knowledgeable of the situation, and flexible enough to go “off script”. If you are conducting social engineering over the phone, it can be extremely helpful to have detailed and well-written notes in case you are asked about some obscure detail.
Another example of social engineering is to leave USB thumb drives or compact discs (CDs) at the target organization. The thumb drives should be distributed to several locations in or near the organization. The parking lot, the lobby, the bathroom, and an employee’s desk are all great “drop” locations. It is human nature for most people to insert the thumb drive or CD into their PC just to see what is on the drive. In this example though, the thumb drive or CD is preloaded with a self-executing backdoor program that automatically launches when the drive is inserted into the computer. The backdoor is capable of bypassing the company firewall and will dial home to the attacker’s computer, leaving the target exposed and giving the attacker a clear channel into the organization. We will discuss the topic of backdoors in Chapter 6.
ADDITIONAL INFORMATION
If you want to be even more successful in these types of attacks, try adding some labels to your CDs or USB thumb drives. It is nearly impossible for someone to resist sneaking a peak at a drive marked “Annual Employee Reviews” or “Q4 Reduction in Force Proposal” or even just simply “Confidential! Not for Public Disclosure!”
Sifting Through the Intel to Find Attackable Targets
Once you have completed the steps above, you need to schedule some time to closely review all the reconnaissance and information you have gathered. In most cases, even light reconnaissance should produce a mountain of data. Once the reconnaissance step is completed, you should have a solid understanding of your target including the organization, structure, and even technologies deployed inside the company.
While conducting the review process, it is a good idea to create a single list that can be used as a central repository for recording IP addresses. You should also keep separate lists that are dedicated to e-mail addresses, host names, and URLs.
Unfortunately, most of the data you collected will not be directly attackable. During the process of reviewing your findings, be sure to transform any relevant, non-IP-based information, into an IP address. Using Google and the host command, you should be able to extract additional IPs that relate to your target. Add these to the IP list.
After we have thoroughly reviewed the collected reconnaissance and transformed the data into attackable targets, we should have a list of IPs that belong to, serve, or are related to the target. As always, it is important to remember your authorized scope because not all the IPs we collect will be within that range. As a result, the final step in reconnaissance is to review the IP list you just created and either contact the company to determine if you can increase the scope of the pen test or remove the IP address from your list.
At this point, you will be left with a list of IP addresses that you are authorized to attack. Do not discard or underestimate all the nonattackable information you have gathered. In each of the remaining steps, we will be reviewing and extracting information from Step 1.
How Do I Practice This Step?
Now that you have a solid understanding of the basic tools and techniques used to conduct reconnaissance, you will need to practice everything that was covered. There are many ways to go about practicing this step. One simple and effective idea is to make a list of companies by reading a newspaper. If you do not have access to a newspaper, any popular news website will do, like www.cnn.com, www.msnbc.com, etc.
While making a list of potential targets to conduct reconnaissance on, try to focus on company names that you have not heard of before. Any good newspaper or website should contain dozens of companies that you are unfamiliar with. One note of caution here, You Must Be Sure Not to Do Any Active Reconnaissance! Obviously, you have not been authorized in any way to perform the active techniques we covered in this chapter. However, you can still practice gathering information through the passive techniques we discussed. This will allow you to refine and sharpen your skills. It will also provide you with an opportunity to develop a system for cataloging, organizing, and reviewing the data you collect. Remember, while this maybe the “least” technical phase, it has the potential for the best returns.
Where Do I Go from Here?
Once you have practiced and mastered the basics of reconnaissance, you will be armed with enough information and skill to tackle advanced topics in information gathering. Below you will find a list of tools and techniques that will take your information-gathering ability to the next level.
Begin the process of expanding your skills by learning search engine directives for sites other than Google. As we mentioned earlier, there are many different search engines and mastering the language of each is important. Most modern search engines include directives or other ways to complete advanced searches. Remember you should never rely on a single search engine to do all of your reconnaissance. Searching for the same keywords in different search engines often returns drastically different and surprisingly useful results.
If you are a Windows user, FOCA and SearchDiggity are awesome tools for extracting metadata and expanding your target list. Both FOCA and SearchDiggity are available for free. FOCA can be found at http://www.informatica64.com/foca.aspx. Unless you are up-to-date on your Spanish, you will need to locate and click on the Union Jack (flag of the United Kingdom) icon. Doing so will load the English version of the page. SearchDiggity is another great tool that leverages OSINT, Google hacking, and data extraction. The tool includes a suite of products and leverages a number of resources to provide results. Invest the time required to master each of these tools and you will be on your way to mastering digital reconnaissance.
Once you understand the basics, it is definitely worth your time to review Johnny Long’s GHDB. This is a single repository for some of the most effective and feared Google Hacks in existence today! It has already been mentioned and should go without saying but Do Not Run These Queries Against Unauthorized Targets! You can find the GHDB at http://www.hackersforcharity.org/ghdb. While you are there, take a minute to read about Hackers for Charity and Johnny’s efforts with the “food for work” program.
Paterva’s Maltego is a very powerful tool that aggregates information from public databases and provides shockingly accurate details about your target organization. These details can be technical in nature, such as the location or IP address of your firewall, or they can be personal, such as the physical location of your currently (travelling) salesman. Learning to master Maltego takes a little effort but is well worth your time. A free version is available in Kali.
Finally, it is worth your time to explore the “Swiss Army Knife Internet Tool” Robtex. This site is often a one-stop shop for information gathering because it is so versatile and provides so much information.
Summary
Information gathering is the first step in any penetration test or hack. Even though this phase is less technical than most, its importance should not be overlooked. The more information you are able to collect, the better your chances of success in later phases of the penetration test. At first, the amount of information that can be gathered on your target can seem a bit overwhelming, but with a good documentation process, the proper use of tools, and further practice you will soon master the art of reconnaissance.