Untangle Network Security (2014)
Chapter 9. Optimizing Network Traffic
Untangle's Bandwidth Control application can be used to enhance your bandwidth usage. Using Bandwidth Control, you can prevent certain users from draining the whole bandwidth by setting quotas. You can also limit the bandwidth assigned to certain protocols (such as BitTorrent). Untangle's Web Cache, provides a local cache of the recently visited websites. This can allow users when rerequesting this website to download the data from the local cache instead of redownloading the data, which could enhance their browsing experience.
The same method that was used to explain the applications in the previous chapters will be used here. We will first introduce the application, then cover how it works and any related technical details, see how we can review the event logs, and finally give some lab-based training. The list of topics that will be covered in this chapter is as follows:
· Untangle's Bandwidth Control
· Untangle's Web Cache
Bandwidth Control
Untangle's Bandwidth Control enables you to control, monitor, and prioritize your network's bandwidth consumption. It allows you to optimally share the network traffic among your users by prioritizing important sites (Salesforce) and time-critical traffic (VOIP), deprioritizing unimportant sites (YouTube), and limiting unauthorized usage (BitTorrent).
How does Bandwidth Control work?
Untangle's Bandwidth Control is similar to the Quality of Service (QoS) rules covered in Chapter 4, Untangle Advanced Configuration. In fact, when you enable Untangle's Bandwidth Control, you'll enable QoS rules. While QoS works with the bypassed traffic only, Untangle's Bandwidth Control can deal with traffic that enters the UVM. As a result, you can prioritize/deprioritize traffic based on its layer 7 information such as the used protocol, application, and destination sites. In addition, Untangle's Bandwidth Control enables you to set quotas for users to prevent network saturation.
Untangle's Bandwidth Control integrates with other Untangle applications to get the application/website-specific information. This includes Web Filter to provide website categorization, Application Control to provide protocol-profiling categorization, and the Directory Connector to provide username/group information.
Settings
This section covers the Untangle Bandwidth Control settings; first, we will cover how to set rules to prioritize/deprioritize and limit the traffic, then we will review the bandwidth monitor tool, and finally, we will review the quotas and penalty box for the users who overuse the network bandwidth.
Bandwidth Control rules
After installing Untangle's Bandwidth Control, it will be turned off by default. We have to run Bandwidth Control Setup Wizard before we turn it on. You can start the setup wizard from the Run Bandwidth Control Setup Wizard button located under the Bandwidth Control Settings | Status. The Bandwidth Control setup wizard will enable the QoS feature and create custom rules based on the configured settings on both QoS and Bandwidth Control.
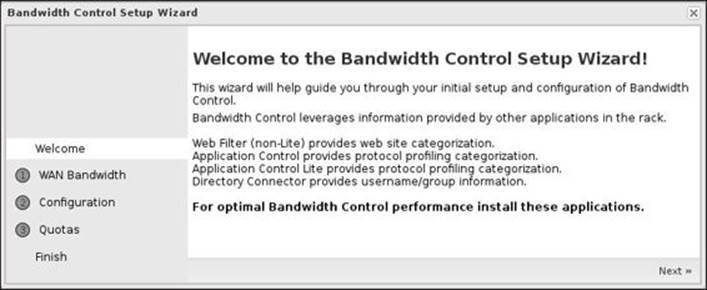
Bandwidth Control setup wizard
The first window in the Bandwidth Control setup wizard is the welcome screen, which gives us a hint that to fully utilize the Bandwidth Control functionality, we may need to install other Untangle applications such as Web Filter, Application Control, and Directory Connector.
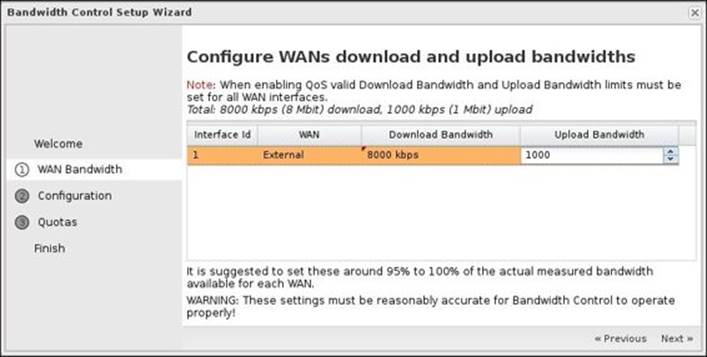
The second step is to configure the bandwidth rate on the WAN interfaces. Here, we only have one interface, which will be configured with a download rate of 8 Mbps and an upload rate of 1 Mbps. You should set the rate around 95 percent to 100 percent of the true rate. As the application sets the limit based on the percentage of the total available bandwidth, so if you have 1 Mbps and set the rate in the setup wizard to 10 Mbps, 10 percent will equal the 1 Mbps, which is the true bandwidth, and instead of limiting the usage, you will let the user fully utilize the bandwidth. If you set the value in the setup wizard to a very low value, the application will limit most traffic to this value even if there is an unallocated bandwidth. The following screenshot shows the configuration steps of the WAN interface:
The third step is to select a starting configuration. Untangle provides many predefined configurations to ease the process of configuring the Bandwidth Control application.
The predefined configuration will automatically create the prioritizing, deprioritizing, and limiting rules. You can modify them anytime you wish, or even create your custom rules from scratch. However, starting with a predefined configuration is always a good idea.
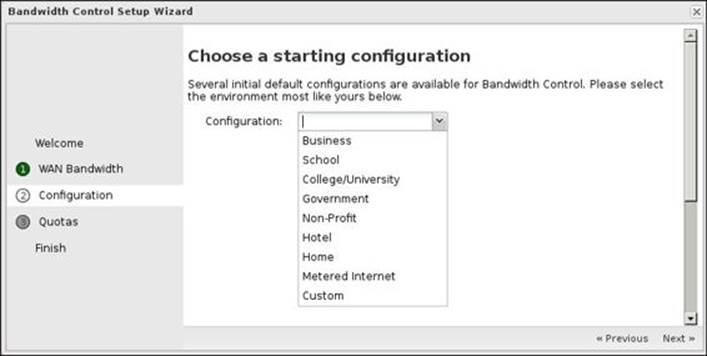
All configurations have common sense in between. They will optimize traffic in the interest of the plan users and deprioritize any other traffic. For example, business users will be more interested in search engines than any other traffic, while home users will need to have flawless experience while watching YouTube videos even if they have running downloads.
Common prioritizing rules are as follows:
· Interactive traffic and services (remote desktop, e-mail, DNS, and SSH)
· Interactive web traffic (based on the selected rule; thus, the school configuration will optimize traffic to education sites, while a hotel plan will optimize traffic to business-related sites)
Common deprioritizing/limit rules are as follows:
· Non-real-time background services (for example, Microsoft updates and backup services)
· Web traffic to download sites
· Any detected peer-to-peer traffic
· All web traffic in violation of the plan policy
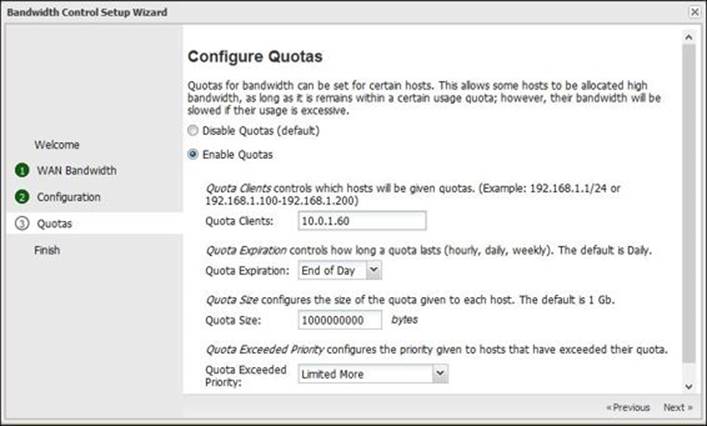
Also, you can set quotas, which is useful in many cases. Quotas allow you to limit the assigned bandwidth for certain hosts if they exceeded their allowed bandwidth usage. Different settings that can be configured are as follows:
· Quota Clients: The quota can be applied to a certain host or a group of hosts. You will need to define the hosts using their IP.
· Quota Expiration: This defines how long the assigned quota will be in use before a host grants a new quota. The quota's expiration could be hourly, daily, or weekly.
· Quota Size: This specifies the allowed data usage before applying any limitation on the host. The default value is 1 GB.
· Quota Exceeded Priority: This specifies the priority given to hosts when they exceed their quota size. These priorities are the same as QoS priorities.
These settings are illustrated in the following screenshot:
The default values will grant each host 1 GB per day. If the 1 GB limit is reached in a single day by a host, a bandwidth limitation will be applied to that host, which limits the upload and download to 2 percent of the available bandwidth (if there are any other hosts that use the bandwidth) and to 50 percent of the available bandwidth (if there isn't any other host that uses the bandwidth).
Note
When a client bandwidth is limited, all limited clients share the limitation level's available bandwidth. Thus, for the preceding example, the client will not grant the whole 2 percent of the available bandwidth, but it will share it with any other limited clients.
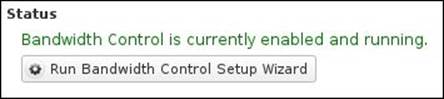
The final screen will inform you that the Bandwidth Control is now configured and enabled. After completing the setup wizard, the following statement will appear under the Status tab:
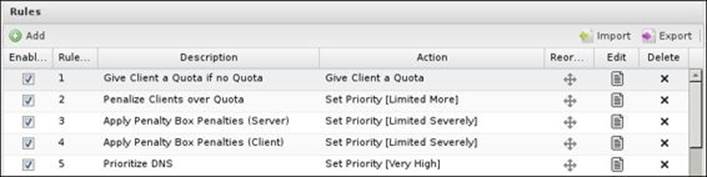
Preconfigured rules will be created under the Rules tab. The created rules vary depending on the configurations selected in the setup wizard:
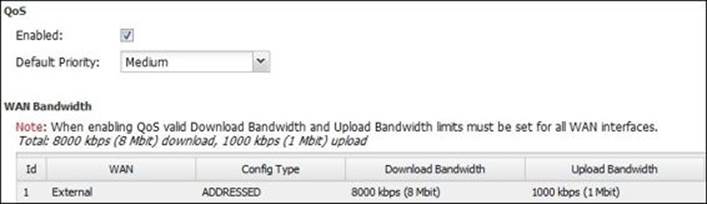
Also, the QoS rules will be enabled and the WAN bandwidth value will be set to the value defined in the setup wizard. If the QoS was previously enabled, the WAN bandwidth settings defined in the setup wizard will override any previously defined values as shown in the following screenshot:
Rules
Basically, rules are what configure and control the behavior of Untangle's Bandwidth Control. You can create custom rules or use the preconfigured rules; the rules are evaluated in order and when a match is found, the action on this rule will be taken; if no match is found, no action will be taken and the traffic will take the default QoS priority, which is medium.
Unlike the other applications' rules, which are evaluated during the session formation only, Untangle's Bandwidth Control rules are evaluated during the session formation and on the first 10 packets of the session since some matchers such as HTTP: Hostname and Application Control: Application are not known until several packets have been transferred. In addition, all rules will be reevaluated if the host moved to the penalty box or exceeded its quota.
As the case with all rules, we will need to define a Matcher and an action to be taken if the traffic is matched. Matchers will mainly look for the traffic properties in layer 7 and can get details such as site category and application protocol from other applications. Actions can be Set Priority, Send to Penalty Box, or Set Quota. The Set Priority action will limit the matched traffic bandwidth based on the priority level. Different priorities and their limitation details were discussed in the QoS section of Chapter 4, Untangle Advanced Configuration. The Send to Penalty Box and Set Quota actions will be discussed in the upcoming sections.
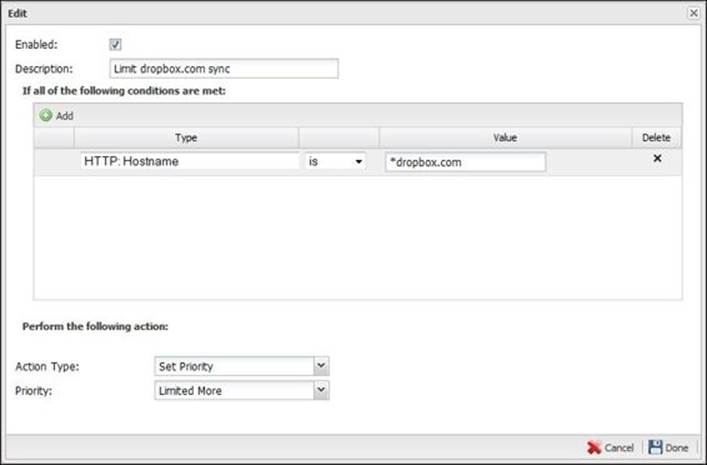
An example of a rule that limits the traffic to dropbox.com is shown in the following screenshot. The used matcher is HTTP: Hostname = dropbox.com, and the action is to set this traffic priority to the more limited priority.
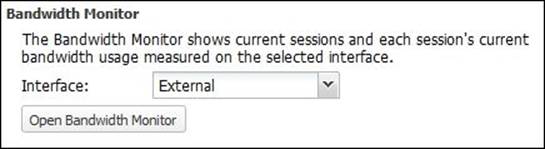
Bandwidth Monitor
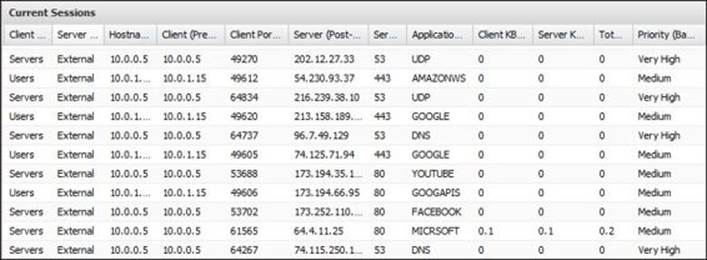
The Bandwidth Monitor tool allows you to review the current sessions and their traffic usage. You can run the tool from the Open Bandwidth Monitor button located under Settings | Status:
The tool is similar to the session viewer tool. However, it has additional columns that state the current bandwidth usage and the assigned priority to that traffic, as shown in the following screenshot:
The penalty box
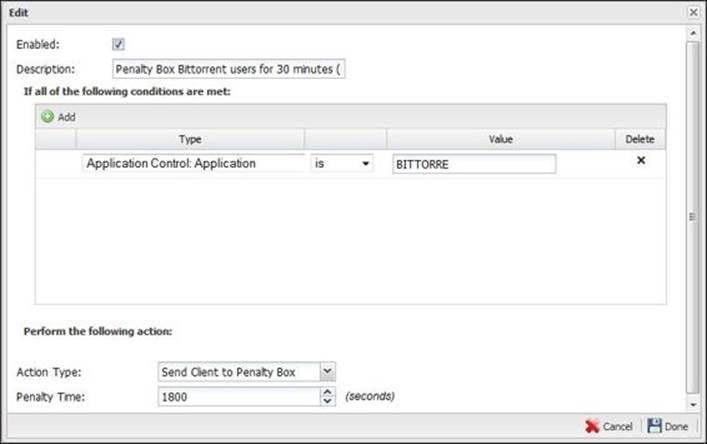
Sometimes, the default deprioritizing and limiting traffic rules are not the right way to punish the offending hosts, especially with hard-to-block and hard-to-control applications such as BitTorrent clients and Skype. Instead, if any unauthorized usage was detected from any host, the host will be sent to the penalty box for a period of time. While in the penalty box, we are able to apply rules to slow or block all traffic from this host. Thus, if any user was using a BitTorrent client instead of giving this traffic a low priority, we will slow down or block all traffic from this user to stop the user from trying to evade the default deprioritize rule.
First, we will need to set a rule to send the host to the penalty box if unauthorized usage such as torrent traffic was detected, as shown in the following screenshot:
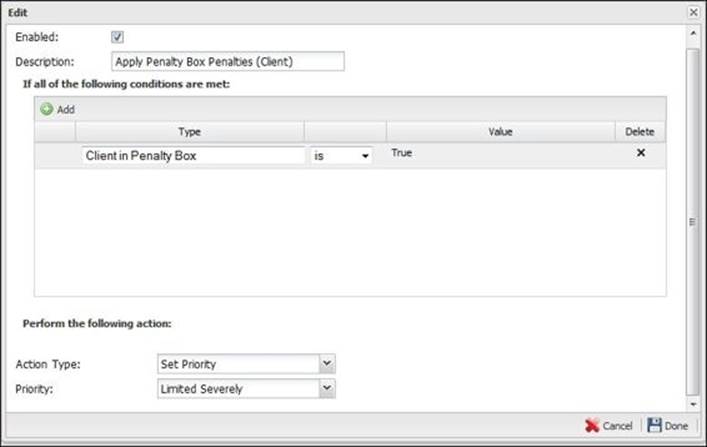
Then, we should add another rule that applies to hosts on the penalty box to slow or block their traffic:
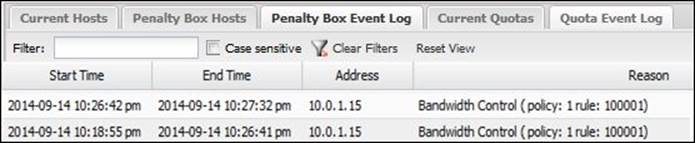
We can review the hosts on the penalty box via the View Penalty Box button located under Settings | Status | Penalty Box, which will open the host viewer window from where we can review the current hosts in the penalty box and the penalty box event log.
The following screenshot shows the IP addresses of currents hosts in the penalty box, the time they entered it, and the planned time to exit from it. You can also manually release the clients from the penalty box before the planned exit time.

The Penalty Box Event Log tab provides historical data of the clients entered in the penalty box and when they left it, and the reason for that (the rule ID):
Quotas
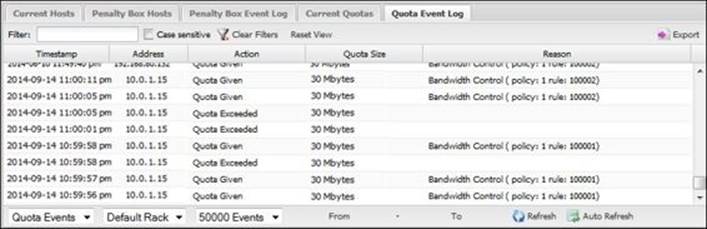
You can review the current quotas by pressing the View Quotas button located under Status | Quotas, which will open the Host Viewer window from which we can review the current applied quotas and the quota event log. Configuring quotas is done under Rules.
The following screenshot shows the current applied quotas. The applied quota is 30 MB and the remaining quota is 29.9 MB. The quota was allocated at 10:59 p.m. and will expire at the end of the day, that is, at 11:59:59 p.m. You can refill the quota (give the user another 30 MB to download) or you can drop (the quota won't apply on the user until the traffic condition rematches).

The quota event logs give a detailed summary about the quota events: when they are applied, on which device, the quota size, and the reason for that:
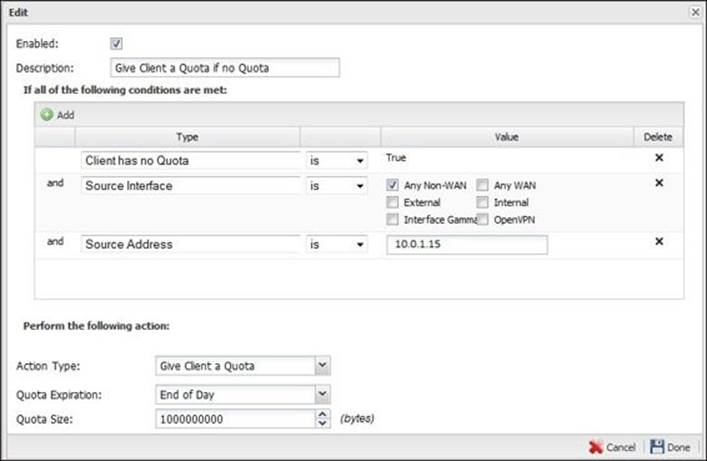
To set quota rules, we will need to apply quotas on a client, as shown in the following screenshot:
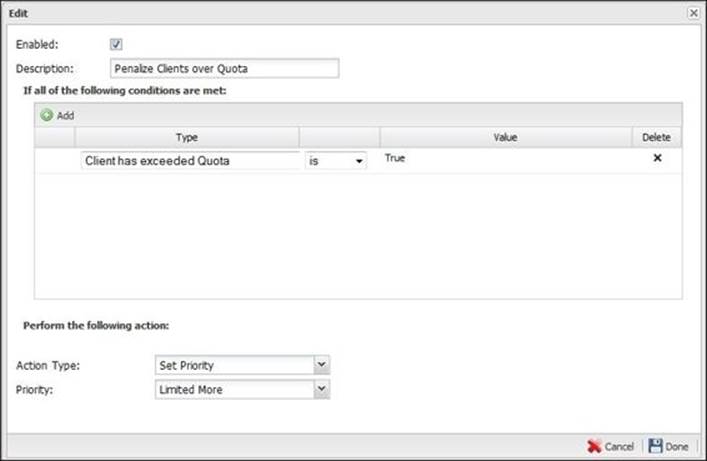
Then, we will need to limit the traffic if the client exceeds their quota:
Reviewing the scan history
As you know, we can review the scan history via the application faceplate, event logs, or reports. The application faceplate gives a summary about what happened since the last server reboot and the real-time traffic processed by the application.

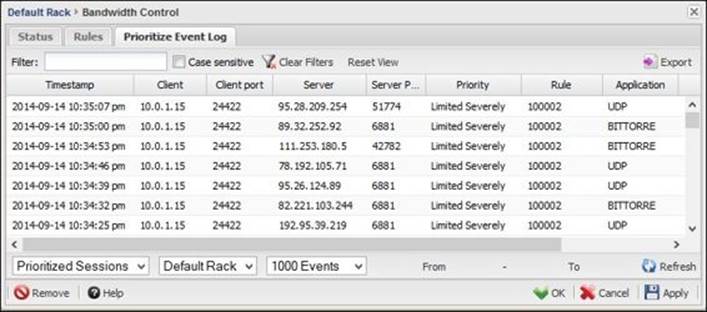
The Event logs give more details about the traffic such as its type, the used application, and the server and client address. They also show the priority assigned to the traffic and the rule that caused that. In addition to Prioritize Event Log, there are also the Quota and Penalty Box Event Log:
Finally, there are Reports, which provide summary reports about the Bandwidth and detailed Quota events. The available Reports are as follows:
· Bandwidth Usage: This gives the average data rate (KB/S) and the total data transferred per day
· Top Bandwidth Hosts: This shows the top hosts' utilization of the available bandwidth
· Top Bandwidth Users: This shows the top users based on their utilization of the available bandwidth
· Top Bandwidth Ports: This shows the top ports that used the available bandwidth
· Bandwidth by Priority: This shows the bandwidth consumed by each priority
· Sessions by Priority: This gives the number of sessions for each priority (for example, Limited Severely has 2000 sessions)
The following screenshot shows the Bandwidth by Priority summary report:

Lab-based training
This lab requires one client machine and one Untangle NGFW server. The lab steps are very simple. First, try to download a torrent file before applying Untangle's Bandwidth Control settings to find out the real download speed. After installing the Bandwidth Control application, run the configuration wizard and configure the WAN with appropriate values. Here, I have selected custom preconfiguration settings to be able to create simple custom rules. Also, I have selected the later option in order to not apply quota now. In addition, you will need to make sure that the BitTorrent traffic is not set to be blocked by the application control application. Perform the following steps to set up a lab:
1. Create a rule that has a matcher, Application Control: Application is BITTORRE, and set the action as Set Priority and select Limited Severely. When you start the download process, the BitTorrent application will be detected, and the Limited Severely priority will be applied on it. You'll notice that the download speed equals about 2 percent of the total available bandwidth.
2. Change the previous rule action to send the client to the penalty box and set the duration as 1800 seconds. We will need to create another rule that sets the clients' priority in the penalty box to Limited Severely. The matcher used in the second rule is Client in Penalty Box Is True and the action is Set Priority to Limited Severely. When the user starts the download process, the client will be sent into the penalty box, and the download limit will reach the 2 percent limit of the available bandwidth.
3. Again, we will change the first rule matcher to the Source Address is <client IP> and the action will be to give client a Quota with End of Day Quota Expiration and Quota size of 30,000,000 bytes (30 MB). The second rule will be changed to client has exceeded quota is true and let the Set Priority settings remain unchanged. Now, after starting the download, the download will be at full speed, but after the first 30 MB of download, the traffic will be throttled to 2 percent of the available traffic as the quota will be exceeded.
Web Cache
Untangle Web Cache helps companies to reduce the bandwidth usage and increase the sites' response time. Every time a user visits a website, its contents are stored locally on the Untangle NGFW server, and whenever the same site is requested either by the same user or by another user, the response will be provided from the cached version.
Untangle Web Cache is based on the Squid project, and it only works with the HTTP traffic. The local cache is kept on the server's hard disk and it's preserved even after system restart. Every cache query uses a fair amount of CPU resources and disk I/O, which when the server is fully utilized may lead to some latency.
To take full advantage of the Untangle Web Cache, you will need to run it on a network with at least one of the following: more than 100 users, slow/metered Internet connection, high duplicated traffic, and low dynamic website traffic (which is not cacheable).
Web Cache settings
Under the Settings tab, we can review the Untangle Web Cache status and configure the bypass list. However, there are not many settings to configure.
Status
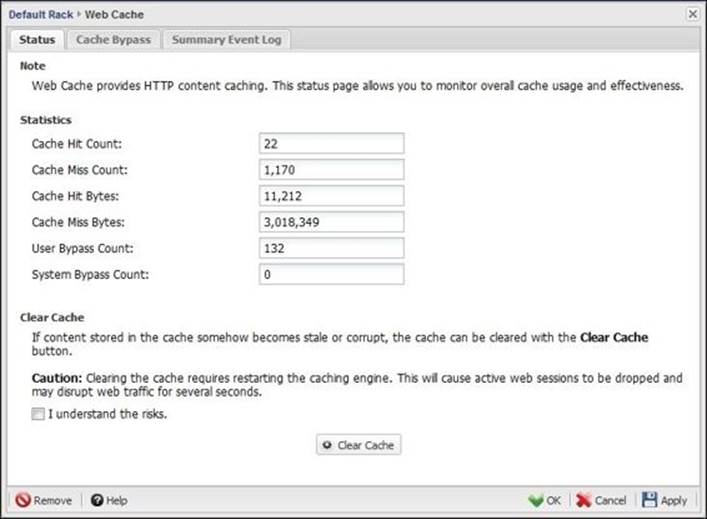
Every client request is first directed to the Web Cache app, and if the content is available, it will be served through the local cache (which is called cache hit); otherwise, it will be called cache miss, and the traffic is downloaded directly from the Internet, and a local copy is saved for later usage.
This section provides the total count of the cache hits and misses. It also provides their size in bytes and the count of any bypass that occurred. The bypass could be a result of the bypass rule created under the Cache Bypass tab or because the HTTP session was determined to be incompatible with the Untangle Web Cache system.
If you feel that the cache contents become obsolete or corrupted, you can clear the current cache contents via the Clear Cache button. You will need to check the I understand the risks checkbox first as clearing the cache contents is done by restarting the cache engine, which will interrupt all the active sessions:
Cache Bypass
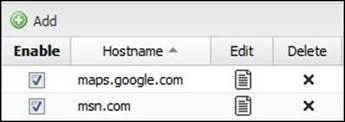
Some sites will not operate correctly when cached, for example, Google Maps, which is added by default. To add additional sites to this bypass list, simply click on the Add button and add the site domain name, as shown in the following screenshot:
Reviewing the caching history
Needless to say, we have three options to review the Untangle Web Cache application activity. The options are the application faceplate, application event logs, and the reports. The following screenshot shows the application's faceplate:

The Summary Event Log tab gives you a summary of the cache hit and misses and their sizes based on the time and not the requested site:

The reports also provide a complete overview over the Web Cache event. The available reports are as follows:
· Hits: This gives the average and maximum number of cache hits and misses
· Size: This gives the average and maximum MB/hours served from the cache or downloaded for the first time
Lab-based training
In this lab, we will prove the Web Cache functionality by trying to load a large image from the Web Cache and see how it can enhance the load time and save the network bandwidth. To do so, perform the following steps:
1. Browse to Google images.
2. Search for any term you wish.
3. From Search Tools, select the maximum size possible.
4. Open any picture you wish and notice the load time.
5. Clear your browser cache and try to open the image again and notice the load time.
6. In step 5, you'll notice that the image loaded much faster than the first time.
7. Open the same picture from another browser and you'll notice that it loads faster than the previous one.
Summary
In this chapter, we learned about Untangle Bandwidth Control and Web Cache and saw how they can save your network bandwidth and optimize its usage. Bandwidth Control is used to set priority for the traffic based on its criteria. Any violience traffic can be limited or can get a certain quota. The Web Cache is used to cache the static contents of the visited web sites; thus, when rerequested, it can serve it from the cache instead of redownloading it, which will save bandwidth and time.
In the next chapter, we'll cover how we can provide different rules for different users; for example, senior staff will get access to Facebook while the remaining staff won't. In addition, we can set time-based policies such as allowing Facebook during the dinner time and block it otherwise.
All materials on the site are licensed Creative Commons Attribution-Sharealike 3.0 Unported CC BY-SA 3.0 & GNU Free Documentation License (GFDL)
If you are the copyright holder of any material contained on our site and intend to remove it, please contact our site administrator for approval.
© 2016-2026 All site design rights belong to S.Y.A.