QuickBooks 2017 All-In-One For Dummies (2016)
Book 3
Bookkeeping Chores
Contents at a Glance
1. Chapter 1: Invoicing Customers
1. Choosing an Invoice Form
2. Customizing an Invoice Form
3. Invoicing a Customer
4. Billing for Time
5. Printing Invoices
6. Emailing Invoices
7. Recording Sales Receipts
8. Recording Credit Memos
9. Receiving Customer Payments
10. Assessing Finance Charges
11. Using Odds and Ends on the Customers Menu
2. Chapter 2: Paying Vendors
1. Creating a Purchase Order
2. Recording the Receipt of Items
3. Simultaneously Recording the Receipt and the Bill
4. Entering a Bill
5. Paying Bills
6. Reviewing the Other Vendor Menu Commands
3. Chapter 3: Tracking Inventory and Items
1. Looking at Your Item List
2. Adding Items to the Item List
3. Editing Items
4. Adjusting Physical Counts and Inventory Values
5. Adjusting Prices and Price Levels
6. Managing Inventory in a Manufacturing Firm
4. Chapter 4: Managing Cash and Bank Accounts
1. Writing Checks
2. Making Bank Deposits
3. Transferring Money between Bank Accounts
4. Working with the Register
5. Using Edit Menu Commands
6. Reconciling the Bank Account
7. Reviewing the Other Banking Commands
5. Chapter 5: Paying Employees
1. Setting Up Basic Payroll
2. Scheduling Payroll Runs
3. Paying Employees
4. Editing and Voiding Paychecks
5. Paying Payroll Liabilities
Chapter 1
Invoicing Customers
IN THIS CHAPTER
![]() Deciding which invoice form to use
Deciding which invoice form to use
![]() Customizing your invoices
Customizing your invoices
![]() Invoicing customers on paper or by email
Invoicing customers on paper or by email
![]() Billing your customers for time
Billing your customers for time
![]() Recording sales receipts, credit memos, and payments
Recording sales receipts, credit memos, and payments
![]() Calculating finance charges
Calculating finance charges
QuickBooks provides several tools for invoicing your customers. This chapter describes these tools, as well as a handful of related tools for recording customer payments and for issuing credit memos.
If you’ve already been invoicing customers by using some manual method — perhaps you’ve been preparing invoices with a word processor — you’ll find QuickBooks to be a godsend. QuickBooks not only makes invoicing and related tasks easier, but also collects invoice information, recording this information in the QuickBooks data file. Happily, this means that you get the extra benefit of recording accounting transactions simply by using QuickBooks for invoicing.
Choosing an Invoice Form
QuickBooks allows you to use an invoice form that matches the requirements of your business. Businesses that sell products — such as retailers and wholesalers — need an invoice that includes descriptions of the product items that are sold. Businesses that sell services — such as law, architectural, engineering, and consulting firms — need an invoice that appropriately describes these services. Businesses that sell both products and services need a blend of attributes.
Fortunately, QuickBooks lets you choose the invoice form that best matches your business. To choose an invoice form, display the Create Invoices window by choosing the Customers ⇒ Create Invoices command. When QuickBooks displays the Create Invoices window, use the Template drop-down list, which appears in the top-right portion of the window, to choose the invoice form that you want. This drop-down list provides choices such as an attorney’s invoice, a finance charge invoice, a fixed-fee invoice, a product invoice, a service invoice, and a professional invoice. Choose the invoice template that seems to best match your business. QuickBooks redraws the Create Invoices window when you choose a new invoice form template. This means that you can see what an invoice form template looks like simply by choosing an option from the Template drop-down list.
Customizing an Invoice Form
Although you can choose a predefined invoice form template for your invoices, QuickBooks gives you more flexibility than that. You can also create custom invoice form templates to design an invoice that looks just the way you want. To do this, you can start with one of the basic invoice form templates and then customize it so that it perfectly matches your requirements.
Choosing a template to customize
To choose a template to customize, display the Create Invoices window by choosing the Customers ⇒ Create Invoices command. Then select the template that most closely matches what you want your ultimate invoice to look like from the Template drop-down list.
Reviewing the Additional Customization options
QuickBooks’s form customization tools easily confuse new QuickBooks users. But typically, the way to start any customization is to fiddle with what QuickBooks calls its Additional Customization options.
To perform this fiddling, click the Create Invoice window’s Formatting tab and then click the Customize Data Layout button. You can’t use the Additional Customization dialog box if you’re working with one of the default invoice templates — only if you’re working with a copy. Accordingly, QuickBooks may prompt you to make a copy of an invoice template when you click the Additional Customization button. In any event, QuickBooks displays the Additional Customization dialog box, as shown in Figure 1-1 . This dialog box gives you control of both the information that appears on your invoices and the way invoices print.
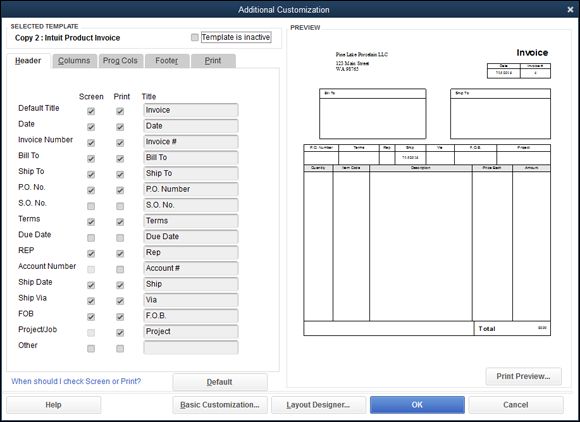
FIGURE 1-1: The Header tab of the Additional Customization dialog box.
Specifying header information
The Header tab of the Additional Customization dialog box (refer to Figure 1-1 ) lets you specify what information goes on the top portion of the Create Invoices window and in the top area of an actual printed invoice form. This information, called the header, provides the invoice number, the invoice date, and the billing and shipping information. You can also choose how information is labeled by filling in or editing the contents of the text boxes. The Default Title check boxes, for example, let you specify whether the form title should appear in the screen version of the invoice (this would be inside the Create Invoices window) and in the printed version of the invoice. The Default Title text box lets you specify what the form title should be. In a similar fashion, the Date check boxes let you specify whether the date should appear in both the screen and print versions of the invoice, as well as what label should be used to describe the invoice date. Figure 1-1 uses the clever descriptive text Invoice as the invoice form’s title.
 As you make these customizations, QuickBooks updates the Preview box, shown on the right half of the Additional Customization dialog box, so you can see what your changes look like.
If you don’t need a particular piece of information in an invoice, don’t select the Screen and Print check boxes for that bit of data. Leaving these check boxes deselected tells QuickBooks that it shouldn’t include that piece of header information in the window or print version of the invoice form.
Specifying columns information
The columns portion of an invoice describes in detail the items for which an invoice bills. Product invoice columns describe the specific products, including price and quantity; they also describe the items being invoiced. A service invoice’s columns describe the specific services being billed. As you may guess from looking closely at Figure 1-2 , the Columns tab of the Additional Customization dialog box looks like the Header tab. You use the Screen and Print check boxes to indicate whether a particular piece of column-level information should appear as a column in the Create Invoices window or in the actual created invoice. Similarly, you use the Title text boxes to provide the descriptive labels that QuickBooks uses in the Create Invoices window and in the printed invoice form.
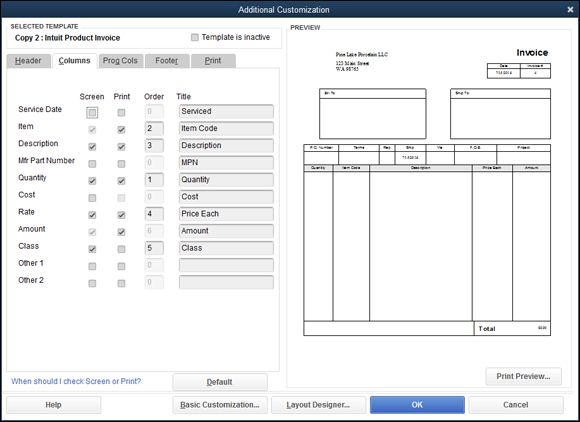
FIGURE 1-2: The Columns tab of the Additional Customization dialog box.
The only unusual options shown on the Columns tab are the Order text boxes (see Figure 1-2 ). These boxes let you indicate the order (from left to right) in which the columns should appear. If the item number or code should appear in the first column on the left, for example, you enter the value 1 in the Item row’s Order box.
Specifying prog columns information
The “prog columns” portion of an invoice provides information relevant to situations in which you’re using progress billings. You can click the Prog Cols tab of the Additional Customization dialog box to add and remove such information as the ordered amount, the previously invoiced amount, and any back-ordered amounts.
The Header, Columns, and Prog Cols tabs let you make changes in your invoice forms, but don’t get too nervous about making perfect changes the first time. You can easily see exactly how your changes look by using the Preview box (if your eyesight is better than mine) or by clicking OK and then carefully reviewing the new version of the Create Invoices window. If you realize that you’ve made an error — perhaps you’ve used the wrong bit of descriptive text, or you’ve incorrectly ordered the columns — you can customize your invoice again and thereby fix your earlier mistakes.
Specifying footer information
The Footer tab of the Additional Customization dialog box lets you specify what information appears in the Create Invoices window below the columns area and in the actual printed invoice below the columns area. As Figure 1-3 indicates, the footer information includes a customer message, the invoice total, payments and credit information, a balance-due field, and (optionally) a longer text box. You work with the Footer tab in the same manner that you work with other tabs. If you want some bit of information to appear, select the Screen check box and the Print check box. To change the bit of text that QuickBooks uses, edit the contents of the Title text box.
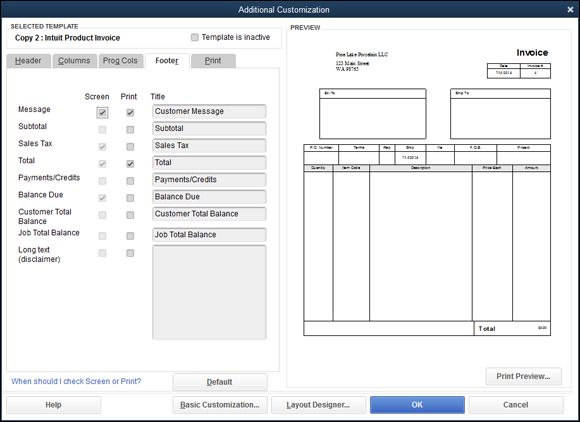
FIGURE 1-3: The Footer tab of the Additional Customization dialog box.
Specifying print information
The Print tab of the Additional Customization dialog box, shown in Figure 1-4 , lets you exercise a bit of control over how QuickBooks prints invoices that use the template you’ve customized. The radio buttons at the top of the tab let you specify that when printing this particular invoice template, QuickBooks should use the regular old invoice printer settings or other, special print settings. The Print settings also let you tell QuickBooks how it should number the pages of a multiple-page invoice.
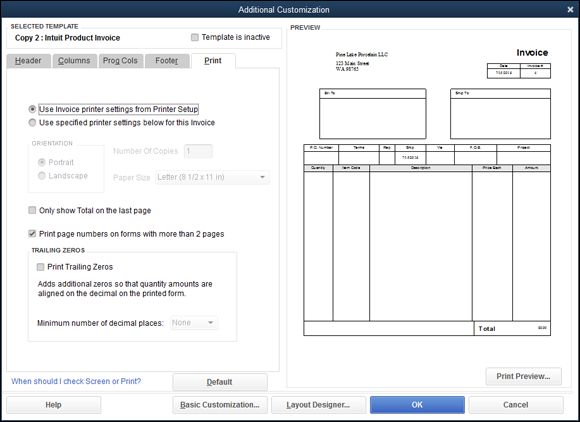
FIGURE 1-4: The Print tab of the Additional Customization dialog box.
You can return all the customized invoice settings to their default condition by clicking the Default button. When you do this, however, you remove any changes or customizations that you’ve made.
Moving on to Basic Customization
The Additional Customization dialog box (refer to Figure 1-4 , for example), provides a Basic Customization button. If you click this button, QuickBooks displays the Basic Customization dialog box, shown in Figure 1-5 , which provides several easy-to-make customization choices.
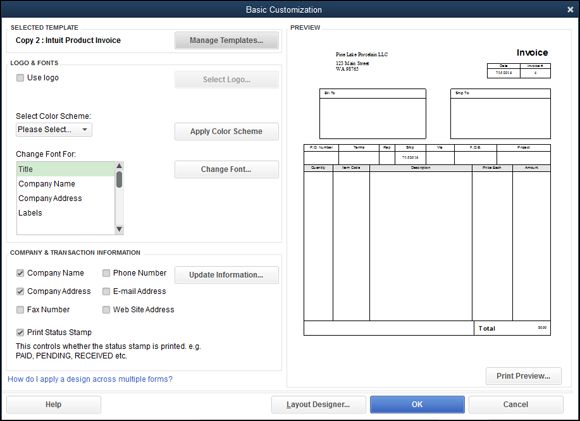
FIGURE 1-5: The Basic Customization dialog box.
To identify which invoice form template you want to customize, click the Manage Templates button; then, when QuickBooks displays the Manage Templates dialog box (see Figure 1-6 ), choose the invoice template you want to customize. QuickBooks initially supplies a custom invoice template and a finance charge template that you can customize.
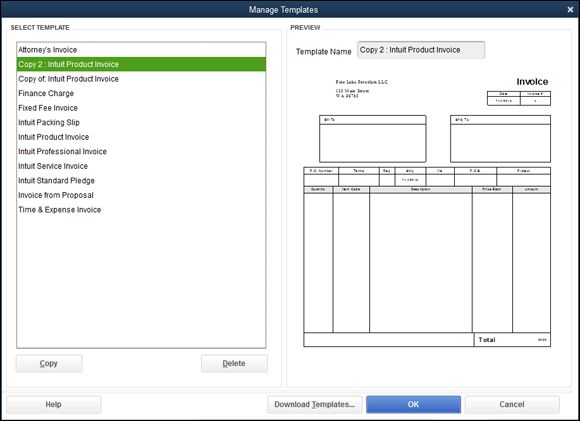
FIGURE 1-6: The Manage Templates dialog box.
Alternatively, you can select one of these existing templates and click Copy to create and then customize it. When you click OK, QuickBooks closes the Manage Templates dialog box and returns you to the Basic Customization dialog box.
Logo, please
To add a logo to your invoices, select the Use Logo check box (shown in Figure 1-5 ). Then, when QuickBooks displays the Select Image dialog box (not shown), use it to select the graphic-image file that shows your logo. The Select Image dialog box works like a standard Windows open-file dialog box.
Color you beautiful
To add color to your invoices — say you have a color printer, and you don’t care whether you spend a small fortune on colored ink — select the color scheme you want to use from the Select Color Scheme drop-down list. Then click the Apply Color Scheme button.
Fiddle with invoice fonts
You can choose the font that QuickBooks uses for the bits of text that go into an invoice. Just select the bit of text you want in the Change Font For list box and then click the Change Font button. QuickBooks displays the Example dialog box, shown in Figure 1-7 . Use its Font, Font Style, and Size boxes to specify what the selected bit of text should look like. The Example dialog box includes a Sample box that shows how your font changes look. When you complete your specification of the font, click OK.
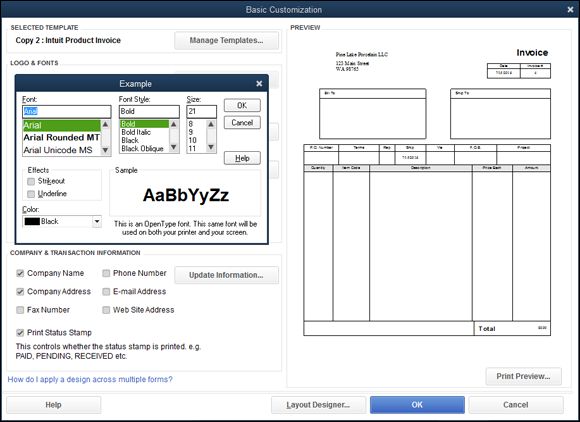
FIGURE 1-7: The Example dialog box.
Specify Company & Transaction information
The Company & Transaction Information options, also shown in Figure 1-5 , let you indicate what information should appear on the form template. You select the check box that corresponds to the bit of information. If you want the company name to appear in the invoice form, for example — which means that you aren’t using letterhead or preprinted invoice forms — select the Company Name check box.
If you need to change some bit of company information, click the Update Information button. QuickBooks displays the Company Information dialog box (not shown), which you can use to edit or update your company name, address, telephone number, and so on.
Working with the Layout Designer tool
Okay. Perhaps you’ve used the Basic Customization dialog box to make some changes in your invoice’s appearance, and you haven’t been satisfied. Maybe you’ve gone the extra mile and noodled around with the Additional Customization dialog box to make further changes, and maybe even that hasn’t left you happy with the appearance of your invoice.
Do you have any additional recourse? Are you stuck with an invoice that doesn’t look right or that doesn’t work for your organization? Heck, no!
If you click the Layout Designer button, which is available in both the Basic Customization and Additional Customization dialog boxes, QuickBooks displays the Layout Designer dialog box, as shown in Figure 1-8 . The Layout Designer dialog box lets you move invoice information around in the actual printed invoice. Your best bet for finding out how to work with the Layout Designer tool is to experiment with it. My recommendation is that you create an example invoice form template — something you don’t really care about — and then use this new invoice form template for some goofing around.
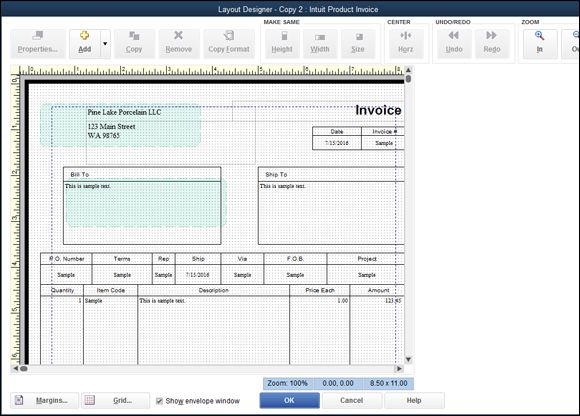
FIGURE 1-8: The Layout Designer dialog box.
Here are some of the things that you may want to try:
· Moving and resizing objects: You can move and resize objects in the form pretty easily. To move some bit of the form, first select the bit by clicking it. Then use the arrow keys or drag the mouse to move the selected bit. You can resize the selected bit in a similar way. Resize the selected object by dragging the black squares (called resizing handles ), which show that the object is selected.
When moving and resizing invoice form objects, keep two points in mind:
o You can select the Show Envelope Window check box to have QuickBooks draw envelope windows in the invoice form to show you where these elements appear. You want to have envelope windows shown to make sure that your customized invoice still has its address information showing through.
o You can click the Grid button to display the Grid and Snap Settings dialog box (not shown). This dialog box provides two check boxes where you can indicate whether QuickBooks should use a grid (those are the dots you see) to more accurately line up invoice objects in the form. The Grid and Snap Settings dialog box also includes a Snap to Grid box so you can tell QuickBooks that it should make gridlines sticky. Sticky gridlines automatically attract invoice objects so that you can more easily line up the objects against the gridlines. The Grid and Snap Settings dialog box also includes a Grid Spacing box that you can use to specify how wide or narrow QuickBooks should draw gridlines.
· Selecting objects: You can select multiple objects in the invoice by dragging the mouse. To do so, click at a point above the top-leftmost object that you want to select, and drag the mouse to a point just below the bottom-rightmost object that you want to select. As you drag the mouse from one corner to the other, QuickBooks draws a rectangle. Any object that’s inside this rectangle when you release the mouse gets selected.
· Resizing multiple objects: You can change the height, width, and size of multiple selected objects by clicking the Make Same Width, Make Same Height, and Make Same Size buttons. To use these Make Same buttons, you first select the objects that you want to make the same.
· Changing column widths: You can change the width of columns in the column area of the invoice form by clicking the Column object. After you do this, and QuickBooks selects the columns area, drag the column divider line left or right to resize the column. Note that if you make column 1 narrower, QuickBooks makes column 2 wider to take up the space. Also note that you can resize the entire column area in the manner described in the preceding point.
· Positioning text within fields: If you click an invoice object and then click the Properties button, QuickBooks displays the Properties dialog box, shown in Figure 1-9 . The Properties dialog box includes a Text tab that lets you specify how text should appear within an invoice object area. The dialog box also includes a Border tab that lets you specify whether QuickBooks should draw a border along the edges of the invoice object. You also have the option to add a solid background color to any box using the Background tab,
· Changing fonts: You can change the font used for the selected object by clicking the Properties button, clicking the Text tab of the Properties dialog box, and then clicking the Font button that appears on this tab. QuickBooks displays the Example dialog box (refer to Figure 1-7 ) . The Example dialog box lets you choose a font; font style; a point size; and special effects, such as strikeout, underlining, and color.
· Adjusting margins: If you click the Margins button, QuickBooks displays the Margins dialog box (not shown), which includes Top, Bottom, Left, and Right text boxes that you use to specify the margin around the invoice. The default or initial margin settings equal half an inch.
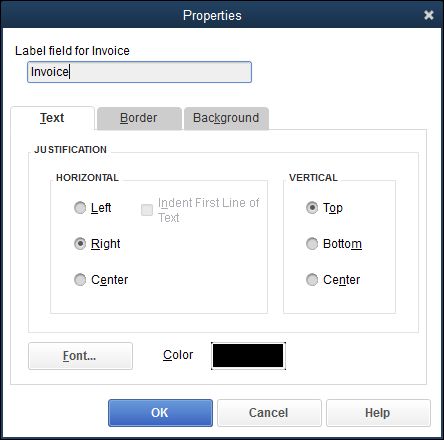
FIGURE 1-9: The Properties dialog box.
Center a selected object in an invoice form by clicking the Center button to activate the Layout Designer. You can click the Zoom In and Zoom Out buttons to see more or less detail. If you want to undo your most recent change, click Undo, or click the Redo button to undo your last undo option.
After you use the Layout Designer to make whatever changes are appropriate to your new invoice form template, click OK to save your changes.
Working with the web-based Forms Customization tool
QuickBooks provides one other form design tool that you can tap to create invoice forms (and other QuickBooks forms) that more closely match your requirements: the web-based QuickBooks Forms Customization tool.
You access this tool from the Create Invoices window by clicking the Customize Design button on the Formatting tab. When you do this, QuickBooks displays a web page that steps you through a full-fledged graphic design session for the invoice form. To use this approach, you simply follow the web page’s instructions.
Invoicing a Customer
To invoice a customer, use the Create Invoices window to identify the customer and specify the amount that the customer owes. To display the Create Invoices window, choose the Customers ⇒ Create Invoices command. When you do, QuickBooks displays a Create Invoices window like the one shown in Figure 1-10 . Note, however, that the Create Invoices window you see may not look exactly like the one shown in Figure 1-10 . As previously described, you can use more than one type of invoice form. You can also choose to customize an invoice form so that it perfectly matches your business requirements. In the following steps, I describe generally how to invoice a customer. The specific steps that you take may be ever-so-slightly different if you’re working with a different invoice form template.
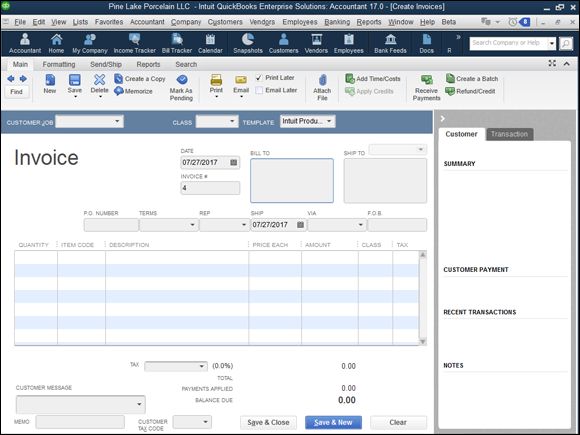
FIGURE 1-10: The Create Invoices window.
If you want to declutter your Create Invoices window, you may want to close the Open Window List along the left edge of the QuickBooks window to provide more room. You can close your Open Window List by clicking its close box (the small box marked with an X that appears in the top-right corner of the list). To redisplay the Open Window List after you’ve closed it, choose View ⇒ Open Window List. You can also collapse the History panel on the right edge of the QuickBooks window to provide more room for invoice information.
After you display the Create Invoices window, take the following steps to invoice a customer:
1. Identify the customer and, if appropriate, the job.
To do this, select the customer or customer and job combination from the Customer:Job drop-down list. Don’t worry about this “job” business if you aren’t familiar with it. I describe how jobs work in Book 4, Chapter 5 . You should understand how customers work, however. You must identify the specific customer you’re invoicing by selecting that customer from the Customer:Job list. If the customer is a new customer that you haven’t yet invoiced or described in the Customer List, enter a brief name for the customer — such as an abbreviation of the customer’s business name — in the Customer:Job list. QuickBooks then indicates that the customer doesn’t yet exist in the Customer List and asks whether you want to add the customer; indicate that you do. When prompted, supply the customer information that QuickBooks requests.
For more information about adding customers in QuickBooks, refer to Book 2, Chapter 2 .
You can also classify an invoice as fitting into a particular category by using the Class drop-down list. Don’t worry at this point about using class tracking. Book 4, Chapter 4 describes how you can use classes to get a better handle on your business’s finances.
2. Confirm or provide new invoice header information.
After you identify the customer, QuickBooks fills out the Date, Invoice, and Bill To fields, and possibly the Ship To field. You probably don’t need to change any of this information. You should review the information shown in these boxes to make sure that it’s correct. Typically, for example, you wouldn’t invoice someone unless you’ve already shipped the product or provided the service. Therefore, you probably should confirm that the invoice date follows the product shipment date or the provision-of-service date. You may also want to confirm that the Ship To address is correct.
3. Provide or confirm the invoice field information.
Invoices include field information that records items such as purchase order numbers, payment terms, ship date, and shipping method. You should make sure that whatever QuickBooks shows in these text boxes is correct. If a customer has provided you a purchase-order number, for example, enter that number in the P.O. Number box. Confirm that the payment terms shown in the Terms box are correct. Confirm that the date shown in the Ship field is correct. These boxes are all in a single line above the detailed description of the item(s) you are selling. If the billing and shipping addresses are different, make sure the Ship To box in the upper-right portion of the invoice is filled in properly. Not all these fields need to be filled for every invoice, but you want to supply any information that makes it easier for a customer to pay an invoice, tie an invoice to his or her purchasing records, and figure out how and when an item is being shipped.
4. Describe the items sold.
How the columns area of your invoice looks really depends on whether you’re selling products or services. Figure 1-11 shows the columns area for products. The columns area for a service looks simpler because you don’t provide much information when describing service items. In the columns area, you want to describe each item — each product or service — for which an invoice bills. To do this, you use a single row for each item. The first item that you want to bill for, then, goes in row 1 of the columns area. For each item, you enter the quantity ordered, the code for the item, and a price or rate. QuickBooks retrieves an item description from your Item list and places this data in the Description column. QuickBooks also calculates the amount billed for the item by multiplying the quantity by the price or rate. You can edit both the Description and Amount fields, however. If you edit the Amount field, QuickBooks recalculates the Price Each field by dividing the amount by the quantity.
To enter additional items in the invoice, enter additional rows. Each item that you want to bill for — each item that should appear as a separate charge in the invoice — appears as a row in the columns area. If you want to invoice a customer for some product, one line in the columns area of the invoice is used for that product. If you want to charge a customer for freight, one line of the invoice area describes that freight charge. If you want to bill a customer for sales tax, again, one line or row of the columns area shows that sales tax charge.
Discounts represent tricky line items to include in an invoice. For this reason, I provide an example of how a discount item appears in an invoice. Assume that you want to grant some customer a 10 percent discount. To do this, as you now know (or should be able to guess), you include a discount line item in your invoice. But although QuickBooks includes a discount item in its Item list, a discount percentage can be applied only to the previous line item in the invoice. For this reason, QuickBooks also supplies a subtotal line item. You use a subtotal line item to total all the previous items shown in the invoice. By subtotaling all the product items shown in the invoice in Figure 1-11 , for example, the business can grant the customer a 10 percent discount on these products.
You need to include the percentage symbol to tell QuickBooks to calculate a discount equal to a percentage of the subtotal. If you omit the percentage symbol, QuickBooks assumes that you want a dollar discount, not a percentage discount. In Figure 1-11 , for example, omitting the percentage symbol would turn the 10 percent discount into a $10 discount.
5. Use the Customer Message box at the bottom of the Create Invoices window to supply a customer message that appears at the bottom of the invoice.
If you’ve created a custom invoice form template that includes other footer information, these footer boxes also appear at the bottom of the Create Invoices window. You can use them to collect and transfer additional footer information.
6. (Optional) Check your spelling.
If you click the Spelling button, which appears along the top edge of the Create Invoices window’s Formatting tab, QuickBooks checks the spelling of the words that you use in the invoice. If QuickBooks finds no spelling errors, it displays a message telling you that the spelling check is complete. If QuickBooks finds a spelling error — product code abbreviations often produce spelling errors in QuickBooks — it displays the Check Spelling on Form dialog box, shown in Figure 1-12 . (In Figure 1-12 , I’ve misspelled the word Yellow, much to the horror of my editor.)
You can use the Change To box to correct your spelling error — if it actually is a spelling error. You can select one of the suggested replacements from the Suggestions list box by clicking the suggestion and then clicking the Replace button. You can replace all occurrences of the misspelling by clicking the Replace All button. If the word that QuickBooks says is misspelled is actually correctly spelled, you can click the Ignore button to tell QuickBooks to ignore this word or the Ignore All button to tell QuickBooks to ignore all occurrences of this word in the invoice form.
If you use terms that are always popping up as misspelled words, at least in QuickBooks, you can click the Add button that appears on the Check Spelling on Form dialog box. Clicking the Add button tells QuickBooks to add the word to its spelling dictionary. After you’ve added a word to the QuickBooks spelling dictionary, QuickBooks doesn’t see the word as misspelled.
Also note that you can click the Options button to display the Spelling Options dialog box. The Spelling Options dialog box includes check boxes that you can use to turn certain types of spell-checking logic on or off. You can select a check box to tell QuickBooks to always check the spelling of forms before printing, saving, or sending the form, for example. The Spelling Options dialog box also includes check boxes to tell QuickBooks that it should ignore certain sorts of words, such as those that use numbers, those that are all uppercase, and those that are mixed case.
7. Click either the Save & Close button or the Save & New button to save your invoice.
Click the Save & Close button if you want to save the invoice and close the Create Invoices window. Click the Save & New button if you want to save the invoice and then enter another invoice in the blank version of the Create Invoices window.
Click the Send/Ship tab (shown near the top-left corner of Figure 1-10 earlier in this chapter) and then click the FedEx, UPS, or USPS button to start the QuickBooks Shipping Manager window, which lets you automate some of the steps in shipping packages using Federal Express (FedEx), United Parcel Service (UPS), or the US Postal Service (USPS). The first time you start the Shipping Manager, you need to do a bit of setup work.
To page through invoices that you’ve already created, click the Previous and Next buttons. Or click the Find button and use the Find Invoices dialog box to describe the invoice that you want to locate.
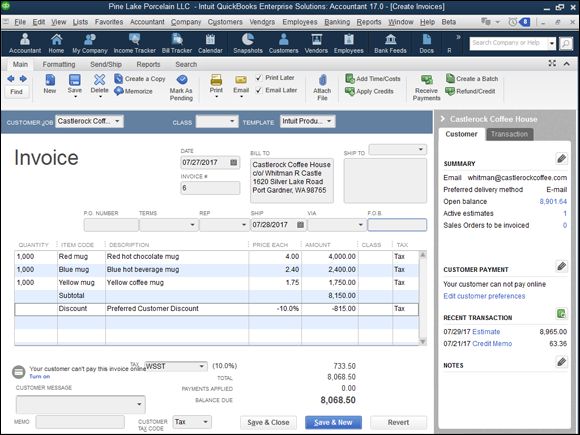
FIGURE 1-11: How a Create Invoices window may look when complete.
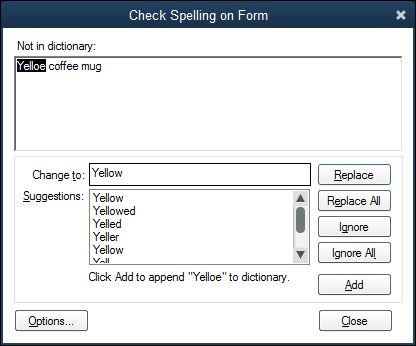
FIGURE 1-12: The Check Spelling on Form dialog box.
QuickBooks lets you add historical information about a customer to — and remove that information from — the Create Invoices window, the Create Credit Memos/Refunds window, and most other customer information windows. To add historical information about a customer to a window, click the Show History button that appears in the top-right corner of the window a bit to the right of the Template drop-down lists; it looks like an arrowhead. You can click links in the historical information panel to drill down and get more information about, for example, a listed transaction.
Billing for Time
Most of the time, line items that appear in an invoice are items that you describe in the Item list and then quantify directly in the invoice. In some service businesses, however, you may actually sell many units of the same item. A lawyer may sell hours or partial hours of legal advice and that may be all that she sells. A CPA may sell hours of consulting, accounting, or tax preparation work.
In these circumstances, you don’t want to have an invoice go out to the customer with one line in it that says, for example, “Legal services, 100 hours, $20,000” — unless you don’t want to stay in business. Instead, you want an invoice that details each of the tasks that the lawyer performed: estate planning for 1.5 hours, review of a contract for 4 hours, preparation of a new real estate lease for 2 hours, and so forth. To provide this level of detail — detail that is really beneath the item — you use the QuickBooks Time Tracking feature.
QuickBooks supplies two methods for tracking the time spent that will be billed in an invoice as an item. You can use the weekly time sheet, or you can time or record individual activities. I briefly describe how both time tracking methods work; neither is difficult. Professional service providers — accountants, attorneys, consultants, architects, and so on — who bill based on the time spent should consider using one of these features to make sure that they keep accurate records of the time spent working for a client or customer.
Using a weekly time sheet
To use the weekly time-sheet method, choose the Customers ⇒ Enter Time ⇒ Use Weekly Timesheet command. QuickBooks displays the Weekly Timesheet window, shown in Figure 1-13 . To use the Weekly Timesheet window, first use the Name box to identify the employee, vendor, or other person performing the service. You should be able to select this person’s name from the Name drop-down list. If you can’t select a person’s name from the Name drop-down list, enter the person’s name in the box; then, when prompted, tell QuickBooks to which list (employee, vendor, or other names) it should be added. After you’ve added the name of the person performing the work, use the columns of the Weekly Timesheet window to describe the customer or job for which the work has been performed, the service code, a brief description or note, the payroll item (if you’re using QuickBooks for payroll), the class (if you’re tracking classes), and then the hours spent per day. You can enter as many lines in the Weekly Timesheet window as you want. Each line appears separately in an invoice. The notes information appears in the description area of the invoice. For this reason, you want to use appropriate and descriptive notes.
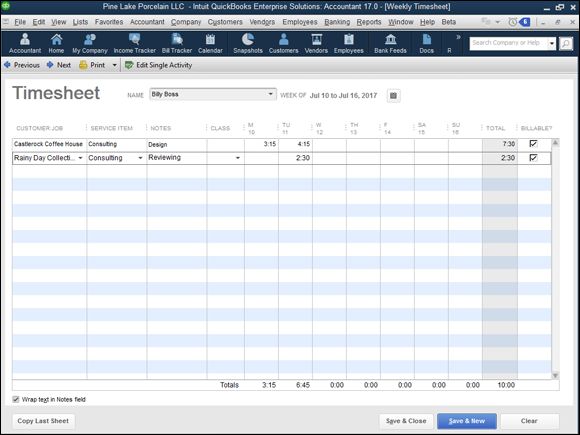
FIGURE 1-13: The Weekly Timesheet window.
Timing single activities
If you want to record service activities as they occur, choose the Customers ⇒ Enter Time ⇒ Time/Enter Single Activity command. QuickBooks displays the Time/Enter Single Activity dialog box, as shown in Figure 1-14 .
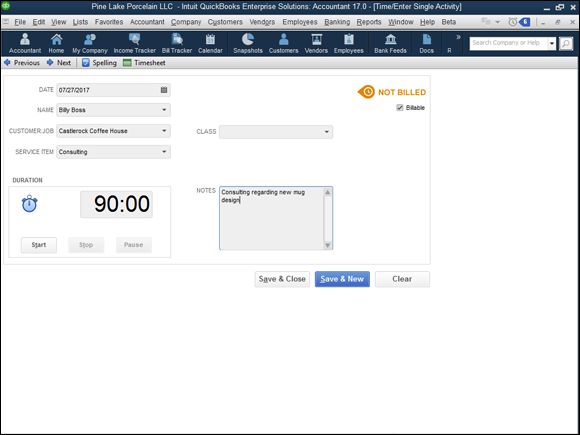
FIGURE 1-14: The Time/Enter Single Activity dialog box.
To time or record a single activity, record the activity date in the Date box. Use the Name box to identify the person performing the service. In the Customer:Job box, identify the customer or the job for which the service is being performed. Select the appropriate service item from the Service Item drop-down list and (if you’re tracking an employee) the appropriate payroll item from the Payroll Item drop-down list. If you’re tracking classes, predictably, you can also use the Class drop-down list to classify the activity. Use the Notes box to record a brief, appropriate description of the service. This description appears in the invoice, so be thoughtful about what you write.
After describing or providing this general information about the service, you have two ways to record the time spent on the service:
· Record time manually. You can manually record the time spent on an activity by using the Duration box to enter the time. If you spent 10 minutes, for example, enter 0:10 in the Duration box. If you spent 3 hours and 40 minutes, enter 3:40 in the Duration box.
· Have QuickBooks record the time. You can also have QuickBooks record the time that you spent on the activity. Just click the Start button in the Duration box when you start the activity, and click the Stop button when you stop the activity. If you want to pause the timer (while you take a phone call, for example), click the Pause button.
After you use the Time/Enter Single Activity dialog box to describe the activity that you’re performing, click the Save & New or Save & Close button to save the activity information.
Verify that the Billable check box (in the top-right corner of the Time/Enter Single Activity dialog box) is selected. By selecting the Billable box, you tell QuickBooks that it should keep this record of a billable activity for later inclusion in an invoice.
You can use the Previous and Next buttons, which appear at the top of the Time/Enter Single Activity dialog box, to page back and forth through your records of activity timing. Note, too, that a Spelling button is available. Click that button to spell-check the notes description that you enter — which is a good idea, because this information will appear in an invoice later.
Including billable time on an invoice
To add billable time and cost to an invoice, create the invoice in the usual way, as I describe previously. After you identify the customer (if you’ve entered time for the customer), and if you’ve been tracking costs for the customer, QuickBooks displays a message box asking whether you want to bill for any of the time or costs. If you indicate “yes,” QuickBooks displays the Choose Billable Time and Costs dialog box, shown in Figure 1-15 .
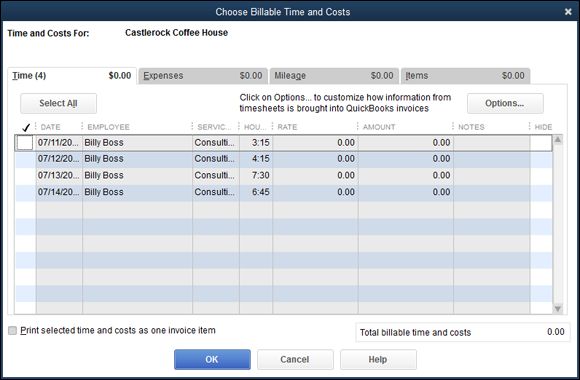
FIGURE 1-15: The Choose Billable Time and Costs dialog box.
The Time tab of this dialog box shows each of the times that you’ve recorded for a customer. To add these times to the invoice, click the Use column for the time. (The Use column is the leftmost column, displaying a check mark.) Or, if you want to select all the times, click the Select All button. Then click OK. QuickBooks adds each of these billable times to the invoice as separate lines. Figure 1-16 shows how billable time information appears in the Create Invoices window. You may also notice the PAID 7/29/2017 notation on the left side of this figure. Your invoices are stamped with the paid date when you receive funds and make deposits correctly in the program, which I cover later in this chapter.
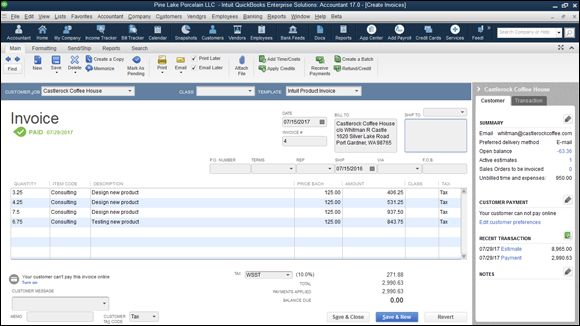
FIGURE 1-16: The Create Invoices window, billing for billable time.
If you leave the Print Selected Time and Costs As One Invoice Item check box unselected (refer to Figure 1-15 ), QuickBooks puts each time recording you log on a separate line of the invoice, as shown in Figure 1-16 . If you check the box, however, QuickBooks lets you combine individual time recordings into a single invoice line item. (You might want to experiment with this feature a bit if you’re interested.)
As Figure 1-15 suggests, you can click the Items, Expenses, or Mileage tab to see lists of the items, out-of-pocket expenses, or business miles incurred on behalf of a customer. You add charges to an invoice for these sorts of things in the same way that you add charges for time. You can even apply a markup to your out-of-pocket expenses. In Book 2, Chapter 3 , I talk about how to record reimbursed expenses (out-of-pocket expenses that you want to charge to customers). And you can record and then bill for miles you incur on behalf of customers by choosing the Company ⇒ Enter Vehicle Mileage command. (When you choose the Enter Vehicle Mileage command, use the dialog box QuickBooks displays to log the miles covered and identify the customer.) By the way, if you want to return to the Choose Billable Time and Costs dialog box, and you’re viewing the Create Invoices window, click the Add Time/Costs button, which appears at the top of the Create Invoices window.
Printing Invoices
You can print invoices and then mail the printed invoices in a couple of ways:
· You can print individual invoices by clicking the Print button at the top of the Create Invoices window.
· You can also print a batch of invoices by clicking the arrow button below the Print button, choosing Batch from the menu that QuickBooks displays, and then using the Select Invoices to Print dialog box (which QuickBooks displays) to select the To Be Printed Invoices for printing. After you select the invoices that you want to print by clicking them, click OK.
The menu that QuickBooks displays when you click the Print button includes a Preview command. You can choose the Preview command to see a preview version of the printed invoice.
Emailing Invoices
You can email an invoice from QuickBooks. To do this, click the Email button, which appears at the top of the Create Invoice screen on the Main tab. When QuickBooks displays the Send Invoice dialog box, as shown in Figure 1-17 , indicate which email account you want to use (web mail, an email application such as Microsoft Outlook, or the QuickBooks emailing system), and provide the email address and (optionally) a new email message. Then, not coincidentally, click the Send button to send the invoice.
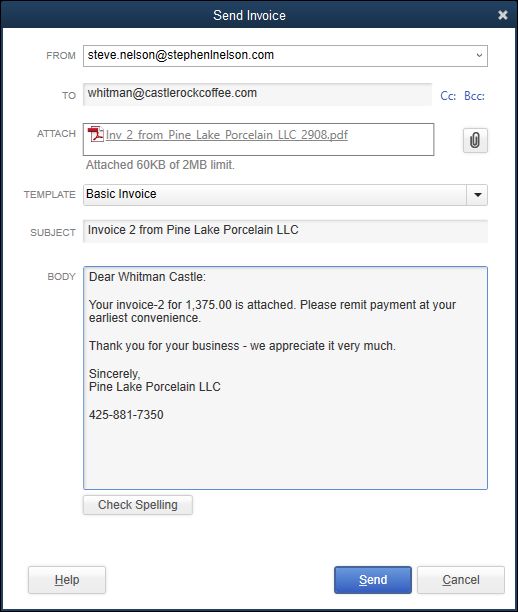
FIGURE 1-17: The Send Invoice dialog box.
The first time you click the Email button, QuickBooks may ask you to describe your email account or accounts, which you do by following the onscreen prompts. QuickBooks may also suggest that you use its mailing service, which means you email the invoice to Intuit and then Intuit snail-mails the paper invoice to your client. If you’re interested in Intuit’s invoice mailing service, follow the onscreen prompts.
 Much to the consternation of many users, recent versions of the QuickBooks program added a message and clickable link to the bottom of your printed and emailed invoices that prompted those users’ customers or clients to use a free (for them) online payment system to pay your invoice. This service, called the Intuit Payment Network, costs you a few dollars a month and a 2 to 3 percent service charge for credit card payments. For more information, see the last section of this chapter “Using Odds and Ends on the Customers Menu .”
Recording Sales Receipts
To bill a customer, you create an invoice, as I describe earlier in this chapter. To record the fact that you sold the customer some item — presumably because the customer simultaneously purchases and pays for the item or service — you don’t invoice the customer. Rather, you create a sales receipt. A sales receipt looks very, very similar to an invoice. It doesn’t include shipping information, however (because that’s irrelevant), and it lets you record the amount that the customer pays.
To record a sales receipt when appropriate, choose the Customers ⇒ Enter Sales Receipts command and then follow these steps:
1. In the Enter Sales Receipts window, shown in Figure 1-18 , use the Customer:Job box to describe the customer or, optionally, the customer and job.
2. Use the Class drop-down list to identify the class if you’re performing class tracking.
If you have questions about how the Customer:Job or Class box works, refer to “Invoicing a Customer ” earlier in this chapter.
You can customize a sales receipt in the same basic way that you customize an invoice form. Go back to “Customizing an Invoice Form ” at the beginning of this chapter.
3. Provide the sales receipt header info.
A sales receipt, like an invoice, includes some header information. Specifically, the sales receipt includes a sales receipt date and a sales number. The sales receipt also includes a Sold To box, which shows the customer name and address. You should confirm that this information is correct — as it should be if you’re recording timely sales receipts and have an up-to-date customer list.
4. Use the Item column to describe the items that you’re selling.
The Item column of a sales receipt works exactly the same way as the Item column of an invoice. Therefore, rather than repeat myself, I’ll direct you to go back to the earlier discussion of how this column works.
5. (Optional) If you want, enter a customer message in the footer area of the Enter Sales Receipts window.
This option is available directly above the Memo and Customer Tax Code fields. If you’ve added other footer information to the Enter Sales Receipts window — because you’ve customized the sales receipt form template — you can include that information, too.
6. Describe where the sales proceeds go.
In the bottom-left corner, the Enter Sales Receipts window may show a Deposit To drop-down list. Use this drop-down list to indicate what to do with the money that you receive from this sale. If you immediately deposit the amount in a bank account, select the account into which you want to deposit the check. If you want to batch this receipt with a bunch of other receipts — maybe you’re going to deposit the day’s receipts together in one lump sum — select Group with Other Undeposited Funds.
If you don’t see the Deposit To drop-down list, you may have indicated (perhaps even inadvertently) during setup that you want QuickBooks to assume that funds are deposited in an undeposited funds account. This probably works just fine. If you do want to specify an account where sales proceeds go when you record the sales receipt, choose the Edit ⇒ Preferences command, click the Payments icon, click the Company Preferences tab, and then deselect Use Undeposited Funds As a Default Deposit To Account.
Book 3, Chapter 4 talks about making deposits of undeposited funds.
7. (Optional) To print a copy of the receipt, click the Print button.
When you’ve printed the receipt, you can hand it to your customer.
The Previous, Next, Find, Spelling, Show/Hide History, and Time/Cost buttons in the Enter Sales Receipts window work identically to the same buttons in the Create Invoices window.
8. Click the Save & Close or Save & New button to save the sales receipt.
These buttons work the same way in the Enter Sales Receipts window as they do in the Create Invoices window.
Both the Create Invoices window (described earlier in the chapter) and the Enter Sales Receipts window (just described) include a Print Later check box in the toolbar on the Main tab. If you select this check box, QuickBooks adds the invoice or sales receipt to its list of unprinted invoices or sales receipts. You can print invoices and sales receipts that appear on either side of these lists by choosing the File ⇒ Print Forms command and then choosing either the Invoices or Sales Receipt command. There’s also an Email Later check box that you can select if you want to email a receipt later. (See the earlier section “Emailing Invoices .”)
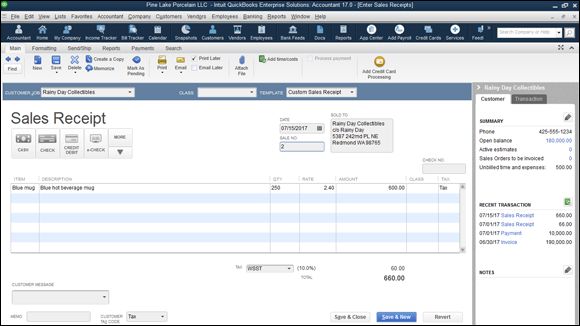
FIGURE 1-18: The Enter Sales Receipts window.
Recording Credit Memos
Credit memos show when a customer no longer owes you money or when you owe a customer money. Credit memos may occur because your customer returns items that you previously sold to him or her. Credit memos may also occur because you issue a customer a refund for some other good reason; perhaps the product wasn’t of the quality that you usually sell or a service wasn’t provided in the manner in which it should have been.
To record a credit memo, follow these steps:
1. Choose the Customers ⇒ Create Credit Memos/Refunds command to display the Create Credit Memos/Refunds window.
2. Identify the customer, or the customer and the job, in the Customer: Job box, shown in Figure 1-19 .
Use the Class box for class tracking if you’ve decided to do that. If you have questions about how either of these boxes works, refer to the earlier discussions of these two boxes. These boxes work the same way for credit memos as they do for invoices.
The Create Credit Memos/Refunds window supplies a bunch of buttons on the various tabs that work the same way here as they do in the Create Invoices window: Previous, Next, and so on. For information about how to use these buttons if you have questions, refer to the earlier section on this topic.
As is the case with invoices, you can create custom credit memo forms. To do this, you click the Formatting tab’s Customize Data Layout button. Customizing a credit memo works the same way as customizing an invoice form. Refer to the earlier section on this topic if you have questions about how to customize a credit memo.
3. Provide the credit memo date and number, and confirm customer information.
Credit memos, like invoices and sales receipts, include a header. This header includes the transaction date, number, and the customer information. You should confirm that the credit memo header information is correct in the Create Credit Memos/Refunds window. If it isn’t, edit the default information that QuickBooks uses to fill the Create Credit Memos/Refunds window.
4. In the columns area, describe the reason for the credit memo.
If the customer returned items, for example, use the columns to describe these items and the original price that you’re refunding.
5. Click the Print button to print the credit memo.
Note, too, that you can print credit memos in a batch. Obviously, after you print credit memos, you need to distribute them.
You can email a copy of the credit memo directly from QuickBooks, too. The steps for emailing a credit memo mirror those for emailing an invoice, which is described earlier in “Emailing Invoices .”
6. Click either Save & Close or Save & New to save the credit memo.
At the time you save your credit memo, QuickBooks allows you to indicate what you want to do with it: retain it for later application to a customer invoice, immediately apply it to a customer invoice, or issue a refund check. You apply credit memos to invoices as described in the next section of this chapter. You write a refund check the same way that you write other checks. Book 3, Chapter 4 describes writing checks.
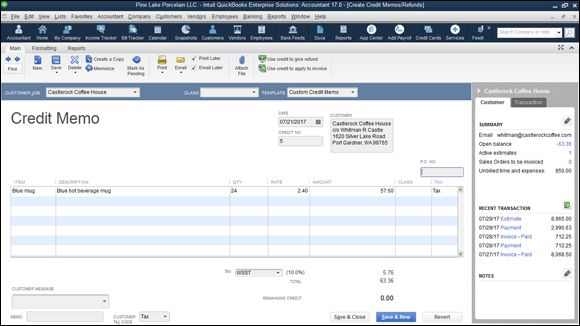
FIGURE 1-19: The Create Credit Memos/Refunds window.
Receiving Customer Payments
When a customer pays an invoice that you’ve sent, you choose a command from the Customers menu to record the payment. To record a customer payment, follow these steps:
1. Choose the Customers ⇒ Receive Payments command.
QuickBooks displays the Customer Payment window, shown in Figure 1-20 .
2. Use the Received From box to identify the customer who’s paying you.
3. Record the payment information in the Date, Amount, and Reference # on the left side under where it says Customer Payment. You can also choose a payment method by clicking cash, check, or credit card to the right of these fields.
4. Identify the invoice or invoices paid.
QuickBooks lists the open invoices for the customer in the columns area of the Receive Payments window. You can identify which invoices a customer payment pays by clicking the invoices that you see listed.
5. To apply any credit memos to open invoices as you apply the payment, follow these steps:
1. Click the Discounts and Credits button.
QuickBooks displays the Discount and Credits dialog box, shown in Figure 1-21 .
2. To apply a credit to the selected invoices, click the Credits tab and then select the credit that you want to apply.
3. Apply any discounts to the open invoices, and click Done.
Discounts work like credits. In fact, you use the same dialog box (refer to Figure 1-21 ). When you click Done, QuickBooks closes the Discount and Credits dialog box.
6. Use the Deposit To box to select the account to which you want to deposit the check, or select the Undeposited Funds option if you want to batch the payments for later deposit.
The Deposit To drop-down list appears in the Receive Payments window when, during the QuickBooks Setup interview, you indicate that you may want to bunch the payments that you later deposit.
If you have a question about how these buttons work, refer to the discussion of these buttons in “Recording Sales Receipts ” earlier in this chapter.
Click the Get Online Pmts button to receive online payment information for a customer. (The Get Online Pmts button appears only if you’re using online billing or online banking.) Book 3, Chapter 4 provides more information about how online banking works.
7. Click the Save & Close or Save & New button to save the customer payment information.

FIGURE 1-20: The Customer Payment window.
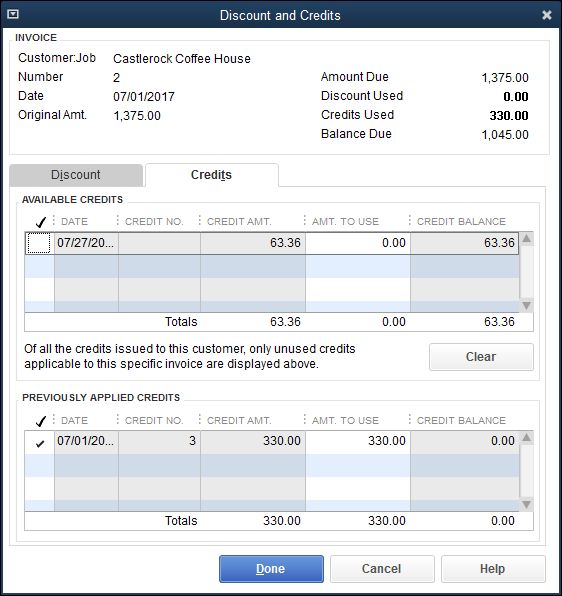
FIGURE 1-21: The Discount and Credits dialog box.
Assessing Finance Charges
You can tell QuickBooks to assess finance charges on overdue customer invoices. To do this, you first set up the finance charge calculation rules. After you’ve done this, you can easily assess finance charges on overdue amounts by choosing the QuickBooks command.
Setting up finance charge rules
To set up the finance charge rules, choose the Edit ⇒ Preferences command. When QuickBooks displays the Preferences dialog box, click the Finance Charge icon and then click the Company Preferences tab. The Preferences dialog box at this point should look like the one shown in Figure 1-22 .
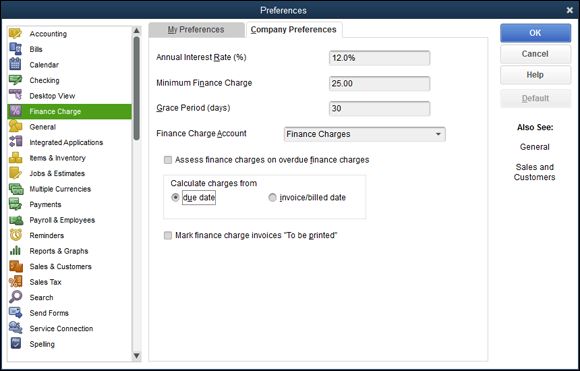
FIGURE 1-22: The Company Preferences tab of the Finance Charge section of the Preferences dialog box.
To tell QuickBooks how it should calculate the finance charges, enter the annual interest rate that you’ll use for calculating charges in the Annual Interest Rate (%) box. Enter the minimum finance charge amount that you assess in the Minimum Finance Charge box. If you want to create a grace period, enter the number of grace-period days in the Grace Period (Days) box. Use the Finance Charge Account drop-down list to specify the QuickBooks income account to which finance charge revenue should be credited. Select the Assess Finance Charges on Overdue Finance Charges check box if you want to charge finance charges on finance charges. Finally, use the Calculate Charges From radio buttons — Due Date and Invoice/Billed Date — to specify the date from which finance charges should be calculated. After you’ve provided this information, you can click OK to save your finance charge calculation rules.
QuickBooks assumes that you don’t want to print finance charge invoices. For this reason, the Mark Finance Charge Invoices “To Be Printed” check box isn’t selected. Finance charges typically appear only in customer statements.
Calculating finance charges
After you set up the finance charge rules, you can easily assess finance charges on overdue invoices. To do this, choose Customers ⇒ Assess Finance Charges. QuickBooks displays the Assess Finance Charges dialog box, as shown in Figure 1-23 . This dialog box lists all the overdue invoices that customers owe you and, based on your finance charge calculation rules, calculates a finance charge.
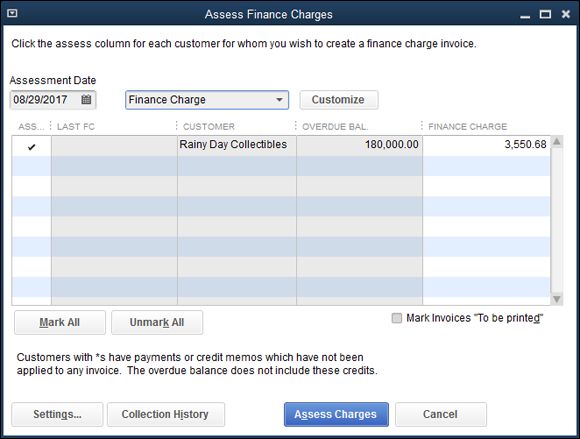
FIGURE 1-23: The Assess Finance Charges dialog box.
To assess the finance charge to a particular customer, click the Assess field for the customer. (By default, QuickBooks assumes that you want to assess finance charges whenever a customer’s account is past due.) If you don’t want to assess finance charges to a particular customer, remove the check mark from the Assess field by clicking it. After you’ve identified which customers should be assessed finance charges, click the Assess Charges button. QuickBooks essentially creates a new invoice for each of these customers. These new invoices charge the customers a finance fee.
Using Odds and Ends on the Customers Menu
In this chapter, I discuss most of the important commands on the Customers menu. This menu, however, supplies several other commands that are noteworthy — perhaps even useful — and deserve discussion somewhere in this book. For this reason, I want to briefly describe the other commands that may be available on your Customers menu:
· Customer Center: Displays the Customer Center window, which includes information about your customer list, including the amounts that your customers owe.
· Create Estimates: Displays a window you can use to create an estimate for a customer to show, for example, what a product or service will cost if you sell it to that customer.
· Create Sales Orders: Displays a window you can use to create a sales order. Essentially, a sales order is an invoice for something you haven’t yet really sold or for services you haven’t yet provided. You prepare a sales order to record an order from a customer or client and document the order details.
· Sales Order Fulfillment Worksheet: Displays the Sales Order Fulfillment worksheet window, which lists all your unfulfilled sales orders. You can print batches of sales orders by using this worksheet, too. ( Note: If you’ve created sales orders for a particular customer or client, QuickBooks asks whether you want to turn a sales order into an invoice whenever you start working on an invoice for that customer.)
· Create Batch Invoices: Displays the Batch Invoice dialog box, which lets you identify a group of customers you want to bill for some specified item. After you’ve grouped, or batched, the customers in this manner, you can tell QuickBooks to create a bunch (a batch) of invoices. If you charge customers a monthly retainer fee, for example, you could batch the customers on retainer and then create an invoice for each of them that billed for the “monthly retainer fee” item.
· Enter Statement Charges: Displays the Accounts Receivable Register. You shouldn’t need to use this command. You can use this command, however, to add amounts to the accounts receivable for a particular customer. The amounts appear in the customer’s next statement.
· Create Statements: Displays a window that you can use to create a set of monthly statements for customers. Such statements show the amounts that a customer owes, invoices created for the month, credit memos issued for the month, and payments made during the month.
· Income Tracker: Displays the Income Tracker window, which graphically organizes your estimates, orders, and invoices to show the flow of sales revenue you’ll (ideally) receive and also graphically organizes your vendor bills and payments data to show you the flow of expenses you have or will experience.
· Lead Center: Displays the Lead Center window, which lets you store and monitor customer leads. The window lets you name names, collect notes, and keep a to-do list of lead-generation activities.
· Add Credit Card Processing: Displays a web page that explains and tries to talk you into buying Intuit’s credit card processing service.
· Add Electronic Check: Displays a web page that explains and tries to talk you into buying Intuit’s electronic check service. With an electronic check, or e-check, you take payment information from a customer over the phone and then use that information to electronically withdraw money from the customer’s bank account.
· Link Payment Services to Company File: Makes the connection between your QuickBooks data file and the Intuit servers — something that’s necessary if you sign up for credit card or electronic check processing.
· Intuit Payment Network: Makes the connection between your QuickBooks data file and the Intuit servers so you can download any payments people have made using the Intuit Payment Network service.
· Add Marketing and Customer Tools: Available in the Enterprise Solutions version of QuickBooks, this command displays a list of web pages you can jump to in order to get information about a work order management feature and an electronic data interchange feature that work with QuickBooks.
· Learn about Point of Sale: Displays a web page that explains and tries to talk you into buying Intuit’s point-of-sale software.
· Item List: Displays the Item list, which shows the items that may be included in the invoice or credit memo.
· Change Item Prices: Lets you change the prices of a bunch of items at one time — increasing every price by 5 percent, for example.
· Advanced Pricing Rules: Displays a web page with information about an add-on price customization feature you can use with the Enterprise Solutions version of QuickBooks.