Activiti 5.x Business Process Management Beginner's Guide (2014)
Chapter 9. Implementing Advanced Workflows
In the previous chapter, we went through the integration of Activiti with various third-party services such as portals, CMS, and OSGi. We were able to use the third-party service for the implementation of our business workflows. Now we can make use of some advanced notations for implementing advanced business workflows.
This chapter covers the following topics:
· Understanding parallel gateways
· Getting started with Sub-Processes
· Understanding multi-instance processes
· Working with execution and task listeners
· Monitoring workflows using BAM and CEP
· Monitoring using Esper
We can design and implement some advanced and complex workflows in Activiti with the help of Sub-Processes, parallel gateways, and multi-instance processes.
Understanding parallel gateways
We can make use of parallel gateways to implement concurrency in a business process. The difference between a parallel gateway and other gateways is that we do not require any condition to be satisfied for the execution of the flow. In a parallel gateway, all the outgoing flows are executed. A parallel gateway can be used for both the forking and joining of the business flow.
Time for action – implementing a parallel gateway
We will implement a process with a parallel gateway by performing the following steps:
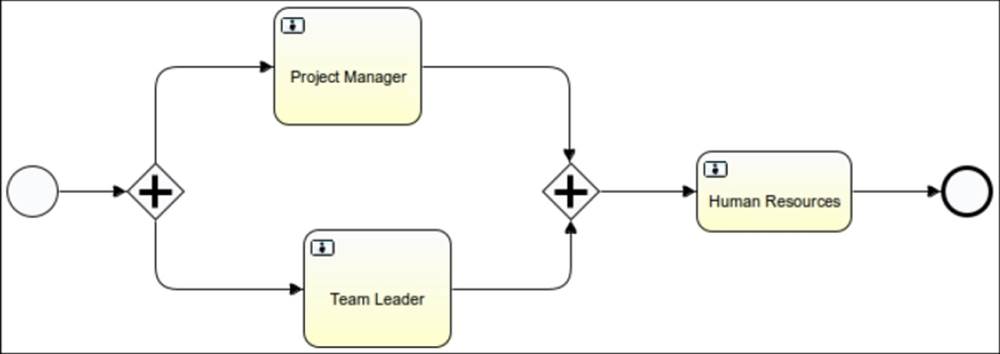
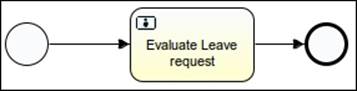
1. We will use an example of a leave process. When an employee applies for leave, the request is sent to the project manager and team leader in parallel and then sent to Human Resources:
2. You can populate the form properties for accepting values from the employee on the start event, as shown in the following code:
3. <startEvent id="sid-2BB933AE-E0AE-48D2-9ACC-B5EC35AD3687">
4. <extensionElements>
5. <activiti:formProperty id="empName" name="Employee Name" type="string" required="true"></activiti:formProperty>
6. <activiti:formProperty id="empDesignation" name="Employee Designation" type="string" required="true"></activiti:formProperty>
7. <activiti:formProperty id="empLeaveReason" name="Leave Reason" type="string" required="true"></activiti:formProperty>
8. <activiti:formProperty id="empLeaveDays" name="No of Days Leave " type="long" required="true"></activiti:formProperty>
9. </extensionElements>
</startEvent>
10. Create a user task for the team leader and project manager, who will be able to view the details filled by the employee. Then, based on the details, they can either accept or reject the leave, as shown in the following code:
11.<userTask id="sid-03BC7128-4496-4027-88A9-E67D3DA63734" name="Project Manager" activiti:assignee="gonzo">
12. <extensionElements>
13. <activiti:formProperty id="eName" name="Employee Name" type="string" expression="${empName}" writable="false"></activiti:formProperty>
14. <activiti:formProperty id="eDesig" name="Employee Designation" type="string" expression="${empDesignation}" writable="false"></activiti:formProperty>
15. <activiti:formProperty id="eLeaveReason" name="Leave Reason" type="string" expression="${empLeaveReason}" writable="false"></activiti:formProperty>
16. <activiti:formProperty id="eLeaveDays" name="Leave Days" type="long" expression="${empLeaveDays}" writable="false"></activiti:formProperty>
17. <activiti:formProperty id="pmDecision" name="Do You Approve ?" type="enum" required="true">
18. <activiti:value id="true" name="Yes"></activiti:value>
19. <activiti:value id="false" name="No"></activiti:value>
20. </activiti:formProperty>
21. <activiti:formProperty id="pmComment" name="Your Comment" type="string" required="true"></activiti:formProperty>
22. </extensionElements>
23. </userTask>
24. <userTask id="sid-7581049C-894E-4FF9-B861-7DF44B7229E3" name="Team Leader" activiti:assignee="fozzie">
25. <extensionElements>
26. <activiti:formProperty id="eName" name="Employee Name" type="string" expression="${empName}" writable="false"></activiti:formProperty>
27. <activiti:formProperty id="eDesig" name="Employee Designation" type="string" expression="${empDesignation}" writable="false"></activiti:formProperty>
28. <activiti:formProperty id="eLeaveReason" name="Leave Reason" type="string" expression="${empLeaveReason}" writable="false"></activiti:formProperty>
29. <activiti:formProperty id="eLeaveDays" name="Leave Days" type="long" expression="${empLeaveDays}" writable="false"></activiti:formProperty>
30. <activiti:formProperty id="tlDecision" name="Do You Approve ?" type="enum" required="true">
31. <activiti:value id="true" name="Yes"></activiti:value>
32. <activiti:value id="false" name="No"></activiti:value>
33. </activiti:formProperty>
34. <activiti:formProperty id="tlComment" name="Your Comment" type="string" required="true"></activiti:formProperty>
35. </extensionElements>
</userTask>
36. Now, create a parallel gateway to connect to the Team Leader and Project Manager tasks that are to be executed in parallel, as shown in the following code:
37. <sequenceFlow id="flow1" sourceRef="sid-2BB933AE-E0AE-48D2-9ACC-B5EC35AD3687" targetRef="parallelgateway1"></sequenceFlow>
38. <parallelGateway id="parallelgateway1" name="Parallel Gateway"></parallelGateway>
39. <sequenceFlow id="flow2" sourceRef="parallelgateway1" targetRef="sid-03BC7128-4496-4027-88A9-E67D3DA63734"></sequenceFlow>
<sequenceFlow id="flow3" sourceRef="parallelgateway1" targetRef="sid-7581049C-894E-4FF9-B861-7DF44B7229E3"></sequenceFlow>
40. Create a Human Resource user task where all the details from the employee, project manager, and team leader will be viewed, and based on the results of the Project Manager and Team Leader tasks, HR will either approve or reject the leave, as shown in the following code:
41.<userTask id="usertask1" name="Human Resource">
42. <extensionElements>
43. <activiti:formProperty id="eName" name="Employee Name" type="string" expression="${empName}" writable="false"></activiti:formProperty>
44. <activiti:formProperty id="eDesig" name="Employee Designation" type="string" expression="${empDesignation}" writable="false"></activiti:formProperty>
45. <activiti:formProperty id="eLeaveReason" name="Leave Reason" type="string" expression="${empLeaveReason}" writable="false"></activiti:formProperty>
46. <activiti:formProperty id="eLeaveDays" name="Leave Days" type="long" expression="${empLeaveDays}" writable="false"></activiti:formProperty>
47. <activiti:formProperty id="hrDecision" name="Do You Approve ?" type="enum" required="true">
48. <activiti:value id="true" name="Yes"></activiti:value>
49. <activiti:value id="false" name="No"></activiti:value>
50. </activiti:formProperty>
51. <activiti:formProperty id="hrComment" name="Your Comment" type="string" required="true"></activiti:formProperty>
52. <activiti:formProperty id="tlComments" name="TL Comments" type="string" expression="${tlComment}" writable="false"></activiti:formProperty>
53. <activiti:formProperty id="pmComments" name="Project Manager Comments" type="string" expression="${pmComment}" writable="false"></activiti:formProperty>
54. </extensionElements>
</userTask>
55. We need to join the parallel gateways so that we can get the appropriate results, as shown in the following code:
56.<sequenceFlow id="flow5" sourceRef="usertask1" targetRef="sid-65043A85-6BAD-4616-AD1E-FF3FA8D64D4B"></sequenceFlow>
57. <sequenceFlow id="flow6" sourceRef="sid-03BC7128-4496-4027-88A9-E67D3DA63734" targetRef="parallelgateway2"></sequenceFlow>
58. <sequenceFlow id="flow7" sourceRef="sid-7581049C-894E-4FF9-B861-7DF44B7229E3" targetRef="parallelgateway2"></sequenceFlow>
59. <sequenceFlow id="flow8" sourceRef="parallelgateway2" targetRef="usertask1"></sequenceFlow>
<parallelGateway id="parallelgateway2" name="Exclusive Gateway"></parallelGateway>
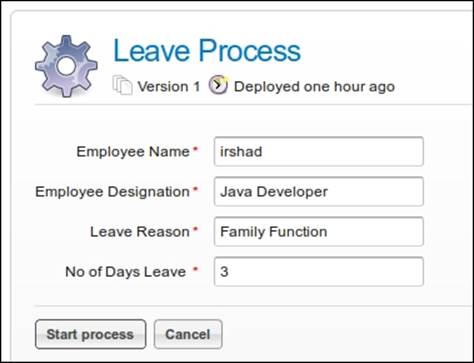
60. Now, to execute the process, deploy it into the Activiti Explorer, start it, and fill in the details for the leave, as shown in the following screenshot:
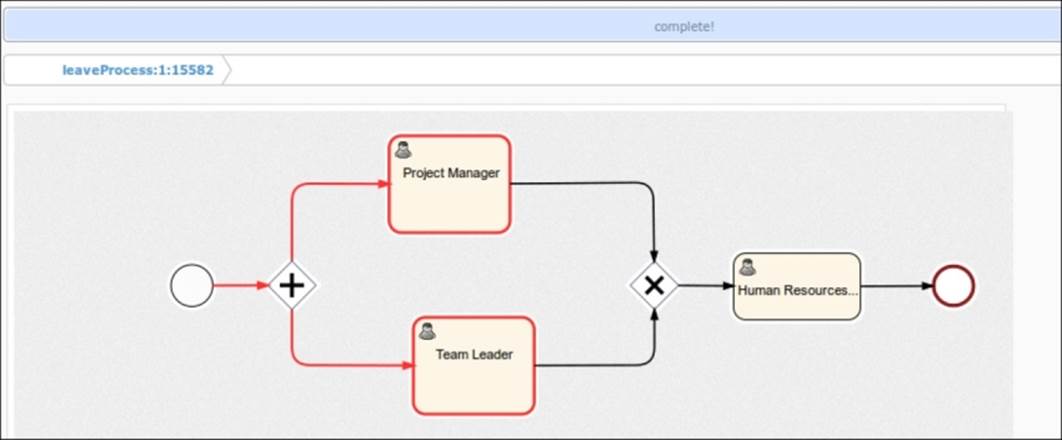
61. To view the state of your process, navigate to the My Instances tab. As seen in the following screenshot, the Project Manager and Team Leader process are in execution:
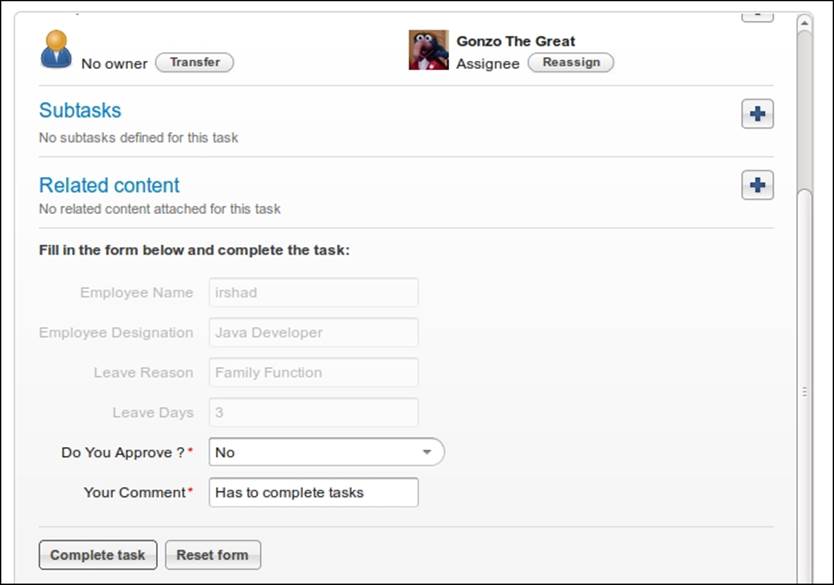
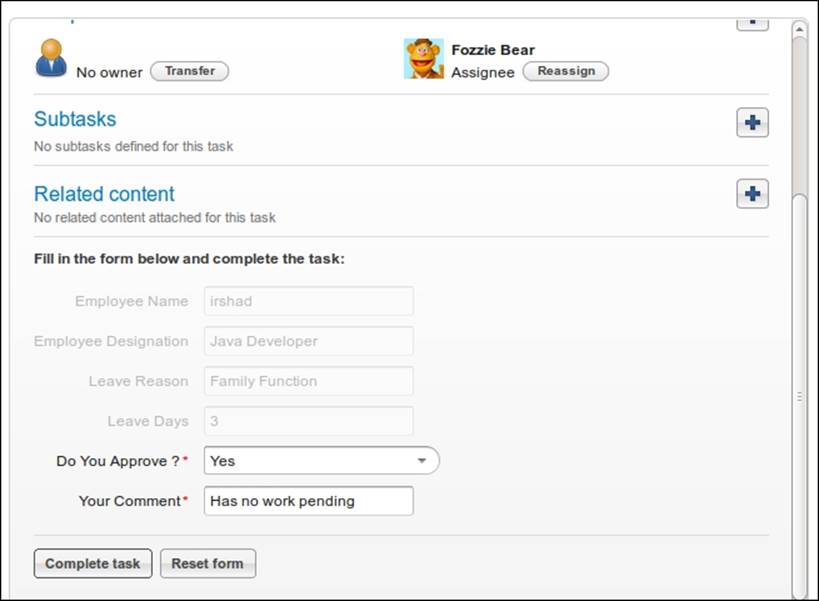
62. Log in with gonzo as the user, as we have assigned the Project Manager task to him. The values added by the employee will be visible to him; now, the PM can accept or reject the leave and provide comments as shown in the following screenshot:
63. Now log in with fozzie, as the Team Leader task is assigned to him. Here, too, the details added by the employee will be available, as you can view in the following screenshot:
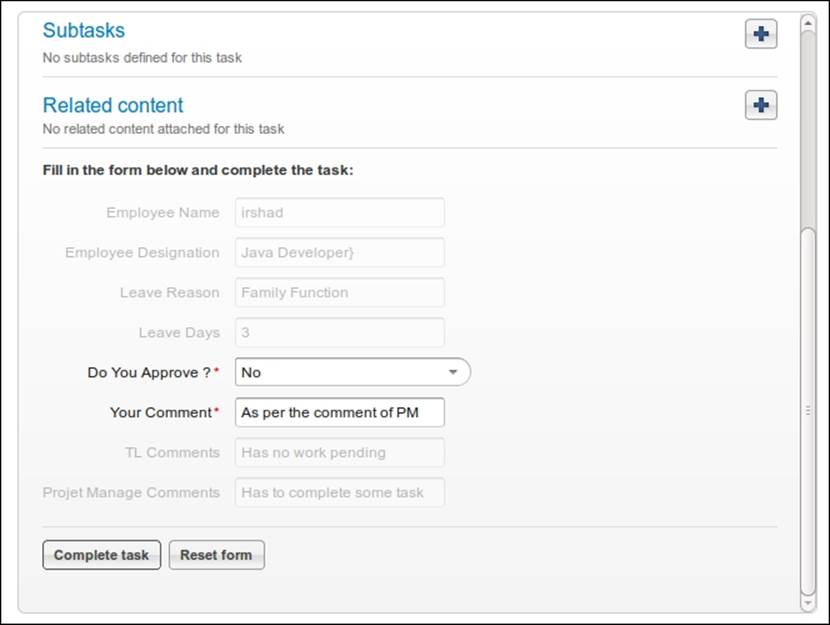
64. Now log in with kermit, as he is assigned the Human Resource task. In this task, the details provided by the employee as well as the comments provided by the PM and TL will be available, as shown in the following screenshot:
What just happened?
We went through a process that had a certain task to be completed in parallel, and we used a parallel gateway to achieve this functionality. Now you must be aware of when to use a parallel gateway.
Getting started with Sub-Processes
A Sub-Process is a process that is considered a part of a larger process. A Sub-Process comprises various activities, gateways, and events. As a Sub-Process is one business process, it consists of only one non-start event. Every Sub-Process must have at least one end event. There are three types of Sub-Processes, as follows:
· Embedded Sub-Processes
· Standalone Sub-Processes
· Event Sub-Processes
Embedded Sub-Processes
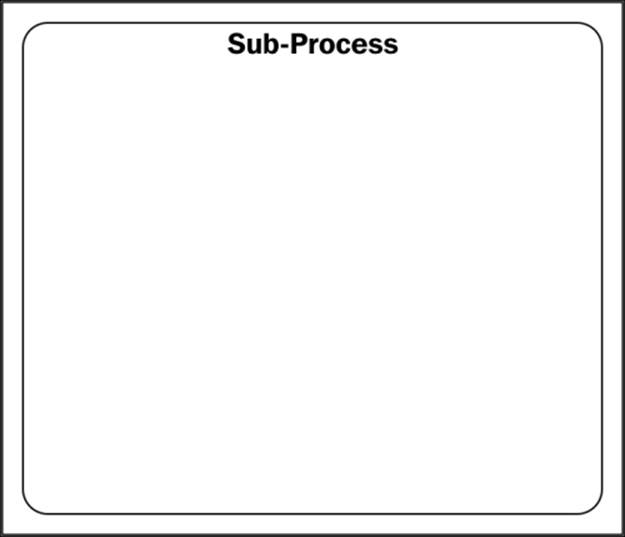
An embedded Sub-Process is defined within the parent process. An embedded Sub-Process is useful to divide the process into small processes and use them. The scope of an embedded Sub-Process is limited to the parent process only. The embedded Sub-Process cannot be accessed outside the parent process. Activiti provides a graphical representation of the Sub Process node (as shown in the following diagram) to help create an embedded Sub-Process:
Standalone Sub-Process
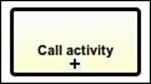
We already know how an embedded Sub-Process is defined and used within the parent process. The standalone Sub-process is the exact opposite of the embedded Sub-Process. A standalone Sub-Process refers to a process that is already available within the Activiti Engine and that you want to reuse within your process. Activiti provides a graphical representation called Call activity to implement a standalone Sub-Process, as shown in the following diagram:
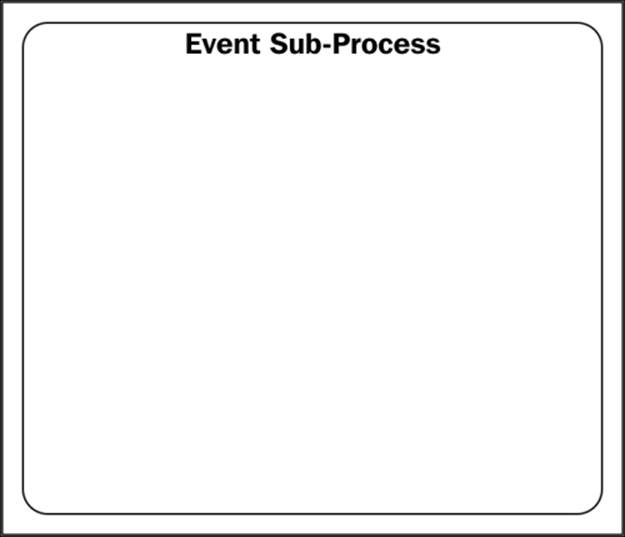
Event Sub-Process
The two Sub-Processes discussed so far require a start event to trigger the Sub-Process, but the event Sub-Process is a process that can be triggered by the following events: message events, error events, timer events, compensation events, and signal events. An event Sub-Process doesn't have any incoming or outgoing connections. The graphical representation provided by Activiti for an event Sub-Process is Event Sub-Process as shown in the following diagram:
Time for action – working with BPMN 2.0 Sub-Processes
Now that we are aware of the various Sub-Processes available in Activiti, we will create some examples for understanding the working of a Sub-Process. We will split this example into two parts:
· Understanding an embedded Sub-Process
· Understanding a standalone Sub-Process
Understanding an embedded Sub-Process
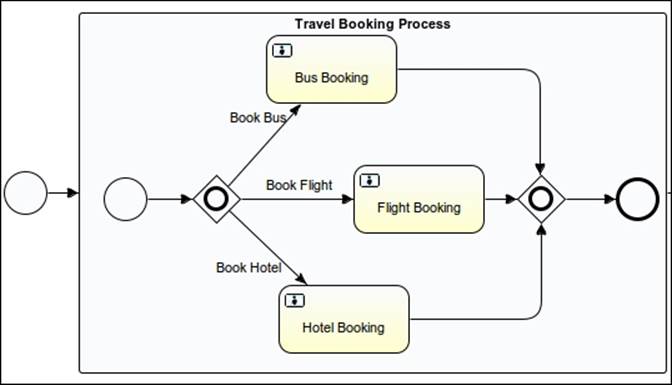
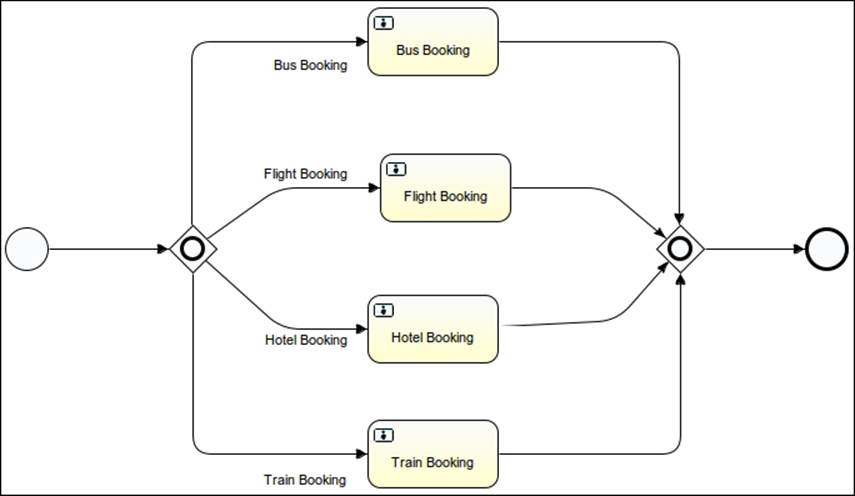
An embedded Sub-Process represents a process designed within the main process itself. To understand it, we will create a business process as shown in the following screenshot:
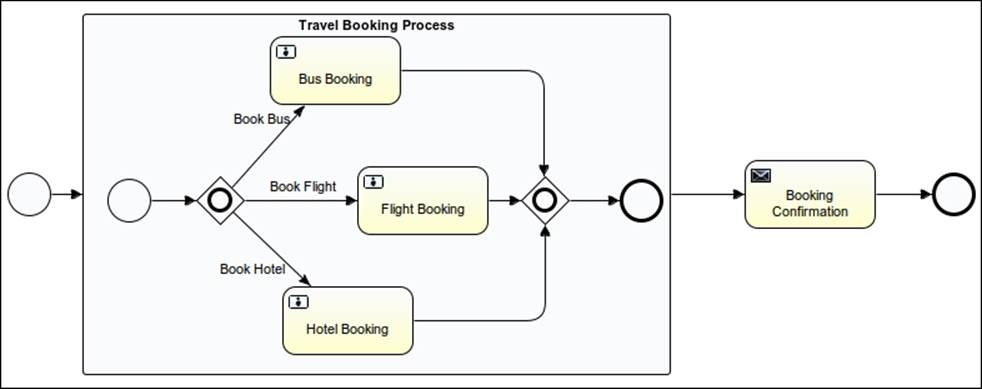
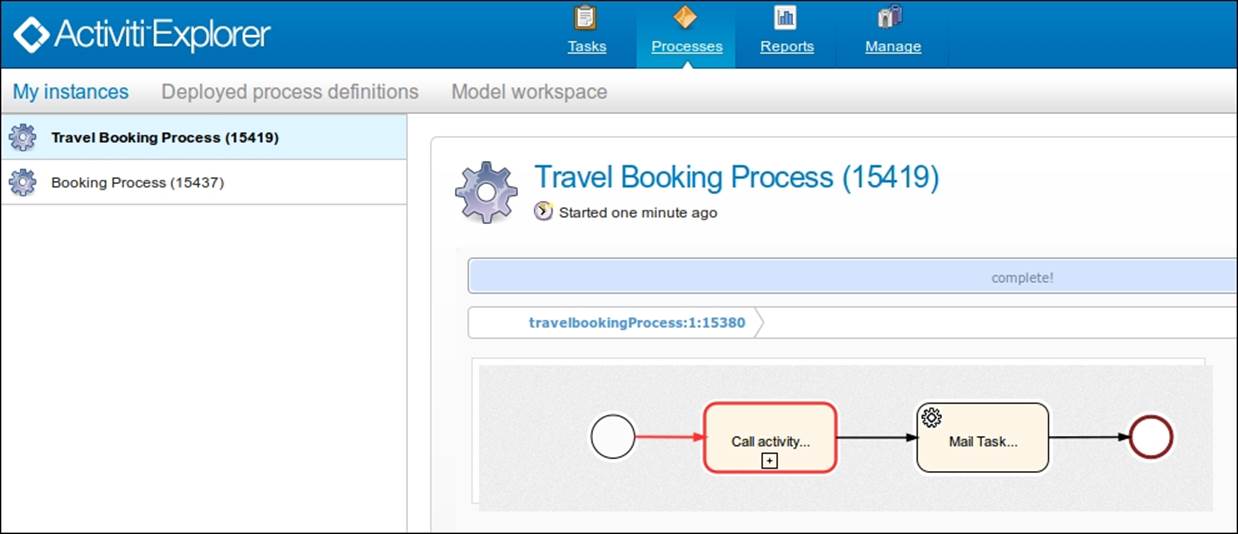
The process illustrated in the preceding screenshot describes a travel booking process where we have created an embedded Sub-Process for booking a flight, bus, and hotel. We will perform the following steps to design the process:
1. We will start with process creation. You can create a new Activiti project in Eclipse and an Activiti diagram within it.
2. We will create a form on the start event. This form will be filled by the potential customer who wishes to make the booking. To create a form, we will have to add the following code in the .xml file for the start event:
3. <startEvent id="startevent1" name="Start">
4. <extensionElements>
5. <activiti:formProperty id="customerName" name="Name" type="string" required="true"></activiti:formProperty>
6. <activiti:formProperty id="customerMailId" name="Email Id" type="string" required="true"></activiti:formProperty>
7. <activiti:formProperty id="hotelBooking" name="Hotel Booking" type="enum">
8. <activiti:value id="true" name="Yes"></activiti:value>
9. <activiti:value id="false" name="No"></activiti:value>
10. </activiti:formProperty>
11. <activiti:formProperty id="busBooking" name="Bus Booking" type="enum">
12. <activiti:value id="true" name="Yes"></activiti:value>
13. <activiti:value id="false" name="No"></activiti:value>
14. </activiti:formProperty>
15. <activiti:formProperty id="flightBooking" name="Flight Booking" type="enum">
16. <activiti:value id="true" name="Yes"></activiti:value>
17. <activiti:value id="false" name="No"></activiti:value>
18. </activiti:formProperty>
19. <activiti:formProperty id="travelPlace" name="Travel Destination" type="string" required="true"></activiti:formProperty>
20. </extensionElements>
</startEvent>
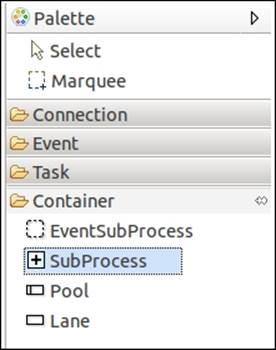
21. We can add a Sub-Process from the Palette tab available in Eclipse, as shown in the following screenshot:
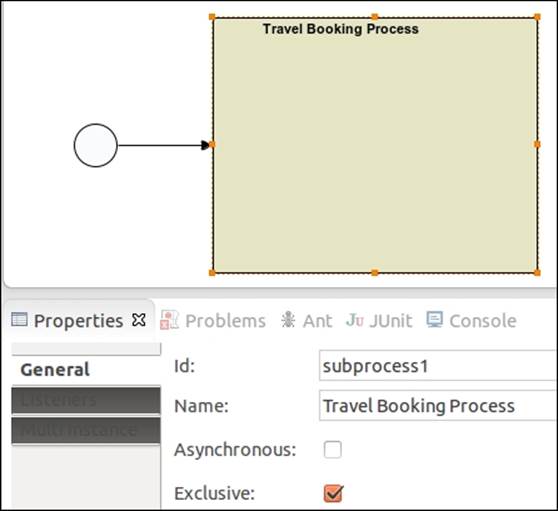
22. We need to provide a name to the added Sub-Process as shown in the following screenshot:
23. As it is required to have at least one start event and one end event in a Sub-Process, we will create a traveling process in it with an inclusive gateway and three user tasks, Bus Booking, Flight Booking, and Hotel Booking, as shown in the following screenshot:
24. Now, as these tasks are to be performed by some users and the forms are to be displayed on the execution of these tasks, we will populate the properties of the Bus Booking, Flight Booking, and Hotel Booking user tasks as per the following code:
25.<userTask id="usertask1" name="Bus Booking" activiti:assignee="${customerName}">
26. <extensionElements>
27. <activiti:formProperty id="busBookingcustomerName" name="Customer Name" type="string" expression="${customerName}" writable="false"></activiti:formProperty>
28. <activiti:formProperty id="busBookingDestination" name="Travel Destination" type="string" expression="${travelPlace}" writable="false"></activiti:formProperty>
29. <activiti:formProperty id="busType" name="Bus Type" type="enum" required="true">
30. <activiti:value id="ac" name="A/c"></activiti:value>
31. <activiti:value id="non_ac" name="Non A/C"></activiti:value>
32. </activiti:formProperty>
33. </extensionElements>
34. </userTask>
35.
36.<userTask id="usertask2" name="Flight Booking" activiti:assignee="${customerName}">
37. <extensionElements>
38. <activiti:formProperty id="flightBookingCustomerName" name="Customer Name" type="string" expression="${customerName}" writable="false"></activiti:formProperty>
39. <activiti:formProperty id="filghtDestination" name="Travel Destination" type="string" expression="${travelPlace}" writable="false"></activiti:formProperty>
40. </extensionElements>
41. </userTask>
42. <userTask id="usertask3" name="Hotel Booking" activiti:assignee="${customerName}">
43. <extensionElements>
44. <activiti:formProperty id="hotelBookingCustomerName" name="Customer Name" type="string" expression="${customerName}" writable="false"></activiti:formProperty>
45. <activiti:formProperty id="hotelType" name="Type Of Hotel" type="enum">
46. <activiti:value id="5_star" name="5 Star"></activiti:value>
47. <activiti:value id="4_star" name="4 Star"></activiti:value>
48. <activiti:value id="3_star" name="3 Star"></activiti:value>
49. </activiti:formProperty>
50. <activiti:formProperty id="hotelRoom" name="Room Type" type="enum">
51. <activiti:value id="ac" name="A/c"></activiti:value>
52. <activiti:value id="non_ac" name="Non A/C"></activiti:value>
53. </activiti:formProperty>
54. </extensionElements>
</userTask>
55. Once we are done with populating the properties for Travel Booking Process, we want an e-mail to be sent to the customer regarding their request for a booking. Once this is done, we need to populate the properties using the following code:
56. <serviceTask id="mailtask1" name="Booking Confirmation" activiti:type="mail">
57. <extensionElements>
58. <activiti:field name="to">
59. <activiti:expression>${customerMailId}</activiti:expression>
60. </activiti:field>
61. <activiti:field name="subject">
62. <activiti:string>Information Regarding your Travel Booking Process</activiti:string>
63. </activiti:field>
64. <activiti:field name="from">
65. <activiti:string>contact@attuneuniversity.com</activiti:string>
66. </activiti:field>
67. <activiti:field name="text">
68. <activiti:expression>Hello ${customerName}
69.
70.As per your request for traveling to ${travelPlace} following are the list of hotels, bus and flight details</activiti:expression>
71. </activiti:field>
72. </extensionElements>
</serviceTask>
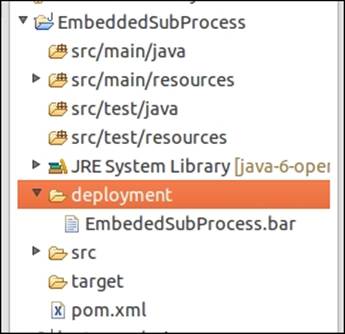
73. Now, to execute our process, create the deployment artifact of your process. To create a deployment artifact, right-click on your project and select the Create deployment artifacts option from the list. It will create a .bar file for your project in the deploymentfolder, as shown in the following screenshot:
74. To deploy the process into the Explorer for execution, we have to upload the file into the Activiti Explorer. To upload the file, click on the Upload new button under Deployments as shown in the following screenshot:

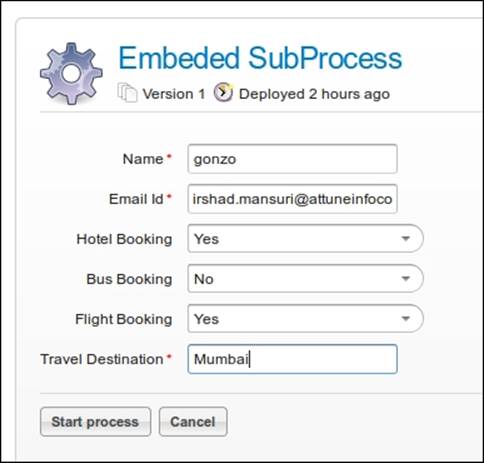
75. Once the process is deployed successfully, we can start its execution. A form will pop up at the start of the process (as shown in the following screenshot), which is to be filled.
76. After submitting the preceding form, the Sub-Process will be executed. You can have a look at the My Instance tab of the Explorer to monitor your business process. As shown in the following screenshot, the Flight Booking and Hotel Booking tasks are in execution:
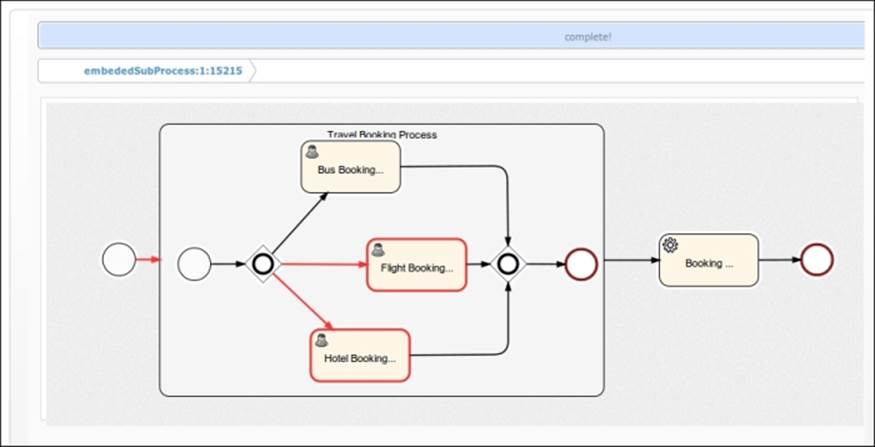
77. As we have populated the Name field with gonzo, the Flight Booking and Hotel Booking tasks will be assigned to gonzo.
78. Log in with gonzo as the user and execute the preceding two tasks. On the completion of the task, an e-mail will be sent to the user regarding the availability of the booking services.
Understanding a standalone Sub-Process
A standalone Sub-Process is also called a call activity. This task is used when we want to call a process that is already modeled and running within the process engine. We will create two separate processes to understand standalone Sub-Processes. We will perform the following steps to implement a standalone Sub-Process:
1. Create a new Activiti project in Eclipse and name it Booking Process.
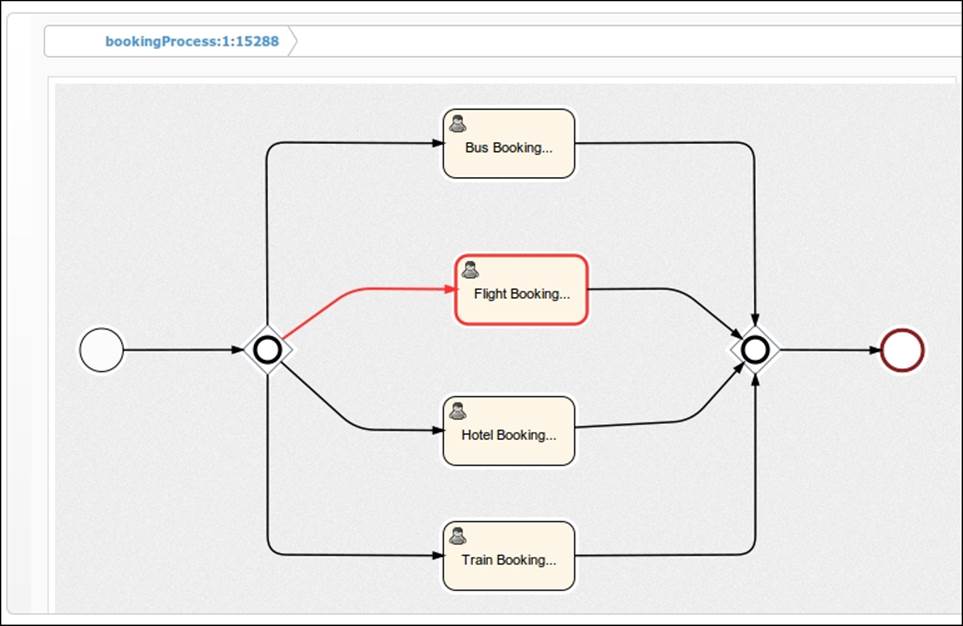
2. Create an Activiti diagram in it and name it bookingProcess. This process will only contain the task for the various bookings, as shown in the following screenshot:
3. On the start event of BookingProcess, we will have a form that accepts the information for the type of booking required by the customer. So the following is the code for a start event with form properties:
4. <startEvent id="startevent1" name="Start">
5. <extensionElements>
6. <activiti:formProperty id="bookingPersonName" name="Booking Person Name" type="string" required="true"></activiti:formProperty>
7. <activiti:formProperty id="busBooking" name="Bus Booking" type="enum">
8. <activiti:value id="true" name="Yes"></activiti:value>
9. <activiti:value id="false" name="No"></activiti:value>
10. </activiti:formProperty>
11. <activiti:formProperty id="flightBooking" name="Flight Booking" type="enum">
12. <activiti:value id="true" name="Yes"></activiti:value>
13. <activiti:value id="false" name="No"></activiti:value>
14. </activiti:formProperty>
15. <activiti:formProperty id="hotelBooking" name="Hotel Booking" type="enum">
16. <activiti:value id="true" name="Yes"></activiti:value>
17. <activiti:value id="false" name="No"></activiti:value>
18. </activiti:formProperty>
19. <activiti:formProperty id="travelDestination" name="Travel Destination" type="string" required="true"></activiti:formProperty>
20. <activiti:formProperty id="trainBooking" name="Train Booking" type="enum">
21. <activiti:value id="true" name="Yes"></activiti:value>
22. <activiti:value id="false" name="No"></activiti:value>
23. </activiti:formProperty>
24. </extensionElements>
</startEvent>
25. Now create a new Activiti Project in Eclipse and name it StandaloneSubProcess.
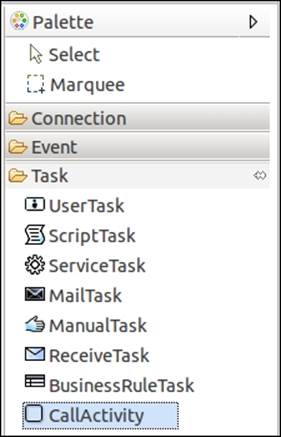
26. Create an Activiti diagram named TravelBooking process. In this process, we will add a Call Activity node to call BookingProcess. The Call Activity task will be available in Palette, as shown in the following screenshot:
27. We can design the TravelBooking process as shown in the following screenshot:

28. On the start event, we will have a form that accepts some input to be passed to the BookingProcess. The following code should be added to the start event:
29.<startEvent id="startevent1" name="Start">
30. <extensionElements>
31. <activiti:formProperty id="custName" name="Name" type="string" required="true"></activiti:formProperty>
32. <activiti:formProperty id="custMailId" name="Email Id" type="string" required="true"></activiti:formProperty>
33. <activiti:formProperty id="custTravelDestination" name="Travel Destination" type="string" required="true"></activiti:formProperty>
34. <activiti:formProperty id="custBusBooking" name="Bus Booking" type="enum">
35. <activiti:value id="true" name="Yes"></activiti:value>
36. <activiti:value id="false" name="No"></activiti:value>
37. </activiti:formProperty>
38. <activiti:formProperty id="custFlightBooking" name="Flight Booking" type="enum">
39. <activiti:value id="true" name="Yes"></activiti:value>
40. <activiti:value id="false" name="No"></activiti:value>
41. </activiti:formProperty>
42. <activiti:formProperty id="custTrainBooking" name="Train Booking" type="enum">
43. <activiti:value id="true" name="Yes"></activiti:value>
44. <activiti:value id="false" name="No"></activiti:value>
45. </activiti:formProperty>
46. <activiti:formProperty id="custHotelBooking" name="Hotel Booking" type="string" default="false" readable="false" writable="false"></activiti:formProperty>
47. </extensionElements>
</startEvent>
48. From the TravelBooking process, we will be calling the BookingProcess using the Call activity task.
49. We will be populating the properties of Call activity. The Called Element field will contain the ID of the process to be called, BookingProcess, and the Input parameters table will be used for mapping the parameters provided at the start of the TravelBookingprocess to BookingProcess, as you can see the properties populated in the following screenshot:
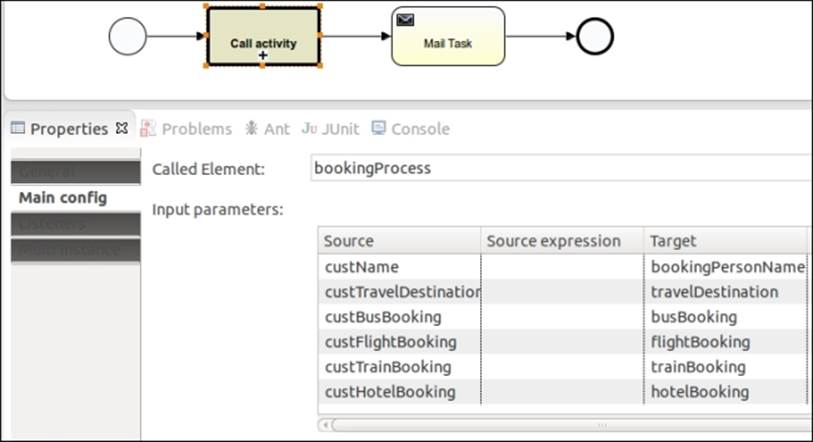
The values passed from the TravelBooking process to BookingProcess using Call Activity will be mapped with the variable of BookingProcess.
Note
For executing the TravelBooking process, the BookingProcess should be deployed into the Activiti process engine, otherwise the TravelBooking process will not execute properly. So, first deploy the BookingProcess and then the TravelBooking process.
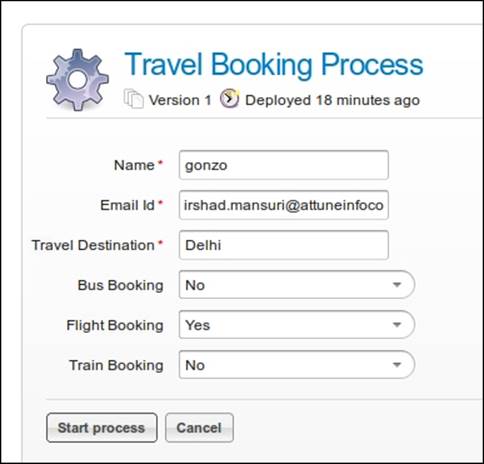
50. So, after completing the creation of the process, deploy the process into the Explorer and start the TravelBooking process. On the start of the process, a form will pop up as shown in the following screenshot, where you need to fill in the details of the booking:
51. On starting the TravelBooking process, the booking process will start automatically, as shown in the following screenshot:
52. When you select Booking Process from My Instances, you will find that the Flight Booking task is in execution. This is because we have provided the booking type as Flight Booking:
53. So, after the completion of the flight task, the process will return to the TravelBooking process and execute the mail task for sending an e-mail to the customer.
What just happened?
After a long implementation, we have completed the use of a Sub-Process as an embedded Sub-Process and as a standalone Sub-Process. So now you should be able to implement a process with Sub-Processes.
Understanding multi-instance processes
Multi-instance is a way through which we can repeat certain steps of a business process. In terms of programming, it can be considered similar to the for loop. The multi-instance functionality can be implemented on almost all of the activities. The list of activities that contain this property are user task, script task, service task, business rule task, e-mail task, Sub-Process, and call activity. Multi-instance can be parallel or sequential.
Time for action – implementing a multi-instance process
To implement a multi-instance process, we have to perform the following steps:
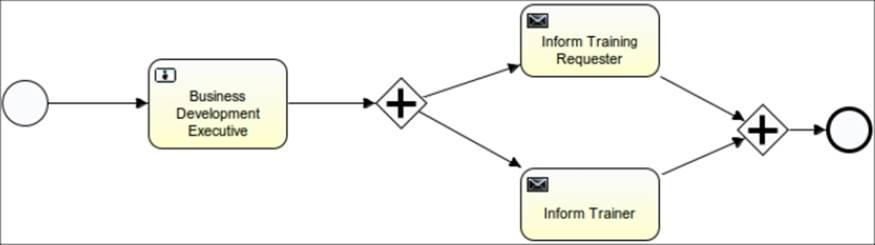
1. Here we will take the TrainingRequest process covered in Chapter 6, The Activiti ProcessEngine API. The TrainingRequest process is shown in the following screenshot:
2. We can make the multi-instance process either sequential or parallel; for that, we need to set the isSequential parameter of multi-instance. If the value is true, Activiti will execute in a sequential order; if false, it will execute in parallel. By default, the value is set to false.
3. To iterate the Business Development task, we can set the Multi Instance property's Loop cardinality value to some positive value, as provided in the following screenshot:

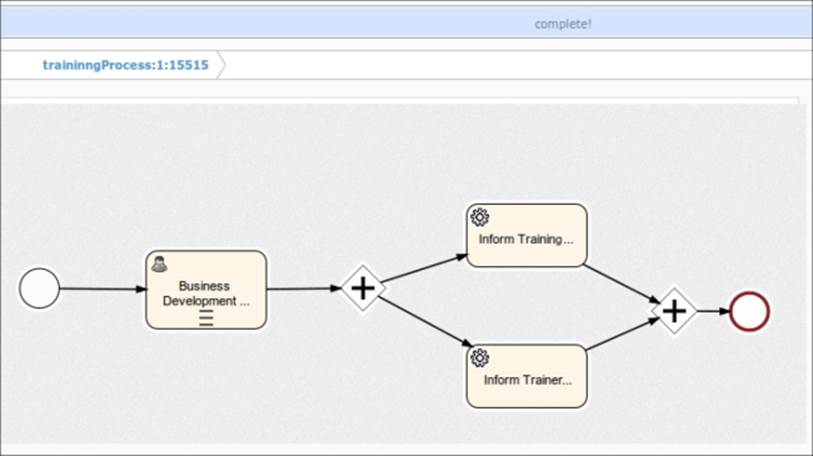
4. On setting the Multi Instance property and deploying the process to the Activiti Engine, the graphical view of the process will be similar to the following screenshot:
5. On setting the loopCardinality value, the task will execute for that number of times.
6. Instead of setting the static value to loopCardinality, we can set a dynamic value too, as shown in the highlighted code in the following block:
7. <userTask id="usertask1" name="Business Development Executive" activiti:assignee="gonzo">
8. <extensionElements>
9. <activiti:formProperty id="custName" name="Customer Name" type="string" expression="${customerName}" writable="false"></activiti:formProperty>
10. <activiti:formProperty id="trainTopic" name="Training Topic" type="string" expression="${trainingTopic}" writable="false"></activiti:formProperty>
11. <activiti:formProperty id="trainDate" name="Training Date" type="date" expression="${trainingDate}" writable="false"></activiti:formProperty>
12. <activiti:formProperty id="trainerName" name="Trainer Name" type="string" required="true"></activiti:formProperty>
13. <activiti:formProperty id="trainerMailId" name="Trainer Id" type="string" required="true"></activiti:formProperty>
14. </extensionElements>
15. <multiInstanceLoopCharacteristics isSequential="true">
16. <loopCardinality>${loopCounter}</loopCardinality>
17. </multiInstanceLoopCharacteristics>
</userTask>
18. You can also assign the collection of data for the multi-instance of a task as follows:
19.<userTask id="usertask1" name="Business Development Executive"
20. activiti:assignee="gonzo">
21. <extensionElements>
22. <activiti:formProperty id="custName" name="Customer Name"
23. type="string" expression="${customerName}" writable="false"></activiti:formProperty>
24. <activiti:formProperty id="trainTopic" name="Training Topic"
25. type="string" expression="${trainingTopic}" writable="false"></activiti:formProperty>
26. <activiti:formProperty id="trainDate" name="Training Date"
27. type="date" expression="${trainingDate}" writable="false"></activiti:formProperty>
28. <activiti:formProperty id="trainerName" name="Trainer Name"
29. type="string" required="true"></activiti:formProperty>
30. <activiti:formProperty id="trainerMailId"
31. name="Trainer Id" type="string" required="true"></activiti:formProperty>
32. </extensionElements>
33. <multiInstanceLoopCharacteristics
34. isSequential="true" activiti:collection="BDMList"
35. activiti:elementVariable="bdmName">
36. </multiInstanceLoopCharacteristics>
</userTask>
What just happened?
We have understood the use of the multi-instance property for Activiti and various ways in which we can use the multi-instance property.
Introducing execution and task listeners
Listeners are used to perform background execution. They are used to perform automatic tasks in the background, such as the autoexecution of any activity, autotransactions, and creating users. Listeners provide great hooks into process execution; they can be used for business process management and simpler things such as flexibly assigning a group of candidate users to a user task. It is used to execute external Java code. We can also perform some expressions during the occurrences of some events.
Activiti supports two types of listeners:
· Execution listeners
· Task listeners
Execution listeners
An execution listener is a class file implementation that can be used during the execution of a process. Let's say we want to fetch some data from an external API or implement some logic on the execution of a process; in this case, we can call it using an execution listener. It can be configured on the following:
· The process itself
· Activities
· Transition
These listeners can be executed on various events, such as the following:
· The start and end events of the process itself
· The start and end events of the activities
· The take event of the transition phase
Task listeners
A task listener is similar to an execution listener; the only difference is that it will execute on a task.
A task listener can be executed on the user task. We can use this listener to allocate tasks to a particular user at runtime. We can complete the task using the task listener.
A task listener can be executed on the create, assignment, and complete events of the user task.
Now let's model a process to use these listeners.
Time for action – implementing execution and task listeners
To get a better understanding of execution and task listeners, we will design a process as shown in the following screenshot:
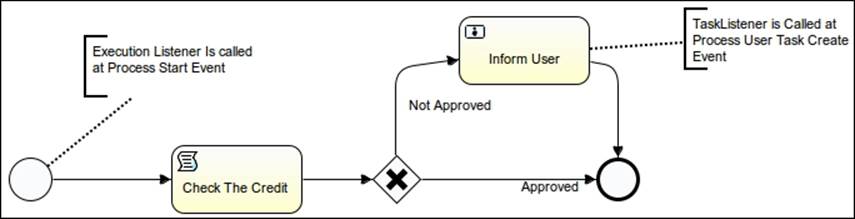
We will perform the following steps to implement the preceding process:
1. Create an Activiti project in the Eclipse editor named ExecutionTaskListener.
2. Create a class MyExecutionListener with the following code:
3. public class MyExecutionListener implements ExecutionListener {
4.
5. @Override
6. public void notify(DelegateExecution execution) throws Exception {
7. // TODO Auto-generated method stub
8. long approved_amount_limit;
9.
10. approved_amount_limit=50000;
11. System.out.println("******************the Start event Listener is Called************");
12. execution.setVariable("approved_amount_limit", approved_amount_limit);
13.
14.
15. }
}
16. Create one more class, MyTaskListener, for the task listener and write the following code in it:
17.public class MyTaskListener implements TaskListener{
18.
19. @Override
20. public void notify(DelegateTask task) {
21. // TODO Auto-generated method stub
22.
23. task.setAssignee("kermit");
24.
25. System.out.println("Task Listener is called");
26. }
}
27. Create yet another class, MyExecution_Transition_Listener, and place the following code in it:
28.public class MyExecution_Transition_Listener implements ExecutionListener{
29.
30. @Override
31. public void notify(DelegateExecution execution) throws Exception {
32. // TODO Auto-generated method stub
33.
34. System.out.println("Your Request Is Approved");
35. }
}
36. Now create a new the Activiti diagram within the project and design a process as displayed in the screenshot that follows.
37. Once finished with the modeling of the process, we will edit the properties of the process. So select the white canvas and open the Properties window as shown in the following screenshot:
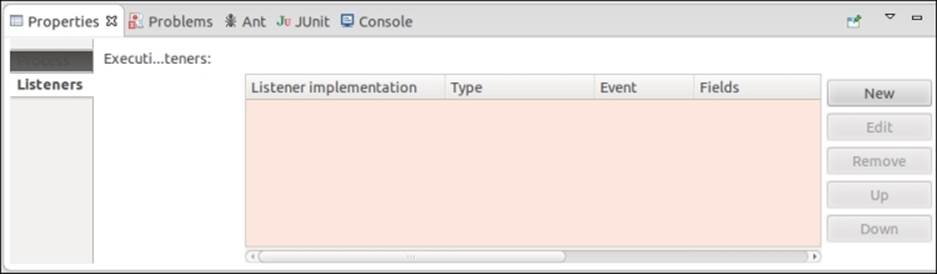
38. In the Listeners option, click on the New button; it will pop up a window as shown in the following screenshot. In a process, we can assign listeners on either a start event or an end event. We will have it on the start event; now, we will select theMyExecutionListener class that is to be assigned on the start event as shown in the following screenshot:
Note
If you want the listener class to be executed at the end of the process, set end as the event type.

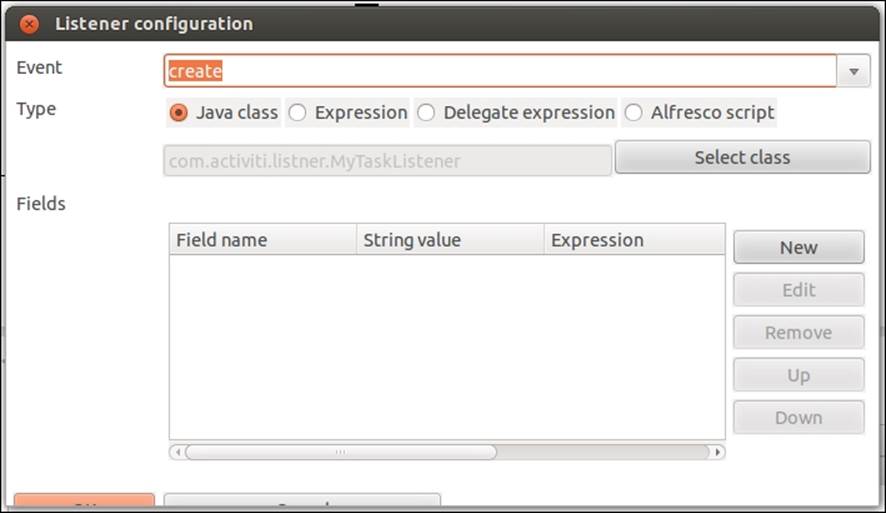
39. Now we will assign a listener class on usertask, open the Properties window, and go to Listeners | New.
40. On a user task, we can have listeners on the create, assignment, complete, and all events. We will have a listener on the create event and will select the MyTaskListener class, so this class will be executed when usertask is created.
Note
If you want the listener classes to be executed when the task is assigned to a user, select the assignment event; similarly, if the listener class should be executed on the completion of the user task, select the complete event; select all if you want the class to be executed on all the mentioned events.
So, we will have a listener on the create event and will select the MyTaskListener class as shown in the following screenshot:
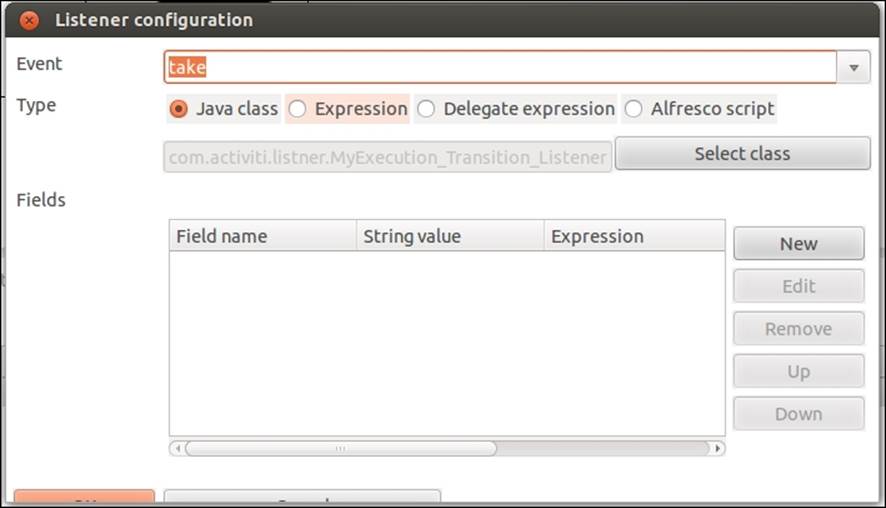
41. We can also have listeners on the sequence flows. A sequence flow only has a take event. So whenever the sequence flow is executed, the class file will be called, as shown in the following screenshot:
42. Now we will create deployment artifacts in Eclipse, which will generate bar graphs for us. We will have to deploy these into the Activiti Explorer. Make sure that you test the process.
What just happened?
We have seen which types of listeners are available. We have implemented a process using the execution listener and task listener.
Monitoring workflows using BAM and CEP
There are multiple processes running in an organization, and it becomes difficult to visualize all the processes. To analyze a process, we need to monitor the process.
Understanding BAM
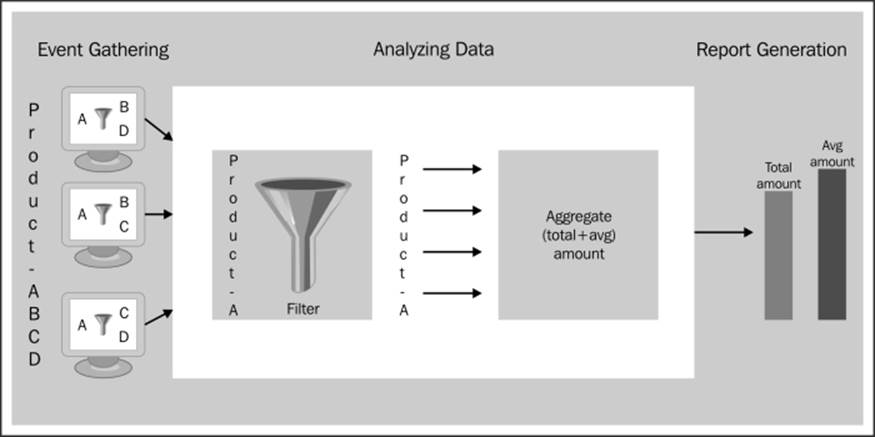
To have a real-time look at all the processes that are running within a business organization, you can make use of Business Activity Monitoring (BAM). With the help of BAM, we can easily identify the problems or risks and take preventive steps to resolve them and adapt the change. For the implementation of a BAM solution, perform the following steps:
· Gathering of events: This step involves the collection of data from events of various sources within an application. The data can be things like the purchase of five pairs of trousers for $50.
· Analyzing gathered data: Here we can do some filtering on the gathered data to get an output based on some conditions. For example, a garment store has announced a discount on all their products. Now, the store owner wants to know which products are sold more; for this, he can filter the sold products.
· Generating reports: In the previous step, we have seen an example of a garment store. After the analysis, the owner has the data of the most sold products. Based on the reports, he can make a decision as to which products are trending and focus on those.
Understanding CEP
CEP stands for complex event processing. In CEP, the main event can be identified based on the collection of certain basic events occurring simultaneously. For example, consider the following events:
· Church bells ring
· A man wearing a tuxedo appears, with a woman in a white gown at his side
· Rice flies through the air
From the preceding basic events, we can identify that there is a wedding going on. CEP filters, correlates, and performs calculations on real-time event data and generates a new event. CEP works as an inverted database, where the data is stored in the database and then we can fire queries to retrieve the data from the database.
The CEP engine performs different types of operations on the events, such as the filtering of events, the aggregation of events, and the joining of events. Based on the results provided, a pattern matching mechanism that looks for the data that is to be provided as an output is executed.
Monitoring using Esper
Esper is a component for complex event processing. Esper and Event Processing Language (EPL) provide a highly scalable, memory-efficient, in-memory computing, SQL-standard, minimally latent, real-time streaming Big Data processing engine for medium to high-velocity, high variety data. We can monitor the process using Esper. We will see how we can use Esper to monitor the required time for executing the process. For more information, you can go through this URL: http://esper.codehaus.org/.
Time for action – using Esper with Activiti
We will use Esper in Activiti by performing the following steps:
1. We will create a new Activiti project in Eclipse named EsperinActiviti, and within this project, we will model an Activiti diagram named leaverequest_withespertest.bpm. We will model the diagram as in the following screenshot and assign the user task to fozzie:
2. Now we will create two execution listener classes, ProcessStartExecutionListener and ProcessEndExecutionListener.
3. The ProcessStartExecutionListener class will consist of the following lines of code:
4. public class ProcessStartExecutionListener implements ExecutionListener {
5.
6. @Override
7. public void notify(DelegateExecution execution) throws Exception {
8. LeaveRequestReceivedEvent event = new LeaveRequestReceivedEvent(
9. execution.getId(),
10. new Date().getTime(),
11. (Integer) execution.getVariable("leaveDay"));
12. EPServiceProviderManager.getDefaultProvider().getEPRuntime()
13. .getEventSender("LeaveRequestReceivedEvent")
14. .sendEvent(event);
15. }
}
16. The ProcessEndExecutionListener class will consist of the following lines of code:
17.public class ProcessEndExecutionListener implements ExecutionListener {
18.
19. @Override
20. public void notify(DelegateExecution execution) throws Exception {
21. LeaveRequestProcessedEvent event = new LeaveRequestProcessedEvent (
22. execution.getId(),
23. new Date().getTime(),
24. (Boolean) execution.getVariable("requestApproved"),
25. (Integer) execution.getVariable("leaveDay"));
26. EPServiceProviderManager.getDefaultProvider().getEPRuntime()
27. .getEventSender("LeaveRequestProcessedEvent")
28. .sendEvent(event);
29. }
}
30. Now we will assign these listeners on the start and end events of the process, as displayed in the following screenshot:

31. We will create a class file named LeaveRequestProcessedEvent with the following code. This class file checks the time taken by the process to complete.
32.public class LeaveRequestProcessedEvent {
33.
34. // For correlating the events.
35. @XmlElement
36. private final String processInstanceId;
37. @XmlElement
38. private final long processedTime;
39. @XmlElement
40. private final boolean requestApproved;
41. @XmlElement
42. private final int requestedDay;
43.
44. @SuppressWarnings("unused")
45. private LeaveRequestProcessedEvent() {
46. processInstanceId = null;
47. processedTime = 0;
48. requestApproved = false;
49. requestedDay = 0;
50. }
51.
52. public LeaveRequestProcessedEvent(String processInstanceId, long processedTime, boolean requestApproved, int requestedDay) {
53. this.processInstanceId = processInstanceId;
54. this.processedTime = processedTime;
55. this.requestApproved = requestApproved;
56. this.requestedDay = requestedDay;
57. }
58.
59.LeaveRequestProcessedEvent method used to take process instance, processed time and request approve.
60.
61. public String getProcessInstanceId() {
62. return processInstanceId;
63. }
64.
65. public long getProcessedTime() {
66. return processedTime;
67. }
68.
69. public boolean isRequestApproved() {
70. return requestApproved;
71. }
72.
73. public int getRequestedDay() {
74. return requestedDay;
75. }
76.
77. @Override
78. public String toString() {
79. return "LeaveRequestProcessedEvent{processInstanceId="+processInstanceId+",processedTime="+processedTime+",requestApproved="+requestApproved+",requestedDay="+requestedDay+"}";
80. }
}
81. Create a LeaveRequestReceivedEvent class with the following code. This class file will check the time taken to receive the request for the process.
82.public class LeaveRequestReceivedEvent {
83.
84. // For correlating the events.
85. @XmlElement
86. private final String processInstanceId;
87. @XmlElement
88. private final long receiveTime;
89. @XmlElement
90. private final int requestedDay;
91.
92. @SuppressWarnings("unused")
93. private LeaveRequestReceivedEvent() {
94. processInstanceId = null;
95. receiveTime = 0L;
96. requestedDay = 0;
97. }
98.
99. public LeaveRequestReceivedEvent(String processInstanceId, long receiveTime, int requestedDay) {
100. this.processInstanceId = processInstanceId;
101. this.receiveTime = receiveTime;
102. this.requestedDay = requestedDay;
103. }
104.
105. public String getProcessInstanceId() {
106. return processInstanceId;
107. }
108.
109. public long getReceiveTime() {
110. return receiveTime;
111. }
112.
113. public int getRequestedDay() {
114. return requestedDay;
115. }
116.
117. @Override
118. public String toString() {
119. return "LeaveRequestReceivedEvent{processInstanceId="+processInstanceId+",receiveTime="+receiveTime+",requestedDay="+requestedDay+"}";
120. }
}
121. Now we will create a test class, TimeactivitiTest, for unit testing. We will split this class for better understanding. We create the TimeactivitiTest class as follows:
122. public class TimeactivitiTest {
123.
}
124. Place the following code in the test class to configure the Esper engine in Activiti:
125. private EPRuntime epRuntime;
126. private EPAdministrator epAdmin;
127.
128. @Before
129. public void startEsper() {
130. Configuration configuration = new Configuration();
131. configuration.addEventTypeAutoName("org.activiti.event");
132. EPServiceProvider epService = EPServiceProviderManager.getDefaultProvider(configuration);
133. epRuntime = epService.getEPRuntime();
134. epAdmin = epService.getEPAdministrator();
}
135. Now we will create some variables to fetch the average and maximum process time of the process, as shown in the following code:
136. private Queue<Double> avgProcessDurationQueue = new LinkedList<Double>();
private Queue<Long> maxProcessDurationQueue = new LinkedList<Long>();
137. Create a test method to perform the testing of the process execution, as shown in the following code:
138. @Test
139. public void monitorProcessDuration() {
140. epRuntime.sendEvent(new TimerControlEvent(ClockType.CLOCK_EXTERNAL));
141.
142. EPStatement epStatement = epAdmin.createEPL(new StringBuffer()
143. .append("select avg(endEvent.processedTime - beginEvent.receiveTime) as avgProcessDuration, ")
144. .append("max(endEvent.processedTime - beginEvent.receiveTime) as maxProcessDuration ")
145. .append("from pattern [every beginEvent=LeaveRequestReceivedEvent -> endEvent=LeaveRequestProcessedEvent(processInstanceId=beginEvent.processInstanceId)].win:time(5 sec)")
146. .toString());
147.
148. epStatement.addListener(new UpdateListener () {
149. public void update(EventBean[] newEvents, EventBean[] oldEvents) {
150. Assert.assertEquals(1, newEvents.length);
151. Assert.assertNull(oldEvents);
152. Double avgProcessDuration = (Double) newEvents[0].get("avgProcessDuration");
153. Long maxProcessDuration = (Long) newEvents[0].get("maxProcessDuration");
154. System.out.println
155. ("avgProcessDuration="+avgProcessDuration+", maxProcessDuration="+maxProcessDuration);
156. avgProcessDurationQueue.add(avgProcessDuration);
157. maxProcessDurationQueue.add(maxProcessDuration);
158. }
159. } );
160.
161. sendLeaveRequestReceivedEvent ( 0, "1", 100);
162. assertMonitoredProcessDuration(null, null);
163.
164. sendLeaveRequestReceivedEvent ( 300, "2", 200);
165. assertMonitoredProcessDuration(null, null);
166.
167. epStatement.destroy();
}
168. Add the following methods as we are using them in our test case:
169. private void assertMonitoredProcessDuration(Double avgProcessDuration, Long maxProcessDuration) {
170. Assert.assertEquals(avgProcessDuration, avgProcessDurationQueue.poll());
171. Assert.assertEquals(maxProcessDuration, maxProcessDurationQueue.poll());
172. }
173.
174. private void sendLeaveRequestReceivedEvent(long time, String processInstanceId, int requestedAmount) {
175. sendEvent(time, new LeaveRequestReceivedEvent(processInstanceId, time, requestedAmount));
176. }
177.
178. private void sendLeaveRequestProcessedEvent(long time, String processInstanceId, boolean requestApproved, int LeaveedAmount) {
179. sendEvent(time, new LeaveRequestProcessedEvent(processInstanceId, time, requestApproved, LeaveedAmount));
180. }
181.
182. private void sendEvent(long time, Object event) {
183. System.out.printf(" %1$4d : %2$s\n", time, event);
184. epRuntime.sendEvent(new CurrentTimeEvent(time));
185. epRuntime.sendEvent(event);
}
What just happened?
We went through how to use Esper in Activiti for monitoring our business process. We have also monitored a process by executing an Esper query.
Have a go hero
Having gone through the chapter, feel free to attempt the following. You can refer to the examples implemented earlier.
· Implement a Sub-Process, either embedded or standalone, to issue a driving license based on the applicant's age, and use the same Sub-Process for the vehicle registration process
· Design a process and use task listeners to complete the user task
Pop quiz – the Activiti Process Engine
Q1. Which Sub-process can be used in any main process?
1. Embedded Sub-Process
2. Multi-instance Sub-Process
3. Standalone Sub-Process
4. None
Q2. Which tab is used to implement a multi-instance task?
1. Listener
2. Multi-instance
3. Form
4. None
Q3. Which gateway doesn't require conditions?
1. Exclusive
2. Inclusive
3. Parallel
4. None
Summary
In this chapter, we have learned about advanced workflows. We have seen how a process can be further divided into Sub-Processes. We have implemented processes using multi-instance and parallel gateways. We have also learned about BAM and CEP for Activiti. We can now implement processes using different listeners.
All materials on the site are licensed Creative Commons Attribution-Sharealike 3.0 Unported CC BY-SA 3.0 & GNU Free Documentation License (GFDL)
If you are the copyright holder of any material contained on our site and intend to remove it, please contact our site administrator for approval.
© 2016-2026 All site design rights belong to S.Y.A.