Salesforce CRM – The Definitive Admin Handbook Third Edition (2015)
Chapter 2. User Management in Salesforce CRM
In the previous chapter, we looked at user authentication and how user login access is authorized by the Salesforce application. We were introduced to the concept of a user being assigned a profile that could be set to control certain permissions. The user profile login permissions we looked at were restrictions on login hours and IP addresses, which allow you to control when and from where users log in to the Salesforce application.
In this chapter, we will look at how users can be managed in more detail and understand how some of the key profile settings are used within the Salesforce CRM application.
We will start to look into the ways in which a user's profile controls access to objects and also governs what features are available to that user.
Generally speaking, objects represent database tables that contain your organization's information and are discussed in detail in Chapter 3, Configuration in Salesforce CRM. For example, one of the key objects in the Salesforce CRM application represents account information.
Along with profiles, this chapter also begins to look at the concept of record sharing and provides a high-level look at sharing features within Salesforce. It also describes how these features control access to records for users.
The term record describes a particular occurrence of an object. A specific record could be American Express or Google, which is represented by an account object in our preceding example. We will now look at the following:
· An introduction to record ownership, profiles, and sharing
· Managing users in Salesforce
An introduction to record ownership, profiles, and sharing
Before looking at the features available to manage users, we start with a brief introduction to the concepts of record ownership, profiles, and sharing in Salesforce CRM.
Record owner
The record owner terminology is reflected throughout Salesforce and, for each and every data record, there can be one and only one record owner.
Only users that are active in Salesforce can have records assigned to them.
When a user is marked inactive in Salesforce CRM, he or she no longer has access to the application. However, any records that this inactive user owns remain in the application and continue to show the inactive user as the record owner.
The record owner setting generally determines whether access to that record is available to other users within the organization and is enabled using either profile or sharing settings.
Profiles and sharing
Profiles, sharing, and the optional role hierarchy setting work together and should be considered as a whole when setting up record ownership and data access for users. An overview of the relationship between users, profiles, and sharing settings can be pictured as follows:

All users in Salesforce must be assigned a profile. The profile is a control mechanism used to determine which functions the user can perform, which types of data they can access, and which operations they can carry out on that data.
All users are associated with sharing mechanisms in Salesforce; this determines the actual records the user can access. Controlling the level of record access can be achieved using options ranging from default sharing, which is set at the organization level, to role hierarchy and beyond using advanced sharing mechanisms. A user does not have to be assigned to a role in Salesforce.
The sharing rules are briefly outlined as follows and covered in far more detail later in this book.
Profiles
Some of the key controls of profiles are to identify the type of license specified for the user, any login hours or IP address restrictions, and control access to objects. If the appropriate object-level permission is not set on the user's profile, the user will be unable to access the records of that object type in the application.
Profiles never override your organization's sharing model or role hierarchy. For example, a profile might be set to allow a user access to create, edit, and delete leads. However, a user with this profile cannot edit or delete other users' leads if your organization's lead sharing model is read-only.
In Chapter 3, Configuration in Salesforce CRM we will look in detail at the features that the profile controls, including tabs, object-level security, field-level security, Apex/Visualforce page accessibility, console layout, application selections, and administrative and general user permissions.
There are two types of profile in Salesforce:
· Standard
· Custom
Here, each standard or custom profile belongs to exactly one user license type.
Standard profiles and custom profiles are similar in nature. The difference is that, for standard profiles, these types of settings cannot be applied: administrative permissions, general user permissions, object-level permissions, and, notably, the Password Never Expires setting, which means you are not required to change your password after a certain amount of time (this is part of the password policies that are described later). Hence, you must either create a custom profile or use a permission set (described later in this chapter) if you want to enable any of these features.
There are a number of standard profile types, such as:
· Contract manager
· Marketing user
· Solution manager
· Standard user
· System administrator
Contract manager
The contract manager profile is generally used to manage contracts and override forecasts.
Marketing user
The marketing user profile is generally used to manage campaigns, import leads, and manage public documents. Users with this profile have access to the same functions as standard user profiles.
Solution manager
The solution manager profile is generally used to publish and review solutions. Users with this profile have access to the same functions as standard user profiles.
Standard user
The standard user profile is used to create and edit the main types of records. This profile also allows users to run reports and view the organization's setup. Notably, this profile can view, but not manage, campaigns. This profile can create, but cannot review, solutions.
System administrator
The system administrator profile is used to configure and customize the application. Users with this profile have access to all functionalities that do not require any additional licenses. For example, system administrators cannot manage campaigns unless they also have a marketing user license.
Note
Standard profiles have their uses, but it is wise to limit their usage to cloning them to create custom profiles, as Salesforce their been known to change the settings for standard profiles when a new release is rolled out, which can result in an undesired outcome for any user assigned with that profile.
Sharing
Sharing settings control the default access for each object across the organization. Sharing rules per object can grant access beyond the default sharing settings; they cannot restrict access. The default sharing settings are as follows:
· Controlled by Parent
· Private
· Public Read Only
· Public Read/Write
· Public Read/Write/Transfer
· Public Full Access
· Grant Access Using Hierarchies
When the Grant Access Using Hierarchies setting is enabled, the role of the record owner determines visibility throughout the organization. Users in higher roles in the hierarchy will have full access (view/edit/delete) to all records owned by those at a lower level in the role hierarchy.
If Grant Access Using Hierarchies is not enabled, all roles are treated equally regardless of the hierarchy.
Note
Grant Access Using Hierarchies is only applicable for custom objects as they cannot be disabled for standard objects.
Roles
Roles are the principal elements in sharing rules. Users can be grouped into roles based on their need to access data according to how they fit into the role hierarchy. Creating a role for every user's job title is not required.
Roles are accessed throughout the application and are particularly important for reporting. For instance, if you have two departments, Operations and Sales, you can run comparative reports for both roles.
Roles generally report to another role and are used to maintain the role hierarchy. They are a one-to-many hierarchical relationship with the hierarchy, allowing managers to see the data of the users who report to them. Users at any given role level are always able to view, edit, and report on all data owned by or shared with users below them in the hierarchy.
Note
You can create up to 500 roles for your organization.
Role hierarchies do not need to specifically match your organization chart. Instead, each role in the hierarchy should represent a level of data access required by users.
Permission sets
Permission sets allow you to further control access to the system for the users in your organization. They can be considered as a method to fine-tune the permissions for selected individuals and enable access in a way similar to the setting up of profiles.
Note
Permission sets allow you to grant further access but not to restrict or deny access.
While an individual user can have only one profile, you can assign multiple permissions and permission sets to users. For example, you can create a permission called Convert Leads that provides the facility to convert and transfer the leads and assign them to a user who has a profile, which does not provide lead conversion. You can create a permission called Edit Contacts and assign it to a user who has a profile that does not provide contact editing. You can also group these permissions into a permission set to create specific profile-like permissions without actually having to create or clone complete profiles, which is often unnecessary.
Note
You can create up to 1,000 permission sets for your organization.
Permission sets are an ideal mechanism to apply system access for your users without affecting all other users who have the same profile and without having to create one-off profiles, which sometimes lead to an increase in the amount of maintenance.
A common use for permission sets is to grant additional permissions, in addition to the settings listed in a profile, to individuals without changing their profile, for example, to provide more rights than their profile currently allows.
Creating permission sets
To create a permission set, navigate to Setup | Manage Users | Permission Sets. Click on New. Enter a label, API name, and description.
Note
If you plan to assign the permission set to all users who have the same type of user license, a best practice is to associate that user license with the permission set. However, if you plan to assign the permission set to users who currently have different licenses (or might have different licenses in the future), it is probably best to create an organization-wide permission set.
To continue creating the permission set (as outlined previously), either select a user license or select the --None-- option (to create an organization-wide permission set). Finally, click on Save.
Note
When you clone an existing permission set, the new permission set has the same user license and enabled permissions as the permission set it is cloned from.

Managing users in Salesforce CRM
All users in your organization with access to Salesforce CRM require a username, an e-mail address, a password, and a profile along with an active user license.
Depending on the features your organization has purchased, you can have user options such as Marketing, Service Cloud, and Mobile, which give particular users the ability to access other features that are only available with a specific user license. A user can be assigned to one or more of these options.
You can also create and manage other types of users outside your organization by applying the appropriate licenses that provide limited access to your Salesforce organization, as detailed later in this chapter.
In association with the user license, you can govern all users' access to data using the options available in either the profile settings or the sharing features.
Profile settings control access to applications and objects, while sharing features control access to specific records.
To go to the user detail page, navigate to Setup | Manage Users | Users.
The user detail page shows you a list of all the users in your organization as well as any portal users.
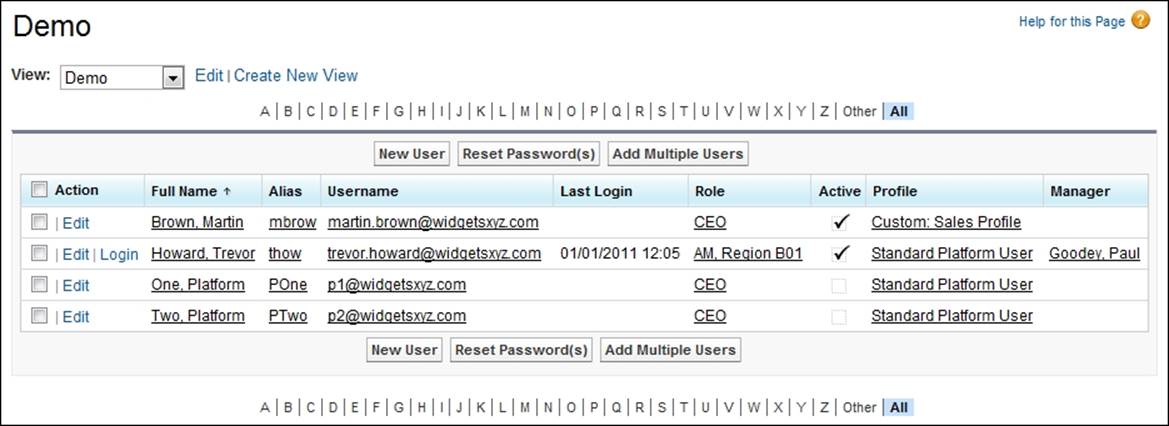
To show a filtered list of users, select a predefined list from the View drop-down list, or click on Create New View to define your own custom view.
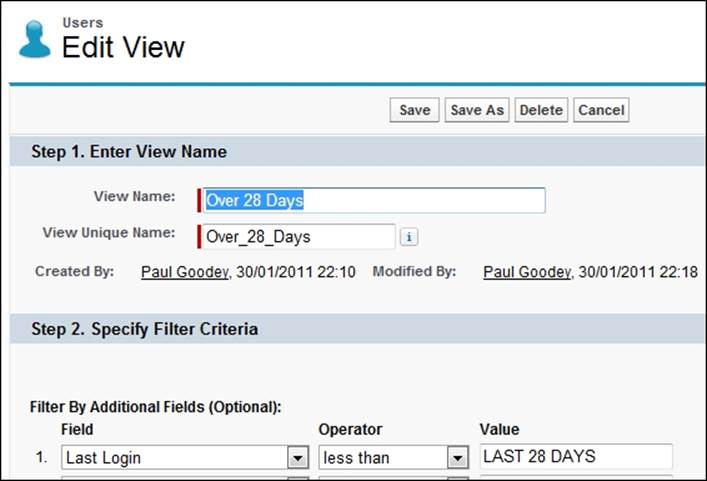
For example, you can create a view with search criteria of Last Login, less than, LAST 28 DAYS to show all users who have not logged in for 28 days, as shown in the following screenshot:
As the system administrator of Salesforce CRM, you can perform various user management actions, such as creating new users, resetting passwords, and even delegating user administration tasks to other users within your organization. The following list of user actions will be covered:
· Creating new users
· Viewing and editing user information
· Password management
· Session management
· Logging in as another user
· Creating custom user fields
Creating new user records
The steps to create a new user are as follows:
1. Click on New User
2. Enter fields in the General Information and Locale Settings sections
3. Check the Generate new password and notify user immediately box
4. Save the new user details
To create a new user for your organization, navigate to the user detail page. This page displays a list of all the users in your organization. To go to the New User page, navigate to Setup | Manage Users | Users. Now, click on the New User button.
Looking at the top section of the page, you will see the General Information section, as shown in the following screenshot:
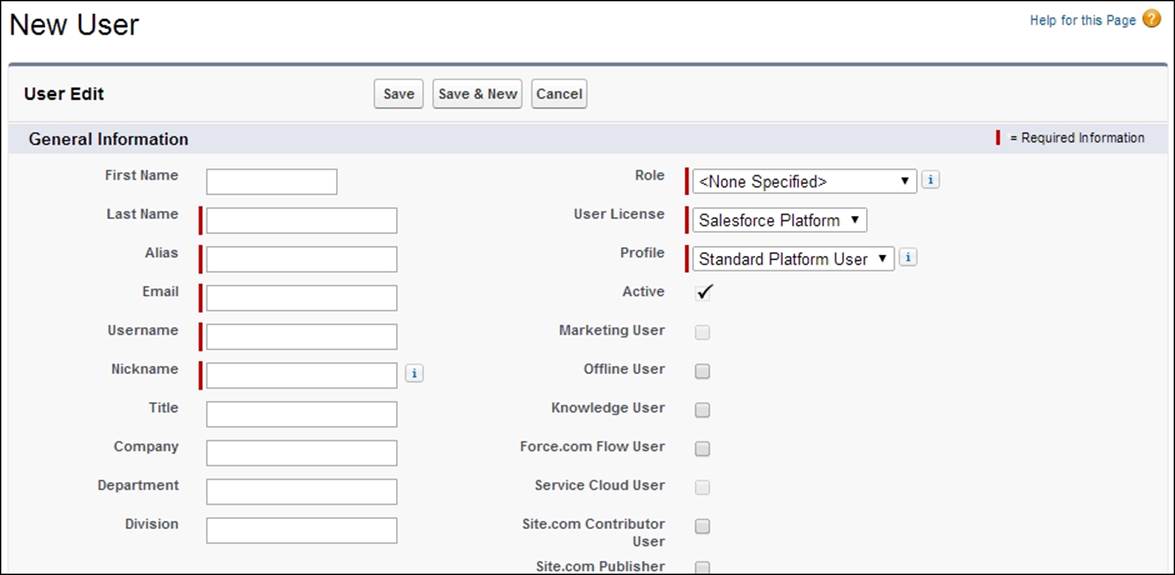
The mandatory user information is shown with a red bar and requires the entry of the user's last name, e-mail address, username user license, and profile.
Note
The length of users' passwords cannot exceed 16,000 bytes.
The e-mail address automatically becomes the username, but you can change it prior to saving it, if required.
Note
Restricting the domain names of users' e-mail addresses
You can restrict the domain names of users' e-mail addresses to a list of values such as xxx@WidgetsXYZ.com, yyy@CompanyXYZ.com, and so on. After this, attempts to set a user's e-mail address to an unlisted domain (such as xxx@MyNonCompanyWebMail.com) will result in an error.
This feature can only be enabled by sending a request to Salesforce customer support. When selecting a user license, note that some further options become unavailable depending on the license type you choose. For example, the Marketing User and Allow Forecasting options are not available for Force.com user licenses because the Forecasts and Campaigns tabs are not available to users with that license. Also, the selection of a profile from the available list depends on the user license you have chosen.
Note
You should consider the username that is entered. After the username is saved, it becomes a unique setting throughout the Salesforce.com universe; hence, you will not be able to use that same username in any other Salesforce CRM application.
You can select various checkboxes that give the user additional features or options. The types of additional features are available by selecting one or more of the following example checkboxes:
· Marketing User
· Offline User
· Knowledge User
· Force.com Flow User
· Service Cloud User
· Site.com Publisher User
· Salesforce CRM Content User
You will not be able to select these features if they are not supported by your user license type. Also, you will be unable to save the new user record if you do not have any remaining licenses available for these features.
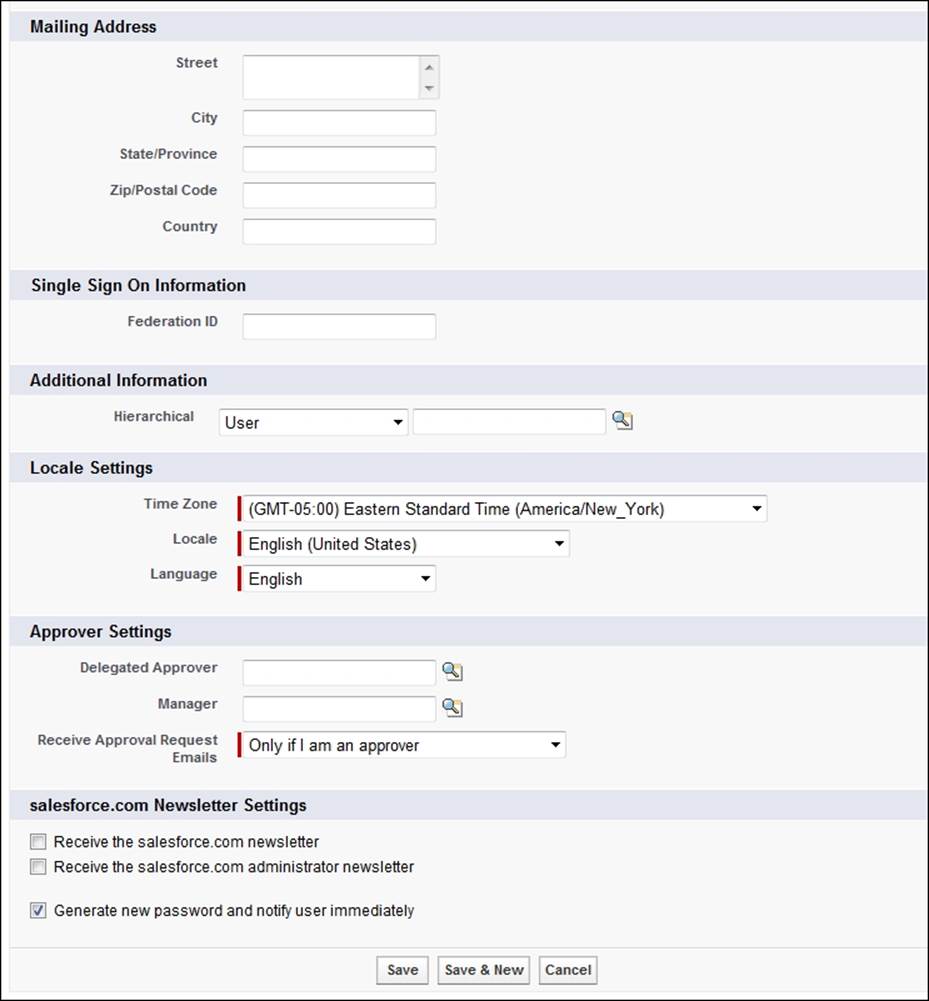
At the bottom of the New User edit page, there are further sections that include the Locale Settings section, as shown in the following screenshot:
Saving new user records
Complete the required information, which is displayed with a red bar, and then check the Generate new password and notify user immediately checkbox, and save the details by clicking on the Save button. Upon saving, the user's login name and a temporary password are e-mailed via Salesforce.com to the new user.
Tip
Junk e-mail folder
If you have generated the new password to be sent but the new user cannot see the e-mail notification from Salesforce.com in his or her inbox, you might need to have the user check his or her junk e-mail folder.
The following table lists the key standard user fields with the required fields shown in bold:
|
First Name |
Last Name |
Alias |
|
Username |
|
Community Nickname |
Title |
Company |
Department |
Division |
|
Role |
User License |
Profile |
Active |
Grant Checkout Access |
|
Marketing User |
Offline User |
Knowledge User |
Service Cloud User |
Mobile User |
|
Mobile Configuration |
Accessibility Mode |
Color-Blind Palette on Charts |
Salesforce CRM Content User |
Receive Salesforce CRM Content Email Alerts |
|
Receive Salesforce CRM Content Alerts as Daily Digest |
Allow Forecasting |
Call Center |
Phone |
Extension |
|
Fax |
Mobile |
Email Encoding |
Employee Number |
Mailing Address Fields |
|
Time Zone |
Locale |
Language |
Delegated Approver |
Manager |
|
Receive Approval Request Emails |
Newsletter |
Admin Newsletter |
Development Mode |
Send Apex Warning Emails |
Viewing new user records
After saving the User Edit page, you are presented with the details page for the user where you can view the information that was entered, as shown in the following screenshot:
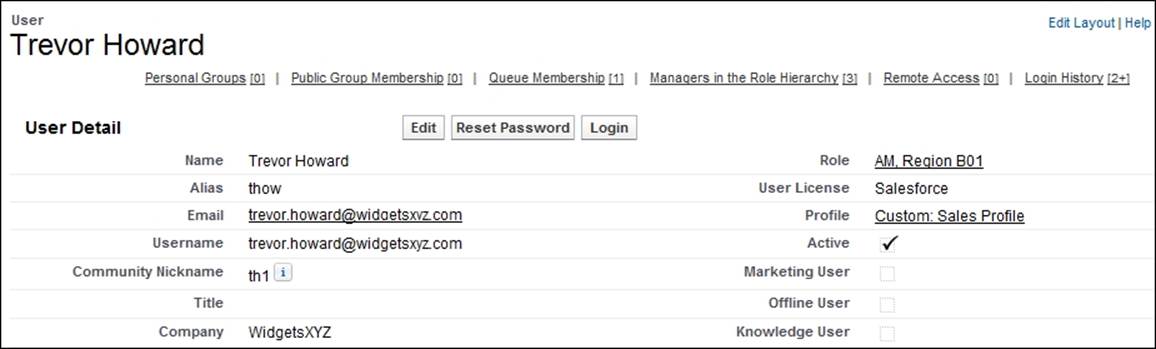
In the view's User Detail page, the following types of read-only fields (among others) can be seen:
· Used Data Space
· Last Login
· Last Password Change or Reset
Tip
Do not overwrite active or inactive user records with new user data
Salesforce recommends that you avoid overwriting inactive user records with new user data. Doing this prevents you from tracking the history of past users and the records associated with them.
There are also situations where you might consider it appropriate to recycle an active user record, but it is better to deactivate users when they are no longer using Salesforce and create a new record for each new user.
A typical real-world example of recycling a user record, and one to avoid, is sometimes encountered when a sales team is organized into sales territories.
The sales team user records in Salesforce are stamped with a territory indicator, and any account records that are located in their particular territory are assigned to the user record (set as the record owner). This way, the user record simply acts as a container for the territory.
Managing user records in this way results in both audit and maintenance issues. For example, if Tina Fox changes her sales territory, all her personal information (username, password, e-mail, address, phone number, and so on) has to be transferred to a new user record, requiring Tina to reactivate a new password and re-enter both personal details and all her personal preferences in the Salesforce application.
The issue worsens if the user record (or territory) that Tina is getting reassigned to is held by, say, Timothy Little, as he would also need to reset his personal details.
This approach leads to a technically complex method of territory reassignment and a very disappointing user experience for your sales team. Fortunately, Salesforce provides features such as criteria-based sharing rules, sales teams, and territory management to better manage the organization of sales territories.
Adding multiple users
If you have several users to add, you can add more than one at a time. To add multiple users, navigate to Setup | Manage Users | Users. Now, click on the Add Multiple Users button.
As you can see, this can be a quick method to create users, as not all required fields have to be entered in this page:
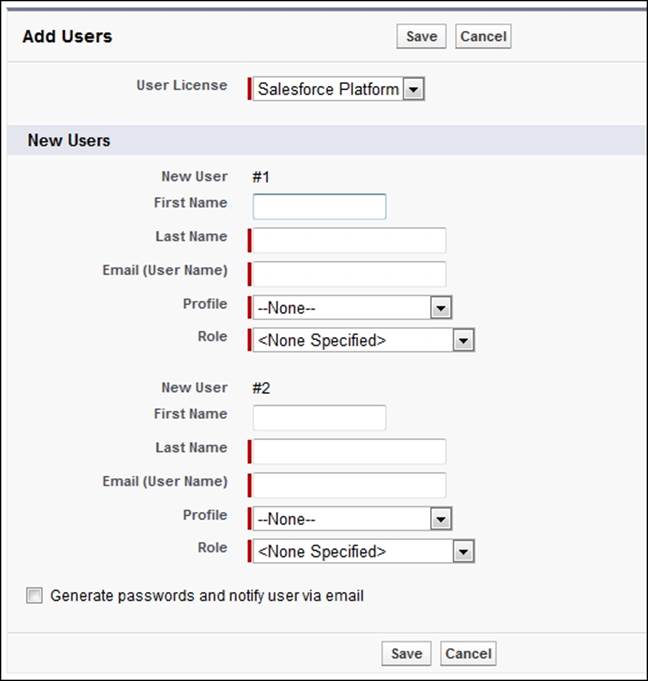
If, however, after initially saving multiple user records, you attempt to edit a user record via the user edit screen, you will be prompted to fill out all mandatory fields.
Delegation of user management
If you have an organization with a large number of users or a complex role hierarchy, you can delegate aspects of user administration to users who are not assigned with the system administrator profile.
This allows you to focus on tasks other than managing users for every department or structure that your company has within Salesforce. This provides further benefits for global organizations that encounter time zone and cultural differences, as it allows a user based in that region with local knowledge to create users, which saves time and results in a better user experience.
For example, you might want to allow the manager of the Asia Pacific Operations team to create and edit users in the Asia Pacific Operations Team Leader role and all subordinate roles.
There are currently two options to provide this delegated user management access:
· Create a profile with the Manage Users permission
· Use delegated administration
Creating a profile with the Manage Users permission
This option is not recommended and should be very carefully considered, as it allows a much greater range of system administration functions to be carried out by the user.
In addition to creating and managing users, the Manage Users permission also allows the user to perform the following:
· Expire all passwords
· Clone, edit, or delete profiles
· Edit or delete sharing settings
· Edit user login hours
By providing users with the Manage Users permission, as you can see, there are many other permissions that are switched on, which introduces security risks.
Using delegated administration
Delegated administration is a more secure method to provide delegated user management access, as it allows you to assign limited administrative privileges to the selected non-administrator users in your organization.
Delegated administrators can perform the following tasks:
· Create and edit users and reset passwords for users in specified roles and all subordinate roles
· Assign users to specified profiles
· Log in as a user who has granted login access to his or her administrator
To create delegated groups, navigate to Setup | Security Controls | Delegated Administration. Now, click on the New button or select the name of an existing delegated administration group.
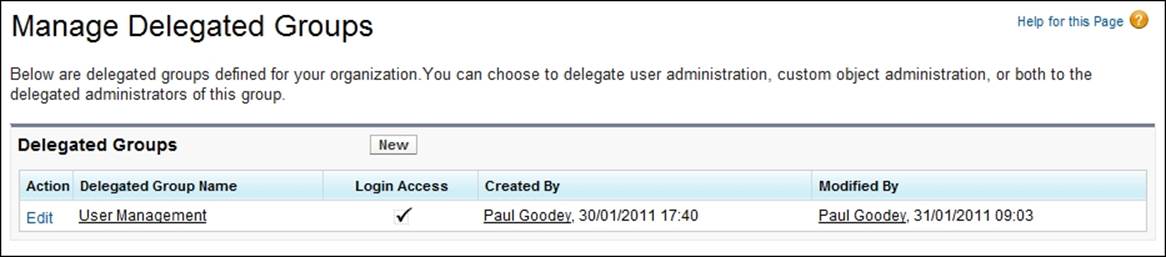
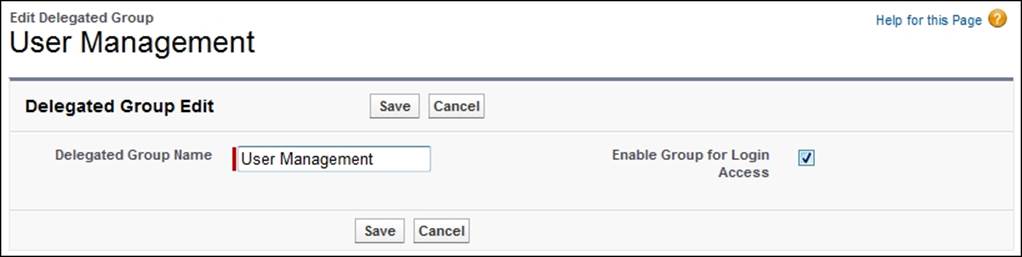
Here, we look at the existing group that has been named User Management:
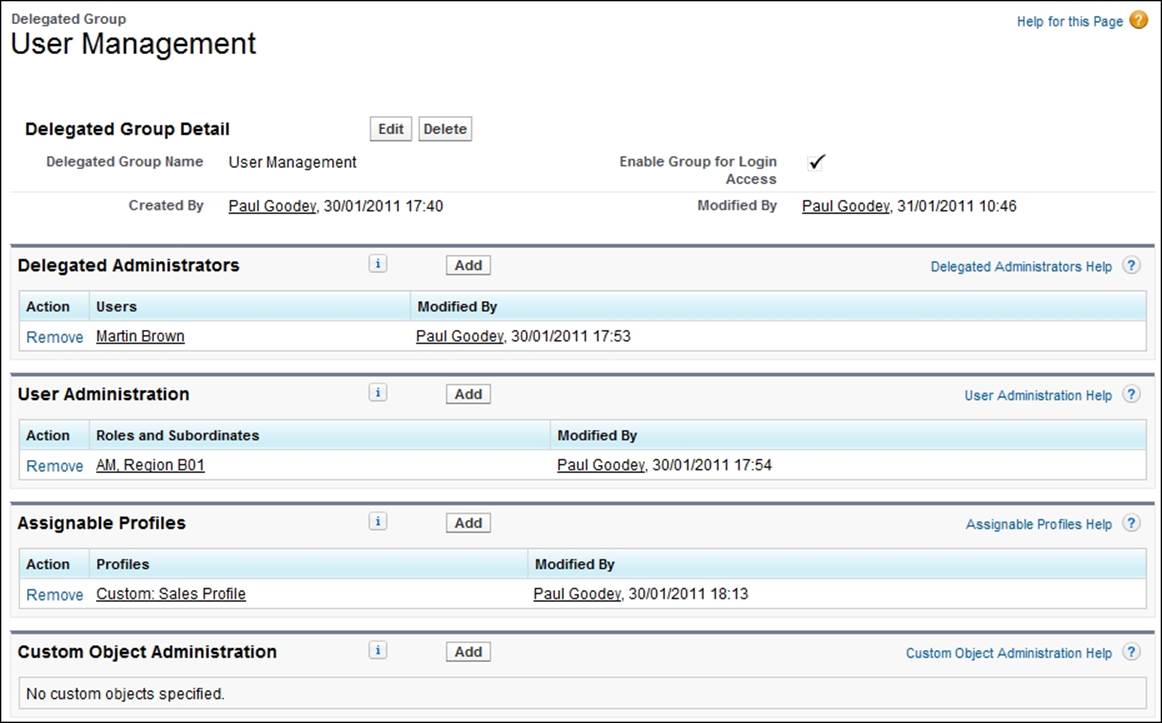
The Delegated Administrators section allows you to select and add the users that are to be given the delegated administration permission.
The User Administration section allows you to select and add roles that the delegated administrators can assign to the users they create and edit. They can assign users for the stated roles and all subordinated roles.
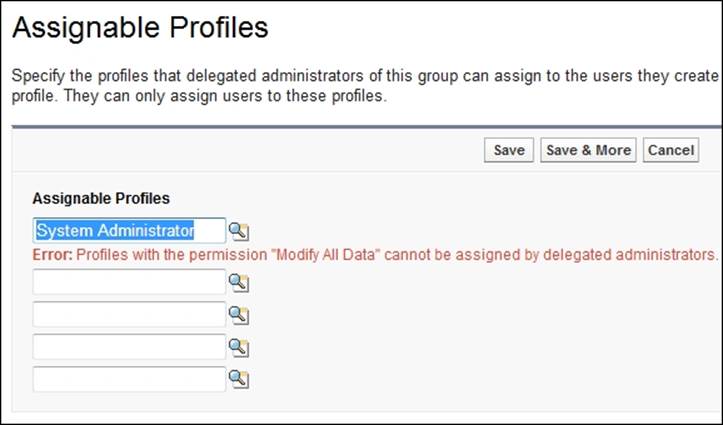
The Assignable Profiles section allows you to select and add profiles that the delegated administrators can assign to the users they create and edit.
To enforce security, profiles with the Modify All Data permission (such as the System Administrator profile) cannot be assigned by a delegated administrator. See the following example message that is shown when you attempt to allow the delegated administrator to assign the System Administrator profile:
Tip
If a user is a member of more than one delegated administration group, be aware that he or she can assign any of the assignable profiles to any of the users in roles he or she can manage.
Select the Enable Group for Login Access option if you want to allow delegated administrators in this group to log in as users who have granted login access to their administrators and are in the roles selected for the delegated administrator group.
To look at how users can grant login access to their administrators, refer to the Logging in as another user section toward the end of this chapter.
Tip
Agreement in using active user licenses by delegated user administrators
If you have established delegated user management in your organization, you will need to have an agreement between yourself and the delegated user administrators about how many of the available licenses can be used for each area of the organization. You cannot automatically limit the number of active users that can be created by users with these permissions.
Viewing and editing user information
To view or edit user information, navigate to Setup | Manage Users | Users. Now, click on Edit next to a user's name. Change the necessary information and click on Save.
Users can also change or add to their own personal information after they log in.
If you change a user's e-mail address and do not select the Generate new password and notify user immediately option, a confirmation message will be sent to the new e-mail address that you entered to verify the change of e-mail. The user must click on the link provided in that message for the new e-mail address to take effect.
If you change a user's e-mail and reset the password at the same time, the new password is automatically sent to the user's new e-mail address, and an e-mail verification is not required.
Click on Unlock to unlock a user who is locked out of Salesforce.
Note
The Unlock button is only available when a user is locked out.
Searching for users
You can use the search features (described in the previous chapter) to search for any user in your organization regardless of the user's status. However, when using a lookup dialog from fields within records, the search results return active users only.
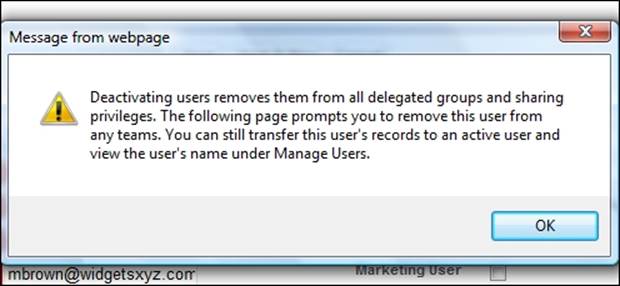
Deactivating users
You cannot remove users from the system, but you can deactivate their records so that they can no longer access the application. To deactivate users, navigate to Setup | Manage Users | Users. Now, click on Edit next to a user's name, disable the Activecheckbox, and then click on Save.
If the user is a member of account, sales, or case teams, you are prompted to remove the user from those teams.
When deactivating users, there are some considerations that should be borne in mind, such as the following:
· Deactivating users with Run as specified user dependencies set on dashboards causes those dashboards to stop displaying. Each dashboard has a running user whose security settings determine which data is to be displayed in a dashboard. You need to reassign Run as specified user to an active user with the appropriate permissions.
· As mentioned in Chapter 1, Organization Administration, in the section License information, Salesforce bills an organization based on the total number of licenses and not on active users.
· If Chatter is enabled, a user who has been included in either the Following or Followers list is deactivated and the user is removed from the list. However, he or she is restored to the lists if he or she is reactivated.
Note
Deactivating users who have been explicitly included as part of an approval process, which is described in Chapter 6, Implementing Business Processes in Salesforce CRM, will cause the approval step to fail.
Freezing user accounts
This feature allows you to freeze user records. Often, there are times where you might not want to deactivate a user immediately (such as when a user is part of an approval process) but you must prevent them from logging into your organization (as they have left the company, for example) while you perform the steps to deactivate them.
To freeze a user record, navigate to Setup | Manage Users | Users. Now, click on a user's name to access their user detail page. Then, click on the Freeze button.
Password management
You have the following options to reset passwords for users in Salesforce CRM:
· Resetting passwords
· Expiring passwords
Resetting passwords
If users have forgotten their password, they can click on the Forgot your password? link on the Salesforce CRM login page, which presents them with a screen to enter their username, as shown in the following screenshot:
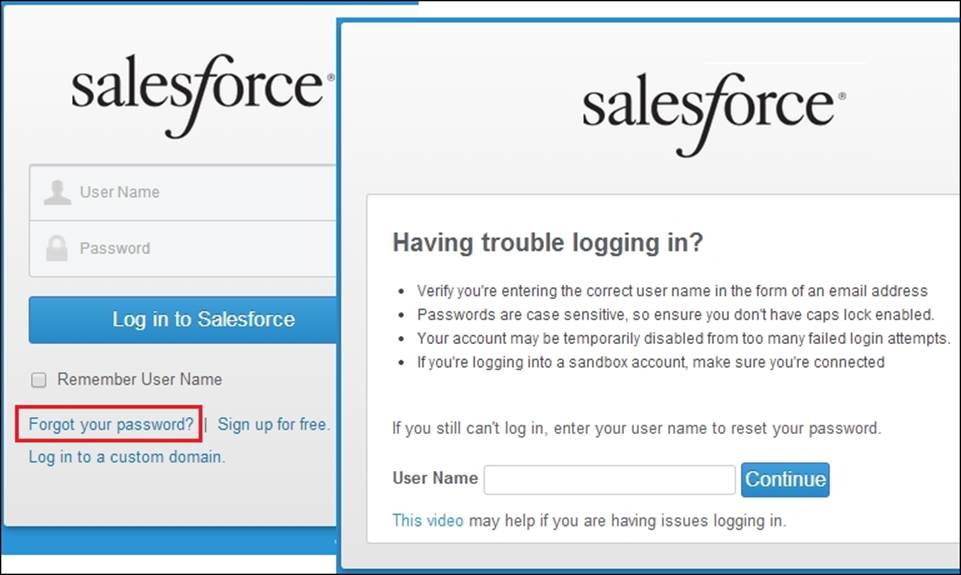
The user will then receive an e-mail from Salesforce that contains a new password link that will require them to answer a previously set security question, (such as Where were you born? ) before their password is reset, and then they can log in to Salesforce.
To reset a user's password, navigate to Setup | Manage Users | Users. Now, select the checkbox next to the user's name.
Optionally, to change the passwords for all currently displayed users, check the box in the column header to select all rows.
Click on Reset Password to have a new password e-mailed to the user(s).
Note
After you reset users' passwords, some users might need to reactivate their computers to successfully log in to Salesforce (see the previous chapter).
Expiring passwords
You can expire passwords for all users any time to enforce extra security for your organization. After you expire passwords, users might need to activate their computers to successfully log in to Salesforce (see the previous chapter).
Note
This includes system administrators if they don't have Password Never Expires activated on their profile (or permission set); however, the standard System Administrator profile has the Password Never Expires setting activated by default.
To expire passwords for all users except those with the Password Never Expires permission, navigate to Setup | Security Controls | Expire All Passwords. Now, select the Expire all user passwords checkbox and then click on Save.
The next time each user logs in, they will be prompted to reset their password.
Note
After you expire passwords, some users might need to reactivate their computers to successfully log in to Salesforce (see the previous chapter).
Password policies
There are several password and login policy features that help you improve your organization's security. To set these password policies, navigate to Setup | Security Controls | Password Policies. Select the required settings and then click on Save.
Let's look at each of the password policies that are shown in the following screenshot:
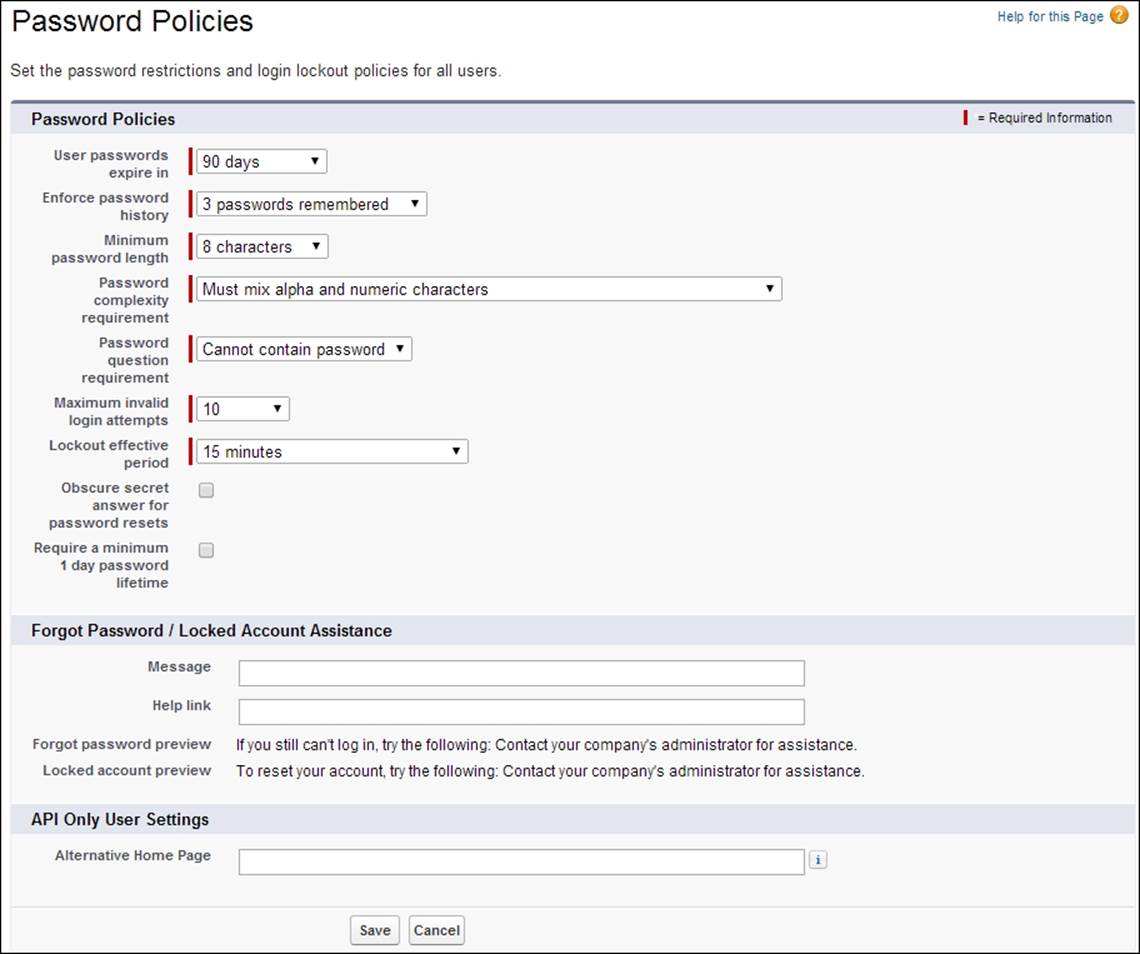
The user password expiration period
Password expiration periods for all users in your organization are set by the User passwords expire in picklist selection.
This sets the length of time until all user passwords expire and must be changed. Users with the Password Never Expires permission are not affected by this setting.
Note
The options are 30 days, 60 days, 90 days, 180 days, One Year, and Never Expires.
Enforce password history
The enforce password history setting is used to remember users' previous passwords so that they must always enter a previously unused password. The password history is not saved until you set this value. You cannot select the No passwords rememberedoption unless you select the Never expires option for the User passwords expire in field.
Note
The options are either No passwords remembered or between 1 password remembered and 24 passwords remembered.
Minimum password length
The Minimum password length feature sets the minimum number of characters required for a password. When you set this value, existing users are not affected until the next time they change their passwords.
Note
The options are 5 characters, 8 characters, 10 characters, or 12 characters.
Password complexity requirement
The Password complexity requirement feature sets a restriction on which types of characters must be used in a user's password. The options are No Restriction and Must mix alpha and numeric (which require at least one alphabetic character and one number), Must mix alpha, numeric and special characters (which requires at least one alphabetic character, one number, and one of the : !, #, $, %, -, _, =, +, <, and > characters), Must mix numbers and uppercase and lowercase letters (which requires at least one number, one uppercase letter, and one lowercase letter.), and Must mix numbers, uppercase and lowercase letters, and special characters (which requires at least one number, one uppercase letter, one lowercase letter, and one of the !, #, $, %, -, _, =, +, <, and > characters).
Note
The Must mix alpha and numeric characters option is the default option.
Password question requirement
Password question requirement setting requires a user's answer to the password hint question to not contain the password itself.
Note
The options are either Cannot contain password, which means that the answer to the password hint question cannot contain the actual password itself, or None, which is the the default, for no restrictions on the answer.
Maximum invalid login attempts
The Maximum invalid login attempts feature sets the number of incorrect login attempts allowed by a user before they get locked out. The options are No limit, 3, 5, and 10.
Note
The default number of invalid login attempts is 10.
Lockout effective period
The Lockout effective period feature sets the duration of the login lockout. The options are 15 minutes, 30 minutes, 60 minutes, and Forever (must be reset by admin).
Note
The default lockout effective period is 15 minutes.
If a user gets locked out, they can either wait until the lockout effective period expires, or you can view the user's information and click on Unlock. The Unlock button is only displayed when a user is locked out.
Obscure secret answer for password resets
The Obscure secret answer for password resets feature hides the text as users type the answers to security questions. The default option is unchecked, which will display the answer in plain text when users answer a security question, say, when they're resetting their passwords.
Require a minimum 1 day password lifetime
When selected, the Require a minimum 1 day password lifetime option prevents users from changing their passwords more than once per day. The default option is unchecked, which allows users to change their password as often as they like.
Forgot Password / Locked Account Assistance
The following sections discuss the options available under Forgot Password / Locked Account Assistance.
Message
By setting this message, the text will appear in the lockout e-mail that users receive whenever they need you to reset their password. Your users will also see the message text in the confirm identity screen and e-mail that they receive whenever their password is reset. It is useful to add your contact details and a personal message.
Help link
Setting this link results in the text above this option appearing as a web URL that, when clicked on, will allow your users to navigate to a separate page, such as a custom help page, that you have available.
API Only User Settings
The upcoming section discusses the option available under API Only User Settings.
Alternative Home Page
API Only Users will be redirected to this URL after they have confirmed a user management change (such as resetting a password). This can be used as a way of confirming the change as users with the profile or permission setting of API Only User cannot access Salesforce via the user interface and hence receive no visual confirmation.
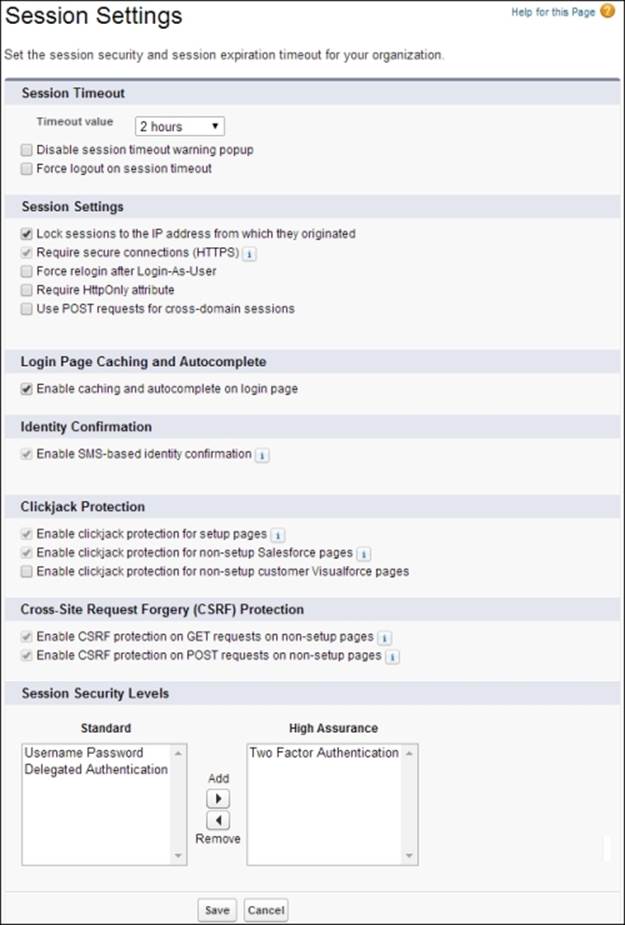
Session management
There are several session security features that help you improve your organization's security. These features include setting the session expiration timeout, locking sessions to the IP address from which they originated, and other organization-wide session settings. To set these session options, navigate to Setup | Security Controls | Session Settings. Select the required settings, as shown in the following screenshot, and then click Save:
Let's look at each of the session security features.
Session timeout
There are various features that can be used to set the session timeout as per the following sections.
Timeout value
Timeout value sets the length of time after which inactive users are automatically logged out of the system. The options are between 15 minutes and 12 hours.
Note
As a system administrator, you need to balance the requirements for user satisfaction and the enforcement of security controls; however, it is recommended that you choose as short a timeout period as possible to protect sensitive information and enforce stricter security.
The value of the last active session is not updated until halfway through the timeout period. So, if you have a 2-hour timeout, the system does not check for activity until 1 hour has passed. As an example, say, you have a 2-hour timeout value. If you update a record after 30 minutes, the last active session value is not updated because there was no activity after 1 hour and hence, you will still be logged out in another 1 hour and 30 minutes, because the last active session has not been updated.
Disable session timeout warning popup
The Disable session timeout warning popup feature sets whether inactive users are presented with a timeout warning message. Users are warned 30 seconds before the session timeout, as set by the timeout value.
Force logout on session timeout
Enabling Force logout on session timeout option causes inactive users to have their browsers refreshed and set to the Salesforce.com login page when the session times out.
Note
It is recommended that you do not select Disable session timeout warning popup when enabling the Force logout on the session timeout feature.
Session settings
There are various features that can be sued to set the session as per the following sections.
Lock sessions to the IP address from which they originated
The Lock sessions to the IP address from which they originated option is used to specify whether users' sessions are to be locked to the IP address with which they logged in.
Note
Enabling this option helps prevent the hijacking of valid user sessions by unauthorized people.
Require secure connections (HTTPS)
The Require secure connections (HTTPS) option sets whether HTTPS (instead of the less secure HTTP connection) is required to access Salesforce.
Note
This option is enabled by default and can only be disabled by sending a request to salesforce.com support.
Force relogin after Login-As-User
The Force relogin after Login-As-User option, when set, results in you having to log in again to get back into Salesforce after logging out as a logged-in user. When this is not set, you are taken to the original session after logging out as the logged-in user, and you do not have to re-log in.
Note
This option is enabled by default for new organizations since the Summer 2014 release.
Require HttpOnly attribute
The Require HttpOnly attribute option restricts access to the session ID cookies. The effect of this is that cookies with the HttpOnly attribute are not accessible using non-HTTP calls such as JavaScript methods from custom or packaged applications.
Note
Setting this will result in custom or packaged applications that use JavaScript to call session ID cookies that are no longer working, as they are denied access to the session cookie.
Use POST requests for cross-domain sessions
The Use POST requests for cross-domain sessions option configures the organization to send session information using a POST request instead of a GET request during cross-domain exchanges, such as when calling a Visualforce page that is served on a different URL to the standard Salesforce CRM pages.
Note
In this scenario, POST requests are more secure than GET requests as the session information is in the body of the request.
Login page caching and autocomplete
The Login page caching and autocomplete feature, which stores users' login details (just the list of usernames but not the password), is as per the upcoming section.
Enable caching and autocomplete on login page
The Enable caching and autocomplete on login page option enables users' browsers to store username text and so, after their initial log in, usernames are automatically set in the User Name field on the login page.
Note
This option is enabled by default.
Identity confirmation
The Identify confirmation feature, which allows further mechanisms to extend the standard use of e-mail confirmation, is as per the upcoming section.
Enable SMS-based identity confirmation
The Enable SMS-based identity confirmation option enables users to receive a One-Time PIN, which they receive via SMS. Once enabled, administrators or users must verify their mobile phone number before taking advantage of this feature.
Note
This option is enabled by default and can only be disabled by sending a request to salesforce.com support.
Clickjack protection
Clickjacking is a malicious technique of fooling a web user into clicking on something different from what the user intended and often takes the form of embedded code or script that executes without the user's knowledge, for example, when clicking on a button or concealed link that then performs another function. There are various features that can be used to set clickjack protection as per the upcoming sections.
Enable clickjack protection for setup pages
The Enable clickjack protection for setup pages option adds security to help guard against clickjack attacks on setup Salesforce pages.
Note
This option is enabled by default and can only be disabled by sending a request to salesforce.com support.
Enable clickjack protection for non-setup Salesforce pages
The Enable clickjack protection for non-setup Salesforce pages option adds security to help guard against clickjack attacks on non-setup Salesforce pages.
Note
This option is enabled by default and can only be disabled by sending a request to salesforce.com support.
Enable clickjack protection for non-setup customer Visualforce pages
The Enable clickjack protection for non-setup customer Visualforce pages option protects against clickjack attacks on your custom Visualforce pages. The effect of this is that Visualforce pages in a page layout do not function when clickjack protection is on.
Note
Setting this will result in custom Visualforce pages within a frame or iframe that is no longer working as intended; you might see a blank page or the page might get displayed without the frame.
Cross-Site Request Forgery (CSRF) Protection
Cross-Site Request Forgery (CSRF) is a malicious technique in which unauthorized commands are crafted (by a script or a page link, for example) to be sent by a user to a website that has been authenticated.
These options protect against CSRF attacks by modifying the non-setup pages to include a random string of characters in the URL parameters or as a hidden embedded field. The system then verifies this string of characters and only executes the command if the value matches the expected value. There are various features that can be used to set protection against CSRF attacks as per the upcoming sections.
Enable CSRF protection on GET requests on non-setup pages
The Enable CSRF protection on GET requests on non-setup pages option protects against CSRF attacks on GET requests on non-setup pages. It is enabled by default and can only be disabled by sending a request to salesforce.com support.
Enable CSRF protection on POST requests on non-setup pages
The Enable CSRF protection on POST requests on non-setup pages option protects against CSRF attacks on POST requests on non-setup pages. It is enabled by default and can only be disabled by sending a request to salesforce.com support.
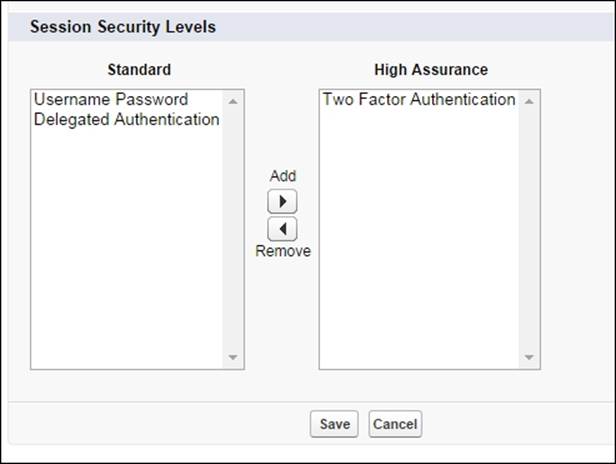
Session Security Levels
Session-level security settings are used for connected apps, reports, and dashboards. Here, you can restrict access to these areas of functionality based on the level of security associated with the authentication (login) method for the user's current session. You can restrict access to connected apps, reports, and dashboards by setting the level of security associated with the user's current authentication (login) method; each login method has one of the two security levels: either Standard or High Assurance. Different authentication methods are assigned with the following security levels:
· Username Password – Standard
· Delegated Authentication – Standard
· Two-Factor Authentication – High Assurance
· Authentication Provider – Standard
· SAML – Standard
To change the security level associated with a login method, navigate to Setup | Security Controls | Session Settings. Locate Session Security Levels, select the login method, and then click on the Add or Remove arrow to move it to the required category, as shown in the following screenshot:
Logging in as another user
To assist other users, you can log in to Salesforce as another user. If you have been granted access, you will see a Login button on their user record if they have granted login access to their administrator.
System administrators can also log in as any user in their organization without asking users to grant login access.
Note
This feature is only available by sending a request to Salesforce.com support to have this in your organization.
If you have had this feature activated by Salesforce, you can enable login access by navigating to Setup | Security Controls | Login Access Policies. On the Login Access Policies page, enable Administrators Can Log in as Any User. Finally, click on Save.
To log in as another user, navigate to Setup | Manage Users | Users. Now, click on the Login link next to the user who has granted you access.
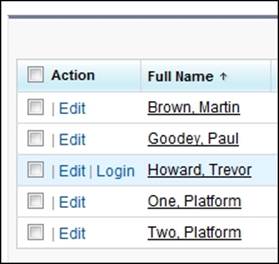
You can also log in as another user from the User Detail page using the Login button, as shown in the following screenshot:
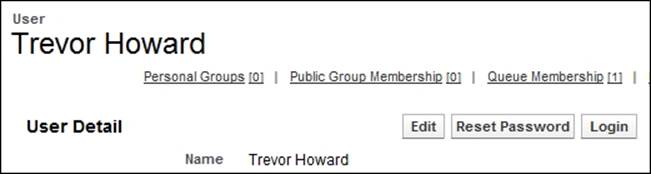
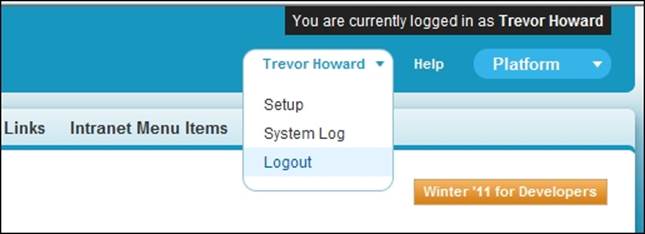
The Login link or button only appears for users who have granted login access to an administrator. After you have logged in as another user, you will notice a message in the top-right corner of all Salesforce pages that display the You are currently logged in asmessage.
To return to your administrator account, click on the logged-in user's name (the user who has granted you access—Trevor Howard, in this example). Then, click on the Logout option.
Note
Regardless of the login access policy, whenever an administrator logs in as another user, the login and logout events are recorded in the setup audit trail.
A how-to guide to help users grant login access to you
There are many occasions where it is useful for you to log in as one of the users in your organization. This could be, say, to check data access from their role or profile or to check reports or dashboards, and so on.
Rather than instructing individuals one by one, you can save time for both yourself and the users in your organization by preparing a how-to guide to help users grant login access to you. Produce a how-to guide that lists the steps that need to be taken to create the required setting; the following is an example:
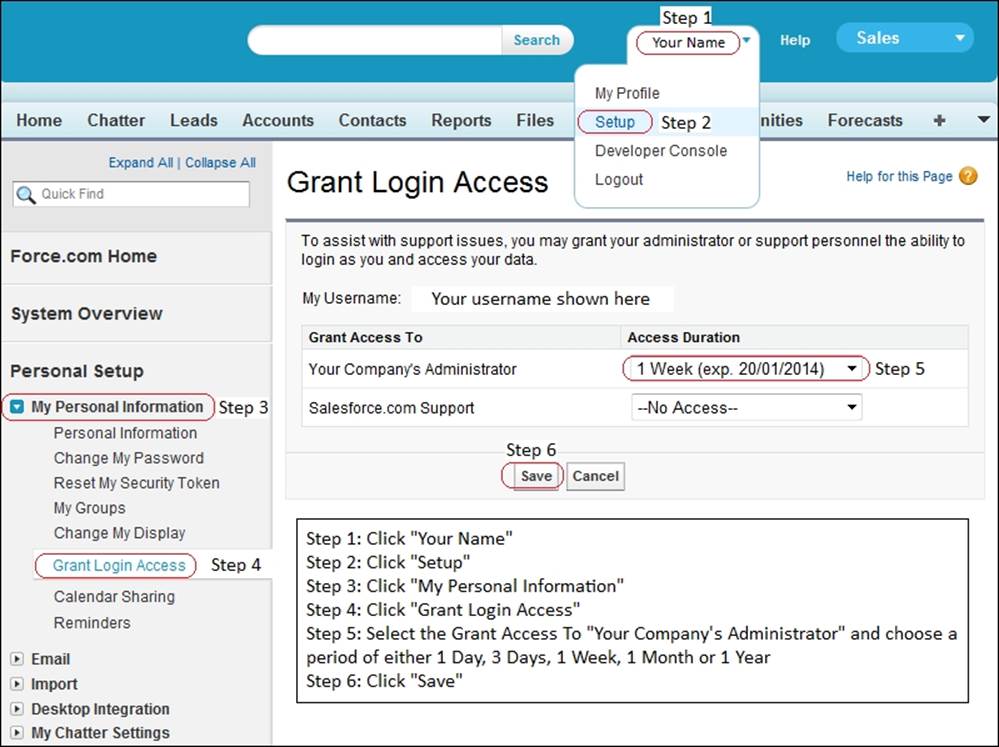
When the Administrators Can Log in as Any User feature is enabled, users will no longer have the option to grant login access to administrators, but they can still grant login access to Salesforce.com support.
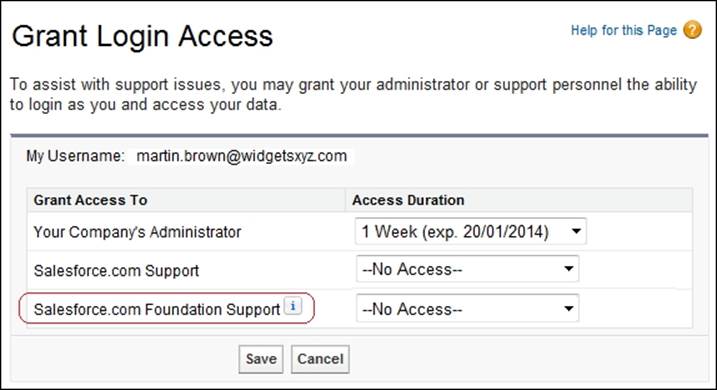
Where additional apps have been installed, the list of entities that users can select to grant access might increase. For example, if your organization has installed the Nonprofit Starter Pack app published by the Salesforce.com Foundation (seehttp://www.salesforcefoundation.org/nonprofitstarterpack), you will see the option to grant access to this organization's support team, as shown in the following screenshot:
Creating custom user fields
You can create custom fields for users and set custom links that appear on the user detail page. To go to the user field's page, navigate to Setup | Customize | Users | Fields, and then scroll down to the User Custom Fields section.
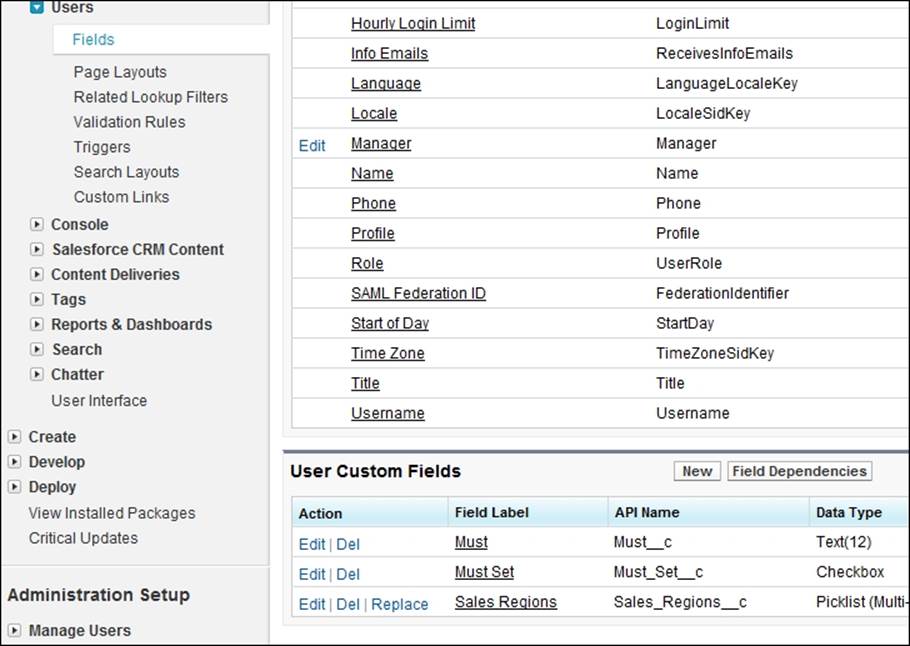
The User object can be considered a special object in Salesforce, as there are restrictions on what can be configured. For example, there can be only one record type and page layout for the User object.
Summary
In this chapter, we described the features that are used to manage users within Salesforce CRM.
We looked at how user information can be accessed, the mechanisms to manage user passwords, and the options to set the session security.
We were introduced to the concepts of record ownership, profiles, and sharing and discussed at a high level how these concepts are used to control the application and record permissions for users.
We discussed other features that help with the administration of users using features such as granting login access to administrators and enabling delegated user administration.
In the next chapter, we will look in detail at mechanisms to control access to data and the features that provide data management and record sharing.
All materials on the site are licensed Creative Commons Attribution-Sharealike 3.0 Unported CC BY-SA 3.0 & GNU Free Documentation License (GFDL)
If you are the copyright holder of any material contained on our site and intend to remove it, please contact our site administrator for approval.
© 2016-2026 All site design rights belong to S.Y.A.