Selenium Design Patterns and Best Practices (2014)
Chapter 2. The Spaghetti Pattern
|
"Always code as if the guy who ends up maintaining your code will be a violent psychopath who knows where you live." |
||
|
--Martin Golding |
||
Writing and maintaining any form of software is like fighting entropy; given enough time and changes, any code base will gradually decline into disorder. A test suite is a closed system; if you do not provide energy in constant upkeep and planning, the suite will deteriorate and will fail constantly. Every new feature and line of code added to our website makes our test suite obsolete. The only way to fight back these natural forces is to constantly upgrade and improve existing tests.
In this chapter, we will start to grow our test suite organically and take a look at an anti-pattern called the Spaghetti pattern. Along the way, we will pick up some more basic skills, such as using XPath and CSS selectors to locate the elements on a web page.
Note
The term anti-pattern was inspired by a great book on software design called Design Patterns: Elements of Reusable Object-Oriented Software by Erich Gamma, Richard Helm, Ralph Johnson, and John Vlissides, published by Addison-Wesley Professional and is roughly defined as a common practice, which seems appropriate for current situation, but has a lot of unintended side effects. Furthermore, a better solution for the problem does exist, but is typically ignored in favor of the initial obvious but wrong solution.
In order to write the new tests in this chapter, we will cover the following topics:
· Spaghetti pattern
· Element locator strategies
· XPath and CSS selector query languages
· Relative and absolute path
· Browser inspector tool
· Test run order
· Chain Linked pattern
· Big Ball of Mud pattern
Introducing the Spaghetti pattern
In automated test projects, the Spaghetti pattern development is characterized by lack of perceived architecture and design. This style of test development evokes an image of bowl of spaghetti, where each strand of spaghetti can represent a single test or multiple tests intertwined so tightly together that it becomes difficult to tell one apart from another. Furthermore, it is close to impossible to understand anything at a glance without spending time fishing out and untangling each individual strand of spaghetti from the bowl.
Tests in this pattern not only depend on the execution order of all the tests, but also tend to over-share internal private components with each other. The run order is important because each test is not self sufficient and independent, and thus needs previously run tests to set up the test environment. For example, a login test requires the registration test to successfully register a new user, instead of having an existing user or registering one on its own. Furthermore, variables in the test suite are shared on a global level, allowing individual tests too much control over the whole test suite.
Note
The Spaghetti pattern is a close relative to the Chain Linked pattern and the Big Ball of Mud pattern. We will discuss both of these patterns at the end of this chapter.
Advantages of the Spaghetti pattern
Even though the Spaghetti pattern is an anti-pattern, it is not without some positive elements. Let's take a look at several positives:
· Quick start: The reason that this type of a development pattern is initially popular is because it is by far the easiest and fastest way to get going. No need to sit down and plan ahead; just use Record and Playback to record one long test session and split it up into smaller chunks.
· Smaller code base: Since all the tests depend on each other, we do not need to repeat test actions within individual tests. As a result, each individual test is smaller in code size, and we do not need to have unique test data for each test.
Tip
This is by far the worst justification for any anti-pattern. We no longer live in the Commodore 64 days; if a test or a piece of code needs an additional 20 lines of code to become easy to comprehend, then always choose verbosity over brevity.
· Smoke tests: By definition, smoke tests need to be fast, brief, and leave as small a test data footprint as possible. Having several tests that reuse a single registered user in production is a good practice. No need to fill up the production database with test users.
Note
We will discuss different test suite types, including smoke tests, in more detail in Chapter 8, Growing the Test Suite.
Disadvantages of the Spaghetti pattern
Aside from the ability to get going fast, the Spaghetti pattern has many disadvantages:
· Anti-pattern: Building one test on top of another seems like a great idea at first. After all, this is how we test applications when we do it manually. However, in context of test automation, this leads to long-term maintainability problems. Thus, it is considered an anti-pattern.
· Tight coupling: The more tightly integrated individual parts of the application are, the more indistinguishable they are from each other. Tight coupling prevents code reusability and leads to duplication.
Note
We will concentrate on code reusability and decoupling in Chapter 3, Refactoring Tests.
No random order: Dependence on the strict order of execution leads to the inability to run our tests in a random order. This might not seem like a problem at first, until we need to debug test data pollution in the test suite.
Note
Data pollution occurs when a certain test puts the test environment into an unrecoverable state by adding unexpected data into the database or memory. If that test is executed last in the test suite, an application crash might not be detected until the execution order is accidentally switched.
· No parallel test runs: Once the test suite grows in size, we might wish to reduce the total execution time by running multiple tests in parallel. Having each test depend on the execution order of the whole suite will prevent us from accomplishing this task.
· Covers up failures: A failure in the beginning of the test suite can prevent the execution of the entire test suite. Several tests that would have failed later in the suite are never executed.
· No resilience: Certain tests are not able to fulfill their target goals. A credit card processing test that does not know how to register a required user will never run if the user registration test fails due to an unrelated issue.
Testing the product review functionality
Our website, like many other modern websites, allows users to leave positive and negative feedback on a given product. Higher-rated comments on any given product can provide a much needed boost in sales. As with any situation involving monetary incentives, someone will try to game the system and make money in the process. So, aside from the ability to leave a comment, our website has a rudimentary fraud prevention system. It will prevent any suspiciously duplicate comments/ratings from being added to any product.
It is now our task to test both of these features. So, let's explicitly state the target goals of the tests we will now implement:
· As a website user, I should be able to leave a product review for any product, and the resulting review should be immediately visible on the product's page
· As a fraudulent user, I should be prevented from posting duplicate product reviews on our website
Starting a product review test
Let's start off by making a new file, product_review_test.rb. In this file, we will be writing our tests for this chapter. We will copy and paste most of the initial boilerplate from cheese_finder_test.rb from the previous chapter.
Note
Boilerplate code refers to parts of the code that remain close to identical between different files/classes. Several examples of boilerplate are includes, requires, and imports. These are used by most programming languages to specify dependencies used in the current file.
The starting point of our test will look like this:
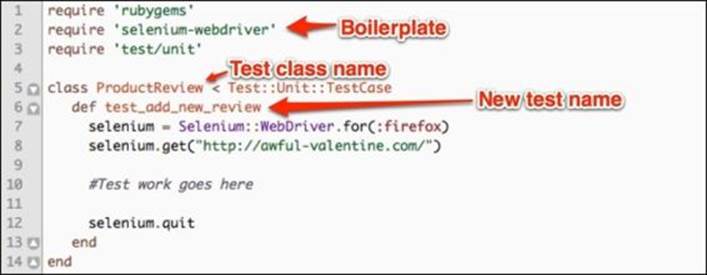
As described in the previous chapter, in our test we created an instance of selenium and sent it a command to navigate to our website of choice. Later, we have a comment #Test work goes here followed by a command to close the instance of Firefox we are using with selenium.quit.
Tip
The test name and class name for this file has changed. You can find a more detailed explanation of Ruby class names under the Understanding test class naming section, in Appendix, Getting Started with Selenium.
The steps of our new product review test are listed as follows:
1. Locate and click on the MORE INFO button for the product of your choice.

2. Check whether the correct product was selected.
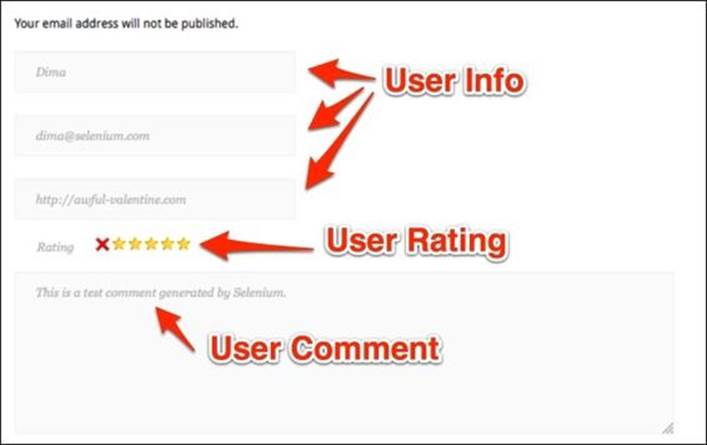
3. Fill in the user information, comment, and rating and submit the review.
4. Check whether the product review is properly saved:

Let's implement our test!
Locating elements on the page
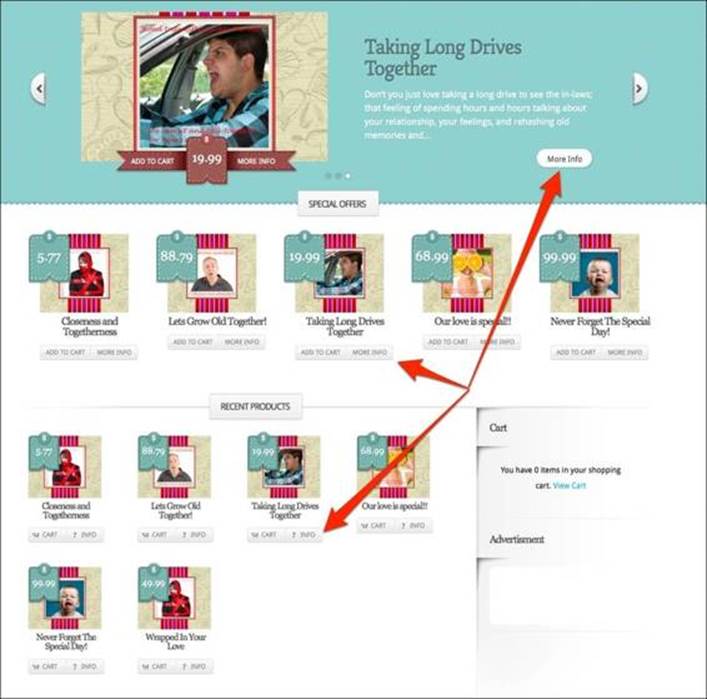
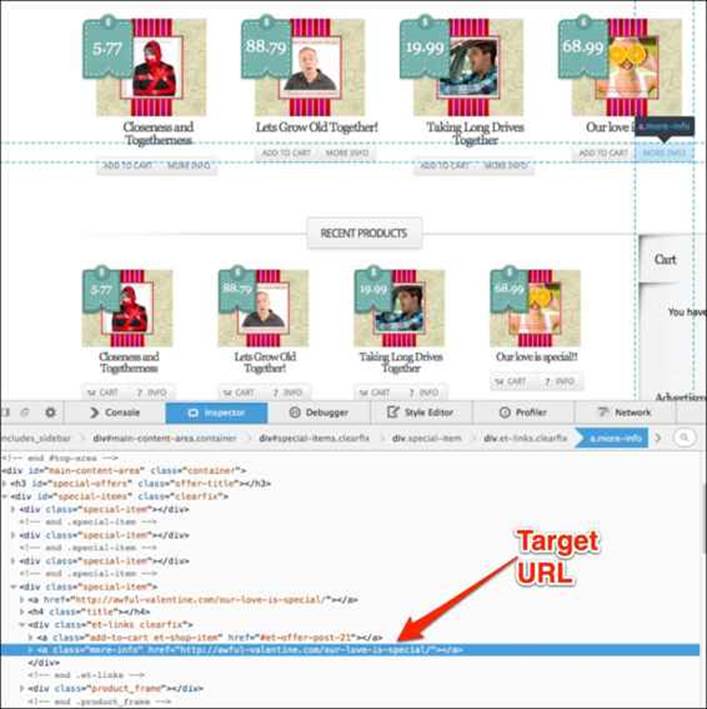
The first step of the test_add_new_review implementation is to navigate to the home page of our site and click on the MORE INFO button of the product we wish to review. However, it has to be the product in the SPECIAL OFFERS section, as shown in the following screenshot:
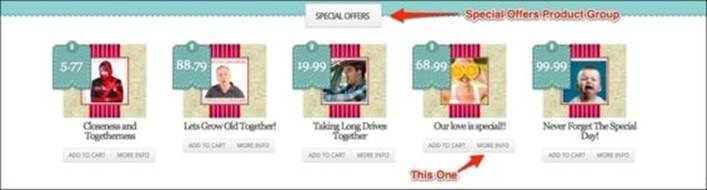
Since there are multiple products with the MORE INFO button and sometimes we have the same product on the page multiple times, each with the MORE INFO button, the task seems impossibly hard. The following screenshot shows an example of a product with three occurrences of the MORE INFO button:
But fret not; the solution is extremely simple once we learn about different ways of locating elements on the page. The first step is to locate the element we want to interact with on the page. For this purpose, most modern browsers have a built-in page inspector.
Using a browser's element inspector
Until recently, when writing an automated test, we would have to open up the HTML source of any given page and hunt through the code to find the element we want. Needless to say, this was difficult and time-consuming. In recent iterations of Firefox and Chrome browsers, the functionality of the Firebug plugin was copied into the browser, allowing users to interactively inspect any element on the page. This makes our life as test automators a lot easier! Let's get our hands dirty with the page inspector.
Note
Firebug was one of the earliest Firefox plugins, which gave users the ability to inspect the elements on the page, directly interact with CSS, and do much more. The majority of built-in inspectors function identically to Firebug. This plugin is still backwards compatible with Firefox Version 3, and it is a great option for users who are not able to use latest version of Firefox or Chrome. For more info, visit https://addons.mozilla.org/en-US/firefox/addon/firebug/.
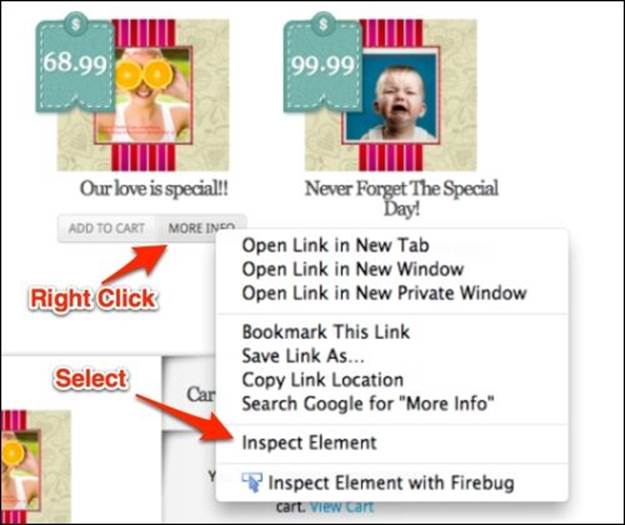
To inspect the desired element, all we have to do is right click on the MORE INFO button of the product and select the Inspect Element option from the context menu, as shown in the following screenshot:
Once the inspector window opens, we will see the following breakdown of the page source:
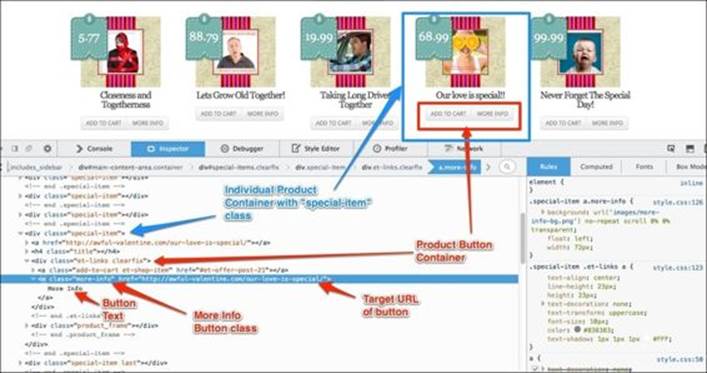
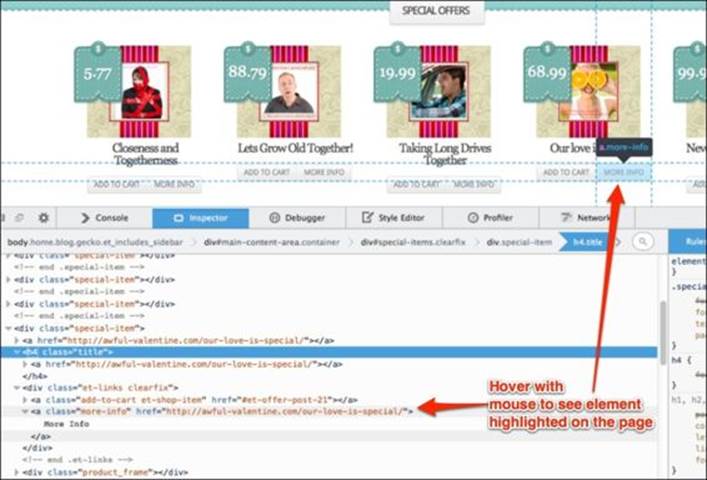
If you ever feel lost looking at the inspector, just remember, hovering over a piece of HTML code will highlight that element on the page.
Using the element IDs, tags, classes, and position within parent elements, we are able to express an exact location of any element on the page. Let's talk about different ways of expressing the element locations next.
Introducing locator strategies
When giving driving direction to someone, we can express said instructions in multiple ways. We can show the destination on a map or give a turn-by-turn instruction, or even give the individual the final address and let them use a GPS to find the address. Similarly, WebDriver allows us to find an element through the following strategies:
· ID: This finds an element that has an ID provided. By far, it's the best way to locate any element because we can jump directly to the element without having to deal with surrounding elements or parent elements.
Note
Even though finding an element by ID is the best location strategy, we have to use it with care. There is no guarantee that an element we want will have an ID attached to it, or that a given element ID is unique.
· Class name: This will locate an element(s) with a given class name.
Note
We might get different search results if we use the find_element method vs find_elements. The first method will return the first element found out of all matches on the page; the second method will return all matching elements. In our case, searching for all of the buttons with a class of more information will return many results. Thus, it is not the most useful approach.
· Link text: This finds a link that has an exact text in it; in our case, MORE INFO.
Note
Since most modern website use links that are styled with CSS to look like buttons, the term link and button are used interchangeably in this book.
· Partial link text: This is similar to link text locator, but allows a wild card search for partial text match. In our case a search for info will return all of the MORE INFO buttons.
· Name: This searches for all elements that have a name property.
Note
The name is not the most popular element property in modern websites, thus this locator strategy is rarely used.
· Tag name: This searches for an element's tag name, such as input or label.
· CSS selector: This searches for elements with custom-written CSS selector style query.
· XPath: This searches for elements with custom-written XPath style query.
In a perfect world, all of the buttons on the home page would have unique IDs. Within the ID, we would be able to specify the product name or SKU number and the location of the product, such as the Special Offers section or in the Featured section. In that case, if we ever wanted to click on the exact MORE INFO button we want, all that we would have to do is write this one line:
selenium.find_element(:id, "more-info-product-25-special-offer").click
Sadly, things are typically not this simple, and elements don't have unique IDs that we can use. More often than not, we have to find the location of the element using CSS selectors or XPath; in the next section, we will learn about these advanced techniques.
Tip
Just because our website does not have unique IDs, it does not mean we have to give up and try to find a difficult solution for finding and element. It is amazing how often a unique identifier can be added to the website by simply talking to the developers and making a good case for it. If an argument such as "it will make testing much simpler for me" does not work, an argument of making the website accessible for the blind might work. Screen readers work best with lots of uniquely identifiable elements.
Using advanced locator strategies
Searching for an element by using the unique ID of the element is similar to giving your friends the address of the party and letting them figure out the directions with a smart phone. Aside from several glitches in the navigation software, it is the fastest and simplest way to get around. However, when a smart phone or a map is not available, we have to write directions on a napkin.
We can give directions in two ways, the absolute path and relative path. Let's compare these two types of directions:
· Absolute path: This is a very detailed set of instructions starting from the friend's house and gives every turn, road name, number, and even the distance between each turn. My dad typically gives directions in this manner.
· Relative path: This approach is a little more relaxed and is the preferred way of giving directions by my mother. These directions typically look like this: "Get to that big store where we bought this rug from, you remember? Then take a left and drive until you see the blue gas station, turn around, and turn right on the second stop sign you see."
Both approaches have their own advantages and disadvantages. The absolute path requires the least amount of thinking and is simplest to follow. However, it is very rigid and becomes useless if there is a traffic accident on the way and we need to find new directions. The relative path requires the most concentration from the driver, but at the same time is the most flexible. By setting the starting point of the directions at a known location that is close to the destination, it allows the driver to take any route he or she wishes.
As you already guessed, the driving directions example is a thinly veiled metaphor for locating elements. The two most common ways of describing the direction to elements on the page are called XPath and CSS selector. Let's discuss how absolute and relative paths are used in these two query languages. First we will start with the absolute path.
Using the absolute path
If we write out the absolute path to the MORE INFO button we want to click on, we would start from the very top: from the <html> tag. Then, we would go into the <body> tag, followed by the <div> tag, and so on. The fully written out path looks like this in XPath notation:
/html/body/div[4]/div[1]/div[4]/div[1]/a[2]
Note
The absolute path for the button written in CSS selector is this (it is just as complicated and ugly as the XPath example):
html.js body.home.blog.gecko.et_includes_sidebar div#main-content-area.container div#special-items.clearfix div.special-item div.et-links.clearfix a.more-info
As you can see, when reading from right to left, we are looking for a second link <a> that is in the first <div> tag of the fourth <div> tag and so on, until <html> is found. Computers love this type of description, as it is easy to understand: just travel two miles, take the third left, and travel five miles more. But wait a minute, what happens if we add one more new product to the home page? Well, all of the numbers will be off by one and the test will now click on the wrong link. Of course, you did say that you wanted the fourth <div> tag and not the fifth after all. Even though using the absolute path is super fast and efficient for the computer, it is rarely used since it is very easy to break. Thus, we use the relative path the majority of the time to find the elements we want.
Tip
Hard coding the position of any element on the page is a poor practice and should be avoided at all costs.
Using the relative path
The best practice to find an element is to use as much contextual information as possible to find the desired element. To accomplish this, we need to start from the closest most unique parent element and drill our way down to the child element that we want. Let's look at a visual step-by-step demonstration:
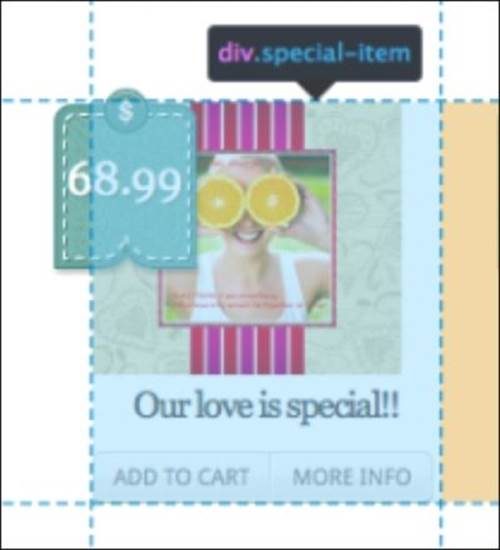
1. Since the button we are interested in is in the Special Offers section, this will become the starting point for the element search.

2. Within the special-items container, we have four special-item products.
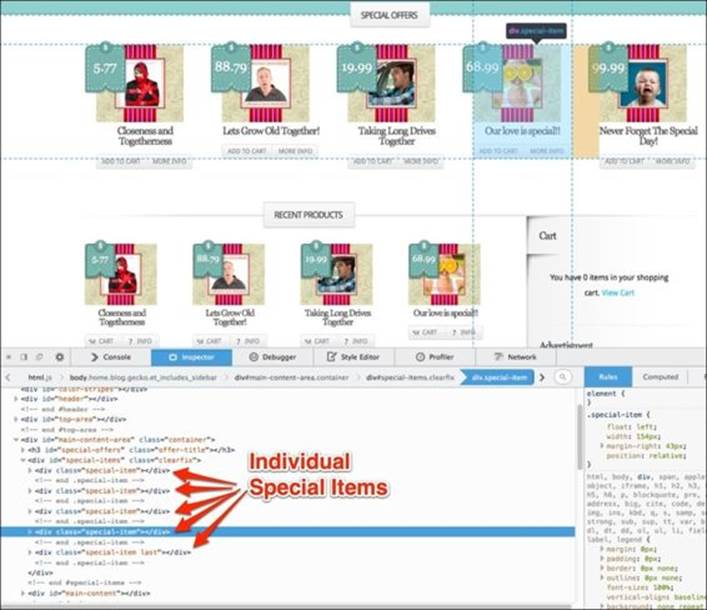
3. All of the special-item containers have a button with the more-info class. Since there are no unique IDs to help us distinguish one product from the other, we look at the target URL for all of the buttons. Once we find the one that should lead us to the correct product, we will click on it.
In this example, we started by looking at the grandparent of the desired element and drilling down to the desired child element. XPath and CSS selectors allow reverse traversal from a child element up to the parent element.
Writing locator strategy code
Now that you have a theoretical understanding of the search, let's take a look at a couple of practical examples. We have three ways of implementing the search for the element. When confronted with a similar situation, always choose the approach that is best for the current situation.
Tip
Keep in mind that sometimes one of the approaches will be a lot shorter than the other two. However, the smallest solution that is difficult to understand is always worse than a long solution that is obvious.
Using chained selector strategy methods
Typically, using the find_element methods chained in the row is the simplest solution to understand. It is highly verbose, but each individual step is small, concise, and easy to understand compared to a cryptic XPath or CSS selector statement. Let's break down each step of the solution:
special_items = selenium.find_elements(:class, "special-item")
The first step is to collect all of the special-item DIVs, for example:
This will give us an array of possible options. Next, we refine our search by looping through all of the special-item DIVs and collecting all the buttons that have the more-info class:
more_info_buttons = special_items.collect do |special_item|
special_item.find_element(:class, "more-info")
end
Note
The collect method is useful to loop through an existing array and build a new array of selected items.
Finally, we use the find method to loop through the array and pick the button whose href attribute matches the URL of the desired product:
button_to_click = more_info_buttons.find do |button|
button.attribute("href").include?("our-love-is-special")
end
Now that we located the MORE INFO button, we are ready to click on it!
Note
The uninterrupted code snipped looks like this:
special_items = selenium.find_elements(:class, "special-item")
more_info_buttons = special_items.collect do |special_item|
special_item.find_elements(:class, "more-info")
end
button_to_click = more_info_buttons.find do |button|
button.attribute("href").include?("our-love-is-special")
end
Using the CSS selector
Looking for the desired element with CSS selector can be accomplished with one line, but it will require basic knowledge of CSS selector syntax:
selenium.find_element(:css, '.special-item a[href*="our-love-is-special"].more-info')
In this code snippet, we use the .special-item statement to find all of the special items. We then refine our search to retrieve all of the links with the appropriate href attribute. We finish our search by narrowing down the link list to only the links with the more-info class.
Note
A very good beginner tutorial for CSS selector is located on the SauceLabs website: https://saucelabs.com/resources/selenium/css-selectors.
Using XPath
In XPath notation, the search query will look like this:
selenium.find_element(:xpath, "//div[@class='special-item']//a[contains(@href, 'our-love-is-special') and @class='more-info']")
The // symbol in XPath denotes a relative position of elements compared to each other.
Note
W3Schools has a detailed XPath tutorial at http://www.w3schools.com/XPath/.
When trying to find an element, don't be shy to use any mixture of the mentioned strategies if you need to accomplish the task. Mix and match as much as you need, as long as it is clearly expressed and easy to understand.
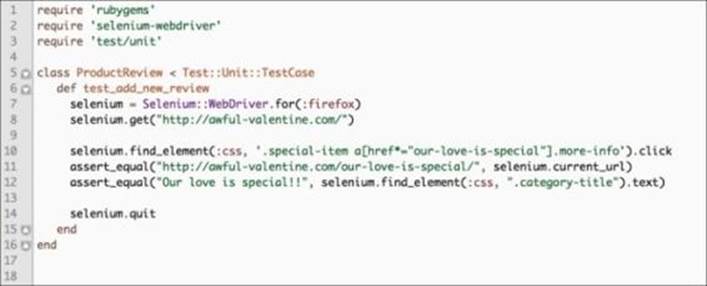
Implementing clicks and assertions
Now that we have had a crash course in element locator strategies, we should be able to face any challenge—no matter how difficult it is. Using the CSS selector strategy, we will click on the MORE INFO button for our product and check whether we are taken to the correct product page by checking the URL, as shown in the following code:
selenium.find_element(:css, '.special-item a[href*="our-love-is-special"].more-info').click
assert_equal("http://awful-valentine.com/our-love-is-special/", selenium.current_url)
Next, we will use the class locator to get the category-title DIV and then check whether the product title matches the expectation:
assert_equal("Our love is special!!", selenium.find_element(:class "category-title").text)
Our test file now looks like this:
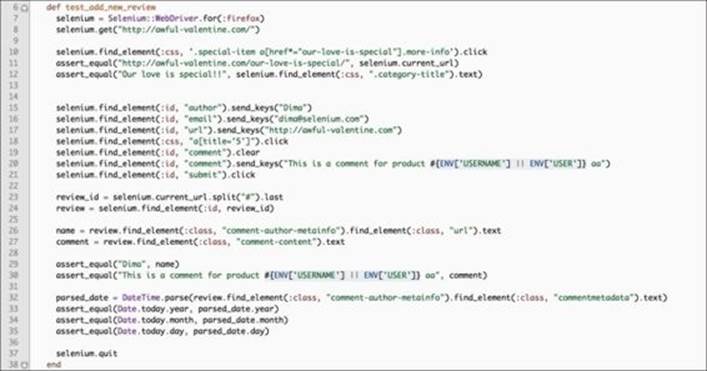
Next, we will add some lines to fill out the product review form and submit the form. We will accomplish this with these seven lines of code:

There are two items of note in preceding code:
· On line 18, we are using CSS selector strategy to click on the five-star rating for the product.
· On line 20, we append the computer's username to the comment to make it unique enough to allow the product review to not be rejected by the fraud filter. We will improve this situation in Chapter 4, Data-driven Testing.
After the review form is submitted, the product page will refresh and the new review should appear on the page. Time to add some assertions to verify that everything was saved properly.
We could cheat a little and just make an assertion that our semi-unique comment, which we left on the review form, appears somewhere on the page. However, this approach might get us in trouble if an identical comment already exists on the page; our test would not be able to distinguish the existing review from the new one we just created. It is a much better approach to capture the container of the newly created review and check whether each piece of information is correct.
Lucky for us, when a new comment is created, the unique review ID is placed as a hyperlink anchor into the browser's URL. Take a look at this:
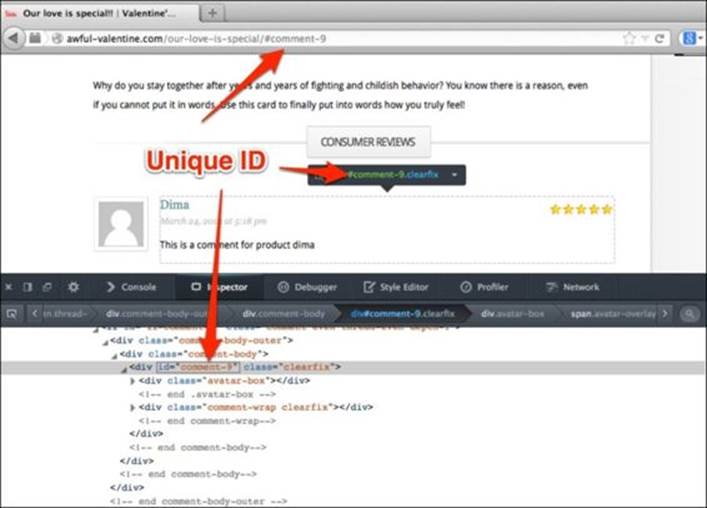
Let's use the selenium.current_url method to get the URL and parse out the unique review ID:
comment_id = selenium.current_url.split("#").last
In the preceding code, we are splitting the whole URL string on the hash tag (#) and taking the last item from the resulting array; for me, it was the ninth comment posted to the website so my unique ID is comment-9.
Now that we have a way to pull out just the data we care about, let's store the review container in the review variable so that we can interrogate it later. The code should look like this:

Now let's get the reviewer's name and comment, and then assert the expected value to the actual value:

Let's get a little creative; check the date of the newly created comment. We will take a human readable date that looks something like March 3, 2014 at 3:05 pm and convert it into a DateTime object with the parse method. After the parsing is complete, we will use the Date.todaymethod call to assert that the timestamp on screen matches today. The code looks like this:

Let's take a look at our comment test in its full glory:
Duplicating the product review test
Our second test will be a prime example of the Spaghetti pattern. It will completely depend on the first test to set up the test environment and make it ready. The second test is slightly shorter than the first, since it only has one assert at the end. Let's take a look attest_adding_a_duplicate_review:
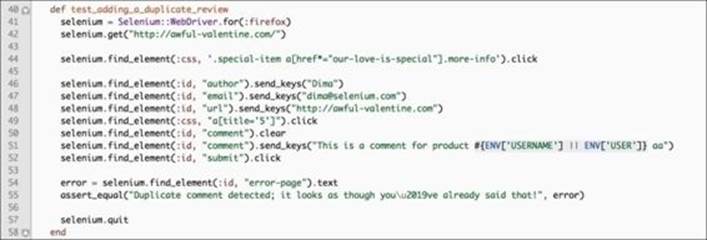
Due to the fact that this test relies on unique data, we might need to alter the text that goes into the comment text box in order to get the tests to pass during multiple concurrent runs. This is done intentionally to show that data going into the text fields is important and can be extremelydifficult to manage.
Note
We will learn how to properly handle test data in Chapter 4, Data-driven Testing.
Reasons for failures
We finished our two tests and we should now examine just how fragile they are. Even though the design of our tests made sense at the time of writing them, they will fail at the slightest provocation. Let's imagine a couple of real-life situations.
The sales team decided that having to change the amount of exclamation marks in the name of the product. These little tweaks happen all the time. We won't change the actual website, but we will change our test to expect a different amount of exclamation marks in the assertion. This will provide a sufficient discrepancy between the test and reality to make the test fail.
Note
You can download the full test code from http://awful-valentine.com/code/chapter-2.
Let's change the assertion in test_add_new_review to look like this:
![]()
Running the tests will now give the following output:
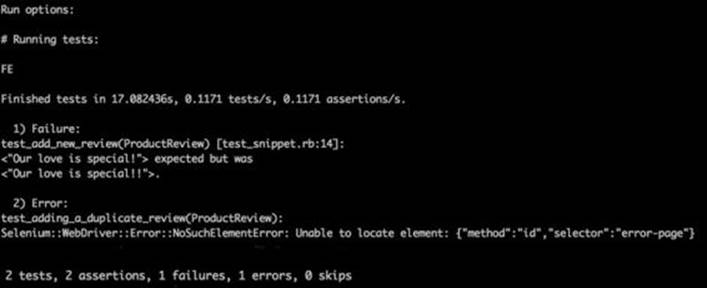
Let's do a postmortem of our tests and list several bad mistakes:
· Test on test dependence: This is the most obvious test. If the first test we execute does not complete the review creation process, the environment is not in an ideal state for the second test to run.
· Hardcoded test data: Both tests have all of the website implementation details hardcoded. The URL of the product page and the title of the product being tested are written in the test itself. If the any of these details ever change even minutely, we will have to go and update every test that has product data hardcoded. Furthermore, if the product data is different between test environments, these tests cannot be reused. We will discuss test data management in Chapter 4, Data-driven Testing.
· Code duplication: A lot of actions, such as clicking on links and filling out form data, are duplicated between the tests. We will fix this problem in the next chapter.
All we wanted to do was to test the functionality of the website, and the majority of the choices we made were not obviously bad. However, the end result is a completely unstable test suite. Thus, we inadvertently used an anti-pattern. If uncorrected, our test suite will become so unstable that the whole team will ignore it altogether.
Note
If you are feeling adventurous and want to destabilize our test suite in a couple of other ways, you can experiment with following changes:
1. Delete the first test all together, and only run the second test.
2. Rename the second test to test_add.
In both cases, your test suite will fail since the duplication test is not able to recover from its rigid dependencies on the first test.
Before concluding this chapter, let's briefly discuss two other development patterns that are closely related to the Spaghetti pattern. They are not so closely related as to call them siblings, so let's just call them cousins for now. If we wish to make a slight upgrade to our Spaghetti tests, we can convert them to the Chain linked pattern. If we want to downgrade the quality of the test suite, the Big Ball of Mud pattern is a suitable pattern for us.
The Chain Linked pattern
The Chain Linked pattern is an improvement on the Spaghetti pattern. Unlike the bowl of spaghetti, an outstretched length of chain can characterize this pattern. Each link in the chain is an individual test and is an entity on its own. Even though each test is self contained and does not share too much with its neighbors, it still relies on a rigid order of execution. Most tests in this pattern rely on previous tests to set up the environment to be just right. This pattern is a huge improvement on the Spaghetti pattern in its long-term maintainability; however, since the whole test suite needs to be executed every time, it is neither efficient nor easy to use. In conclusion, the Chain Linked pattern might not be the best way to approach writing a test suite. However, it is an overall improvement over the Spaghetti pattern, since it segregates individual tests into more or less self-contained units.
The Big Ball of Mud pattern
Brian Foote and Joseph Yoder first popularized the Big Ball of Mud in their self-titled paper. Unlike the Spaghetti pattern, where the test suite can be separated into individual strands, Big Ball of Mud does not have any formal structures that will allow a distinction between any individual components. Test data and results are promiscuously shared amongst most distant and unrelated components until everything is global and mutable without warning. Unintentional test failures occur when a component is changed for a new test without the realization that hundreds of other tests depend on it. To exacerbate the problem, there is no easy way to find all of the interdependencies since everything is merged together like a piece of wet clay.
Adoption of this pattern is usually unintentional and stems from being developed over long periods of time with different individuals working on different pieces without any overall architectural plan. The initial success of just making it work leads to shortcuts and haphazard patches, which require more and more workarounds just to add one additional feature. In comparison to the Spaghetti pattern, this state of affairs is in much more dire need of repair.
Summary
In this chapter, we added two new tests to our test suite. In order to do that, we had to first learn some advanced techniques of locating elements on the page; no matter how complicated the website might be, we can now test it! By the end of the chapter, we had two tests that heavily depended on each other; we watched them crash and burn at the slightest problem. We then analyzed the shortcomings of the Spaghetti pattern and briefly talked about the two related anti-patterns: the Chain Linked pattern and the Big Ball of Mud.
In the next chapter, we will refactor our test suite to dry out our code. We will make our tests more independent and stable by decoupling them from the implementation details and each other.
All materials on the site are licensed Creative Commons Attribution-Sharealike 3.0 Unported CC BY-SA 3.0 & GNU Free Documentation License (GFDL)
If you are the copyright holder of any material contained on our site and intend to remove it, please contact our site administrator for approval.
© 2016-2026 All site design rights belong to S.Y.A.