Selenium Design Patterns and Best Practices (2014)
Chapter 6. Testing the Behavior
|
"Do not allow watching food to replace making food." |
||
|
--Alton Brown |
||
How important is it to clearly state your intended actions? When driving a car on an empty street at night, do you use a turning signal to let any unseen pedestrians know what you intend to do? It is too easy to write a test that seems fine, but after two months of working on something else, it looks completely cryptic and incomprehensible.
In this chapter, we will be converting our tests from a cryptic set of method calls into something that any person off the street can understand. The actions of the test will remain the same, but how each action is described will become dramatically clearer. In this chapter, we will cover the following topics:
· Behavior-driven Development
· The write once, test everywhere pattern
· JBehave
· Cucumber
Behavior-driven Development
Writing a test that clearly states its intent, is useful in itself. However, as we get into the habit of making ourselves clearly understood, we start to notice a pattern. Behavior-driven Development (BDD) encourages us to step back and think of how the application should behave end-to-end first, and only then concentrate on the smaller details. After all, our application can be refactored many times with all of the IDs and names changing while still maintaining the same intended behavior.
Advantages of BDD
By separating the implementation details from the behavior definition, our tests gain a lot of advantages:
· Better test understanding: If the test is written properly, then it is possible to know exactly what the test plans to do without being confused by code details.
· Modular implementation: The methods that perform the actual implementation can be shared while testing.
Note
For more information on code reuse, see the The DRY testing pattern section in Chapter 3, Refactoring Tests.
· Versatile implementation options: By sticking closely to behavior, it is easy to have one defined behavior running in multiple environments. This will further be explained in the write once, test everywhere pattern later in this chapter.
· Multiple BDD frameworks: There are multiple testing frameworks written to allow you to test with the BDD principle in just about every programming language.
· Data separation: Data used by the test is extracted out of the behavior definition, making it easier to manage the data in the long run.
Note
To study further, refer to the Hardcoding input data section in Chapter 4, Data-driven Testing.
Disadvantages of BDD
There are several disadvantages of using BDD tools; some teams might find that the negatives outweigh the positives. Here are some examples of the disadvantages of BDD:
· Consistent specification language: If you ask 10 people to describe a spoon in one sentence, you will get 10 different sentences. Having the whole team agree on how a registration flow should be described in a consistent plain language can be a nightmare. Without having a consistent standard, it is easy to create duplicate code based on how someone wishes to describe an action. For example, I click on the product link and I follow the link to product page could be describing the same method call.
Note
Gojko Adzic describes ways to bridge the communication gap between team members in Specification by Example: How Successful Teams Deliver the Right Software, Manning Publications.
· Easy to mix behavior and implementation: It is very temptingly easy to start adding implementation into a definition. This practice leads to muddled, confused, and hardcoded tests.
· Which BDD tool to use: Any team might have a long and heated debate over which tool is perfect for a project. Choosing the perfect tool might be very difficult.
· Added overhead: Adding another framework to a project makes writing tests simpler. However, each tool will use precious resources such as time or processing power.
· Learning curve: Each new framework will have a learning curve before everyone on the team can use the tools effectively.
Testing the shopping cart behavior
Adding items to the shopping cart is one of the key components of any online store test suite. This test has to be one of the most common tests ever written. It is a crucial part of our website and lies directly on the Money Path of the application.
Note
Money Path is a simple concept; it says that it is okay to have an occasional bug go into production, as long as none of these bugs ever prevent the customer from giving us their money. A customer might forgive a bug that prevents them from uploading a profile picture, but won't be so forgiving if they cannot purchase the item they desperately need. For more information on this, please refer to the The money path suite section in Chapter 8, Growing the Test Suite.
If we were to write a test that adds a product to a cart, it might look something like this:
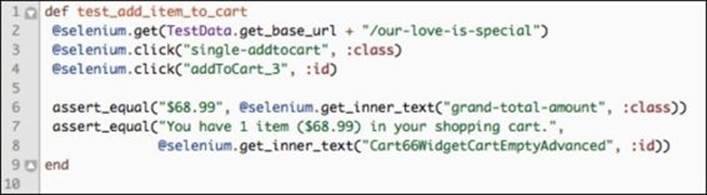
Let's walk through the actions of this test, starting with line 2:
1. Navigate to the page of the product we wish to test by using the get method and our TestData class to obtain the environment URL.
2. Click on the initial Add To Cart button, as follows, that has a CSS class of .single-addtocart:

3. After a modal giving more description appears on the screen, the test clicks on another Add to Cart button. The JavaScript modal looks like this:

After the modal is displayed, the test clicks on the second Add to Cart button.
Note
Note that the JavaScript modal shown here is drawn with jQuery. Because our tests are using the Action Wrapper pattern discussed in Chapter 5, Stabilizing the Tests, they automatically wait for everything to be on the screen before clicking on the second Add to Cart button.
4. Finally, the test asserts the total amount due, which resides in a DIV with the class grand-total-amount. Then, it checks the human-readable summary of the cart from the DIV with the ID Cart66WidgetCartEmptyAdvanced. The cart summary page is shown as follows:

This test is quite brief, concise, and to the point. It is easy to call it complete and move on to another test all together. However, let's take a look at some of the problems with this test:
· The test's class name and test name are the only things telling us what the overall goal of the test is. Even though they are short and concise, they don't really explain what the test is doing.
· Individual steps are written in pure code, without a step-by-step explanation of what each line does; a non-technical individual will have a hard time understanding what is going on.
· Every class and ID of the HTML elements in the test is hard coded, and by now we all know that hardcoding is difficult to maintain and causes long-term difficulties.
Describing shopping cart behavior
To solve similar issues with tests, Dan North set out to develop a new way to describe application behavior in the Given, When, Then format.
Note
For more information about Dan North and BDD, you can visit his website http://dannorth.net. His article Introducing BDD is a must read, and can be found at http://dannorth.net/introducing-bdd.
This textual format template gives semirigid rules to be used when describing any feature. For example, the add to cart test can be described as a human-like language called Gherkin. Let's take a look at this test translated into Gherkin:

Dan's format quickly became one of the most popular formats to describe feature behaviors. There are dozens of tools written in every major computer language, which parse this format and implement actual test steps based on it. Let's take a closer look at the keywords used in this format:
· Features: This give an overview of the whole feature. It is used to describe a group of Scenarios in a given test file.
· Scenario: This describes different test variations within the overall features. Here are a couple of Scenarios for our feature:

· Given: This is the starting point of the test; it describes preconditions that need to be in place before the test can successfully start.
Note
To say that a Given statement is analogous to a setup method is not entirely correct. Yes, it is used to put our environment into a certain state before the actual test begins, but individual scenarios can have different Given statements. Some BDD frameworks support the concept of the Background statement, which resembles a setup method.
· When: These statements are used to start performing actions against the current state of the application. In this case, we click on the Add To Cart button.
· Then: These statements are used to describe the final state of the application; they are used as a test assertion.
· And: These statements are usually interchangeable between Given, When, or Then. They are there to allow the feature description flow naturally in a human language. The preceding feature description can be typically rewritten as shown in the following screenshot:

Writing step definitions
We now have a declaration of how our application is supposed to behave in a human language. We are ready to concentrate on implementing a test for this feature.
Note
Typically, a step is any line item that performs some action in our application. Scenarios and features are not steps in traditional ways, as they only clarify the behavior and do not perform any work.
Let's take a look at how each step is implemented one at a time:
· We start with the Given step, which sets up the environment in a testable state. In this case, it navigates to a certain URL:
![]()
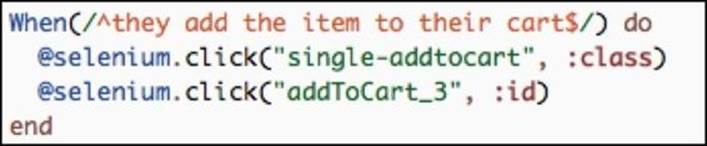
· Next, we implement the two separate steps that click on the Add to Cart buttons:
· Our test concludes with a Then step, which checks that the application behaved in a predictable manner:
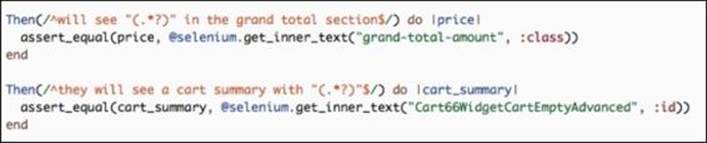
If we compare the code that does the actual testing, we can see that our step definitions are identical to the test we wrote earlier in the chapter. This is the biggest power and strength of most BDD frameworks; they allow users to write real programming language code, not just a specially formatted XML. The step names do use the Given, When, Then format but inside each step is pure Ruby. However, what if we need to use another language besides Ruby to write our tests? Luckily for us, the majority of the programming languages have an implementation of this BDD definition format. Let's take a look at a couple of examples for the Then I should see "$68.99" in the grand total section step written in several languages besides Ruby:
|
Language |
Code Example |
|
Java with JBehave framework |
@Then("I should see $price in the grand total section") public void theGridShouldLookLike(String price) { //Assertion of price } |
|
Python with Lettuce framework |
@step('I should see "(\$[\d\.]+)" in the grand total section') def see_the_string_in_grand_total_section(step, price): #Assertion |
|
PHP with Behat framework |
/** * @Then /^I should see "(\$[\d\.]+)" in the grand total section$/ */ public function iSeePriceInGrandTotal($price) { /* Assertion */ } |
Is BDD right for my project?
Each project and team is different, so choosing the right test framework should be an informed decision. As you are trying to make this decision, ask yourself a couple of questions:
· Is BDD too much for what you need?: Sometimes, the project you are working on is too small or simple to set up a large BDD framework. If you do not expect any growth in the project and test suite, maybe a simple test written in plain language is more than enough.
|
"Do not use a cannon to kill a mosquito." |
||
|
--Confucius |
||
· Is human language too nuanced?: Using plain-language step definitions has a lot of downfalls. For example, the I should be able to Click Purchase button, I Click Purchase button, and Purchase button should be clickable step definitions can be phrased in many other ways. Can the whole team agree on how to describe every action in the future so that duplication is not caused?
· Do you have a proper IDE to deal with Regular Expressions?: To make the step definitions reusable, you might need to use a lot of regular expressions to get different variables out of a name. Searching the project to see whether a step has already been defined is extremely complicated if you do not have an IDE to autocomplete the already defined steps.
· Is the Given, When, Then format right for you?: Being able to read the test intention in human language is great. However, if you do not plan to ever have any nontechnical individual people read the tests, maybe implementing another framework is too much when a simple Test::Unit or JUnit will suffice.
Introducing Cucumber
Cucumber is a tool used to convert BDD behavior definitions into executable steps in several programming languages besides Ruby. Similar to the tools mentioned in the previous section, it parses the Given, When, Then format of feature specification and matches it with the proper code implementation. Cucumber has many great features that we will now explore. To save time, the majority of the existing test suites have been converted to Cucumber already; please download the new workspace from http://awful-valentine.com/code/chapter-6/part-1.
Our workspace project structure has changed a little bit to accommodate some of the cucumber conventions. Let's take a look how the files are now arranged:
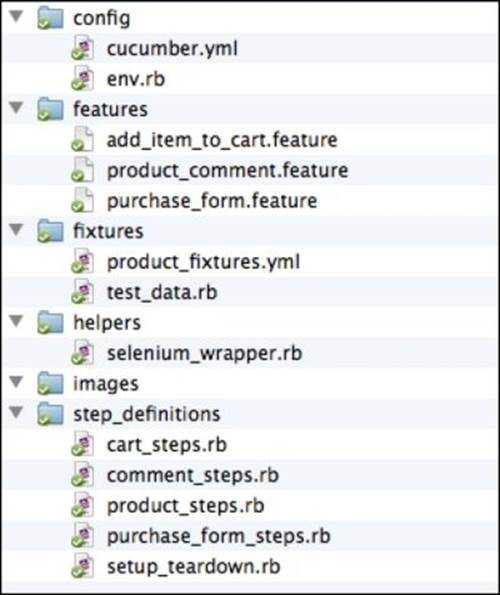
As you can see, the test suite structure has not changed much from what it used to be in the previous chapter, except a couple of files were moved and renamed, and several were deleted. Let's take a closer look at the Cucumber-specific changes.
Feature files
The features directory has several files with the .feature extension. These are the files with the Given, When, Then style of feature definitions. Take a look inside them and make sure all of our tests make sense in a human-readable language.
Note
One of the great features of Cucumber is that it's not tied to the English language. If you wanted to write your feature definition in Russian or Japanese, there is nothing stopping you from accomplishing that. For more information on the supported spoken languages, visit Cucumber's wiki page at https://github.com/cucumber/cucumber/wiki/Spoken-languages.
Step definition files
The step_definitions directory contains all the Ruby files that implement the steps described in the .feature files. Steps defined in any of these files automatically become globally accessible to the whole test suite. It is a standard practice to name the _steps.rb files as clearly as possible because that will help everyone find the required step much faster. For example, any steps definitions that have to deal with creating a comment will go into review_steps.rb.
Note
Typically, the step_definitions directory should be placed inside the features directory. By following this standard, all the files in the step_definitions directory will be automatically required for runtime. However, for reasons that will become clear later in this chapter, we will ignore this convention for now and explicitly use the step_definitions directory.
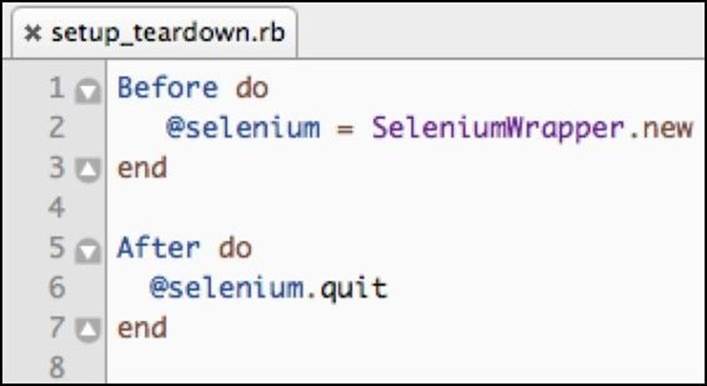
The setup_teardown.rb file contains the two blocks of code that start a new browser before each test and quit the browser after the test has finished executing.
Note
A common practice with Cucumber is to put the global Before and After steps into the env.rb file. However, I would advise against this practice since this file can grow to be incredibly large and difficult to manage; using smaller well-named files is much better for everyone involved.
These blocks of code look like this:
The configuration directory
The configuration directory is a reserved directory in Cucumber; inside, you will typically find the configuration for our test suite. The convention is to store anything that is related to how the tests are executed in this directory.
Cucumber.yml
The cucumber.yml file is one of the files that is used to store Cucumber profiles. Currently, our file looks like this:
<%
common_requires = "--require config --require step_definitions"
%>
default: <%= common_requires %> --format pretty
ci: <%= common_requires %> --format progress
Note
cucumber.yml can be written in plain YAML format or in ERB, which is a template language used to insert Ruby code inside YAML and some other files. Ruby code lives within the <% and %> characters.
The cucumber.yml files begins by collecting all of the directories that contain the required Ruby files into the common_requires variable. Then, it specifies two profiles, default and ci, which in turn incorporate the common_requires variable.
In this example, the only difference between the profiles is the format in which the test results are printed out. When a profile is not specified, the default profile's pretty formatter will look like this:
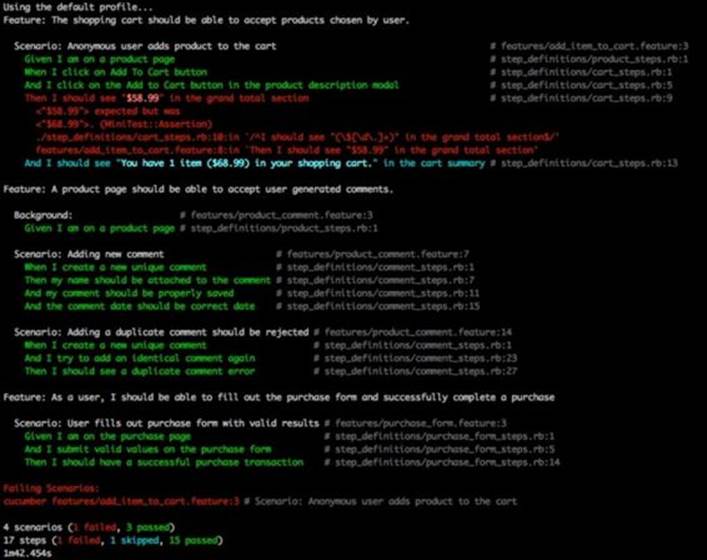
The test failure was introduced to demonstrate how the stack trace is printed out in the pretty format.
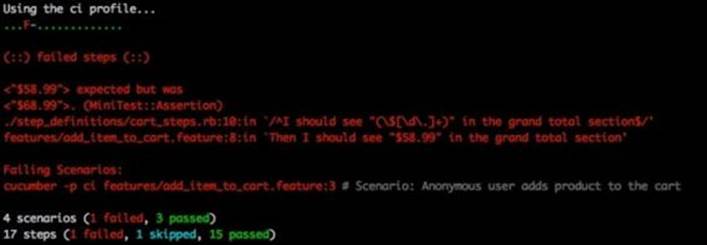
The ci profile uses the progress output formatter. This type of output looks much cleaner when running our tests in CI. The test output in the progress formatter should look familiar, as it resembles the Test::Unit output first introduced in Chapter 1, Writing the First Test:
env.rb
The env.rb file is a bit of a catchall file. We typically store global variables, gem requirements, and anything else the whole test suite would need access to. This saves us the trouble of requiring a specific gem in every single step definition file.
Running the Cucumber suite
Now that we are familiar with the project layout, let's execute some tests. To start, let's install the Cucumber gem. So, run the following command in the terminal:
gem install cucumber
After the gem has been installed, we have several commands we can use to run our tests from the root of the working directory:
1. To execute the whole suite in the default profile, we simply run the following command in our terminal from the root of our workspace:
2. cucumber
The Cucumber gem will automatically find the features directory. If your features are located in another directory, you will need to specify the path to that directory like this:
cucumber some/other/directory
2. Use the -p flag to specify a different profile at the time of execution. To run our whole test suite in the ci profile, we can use this command:
3. cucumber –p ci
3. We do not need to execute the whole test suite every single time. If we want to run only a single file or all the feature files in a directory, we just provide the path to the file/directory as the last parameter in our command:
4. Cucumber -p features/add_item_to_cart.feature
4. Finally, we can execute just a single scenario in any feature file by appending a colon and line number of the scenario. The following commands will only execute the scenarios that are on the provided line:
5. cucumber features/product_review.feature:15
6. cucumber features/product_review.feature:15:33
7. cucumber features/product_review.feature:15 features/ add_item_to_cart.feature:20
Now that you know the basics of using Cucumber, you have a chance to play around with individual tests and see how they run, or you can write a couple of scenarios yourself for practice. When you think you have a good handle on how Cucumber works, we will move to a more advanced usage of it in the next section.
The write once, test everywhere pattern
Jeff Roggers and Kristan Vingrys initially developed the write once, test everywhere pattern while working at ThoughtWorks. The concept centers on taking advantage of shared behavior between multiple implementations of one application. For example, it should be possible to purchase a product from our website no matter whether the user is using our full website, the mobile version, or native mobile application. If the feature definitions are well written, the steps used to implement the test can be interchangeable.
Note
The write once, test everywhere pattern is also known as the pluggable test pattern, since we can plug the implementation of tests into different contexts. As we change the context from the desktop website to mobile to API tests, we plug in the correct implementation.
Advantages of the write once, test everywhere pattern
The write once, test everywhere pattern has several advantages going for it; here is a list of a few of them:
· Foresight: This pattern forces the architect of the test suite to think ahead and boil down every feature and behavior into the simplest, most common list of ideas. When the idea is boiled down to the most basic components, it can describe the behavior of our application from multiple implementations.
· Reusability: The behavior definition can be reused between the mobile website test suite, the full browser test suite, and even at times for native mobile applications. Furthermore, some of the steps written for the full browser version and mobile versions can be reused, as some of the web elements share similar attributes.
· Simplicity: We have a single test suite that runs on multiple platforms, and it shares some of the implementation details. There is no need to have multiple test suites.
Disadvantages of the write once, test everywhere pattern
There are, however, some disadvantages in placing multiple test suites in a single one. Let's take a look at these disadvantages:
· Runtime context switching: In the example provided, we use Ruby's ability to require the correct step definitions on the fly based on the profile. In static languages such as Java, this might be more difficult to accomplish.
· Complex code base: Combining multiple test suites into one has a lot of advantages; however, the project structure might become convoluted and difficult to understand very quickly.
Testing a mobile site
Like many other websites, ours has a special stripped down version to be used with smart phones. The ability to leave comments on any product remains, but the steps to fill up the product comment are now different. So in this section, we will make product_review.feature work on both regular and mobile websites. Let's update our test suite to run on both the full browser version and mobile browser version.
Note
Typically, testing mobile versions of a website can be better accomplished by driving the tests on the actual smart phone or in an emulator. There are two good projects that allow WebDriver tests to run on mobile devices. These projects are iOS Driver and Appium. The project websites are listed respectively: http://ios-driver.github.io/ios-driver and http://appium.io. However, modifying the browser's user agent does not require as much setup time.
Updating the Selenium wrapper
Our first step is to modify how Firefox identifies itself to websites by modifying the user agent's name. Since our website decides which version to serve to the browser based on the user agent, we will change the Firefox profile to identify itself as iPhone. Let's openselenium_wrapper.rb and modify the initialize method to look like this:
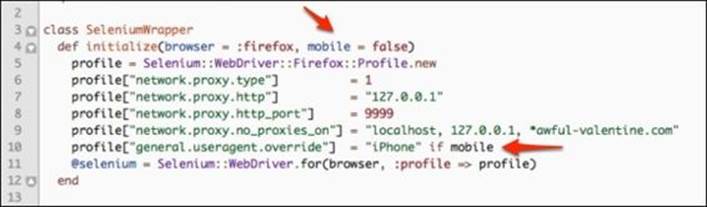
The initialize method now accepts an optional mobile parameter that is set to false, by default. If the mobile parameter is set to true, then we set the general.useragent.override parameter in the profile to iPhone.
Moving step definition files
Many of the steps that were defined for the full browser version of the application will work just fine with the mobile version, but there are several steps that will fail. So, we will make our mobile tests and full browser tests share as many steps as possible. Let's update our step definitions as follows:
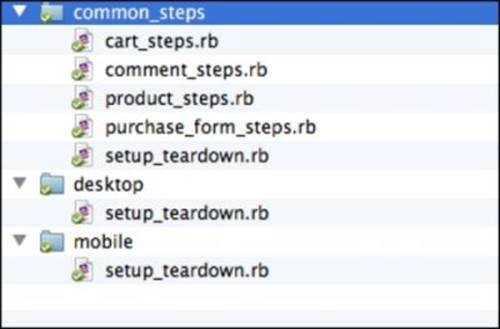
1. Create a new folder called common_steps inside the step_definitions folder.
2. Move all of the _steps.rb files from the root of the step_definitions folder into the common_steps folder.
3. Add two new folders inside the step_definitions folder called desktop and mobile.
4. Add a file for each of the new directories called setup_teardown.rb.
5. In the desktop version of setup_teardown.rb, add the following code:
6. Before do
7. @selenium = SeleniumWrapper.new
end
6. In the mobile version of setup_teardown.rb, add the following code:
7. Before do
8. @selenium = SeleniumWrapper.new(:firefox, true)
end
Note
The mobile version of Before will now pass in the mobile = true parameter explicitly, while the desktop version will remain as it is.
7. Finally, delete the Before statement from setup_teardown.rb in the common_steps folder, since each version of the browser will create its own instance of @selenium. The file should now look like this:
8. After do
9. @selenium.quit
end
The final layout of the step_definitions folder should look like this:
Updating the Cucumber profile and tagging tests
The final step in our refactoring effort is to identify several tests that are mobile-browser ready, and create a profile that will only execute mobile-ready tests.
To tag product_review.feature and purchase_form.feature as mobile ready, add the @mobile tag to the very top of each test. Both files should look something like this at the top:

Next, we modify cucumber.yml to look like this:
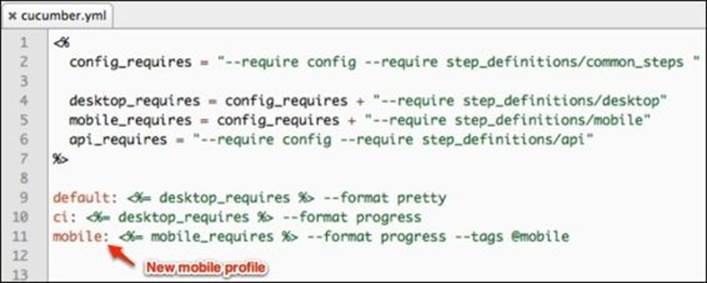
Now we have a new mobile profile, which uses the tags parameter to only execute the tagged features of @mobile. Also, the default and ci profiles share common_steps with the mobile profile; at the same time, each profile requires its own appropriate folder for steps that cannot be shared.
Running and fixing incompatible steps
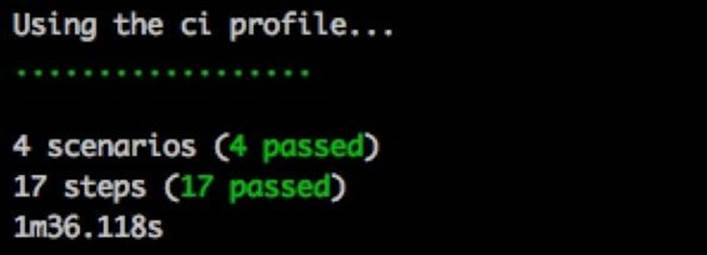
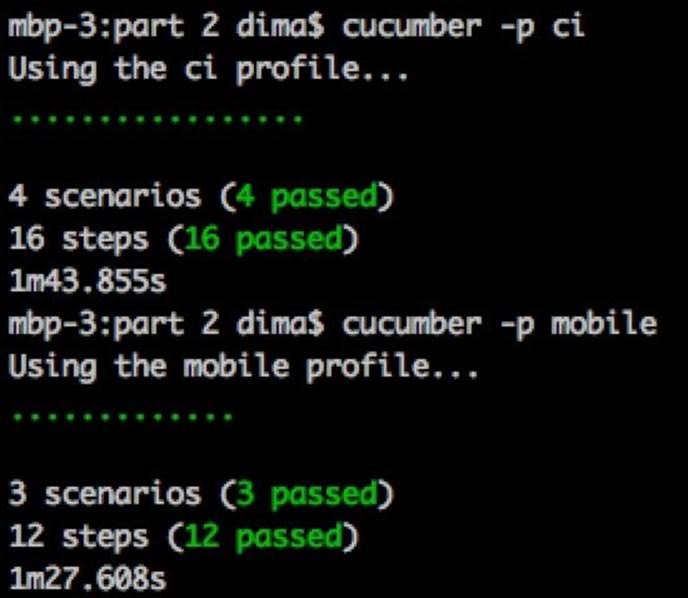
Our refactoring is now complete and we are ready to test both the full and mobile versions of the website. Let's first run the full browser version tests of our website by executing Cucumber with the ci profile:
cucumber -p ci
The result of the test run should be all the passing tests, shown as follows:
Great start! Let's see whether all of the mobile tests also pass by running Cucumber in the mobile profile:
cucumber -p mobile
The output is as shown in the following screenshot:

All but one of the tests passes; that's not bad at all. It turns out that the mobile version does not tag each of the comment DIVs with a unique ID. We need to rectify this difference in behavior between the full version and mobile version of our sites.
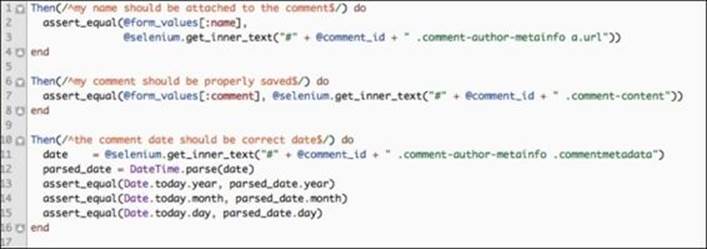
The problem comes from the product_review.feature file with these three steps:

Let's fix these step definitions by separating the full browser tests from the mobile ones:
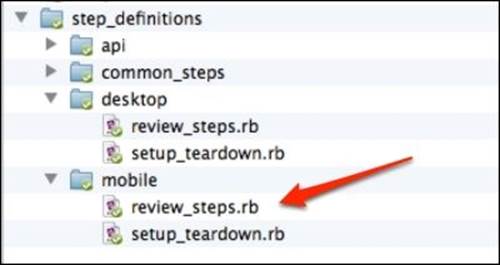
1. Create the review_steps.rb file in the desktop folder, as shown in the following screenshot:
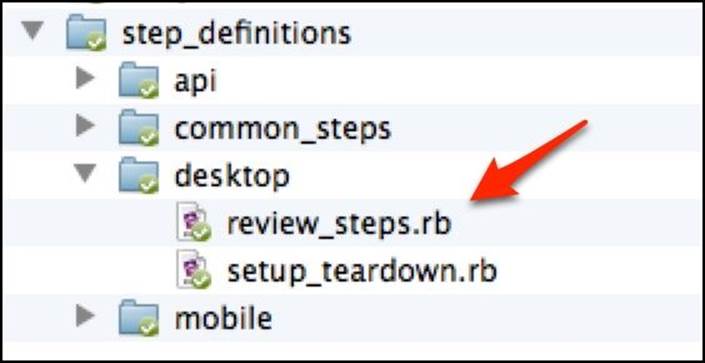
2. Move the following code out of common_steps/review_steps.rb into the newly created file:
3. Create the review_steps.rb file in the mobile folder:
4. Add the following step implementation for the mobile browser version of review_steps.rb:
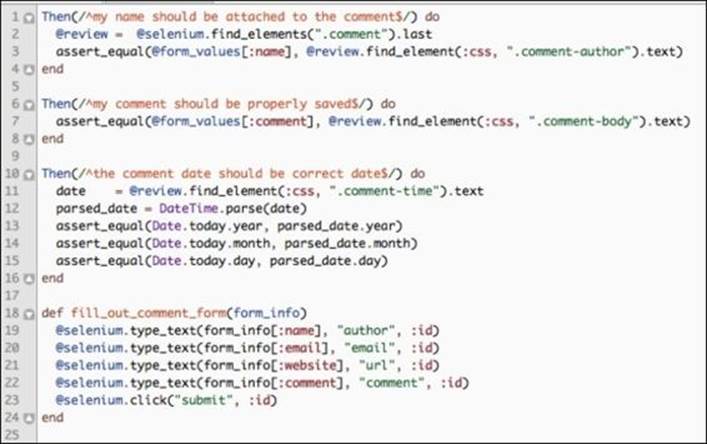
Since the mobile view does not allow us to grab the user's review by a unique comment ID, we search for all the reviews on the page and only grab the last one created. This is seen in line 2, in the preceding code.
Tip
Typically, this is a very poor practice and should be avoided. If another test is running at the same time as ours, the very last review item on the page might be someone else's and not the current tests.
Now when we run the test suite in both the full browser and mobile profiles, we should see all of the tests passing:
Testing the purchase API
Modern websites have started to include public API endpoints. These are used as a communication portal between native mobile phone applications and the core website, amongst other things. Many companies build their whole business on providing a public API. Testing the publicly accessible API is just as critical as testing the main website. After all, if the API breaks, than all of the third-party applications that consume it will stop working, thus preventing users from giving us money.
Our website provides several public API endpoints to allow third-party integration. One of these endpoints allows the purchase of a given product. By sending a POST request with some customer information, we can purchase products from a mobile phone app or a web portal embedded on some other website.
We have several options when it comes to testing our API. For example, we can write a simple shell script that will make a curl or wget request against the API endpoint and perform a simple string parsing of the resulting reply from the API. However, we already have the power of Ruby and existing Cucumber tests with the write once, test everywhere pattern. Thus, we will integrate our API tests into the existing framework.
Note
Curl and wget are simple command-line applications that allow users and scripts to make GET, POST, and other HTTP requests directly from the terminal or a shell script.
To get started, we will make an HttpHelper module that will contain the method to post data to an arbitrary URL. Our test will use the make_post_request method to send the customer's name, credit card info, and the ID of the product we wish to purchase. The server will return a JSON response letting us know whether the purchase was successful.
Note
Modules (Mixins) are snippets of code and methods that do not explicitly belong to any class. Instead, any class that wishes to share these methods will include the appropriate module. This common object-oriented technique helps to reuse the code used between multiple unrelated classes.
Let's take a look at http_helper.rb:
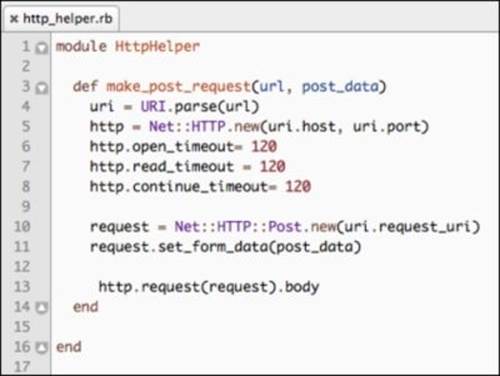
We will not go into a detailed explanation of the preceding code. The gist of the method is to take a URL string and a hash of the POST parameters, build and execute an HTTP request, and return the body of the response from the server.
Note
To make this test more stable, we increased the request timeout to 120 seconds in case the API endpoint is under a lot of load and does not reply fast enough.
Next, we create an api directory inside step_definitions, with purchase_steps.rb and setup_teardown.rb inserted inside. So far, all of the steps performed are similar to the work we did for mobile testing support. The differences start to emerge in setup_teardown.rb, shown as follows:
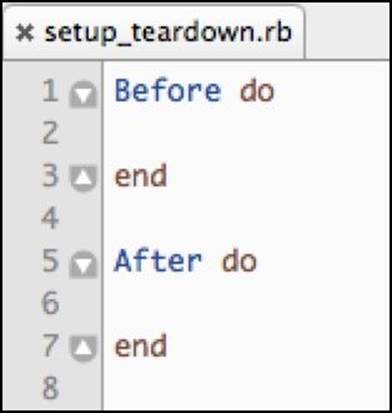
Since the API tests will be making direct HTTP requests against the server, we have no need for a web browser. Thus, the Before and After sections of the code are empty. Next, we need to implement the test steps in purchase_steps.rb. Let's take a look at the implementation of the test steps:
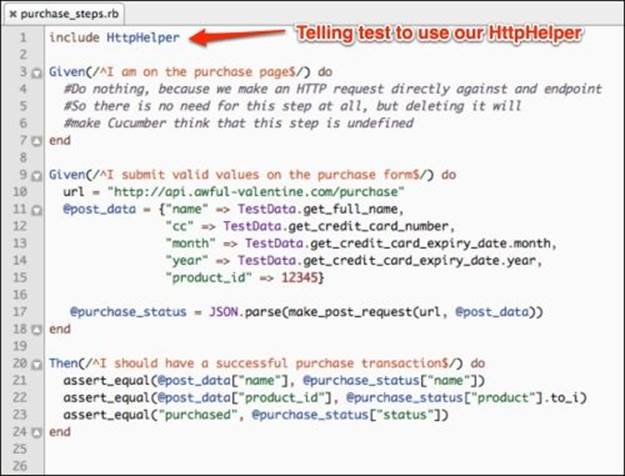
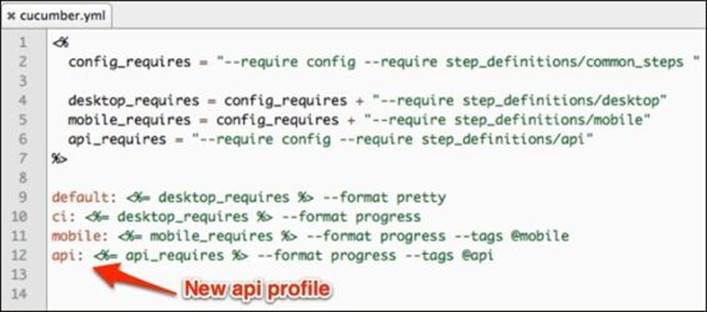
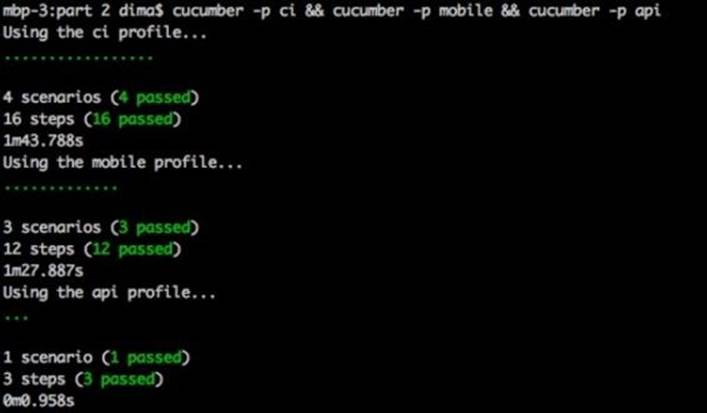
We set the endpoint URL in line 10 and build the POST data to be sent out in line 11. In line 17, we send the POST request and use the JSON.parse method to parse the returned response from the server. We finish the test implementation by checking the returned response against expectations in lines 21 through 23. Before we can run our API test, we just need to create a new api profile in cucumber.yml, shown as follows:
All right, we are ready to test the API endpoint! In the following screenshot, we ran the whole test suite against the desktop, mobile, and API versions of our website. Everything should be green across the board:
Summary
In this chapter, we discussed the need to test application behavior instead of implementation details. By testing the expected business behavior, our tests can still be useful in the long run, even if the underlying website is completely rewritten in a new programming language or framework. We got familiar with the BDD principle and got comfortable with a tool that implemented the BDD ideas called Cucumber. Furthermore, we used the power of our BDD tools to define our application's behavior in such a way that we are able to test both the full browser, mobile, and API versions of our application.
In the next chapter, we will discuss the page objects and how to provide a reusable framework for our tests to interact with the website.