Learning Web Application Development (2014)
Chapter 9. The Application
If you’ve made it this far in our journey, you should be able to make things happen on both the client and the server using HTML, CSS, and JavaScript. And if you have an idea for a web application, you can most likely use what you’ve learned to cobble some code together to do what you need it to do.
This chapter is mostly about why you shouldn’t do that, at least not yet. David Parnas once said that “one bad programmer can easily create two new jobs a year.” While I think this is true, in my experience “bad” programmers aren’t inherently bad, but rather they just lack the experience and wisdom to think about the organization and maintainability of their codebase. Code (especially JavaScript) can quickly become an unmaintainable mess in the hands of an inexperienced programmer.
As I mentioned in the preface, as a beginner it’s completely acceptable to hack code together while you’re learning, but as you continue on you’ll quickly find that it’s not the best way to handle larger, more complex engineering problems. In other words, there is still (and will always be) much to learn.
On the other hand, software engineers have been building database-driven web applications for many years now so it’s probably inevitable that some basic patterns have emerged that inform better code design. In fact, entire development frameworks, such as Ruby on Rails, have been engineered to force (or at least strongly encourage) developers to build applications using some of these patterns. As we end our journey through the basics, we’ll revisit Amazeriffic and attempt to understand how we can make our current code more maintainable. We’ll also see how some of our code can be modified to fit these patterns.
Refactoring Our Client
We’ll start with our client code. In my experience, the client is one of the easier places for our code to become unmaintainable. I think that this can be attributed to the fact that client-side code is often associated with seemingly simple visual actions, and therefore it feels like it should be very easy to implement. For example, executing a specific behavior when a user performs a trivial action such as clicking a button seems like it should be a trivial coding task. But that’s not always the case.
In our example, creating a tabbed user interface seems like it should be relatively straightforward. And for our use case it was. But we can make it much more maintainable by doing a tiny bit of refactoring and following some basic advice.
Generalizing Meaningful Concepts
You should always try to generalize meaningfully related concepts as much as possible. As I have mentioned a few times in this book, when entities in our program are related, it’s best if they are concretely related through real programming constructs. Our tabs don’t follow this advice: they have a lot in common, but the logic and structure is spread out in several places. For example, we define the name of the tab in the HTML:
<div class="tabs">
<a href=""><span class="active">Newest</span></a>
<a href=""><span>Oldest</span></a>
<a href=""><span>Tags</span></a>
<a href=""><span>Add</span></a>
</div>
And in the JavaScript, we use the tab’s location in the DOM to determine what action to take:
if ($element.parent().is(":nth-child(1)")) {
// generate the 'Newest' tab content
} elseif ($element.parent().is(":nth-child(2)")) {
// generate the 'Oldest' tab content
} elseif ($element.parent().is(":nth-child(3)")) {
// generate the 'Tags' tab content
} elseif ($element.parent().is(":nth-child(4)")) {
// generate the 'Add' tab content
}
Notice that we never actually associate a tab name with an action. This is an example of two programming entities that are related, but only in the programmer’s mind—not through any code construct. A very basic symptom of this is that every time we add a tab to our user interface, we have to modify both the HTML and JavaScript. In Chapter 5, I pointed out that this makes our code error prone.
How can we improve this? One course of action is to generalize a tab as an object, just as we did with the card example in Chapter 5. The difference is that the tab object will have a string value associated with the name of the tab, and a function value associated with the action that creates the tab’s content. For example, we can generalize our “Newest” tab as an object like this:
var newestTab = {
// the name of this tab
"name":"Newest",
// the function that generates this tab's content
"content": function () {
var $content;
// generate the "Newest" tab's content and return it
$content = $("<ul>");
for (i = toDos.length-1; i >= 0; i--) {
$content.append($("<li>").text(toDos[i]));
}
return $content;
}
}
It turns out that once we have this structure, we’ve actually solved most of the problem. Our user interface consists of a set of tabs, so instead of having our tab name and the corresponding action stored in separate places in our code, we can create an array of tab objects that keeps them together:
var main = function (toDoObjects) {
"use strict";
var toDos,
tabs;
toDos = toDoObjects.map(function (toDo) {
return toDo.description;
});
// create an empty array of tabs
tabs = [];
// add the 'Newest' tab
tabs.push({
"name":"Newest",
"content":function () {
// create 'Newest' $content
return $content;
}
});
// add the 'Oldest' tab
tabs.push({
"name":"Oldest",
"content":function () {
// create 'Oldest' $content
return $content;
}
});
// add the 'Tags' tab
tabs.push({
"name":"Tags",
"content":function () {
// create 'Tags' $content
return $content;
}
});
// add the 'Add' tab
tabs.push({
"name":"Add",
"content":function () {
// create 'Add' $content
return $content;
}
});
};
Once we have the array that stores the tab objects, we can greatly simplify our approach to building the UI. We’ll start by removing the tabs from the HTML altogether (but leaving the div):
<div class="tabs">
<!-- this is where our tabs used to be defined -->
<!-- we'll dynamically build them in the JavaScript -->
</div>
Next, we can loop over our tabs array. For each one we’ll set up our click handler and add the tab to the DOM:
tabs.forEach(function (tab) {
var $aElement = $("<a>").attr("href",""),
$spanElement = $("<span>").text(tab.name);
$aElement.append($spanElement);
$spanElement.on("click", function () {
var $content;
$(".tabs a span").removeClass("active");
$spanElement.addClass("active");
$("main .content").empty();
// here we get the content from the
// function we defined in the tab object
$content = tab.content();
$("main .content").append($content);
returnfalse;
});
});
AJAXifying Our Tabs
Another issue that our application has right now is that if someone visits it from another browser and adds a to-do item to our list, we won’t see that new to-do item if we click a different tab. Instead, we actually need to reload the entire page to see the update.
This is because our application is storing and loading the to-do items when the page is first loaded and not changing them until the page is loaded again. To solve this problem, we’ll make it so that each tab does an AJAX request when it is loaded. We can do that by wrapping our action in calls to jQuery’s get function:
tabs.push({
"name":"Newest",
"content":function () {
$.get("todos.json", function (toDoObjects) {
// create 'Newest' $content
// we can no longer 'return' $content
});
}
});
TIP
Another solution is to make our program issue real-time updates to the client, meaning that when another user updates the page we’re looking at, the server pushes the new data to us. That’s a bit beyond the scope of this book, but it is possible with a Node.js module called socket.io.
Note that this changes the way our functions behave because now we’ll be doing an asynchronous request inside our function call. This means that this code will no longer correctly return the content to the caller because we’ll have to wait until the AJAX call completes:
$content = tab.content();
$("main .content").append($content);
We have a couple of options that will fix this. The easiest is to move the DOM update into the content function itself:
tabs.push({
"name":"Newest",
"content":function () {
$.get("todos.json", function (toDoObjects) {
// create 'Newest' $content
// update the DOM here
$("main .content").append($content);
});
}
});
I don’t like this approach for two reasons. The first is more of an aesthetic reason: the content function should create and return the content of the tab—it shouldn’t affect the DOM. Otherwise we should call it getContentAndUpdateTheDOM.
The second reason is probably a little more important: if we want to do more than just update the DOM at the end, we’ll need to add that logic to every content function for every tab.
One solution to both of these problems is to implement the continuation approach that we’ve used in the past for asynchronous operations. Let the calling function include a callback, and call that function inside our content function:
// we create our content function
// so that it accepts a callback
tabs.push({
"name":"Newest",
"content":function (callback) {
$.get("todos.json", function (toDoObjects) {
// create 'Newest' $content
// call the callback with the $content
callback($content);
});
}
});
// ...
// now inside our calling function, we send a callback
tab.content(function ($content) {
$("main .content").append($content);
});
This solution is probably the most common approach that you’ll find in the Node.js community, but other approaches are becoming popular, including Promises and Reactive JavaScript. If your asynchronous operations start getting complicated and you find yourself in (what’s commonly referred to as) callback hell, you may want to explore these options.
Ridding Ourselves of Hacks
Now that we have each tab AJAXified, we can get rid of a compatibility hack that’s been hanging around. Previously, we made our server return the entire list of ToDo objects because that’s what our client expected whenever an add was done. Now, instead of doing that, we’ll jump back to the Newest tab whenever a ToDo object gets added.
Our add tab button handler code currently looks something like this:
$button.on("click", function () {
var description = $input.val(),
tags = $tagInput.val().split(","),
newToDo = {"description":description, "tags":tags};
$.post("todos", newToDo, function (result) {
// here is some leftover cruft from when we were
// maintaining all the ToDo items on the client
toDoObjects = result;
// update client toDos
toDos = toDoObjects.map(function (toDo) {
return toDo.description;
});
$input.val("");
$tagInput.val("");
});
});
In actuality, we don’t need to maintain the ToDos on the client anymore, so we can get rid of the majority of this. In fact, all we really need to do once the new ToDo is successfully posted is to clear out the input boxes and then redirect to the Newest tab. This will do our AJAX request and will order the result by the newest item.
We can use the trigger jQuery function to trigger the click event on the Newest tab, and our code ends up looking something like this:
$button.on("click", function () {
var description = $input.val(),
tags = $tagInput.val().split(","),
newToDo = {"description":description, "tags":tags};
$.post("todos", newToDo, function (result) {
// clear out our input boxes
$input.val("");
$tagInput.val("");
// 'click' on the Newest tab
$(".tabs a:first span").trigger("click");
});
});
This little change also allows us to greatly simplify the server-side code that creates a new ToDo object on a post:
app.post("/todos", function (req, res) {
var newToDo = new ToDo({"description":req.body.description,
"tags":req.body.tags});
newToDo.save(function (err, result) {
console.log(result);
if (err !== null) {
// the element did not get saved!
console.log(err);
res.json(err);
} else {
res.json(result);
}
});
};
Handling AJAX Errors
We’ve largely ignored the problem of error handling in all of our code so far, but once you start writing larger-scale apps, you’ll find that thinking about errors is essential. There are times when your client code will be loaded, but the server will become unavailable (or crash inadvertently). What happens then?
In a lot of cases our error conditions will mean that our callbacks won’t be called correctly. When this happens it will look like the application is not responding. Worse, our code might respond by adding ToDos on the client but they won’t get added to the data store correctly. This can cause our users to lose data they think is successfully added.
Fortunately, jQuery allows us to account for this scenario pretty easily using the fail function, which can be chained from an AJAX call. This is an example of a promise-type API that was alluded to in the previous section, but we’re not going to go into much detail about what that means. I think that the best way to handle this situation is to follow the pattern we’ve seen in both the Mongoose and Redis modules for Node.js. We’ll let our calling code send in a callback that accepts an error and the actual data, and let the callback handle the error if it’s not set to null:
// we create our content function
// so that it accepts a callback
tabs.push({
"name":"Newest",
"content":function (callback) {
$.get("todos.json", function (toDoObjects) {
// create 'Newest' $content
// call the callback with the error
// set to null and the $content as
// the second argument
callback(null, $content);
}).fail(function (jqXHR, textStatus, error) {
// in this case, we'll send the error along
// with null for the $content
callback(error, null);
});
}
});
The fail function’s callback accepts three arguments. The error is the one that we’re most interested in and is the one that we’ll pass to the calling function’s callback.
Now in our calling function’s callback, we’ll handle the error just like we did in our Redis and Mongoose examples:
tab.content(function (err, $content) {
if (err !== null) {
alert("Whoops, there was a problem with your request: " + err);
} else {
$("main .content").append($content);
}
});
We can test this behavior by changing the route in our call to get into a nonexistent one (other than todos.json). The error message in that case should be “Not Found.”
Refactoring Our Server
We’ve seen a few tips on refactoring our client code. We can easily apply these same tips, but there are additional considerations on the server. In this section, we’ll learn to organize our server code using the Model-View-Controller design pattern.
Code Organization
Right now, our server-side code is all in one file, server.js. That’s not too complex for a small application such as ours, but as our application grows and includes other entities other than ToDo objects, this can get overwhelming quickly. So let’s break things up a little.
Separating concerns: models
We’ll start by moving the Mongoose model definition out of server.js and organizing it into an independent Node.js module. I like to put the model definitions in their own directory, because as my app grows, the number of models that I’m creating will grow as well. So we’ll create a file called todo.js in a directory called models that lives inside our Amazeriffic directory. Inside that file, we’ll define my model just as we did before and we’ll export it:
var mongoose = require("mongoose");
// This is our mongoose model for todos
var ToDoSchema = mongoose.Schema({
description: String,
tags: [ String ]
});
var ToDo = mongoose.model("ToDo", ToDoSchema);
module.exports = ToDo;
Now we can require the module in server.js and remove the ToDo code contained in the file:
var express = require("express"),
http = require("http"),
mongoose = require("mongoose"),
// import our ToDo model
ToDo = require("./models/todo.js),
app = express();
If we run our server now, everything should work exactly like it did before.
Separating concerns: controllers
Moving the models into their own directory allows us to more easily keep a clean separation of responsibility in our program. We know that when we need to change the way our ToDo data is stored in our database, we can edit the todo.js file in our models directory. Similarly, when we need to change the way our program responds to requests from the client, we’ll edit an associated controller file.
Currently, when our get and post requests come into our Express server, we’re responding with anonymous functions. Let’s give those anonymous functions names and move them into a separate module. This module will consist of a single controller object that has a set of actions that get triggered via our Express routes. In the case of our ToDo objects, we’ll create two actions: index and create.
To this end, we’ll create a directory called controllers that lives next to our models directory, and in that directory, we’ll create a file called todos_controller.js. Inside that module, we’ll import our ToDo model and create a ToDosController object. We’ll attach functions that do the same things the anonymous functions were doing in our server.js file:
// note that this needs to start up one
// directory to find our models directory
var ToDo = require("../models/todo.js"),
ToDosController = {};
ToDosController.index = function (req, res) {
ToDo.find({}, function (err, toDos) {
res.json(toDos);
});
};
ToDosController.create = function (req, res) {
var newToDo = new ToDo({"description":req.body.description,
"tags":req.body.tags});
newToDo.save(function (err, result) {
console.log(result);
if (err !== null) {
// the element did not get saved!
console.log(err);
res.json(500, err);
} else {
res.json(200, result);
}
});
};
module.exports = ToDosController;
Like we did with our model, we’ll import it into our server.js code using require. Once we do that, we’ll update our route actions to point to these functions instead of having anonymous functions. Note that because we no longer have to access the ToDo model in server.js, we’ve removed the require statement for the model:
var express = require("express"),
http = require("http"),
mongoose = require("mongoose"),
// import our ToDo controller
ToDosController = require("./controllers/todos_controller.js),
app = express();
// other setup/Cloud Foundry/mongoose code here ...
// routes
app.get("/todos.json", ToDosController.index);
app.post("/todos", ToDosController.create);
Now our code is a little more organized and more maintainable because we’ve separated our concerns. Our server.js file mostly handles setting up the basics of the server and routing, our controller handles actions that need to happen when a request arrives, and our model handles the issues involved with the database. This separation of concerns makes it much easier to maintain our code as it grows, and it also makes it very easy to map HTTP requests from our client to actions on our server.
HTTP Verbs, CRUD, and REST
In Chapter 6 we briefly discussed the HTTP protocol. In subsequent sections we learned that we can make two types of HTTP requests: GET requests and POST requests. Those correspond to get and post routes in our Express server, which, in turn, correspond to actions that we’ve set up in our controller. It turns out that HTTP also has two other verbs that we haven’t used yet: PUT and DELETE. These four verbs map pretty nicely to the CRUD data-store operations we learned about in Chapter 7 (see Table 9-1)!
Table 9-1. HTTP/CRUD/controller mappings
|
HTTP |
CRUD |
Action |
Behavior |
|
POST |
Create |
create |
Create a new object and return its ID |
|
GET |
Read |
show |
Return an object with a given ID |
|
PUT |
Update |
update |
Update an object with a given ID |
|
DELETE |
Delete |
destroy |
Delete an object with a given ID |
This mapping allows us to create APIs that create a clean and simple interface to resources that are available on our server. APIs that behave in this way are typically referred to as RESTful web APIs. REST stands for Representational State Transfer, and—roughly speaking—it’s an idea that describes how resources on web servers should be exposed via the HTTP protocol.
Setting Up Routes by ID
One nice feature that Express offers us is the ability to create variables in our routes. This allows us to create a single rule that responds to an entire set of requests. For instance, suppose we wanted to be able to get a single to-do item by its associated MongoDB ID:
// routes
app.get("/todos.json", ToDosController.index);
// basic CRUD routes
app.get("/todos/:id", ToDosController.show);
app.post("/todos", ToDosController.create);
Here, we’ve created our get route that maps to a single to-do item. It maps to the show function in our controller. Notice that the route uses a colon (:) to create a variable. This will allow the route to respond to any route that starts off with /todos/. So if we set our browser to/todos/helloworld, this will send the request to our controller’s show action. It’s the controller’s action that is responsible for finding the element with an ID of helloworld.
How can we access the variable that gets sent to the controller? It turns out that the request object keeps track of these in its params property. Our code for the action might look something like this, where we query the model and return the response. If we don’t find the ID, we return a string that says “Not Found”:
ToDosController.show = function (req, res) {
// this is the id that gets sent to the URL
var id = req.params.id;
// find the ToDo item with the associated id
ToDo.find({"_id":id}, function (err, todo) {
if (err !== null) {
res.json(err);
} else {
if (todo.length > 0) {
res.json(todo[0]);
} else {
res.send("Not Found");
}
}
});
};
Assuming we’ve already inserted some to-do items in our database, we can check to see if this is working by firing up the MongoDB client from the command line and getting out an ID:
vagrant $ mongo
MongoDB shell version: 2.4.7
connecting to: test
> show dbs
amazeriffic 0.0625GB
local 0.03125GB
> use amazeriffic
switched to db amazeriffic
> show collections
system.indexes
todos
> db.todos.find()
{ "description" : "first", "_id" : ObjectId("5275643e0cff128714000001"), ... }
{ "description" : "second", "_id" : ObjectId("52756de289f2f5f014000001"), ... }
{ "description" : "test", "_id" : ObjectId("5275722a8d735d0015000001"), ... }
{ "description" : "hello", "_id" : ObjectId("5275cbdcd408d04c15000001"), ... }
Now that we can see the _id field, we can run our server, open up Chrome, and try typing something like http://localhost:3000/5275643e0cff128714000001 into the address bar. If everything works out, we should see the JSON returned from our server!
TIP
If you type in an invalid Object ID (meaning a string that doesn’t consist of 24 numbers or letters a through f), the preceding code will throw an error that says you’ve used an invalid ID. That’s okay for now—we’ll fix it in More Practice and Further Reading.
Using jQuery for put and delete Requests
In addition to making get and post requests, jQuery has the ability to perform put and delete requests via the general $.ajax function. In fact, we can also make get and post requests this way as well:
// PUT example with jQuery
// Here, we update the description of the ToDo
// object which has id 1234
$.ajax({
"url" : "todos/1234",
"type": "PUT",
"data": {"description":"this is the new description"},
}).done(function (response) {
// success!
}).fail(function (err) {
// error!
});
// DELETE example with jQuery
// We delete the ToDo object which has id 1234
$.ajax({
"url" : "todos/1234",
"type": "DELETE",
}).done(function (response) {
// success!
}).fail(function (err) {
// error!
});
We can easily associate these actions with button-click events to update or delete objects in our database from the client. This is assuming we have the associated routes exposed on the server.
HTTP Response Codes
In addition to HTTP including a series of verbs that map nicely to our CRUD operations, it also defines a set of standard response codes that represent possible responses to an HTTP request. You may have tried to visit a nonexistent website or a page and received the infamous 404 error, which means the page is not found. It turns out that 404 is one of the response codes defined by the HTTP protocol.
Other HTTP response codes include 200, meaning that the request was successful, and 500, which represents a generic internal server error. Express lets us send these values back to a client along with the response value. So to make our show route a little more robust, we can include the appropriate HTTP response codes along with the data we’re sending:
ToDosController.show = function (req, res) {
// this is the id that gets sent to the URL
var id = req.params.id;
ToDo.find({"_id":id}, function (err, todo) {
if (err !== null) {
// we'll return an internal server error
res.json(500, err);
} else {
if (todo.length > 0) {
// we'll return success!
res.json(200, todo[0]);
} else {
// we didn't find the todo with that id!
res.send(404);
}
}
});
};
If you run your server now, and you type in an invalid Object ID, you should see that the Chrome browser automatically knows to respond with a “Not Found” message when it receives a 404 response code via HTTP.
Model-View-Controller
This brings us to one of the most important concepts in all of web application development—the Model-View-Controller (MVC) design pattern. This is an approach to application architecture that mostly dictates the design of a database-driven application, and it has become the de facto standard for writing web apps. The pattern is so widely accepted as the best way to write web applications that it has become entrenched in most popular web application frameworks.
We’ve already refactored our Amazeriffic code to fit this pattern, but it’s a good idea to take a step back and understand the responsibility of each of the components and how the application fits together.
The controller is typically the simplest part of the three. When a web browser makes an HTTP request to the server, the router hands off the request to an associated controller action. The controller translates the request into an action, which usually coordinates a database action through the model and then sends (or renders) the response through a view. You can see this in the show action—the controller finds the to-do item with the requested ID (if one exists) and it generates the view (in this case the JSON) object to send in the response.
The model is the object abstraction of elements in our database. Fortunately, most frameworks include an object modeler like Mongoose. In Rails, the default one is called Active Record and behaves roughly the same way Mongoose does. In our case, the ToDo model consists entirely of a schema definition, but typically our model definition can include much more than that. For example, it may define relationships with other models, and specify functions that get fired when certain aspects of the model changes.
Last but not least is the view component. In our case, the view can be thought of as our client-side HTML and CSS. Our controller simply sends the data as JSON to the client and the client decides where to put it. Views can easily be much more interesting, however. For example, most MVC frameworks include server-side templates that allow the controller to construct the HTML at the time of the request. In the JavaScript/Node.js world, Jade and EJS are two commonly used HTML templating engines.
More generally speaking, the application works roughly like this: the client requests a resource via an HTTP verb and route. The router (in our case, server.js) decides which controller and action to send the request to. The controller then uses the request to interact with the model in some way and then decides how the view should be constructed. Once it does that, it responds to the request. Figure 9-1 sums it all up!
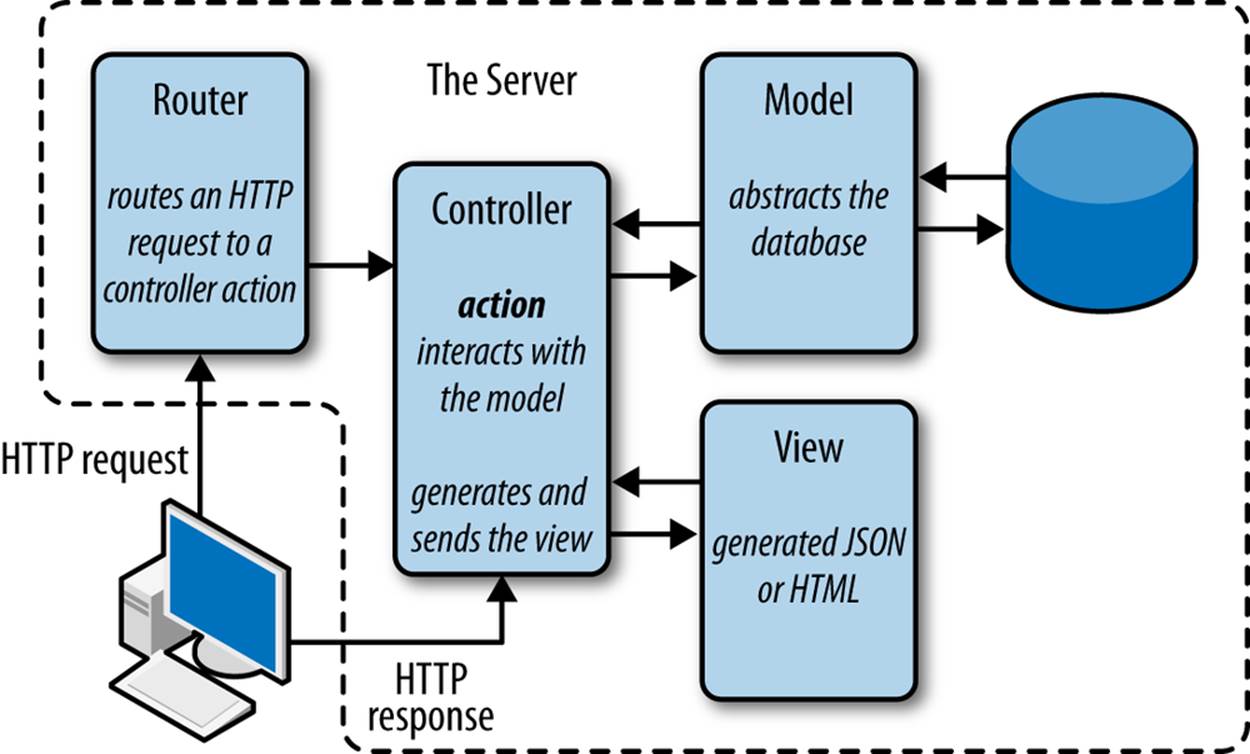
Figure 9-1. The Model-View-Controller pattern
Let’s see this in action. We’ll add users to our application so that each user can have his own set of ToDos.
Adding Users to Amazeriffic
At this point, Amazeriffic has exactly one entity: ToDo objects. That’s fine if we’re the only ones who want to keep track of ToDo objects, but we’ll never build a billion dollar business that way. So what can we do if we want to let an arbitrary number of people use our app to keep track of their to-do list? It turns out that we’ll need to add another entity to our application: users.
Building the User Model
We’ll start by building a model for our users. The User model will consist of a string representing the username and the default MongoDB Object ID. We’ll attach a user ID to the ToDo objects that are owned by that user, and we’ll set up routes that only return the ToDo objects associated with the given user.
When using Mongoose, setting up a simple model like this is actually pretty easy. We’ll create a file called user.js in our models directory. In that file, we’ll build a schema and Mongoose model. And, as before, we’ll export the Mongoose model to the Node.js program that uses it via arequire statement:
var mongoose = require("mongoose");
// This is our mongoose model for users
var UserSchema = mongoose.Schema({
username: String,
});
var User = mongoose.model("User", UserSchema);
module.exports = User;
It might make sense to include an array of ToDo objects as well, but we’ll keep things simple for now. A bit later, we’ll set up a relationship between the ToDo objects and the User objects.
Building the User Controller
Next, we can stub out our user controller. This means we create empty placeholder functions that we’ll fill out later as we need them. We’ll set up an action for each of the CRUD operations, along with an index action to return a list of all of the User objects:
var User = require("../models/user.js"),
mongoose = require("mongoose");
var UsersController = {};
UsersController.index = function (req, res) {
console.log("index action called");
res.send(200);
};
// Show a User
UsersController.show = function (req, res) {
console.log("show action called");
res.send(200);
};
// Create a new user
UsersController.create = function (req, res) {
console.log("create action called");
res.send(200);
};
// Update an existing user
UsersController.update = function (req, res) {
console.log("update action called");
res.send(200);
};
// Delete an existing user
UsersController.destroy = function (req, res) {
console.log("destroy action called");
res.send(200);
};
module.exports = UsersController;
Hopefully, you can generalize these actions from the ToDosController example. In More Practice and Further Reading, you’ll create a user interface that allows you to interact with the User model in the same way that we previously interacted with the ToDo model.
For now, however, we’ll create an example user to work with in the following sections by adding the following code to the top of our user controller:
// This checks to see if a User already exists
User.find({}, function (err, result) {
if (err !== null) {
console.log("SOMETHING WENT HORRIBLY WRONG");
console.log(err);
} elseif (result.length === 0) {
console.log("Creating Example User...");
var exampleUser = new User({"username":"semmy"});
exampleUser.save(function (err, result) {
if (err) {
console.log(err);
} else {
console.log("Saved Example User");
}
});
}
});
We’ll use this sample user to test our routes. You can create other test or default users by following the same basic format.
Setting Up Routes
In this example, the routes are where things are going to get interesting. First of all, we can set up our basic HTTP/action mapping for our User model as we did before. Open up server.js and add the following basic routes that map HTTP requests to controller actions:
app.get("/users.json", usersController.index);
app.post("/users", usersController.create);
app.get("/users/:username", usersController.show);
app.put("/users/:username", usersController.update);
app.del("/users/:username", usersController.destroy);
WARNING
Notice that Express uses del instead of delete for HTTP DELETE requests. This is because delete has a different meaning in JavaScript.
Now we’d like to set up our app so we can have the routes and behaviors shown in Table 9-2.
Table 9-2. Routes/behaviors
|
Verb |
Route |
Behavior |
|
GET |
/users/semmy/ |
Show my Amazeriffic page |
|
GET |
/users/semmy/todos.json |
Get all of my ToDos as an array |
|
POST |
/users/semmy/todos |
Create a new ToDo for me |
|
PUT |
/users/semmy/todos/[id] |
Update my ToDo with the given ID |
|
DELETE |
/users/semmy/todos/[id] |
Delete my ToDo with the given ID |
You’ll see that the routes behave almost exactly the way our existing ToDo routes behave, with the exception that they are associated with a particular username. How can we make this happen with our existing code? We’ll simply set up another set of routes that include theusers/:username prefix, and we’ll point those to our ToDosController actions:
app.get("/users/:username/todos.json", toDosController.index);
app.post("/users/:username/todos", toDosController.create);
app.put("/users/:username/todos/:id", toDosController.update);
app.del("/users/:username/todos/:id", toDosController.destroy);
Now that we have some basic routing set up we can start integrating our changes. First, we’re going to want to send along our existing client-side index.html file when we request the user page instead of creating a different one. We can easily make this happen by modifying our show action. We want our show action to send a view for that user. Fortunately, the user’s view will be the same as the default view, so we can simply send along our index.html file using the Express response’s sendfile function:
UsersController.show = function (req, res) {
console.log("show action called");
// send the basic HTML file representing the view
res.sendfile("./client/index.html");
};
If we run our server now and go to localhost:3000/users/semmy/, we should see the same interface that we saw previously, including whatever ToDo objects are currently in our data store. That’s because we haven’t gotten restricted to the subset of ToDos owned by a user yet.
But there’s a problem. Open your browser and go to localhost:3000/users/hello/. We’ll see the same thing, and hello is not actually a user! Instead, we want to return a 404 when the route points to an invalid user. We can do that by querying the user model against the username sent in as a parameter. So our show action will change to this:
UsersController.show = function (req, res) {
console.log("show action called");
User.find({"username":req.params.username}, function (err, result) {
if (err) {
console.log(err);
res.send(500, err);
} elseif (result.length !== 0) {
// we've found a user
res.sendfile("./client/index.html");
} else {
// there is no user with that name,
// so we send a 404
res.send(404);
}
});
};
Now we should only get responses to this route when a valid user is requested.
Improving Our ToDo Controller Actions
Before we go any further, we need a way to tie our User model and our ToDo model together. To do this, we’ll modify our ToDo model so that each ToDo object has an owner. The owner will be represented by an ObjectID in the ToDos collection, which will reference a user element in theUsers collection. In classical database terms, this is roughly the same thing as adding a foreign key that relates a given table to a different table.
To set this up, we’ll modify our ToDo model and schema to include the reference to the User model:
var mongoose = require("mongoose"),
ToDoSchema,
ObjectId = mongoose.Schema.Types.ObjectId;
ToDoSchema = mongoose.Schema({
description: String,
tags: [ String ],
owner : { type: ObjectId, ref: "User" }
});
module.exports.ToDo = mongoose.model("ToDo", ToDoSchema);
When we create a ToDo object, we’ll also include an owner or the value null if the owner doesn’t exist (in the case that we add a ToDo from the default route, for example).
Next, we can start working on our ToDo controller actions so that they take into account the possibility that they can be called via a route associated with a username. To start with, we’ll modify our index action so that it responds with a user’s ToDos if the user is defined:
ToDosController.index = function (req, res) {
var username = req.params.username || null,
respondWithToDos;
// a helper function that gets ToDos
// based on a query
respondWithToDos = function (query) {
ToDo.find(query, function (err, toDos) {
if (err !== null) {
res.json(500,err);
} else {
res.json(200,toDos);
}
});
};
if (username !== null) {
// get the todos associated with the username
User.find({"username":username}, function (err, result) {
if (err !== null) {
res.json(500, err);
} elseif (result.length === 0) {
// no user with that id found!
res.send(404);
} else {
// respond with this user's todo objects
respondWithToDos({ "owner" : result[0].id });
}
});
} else {
// respond with all todos
respondWithToDos({});
}
};
Finally, we’ll modify our create action so that it adds the user to the new ToDo if the user is defined:
ToDosController.create = function (req, res) {
var username = req.params.username || null,
newToDo = new ToDo({"description":req.body.description,
"tags":req.body.tags});
User.find({"username":username}, function (err, result) {
if (err) {
res.send(500);
} else {
if (result.length === 0) {
// the user was not found, so we
// just create an ownerless todo
newToDo.owner = null;
} else {
// a user was found, so
// we set the owner of this todo
// with the user's id
newToDo.owner = result[0]._id;
}
newToDo.save(function (err, result) {
if (err !== null) {
res.json(500, err);
} else {
res.json(200, result);
}
});
}
});
};
Here, you’ll see that we are setting the owner to null if the user doesn’t exist and we’ll set the owner to the user’s associated _id if they do exist. Now when we run our server, we should be able to visit a route for each test user we created and create ToDos associated with that user under their route. And if we go to the main page localhost:3000, we should see all ToDos for all users.
Summary
Writing a web application is not hard once you know how all the parts work. On the other hand, writing a maintainable web application requires some forethought and planning. Code maintainability in web applications is closely related to the idea of the separation of concerns of certain aspects of the application. In other words, a program should be made up of many small parts that do one thing and do one thing well. The interaction between these parts should be minimized as much as possible.
In this chapter, we saw a few basic tips on how to keep our client-side code clean and straightforward. One of the most essential parts of this is that we learned how to generalize meaningful concepts. This is closely related to the idea of object-oriented programming.
On the server side, there’s a design pattern that dictates the structure of the code. The Model-View-Controller design pattern is an accepted practice for organizing maintainable client/server applications. The practice is so widely accepted that entire frameworks have been built that force developers to write applications using it. These frameworks include Ruby on Rails.
In the MVC pattern, the model abstracts the database using some sort of data modeling tool. In our examples, the view is simply the client portion of our application (the HTML, CSS, and client-side JavaScript). The controller maps requests from the view to actions on the model and responds with data that can be used to update the view.
Another common practice is to organize the server-side part of a web application as a RESTful web service. A RESTful web service exposes program resources (such as data models) to the client-side portion of the application through straightforward URLs. The client makes a request with a specific URL, some data, and an HTTP verb, which the application router maps to a controller action.
More Practice and Further Reading
Removing ToDos
One thing that we haven’t set up yet is the ability to remove ToDos from the app. Fill in the destroy action in the ToDo controller so that it removes the ToDo with the specified ID. Next, we’ll want to add the ability to remove the ToDo from the UI.
How can we do that? If we’ve defined our routes and actions correctly, we’re returning the entire ToDo object from the todos.json route. Then we are only using the description field of our object to create the UI. We’ll also want to use the _id field to build a remove link.
For instance, suppose our tab that lists out our ToDos looks like this:
"content":function (callback) {
$.get("todos.json", function (toDoObjects) {
var $content = $("<ul>");
// create 'Oldest' $content
toDoObjects.forEach(function (toDo) {
$content.append($("<li>").text(todo.description));
});
// call the callback with the $content
callback($content);
});
}
Here, we’re adding an li element for each ToDo object. Instead of just adding the text to the li, we want to include an a element that removes the item. For example, we would want our resulting DOM element to have HTML that looks like this:
<li>This is a ToDo item <a href="todos/5275643e0cff128714000001">remove</a></li>
We can do this by manipulating our $content object a bit:
var $todoListItem = $("<li>").text(todo.description),
$todoRemoveLink = $("<a>").attr("href", "todos/"+todo._id);
// append the remove anchor
$todoListItem.append($todoRemoveLink)
$content.append($todoListItem);
Next, we can modify this to attach a click handler to the remove link:
var $todoListItem = $("<li>").text(todo.description),
$todoRemoveLink = $("<a>").attr("href", "todos/"+todo._id);
$todoRemoveLink.on("click", function () {
$.ajax({
// call the delete HTTP request on the object
}).done(function () {
// once we successfully remove the item from
// our app, we can remove this list item from
// the DOM
});
// return false so we don't follow the link
returnfalse;
});
// append the remove anchor
$todoListItem.append($todoRemoveLink)
$content.append($todoListItem);
This is tricky to get working correctly, so plan to spend some time on it!
Adding a User Admin Page
So far, we don’t have any way to add or remove users from our app. We’ll create a users admin page that lists all of the users along with an input field that allows us to add a user to the app. This will require adding an additional page to our client, along with an additional JavaScript file for handling the UI for that page. For example, you might create a users.html file that imports a users.js file stored in our javascripts directory. You will probably reuse the majority of the CSS from your existing app, so it’s okay to just link the style.css file in your stylesheets directory. There, you’ll probably add a few custom styling elements.
Once you get all of that working, it might be interesting to add a button to each user that allows you to remove them from the app. This will, of course, trigger the destroy action on the user model. In addition to removing the user from the user collection, you’ll want to also remove all the to-do items associated with that user in the action.
This is a little trickier than the remove problem, so try to get that one working first!
Views Using EJS and Jade
One major topic that I’ve left out of this treatment of MVC and Node.js is templating engines. That’s not because I don’t think they are useful or important. Instead, I was making an effort to keep the content a little more manageable and to give you more of an opportunity to work with client-side AJAX calls.
That being said, I encourage you to take some time to read about both Jade and EJS. They take very different approaches to generating HTML dynamically on the server-side, and they both integrate very nicely with Express.
Build Another App
We built a simple to-do list app. Try building another one from scratch. Try generalizing the ideas that you’ve learned and build another application. If you look at other tutorials, you’ll often see examples involving blogging platforms or Twitter clones. Those are straightforward, manageable projects that will help you solidify the knowledge that you’ve gained from this book.
Ruby on Rails
One of my major goals with this book was to give readers enough background to start learning Ruby on Rails, one of the most popular web frameworks. At this point, I hope you have enough of a background to undertake Michael Hartl’s Rails Tutorial. In this tutorial, he walks you through using test-driven development to build a simple Rails application. Many of the concepts that I presented here should carry over to his tutorial.
All materials on the site are licensed Creative Commons Attribution-Sharealike 3.0 Unported CC BY-SA 3.0 & GNU Free Documentation License (GFDL)
If you are the copyright holder of any material contained on our site and intend to remove it, please contact our site administrator for approval.
© 2016-2026 All site design rights belong to S.Y.A.