EPiServer 7 CMS Development (2014)
I. UNDERSTANDING EPISERVER CMS
Imagine that we’ve been asked to build an iPhone app. Also imagine that we’ve never used an iOS device, or perhaps not even a smartphone or tablet of any kind. We could of course fire up Xcode, the IDE used when building iPhone apps, and start coding away. But without knowing anything about the context in which our app runs odds are we wouldn’t get very far. Even if we did manage to build a working app our users probably wouldn’t find it very easy or enjoyable to use - we have no idea about how iPhone users are used to interacting with apps.
The same goes for EPiServer CMS development. In order to build an EPiServer site we need to know how our users, the editors, interact with the system. In this part of the book we’ll introduce the core concepts of EPiServer CMS, and many other CMSes like it. Then we’ll walk through the steps required to install the CMS and create a sample site. Equally important we’ll also look at what the installation does. Finally, we’ll use the sample site that we learn to set up to learn the most important aspects of using the CMS to create and edit content on a website.
Chapter 1. From static site to CMS
EPiServer CMS is a complicated product that has been developed for over a decade. As you can imagine, it’s very rich in terms of features, some more useful than others. This creates a risk when writing, and reading, a book about EPiServer development; we may lose focus of the core concepts. If that were to happen we’d gain a superficial understanding of many fringe features without actually understanding the essence of EPiServer CMS.
Therefore, to allow us to focus on the essence of EPiServer CMS and EPiServer development this chapter, the first chapter in this book about EPiServer CMS development, actually isn’t about EPiServer CMS. Instead it’s a story about a site that doesn’t exist.
We’ll follow this fictive site from its infancy, being a single static HTML page, to a dynamic, database driven website where non-technical users can create and edit its content. In the process we’ll face the same problems that the early developers of EPiServer faced and we’ll, for the most part, implement the same solutions.
While we’ll look at code in this chapter, as with the site, this code isn’t real. Instead it’s pseudo code intended to illustrate solutions and concepts. So, don’t try to compile it :-)
In the beginning there was HTML
Imagine that we’ve just been hired to work as web developers by a company that imports and sells fruit. The company isn’t present on the web and it’s our job to change that.
As a first step we create a single page website with some information about the company along with contact information.
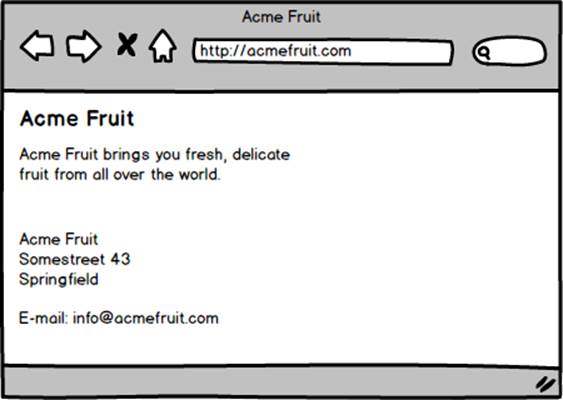
Simple image and text only website
All that’s needed for this simple site is a static HTML file and the logotype. In order to publish it we upload it to a web server using FTP.
The markup in the HTML file, index.html, looks something like this:
<html>
<head>
<title>Acme Fruit</title>
</head>
<body>
<img src="logo.png" />
<p>
Acme Fruit brings you fresh, delicate
fruit from all over the world.
</p>
<p>
Acme Fruit<br/>
Somestreet 43<br/>
Springfield
</p>
<p>E-mail: info@acmefruit.com</p>
</body>
</html>
Next we want to add information about the company’s products. We do that by adding a new static HTML page similar to the first one. As we’ve now left the single page site stage we also decide to move the contact information from the start page onto its own separate page.
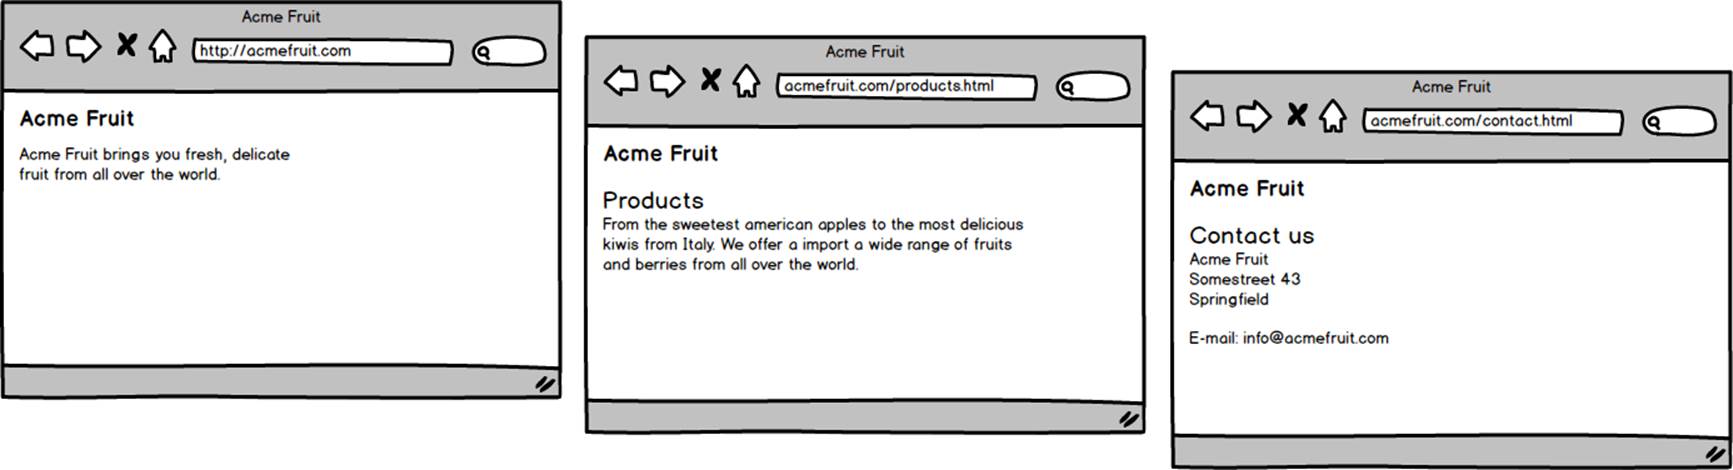
Three static HTML pages
Of course having multiple pages on our site we need a way for visitors to navigate between them. To provide that we add a navigation bar to each of the pages. The navigation shows what page the visitor is currently viewing and contains links to the other pages on the site.
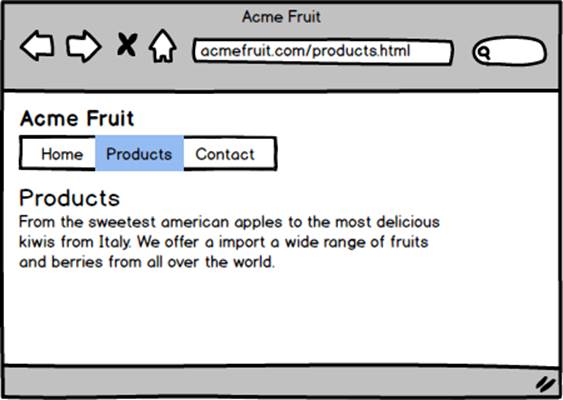
The products page with top navigation
The HTML for the navigation bar looks something like this on the Products page:
<ul>
<li><a href="/">Home</a></li>
<li>Products</li>
<li><a href="/contact.html">Contact</li>>
</ul>
Apart from the fact that the page that the visitor is currently viewing isn’t linked to in order to indicate that it’s the currently viewed page the code for the navigation is identical on the three pages.
Componentization and server side processing
Next we decide to add a fourth page with information about the company. Following the workflow that we’ve used so far, using static HTML pages, the easiest way of adding the new page would be to copy one of the existing pages and change the copied page’s content. While that’s easy we would also have to add a new link to the top navigation. As the code for the navigation exists on all four pages and we want the link to the new page to exist on all of them we’ll have to first add it to the navigation on one page and then copy and paste it into the other three pages. This is tedious and error prone work and as we envision that the site will continue to grow it’s clear that our current solution for the navigation won’t work, at least not efficiently.
The problem with the navigation is twofold. It is made up of nearly identical duplicated code, meaning that in order to make a single change to its functionality we have to make changes to code in multiple places. Second, it’s made up of static code. While it differs slightly depending on what page it’s displayed on as the name of the currently viewed page is treated specially, this logic is handled by the fact that the code for the navigation is duplicated on each page with minor variations. It’s of course also static in the sense that there’s no logic or data source that determines what links it should show - the links are hard coded.
If it hadn’t been for the slight difference in the code for the navigation that highlights the currently viewed page there would have been a simple solution to the code duplication problem, we could have used a technology called Server Side Includes (SSI). SSI is supported by most popular web servers. When using SSI the web server processes HTML files before serving them to the client. During this processing it looks for a special tag in the HTML code that specifies a path to another HTML file. Upon finding such a tag the web server replaces it with the content in the other referenced file.
SSI is a simple solution for extracting and reusing chunks of HTML on multiple HTML pages. As such it allows for basic componentization, often a prerequisite for maintainable and modular software applications. However, while SSI enables reuse of static HTML it doesn’t allow for any other type of server side processing. Therefore we can’t use SSI to make our navigation easier to change as we also need to implement logic to handle what link is highlighted depending on what page the navigation is being displayed on.
To address that we need more advanced server side processing functionality. We need a web application framework. A web application framework typically acts as a plug-in to the web server and provides an alternate pipeline for handling requests, often for files with a specific file extension. When the web server receives a request for a file of a type handled by the application framework it deviates from its standard procedure of locating the file on the harddrive and instead hands over processing to the application framework.
After being handed over control of the processing of a request, along with information about it such as what file or path was requested, from the web server the framework typically proceeds to execute source code in the requested file. The output from the code in the requested file is written to the response sent to the client from which the request originated.
While a web server can handle serving a wide range of static files a web framework only handles a limited set of files. On the other hand, as opposed to a web server, an application framework cares about what’s in the files it does serve, typically executing application specific source code in the files. Beyond executing source code a web framework also provides an environment in which the code is executed. By means of this environment the application specific source code can interact with the incoming request, the outgoing response as well as a host of other resources and functionality, such as performing operations on files on the file system, accessing databases and utilizing caching.
What programming language the application specific source code is written in differs from framework to framework. So does the environment, operating system, web server etc in which the code is executed. Some frameworks provide a lot of functionality out-of-the-box, often coupled with a number of abstractions and reusable components. Other frameworks takes a minimalistic approach focusing on flexibility for developers rather than rapid development of common functionality.
There exists a wealth of web frameworks for us to choose from when developing websites. Some are commercial and must be licensed. Some are free (and often open source) and can be used without restrictions and some are provided as part of, or extensions to, other software such as web servers or operating systems.
Some of the most popular web application frameworks include PHP, which is both a programming language and a web framework, Ruby on Rails in which functionality is developed in the programming language Ruby and JavaServer Pages (JSP) in which development is done in Java. When a website is to be hosted on servers running Microsoft Windows the most commonly used framework is Microsoft’s own ASP.NET.
ASP.NET allows for web site development in any programming language that runs on the .NET execution engine, the Common Language Runtime (CLR). In practice this usually means C# or VB.NET although there are other alternative CLR languages, including F# and Boo. When building sites the ASP.NET framework offers two “flavors”, Web Forms and MVC.
Any self respecting web framework can be used to solve our problem with the navigation as they provide functionality to add logic to the handling of requests as well as some sort of ability to break pages, or “views”, up into components for reuse. However, as the company that we work for prefers Microsoft technology we decide to use ASP.NET.
Assuming we’ve decided on a framework, we create a new project and convert all of our existing HTML pages into files handled by that framework. With ASP.NET that means either .ASPX files when using Web Forms or controllers plus views when using MVC. We then extract the navigation from one of the pages into a reusable component, such as an User Control (.ASCX file) when using Web Forms or a partial action or HTML helper method when using MVC.
Having created the partial component with the static HTML code from one of the pages we replace the navigation in each of the pages with it. We’ve now fixed the code duplication but in the process we’ve introduced a bug. No matter which page is viewed the navigation will highlight the one from which we copied the code. To correct that we need to add some logic to the component so that it’s displayed differently depending on what page it’s rendered on.
As a first step we create a small class that represents an individual link in the navigation. For that purpose it needs three properties, the link’s text, the URL to link to and a boolean indicating whether it should be displayed as the currently viewed page.
publicclassMenuLink
{
public string Text { get; set; }
public string Url { get; set; }
public bool Selected { get; set; }
}
Then, in the component, such as in the user control’s code behind file or in a controller action, we create a method that returns a number of instance of this class, one for each page on the site.
public IEnumerable<MenuLink> GetMenuLinks()
{
var links = new List<MenuLink>
{
new MenuLink
{
Text = "Home",
Url = "/"
},
new MenuLink
{
Text = "Products",
Url = "/products"
},
new MenuLink
{
Text = "About us",
Url = "/about"
},
new MenuLink
{
Text = "Contact us",
Url = "/contact"
}
};
return links;
}
While we haven’t yet implemented any functionality to set the Selected property to true for the currently viewed page’s link we can now replace the hard coded HTML in the component with a loop that iterates over the objects returned by the method and render a HTML link for each of them. Pseudo code for that may look like this:
<ul>
foreach(var link in GetMenuLinks())
{
<li>
if(link.Selected)
{
<%= link.Text %>
} else
{
<a href="<%= link.Url %>"><%=link.Text%></a>
}
</li>
}
</ul>
Now the menu is generated from the values returned by the GetMenuLinks method and the component renders each page as linked or not depending on the Selected property. To finalize the navigation we need to set the Selected property to true for the currently viewed page. If a link’s URL matches the requested URL we mark it as selected.
...
foreach(var link in links)
{
link.Selected = Request.Url.EndsWith(link.Url);
}
return links;
...
Layouts
The code for the navigation is now centralized to a single place, making it far easier to update when adding new pages to the site. We can continue to use this concept of extracting common functionality to components such as partial views, HTML helpers or user controls. We may for instance want to move the code for the logotype into a reusable component making future changes to it easier. There is however one type of code duplication for which this type of componentization isn’t suitable; layout.
We’d now like to add a footer to the site with some copyright information and possibly some links. We could of course add the HTML code needed for the footer to each individual page but that would create a similar problem as the one we just solved for the navigation. Therefore we can instead create a reusable component that renders the footer.
Still, after creating the footer component we would need to need to go through each of the pages on the site and add the component. This highlights the fact that the site’s layout, it’s graphical framework if you will, is duplicated and hard to maintain. That is, while we can reuse individual code blocks by breaking them out into components, adding or moving such components that should be used across the entire site demands that we modify each individual page, even though all of the pages share the same graphical layout.
To address this problem we need to separate the shared layout from the parts of the pages that is actually different on each page, typically the main editorial content. Most web frameworks or view engines offer some sort of functionality to accomplish this, although both the implementation and name for it may be different. In ASP.NET with Web Forms this functionality is called master pages. In ASP.NET MVC it depends on what view engine is used. In version four of the MVC framework the default view engine is named Razor and its solution to this problem is called simply layouts.
Both master pages and layouts in Razor acts as a top level framework for individual pages, or for more specialized master pages or layouts. Master pages allow us to define placeholders called content placeholders. A content placeholder can be empty or contain default content, including other content placeholders. A page, or another master page, can specify that it uses a master page. When doing so we’re not allowed to put HTML code anywhere we’d like in the page but can instead override one or several of the master page’s content placeholders. When the page is rendered the framework will see that the page uses a master page and will render the master page with any content added, or “filled in”, by the requested page.
Razor layouts are similar but instead of them being able to define multiple areas where a view, or another layout, can provide content they must somewhere within the code invoke a method named RenderBody. When an individual view is rendered the framework sees that it uses a layout and renders that with the content of the view in place of the RenderBody method. In addition to this layouts can define additional extension areas for views called “areas”. A view can then populate a given area by declaring that a piece of the view should be rendered inside a named area.
This type of functionality is great for defining top level HTML code which defines the common layout for all pages, as well as common elements, such as the logotype and the footer in our case. Naturally, the first step in using a layout file of some sort is to create it. We can then extract the HTML code that defines the layout for the site from one of the pages. In the process we also add the footer.
<html>
<head>
<title>Acme Fruit</title>
</head>
<body>
<img src="logo.png" />
<% TopMenuComponent %>
<div class="footer">Copyright Acme Fruit</div>
</body>
</html>
Next we define a place holder in the layout where content from pages that use the layout will be inserted. So far our site is so simple that there’s only one part that differs between each page; the content between the top menu and the footer. Therefore we insert a placeholder there in the layout.
...
<% TopMenuComponent %>
<% Placeholder_for_content_from_pages %>
<div class="footer">Copyright Acme Fruit</div>
...
We can now start using our layout by adding a directive to each page configuring them to use the layout. We also remove the common HTML code and leave only the code and content that is specific to each page.
<% UseLayoutDirective %>
<h1>Welcome to Acme Fruit</h1>
<p>...</p>
Following the shift to using a layout we now have a more flexible and maintainable site compared to when we had four static HTML files all defining the same “framework” elements. When we add a new page we need to make sure that it uses the layout and add link to it in the top menu component but can then focus on the content in the page. When we want to change the design of the site we simply need to modify the layout file.
Storing page content in a database
The site in its current state is fairly easy to work with given that we know HTML, have a basic understanding of ASP.NET and know how to transfer files using FTP. While this knowledge is common among developers it’s typically not developers that publish and update website content in an enterprise. The company that we work for is no exception. While everyone in the organization is excited about having the website we soon start getting more and more requests to update its content. This gets in the way of further development and those requesting the content changes feel frustrated as they have to wait for us to implement the changes.
Currently the content in each page is stored in a separate file. If we moved the content into a database and added an authentication mechanism to the site we could create an interface through which non-developers could work with the content.
As a first step towards that we create a database and add a table where each row will represent a page. The table will need to have an identity column, a column for the pages name in as displayed in the top menu, we’ll call that “Name”, and a column for the content. Having created the table and populated it with the data from each page it looks like this:
|
id |
name |
content |
|
1 |
Home |
<h1>Acme Fruits… |
|
2 |
Products |
<h1>… |
|
3 |
Contact |
<h1>… |
|
4 |
About |
<h1>… |
As we’ve now moved all of the page specific content into the database we can remove all but one of our existing pages (ASPX files when using Web Forms or Controllers and or Views when using MVC). We’ll keep the one that we used as the start page and use that as a template for all of our pages, rendering the content stored in the database.
Of course, for that to work we’ll need to know which page’s content we should render in the template. As each of the pages have a unique integer identifier, from the id column in the database, we’ll use a query string parameter named “id” for handling that. When the template is called upon to handle a request we make it check whether the request contains such a query string parameter. If it does, we’ll fetch that row from the database and render the content in it. If it doesn’t, or the query string parameter is invalid, we make the template default to the ID of the start page (1 in the table above).
In (pseudo code) practice the code for this consists of two methods. The first returns the ID of the page that should be rendered, the current page:
public int GetCurrentPageId()
{
var id = 1;
if(Request["id"] == null)
{
return id;
}
int.TryParse(Request["id"], out id);
return id;
}
The second method uses the above method to fetch and return the content for the current page:
public string GetCurrentPageContent()
{
var sql = "select content from page "
+ "where id = " + GetCurrentPageId();
//Execute the SQL query against the database
//and return the result.
}
Finally we modify our remaining page, or rather our template, to display the content.
<% UseLayoutDirective %>
<%= GetCurrentPageContent() %>
<!-- The below static HTML is replaced by the line above.
<h1>Welcome to Acme Fruit</h1>
<p>...</p>
-->
Our site now stores and fetches its content from a database. A request to a URL such as http://acmefruit.com/default.aspx?id=1 or http://acmefruit.com/home/?id=1 displays the start page. A request to /default.aspx?id=2 or /home/?id=2 displays the Products page and so on.
As a result the top menu is broken as the URLs for all pages except the start page has changed. The top menu also still uses hard coded texts for the links. We fix both issues by modifying the top menu so that it fetches ID and name for all pages in the database and renders links to them.
public IEnumerable<MenuLink> GetMenuLinks()
{
string templatePath = //Relative URL for the path,
//such as ~/default.aspx or /home/.
var sql = "select id, name from page";
//Execute the SQL query against the database and
//assign the result to a DataReader represented by
//a variable named reader.
var links = new List<MenuLink>();
while(reader.read())
{
var pageId = reader.readInt(0);
var pageName = reader.readString(1);
var url = templatePath + "?id=" + pageId;
var selected = pageId == GetCurrentPageId();
var link = new MenuLink
{
Text = pageName,
Url = url,
Selected = selected
};
}
return links;
}
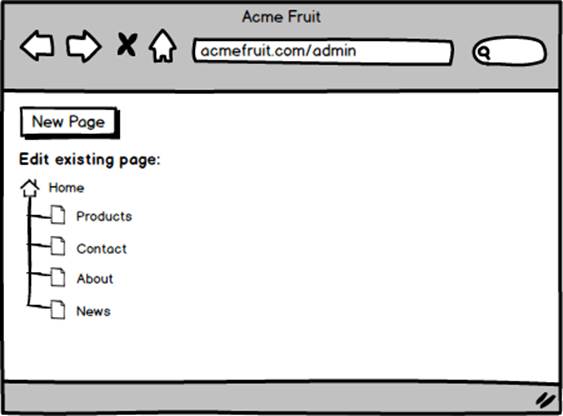
A user interface for working with pages
With the top menu updated both the content and the navigation of the site is based on what’s in the database. Adding, updating or deleting pages no longer require changes to the code. It does however require access to the database. Worse, it requires knowledge about databases. We’re halfway to making the site manageable for non-technical users but we lack an interface for editing content.
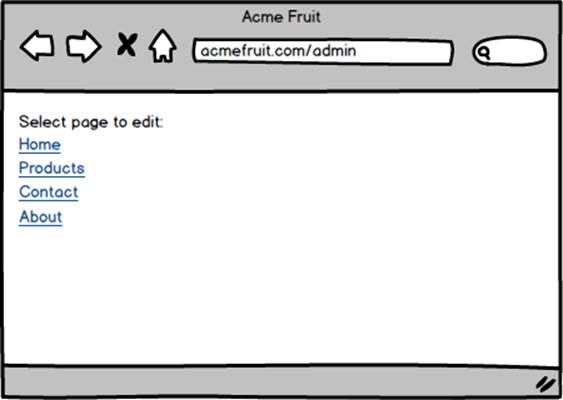
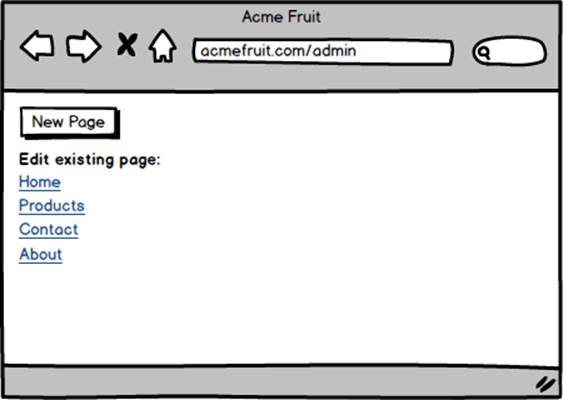
To address that we add a new handler (ASPX or MVC controller + view). We don’t make this new handler use the layout as this page won’t be for public display on the site and therefore doesn’t need elements such as the top menu and the footer.
Instead we add functionality to the handler to generate a list of links for all pages in the database. While the code will be similar to the top menu this list is vertical instead of horizontal. Also, it doesn’t link to the template used for public rendering of pages but instead to yet another handler that we’ll create that we’ll call “edit page handler”. That handler will still need to know what page has been selected though, so the URL will be made up of the URL for the handler and an “id” query string parameter.
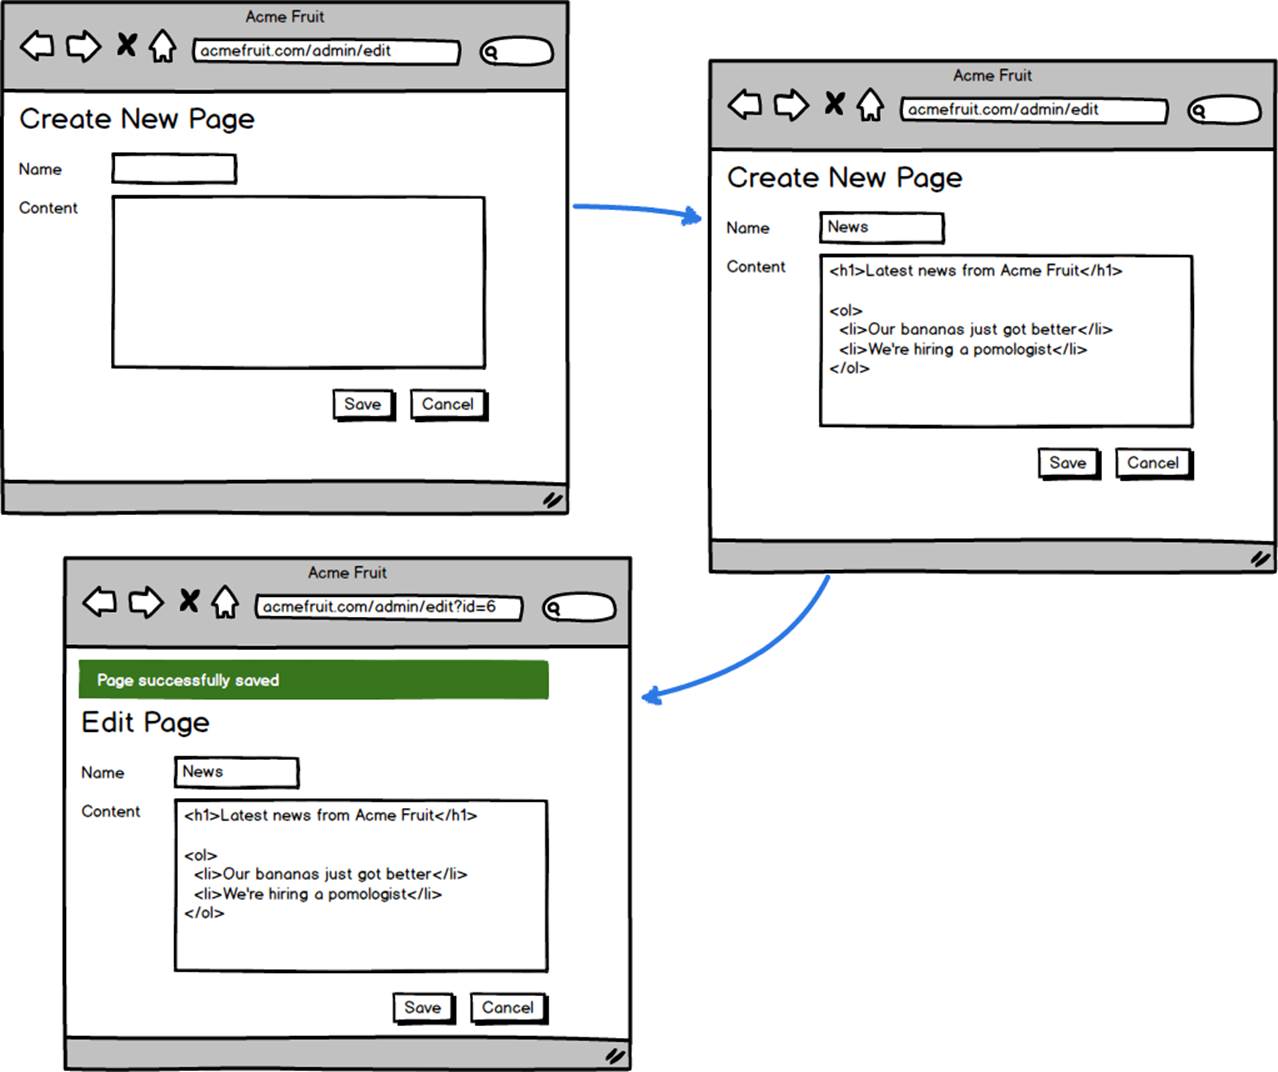
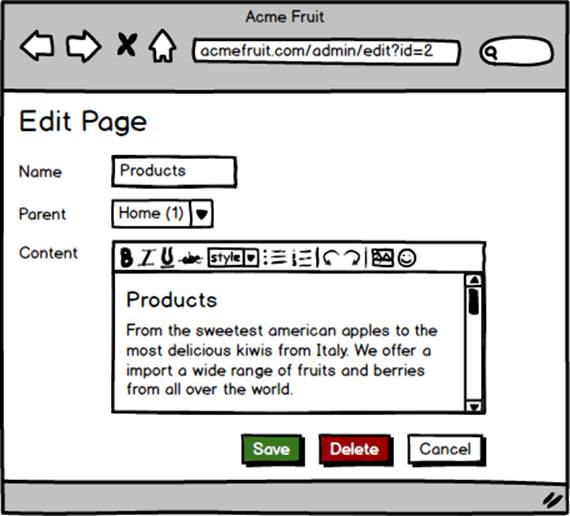
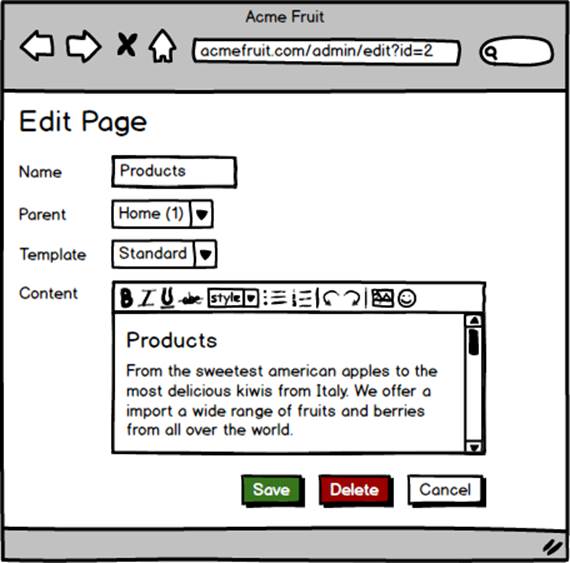
Next we add the edit page handler. It will render a textbox for the name, a textarea for the content and two buttons, one for saving and one for canceling editing without saving.
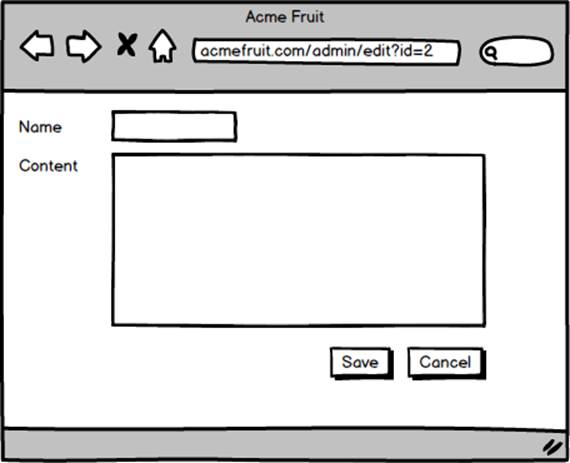
To enable users to edit a page we first need to fetch the content. We do so by retrieving the page’s id from the query string and then fetch all cells from the database row with that ID. Once fetched from the database we assign the value of the name cell to the textbox and the content cell’s value to the textarea.
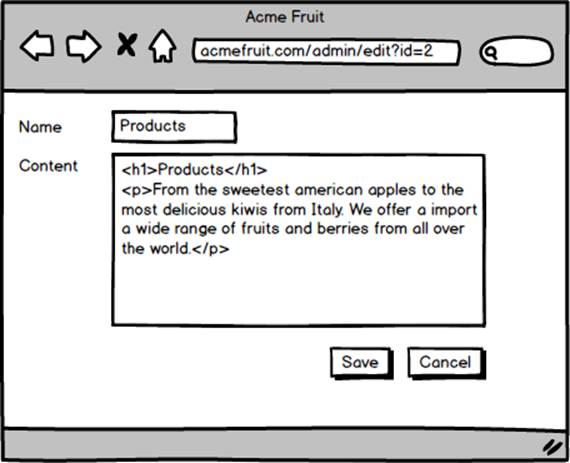
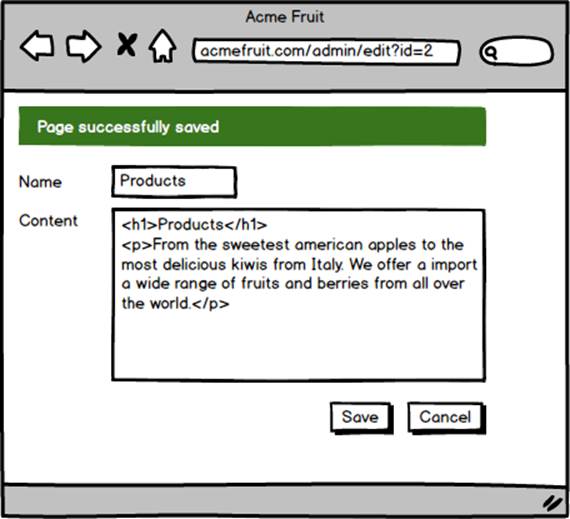
While users are now able to look at the values stored in the database as well as changing them in their browser they aren’t yet able to save the changes. Therefore we proceed by implementing the buttons. If a user clicks the Cancel button we simple redirect them back to the list of pages. However, if the user clicks the Save button we read the values from the Name textbox and the Content textarea and update the page’s row in the database, locating it by ID using the “id” query string parameter. After successful updating it we display a message confirming that the page was indeed successfully updated.
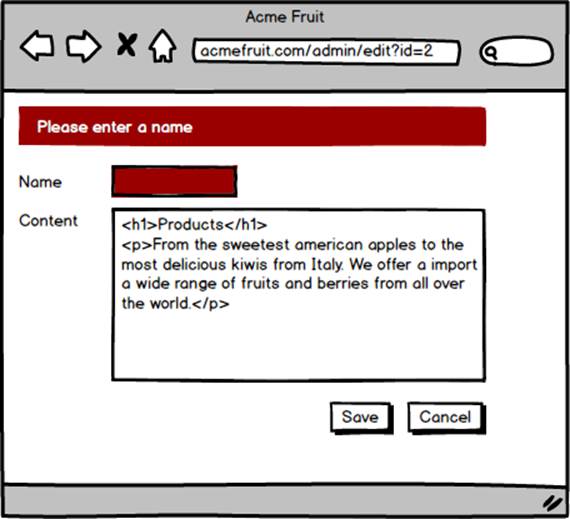
Great! Users are now able to modify existing pages through a graphical interface. However, we have one rather serious bug; if a user changes the name of a page to a blank string it won’t be possible to navigate to it on the public site as there won’t be anything to click on in the top menu. Worse, there won’t be anything to click on in the list of pages for editing either, making it hard to revert the change. Therefore we add some validation. Prior to updating the page’s row in the database we check that the name isn’t empty. If it is we don’t execute the database update and instead show a an error message.
Our users are excited that they can now change the content on existing pages as long as they have a basic understanding of HTML. However, they would really like to be able to create new pages as well. To address that we add a button for creating new pages.
When a user clicks the button we redirect them to the edit page handler but without an “id” query string parameter. In the code for the edit page handler we implement a check whether an existing page has been selected. If not we simply skip populating the textbox and textarea upon loading.
Also, when a user presses the Save button we perform the same check and if we deduce that it’s not an existing page that’s being edited we use a slightly different SQL statement, using INSERT instead of UPDATE. A minor but important detail is also that we after having created the new page don’t redirect the user back to the same URL but instead add the newly created page’s ID to the URL in the form of the “id” query string parameter.
Pseudo code for the functionality for saving a page in the edit page handler looks something like this:
publicvoid Save()
{
if(string.IsNullOrEmpty(input["name"]))
{
//Show validation error
return;
}
if(Request["id"] == null)
{
//Create INSERT SQL statement and execute.
//Retrieve returned ID from the database.
//Redirect to the same handler with ?id={returned_id}
//added to the URL.
}
else
{
//Create and execute UPDATE SQL statement based on input
//and ID from query string.
//Redirect to the same URL.
}
}
Of course, after enabling users to create new pages we don’t have to wait long for them to ask for functionality to remove pages. So, we add a delete button to the edit page dialog that is only shown when editing an existing page.
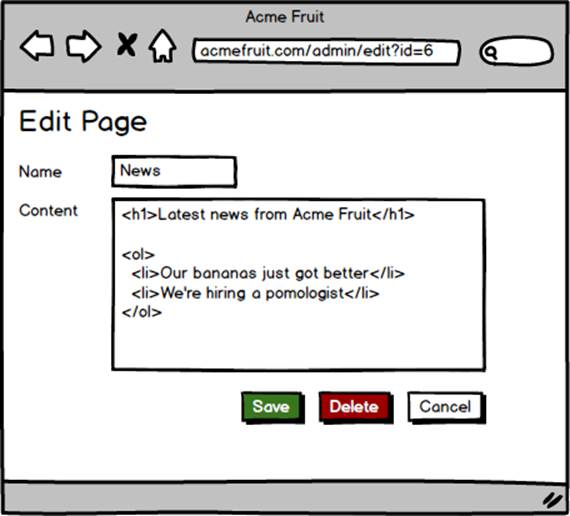
When a user presses the Delete button we execute a DELETE SQL statement against the database with the page’s ID from the query string in the WHERE clause. After that we redirect the user back to the list of pages.
We now have a simple but effective user interface for managing content on a small site, such as ours. Non-technical users can create, update and remove pages by simply redirecting their browsers to a special part of the site. While everyone is happy that the site can be updated without having to upload files using FTP or by manually updating a database our users still complain about having to write HTML when editing the content in pages though.
To address that we modify the edit page dialog to use a WYSIWYG (What-You-See-Is-What-You-Get) editor. Such an editor takes HTML content in an existing input element and let users modify it without having to write HTML code. Instead they see only the rendered content and can work with it using various tools in the editor, such as for selecting headers or font styles, that modify the underlying HTML for them. When the underlying HTML is updated the editor writes it back to the original input field, meaning that we as developers still deal with the “raw” HTML.
While we could in theory create such an editor ourselves using JavaScript or some other client side technology such as Flash or Silverlight that would be borderline professional misconduct considering the rich flora of existing editors. After examining the market for WYSIWYG HTML editors we decide to use TinyMCE, a free JavaScript based editor with a rich ecosystem of plug-ins.
Adding it to our edit page dialog doesn’t require us to change any of the server side logic. We do however have to add the JavaScript and CSS files needed to use TinyMCE as well as some custom JavaScript that replaces the existing textarea with the editor. After doing so users no longer have to manually change the HTML markup but can instead edit it in a way resembling how they would use a word processor such as Microsoft Word.
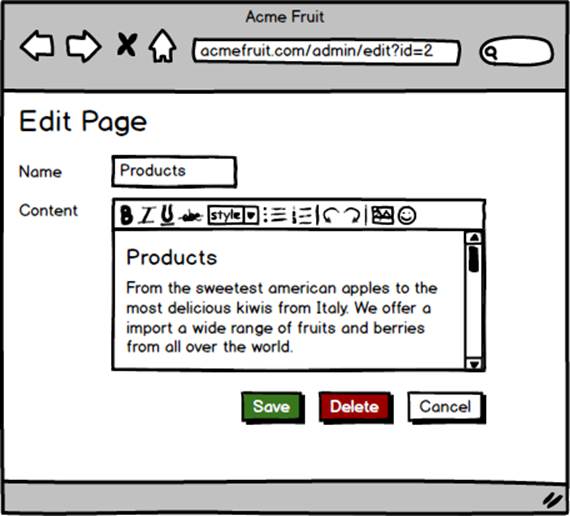
After saving a page the content, when viewed on the site, may not look exactly as it did in the editor as it’s rendered in a different context using different CSS styles. However, our users are still happy as they can now create paragraphs by simply pressing the enter key and create headlines, bulleted lists and other types of formatting without having to write HTML code. The users are able to focus on working with content rather than dealing with the intricacies of the underlying HTML used for structuring and formatting it.
As developers we’re also happy as the WYSIWYG editor does its magic on the client side and when the content is submitted we still get the raw HTML as a string which we can save to the database. Just as before.
Creating an API
While our users are now happy, for the moment, we have some technical debt to deal with. Both the public part of the site and the editorial user interface is functional but it isn’t very maintainable with SQL statements scattered throughout the code base, making for tedious and error prone work should we want to change the database schema. Also, the code looks like crap :-)
Further, there are also some performance issues. In order to load the content for a page we need to query the database to find it by ID each time it’s requested. On each request we must also execute a query to fetch all pages so that we can render links to them in the top menu.
These database queries, and the frequency of their execution, doesn’t have any significant impact on a small site with little traffic. However, as the site grows, both in terms of amount of content and in terms of traffic we’ll start to experience problems with the availability and responsiveness of the site.
To address these issues we establish that we need to move all of the data access code into a central place that the template and other presentation layer components can use instead of talking directly to the database. We need to build ourselves an API.
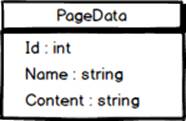
The API will consist of two classes. One representing a page, or rather the data for a page. We’ll call that class PageData. The other class will be used to save, load, list and delete pages. We’ll call that class PageRepository.
As the PageData class represents an individual page we give it properties matching the columns in the database table in which we store the data for pages.
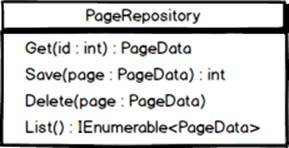
The PageRepository class needs to have methods with which we can replace the existing database calls in both the template for public rendering of pages and in the editorial interface. In both place we need a method for getting a page by ID, so we’ll add a method named Get for that.
Further, in both places we also need get the name and ID for all pages so that we can link to them. We’ll call that method List. While we could let the List method return only the IDs and names for pages as we’ll (initially) only use it to render lists of links we would then have to create a separate type for its return value. Opting for consistency in our API we make the List method return full PageData objects.
For the editorial interface we also need methods for creating new pages and updating and deleting existing pages. We add a single method name Save that handles both inserting new pages and updating existing ones. In its implementation we can handle this somewhat dual role by checking if the PageData object’s Id property has been set. If it has we know that we’re dealing with an existing page and use an UPDATE SQL statement. Otherwise we use an INSERT statement to create a new row in the database. As we need to know the ID of newly created pages in the code for the editorial interface we make the Save method return the page’s ID.
Finally, in order to be able to delete pages we add a method named Delete.
Using our new API classes we can clean up our existing code. For instance, the GetMenuLinks method used by the top menu may look like the below code once it’s using the API:
public IEnumerable<MenuLink> GetMenuLinks()
{
string templatePath = //Relative URL for the template,
//such as ~/default.aspx or /home/.
var pageRepository = new PageRepository();
var pages = pageRepository.List();
foreach(var page in pages)
{
yieldreturnnew MenuLink
{
Text = page.Name,
Url = templatePath + "?id=" + page.Id;,
Selected = page.Id == GetCurrentPageId();
};
}
}
After updating all of our existing code to use the API it no longer relies on ad-hoc database queries and is instead focused on displaying or editing pages. We’re still hitting the database several times on each request though. There are several ways to address that using different forms of caching.
The simplest but also most crude solution would be to use output caching. We would then instruct the web framework, ASP.NET, to store the full HTML output in memory on a per URL basis. On the first request to a specific URL everything would work as it currently does, with the addition that after rendering the page the framework would put the rendered output somewhere in the server’s RAM memory. On the next request to the same URL the framework would find that it already has the output in memory and abort the regular execution steps to render the page and instead send the cached output to the client.
Using output caching means that our code, including the database queries, would be bypassed once the output for the URL has been cached. That’s good as it relieves the web server of having to execute our code, and the database of having to execute the same query, over and over again. It’s however bad as any changes made by editors wouldn’t show up on the site until the cache expires.
There’s certainly a place for output caching in many web applications and there are ways to force expiration of the cache. However, for our site we’re better off implementing a different type of caching; object caching in the API. As PageData objects are fetched using one of two methods in the PageRepository class we can let the PageRepository cache the individual PageData objects. Also, as all operations that changes PageData objects are also made through the PageRepository class we can make it remove PageData objects from the cache when needed.
This approach gives us an effective and fine grained way of avoiding unnecessary database calls without giving up control over how the application should respond to individual requests. There’s one possible pitfall though. Let’s say that we implement the List method in such a way that it fetches all of the data for each page from the database. Then we implement caching in the method. Now, each time there’s any change (insert, update or delete) to the pages on the site we’ll need to clear that cache. Each time the cache is cleared the method would have to again fetch all of the data for each of the pages. However, given that we also use the Get method frequently most PageData objects will already reside in the cache.
To avoid caching the same object multiple times as well as to free the List method from having to retrieve complete rows from the database we can implement it so that it only retrieves the IDs for all pages from the database. Once it has the IDs it can use the Get method to retrieve the fullPageData objects. Using this approach the List method will cache a collection containing the IDs for all pages of the site while the Get method will cache an individual PageData object. This way when a single page is updated we’ll only need to release the cache for that individual page as well as the List method’s collection of IDs. Meaning that upon the next request to the site most PageData objects are likely to already be in the cache.
Using the interface that we saw in the class diagram, and with caching implemented, pseudo code for the PageRepository class may look like this:
publicclassPageRepository
{
public PageData Get(int id)
{
var page = Cache.Get(id.ToString()) as PageData;
if(page != null)
{
return page;
}
page = //Retrieve from database
Cache.Insert(id.ToString(), page);
return page;
}
public int Save(PageData page)
{
int pageId = pageId;
id(pageId != 0)
{
//UPDATE in database
}
else
{
//INSERT to database
pageId == //Returned ID from database
}
Cache.Remove(pageId.ToString);
Cache.Remove("all_page_ids");
return pageId;
}
publicvoid Delete(PageData page)
{
//DELETE from database
Cache.Remove(page.Id.ToString());
Cache.Remove("all_page_ids");
}
public IEnumerable<PageData> List()
{
var pageIds = Cache.Get("all_page_ids") as IEnumerable<int>;
if(pageIds == null)
{
pageIds = //Get all page IDs from the database
Cache.Insert("all_page_ids", pageIds);
}
foreach(var id in pageIds)
{
yieldreturn Get(id);
}
}
}
PHU! It took some hard work but we now have a nice looking API including fairly smart caching ensuring that we can handle the growing popularity of our site. We’re off to some well deserved vacation.
Structuring pages in a hierarchy
Alas, the vacation will have to wait. As we’re packing our bags one of the business folks comes by and asks us if we can’t make the top menu a bit wider. “Wider?” we ask. Why does our users want a wider top menu? After all, we’ve made it. It’s perfect. Well, it turns out that since we made it possible to create new pages on the site they have been creating quite a few and they don’t all fit in the top menu.
Of course what the user is really asking isn’t if we can change the top menu but rather he or she is expressing a need to be able to add more content to the site and for the sites navigation to be able to support that.
So, we sit down with our users and look at some other sites. There we see a pattern where some pages are linked to in the top menu and when viewing such a page another navigation component, a sub navigation, is shown. After some heated debate we conclude that many of those sites must be structuring their content in some sort of hierarchy where some pages are top level pages and other pages reside under them. After yet some more debating we decide to modify our site so that our editors can structure the pages in a tree like structure.
To support that we begin by adding a new column to our database table in which we store the ID of a page’s parent, meaning the ID of the page under which the stored page resides in the tree. After doing so we set the value in the new column to the ID of the start page (Home), except for the start page itself whose value we leave as null. We also add a new property to the PageData class for exposing the parent page’s ID.
The database table after adding the new column.
|
id |
name |
content |
parentId |
|
1 |
Home |
<h1>Acme Fruits… |
null |
|
2 |
Products |
<h1>… |
1 |
|
3 |
Contact |
<h1>… |
1 |
|
.. |
… |
… |
… |
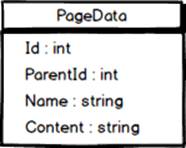
The PageData class after adding the ParentId property.
Next we add a new method to the PageRepository class for getting all pages that share the same parent. We call the new method GetChildren. It’s implementation is similar to the List method’s but its database query adds a WHERE clause looking something like this: “WHERE ParentId == {pageId}”.
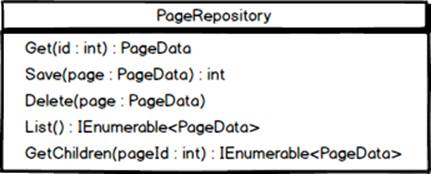
The PageRepository class after adding the GetChildren method.
As for caching we make the method cache the IDs of a page’s children using the parent page’s ID as cache key. Using this approach we can clear the cached value when a new page is added, or when a page is deleted, by clearing the cached children for the page’s parent. In other words, thePageRepository class can cache the children for each page individually and release only affected cached values when needed.
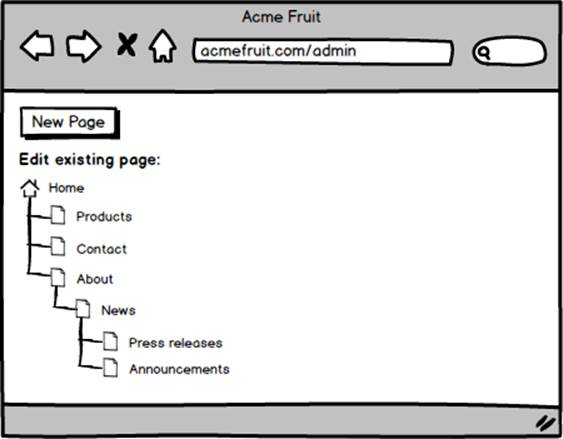
With the GetChildren method in place we can show our users the structure of the site by replacing the list of all pages with a tree. To render the tree we first fetch the start page and then invoke the GetChildren method. For each child of the start page we render a link to it using HTML and CSS that shows that it resides below the start page. Also, recursively for each child, we do the same, check if it has any children and if so render links to them below their respective parent page in the tree.
Next we modify the code for the top menu so that it no longer fetches all pages but instead fetches only the start page and its children.
public IEnumerable<MenuLink> GetMenuLinks()
{
string templatePath = //Relative URL for the path,
//such as ~/default.aspx or /home/.
var pageRepository = new PageRepository();
var pages = pageRepository.GetChildren(1).ToList();
page.Insert(0, pageRepository.Get(1));
foreach(var page in pages)
{
yieldreturnnew MenuLink
{
Text = page.Name,
Url = templatePath + "?id=" + page.Id;,
Selected = page.Id == GetCurrentPageId();
};
}
}
Next, to let our users change the hierarchy we add a dropdown to the edit page dialog in which they can choose between all pages on the site, except for the same page, as parent. This way they can move the page to another node in the tree.
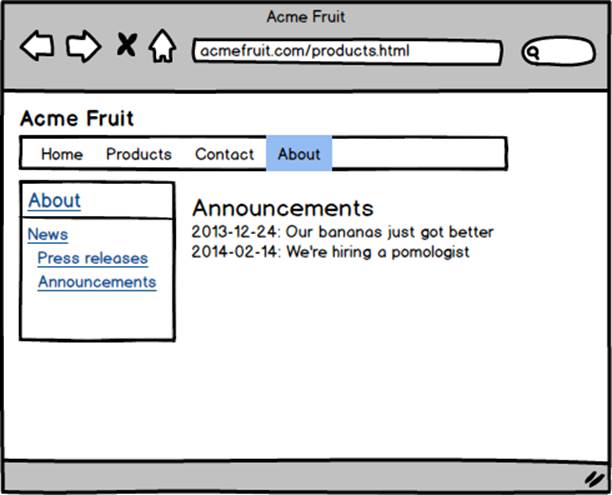
“The sub navigation as shown on the About page.”
Our users are excited to start restructuring the site’s structure. Soon we find that they have built a hierarchy consisting of multiple levels.
In order for visitors to be able to see pages on lower levels in the page tree we need to add a new navigation component. After discussing this with the editors we decide to add a vertical sub navigation. The sub navigation will consist of a link to the current “section” of the site, meaning the page in the top menu that either is the currently viewed page or the parent/ancestor of the currently viewed page.
Template selection
Adding the sub navigation to our template, or rather to the layout, had an unwelcome side effect. On the start page the sub navigation doesn’t make much sense. When we created it we had to position it to the left of the main content on the pages meaning that we had to create a simple grid using HTML and CSS. On the start page, where the sub navigation is empty, this means that we have a lot of unused space on the left side of the page.
To address this specific issue we could introduce a setting on all pages that allowed editors to specify whether the sub navigation should be shown. However, it would be nice with a more flexible approach.
Currently we have a single template for all pages. What if we could have multiple templates and let our users select which one they would like to use on a page per page basis?
Said and done. We copy our existing template and move the usage of the navigation component from the layout into the new template. Next we add a new string column to our database table and add the path to the new template to the column for all pages except the start page. For the start page we instead add the path to the old template, the one without the sub navigation.
The database table after adding the new column with (example) values.
|
id |
name |
content |
parentId |
templatePath |
|
1 |
Home |
<h1>Acme Fruits… |
null |
~/default.aspx |
|
2 |
Products |
<h1>… |
1 |
~/standard.aspx |
|
3 |
Contact |
<h1>… |
1 |
~/standard.aspx |
|
.. |
… |
… |
… |
… |
With the new column in place, including values for existing pages, we modify the the PageRepository class to retrieve and update the column. It does this by mapping values stored in the column to a new property in the PageData class. We name the new property TemplatePath.
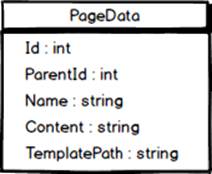
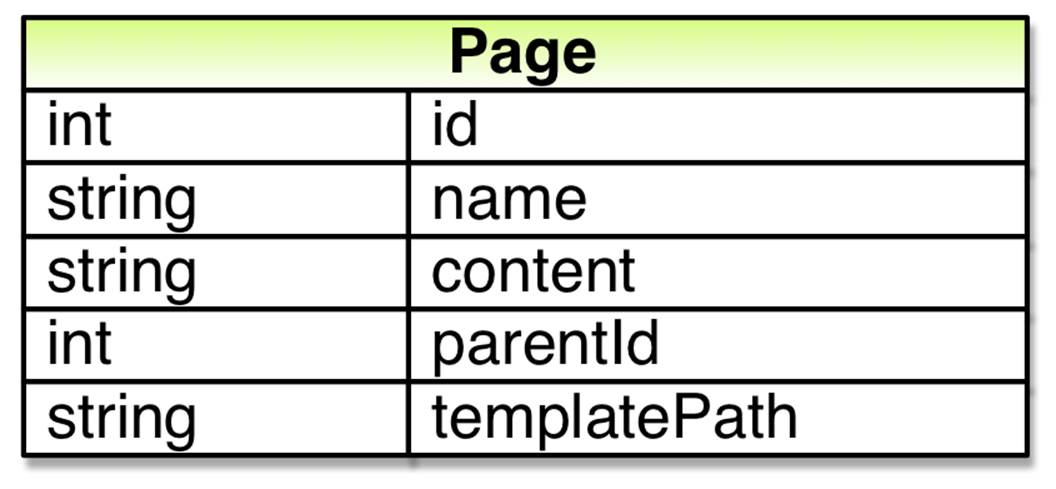
The PageData class after adding the TemplatePath property.
Finally we add a drop down control to the Edit Page dialog with which editors can select what template to use. For now we use hard coded options for each of our two templates.
After making this change, allowing pages do have different templates, we can no longer create link to pages by appending their ID to the end of the URL for a single template as we currently do in our navigation components. Instead we need to use the TemplatePath property on each page. For the GetMenuLinks method this means the following change:
...
yieldreturnnew MenuLink
{
Text = page.pageName,
//OLD, using hardcoded path:
//Url = templatePath + "?id=" + page.Id;,
//NEW:
Url = page.TemplatePath + "?id=" + page.Id;,
Selected = page.Id == GetCurrentPageId();
};
...
Page types
After introducing the ability to select what template a page should be rendered with our users recognize that this could be used more extensively than to just hide the sub navigation on the start page. They come to us with two sketches. One shows how they’d like the start page to look:
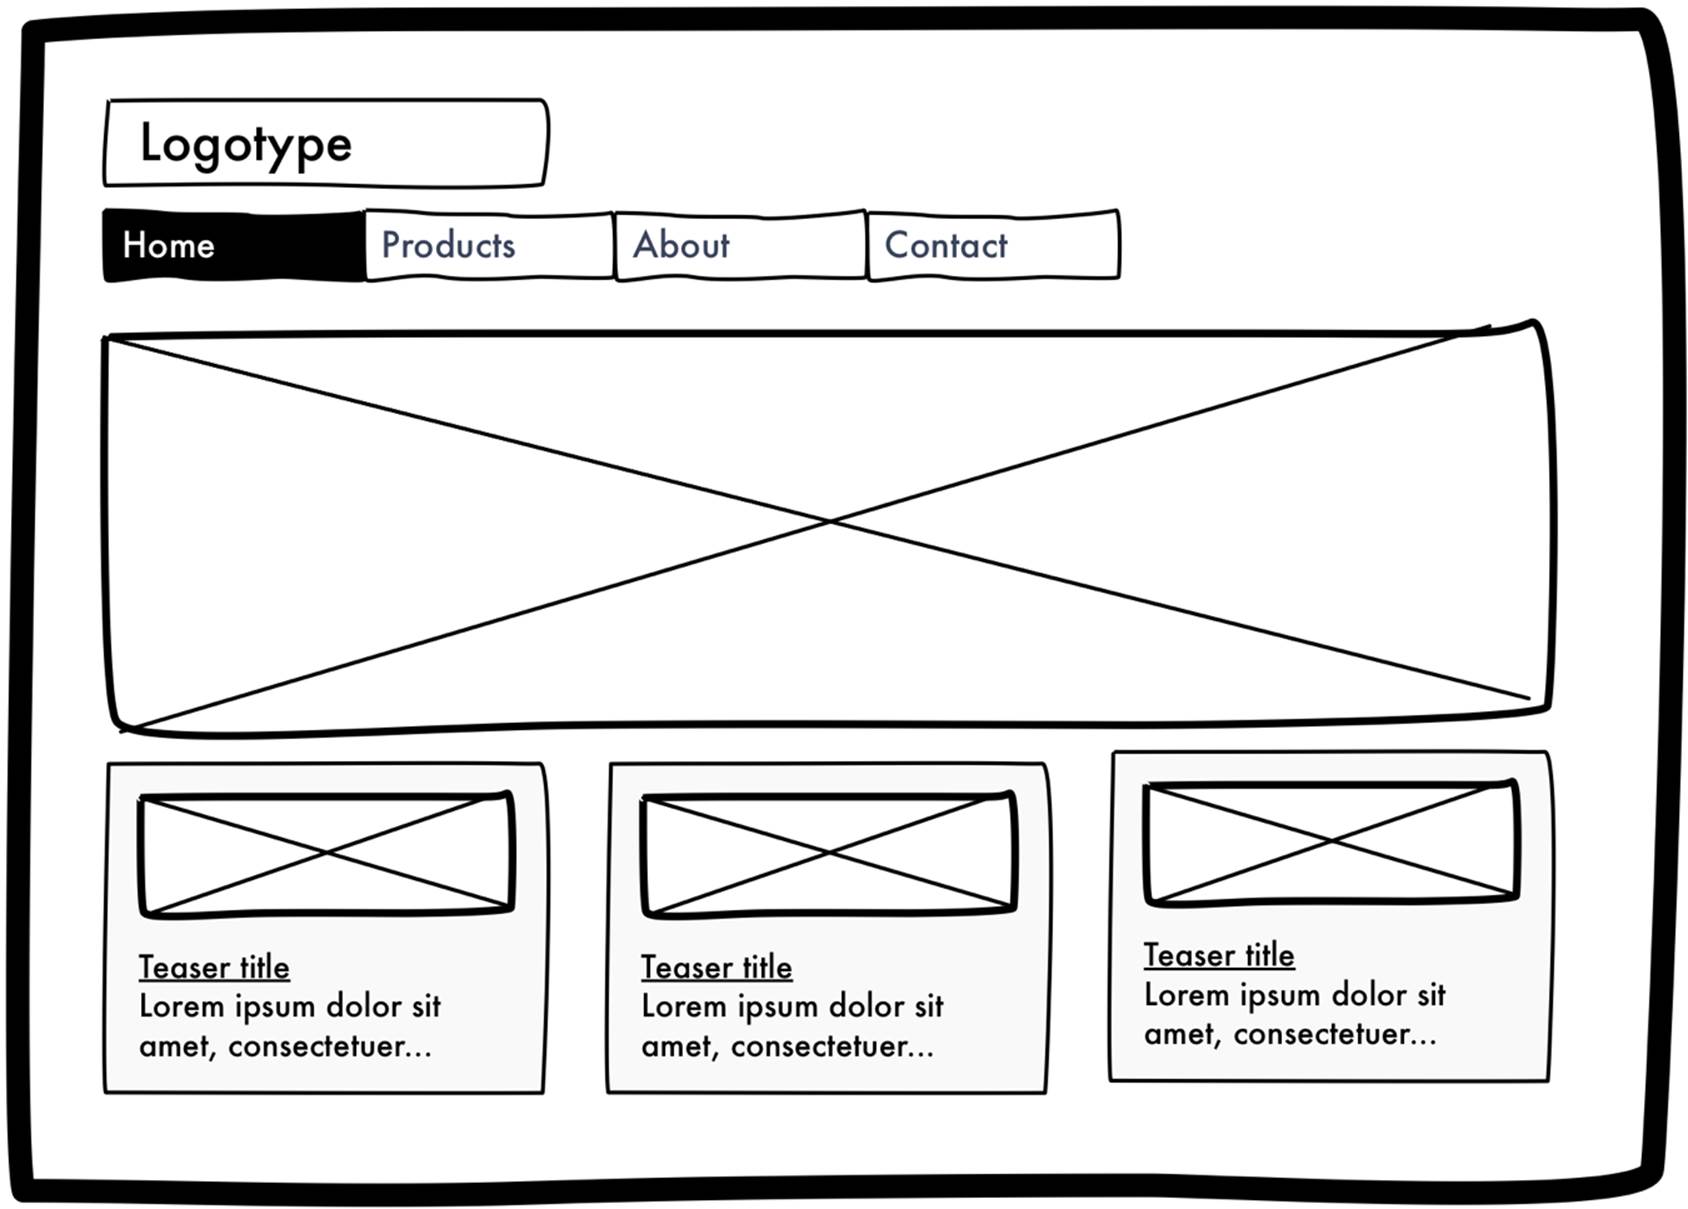
They explain that they want the start page to be made up of a large welcoming image and three smaller elements each consisting of an image, a link and some text. The links in those elements will lead to other pages on the site that our editors wish to promote on the start page. During the discussion these elements are referred to as “teasers”.
While they in theory could make the start page look like the sketch today, as editors can store any HTML they want in the page’s Content property, we all agree that the HTML that would be needed for the desired layout can’t (easily) be created through the WYSIWYG editor. The editors also tell us that they would prefer each unique property, such as the URL for each image and each text, to be edited as a separate field. That way they can focus on entering the content rather than working with the graphical layout. To nuance that request they tell us that they love being able to insert images, tables etc anywhere in the content on other pages but on the start page the content in each teaser should be fixed.
During this discussion with our users we start to think about possible solutions. Clearly one would be to extend our PageData class with a number of new properties, such as WelcomeImageUrl, TeaserOneImageUrl and TeaserTwoText. While that would lead to a lot of input fields when editing a page, even if those aren’t used, it would solve the use case. We could render those properties in the start page’s template but not in the other, “Standard”, template.
However, before we decide on a solution we take a look at the other sketch. This one is for a page that lists other pages, such as the latest news articles:
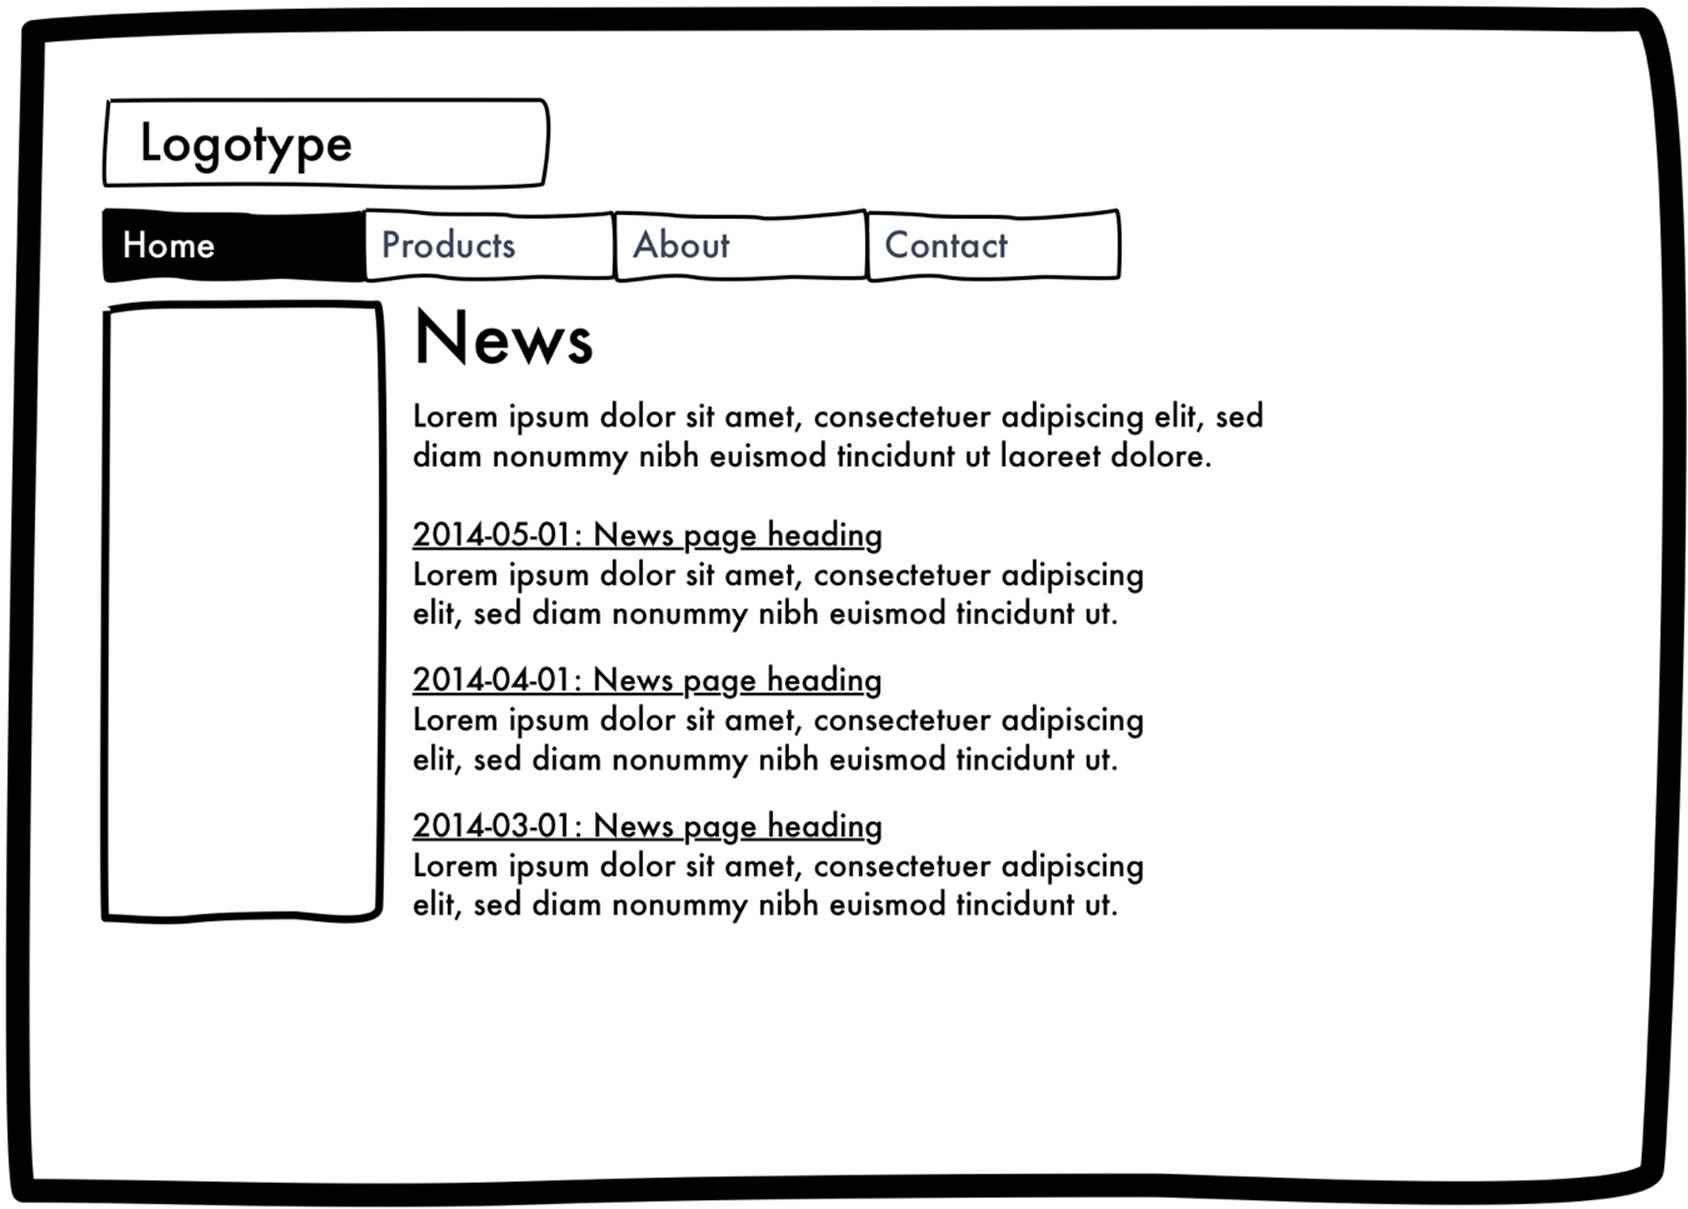
Here our users want a template that first renders the content of the current page, including the sub navigation to the left, just like our current “Standard” template. Below the page’s own content they want to fetch each page located below the current page in the page tree, sort them in chronological order and then link to each of them in a list. They explain that each item, each child page, in the list should consist of the page’s name in the form of a link to the page and the preamble from the page.
This requirement is straight forward enough. We can now fairly easily add new templates and when implementing the template we have the API method needed for the listing, the GetChildren method. However, how do we get a hold of the “preamble” from each page?
Currently each page only has a properties for its name and its content, where the latter is a chunk of HTML. As it turns out our editors have, on most pages, added a preamble in the content. The preamble is just an ordinary <p> tag that the editors have applied some styling to so that the text is bold and has a slightly larger font size.
In theory we could parse the preamble from each page’s content by matching P tags with specific styling. However, our editors tell us that they haven’t been consistent in how they have styled the preamble on all pages. On some pages they haven’t actually made the text bold but italic instead. When we discuss this problem with our users we together conclude that the best solution would be to create a separate input field for preambles. Instead of editing this field using the WYSIWYG editor it will be a plain text area where editors won’t be able customize the HTML. Instead we, the developers, will take care of that in the template. This way we’ll be able to fetch the preamble when listing pages and we also enforce a consistent styling of preambles.
Varying properties for different types of pages
We could solve our requirements by adding a number (12 to be precise) of new properties to our PageData object as well as an equal amount of columns to the table in which we store properties. This way each page would have the ability to store all of the content needed by all of our templates. In other words, the start page would have a preamble property even though that’s not used. Similarly a standard article page would have a TeaserThreeImageUrl property.
While this approach would solve our new requirements it would lead to a horrible user experience for both editors and developers. Clearly it would be better if editors could only edit relevant properties for the template used for rendering the page. However, a template is just a Web Forms page or an MVC Controller, making it hard to deduce what properties it support. Also, even if we could use that approach we’d have to add new columns to the database whenever a new template that needs a new property is created.
After some discussion we decide to go a different route. We introduce a concept that we call “page types”. Instead of being able to choose which template a page is rendered with we’ll let editors choose what type of page they want to create when they add new pages. Each type will define both which template pages of that type will be rendered with and what properties such a page has.
A new database model
How do we do that? We’ll start with the database. Currently we have single table that looks like this:
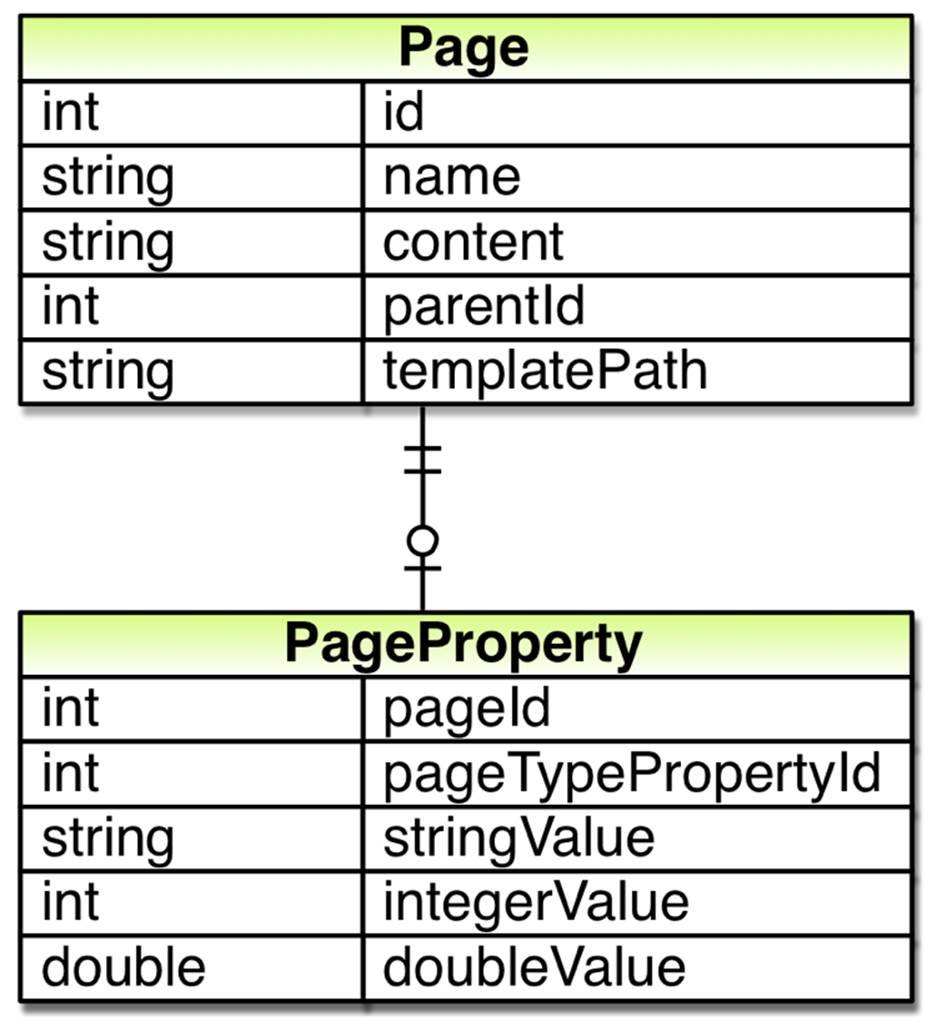
As a first step we add a new table in which we’ll store page types. Each page type will have an ID and a name. Also, as the template used for rendering won’t vary per page but rather per page type we move the template path column from the table in which we store pages to the new table and instead connect individual pages to a page type using a new column (pageTypeId) in the Page table.

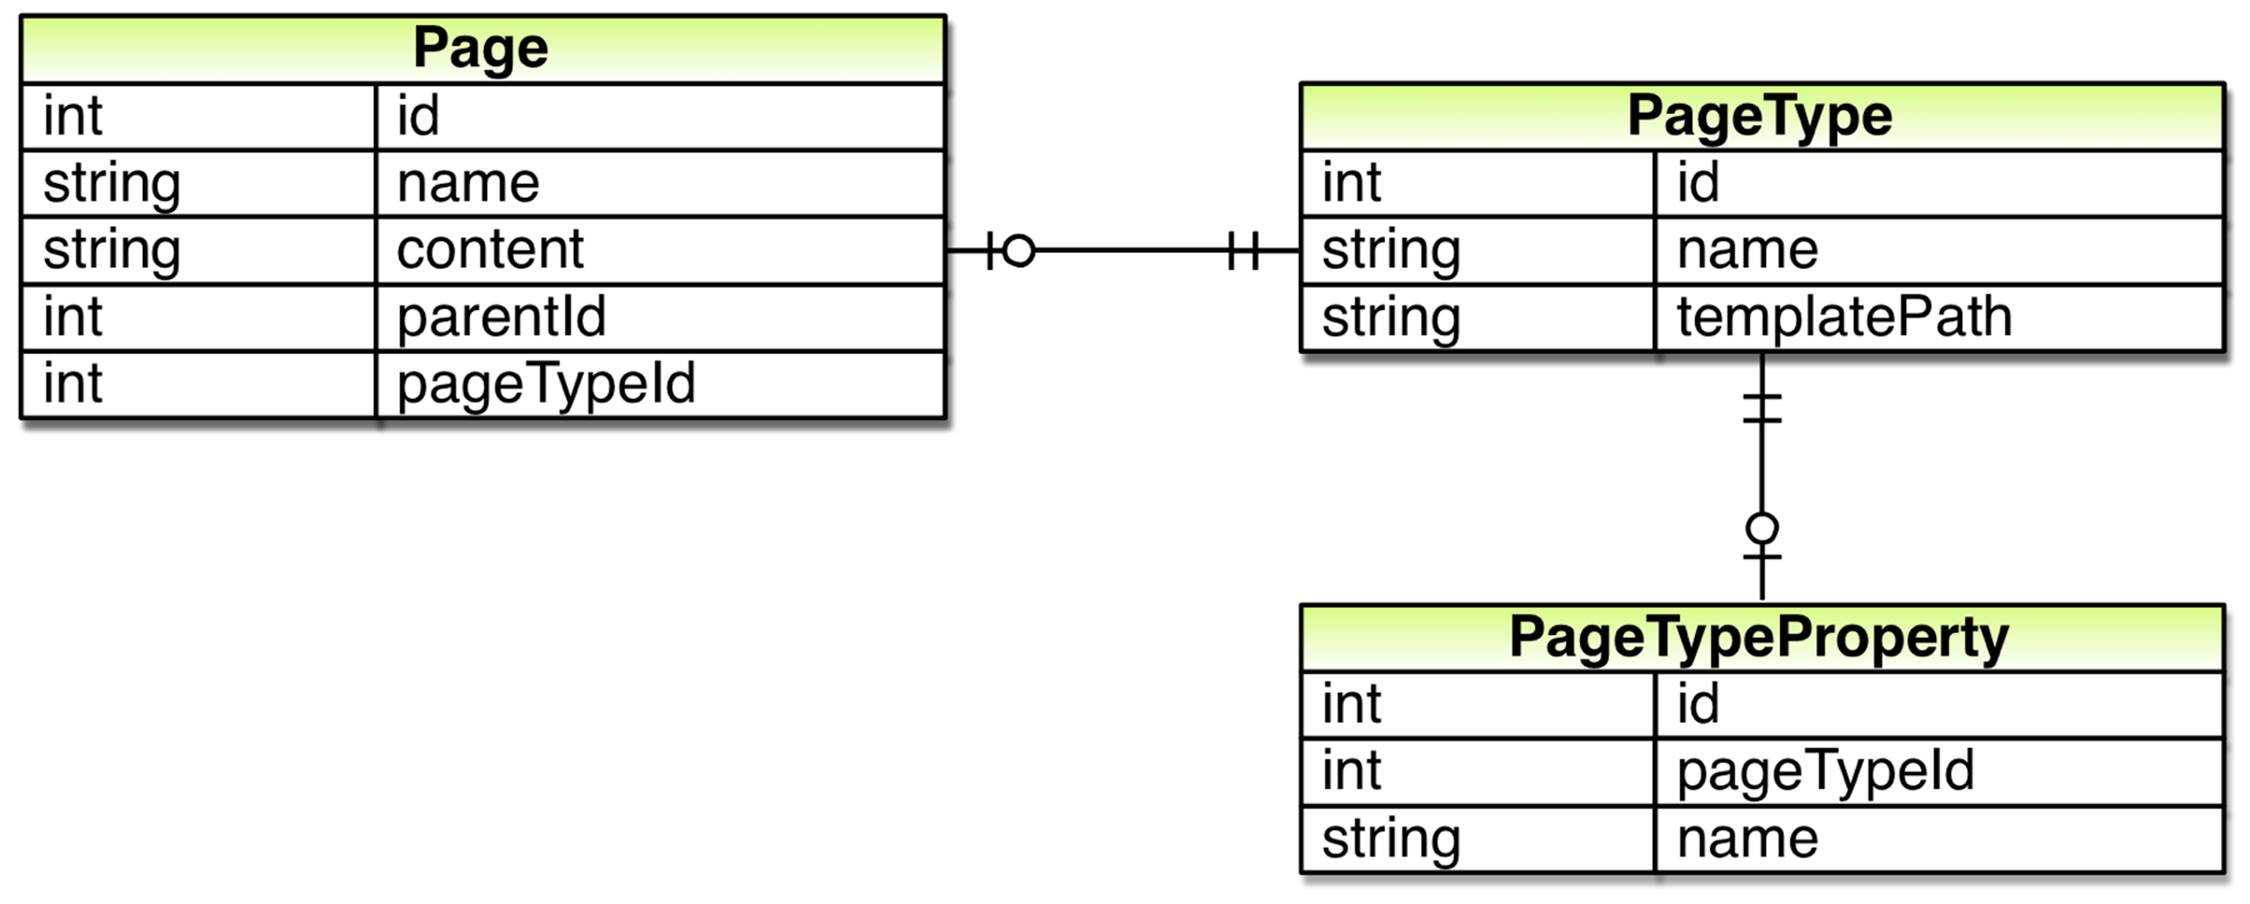
Each page type will define what properties a page of that type should have. As the number of properties can vary from page type to page type, meaning a one-to-many relationship, we add a new table used for storing definitions of properties in page types. Each such definition will need to have its own ID as well as a connection to the page type to which it belongs, the page type’s ID. It will also need a name which we can use when showing the property to editors in the Edit Page dialog as well as when retrieving the property’s value.
Up until now content in pages, with the exception of settings such as the parent page, has been strings. However, after further discussion with our users we find that they would like to be able to control the number of pages shown in listing pages, meaning a property whose value is an integer instead of a string. This means that we need to know how to store a property’s value in the database. To handle that we could add another column to the above table.
However, properties don’t just vary in terms of how they are stored in the database. Two properties that should both be stored as strings in the database can be edited in different ways. For instance, the preamble on a standard page should be edited using a text area while the main content on the page should be edited using a TinyMCE editor.
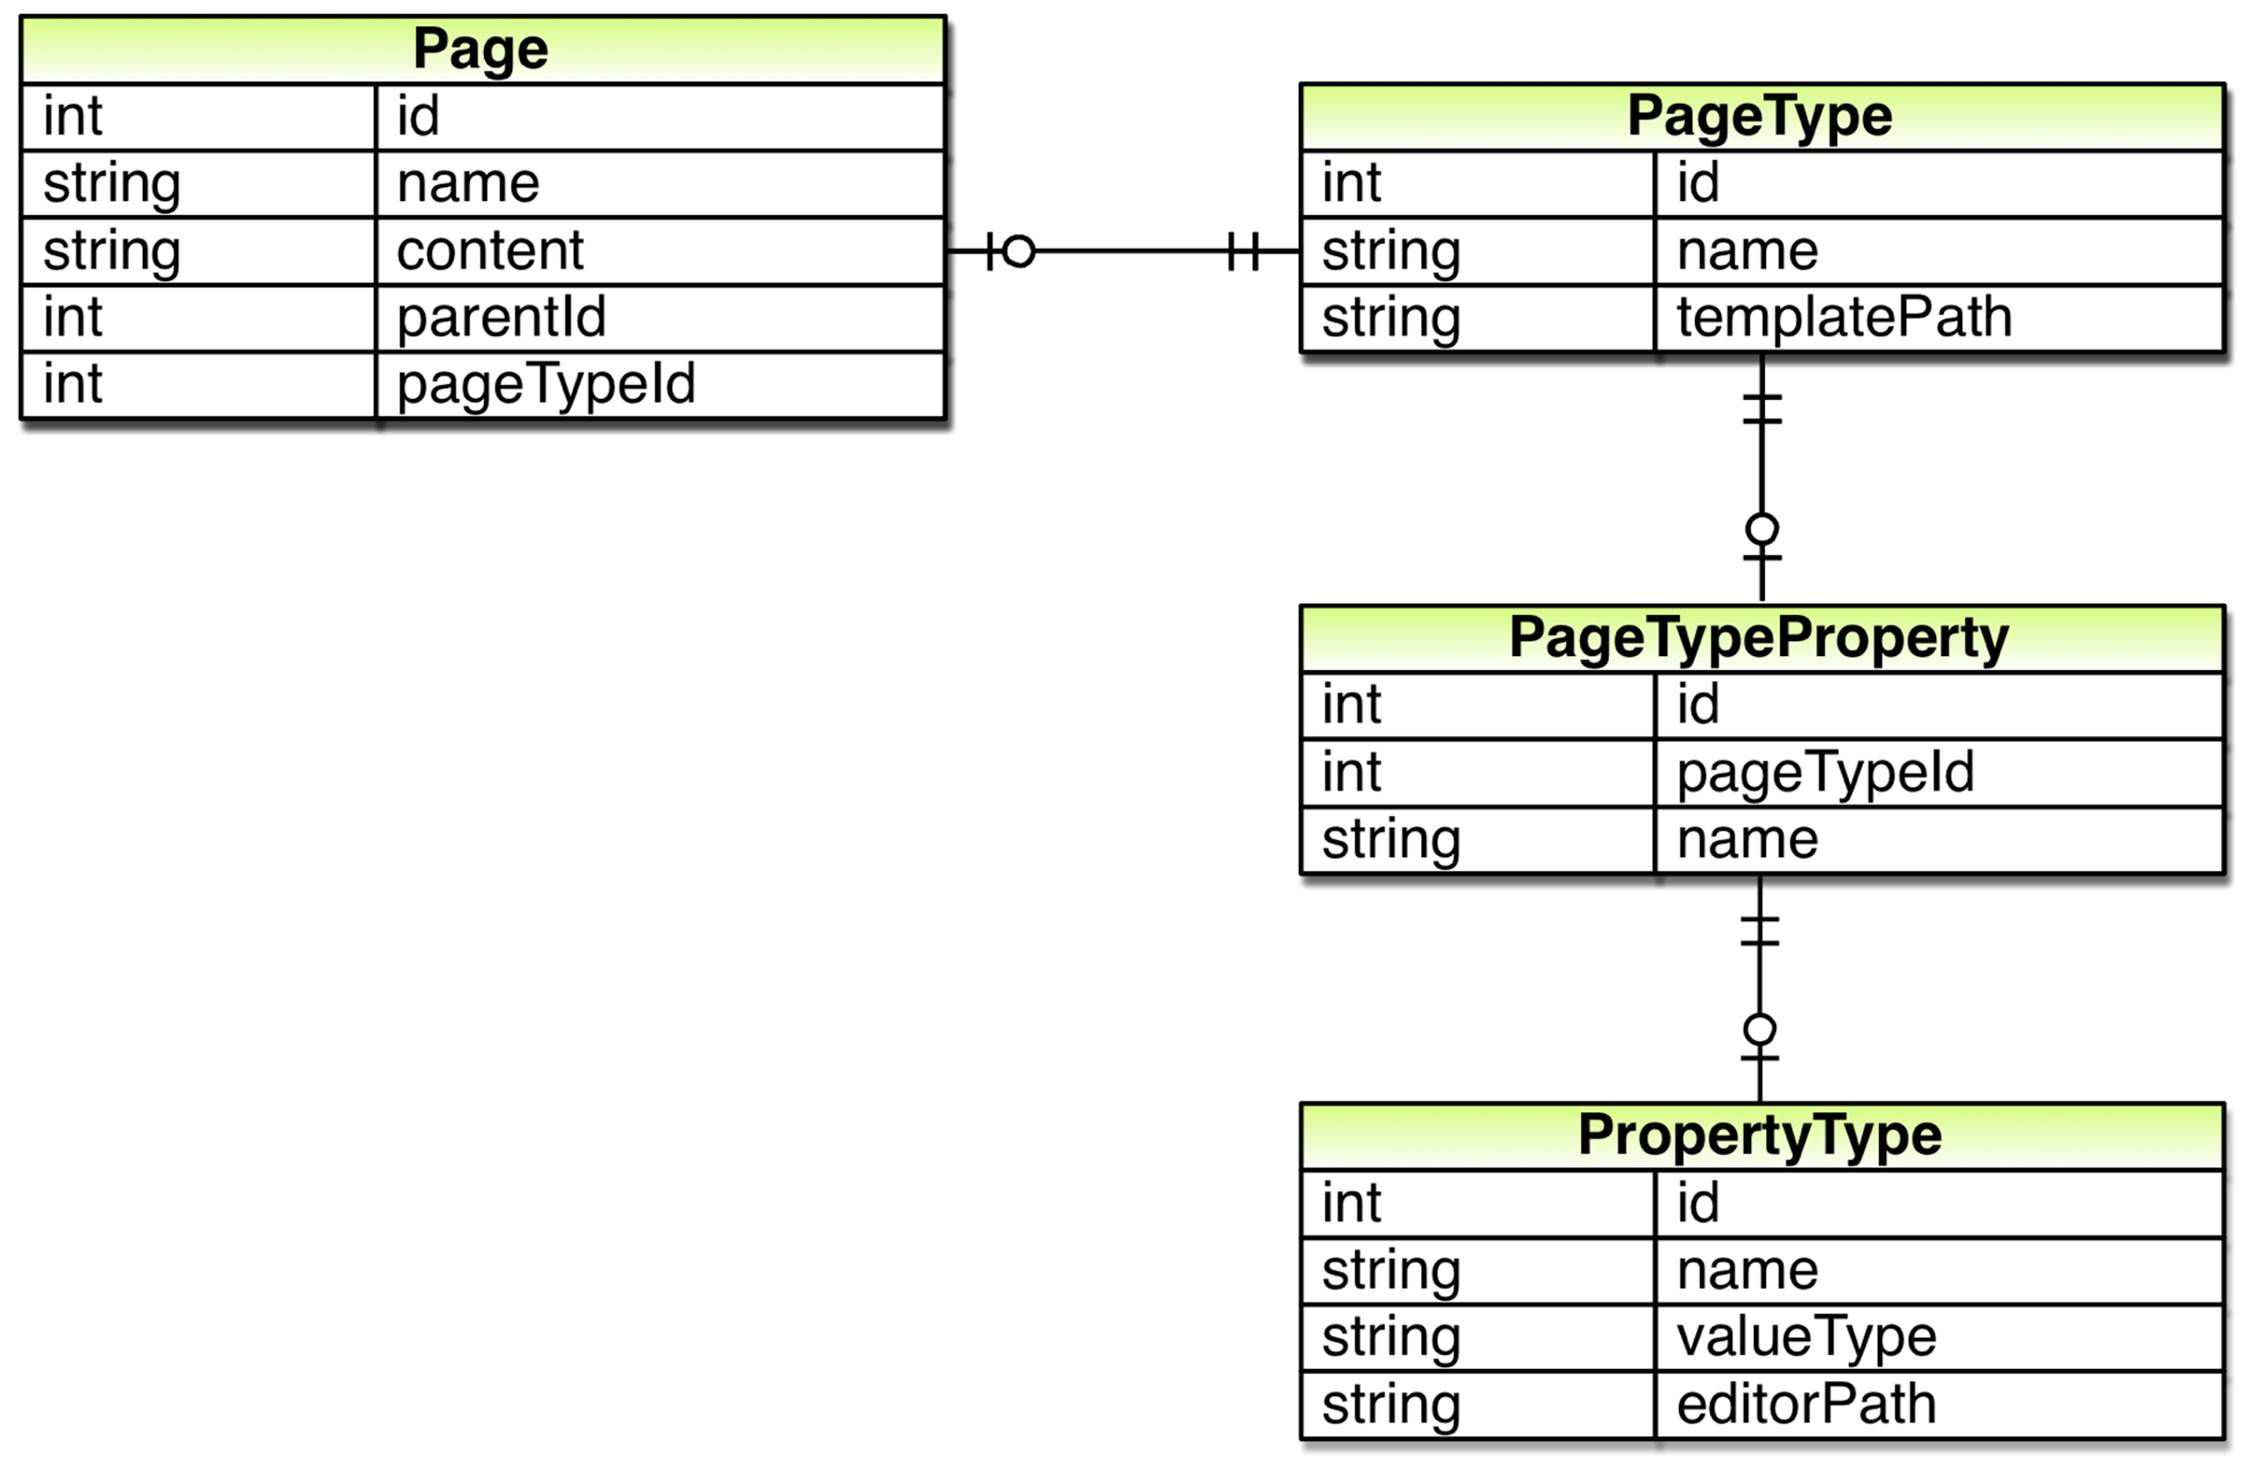
So, each page type property definition needs to know its value type as well as how it should be edited. To address that we add another table to our database in which we store definitions for property types.
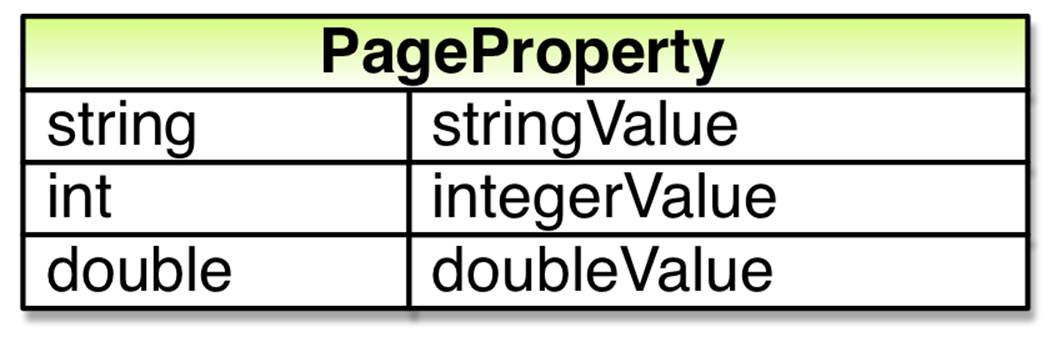
So far we haven’t actually changed where the data, the various properties of pages, is stored except for the template path. In order to do that we need a table in which we store each property’s value. As properties can have values of different types we’ll need a way to store values of different types in the database. Keeping it simple we add a single table with a column for each possible value type.
In order to retrieve values from this table we’ll need to know both the name and the type of the property. So, we’ll need to store which property definition the value belongs to. After doing so we can figure out which column we should retrieve the value from, the name of the property for which a row holds the value as well as how the value should be edited, as we can use the property definition to look up the property type.
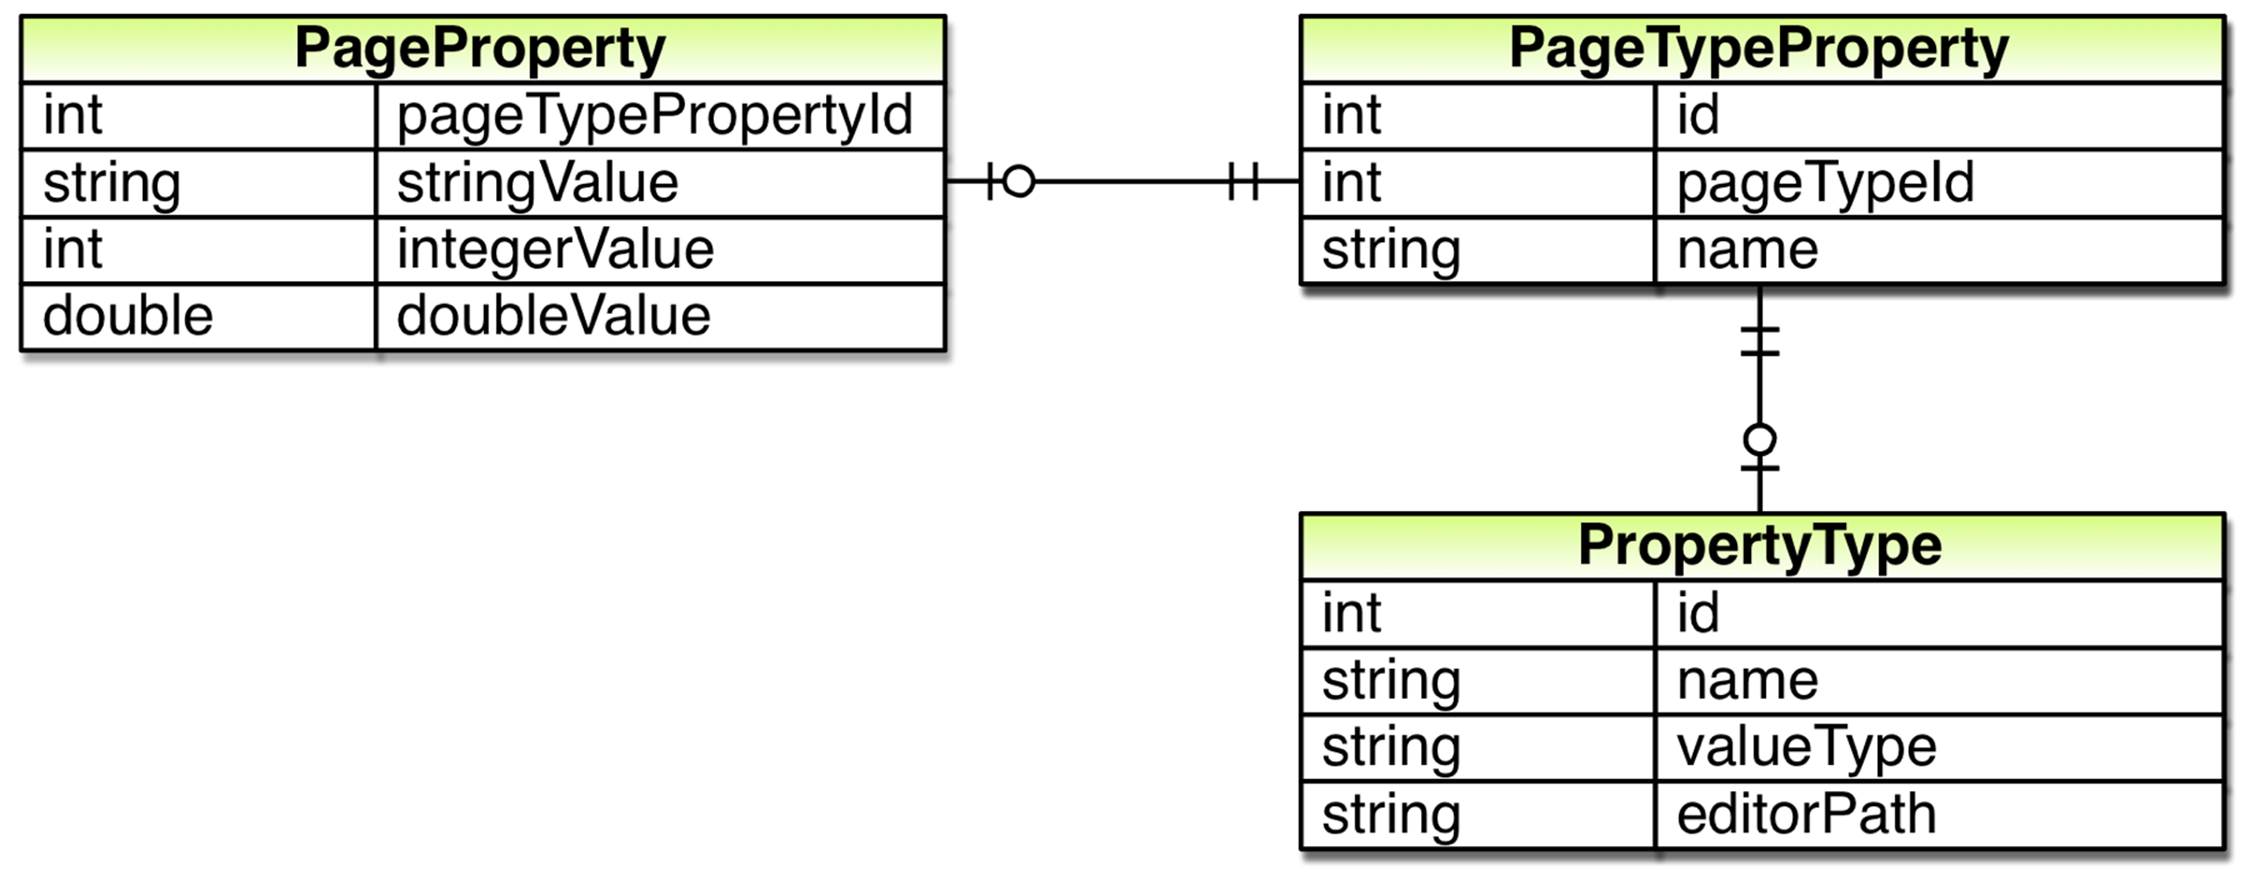
We can now connect a property value to its property definition, a row in the PageTypeProperty table. Through the definition we can also figure out what type of page the property and its value belongs to. However, while we know the type of the page we don’t know what specific page it belongs to. So, we also need to connect the property value to a page, a row in the Page table.
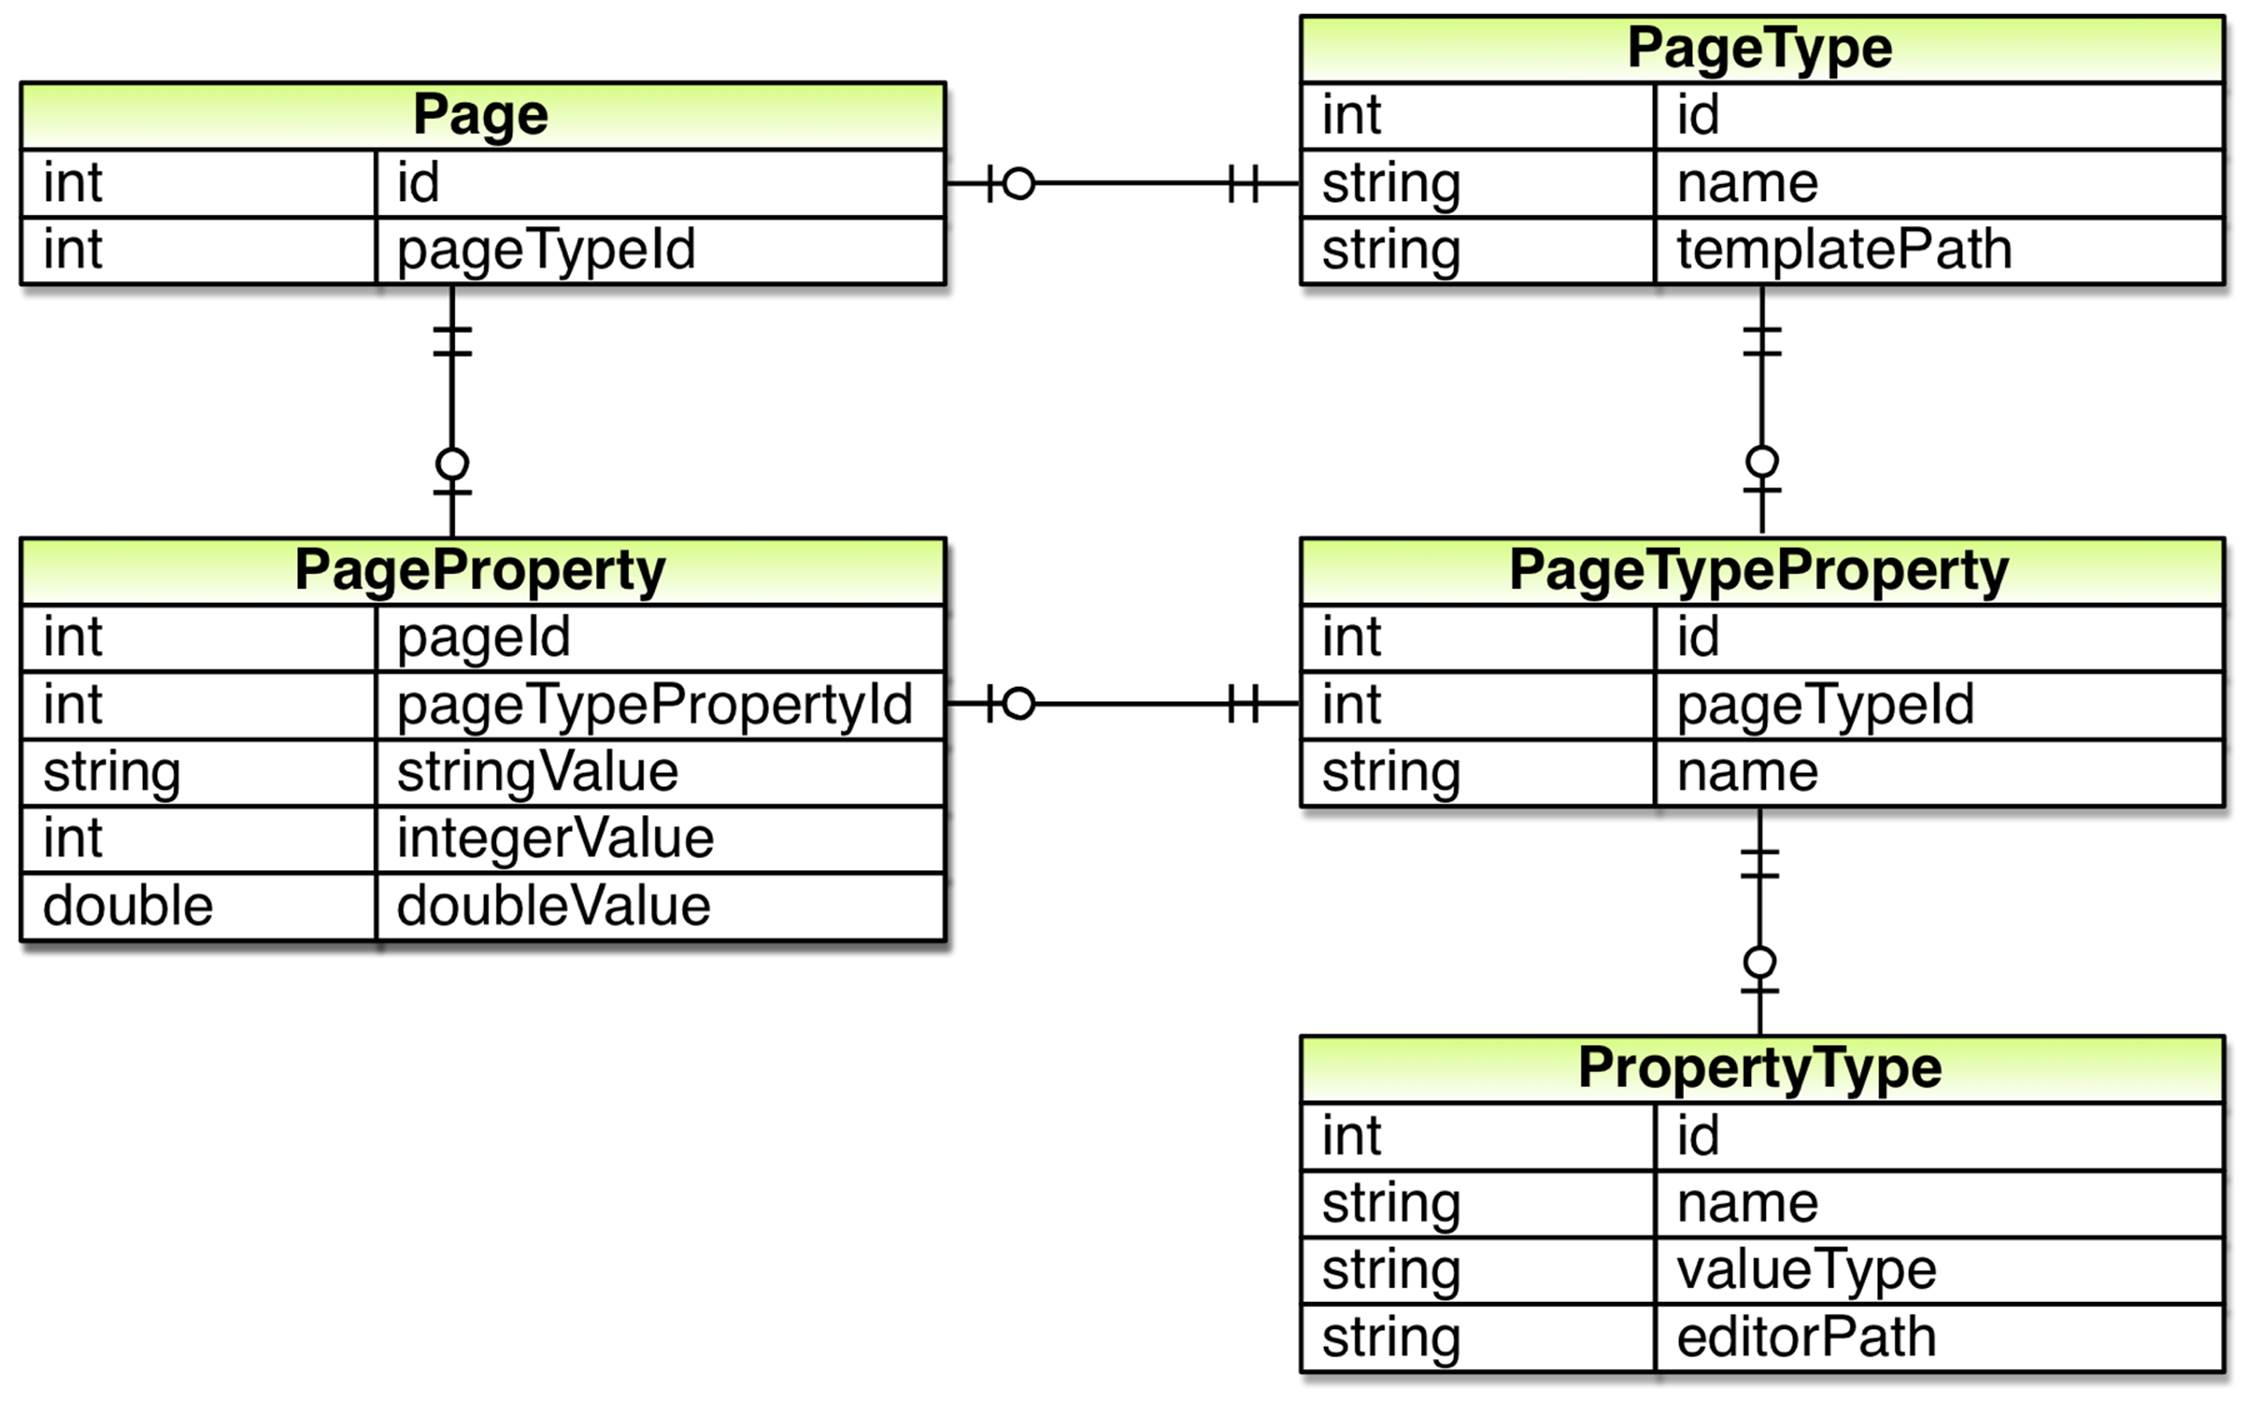
After doing so we remove most of the columns in Page table and replace them with rows and values in the other tables. For instance the name column in the Page table is replaced with one row per page type in the PageTypeProperty table. After doing so, our new database model is complete:
API changes
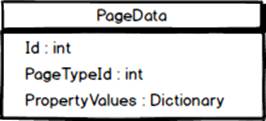
With our new database model in place it shouldn’t come as a big surprise that our API is broken. Currently our PageData class exposes a fixed set of properties. That won’t work anymore as what properties a page has is determined by its page type. To address that we remove all of the properties that doesn’t correspond to a column in the Page table and replace them with a dictionary holding all of the property values. The dictionary will have keys of type String, in the form of the property names. As the types of properties can vary we’re forced to let the dictionary hold values of type Object.
This means that we’ll have to replace code such as Text = page.Name with code that retrieves values from the dictionary, like this: Text = page.PropertyValues["Name"]. That’s not very nice. It seems that the flexibility in our new model with page types comes at a price. However, since there are some properties common to all page types we can add strongly typed properties for those.

This way we can still use code such as Text = page.Name for “built in” properties. Of course, for other properties we’ll still have to retrieve their values from the dictionary using their names in string form. For instance, to retrieve the main content for standard pages we’ll have to usepage.PropertyValues["Content"].
Anyhow, the PageData class is now compatible with our new database model. However, the rest of our API isn’t. To fix that we modify the methods in the PageRepository class.
The Get method can no longer just fetch a single row from the Page table in the database. Instead it will need to use a SQL join to also retrieve the property values for the page from the PageProperty table. Also, to make sense of those values it will need to retrieve the “definition” of each property, meaning that it will need to fetch rows from the PageTypeProperty and PropertyType tables.
The Save and Delete methods will need similar modifications but in the other direction, storing and deleting data in more than just one table.
Typed pages
After modifying the API so that it works with our new model where characteristics of pages, such as what properties a page has and what template is used to render it, is defined by a page type we need some way of creating and modifying page types. One way to do that would be to create a user interface.
Another way would be to define page types in code. After all, a page type is very similar to a class. What if we could let the PageData class act as a base class for all pages and create individual page types by creating classes that inherit from it? We could then, using reflection, scan for such classes within the application when it starts and create or update page types in the database based on such classes. In other words, a C# property in such a class would result in a “page property” stored in the PageTypeProperty table.
Using this approach we could also store information about the corresponding C# class in the PageType table and when we instantiate PageData objects in the PageRepository.Get method we could create objects of that type. That way we would again be able to access all properties in a strongly typed way, such as page.Content.
However, using this approach to delete page types, for instance deleting all page types for which we can’t find a corresponding class, would be quite risky. Also, seeing as we’re already storing page types in the database it would be nice to be able to create or modify them without being forced to modify the code. So, we decide to implement both approaches, creating and updating page types based on classes using reflection and creating a user interface for administering page types.
Improving “edit mode”
Following the rather large conceptual changes in the previous section we need to make some modifications to the user interface our editors work in. For instance, the drop down for selecting template doesn’t make any sense any more. Instead we need to ask editors to select a page type when creating a new page. More significantly we need to modify the Edit Page dialog to show input fields based on what properties is defined for the page type.
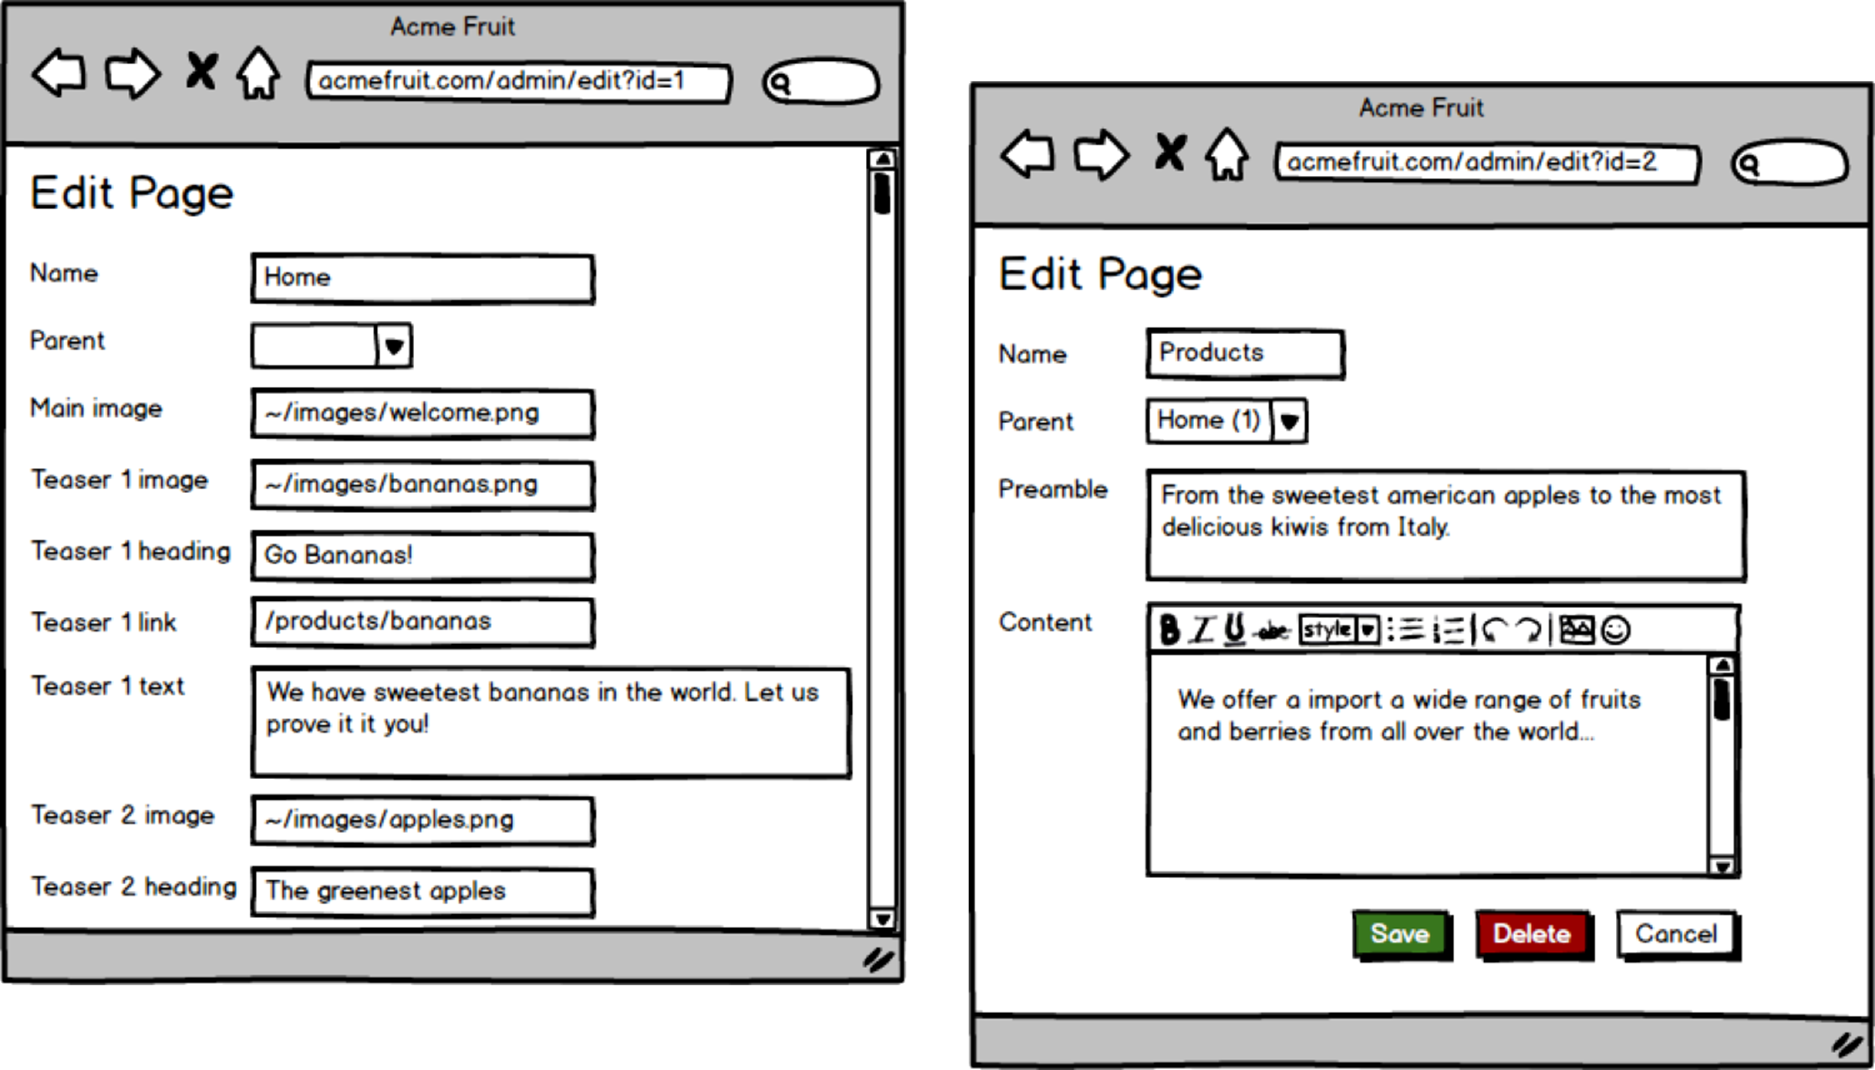
Editing the start page and the Products page after updating the Edit Page dialog.
Also, after making it possible to manage the site’s content in a more powerful way we soon recognize that our current user interface isn’t cutting it. Editors feel that it takes to long to navigate between different pages and that they constantly need to switch between tabs in their browsers to view the result.
To address that we redesign our editorial user interface so that the page tree is always visible and the currently selected page in the tree is displayed in an IFrame next to it. When a user selects a page in the tree it is first shown as it looks on the site. By clicking a button in the top right corner editors can see and edit its individual properties.

Viewing and editing the Products page.
Versioning, multilingual content, files, work flows and god knows what
After improving edit mode to better support our users we get a lot of positive feedback. Our users love it. However, there’s just o…
Actually. Let’s stop here. We’ve come a long way from the early days of our site. In fact, we’ve built ourselves a decent content management system. There are no doubt more requirements. Before we extract the content management parts of the site, make them more generic and package them up into a product with which we try to compete on the CMS market we should probably implement, amongst other things:
· Versioning - Allowing users to create and work on multiple versions of the same page and enabling them to schedule a version to be published at a later time.
· Multilingual content - Enabling users to create versions of the same page in different languages.
· Reference integrity - making it possible for editors to link to pages on the site in a way that ensures that links aren’t broken even if page is moved, and warns editors when they are about to delete a page that other pages link to.
· Friendly URLs - Instead of using the ID of a page in the query string we should use URLs that are more user and search engine friendly. Of course internally we’ll still need to know the page’s ID so we’d have to use some sort of routing module for this that maps between “pretty” and “ugly” URLs.
· Assets management - Enabling non-technical users to upload files, such as images and documents, to the site.
· Widgets/partial content - Currently all we have on our site is pages. However, remember our listing page? There we show parts of other pages on a page. Now, think about our start page with its three teasers. Instead of being the sum of twelve properties on the start page those teasers could actually be parts of other pages, inserted on the start page in a property which holds a collection of references to other pages. Of course, if we implemented that, why limit ourselves to pages? There should probably be some other type of “content” that is tailor made to only be used as a part on other pages.
However, for us, the story ends here. You see, we already have such a CMS at our disposal. It’s called EPiServer CMS and it’s the topic of the rest of the book.
While this chapter hasn’t been about EPiServer I hope you’ve found it interesting. And, as you’ll soon see, many of the concepts in EPiServer resembles what we’ve already seen on our site. For instance, EPiServer’s API has a class called PageData. And while it doesn’t have a class calledPageRepository it does have an interface called IContentRepository with similar methods.
Now, forget about the fruit company’s site but try to keep the core concepts in mind as we proceed to installing and learning EPiServer 7 CMS in the next chapters.
All materials on the site are licensed Creative Commons Attribution-Sharealike 3.0 Unported CC BY-SA 3.0 & GNU Free Documentation License (GFDL)
If you are the copyright holder of any material contained on our site and intend to remove it, please contact our site administrator for approval.
© 2016-2026 All site design rights belong to S.Y.A.