Adobe After Effects CC Classroom in a Book (2017 release) (2017)
14. Rendering and Outputting
Lesson overview
In this lesson, you’ll learn how to do the following:
• Create render-settings templates for the Render Queue.
• Create output-module templates for the Render Queue.
• Output movies using Adobe Media Encoder.
• Select the appropriate compressor for your delivery format.
• Use pixel aspect ratio correction.
• Output the final composition for HDTV 1080p resolution.
• Produce a test version of a composition.
• Create custom encoding presets in Adobe Media Encoder.
• Render and output a web version of the final composition.
![]()
The total amount of time required to complete this lesson depends in part on the speed of your processor and the amount of RAM available for rendering. The amount of hands-on time required is less than an hour. Download the project files for this lesson, following the instructions in the Getting Started section under “Accessing the lesson files and Web Edition,” if you haven’t already done so. As you work on this lesson, you’ll preserve the start files. If you need to restore the start files, download them from your Account page.
PROJECT: OUTPUTTING YOUR PROJECT FOR MULTIPLE USES
The success of any project depends on your ability to deliver it in the format you need, whether it’s for the web or broadcast output. Using Adobe After Effects and Adobe Media Encoder, you can render and export a final composition in a variety of formats and resolutions.
Getting started
This lesson continues from the point at which many of the preceding lessons end: when you’re ready to output the final composition. In order to produce several versions of the animation for this lesson, you’ll explore options available within the Render Queue panel and Adobe Media Encoder. For this lesson, we provide you with a starting project file that is essentially the final composition from Lesson 12 of this book.
1. Make sure the following files are in the Lessons/Lesson14 folder on your hard disk, or download them from your Account page at www.peachpit.com now:
• In the Assets folder: Desktop.mov, Treasures_Music.aif, Treasures_Title.psd
• In the Start_Project_File folder: Lesson14_Start.aep
• In the Sample_Movies folder: Lesson14_Final_360p_Web.mp4, Lesson14_Final_1080p.mp4, Lesson14_Final_lowres_Web.mp4, Lesson14_Final_MPEG4.mov, Lesson14_HD_test_1080p.mp4
2. Open and play the sample movies for Lesson 14, which represent different final versions of the movie—rendered with different quality settings—that you created in Lesson 12. When you’re done viewing the sample movies, quit Windows Media Player or QuickTime Player. You may delete the sample movies from your hard disk if you have limited storage space.
![]() Note
Note
The Lesson14_HD_test_1080p.mp4 file includes only the first five seconds of the movie.
As always, when you begin the lesson, restore the default application settings for After Effects. See “Restoring default preferences” on page 2.
3. Start After Effects, and then immediately hold down Ctrl+Alt+Shift (Windows) or Command+Option+Shift (Mac OS). When prompted, click OK to delete your preferences. Close the Start window.
![]() Note
Note
Depending on which applications you have on your system, you may not be able to play the .mov file in Windows.
4. Choose File > Open Project. If the Start screen opens, click Open Project in it.
5. Navigate to the Lessons/Lesson14/Start_Project_File folder, select the Lesson14_Start.aep file, and click Open.
![]() Note
Note
If you receive an error message about missing layer dependencies (Arial Narrow Regular), click OK.
6. Choose File > Save As > Save As.
7. In the Save As dialog box, navigate to the Lessons/Lesson14/Finished_Project folder.
8. Name the project Lesson14_Finished.aep, and then click Save.
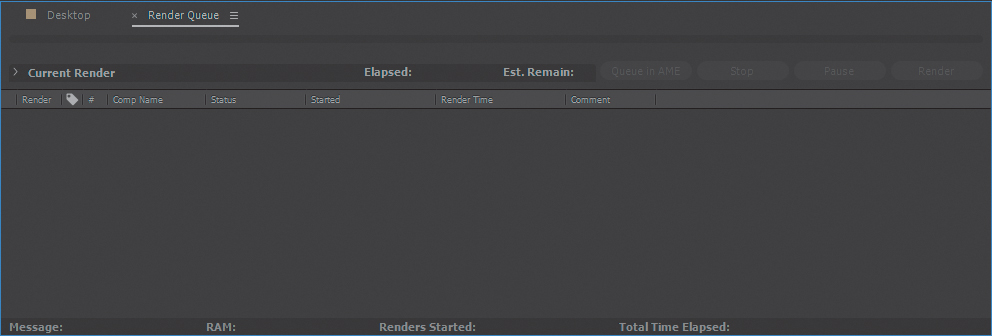
9. Choose Window > Render Queue to open the Render Queue panel.
Creating templates for the Render Queue
When you output your compositions in previous lessons, you selected individual render and output-module settings. In this lesson, you’ll create templates for both render settings and output-module settings. These templates are presets that you can use to streamline the setup process when you render items for the same type of delivery format. After you define templates, they appear in the Render Queue panel on the appropriate pop-up menu (Render Settings or Output Module). Then, when you’re ready to render a composition, you can simply select the appropriate template for the delivery format that your job requires, and the template applies all the settings.
Creating a render-settings template for test renderings
You’ll create a render-settings template, selecting settings appropriate for rendering a test version of your final movie. A test version is smaller—and therefore renders faster—than a full-resolution movie. When you work with complex compositions that take relatively long times to render, it is a good practice to render a small test version first. This helps you find any issues that you want to address before you take the time to render the final movie.
1. Choose Edit > Templates > Render Settings. The Render Settings Templates dialog box appears.
2. In the Settings area, click New to create a new template.
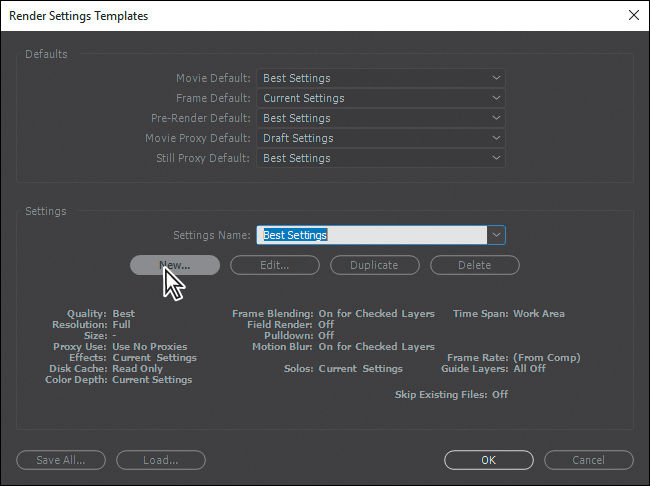
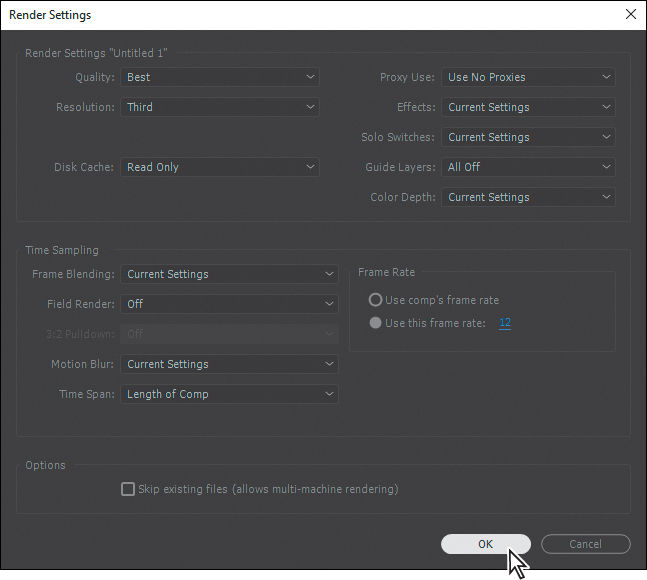
3. In the Render Settings dialog box, do the following:
• Leave Quality at Best.
• For Resolution, choose Third, which reduces the linear dimension of the composition to one-third.
4. In the Time Sampling area, do the following:
• For Frame Blending, choose Current Settings.
• For Motion Blur, choose Current Settings.
• For Time Span, choose Length Of Comp.
5. In the Frame Rate area, select Use This Frame Rate, and type 12 (fps). Then click OK to return to the Render Settings Templates dialog box.
6. For Settings Name, type Test_lowres (for low resolution).
7. Examine your settings, which appear in the lower half of the dialog box.
If you need to make any changes, click Edit to adjust the settings. Then click OK.
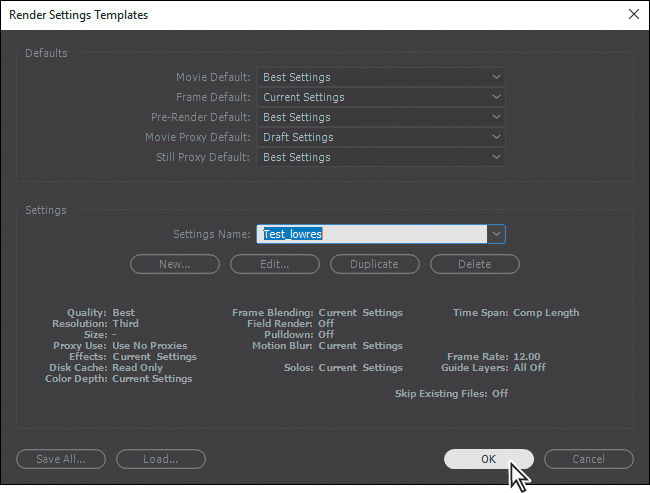
The Test_lowres option will be available on the Render Settings pop-up menu in the Render Queue panel.
Creating templates for output modules
You’ll use a similar process to create a template to use for output-module settings. Each output-module template includes unique combinations of settings appropriate for a specific type of output. You’ll create one that is appropriate for a low-resolution test version of the movie, so you can quickly see a rendered version to identify any changes you want to make.
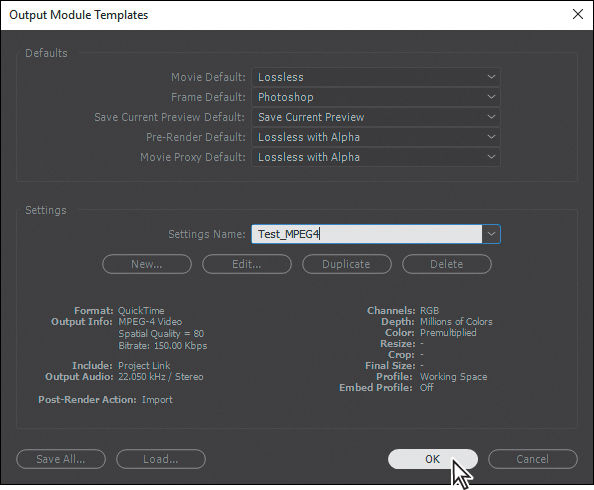
1. Choose Edit > Templates > Output Module to open the Output Module Templates dialog box.
2. In the Settings area, click New to create a new template.
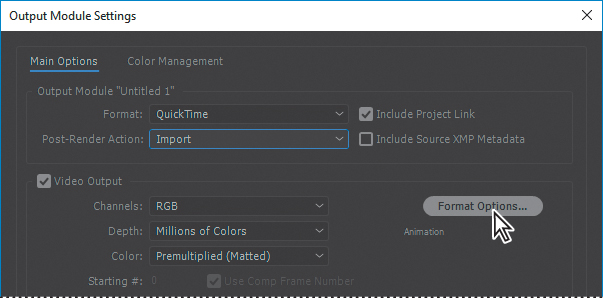
3. In the Output Module Settings dialog box, choose QuickTime for Format.
4. For Post-Render Action, choose Import.
5. In the Video Output area, click Format Options.
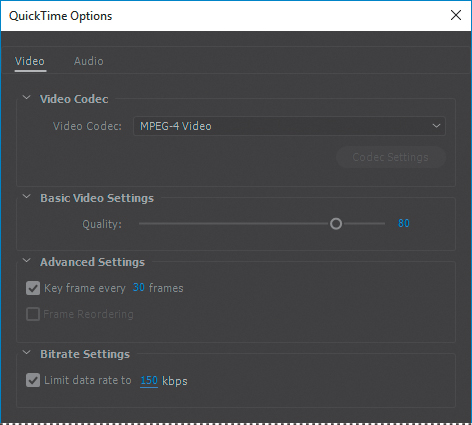
6. Select the following settings in the QuickTime Options dialog box:
• For Video Codec, choose MPEG-4 Video. This compressor automatically determines the color depth.
• Set the Quality slider to 80.
• In the Advanced Settings area, select Key Frame Every, and then type 30 (frames).
• In the Bitrate Settings area, select Limit Data Rate To, and type 150 (kbps).
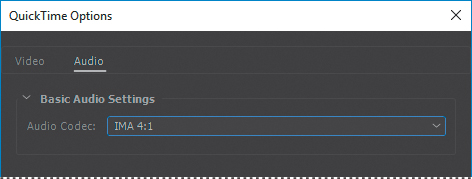
7. Select the Audio tab, and choose IMA 4:1 from the Audio Codec menu.
![]() Note
Note
The IMA 4:1 compressor is commonly used when compressing audio for web or desktop playback.
8. Click OK to close the QuickTime Options dialog box and return to the Output Module Settings dialog box.
9. Choose Audio Output On from the pop-up menu at the bottom of the dialog box. Then choose the following audio settings, from left to right:
• Rate: 22.050 kHz
• Use: Stereo
10. Click OK to close the Output Module Settings dialog box.

11. In the lower half of the Output Module Templates dialog box, examine your settings, and click Edit if you need to make any changes.
About compression
Compression is essential to reduce the size of movies so that they can be stored, transmitted, and played back effectively. When exporting or rendering a movie file for playback on a specific type of device at a certain bandwidth, you choose a compressor/decompressor (also known as an encoder/decoder), or codec, to compress the information and generate a file that is readable by that type of device at that bandwidth.
A wide range of codecs is available; no single codec is the best for all situations.
For example, the best codec for compressing cartoon animation is generally not efficient for compressing live-action video. When compressing a movie file, you can fine-tune it for the best quality playback on a computer, a video playback device, the web, or from a DVD player. Depending on which encoder you use, you may be able to reduce the size of compressed files by removing artifacts that interfere with compression, such as random camera motion and excessive film grain.
The codec you use must be available to your entire audience. For instance, if you use a hardware codec on a capture card, your audience must have the same capture card installed, or a software codec that emulates it.
For more about compression and codecs, see After Effects Help.
12. For Settings Name, type Test_MPEG4, and then click OK. Now this output template will be available on the Output Module pop-up menu in the Render Queue panel.
As you might expect, greater compression and lower audio sample rates create smaller file sizes, but they also reduce the quality of the output. However, this low-resolution template is fine for testing your movie before you make final edits.
Exporting using the Render Queue
Now that you have created templates for your render settings and output modules, you can use them to export the test version of your movie.
![]() Tip
Tip
Alternatively, you can drag the composition from the Project panel onto the Render Queue panel.
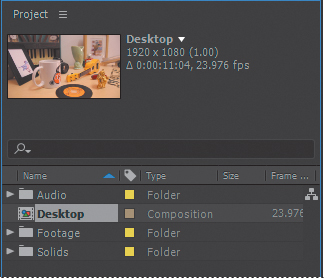
1. Select the Desktop composition in the Project panel, and choose Composition > Add To Render Queue.
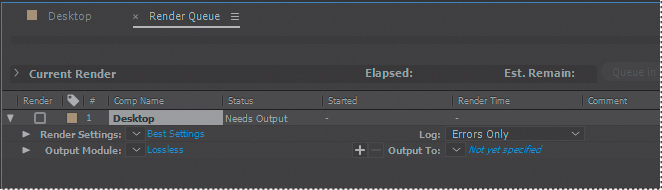
In the Render Queue panel, note the default settings in the Render Settings and Output Module pop-up menus. You’ll replace those settings when you select your low-resolution templates.
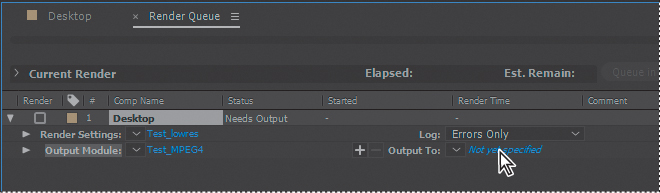
2. Choose Test_lowres from the Render Settings menu.
3. Choose Test_MPEG4 from the Output Module menu.
4. Click the blue words next to Output To.
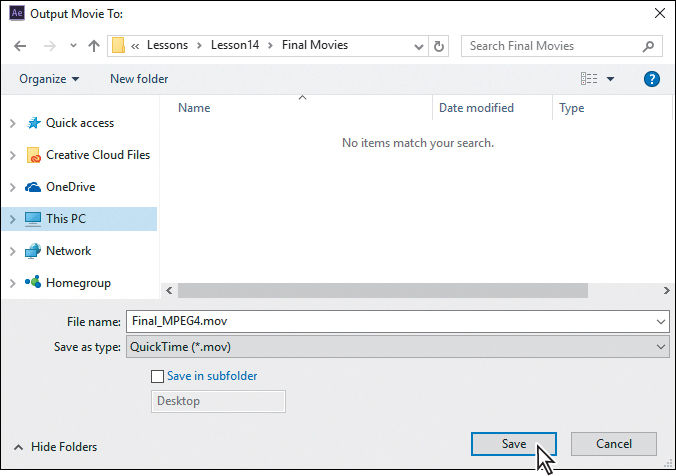
5. In the Output Movie To dialog box, locate the Lessons/Lesson14 folder, and create a new folder called Final_Movies:
• In Windows, click New Folder, and then type the name for the folder.
• In Mac OS, click the New Folder button, name the folder, and click Create.
6. Open the Final_Movies folder, if it’s not already open.
![]() Note
Note
You do not need to render a movie multiple times to export it to multiple formats with the same render settings. You can export multiple versions of the same rendered movie by adding output modules to a render item in the Render Queue panel.
7. Name the file Final_MPEG4.mov, and then click Save to return to the Render Queue panel.
8. Choose File > Save to save your work.
9. Click the Render button in the Render Queue panel. After Effects renders the movie. If there were additional movies—or the same movie with different settings—in the queue, After Effects would render those, too.
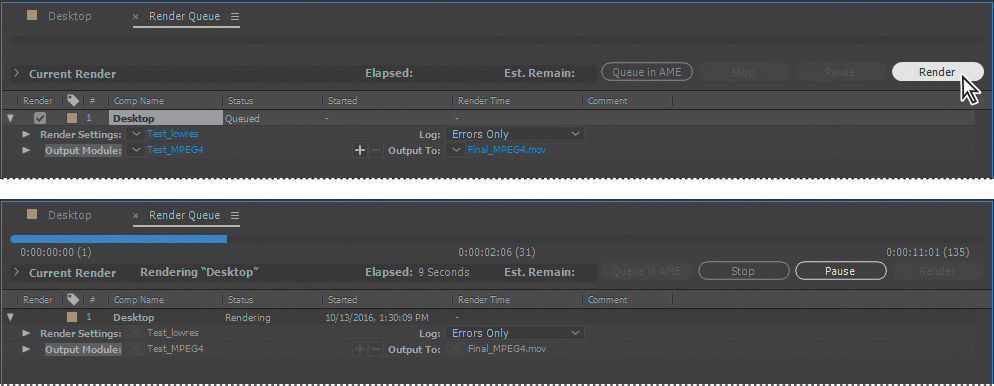
When the processing is complete, the Final_MPEG4 movie appears in the Project panel.
![]() Note
Note
In Windows, you may not hear the audio when you play the QuickTime movie in After Effects.
To preview the movie, double-click it in the Project panel, and then press the spacebar to view the movie.
If you need to make any final changes to the movie, reopen the composition and make those adjustments now. Remember to save your work when you finish, and then output the test movie again using the appropriate settings. After examining the test movie and making any necessary changes, you’ll proceed with outputting the movie for full-resolution broadcast.
Preparing movies for mobile devices
You can create movies in After Effects for playback on mobile devices, such as tablets and smartphones. To render your movie, add the composition to the Adobe Media Encoder encoding queue, and choose an appropriate device-specific encoding preset.
For the best results, consider the limitations of mobile devices as you shoot footage and work with After Effects. For a small screen size, pay careful attention to lighting, and use a lower frame rate. See After Effects Help for more tips.
Rendering movies with Adobe Media Encoder
Your movie is ready for final output. Adobe Media Encoder, which is installed when you install After Effects, has the widest selection of codecs available for different delivery formats, including popular video services such as YouTube.
![]() Note
Note
If Adobe Media Encoder is not currently installed on your system, install it from Creative Cloud.
![]() Tip
Tip
You can also drag a composition into the Render Queue panel, and click Queue in AME to add it to the Adobe Media Encoder queue.
Rendering a broadcast-quality movie
First, you’ll select settings to render your movie in a quality suitable for broadcast.
1. In the Project panel, select the Desktop composition, and choose Composition > Add To Adobe Media Encoder Queue.
After Effects opens Adobe Media Encoder, and adds your composition with default render settings. Your default settings may vary from ours.

2. Click the blue link in the Preset column.
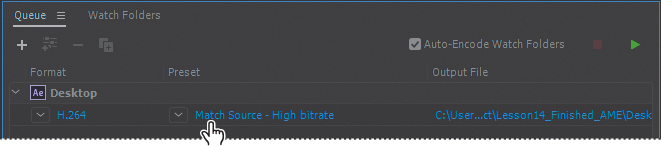
Adobe Media Encoder connects to the Dynamic Link server, which may take a few moments.
![]() Note
Note
If you don’t need to change anything else in the Export Settings dialog box, you can change the preset using the Preset pop-up menu in the Queue panel.
3. When the Export Settings dialog box appears, choose H.264 from the Format menu, and then choose HD 1080p 23.976 from the Preset menu.

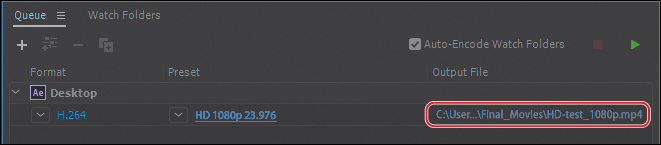
Rendering the full movie with the HD 1080p 23.976 preset may take several minutes. You’ll change the settings to render only the first five seconds of the movie so that you can preview the quality. You can change the range rendered using the time ruler at the bottom of the Export Settings dialog box.
4. Move the current-time indicator to 5:00, and then click the Set Out Point button (![]() ) to the left of the Select Zoom Level pop-up menu.
) to the left of the Select Zoom Level pop-up menu.

5. Click OK to close the Export Settings dialog box.
6. Click the blue link in the Output File column. Name the movie HD-test_1080p.mp4, and specify the Lessons/Lesson14/Final_Movies folder. Then click Save or OK.
You’re ready to output this movie, but you’ll set up a few additional movie options in the queue before you render it.
Adding another encoding preset to the queue
Adobe Media Encoder comes with dozens of built-in presets suitable for output for traditional broadcast, mobile devices, and the web. You’ll output a version of your composition ready for posting to YouTube.
![]() Tip
Tip
If you render files frequently, consider setting up a “watch folder.” When you place a file in the watch folder, Adobe Media Encoder automatically encodes it using the settings you’ve specified in the Watch Folders panel.
1. In the Preset Browser panel, navigate to Web Video > YouTube > YouTube 480p SD Wide.
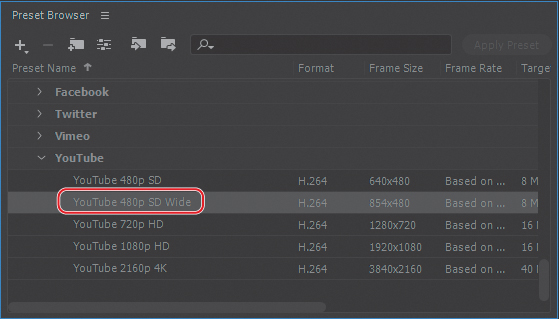
2. Drag the YouTube 480p SD Wide preset onto the Desktop composition in the Queue panel.
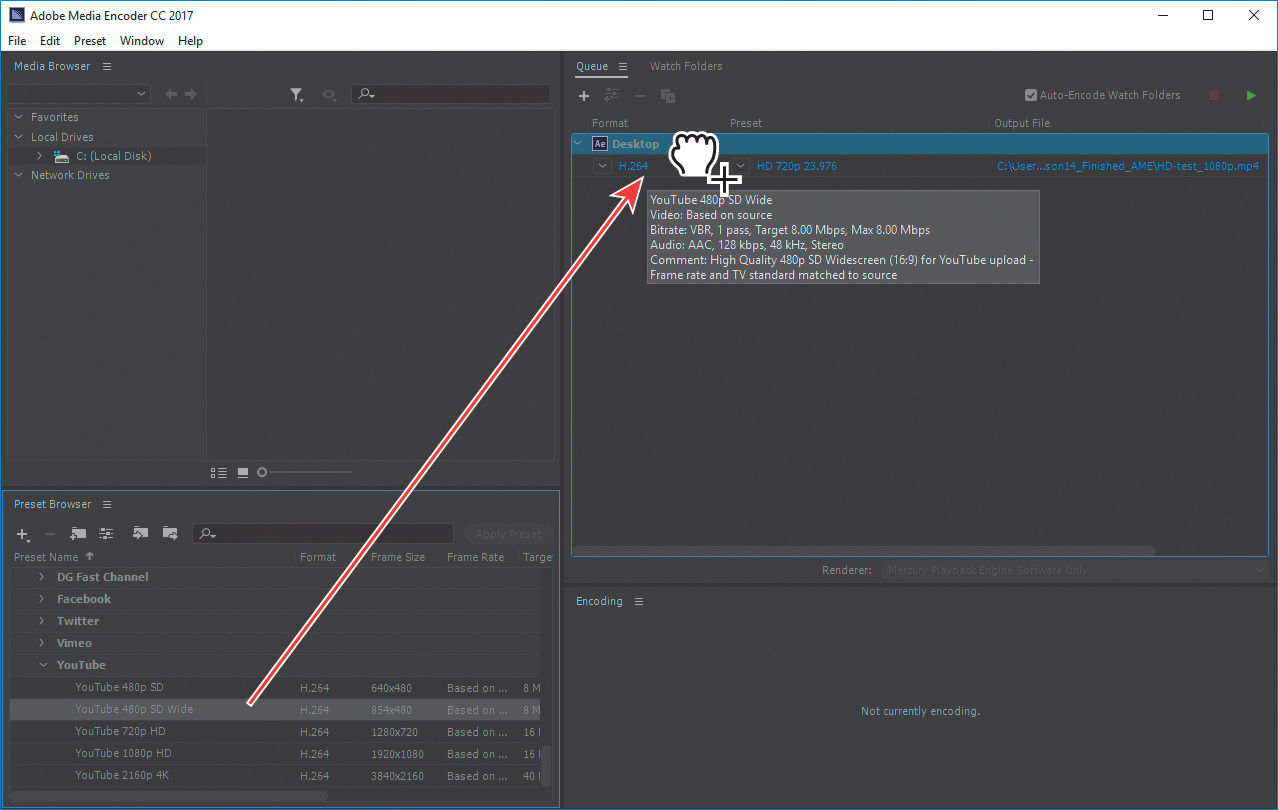
Adobe Media Encoder adds another output item to the queue.
3. Click the blue link in the Output File column for the item you just added. Then name the file Final_Web.mp4, specify the Lessons/Lesson14/Final_Movies folder, and click Save or OK.

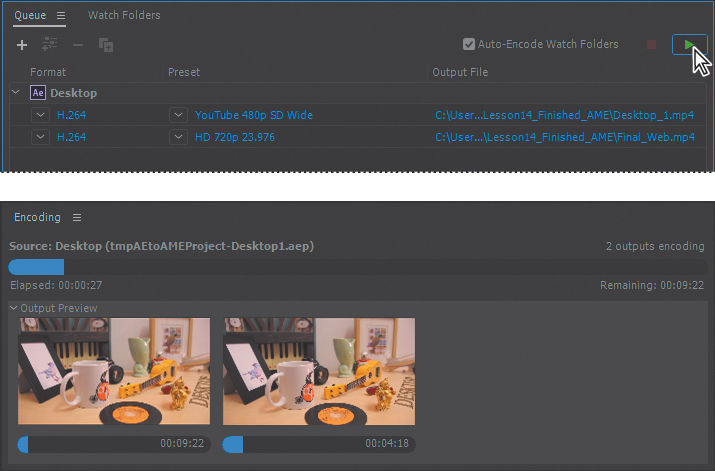
Rendering movies
You’ve set up two versions of your movie in the queue. Now you’ll render and view them. Rendering is resource-intensive, and it can take a while, depending on your system, the complexity and length of the composition, and the settings you use.
1. Click the green Start Queue button (![]() ) in the upper right corner of the Queue panel.
) in the upper right corner of the Queue panel.
 Depending on your system, this may take a while.
Adobe Media Encoder encodes the movies in the queue simultaneously, displaying a status bar, and reporting the estimated time remaining.
2. When Adobe Media Encoder has finished, navigate to the Final_Movies folder in the Finder or Explorer, and double-click your files to play them.
![]() Tip
Tip
If you forget where you saved your encoded movies, click the blue link in the Output File column next to the finished movie. Adobe Media Encoder opens a window to show you where your files were saved.
Creating custom presets for Adobe Media Encoder
In most cases, one of the default Adobe Media Encoder presets will be appropriate for your project. However, you can create your own encoding presets if you have specialized needs. In this case, you’ll create a preset that renders a lower-resolution file for YouTube more quickly than the one you just encoded.
1. Click the Create New Preset Group button (![]() ) at the top of the Preset Browser panel, and give the group a unique name, such as your name.
) at the top of the Preset Browser panel, and give the group a unique name, such as your name.
2. Click the Create New Preset button (![]() ), and choose Create Encoding Preset.
), and choose Create Encoding Preset.
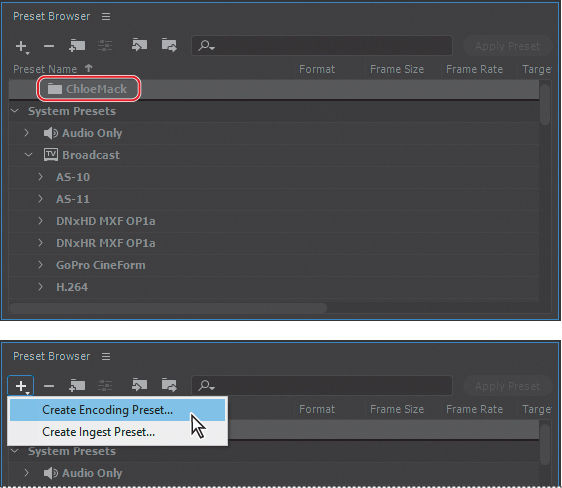
3. Do the following in the Preset Settings dialog box:
• Name the preset Low-res_YouTube.
• Make sure H.264 is chosen from the Format menu.
• Choose YouTube 480p SD Wide from the Based On Preset menu.
• Select the Video tab, if it’s not already selected.
• For Frame Rate, deselect Based On Source.
• Choose Baseline from the Profile menu. (You may need to scroll down to see it and the following options.)
• Choose 3.0 from the Level menu.
• Make sure VBR, 1 Pass is chosen from the Bitrate Encoding menu.
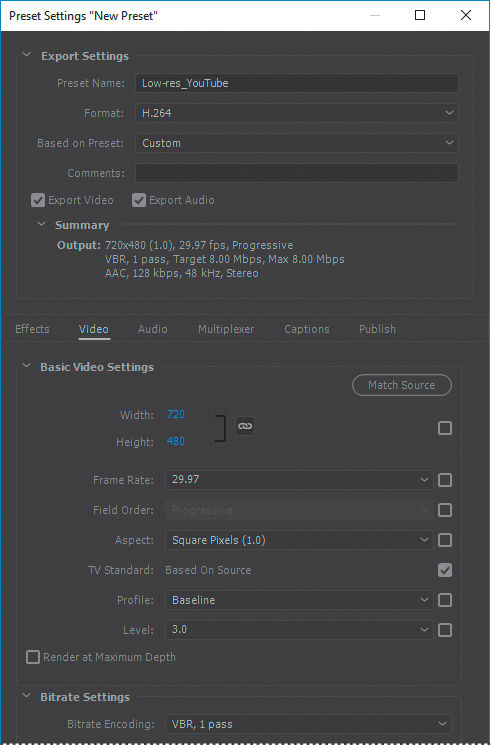
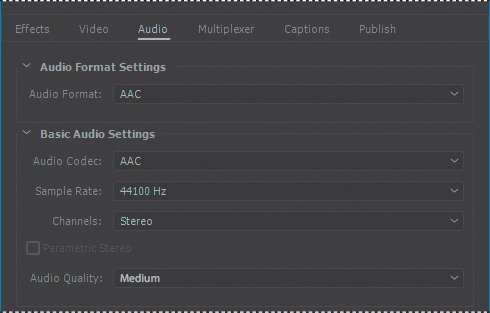
• Click the Audio tab, and choose 44100 Hz from the Sample Rate menu and Medium from the Audio Quality menu.
4. Click OK to close the Preset Settings dialog box.
5. Drag the Low_res_YouTube preset onto the Desktop composition in the Queue panel.
6. Click the blue link in the Output File column. Then name the file Lowres_YouTube, specify the Lessons/Lesson14/Final_Movies folder, and click Save or OK.
7. Click the Start Queue button (![]() ).
).
With the settings in your new preset, the movie encodes more quickly. However, the quality isn’t as high.
8. When Adobe Media Encoder has finished, navigate to the Final_Movies folder in Explorer or the Finder, and double-click the Lowres_YouTube movie to view it.
Preparing a movie for broadcast output
The project you’re rendering in this lesson is already high-resolution and appropriate for broadcast output. However, you may need to adjust other compositions for your intended delivery format.
To change the composition size, create a new composition with the appropriate settings for your final format. Then drag the project composition into the new composition.
If you converted the composition from a square pixel aspect ratio to a nonsquare pixel aspect ratio, which is used in broadcasting, items in the Composition panel may appear wider than before. To view the video accurately, enable pixel aspect ratio correction. Pixel aspect ratio correction squeezes the view of the composition slightly to display the image as it will appear on a video monitor. By default, this feature is turned off, but you can easily turn it on by clicking the Toggle Pixel Aspect Ratio Correction button at the bottom of the Composition panel. The quality of the pixel aspect ratio correction for previews is affected by the Zoom Quality preference in the Previews category of the Preferences dialog box.
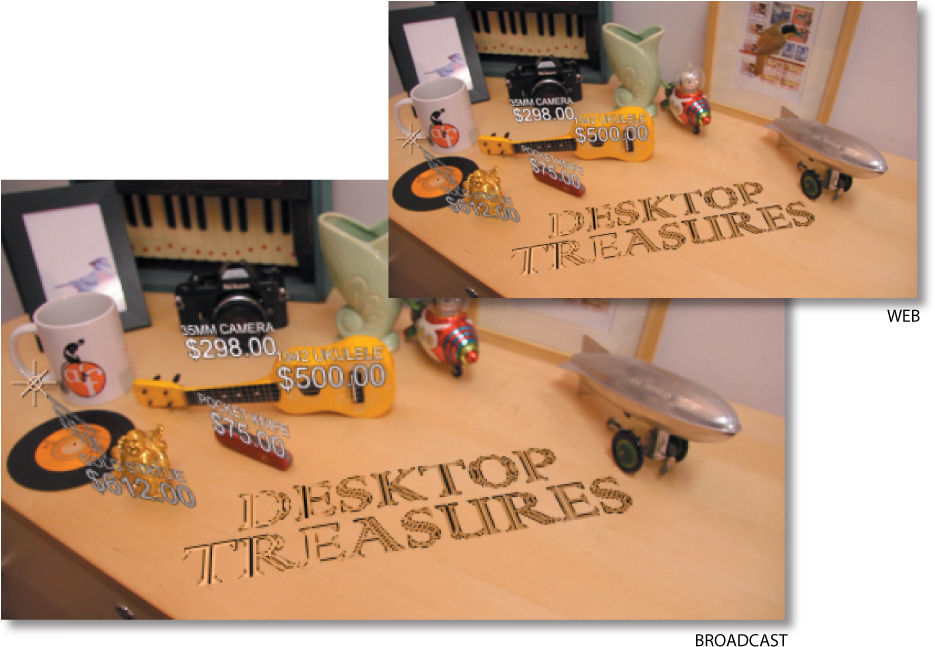
You have created both a web version and a broadcast version of the final composition.
Congratulations! You have completed all the lessons in Adobe After Effects CC Classroom in a Book (2017 release).
While this book is intended to give you a good foundation for working with After Effects, it can’t cover everything. To continue learning about After Effects, check out the resources described in the Getting Started section at the beginning of the book.
Review questions
1. Name two types of templates you can create for use in the Render Queue panel, and explain when and why to use them.
2. What is compression, and what are some things you should consider when compressing files?
3. How can you output a movie using Adobe Media Encoder?
Review answers
1. In After Effects, you can create templates for both render settings and output-module settings. These templates are presets that you can use to streamline the setup process when you render items for the same type of delivery format. After you define these templates, they appear in the Render Queue panel on the appropriate pop-up menu (Render Settings or Output Module). Then, when you’re ready to render a job, you can simply select the template that is appropriate for the delivery format that your job requires, and the template applies all the settings.
2. Compression is essential to reduce the size of movies so that they can be stored, transmitted, and played back effectively. When exporting or rendering a movie file for playback on a specific type of device at a certain bandwidth, you choose a compressor/decompressor, or codec, to compress the information and generate a file readable by that type of device at that bandwidth. A wide range of codecs is available; no single codec is the best for all situations. For example, the best codec for compressing cartoon animation is generally not efficient for compressing live-action video. When compressing a movie file, you can fine-tune it for the best quality playback on a computer, a video playback device, the web, or from a DVD player. Depending on which encoder you use, you may be able to reduce the size of compressed files by removing artifacts that interfere with compression, such as random camera motion and excessive film grain.
3. To output a movie using Adobe Media Encoder, select the composition in the Project panel in After Effects, and then choose Composition > Add To Adobe Media Encoder Queue. In Adobe Media Encoder, select an encoding preset and any other settings, name the output file, and click the Start Queue button.