Adobe After Effects CC Classroom in a Book (2017 release) (2017)
13. Advanced Editing Techniques
Lesson overview
In this lesson, you’ll learn how to do the following:
• Stabilize a shaky camera shot.
• Use single-point motion tracking to track one object in a shot to another object in a shot.
• Perform multipoint tracking using perspective corner-pinning.
• Use Imagineer Systems mocha for After Effects to track motion.
• Create a particle system.
• Use the Timewarp effect to create slow-motion video.
![]()
This lesson will take approximately two hours to complete. Download the project files for this lesson, following the instructions in the Getting Started section under “Accessing the lesson files and Web Edition,” if you haven’t already done so. As you work on this lesson, you’ll preserve the start files. If you need to restore the start files, download them from your Account page.
PROJECT: SPECIAL EFFECTS AND EDITING TECHNIQUES
After Effects provides advanced motion stabilization, motion tracking, high-end effects, and other features for the most demanding production environments.
Getting started
In previous lessons, you’ve used many of the essential 2D and 3D tools you need for motion graphics design. But Adobe After Effects also offers motion stabilization, motion tracking, advanced keying tools, distortion effects, the capability to retime footage using the Timewarp effect, support for high dynamic range (HDR) color images, network rendering, and much more. In this lesson, you will learn how to use Warp Stabilizer VFX to stabilize a handheld camera shot, how to track one object to another in an image so that their motion is synchronized, and how to use corner-pinning to track an object with perspective. Finally, you will explore two of the high-end digital effects available in After Effects: a particle system generator and the Timewarp effect.
This lesson includes multiple projects. Take a peek at all of them before beginning.
1. Make sure the following files are in the Lessons/Lesson13 folder on your hard disk, or download them from your Account page at www.peachpit.com now:
• In the Assets folder: flowers.mov, Group_Approach[DV].mov, majorspoilers.mov, metronome.mov, mocha_tracking.mov, multipoint_tracking.mov
• In the Sample_Movies folder, the AVI and MOV subfolders, each with the following files: Lesson13_Multipoint, Lesson13_Particles, Lesson13_Stabilize, and Lesson13_Timewarp
2. Open and play the sample movies in the Lesson13/Sample_Movies/AVI folder in Windows Media Player or play the Lesson13/Sample_Movies/MOV folder in QuickTime Player to see the projects you will create in this lesson.
3. When you’re done, quit Windows Media Player or QuickTime Player. You may delete these sample movies from your hard disk if you have limited storage space.
![]() Note
Note
You can view these movies all at once or, if you don’t plan to complete these exercises in one session, you can watch each sample movie just before you are ready to complete the associated exercise.
Using Warp Stabilizer VFX
If you shoot footage using a handheld camera, you will probably end up with shaky shots. Unless this look is intentional, you’ll want to stabilize your shots to eliminate unwanted motion.
Warp Stabilizer VFX in After Effects automatically removes extraneous jitters. When played back, the motion appears smooth, because the layer itself is scaled and moves incrementally to offset the unwanted movement.
Bicubic scaling
When you scale video footage or an image to a larger size, After Effects must sample data to add information where none existed before. You can choose which sampling method After Effects uses when scaling a layer. For details, see After Effects help.
Bilinear sampling is the method After Effects traditionally used. However, bicubic sampling uses a more complex algorithm that typically provides better results when color transitions are more gradual, as in nearly all real-world photographic images. Bilinear scaling may be a better option for sharp-edged graphics.
To choose a sampling method for a layer, select the layer, and choose Layer > Quality > Bicubic or Layer > Quality > Bilinear. Bicubic and bilinear sampling are available only for layers that are set to Best quality. (To change a layer’s quality setting to Best, choose Layer > Quality > Best.) You can also use the Quality and Sampling layer switch to toggle between the Bilinear and Bicubic sampling methods.
If you need to scale an image by a large amount while preserving details, use the Detail-preserving Upscale effect instead. The effect preserves the sharpness of sharp lines and curves. For example, you can scale up from SD frame sizes to HD frame sizes, or from HD frame sizes to digital cinema frame sizes. This effect is very closely related to the Preserve Details resampling option in the Image Size dialog box in Photoshop. Note that using the Detail-preserving Upscale effect is slower than using either bilinear or bicubic scaling for the layer.
Setting up the project
As you start After Effects, restore the default application settings for After Effects. See “Restoring default preferences” on page 2.
1. Start After Effects, and then immediately hold down Ctrl+Alt+Shift (Windows) or Command+Option+Shift (Mac OS) to restore default preferences settings. When prompted, click OK to delete your preferences.
2. Close the Start window.
After Effects opens to display a new, untitled project.
3. Choose File > Save As > Save As.
4. In the Save As dialog box, navigate to the Lessons/Lesson13/Finished_Projects folder.
5. Name the project Lesson13_Stabilize.aep, and then click Save.
Importing the footage
You need to import one footage item to start this project.
1. Double-click an empty area of the Project panel to open the Import File dialog box.
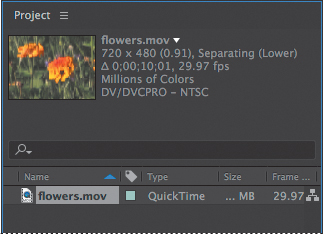
2. Navigate to the Lessons/Lesson13/Assets folder. Select the flowers.mov file, and click Import or Open.
Creating the composition
You’ll start by creating the composition.
1. Drag the flowers.mov clip in the Project panel onto the Create A New Composition button (![]() ) at the bottom of the panel.
) at the bottom of the panel.
After Effects creates a new composition named flowers with the same pixel size, aspect ratio, frame rate, and duration of the source clip.
2. Click the Play button in the Preview panel to preview the footage. Press the spacebar to stop the preview when you’ve seen the whole clip.
This clip was shot with a handheld camera in the late afternoon. A slight breeze rustles the vegetation, and the camera moves unsteadily.
Applying Warp Stabilizer VFX
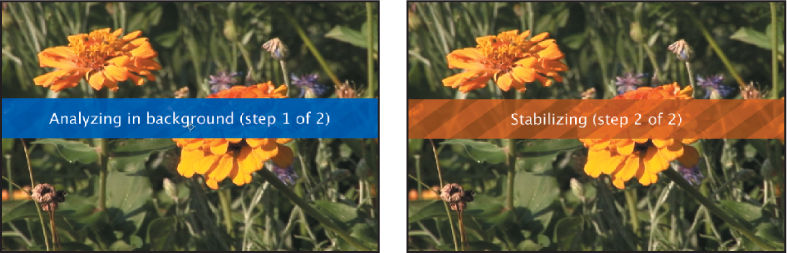
Warp Stabilizer VFX starts analyzing footage as soon as you apply it. Stabilization is a background process, so you can work on other compositions while it finishes. How long it takes depends on your system. After Effects displays a blue banner while it analyzes the footage and an orange banner while it applies stabilization.
1. Select the flowers.mov layer in the Timeline panel, and choose Animation > Warp Stabilizer VFX. The blue banner appears immediately.
2. When Warp Stabilizer VFX has finished stabilizing, and the orange banner has disappeared, press the spacebar to preview the changes.
3. Press the spacebar to stop the preview.
The clip is still shaky, but it’s smoother than it was initially. Warp Stabilizer VFX moved and repositioned the footage. To see how it applied changes, view the effects in the Effect Controls panel. For example, the clip’s borders were scaled up (to about 103%) to hide black gaps that occur when the image is repositioned in the stabilization process. You’ll adjust the settings that Warp Stabilizer VFX uses.
Adjusting the Warp Stabilizer VFX settings
You’ll change the settings in the Effect Controls panel to make the shot smoother.
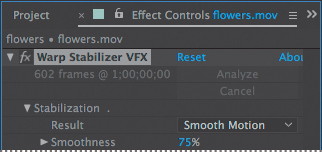
1. In the Effect Controls panel, increase the Smoothness amount to 75%.
Warp Stabilizer VFX immediately begins stabilizing again. It doesn’t need to analyze the footage, because the initial analysis data is stored in memory.
Warp Stabilizer VFX settings
This is a summary of the Warp Stabilizer VFX settings to help you get started. To learn more about the settings, and to read more tips for using the effect successfully, see After Effects Help.
• Result controls the intended result. Smooth Motion makes camera movement smoother, but doesn’t eliminate it; use the Smoothness setting to control how smooth the movement becomes. No Motion attempts to remove all of the camera motion.
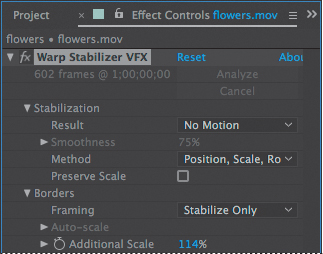
• Method specifies the most complex operation the Warp Stabilizer VFX performs on the footage to stabilize it: Position, which is based on position data only; Position, Scale, Rotation, which uses these three types of data; Perspective, which effectively corner-pins the entire frame; or Subspace Warp (the default), which attempts to warp various parts of the frame differently to stabilize the entire frame.
• Borders settings adjust how borders (the moving edges) are treated for footage that is stabilized. Framing controls how the edges appear in a stabilizing result, and determines whether the effect crops, scales, or synthesizes edges using material from other frames.
• Auto-scale displays the current auto-scale amount, and allows you to set limits on the amount of auto-scaling.
• Advanced settings give you even greater control over the actions of the Warp Stabilizer VFX effect.
2. When Warp Stabilizer VFX has finished, preview the changes.
3. Press the spacebar to stop playback when you’re done.
It’s better, but still a little rough. The Auto-scale setting in the Effect Controls panel now displays 103.7%; the effect moved the frames more dramatically, requiring more scaling to eliminate black gaps around the edges.
Rather than change the amount Warp Stabilizer VFX smooths the footage, now you’ll change its goal.
4. In the Effect Controls panel, choose No Motion from the Result menu.
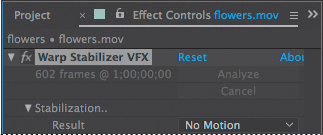
With this setting, Warp Stabilizer VFX attempts to lock the camera in position. This requires even more scaling. When No Motion is selected, the Smoothness option is dimmed.
5. When the orange banner disappears, preview the changes again. Press the spacebar to stop the playback.
Now the camera stays in position, so that the movement you notice is the rustling of the flowers in the wind, not the shakiness of the camera. In order to achieve this effect, Warp Stabilizer VFX had to scale the clip to about 112% of its original size.
Fine-tuning the results
The default analysis works well most of the time, but sometimes you may need to massage the end results even further. In this project, the clip skews subtly in a few places, most noticeably at about the five-second mark. Casual viewers may not notice the problem, but a keen producer will. You’ll change the method that Warp Stabilizer VFX uses to remove the skew.
1. In the Effect Controls panel, choose Position, Scale, Rotation from the Method menu.
2. Choose Stabilize Only from the Framing menu.
3. Increase the Additional Scale to 114%.
4. Preview the changes.
Now the shot looks rock-steady. The only movement is that caused by the wind rustling the flowers.
![]() Note
Note
Scaling a video layer up degrades the image. A good rule of thumb is to increase the layer to no more than 115% the size of the original source.
5. Press the spacebar to stop the playback when you’re done.
6. Choose File > Save to save your work.
7. Choose File > Close Project.
As you have discovered, stabilizing a shot is not without its drawbacks. To compensate for the movement or rotation data applied to the layer, the frames must be scaled, which could ultimately degrade the footage. If you really need to use the shot in your production, this may be the best compromise.
![]() Tip
Tip
You can use Warp Stabilizer VFX advanced settings to achieve more complex effects, too. To learn more, see Adobe After Effects CC Visual Effects and Compositing Studio Techniques, available from Adobe Press.
Using single-point motion tracking
With the increase in the number of productions that incorporate digital elements into final shots, compositors need an easy way to synchronize computer-generated effects with film or video backgrounds. After Effects lets you do this with the capability to follow, or track, a defined area in the shot, and to apply that movement to other layers. These layers can contain text, effects, images, or other footage. The resulting visual effect precisely matches the original moving footage.
When you track motion in an After Effects composition that contains multiple layers, the default tracking type is Transform. This type of motion tracking tracks position and/or rotation to apply to another layer. When tracking position, this option creates one track point, and generates Position keyframes. When tracking rotation, this option creates two track points, and produces Rotation keyframes.
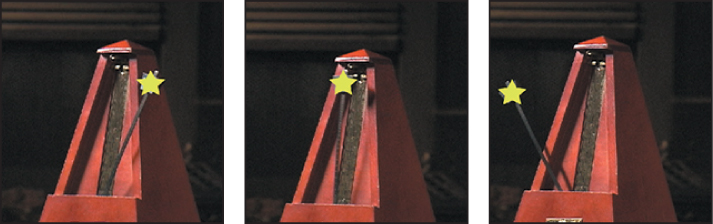
In this exercise, you will track a shape layer to the weighted arm of a metronome. This will be especially challenging, as the camera operator chose not to use a tripod.
Setting up the project
If you’ve just completed the first project, and After Effects is open, skip to step 3. Otherwise, restore the default application settings for After Effects. See “Restoring default preferences” on page 2.
1. Start After Effects, and then immediately hold down Ctrl+Alt+Shift (Windows) or Command+Option+Shift (Mac OS) to restore default preferences settings. When prompted, click OK to delete your preferences.
2. Close the Start window.
After Effects opens to display a new, untitled project.
3. Choose File > Save As > Save As.
4. In the Save As dialog box, navigate to the Lessons/Lesson13/Finished_Projects folder.
5. Name the project Lesson13_Tracking.aep, and then click Save.
Creating the composition
You need to import one footage item to start this project. You’ll use it to create the composition.
1. Double-click an empty area of the Project panel to open the Import File dialog box.
2. Navigate to the Lessons/Lesson13/Assets folder. Select the metronome.mov file, and then click Import or Open.
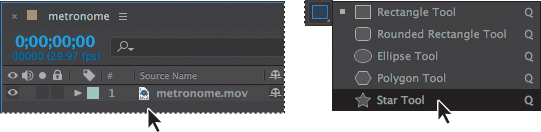
3. In the Project panel, drag the metronome.mov clip onto the Create A New Composition button at the bottom of the panel.
After Effects creates a new composition named metronome, with the same pixel size, aspect ratio, frame rate, and duration of the source clip.
4. Drag the current-time indicator across the time ruler to manually preview the footage.
Creating a shape layer
You’re going to attach a star to the end of the metronome. First, you need to create the star. You’ll use a shape layer.
1. Press the Home key, or move the current-time indicator to the beginning of the time ruler.
2. Click an empty area of the Timeline panel to deselect the layer.
3. Select the Star tool (![]() ), hidden behind the Rectangle tool (
), hidden behind the Rectangle tool (![]() ) in the Tools panel.
) in the Tools panel.
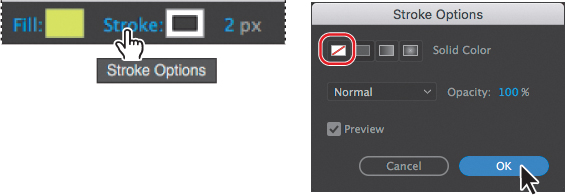
4. Click the Fill Color swatch, and select a light yellow such as R=220, G=250, B=90. Click the word Stroke, select None in the Stroke Options dialog box, and click OK.
![]() Note
Note
If you don’t see the Fill Color swatch, make sure you don’t have a layer selected. When a layer is selected, shape tools draw masks.
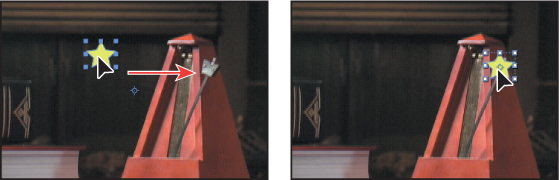
5. In the Composition panel, draw a small star.
6. Use the Selection tool (![]() ) to position the star over the weighted end of the pendulum arm.
) to position the star over the weighted end of the pendulum arm.
7. Select Shape Layer 1 to see the layer’s anchor point. Use the Pan Behind tool (![]() ) to move the anchor point to the center of the star shape, if it isn’t already there.
) to move the anchor point to the center of the star shape, if it isn’t already there.
Positioning the track point
After Effects tracks motion by matching pixels from a selected area in a frame to pixels in each succeeding frame. You create tracking points to specify the area to track. A track point contains a feature region, a search region, and an attach point. After Effects displays the track point in the Layer panel as it tracks.
You will track the metronome weight (the rhombus at the end of its arm) by placing tracking regions around the area that you’ll track another layer to. With the star shape added to the Tracking composition, you are ready to position the track point.
1. Select the metronome.mov layer in the Timeline panel.
2. Choose Animation > Track Motion. The Tracker panel opens; increase its size if you can’t see all the options.
After Effects opens the selected layer in the Layer panel. The Track Point 1 indicator is in the center of the image.
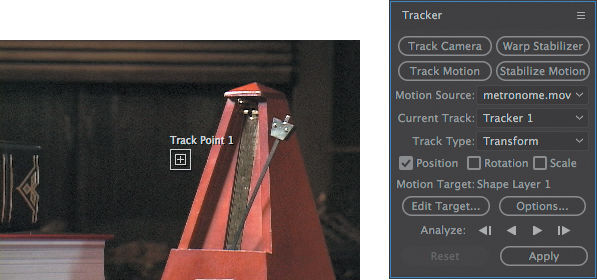
Notice the settings in the Tracker panel: Metronome.mov is selected in the Motion Source menu. The Current Track is Tracker 1, and the Motion Target is Shape Layer 1, because After Effects automatically sets the Motion Target to the layer immediately above the source layer.
Now, you’ll position your track point.
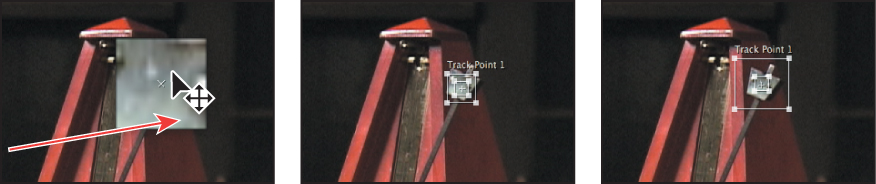
3. Using the Selection tool (![]() ), move the Track Point 1 indicator (drag the empty portion of the inner box) in the Layer panel over the metronome weight.
), move the Track Point 1 indicator (drag the empty portion of the inner box) in the Layer panel over the metronome weight.
4. Enlarge the search region (the outer box) to encompass the area around the pendulum. Then adjust the feature region (the inner box) within the weight.
![]() Note
Note
In this exercise, you want the star to move atop the metronome weight. However, if you wanted an object to move in relationship to the tracked area but not on top of it, you could reposition the attach point accordingly.
Analyzing and applying tracking
Now that the search and feature regions are defined, you can apply the tracker.
![]() Note
Note
The tracking analysis may take quite a while. The larger the search and feature regions, the longer After Effects takes to analyze tracking.
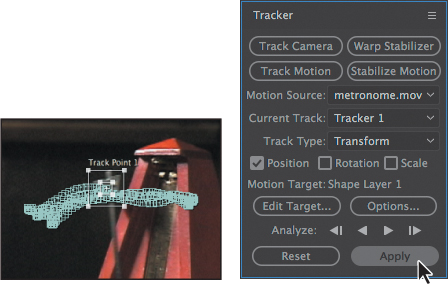
1. Click the Analyze Forward button (![]() ) in the Tracker panel. Watch the analysis to ensure the track point stays with the metronome weight. If it doesn’t, press the spacebar to stop the analysis, and reposition the feature region. (See the sidebar “Checking for drift.”)
) in the Tracker panel. Watch the analysis to ensure the track point stays with the metronome weight. If it doesn’t, press the spacebar to stop the analysis, and reposition the feature region. (See the sidebar “Checking for drift.”)
2. When the analysis is complete, click the Apply button.
3. In the Motion Tracker Apply Options dialog box, click OK to apply the tracking to the x and y dimensions.
Checking for drift
As an image moves in a shot, the lighting, surrounding objects, and angle of the object can all change, making a once-distinct feature no longer identifiable at the subpixel level. It takes time to develop an eye for choosing a trackable feature. Even with careful planning and practice, you may often find that the feature region drifts away from the desired feature. Readjusting the feature and search regions, changing the tracking options, and trying again are all standard parts of digital tracking. When you notice drifting occurring, try the following:
1. Immediately stop the analysis by pressing the spacebar.
2. Move the current-time indicator back to the last good tracked point. You can see this in the Layer panel.
3. Reposition and/or resize the feature and search regions, being careful not to accidentally move the attach point. Moving the attach point will cause a noticeable jump in your tracked layer.
4. Click the Analyze Forward button to resume tracking.
The motion-tracking data is added to the Timeline panel, where you can see that the track data is in the metronome layer, but the results are applied to the Position property of the Shape Layer 1 layer.
4. Press the spacebar to preview the movie. The star not only follows the pendulum; it moves with the camera’s movement.
5. When you’re ready, press the spacebar to stop playback.
6. Hide the properties for both layers in the Timeline panel, choose File > Save, and then choose File > Close Project.
Motion tracking an element onto background footage can be fun. As long as you have a stable feature to track, single-point motion tracking can be quite easy.
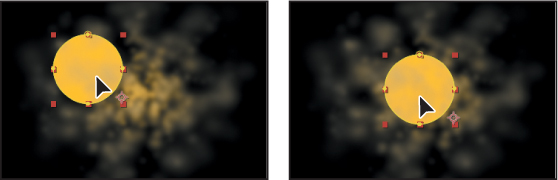
Moving and resizing the track points
In setting up motion tracking, it’s often necessary to refine a track point by adjusting its feature region, search region, and attach point. You can resize or move these items independently or in groups by dragging with the Selection tool. The pointer icon changes to reflect one of many different activities.
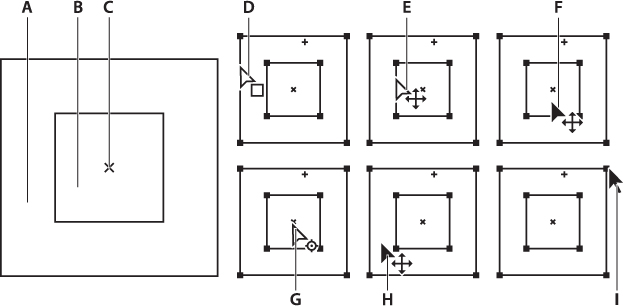
Track point components (left) and Selection tool pointer icons (right):
A. Search region
B. Feature region
C. Attach point
D. Moves search region
E. Moves both regions
F. Moves entire track point
G. Moves attach point
H. Moves entire track point
I. Resizes region
• To turn feature region magnification on or off, choose Magnify Feature When Dragging from the Tracker panel menu. A check mark appears next to the option when it’s on.
• To move only the search region, using the Selection tool, drag the edge of the search region; the Move Search Region pointer (![]() ) appears (D, above).
) appears (D, above).
• To move just the feature and search regions together, Alt-drag (Windows) or Option-drag (Mac OS) with the Selection tool inside the feature or search region; the Move Both Regions pointer (![]() ) appears (E, above).
) appears (E, above).
• To move only the attach point, using the Selection tool, drag the attach point; the Move Attach Point pointer (![]() ) appears (G, above).
) appears (G, above).
• To resize the feature or search region, drag a corner handle (I, above).
• To move the feature region, search region, and attach point together, drag with the Selection tool inside the track point area (avoiding the region edges and the attach point); the Move Track Point pointer (![]() ) appears.
) appears.
For more information about track points, see After Effects Help.
Using multipoint tracking
After Effects also offers two more advanced types of tracking that use multiple tracking points: parallel corner-pinning and perspective corner-pinning.
When you track using parallel corner-pinning, you simultaneously track three points in the source footage. After Effects calculates the position of a fourth point to keep the lines between the points parallel. When the movement of the points is applied to the target layer, the Corner Pin effect distorts the layer to simulate skew, scale, and rotation, but not perspective. Parallel lines remain parallel, and relative distances are preserved.
When you track using perspective corner-pinning, you simultaneously track four points in the source footage. When applied to the target footage, the Corner Pin effect uses the movement of the four points to distort the layer, simulating changes in perspective.
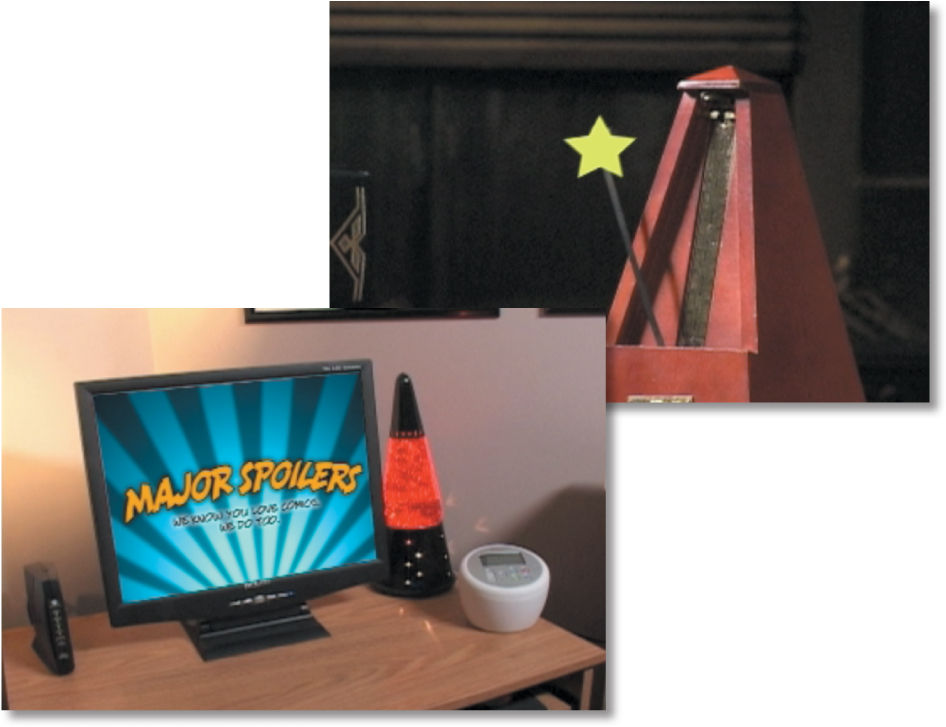
You’ll attach an animation to a computer monitor using perspective corner-pinning. The effect is similar to the Lesson 7 project, but you’ll use a different technique. If you haven’t already watched the sample movie for this exercise, do so now.
Setting up the project
Start by launching After Effects and creating a new project.
1. If it’s not already open, start After Effects, and then immediately hold down Ctrl+Alt+Shift (Windows) or Command+Option+Shift (Mac OS) to restore default preferences settings. When prompted, click OK to delete your preferences, and close the Start window.
After Effects opens to display an empty, untitled project.
2. Choose File > Save As > Save As.
3. In the Save As dialog box, navigate to the Lessons/Lesson13/Finished_Projects folder.
4. Name the project Lesson13_Multipoint.aep, and then click Save.
5. Double-click an empty area of the Project panel to open the Import File dialog box, and then navigate to the Lessons/Lesson13/Assets folder.
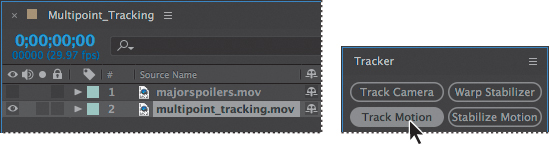
6. Ctrl-click (Windows) or Command-click (Mac OS) both the majorspoilers.mov and multipoint_tracking.mov files, and then click Import or Open.
7. Press Ctrl+N (Windows) or Command+N (Mac OS) to create a new composition.
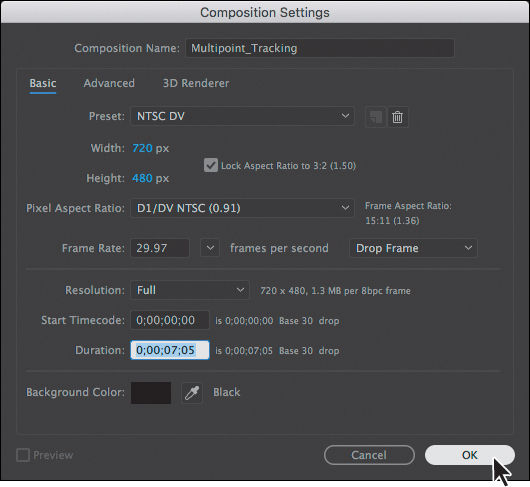
8. In the Composition Settings dialog box, do the following, and then click OK:
• Type Multipoint_Tracking in the Composition Name field.
• Choose NTSC DV from the Preset menu.
• Set the Duration to 7:05—the length of the majorspoilers.mov file.
9. Drag the multipoint_tracking.mov item from the Project panel to the Timeline panel. Manually preview the footage, which is shaky because it was shot with a handheld camera.
Because you’re positioning the majorspoilers.mov layer on the computer monitor, it will be fairly easy to place tracking markers on the flat plane. By default, the tracker tracks by luminance, so you will use the areas around the screen that have high contrast differences for tracking.
10. Press the Home key, or move the current-time indicator to the beginning of the time ruler.
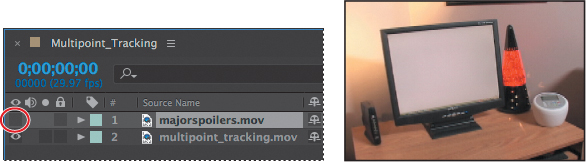
11. Drag the majorspoilers.mov footage item from the Project panel to the Timeline panel, placing it at the top of the layer stack.
12. To make it easier to see the underlying movie as you place the tracking points, turn off the Video switch for the majorspoilers.mov layer in the Timeline panel.
Positioning the track points
You’re ready to add the track points to the multipoint_tracking.mov layer.
1. Select the multipoint_tracking.mov layer in the Timeline panel.
2. Choose Window > Tracker to open the Tracker panel, if it isn’t open.
3. In the Tracker panel, choose multipoint_tracking.mov from the Motion Source menu.
4. Select the multipoint_tracking.mov layer again, and then click Track Motion.
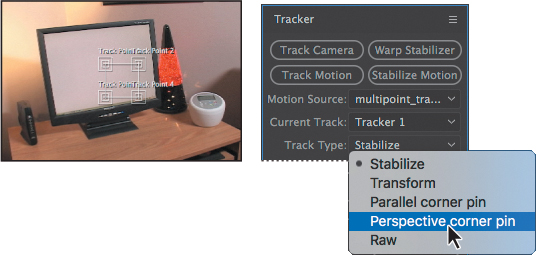
The desk scene opens in the Layer panel, with a track point indicator in the center of the image. However, you will be tracking four points in order to attach the animated movie to the computer screen.
5. Choose Perspective Corner Pin from the Track Type menu.
Three more track point indicators appear in the Layer panel.
![]() Tip
Tip
Refer to the sidebar “Moving and resizing the track points” for help moving the track point regions.
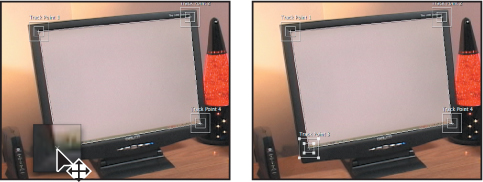
6. Drag the track points to four different high-contrast areas of the image. The four corners of the computer screen provide excellent contrast. Use the image below as a guide. (Because the areas of high contrast are also where you want to attach the majorspoilers layer, you don’t need to move the attach points.)
Applying the multipoint tracker
You’re ready to analyze the data and apply the tracker.
1. Click the Analyze Forward button (![]() ) in the Tracker panel. When the analysis is complete, click the Apply button to calculate the tracking.
) in the Tracker panel. When the analysis is complete, click the Apply button to calculate the tracking.
2. Notice the results in the Timeline panel: You can see the Corner Pin and Position property keyframes for the majorspoilers layer and the track point data for the motion_tracking layer.
3. Make the majorspoilers layer visible again, move the current-time indicator to the beginning of the timeline, and preview the movie to see the results of the tracker.
![]() Note
Note
If the composition doesn’t appear in the Composition panel, click in the Timeline window to move the current-time indicator and refresh the display.
4. When you’re done watching the preview, press the spacebar to stop playback.
If you don’t like the results, return to the Tracker panel, click the Reset button, and try again. With practice, you will become adept at identifying good feature regions.
5. Hide the layer properties to keep the Timeline panel neat, and choose File > Save to save your work.
6. Choose File > Close Project.
mocha for After Effects
In most cases, you’ll get better and more accurate tracking results using mocha from Imagineer Systems to track points in video. A version of mocha is included with After Effects. To track using mocha, choose Animation > Track In Mocha AE.
One advantage of mocha for After Effects is that you don’t have to accurately place tracking points to obtain a perfect track. Rather than using tracking points, mocha for After Effects uses a planar tracker, which attempts to track an object’s translation, rotation, and scaling data based on the movement of a user-defined plane. Planes provide more detail to the computer than is possible with single-point and multi-point tracking tools.
When you work with mocha for After Effects, you need to identify planes in a clip that coincide with movement you want to track. Planes don’t have to be tabletops or walls. For example, if someone is waving goodbye, you can use their upper and lower limbs as two planes. After you track the planes, you can export the tracking data for use in After Effects.
mocha for After Effects uses two different spline technologies for tracking: X splines and Bezier splines. X splines may work better for tracking, especially with perspective motion, but Bezier splines work well, too, and are the industry standard.
To learn more about mocha for After Effects, choose Help > Online Help or Help > Offline Help in mocha.
We’ve saved some tracking data for the computer monitor in mocha for After Effects, so that you can apply it in After Effects if you’d like. To apply the data, follow these steps:
1. Create a new project in After Effects, and import the majorspoilers.mov and mocha_tracking.mov files from the Lesson13/Assets folder. Create a new composition from the mocha_tracking.mov file, and then drag the majorspoilers. mov file to the top of the layer stack in the Timeline panel.
2. Open the mocha_data.txt file (in the Lesson13/Optional_Mocha_Tutorial folder) in a text editor such as WordPad or TextEdit. (Don’t use Notepad on Windows. It doesn’t retain the mocha formatting, so After Effects doesn’t recognize its content on the clipboard.) Choose Edit > Select All, and then Edit > Copy to copy all the data.
3. In After Effects, select the majorspoilers.mov layer in the Timeline panel, and choose Edit > Paste. All the data is applied to the layer.
4. Preview the results.
Creating a particle simulation
After Effects includes several effects that do an excellent job of creating particle simulations. Two of them—CC Particle Systems II and CC Particle World—are based on the same engine. The major difference between the two is that Particle World enables you to move the particles in 3D space, rather than in a 2D layer.
In this exercise, you’ll learn how to use the CC Particle Systems II effect to create a supernova that could be used as the opening of a science program or as a motion background. If you haven’t already watched the sample movie for this exercise, do so now before continuing.
Setting up the project
Start by launching After Effects and creating a new composition.
1. If it’s not already open, start After Effects, and then immediately hold down Ctrl+Alt+Shift (Windows) or Command+Option+Shift (Mac OS) to restore default preferences settings. When prompted, click OK to delete your preferences, and close the Start window.
After Effects opens to display an empty, untitled project.
2. Choose File > Save As > Save As.
3. In the Save As dialog box, navigate to the Lessons/Lesson13/Finished_Projects folder.
4. Name the project Lesson13_Particles.aep, and then click Save.
You don’t need to import any footage items for this exercise. However, you do need to create the composition.
5. In After Effects, press Ctrl+N (Windows) or Command+N (Mac OS).
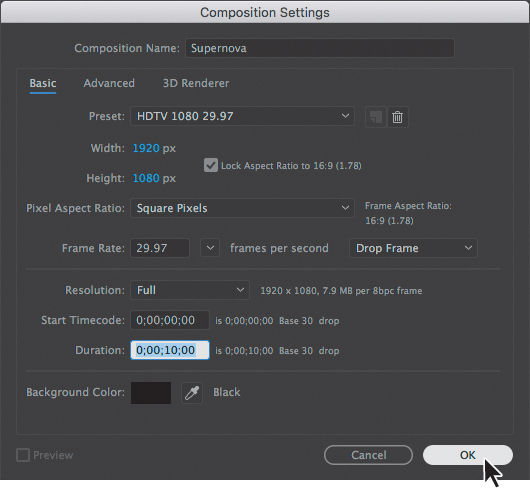
6. In the Composition Settings dialog box, do the following, and then click OK:
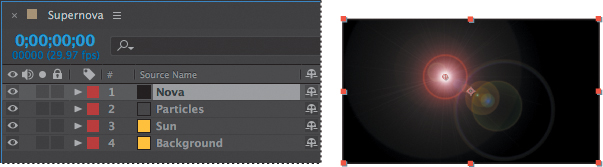
• Type Supernova in the Composition Name field.
• Choose HDTV 1080 29.97 from the Preset pop-up menu.
• Set the Duration to 10:00.
Creating a particle system
You will build the particle system from a solid layer, so you’ll create that next.
1. Choose Layer > New > Solid to create a new solid layer.
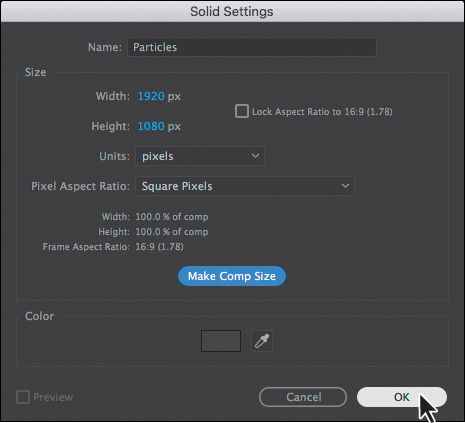
2. In the Solid Settings dialog box, type Particles in the Name box.
3. Click Make Comp Size to make the layer the same size as the composition. Then click OK.
Understanding Particle Systems II properties
Particle systems have a unique vocabulary. Some of the key settings are explained here for your reference. They’re listed in the order in which they appear (top to bottom) in the Effect Controls panel.
Birth Rate Controls the number of particles generated per second. The value itself is arbitrary and does not equal the actual number of particles being generated. However, the higher the number, the more densely packed the particles become.
Longevity Determines how long the particles are visible.
Producer Position Controls the center point or origin of the particle system. The position is set based on the x, y coordinates. All particles emanate from this single point. You can control the size of the producer by making adjustments to the x and y radius settings. The higher these values, the larger the producer point will be. A high x value and a y value of zero (0) result in a line.
Velocity Controls the speed of particles. The higher the number, the faster the particles move.
Inherent Velocity % Determines how much of the velocity is passed along to the particles when the Producer Position is animated. A negative value causes the particles to move in the opposite direction.
Gravity Determines how fast particles fall. The higher the value, the faster the particles fall. A negative value causes particles to rise.
Resistance Simulates particles interacting with air or water, slowing over time.
Direction Determines which direction the particles flow. Use with the Direction Animation type.
Extra Introduces randomness into the movement of the particles.
Birth/Death Size Determines the size of the particles when they are created and when they expire.
Opacity Map Controls opacity changes for the particle over its lifetime.
Color Map Use with the Birth and Death colors to shade the particles over time.
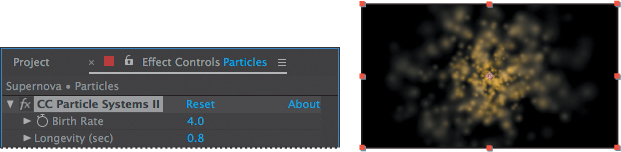
4. With the Particles layer selected in the Timeline panel, choose Effect > Simulation > CC Particle Systems II.
5. Go to 4:00 to see the particle system.
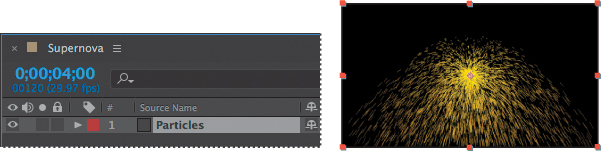
A large stream of yellow particles appears in the Composition panel.
Customizing the particle effect
You will turn this stream of particles into a supernova by customizing the settings in the Effect Controls panel.
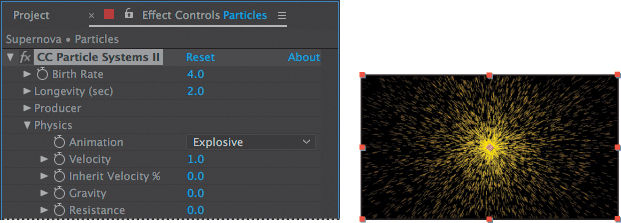
1. Expand the Physics property group in the Effect Controls panel. The Explosive Animation setting works fine for this project, but instead of the particles falling down, you want them to flow out in all directions, so change the Gravity value to 0.0.
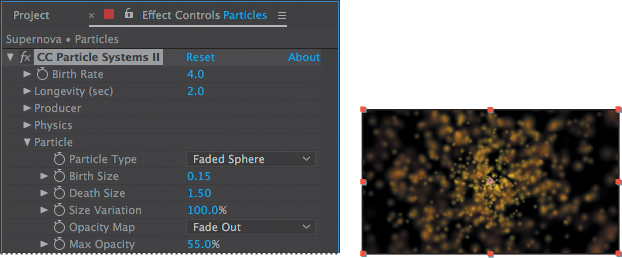
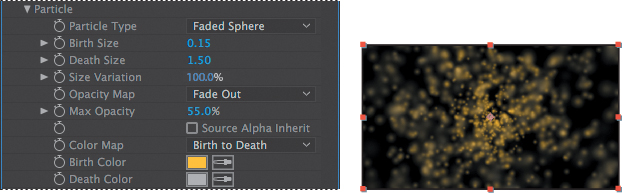
2. Hide the Physics property group, and expand the Particle property group. Then choose Faded Sphere from the Particle Type menu.
Now the particles look intergalactic. Don’t stop there, though.
3. Change the Death Size to 1.50, and increase the Size Variation to 100%.
This allows the particles to change birth size randomly.
4. Reduce the Max Opacity to 55% to make the particles semitransparent.
5. Click the Birth Color swatch, and change the color to R=255, G=200, B=50 to give the particles a yellow hue at birth.
6. Click the Death Color swatch, and change the color to R=180, G=180, B=180 to give the particles a light gray hue as they fade out.
7. To keep the particles from staying onscreen too long, decrease the Longevity value to 0.8 seconds.
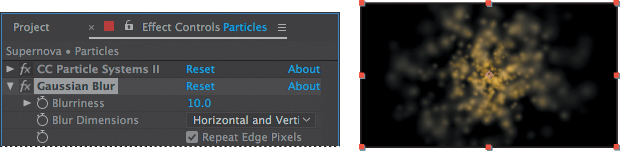
The Faded Sphere particle type softens the look, but the particle shapes are still too sharply defined. You will fix that by blurring the layer to blend the particles with one another.
![]() Note
Note
Even though they’re at the top of the Effect Controls panel, it is often easier to adjust the Longevity and Birth Rate settings after you have set the other particle properties.
8. Hide the CC Particle Systems II effect properties.
9. Choose Effect > Blur & Sharpen > Gaussian Blur.
10. In the Gaussian Blur area of the Effect Controls panel, increase the Blurriness value to 10. Then select Repeat Edge Pixels to keep the particles from being cropped at the edge of the frame.
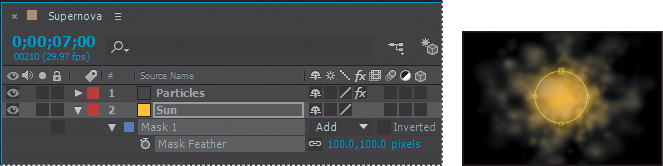
Creating the sun
You will now create a bright halo of light that will go behind the particles.
1. Go to 7:00.
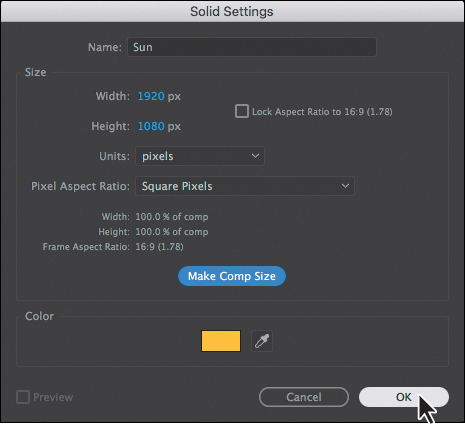
2. Press Ctrl+Y (Windows) or Command+Y (Mac OS) to create a new solid layer.
3. In the Solid Settings dialog box, do the following:
• Type Sun in the Name box.
• Click Make Comp Size to make the layer the same size as the composition.
• Click the color swatch, and make the layer the same yellow as the Birth Color of the particles (255, 200, 50).
• Click OK to close the Solid Settings dialog box.
4. Drag the Sun layer below the Particles layer in the Timeline panel.
5. Select the Ellipse tool (![]() ), which is hidden behind the Rectangle tool (
), which is hidden behind the Rectangle tool (![]() ) or the Star tool (
) or the Star tool (![]() ) in the Tools panel, and Shift-drag in the Composition panel to draw a circle with a radius of roughly 100 pixels, or one-fourth the width of the composition. You’ve created a mask.
) in the Tools panel, and Shift-drag in the Composition panel to draw a circle with a radius of roughly 100 pixels, or one-fourth the width of the composition. You’ve created a mask.
6. Using the Selection tool (![]() ), drag the mask shape to the center of the Composition panel.
), drag the mask shape to the center of the Composition panel.
7. With the Sun layer selected in the Timeline panel, press the F key to reveal its Mask Feather property. Increase the Mask Feather amount to 100, 100 pixels.
8. Press Alt+[ (Windows) or Option+[ (Mac OS) to set the In point of the layer to the current time.

9. Hide the properties for the Sun layer.
Lighting the darkness
Since the sun is bright, it should illuminate the surrounding darkness.
1. Make sure the current-time indicator is still at 7:00.
2. Press Ctrl+Y (Windows) or Command+Y (Mac OS) to create a new solid layer.
3. In the Solid Settings dialog box, name the layer Background, click the Make Comp Size button to make the layer the same size as the composition, and then click OK to create the layer.
4. In the Timeline panel, drag the Background layer to the bottom position in the layer stack.
5. With the Background layer selected in the Timeline panel, choose Effect > Generate > Gradient Ramp.
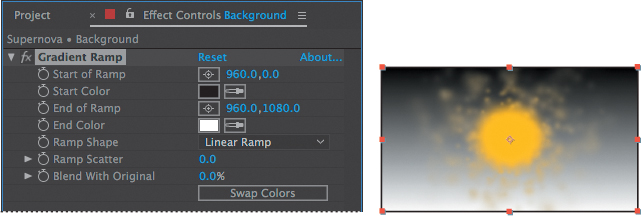
The Gradient Ramp effect creates a color gradient, blending it with the original image. You can create linear ramps or radial ramps, and vary the position and colors of the ramp over time. Use the Start Of Ramp and End Of Ramp settings to specify the start and end positions. Use the Ramp Scatter setting to disperse the ramp colors and eliminate banding.
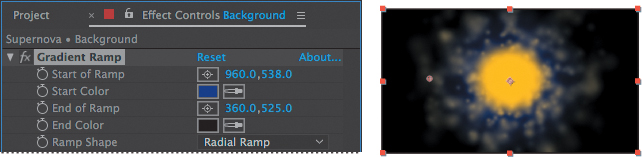
6. In the Gradient Ramp area of the Effect Controls panel, do the following:
• Change Start Of Ramp to 960, 538 and End Of Ramp to 360, 525.
• Choose Radial Ramp from the Ramp Shape menu.
• Click the Start Color swatch, and set the start color to dark blue (R=0, G=25, B=135).
• Set the End Color to black (R=0, G=0, B=0).
7. Press Alt+[ (Windows) or Option+[ (Mac OS) to set the In point of the layer to the current time.
Adding a lens flare
To tie all the elements together, you’ll add a lens flare to simulate an explosion.
1. Press the Home key, or move the current-time indicator to the beginning of the time ruler.
2. Press Ctrl+Y (Windows) or Command+Y (Mac OS) to create a new solid layer.
3. In the Solid Settings dialog box, name the layer Nova, click the Make Comp Size button to make the layer the same size as the composition, set the Color to black (R=0, G=0, B=0), and then click OK.
4. Drag the Nova layer to the top of the layer stack in the Timeline panel. Then, with the Nova layer selected, choose Effect > Generate > Lens Flare.
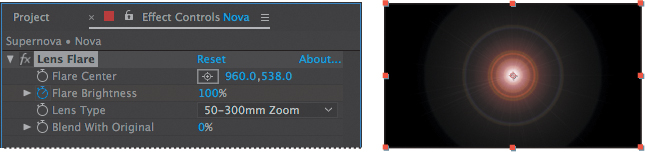
5. In the Lens Flare area of the Effect Controls panel, do the following:
• Change Flare Center to 960, 538.
• Make sure 50–300mm Zoom is selected in the Lens Type menu.
• Decrease Flare Brightness to 0%, and then click the Flare Brightness stopwatch icon (![]() ) to create an initial keyframe.
) to create an initial keyframe.
6. Go to 0:10.
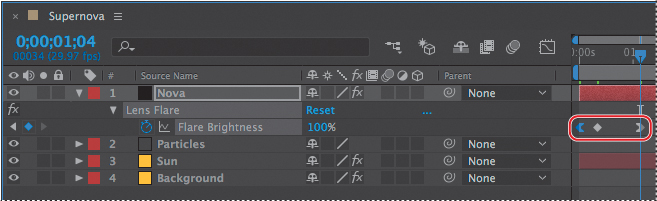
7. Increase the Flare Brightness to 240%.
8. Go to 1:04, and decrease the Flare Brightness to 100%.
9. With the Nova layer selected in the Timeline panel, press the U key to see the animated Lens Flare property.
About high dynamic range (HDR) footage
After Effects also supports high dynamic range (HDR) color.
The dynamic range (ratio between dark and bright regions) in the physical world far exceeds the range of human vision and of images that are printed or displayed on a monitor. But while human eyes can adapt to very different brightness levels, most cameras and computer monitors can capture and reproduce only a limited dynamic range. Photographers, motion-picture artists, and others working with digital images must be selective about what’s important in a scene, because they’re working with a limited dynamic range.
HDR footage opens up a world of possibilities, because it can represent a very wide dynamic range through the use of 32-bit floating-point numeric values. Floating-point numeric representations allow the same number of bits to describe a much larger range of values than integer (fixed-point) values. HDR values can contain brightness levels, including objects as bright as a candle flame or the sun, that far exceed those in 8-bit-per-channel (bpc) or 16-bpc (non-floating-point) mode. Lower dynamic range 8-bpc and 16-bpc modes can represent RGB levels only from black to white, which represents an extremely small segment of the dynamic range in the real world.
After Effects supports HDR images in a variety of ways. For example, you can create 32-bpc projects to work with HDR footage, and you can adjust the exposure, or the amount of light captured in an image, when working with HDR images in After Effects. For more information about support in After Effects for HDR images, see After Effects Help.
10. Right-click (Windows) or Control-click (Mac OS) the ending Flare Brightness keyframe, and choose Keyframe Assistant > Easy Ease In.
11. Right-click (Windows) or Control-click (Mac OS) the beginning Flare Brightness keyframe, and choose Keyframe Assistant > Easy Ease Out.
Finally, you need to make the layers under the Nova layer visible in the composition.
12. Press F2 to deselect all layers, and choose Columns > Modes from the Timeline panel menu. Then choose Screen from the Mode menu for the Nova layer.
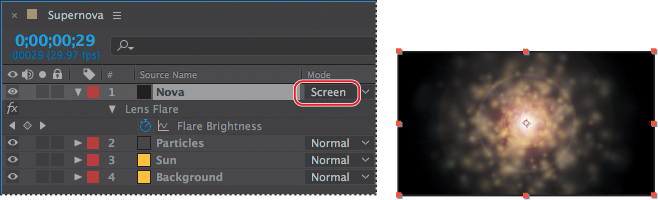
13. Preview the movie. When you’re done, press the spacebar to stop the preview.
14. Choose File > Save, and then choose File > Close Project.
Retiming playback using the Timewarp effect
The Timewarp effect in After Effects gives you precise control over a wide range of parameters when changing the playback speed of a layer, including interpolation methods, motion blur, and source cropping to eliminate unwanted artifacts.
In this exercise, you will use the Timewarp effect to change the speed of a clip for a dramatic slow-motion playback. If you haven’t already watched the sample movie for this exercise, do so now.
Setting up the project
Start by launching After Effects and creating a new project.
1. If After Effects isn’t open, start it, and then immediately hold down Ctrl+Alt+Shift (Windows) or Command+Option+Shift (Mac OS) to restore default preferences settings. When prompted, click OK to delete your preferences, and close the Start window.
After Effects opens to display an empty, untitled project.
2. Choose File > Save As > Save As.
3. In the Save As dialog box, navigate to the Lessons/Lesson13/Finished_Projects folder.
4. Name the project Lesson13_Timewarp.aep, and then click Save.
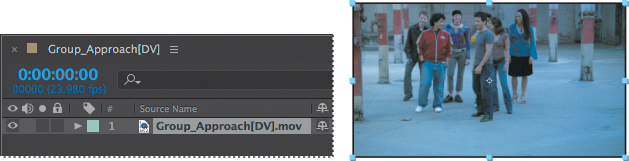
5. Double-click an empty area of the Project panel to open the Import File dialog box. Then navigate to the Lessons/Lesson13/Assets folder on your hard disk, select the Group_Approach[DV].mov, and click Import or Open.
6. Click OK in the Interpret Footage dialog box.
Now, you’ll create a new composition based on the footage item’s aspect ratio and its duration.
7. Drag the Group_Approach[DV].mov file onto the Create A New Composition button (![]() ) at the bottom of the Project panel.
) at the bottom of the Project panel.
After Effects creates a new composition named for the source file, and displays it in the Composition and Timeline panels.
8. Choose File > Save to save your work.
Using Timewarp
In the source footage, a group of young people approaches the camera at a steady pace. At around 2 seconds, the director would like the motion to begin to slow down to 10%, and then ramp back up to full speed at 7:00.
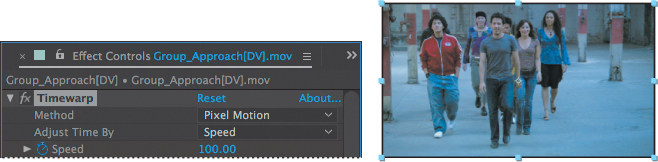
1. With the Group_Approach[DV] layer selected in the Timeline panel, choose Effect > Time > Timewarp.
2. In the Timewarp area of the Effect Controls panel, make sure Pixel Motion is selected in the Method menu and Speed is selected in the Adjust Time By menu.
With Pixel Motion selected, Timewarp creates new frames by analyzing the pixel movement in nearby frames and creating motion vectors. The Speed option controls the time adjustment by percentage rather than by a specific frame.
3. Go to 2:00.
4. In the Effect Controls panel, set the Speed to 100, and click the stopwatch (![]() ) to set a keyframe.
) to set a keyframe.
This tells Timewarp to keep the speed of the clip at 100% until the 2-second mark.
5. With the Group_Approach[DV] layer selected in the Timeline panel, press the U key to see the animated Timewarp Speed property.

6. Go to 5:00, and set the Speed to 10. After Effects adds a keyframe.

7. Go to 7:00, and set the Speed to 100. After Effects adds a keyframe.

8. Press the Home key or move the current-time indicator to the beginning of the time ruler, and then watch a preview of the effect.
![]() Note
Note
Be patient. The first time through, After Effects is caching information in RAM. The second time it plays will provide a more accurate playback.
The speed adjustments are rather abrupt—not the smooth, slow-motion curve you would expect to see in a professional effect. This is because the keyframes are linear instead of curved. You’ll fix that next.
9. Press the spacebar to stop playback when you’re ready.
10. Click the Graph Editor button in the Timeline panel to display the Graph Editor instead of the layer bars. Make sure the Speed property name for the Group_Approach[DV] layer is selected. The Graph Editor displays its graph.
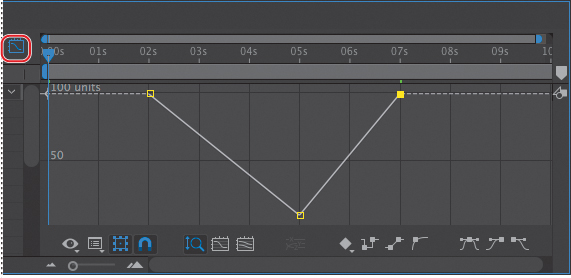
11. Click to select the first Speed keyframe (at 2:00), and then click the Easy Ease icon (![]() ) at the bottom of the Graph Editor.
) at the bottom of the Graph Editor.
![]() Tip
Tip
Close columns in the Timeline panel to see more icons in the Graph Editor. You can also apply an Easy Ease adjustment by pressing the F9 key.
This adjusts the influence into and out of the keyframe to smooth out sudden changes.
12. Repeat step 11 for the other two Speed keyframes in the motion graph, at 5:00 and 7:00.
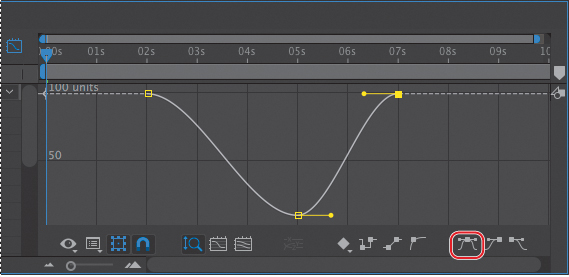
The motion graph is now smoother, but you can tweak it even more by dragging the Bezier handles.
![]() Note
Note
If you need a refresher on using Bezier handles, see Lesson 7, “Working with Masks.”
13. Using the Bezier handles for the keyframes at 2:00 and 5:00, adjust the curve so that it resembles the following image.
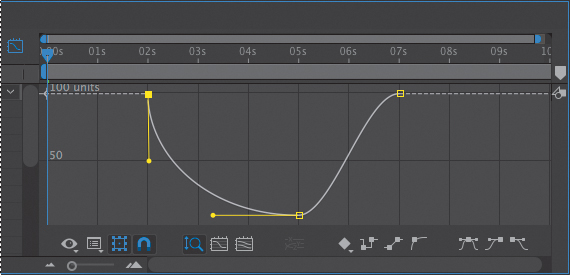
14. Preview the movie again. This time, the slow-motion Timewarp effect looks professional.
15. Choose File > Save to save the project, and then choose File > Close Project.
You’ve now experimented with some of the advanced features in After Effects, including motion stabilization, motion tracking, particle systems, and the Timewarp effect. To render and export any or all of the projects you completed in this lesson, see Lesson 14, “Rendering and Outputting,” for instructions.
Review questions
1. What is Warp Stabilizer VFX, and when do you need to use it?
2. Why might drifting occur when you’re tracking an image?
3. What is the birth rate in a particle effect?
4. What does the Timewarp effect do?
Review answers
1. Shooting footage using a handheld camera typically results in shaky shots. Unless this look is intentional, you will want to stabilize the shots to eliminate unwanted motion. Warp Stabilizer VFX in After Effects analyzes the movement and rotation of the target layer, and then makes adjustments to it. When played back, the motion appears smooth, because the layer itself moves incrementally to offset the unwanted motion. You can change the way Warp Stabilizer VFX crops, scales, and performs other adjustments by modifying settings for the effect.
2. Drifting occurs when the feature region loses the feature that’s being tracked. As an image moves in a shot, the lighting, surrounding objects, and angle of the object can change, making a once-distinct feature unidentifiable at the subpixel level. Even with careful planning and practice, the feature region often drifts away from the desired feature. Readjusting the feature and search regions, changing the tracking options, and trying again are all standard procedures in digital tracking.
3. The birth rate in a particle effect determines how often new particles are created.
4. The Timewarp effect gives you precise control over a wide range of parameters to change the playback speed of a layer, including interpolation methods, motion blur, and source cropping to eliminate unwanted artifacts.
All materials on the site are licensed Creative Commons Attribution-Sharealike 3.0 Unported CC BY-SA 3.0 & GNU Free Documentation License (GFDL)
If you are the copyright holder of any material contained on our site and intend to remove it, please contact our site administrator for approval.
© 2016-2026 All site design rights belong to S.Y.A.