Adobe After Effects CC Classroom in a Book (2017 release) (2017)
4. Working with Shape Layers
Lesson overview
In this lesson, you’ll learn how to do the following:
• Create custom shapes.
• Customize a shape’s fill and stroke.
• Use path operations to transform shapes.
• Animate shapes.
• Repeat shapes.
• Snap layers into alignment.
• Use an expression to animate properties in time with audio.
![]()
This lesson will take approximately an hour to complete. Download the project files for this lesson, following the instructions in the Getting Started section under “Accessing the lesson files and Web Edition,” if you haven’t already done so. As you work on this lesson, you’ll preserve the start files. If you need to restore the start files, download them from your Account page.
PROJECT: SEQUENCE FROM A MUSIC VIDEO
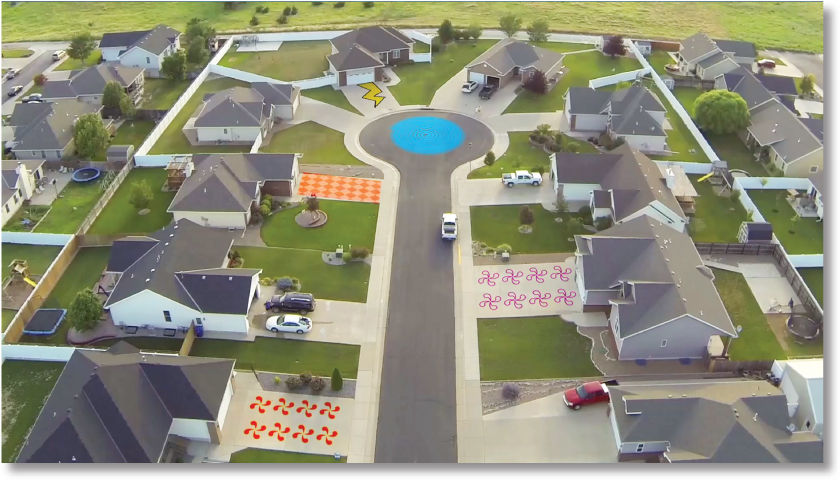
Shape layers make it easy to create expressive backgrounds and intriguing results. You can animate shapes, apply animation presets, and add Repeaters to intensify their impact.
Getting started
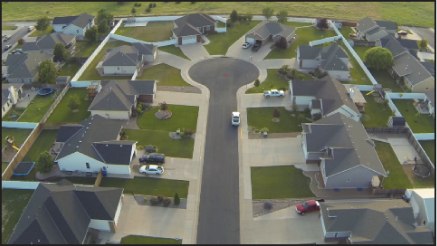
Shape layers are created automatically when you draw a shape with any of the drawing tools. You can customize and transform an individual shape or its entire layer to create interesting results. In this lesson, you will use shape layers to build dynamic and whimsical designs on the street and driveways of a neighborhood.
First, you’ll preview the final movie and set up the project.
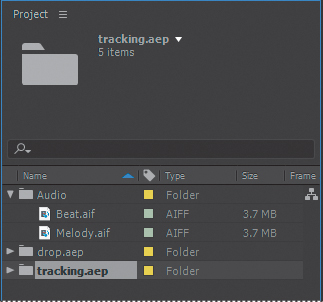
1. Make sure the following files are in the Lessons/Lesson04 folder on your hard disk, or download them from your Account page at www.peachpit.com now:
• In the Assets folder: Beat.aif, drop.aep, Melody.aif, tracking.aep, Tracking.mp4
• In the Sample_Movies folder: Lesson04.avi, Lesson04.mov
2. Open and play the Lesson04.avi sample movie in Windows Media Player or the Lesson04.mov sample movie in QuickTime Player to see what you will create in this lesson. When you are done, close Windows Media Player or QuickTime Player. You may delete the sample movies from your hard disk if you have limited storage space.
As you start After Effects, restore the default application settings. See “Restoring default preferences” on page 2.
3. Start After Effects, and then immediately hold down Ctrl+Alt+Shift (Windows) or Command+Option+Shift (Mac OS) to restore default preferences settings. When prompted, click OK to delete your preferences.
4. Close the Start window.
After Effects opens to display a blank, untitled project.
5. Choose File > Save As > Save As, and then navigate to the Lessons/Lesson04/Finished_Project folder.
6. Name the project Lesson04_Finished.aep, and then click Save.
Creating the composition
Next, you’ll import the files you need and create the composition. You’ll import two footage items and two saved project files.
1. Double-click an empty area of the Project panel to open the Import File dialog box.
2. Navigate to the Lessons/Lesson04/Assets folder on your hard disk, Ctrl-click (Windows) or Command-click (Mac OS) to select the Beat.aif and Melody.aif files, and then click Import or Open.
3. Choose File > New > New Folder to create a new folder in the Project panel.
4. Name the folder Audio, press Enter or Return to accept the name, and then drag the two audio files you imported into the Audio folder. Then expand the folder so you can see its contents.
5. Double-click an empty area of the Project panel to open the Import File dialog box again.
6. Navigate to the Lessons/Lesson04/Assets folder. Ctrl-click (Windows) or Command-click (Mac OS) to select the drop.aep and tracking. aep project files, and then click Import or Open. The video files and other elements you will need later are imported with the projects.
Now you’re ready to create the composition.
7. Press Ctrl+N (Windows) or Command+N (Mac OS) to create a new composition.
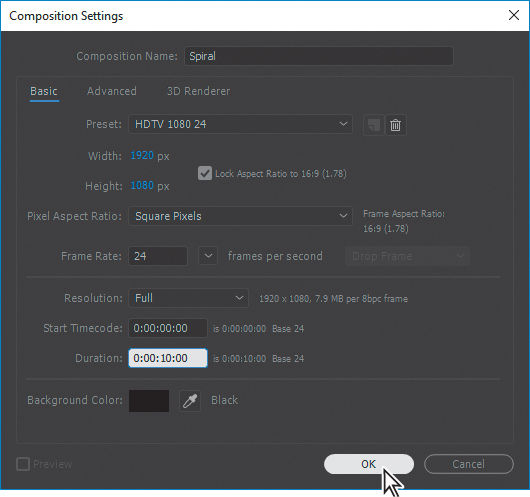
8. In the Composition Settings dialog box, name the composition Spiral, select the HDTV 1080 24 preset, and set the Duration to 10:00. Then click OK.
After Effects opens the new composition in both the Timeline and Composition panels.
![]() Tip
Tip
To specify 10 seconds, type 10. in the Duration box. The period indicates that there are no units in that position. To specify 10 minutes, type 10.. in the box.
Adding a shape layer
After Effects includes five shape tools: Rectangle, Rounded Rectangle, Ellipse, Polygon, and Star. When you draw a shape directly in the Composition panel, After Effects adds a new shape layer to the composition. You can apply stroke and fill settings to a shape, modify its path, and apply animation presets. Shape attributes are all represented in the Timeline panel, and you can animate each setting over time.
The same drawing tools can create both shapes and masks. Masks are applied to layers to hide or reveal areas or as input into effects; shapes have their own layers. When you select a drawing tool, you can specify whether the tool draws a shape or a mask.
Drawing a shape
You’ll begin by drawing a rectangle with a fill and stroke.
1. Select the Rectangle tool (![]() ).
).
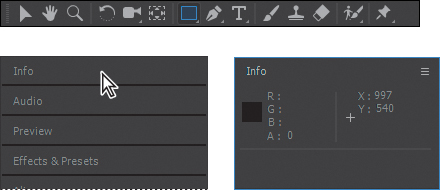
2. Choose Fit from the Magnification Ratio pop-up menu at the bottom of the Composition panel so that you can see the entire composition.
3. Click the Info panel’s title bar to open it. Using the values in the Info panel to guide you, position the cursor at approximately 950, 540, which is near the center of the Composition panel. (You may need to widen the Info panel to see the X and Y coordinates.)
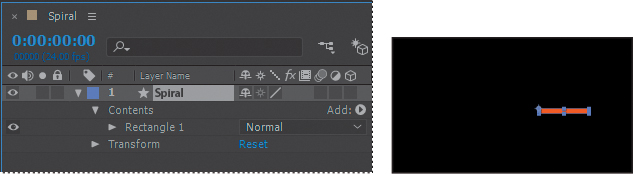
4. Drag down and to the right to create a rectangle. Again, watch the Info panel. The bottom (B) value should be approximately 40 pixels and the right side (R) value should be about 400 pixels. The shape appears in the Composition panel, and After Effects adds a shape layer named Shape Layer 1 to the Timeline panel.
5. Select the Shape Layer 1 layer name, press Enter or Return, change the layer name to Spiral, and press Enter or Return to accept the change.
Applying a fill and stroke
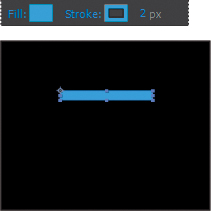
You can change the color of a shape by modifying its Fill settings in the Tools panel. Clicking the word Fill opens the Fill Options dialog box, where you can select the kind of fill, its blending mode, and its opacity. Clicking the Fill Color box opens the Adobe Color Picker if the fill is solid, or the Gradient Editor if the fill is a gradient.
Similarly, you can change the stroke color and width of a shape by modifying its Stroke settings in the Tools panel. Click the word Stroke to open the Stroke Options dialog box; click the Stroke Color box to select a color.
1. Select Rectangle 1 in the Timeline panel.
2. Click the Fill Color box (next to Fill) to open the Shape Fill Color dialog box.
3. Change the color to a light blue (we used R=0, G=170, B=255), and click OK.
4. Click the Stroke Color box in the Tools panel, change the stroke color to the same light blue color, and then click OK.
5. Choose File > Save to save your work so far.
Twisting a shape
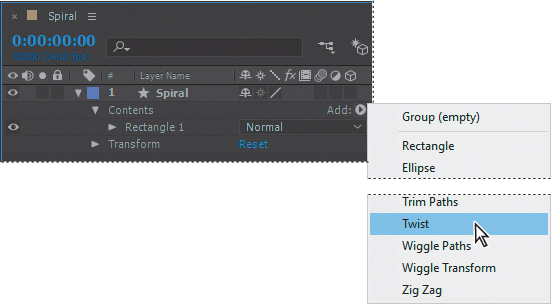
The rectangle is fine, but it isn’t very exciting. In After Effects, you can easily modify a basic shape into something more complex and interesting. You’ll use the Twist path operation to transform this rectangle into a spiral shape.
As you work with the Twist path operation, keep in mind that it rotates a path more sharply in the center than at the edges. Positive values twist clockwise; negative values twist counterclockwise.
1. In the Timeline panel, open the Add pop-up menu next to Contents in the Spiral layer, and choose Twist.
2. Expand Twist 1.
3. Change the Angle to 220.
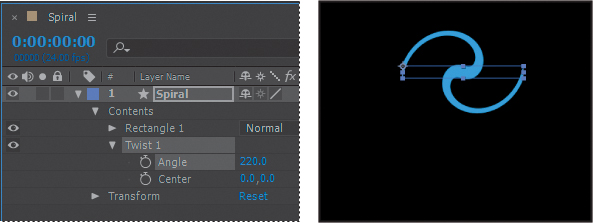
The rectangle changes dramatically. Next, you’ll change the center point of the twist to create a larger spiral.
![]() Note
Note
If the center of your spiral looks different from ours, you probably drew a slightly larger or smaller rectangle. You can delete what you have and start over with a fresh composition or try adjusting the x-axis value for Center.
4. In the Timeline panel, change the x-axis value for Center to –220.

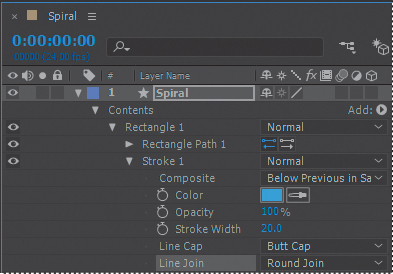
The spiral is a bit thin. You’ll change the stroke width to thicken it.
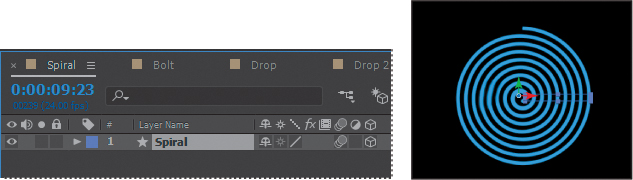
5. Select the Spiral layer in the Timeline panel, and then change the Stroke Width value in the Tools panel to 20 px.
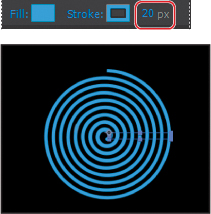
The center of the spiral has a rounded cap, but the end is square. You’ll change the end so that they match.
6. Expand Stroke 1 to see its properties.
7. Choose Round Join from the Line Join menu.
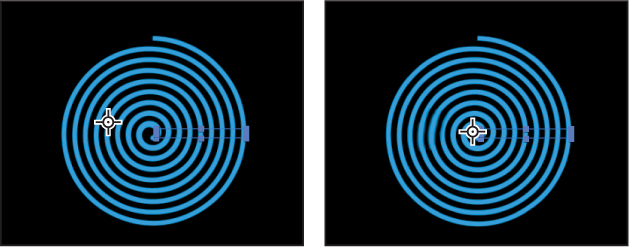
The spiral looks great. Now you just need to center it, so that it looks natural when it rotates, and then you’ll set up its rotation and add motion blur.
8. Press A to reveal the Anchor Point property for the layer. Then adjust the x-axis and y-axis values until the anchor point is centered in the black center (negative space) of the spiral, just above the center end cap. (The exact values will vary depending on how you created the initial shape.)
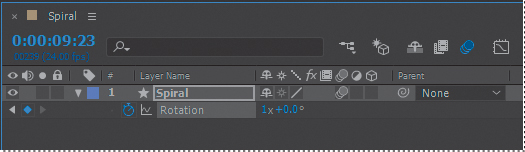
9. Make sure the current-time indicator is at the beginning of the timeline. Then press R to reveal the Rotation property for the layer. Click the stopwatch icon (![]() ) to create an initial keyframe.
) to create an initial keyframe.
10. Press the End key, or move the current-time indicator to the end of the timeline. Change the Rotation value to 1x+0.0°. With this setting, the shape will rotate once during its ten-second cycle.
11. Click the Motion Blur switch for the layer, and then click the Enable Motion Blur button (![]() ) at the top of the Timeline panel.
) at the top of the Timeline panel.
12. Press the spacebar to preview your animation, and press the spacebar again to stop the preview. Choose File > Save to save your work so far.
Creating custom shapes
You can use the five shape tools to create a wide variety of shapes. However, the real power in using shape layers is that you can draw any shape and manipulate it in a myriad of ways.
Drawing a shape with the Pen tool
You’ll use the Pen tool to draw a shape that resembles a lightning bolt. In order to position it properly in the final project, you’ll create a separate composition for this shape.
1. Press Ctrl+N (Windows) or Command+N (Mac OS) to create a new composition.
2. In the Composition Settings dialog box, name the composition Bolt, select the HDTV 1080 24 preset, set the duration to 10:00, and then click OK.
3. Select the Pen tool (![]() ) in the Tools panel.
) in the Tools panel.
4. In the Composition panel, draw a shape that resembles a lightning bolt, as in the illustration. When you create the first vertex, After Effects automatically adds a shape layer to the Timeline panel.
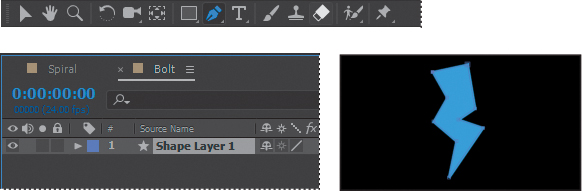
5. Select Shape Layer 1, press Enter or Return, and change the layer’s name to Bolt. Press Enter or Return to accept the new name.
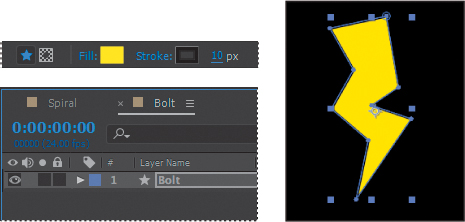
6. With the Bolt layer selected, click the Fill Color box in the Tools panel, and select a yellow color (we used R=255, G=237, B=0). Then click the Stroke Color box in the Tools panel, and select black (R=0, G=0, B=0).
![]() Tip
Tip
Your lightning bolt doesn’t need to look exactly like ours, but you can use the one in the illustration as a guide. Click an initial vertex at the bottom of the shape, and then click to create each additional point. If you’re not familiar with the Pen tool, you may find the display distracting, as the fill seems to jump around as you draw; ignore the preview until you’ve clicked each vertex and completed the shape.
7. Change the Stroke Width to 10 px.
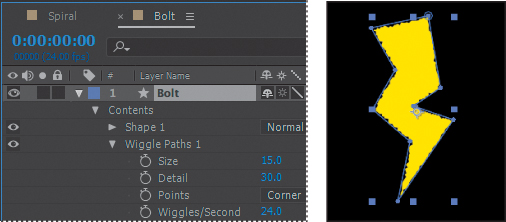
Creating a self-animating shape
Wiggle Paths turns a smooth shape into a series of jagged peaks and valleys. You’ll use it to make the lightning bolt more electrifying. Because the operation is self-animating, you need to change only a few properties for the entire shape to move on its own.
1. Expand the Bolt layer in the Timeline panel, and choose Wiggle Paths from the Add pop-up menu.
2. Expand Wiggle Paths 1. Then change the Size to 15 and the Detail to 30.
3. Change Wiggles/Second to 24 to speed up the movement.
4. Click the Motion Blur switch for the layer, and then click the Enable Motion Blur button at the top of the Timeline panel. Then hide the layer properties.
5. Move the current-time indicator across the time ruler to see the shape move.
Duplicating shapes
You could draw a shape multiple times, but it’s easier to duplicate the shape automatically. The Repeater path operation lets you multiply a shape and transform its properties to achieve different results.
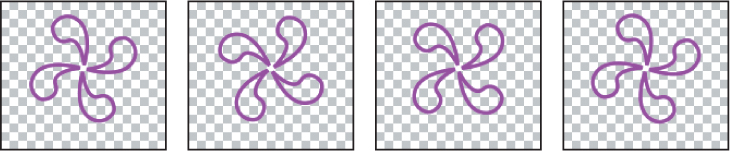
You’ll use the Repeater path operation to duplicate a shape that was created in Adobe Illustrator and then pasted into the Path property of a shape layer in the Drop.aep project file.
1. In the Project panel, expand the drop.aep folder, and then double-click the Drop composition to open it.
![]() Note
Note
Choose Fit from the Magnification Ratio pop-up menu in the Composition window if you don’t see the full shape.
The Drop composition opens in the Timeline panel and the Composition panel.
2. Expand the Drop layer and its Contents folder if its properties aren’t visible. Then select Shape 1, and choose Repeater from the Add pop-up menu.
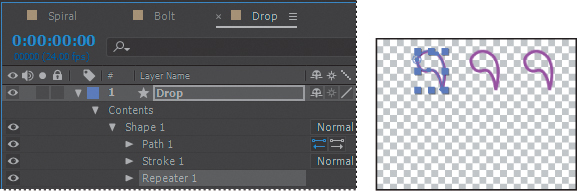
You’re selecting Shape 1 because you want to add the Repeater to the individual shape, not the entire layer.
3. Expand Repeater 1.
4. Change the number of copies to 4.
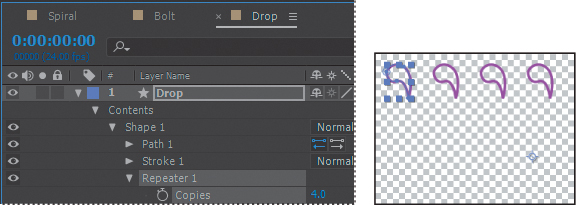
The Repeater creates three copies of the shape, for a total of four. You’ll rotate the shapes and then reposition them to create a pinwheel.
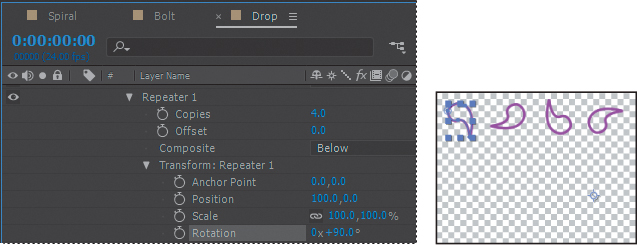
5. Expand Transform: Repeater 1.
6. Change the Rotation to 90°.
![]() Note
Note
There are multiple Transform properties in the Timeline panel, applying to different path operators. Make sure you’re selecting the appropriate Transform property for the object or layer you want to affect. In this case, you want to affect only the Repeater.
Because you applied the rotation to the Repeater rather than to the shape, each drop rotates around the layer’s anchor point to a different degree. When you change the Transform properties for the Repeater, the change is multiplied by the number of copies created. In this case, the first shape retains the original value of 0, the second shape rotates 90 degrees, the third shape rotates 180 degrees, and the fourth shape rotates 270 degrees. The same concept applies to each of the Transform properties.
7. In the Transform: Repeater 1 properties, change the Position to 0, 0.
The shapes overlap because the anchor point is located in the center of each shape.
8. Change the Anchor Point value to 15, 45.
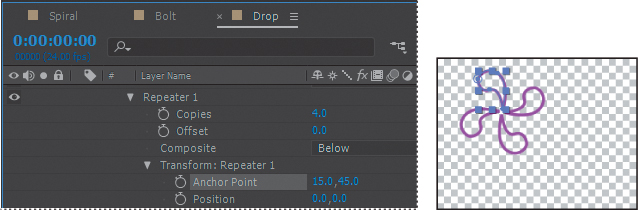
The shapes align to form a pinwheel. Now you’ll make the pinwheel rotate.
9. Make sure the current-time indicator is at the beginning of the time ruler. Then, expand the Transform: Shape 1 category, and click the stopwatch icon (![]() ) next to the Rotation value to create an initial keyframe.
) next to the Rotation value to create an initial keyframe.
10. Press the End key or move the current-time indicator to the end of the time ruler, and change the Rotation value to 2x+0.0°.
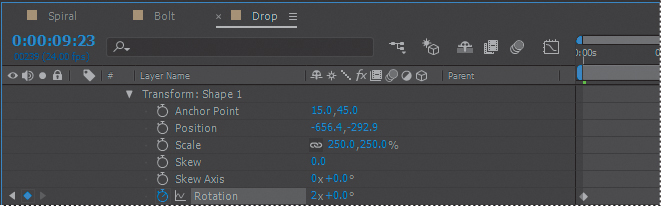
11. Drag the current-time indicator across the time ruler to see the pinwheel rotate.
You used the Repeater path operation to duplicate an individual shape. Now you’ll use it to copy all the contents of the layer, turning one pinwheel into eight.
12. In the Timeline panel, hide all the properties under Shape 1. Then select the Drop layer, and choose Repeater from the Add pop-up menu.
13. Expand the new Repeater 1 category, and change the number of copies to 4.
Because you applied the Repeater to the entire layer, the full pinwheel was copied.
14. Expand the Transform: Repeater 1 category, and change the Position values to 450, 0.
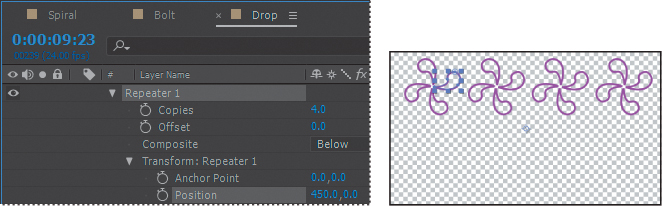
There are now four pinwheels across the top of the Composition window.
15. Select the Drop layer, and choose Repeater from the Add pop-up menu again to create the Repeater 2 category.
16. Expand the Repeater 2 category, and change the number of copies to 2. Then expand the Transform: Repeater 2 category, and change the Position values to 0, 575.
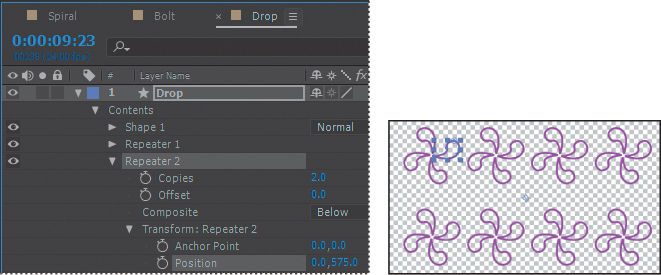
By applying another Repeater to the entire layer, you copied the full row of pinwheels.
17. Hide all the properties for the layer.
18. Click the Motion Blur switch for the layer, and then click the Enable Motion Blur button (![]() ) at the top of the Timeline panel.
) at the top of the Timeline panel.
19. Press the spacebar to preview eight pinwheels rotating in unison; press the spacebar again to stop the preview. Then choose File > Save to save your work so far.
Duplicating and modifying a composition
You’ll use the Drop composition as a starting point for a similar composition that uses different fill and stroke options.
1. In the Project panel, select the Drop composition, and choose Edit > Duplicate to create a copy of the composition.
2. Double-click the Drop 2 composition in the Project panel to open it. Then, in the Timeline panel, expand the Drop layer, and then the Contents category.
3. Select Shape 1, and then choose Fill from the Add pop-up menu.
4. Expand Fill 1, click the Color box, and choose any fill color you like.
5. Expand Stroke 1, click the Color box, and choose the stroke color you like.
6. Move the current-time indicator across the time ruler to preview the rotating pinwheels.
7. Hide all the properties for the layer.
8. Choose File > Save to save your work so far.
Positioning layers with snapping
You’ve created and manipulated shapes in a variety of ways. Now you’ll create a checkerboard pattern. Positioning the layers will be easy with the snapping feature in After Effects.
Creating a new composition
This checkerboard background includes multiple layers, so you’ll create a new composition for it.
1. Press Ctrl+N (Windows) or Command+N (Mac OS) to create a new composition.
2. In the Composition Settings dialog box, name the composition Checkerboard, choose HDTV 1080 24 from the Preset menu, and type 10:00 for Duration. Then click OK.
After Effects opens the new Checkerboard composition in the Timeline and Composition panels. You’ll start by adding two solid layers—the building blocks of the checkerboard background.
3. Choose Layer > New > Solid to create a solid layer.
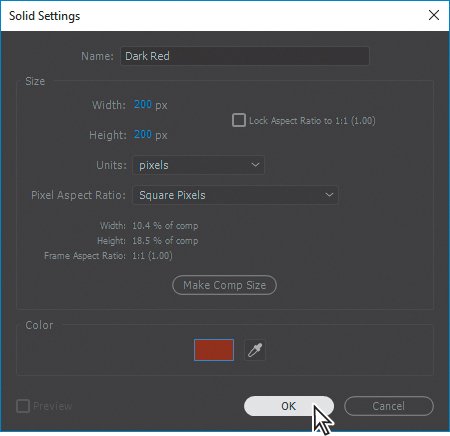
4. In the Solid Settings dialog box, do the following, and then click OK:
• Name the layer Dark Red.
• Change both the Width and Height to 200 px.
• Choose Square Pixels from the Pixel Aspect Ratio menu.
• Select a dark red color. (We used R=145, G=0, B=0.)
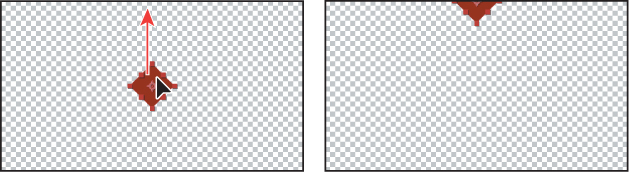
5. With the Dark Red layer selected in the Timeline panel, press R to display the Rotation property for the layer. Then change the Rotation to 45 degrees.

6. Select the Selection tool (![]() ). Then, in the Composition panel, drag the layer up so that only the bottom half of the diamond appears in the composition.
). Then, in the Composition panel, drag the layer up so that only the bottom half of the diamond appears in the composition.
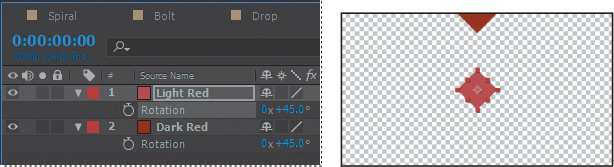
7. Press Ctrl+Y (Windows) or Command+Y (Mac OS) to create another solid layer.
8. In the Solid Settings dialog box, name the layer Light Red, and change the color to a light red (we used R=180, G=75, B=75). Then click OK.
The default width and height for the new solid layer match the settings you used previously, so the Light Red layer has the same dimensions as the Dark Red layer.
9. With the Light Red layer selected in the Timeline panel, press R to display the Rotation property. Then change the Rotation to 45 degrees.
Snapping layers into position
You’ve created two layers, but they have no relationship to each other in the composition. You’ll use the Snapping option in After Effects to quickly align the layers. When the Snapping option is enabled, the layer feature that is closest to your pointer when you click becomes the snapping feature. As you drag the layer near other layers, features on other layers are highlighted, showing you where the snapping feature would snap if you released the mouse button.
![]() Note
Note
You can snap two shape layers together, but not two shapes within a single layer. Also, a layer must be visible to snap to it. 2D layers can snap to 2D layers, and 3D layers can snap to 3D layers.
1. Select Snapping in the options section of the Tools panel, if it’s not already selected.
![]()
2. Using the Selection tool, select the Light Red layer in the Composition panel.
When you select a layer in the Composition panel, After Effects displays the layer handles and anchor point. You can use any of these points as the snapping feature for a layer.
3. Click near the corner handle on the left side of the Light Red layer, and drag it near the lower right edge of the Dark Red layer until it snaps into place, with the sides abutted. Be careful not to drag the corner itself, or you’ll resize the layer.
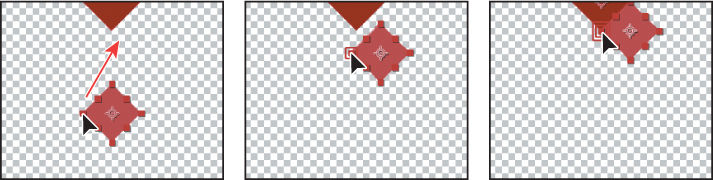
As you drag the layer, a box appears around the left corner handle you selected, indicating that it is the snapping feature.
![]() Tip
Tip
If the Snapping option isn’t selected, you can temporarily enable it: Click a layer and start dragging, and then press Ctrl (Windows) or Command (Mac OS) as you drag the layer.
4. In the Timeline panel, select both of the layers, and press R to hide the Rotation property for both layers.
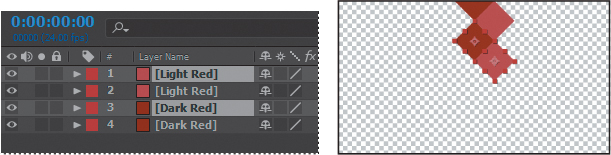
5. With both layers still selected, choose Edit > Duplicate to copy them.
6. In the Composition panel, drag the two new layers down to the left, and then down to the right, so that the new Dark Red layer abuts the original Light Red layer. Remember that the snapping feature is determined by where you initially click when you begin to drag.
![]() Tip
Tip
Instead of choosing Edit > Duplicate, you can press Ctrl+D (Windows) or Command+D (Mac OS) to duplicate layers.
7. Repeat steps 5–6 until you have a column of diamonds filling the screen.
8. Choose Edit > Select All to select the layers in the Timeline panel.
9. Press Ctrl+D (Windows) or Command+D (Mac OS) to duplicate the layers. Then move them to the left in the Composition panel until they snap into place.
10. Repeat step 9 until the Composition panel is full. Pull the duplicate layers to the left or right as necessary. Remember to click near an appropriate snapping feature as you begin dragging each time.

11. Choose File > Save to save your work.
![]() Tip
Tip
If you need to generate a checkerboard more quickly, use the Checkerboard effect. For more information, see After Effects Help.
Adding compositions to a 3D project
You’ve created several compositions, all of which need to stay in position as the camera moves through the scene. You’ll integrate the compositions using the 3D Camera Tracker effect, which lets you add 3D layers to a clip with the same movement and perspective changes as the original.
You’ll work extensively with the 3D Camera Tracker effect in Lesson 12. For this project, we’ve set up the effect so that all you need to do is to position layers and parent them to a null object to attach them to the 3D scene. A null object is an invisible layer that has all the properties of a visible layer, so that it can be a parent to any layer in the composition. In this case, the null object tracks the camera movement.
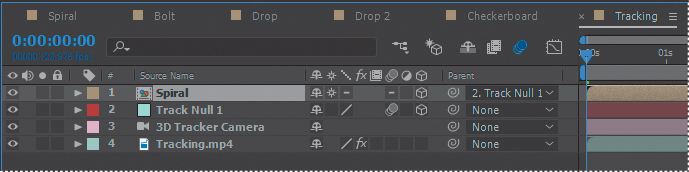
1. In the Project panel, expand the tracking.aep folder, and then double-click the Tracking composition to open it. Choose Fit from the Magnification Ratio pop-up menu at the bottom of the Composition panel so that you can see the entire composition.
The Tracking composition includes the background video you’ll use to place the shapes you’ve created.
2. Select the Spiral composition in the Timeline panel, and then select the 3D switch (![]() ) for the Spiral layer.
) for the Spiral layer.
3. Select the Tracking composition in the Timeline panel again. Then drag the Spiral composition from the Project panel to the Timeline panel, placing it at the top of the layer stack.
4. Select the 3D switch for the Spiral layer, and then select the Collapse Transformations switch (![]() ) for the layer, too.
) for the layer, too.
The Collapse Transformations switch ensures that transformations in a nested composition aren’t flattened; instead, when the project is rendered, transformations in the nested composition will be performed at the same time transformations are performed for the containing composition.
5. In the Timeline panel, click the Parent pop-up menu for the Spiral layer, and choose 2. Track Null 1. This sets the Track Null 1 layer as the parent of the Spiral layer, which in turn becomes the child layer.
6. With the Spiral layer selected, press P to reveal its Position property. Change the value to 0, 0, 0. This moves the spiral to the same location as the Null object.
7. Move the current-time indicator to 5:00 so you can clearly see the Spiral layer’s position in the image. Then press Shift+R to reveal the Rotation properties, and change the Orientation values to 0, 0, 0.
The spiral is almost in the right place, but you want to position it perfectly in the cul-de-sac. You’ll tweak its position.
8. Change the Position for the layer to –35, –225, 0.

9. Press the spacebar to preview the spiral rotating in the cul-de-sac. Press the spacebar again to stop the preview. Hide the Spiral layer’s properties to keep the Timeline panel tidy.
You’ve placed the first composition. You’ll repeat the process to place the others.
10. Drag the Bolt composition from the Project panel to the top of the Timeline panel, and select the 3D switch (![]() ) for the Bolt layer.
) for the Bolt layer.
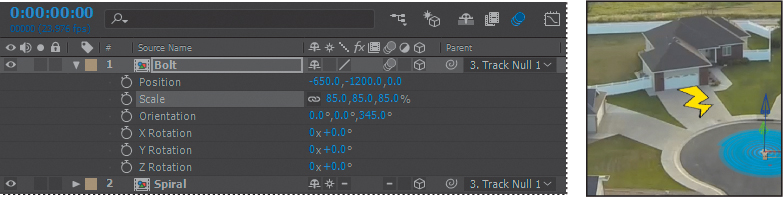
11. Select 3. Track Null 1 from the Parent menu for the Bolt layer. Then press the P key, press Shift+R, and press Shift+S to reveal the Position, Rotation, and Scale properties for the layer.
Pressing the Shift key as you press keyboard shortcuts lets you view multiple layer properties at the same time.
12. Change the Position values to –650, –1200, 0. Change the Orientation to 0, 0, 345. Change the Scale to 85%. Finally, select the Motion Blur switch for the Bolt layer, and then hide the layer’s properties.
![]() Note
Note
You may need to adjust the Position, Orientation, and Scale values, depending on how you drew the lightning bolt.
Next, you’ll use the same process to integrate the Drop composition.
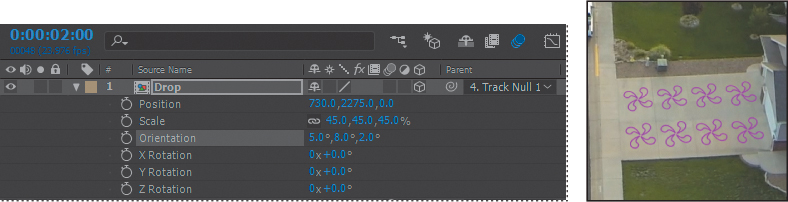
13. Go to 2:00 so you can see the driveway where this composition will be placed. Drag the Drop composition from the Project panel to the top of the stack in the Timeline panel, and select the 3D switch for the layer.
14. Select 4. Track Null 1 from the Parent menu for the Drop layer. Then press P, Shift+R, and Shift+S to reveal the Position, Rotation, and Scale properties.
15. Change the Position values to 730, 2275, 0; the Orientation values to 5, 8, 2; and the Scale to 45%. Then select the Motion Blur switch for the layer, and hide the layer’s properties.
You’ll place the Drop2 composition in the lower left driveway, visible as the camera begins to pan.
16. Go to the beginning of the time ruler. Drag the Drop2 composition from the Project panel to the top of the Timeline panel, select the 3D switch, and select 5. Track Null 1 from the Parent menu.
17. Press P, Shift+R, and Shift+S. Change the Position values to –1025, 3575, 0; the Orientation to 0, 352, 0; and the Scale to 35%. Select the Motion Blur switch for the layer, and hide the layer’s properties.

Finally, you’ll add the Checkerboard composition. You’ll need to scale it a little differently so that it fits into the driveway.
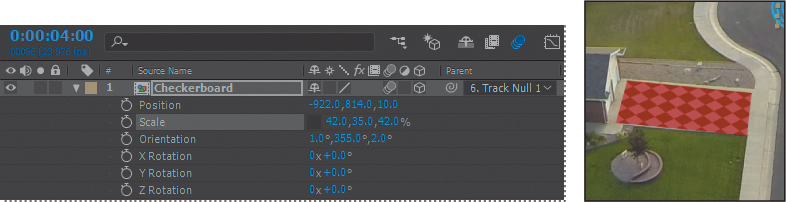
18. Go to 4:00 in the time ruler. Drag the Checkerboard composition from the Project panel to the top of the Timeline panel, select its 3D switch, and choose 6. Track Null 1 from the Parent menu.
19. Press P, Shift+R, and Shift+S. Change the Position values to –922, 814, 10 and the Orientation to 1, 355, 2. Then click the link icon for the Scale property to unlink the values, and change the values to 42%, 35%, 42%. Select the Motion Blur switch for the layer, and hide the layer’s properties.
Adding the finishing touches
The layers work pretty well with the underlying video, but they’ll blend more convincingly if you change the blending modes. You’ll also add the audio file.
1. Click the Toggle Switches/Modes button at the bottom of the Timeline panel.
2. Choose Multiply from the Mode menu for all the layers except the Checkerboard layer; choose Overlay for the Checkerboard layer. (You won’t be able to change the mode for the Spiral layer, because Collapse Transformations is selected.)
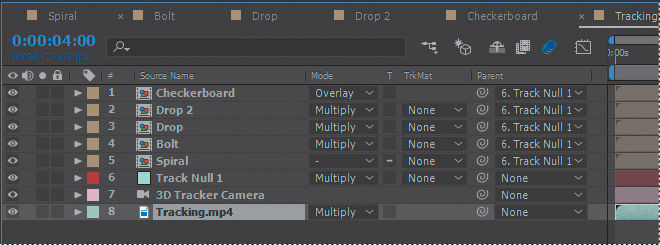
3. Drag the Melody.aif clip from the Project panel to the bottom of the layer stack in the Timeline panel.
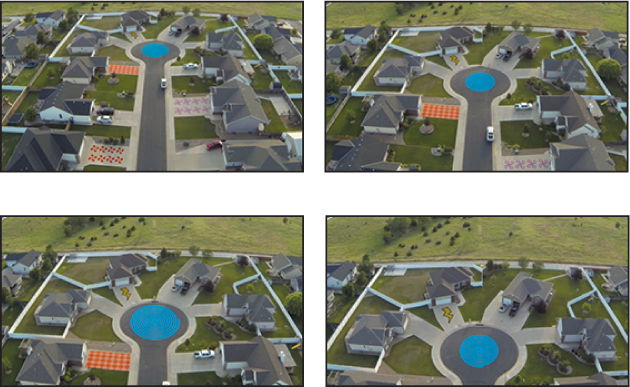
4. Press the spacebar to preview your creation! When you’re done previewing the project, save your work.
![]() Note
Note
Sound may not play back in realtime the first time through the preview. After all the frames have been buffered, it should play more smoothly.
Extra credit
Animating layers to match audio
Currently, the spiral shape turns in a slow circle. The movie will be more compelling if the size of the spiral is animated to match the beat of the music. You can scale the spiral in time with the amplitude of an audio file. First, you need to create keyframes from the audio information.
1. Select the Spiral composition in the Timeline panel. Drag the Beat.aif file from the Project panel into the Timeline panel, and place it beneath the Spiral layer.
2. Right-click or Control-click the Beat.aif layer, and choose Keyframe Assistant > Convert Audio To Keyframes.
After Effects adds the Audio Amplitude layer. The new layer is a null object layer, meaning it has no size or shape and won’t appear in a final render. Null objects let you parent layers or drive effects.
3. Select the Audio Amplitude layer, and press E to display the effects properties for the layer.
Three categories of effects properties are available for the layer: Left Channel, Right Channel, and Both Channels. You’ll work with the Both Channels category.
4. Expand the Both Channels category.
When you converted the audio to keyframes, After Effects created keyframes that specify the amplitude of the audio file in each frame of the layer. You’ll sync the scale of the spiral to those values.
5. Select the Spiral layer, and press S to reveal the Scale property for the layer.
6. Alt-click (Windows) or Option-click (Mac OS) the Scale stopwatch to add an expression. The words transform.scale appear in the time ruler for the layer.
7. With the transform.scale expression selected in the time ruler, click the pick whip icon (![]() ) on the Expression:Scale line, and drag it to the Slider property name in the Audio Amplitude layer.
) on the Expression:Scale line, and drag it to the Slider property name in the Audio Amplitude layer.
When you release the mouse, the pick whip snaps, and the expression in the shape layer time ruler now reads temp = thisComp.layer(“Audio Amplitude”).effect(“Both Channels”)(“Slider”); [temp, temp, temp]. (You may need to click the expression to see the full thing.) This expression means that the Scale values for the shape layer will depend on the Slider values of the Audio Amplitude layer.
Note
You’ll learn more about expressions in Lesson 6.
8. Choose Edit > Deselect All to deselect the layers. Then move the current-time indicator through the time ruler to see the spiral resize with the audio’s amplitude.
The scale definitely changes, but sometimes the spiral disappears. You’ll modify the expression so that the spiral remains visible.
9. In the time ruler, click the expression to make it active. Click an insertion point at the end of the first line, between the closing parentheses and the semicolon. Type +90, and then click an empty area of the Timeline panel to accept the change.
10. Preview the composition, and watch the spiral pulse to the beat of the audio file.
11. Return to the Tracking composition in the Timeline panel. Then press the spacebar, and watch the spiral pulse as the camera moves through the scene. Save your work.
Review questions
1. What is a shape layer, and how do you create one?
2. How can you quickly create multiple copies of a shape?
3. How can you snap one layer to another?
4. What does the Twist path operation do?
Review answers
1. A shape layer is simply a layer that contains a vector graphic called a shape. To create a shape layer, draw a shape directly in the Composition panel using any of the drawing tools or the Pen tool.
2. To quickly duplicate a shape multiple times, apply a Repeater operation to the shape layer. The Repeater path operation creates copies of all paths, strokes, and fills included in the layer.
3. To snap one layer to another in the Composition panel, select Snapping in the options section of the Tools panel. Then click next to the handle or point you want to use as a snapping feature, and drag the layer close to the point to which you want to align it. After Effects highlights the points to which it will align when you release the mouse button. Note that you cannot snap shape layers.
4. The Twist path operation rotates a path more sharply in the center than it does at the edges. Entering a positive value twists clockwise; entering a negative value twists counterclockwise.
All materials on the site are licensed Creative Commons Attribution-Sharealike 3.0 Unported CC BY-SA 3.0 & GNU Free Documentation License (GFDL)
If you are the copyright holder of any material contained on our site and intend to remove it, please contact our site administrator for approval.
© 2016-2026 All site design rights belong to S.Y.A.