Adobe After Effects CC Classroom in a Book (2017 release) (2017)
5. Animating a Multimedia Presentation
Lesson overview
In this lesson, you’ll learn how to do the following:
• Create a complex animation with multiple layers.
• Adjust the duration of a layer.
• Animate with Position, Scale, and Rotation keyframes.
• Use parenting to sync the animation of layers.
• Use Bezier curves to smooth a motion path.
• Animate a precomposed layer.
• Apply effects to a solid layer.
• Fade out audio.
![]()
This lesson will take about an hour to complete. Download the project files for this lesson, following the instructions in the Getting Started section under “Accessing the lesson files and Web Edition,” if you haven’t already done so. As you work on this lesson, you’ll preserve the start files. If you need to restore the start files, download them from your Account page.
Animation by Lee Daniels, www.leedanielsart.com
PROJECT: ANIMATED VIDEO
Adobe After Effects projects typically use a variety of imported footage, arranged in a composition, that is edited and animated using the Timeline panel. In this lesson, you’ll become more familiar with animation fundamentals as you build a multimedia presentation.
Getting started
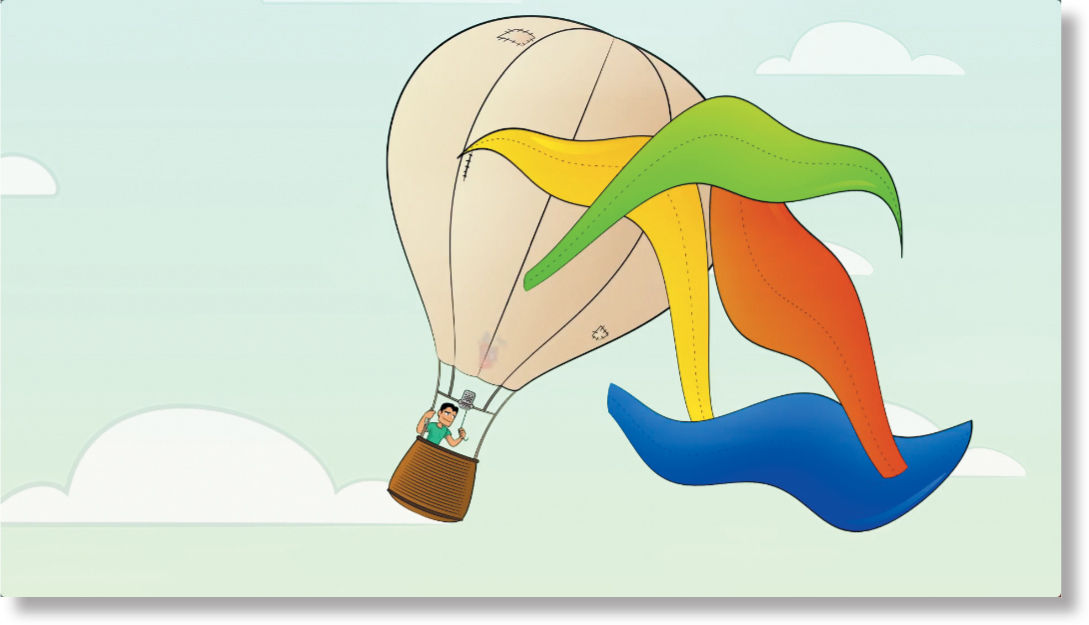
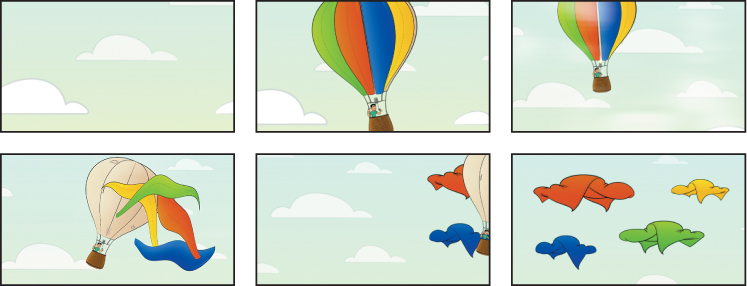
In this project, you will animate a hot air balloon floating through the sky. All seems peaceful until a gust of wind blows the balloon’s colorful canvas off to cover the clouds.
1. Make sure the following files are in the Lessons/Lesson05 folder on your hard disk, or download them from your Account page at www.peachpit.com now:
• In the Assets folder: Balloon.ai, Fire.mov, Sky.ai, Soundtrack.wav
• In the Sample_Movies folder: Lesson05.mov, Lesson05.avi
2. Open and play the Lesson05.avi sample movie in Windows Media Player or the Lesson05.mov sample movie in QuickTime Player to see what you will create in this lesson. When you are done, close Windows Media Player or QuickTime Player. You may delete the sample movies from your hard disk if you have limited storage space.
As you start After Effects, restore the default application settings. See “Restoring default preferences” on page 2.
3. Start After Effects, and then immediately hold down Ctrl+Alt+Shift (Windows) or Command+Option+Shift (Mac OS) to restore default preferences settings. When prompted, click OK to delete your preferences.
4. Close the Start window.
5. Choose File > Save As > Save As.
6. In the Save As dialog box, navigate to the Lessons/Lesson05/Finished_Project folder. Name the project Lesson05_Finished.aep, and then click Save.
Importing the footage
Next, you’ll import the footage you need for the project, including the balloon.ai composition.
1. Double-click an empty area of the Project panel to open the Import File dialog box.
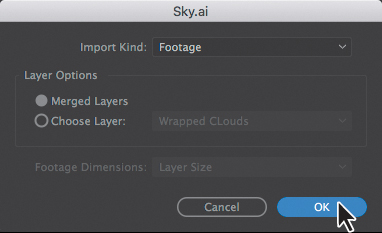
2. Navigate to the Lessons/Lesson05/Assets folder on your hard disk, and select the Sky.ai file.
3. Choose Footage from the Import As menu, and then click Import or Open.
4. In the Sky.ai dialog box, make sure Merged Layers is selected, and then click OK.
5. Double-click an empty area of the Project panel, navigate to the Lessons/Lesson05/Assets folder, and select the Balloon.ai file.
6. Choose Composition – Retain Layer Sizes from the Import As menu, and click Import or Open.
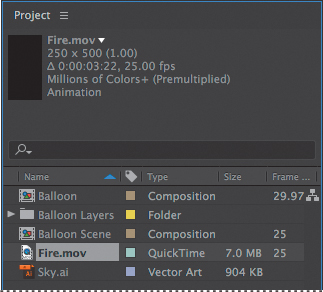
7. Press Ctrl+I (Windows) or Command+I (Mac OS) to open the Import File dialog box again.
8. Navigate to the Lessons/Lesson05/Assets folder, and select the Fire.mov file.
9. Make sure Footage is chosen in the Import As menu, and click Import or Open.
Using Creative Cloud Libraries in After Effects
Easily access images, videos, colors, and other assets you’ve created in After Effects and other Adobe applications. Through Creative Cloud Libraries, you can also use Looks, shapes, and other assets you create with Adobe Capture CC and other mobile apps.
Even Adobe Stock images and videos are available in the Libraries panel: Search and browse assets within the panel, download watermarked versions to see how they work with your projects, and license the ones you want to keep—all without leaving After Effects.
The same search bar you use to search Adobe Stock makes it easier to find specific items in your Creative Cloud Libraries, too.
To learn more about all the ways you can use Creative Cloud Libraries, see After Effects Help.
Creating the composition
You’ll create the composition and add the sky.
![]() Note
Note
If you change Pixel Aspect Ratio or Width settings, the Preset name may change to Custom in the Composition Settings panel.
1. Choose Composition > New Composition.
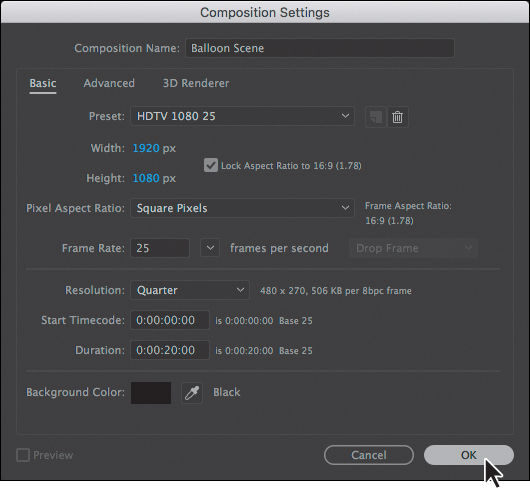
2. In the Composition Settings dialog box, do the following:
• Name the composition Balloon Scene.
• Choose HDTV 1080 25 from the Preset menu.
• Make sure Square Pixels is chosen from the Pixel Aspect Ratio menu.
• Make sure the Width is 1920 px.
• Choose Quarter for the Resolution.
• Set Duration to 20 seconds.
• Click OK.
3. Drag the Sky.ai footage item from the Project panel into the Timeline panel.
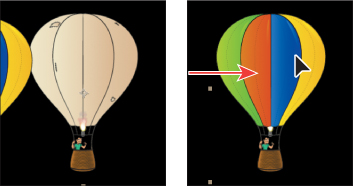
The balloon will float across the Sky.ai image. The far right of the image contains the canvas-wrapped clouds that appear at the end of the scene. The wrapped clouds shouldn’t be visible earlier in the movie.
4. In the Composition window, drag the Sky layer so that its lower left corner is even with the lower left corner of the composition.
Adjusting anchor points
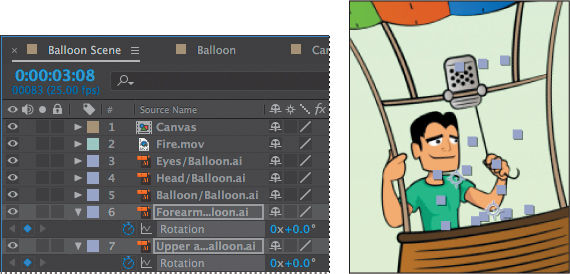
The anchor point is the point about which transformations, such as scaling or rotation, are performed. By default, a layer’s anchor point is at the center of the layer.
You’ll change the anchor points for the character’s arm and head so that you can better control the character’s movements as he tugs on the cord to ignite the fire, and as he looks up and down.
1. Double-click the Balloon composition in the Project panel to open it in the Composition panel and the Timeline panel.
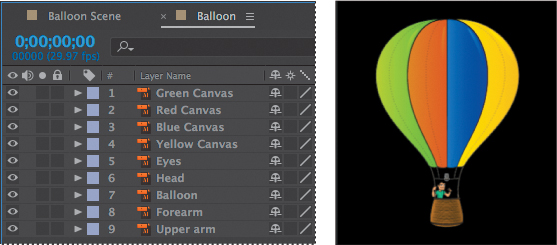
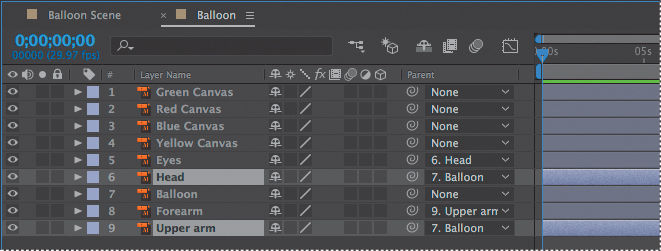
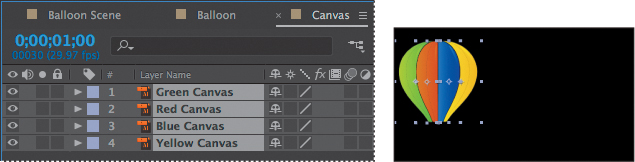
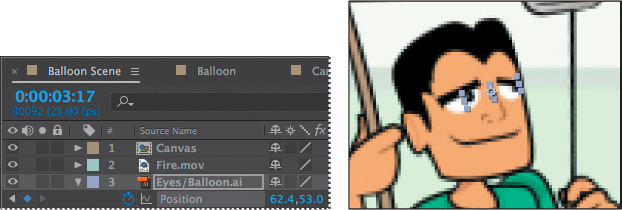
The Balloon composition includes layers for the canvas colors, the balloon itself, and the character’s eyes, head, forearm, and upper arm.
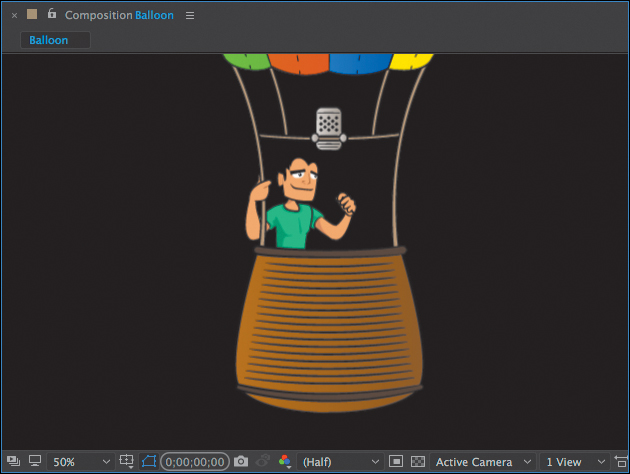
2. Choose 50% from the Magnification Ratio pop-up menu at the bottom of the Composition panel so you can see the balloon’s detail more clearly.
3. Select the Hand tool (![]() ) in the Tools panel, and then pan so that the character is centered in the Composition panel.
) in the Tools panel, and then pan so that the character is centered in the Composition panel.
4. Select the Selection tool (![]() ) in the Tools panel.
) in the Tools panel.
5. Select the Upper arm layer in the Timeline panel.
6. Select the Pan Behind tool (![]() ) in the Tools panel (or press Y to activate it).
) in the Tools panel (or press Y to activate it).
With the Pan Behind tool, you can move the anchor point without moving the entire layer in the Composition window.
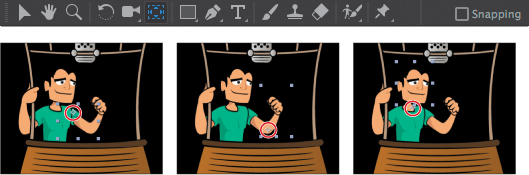
7. Move the anchor point to the character’s shoulder.
8. Select the Forearm layer in the Timeline panel, and then move its anchor point to the elbow.
9. Select the Head layer in the Timeline panel, and move its anchor point to the character’s neck.
10. Select the Selection tool in the Tools panel.
11. Choose File > Save to save your work so far.
Parenting layers
This composition includes several layers that need to move together. For example, as the balloon floats, the character’s arm and head should move along with it. As you’ve seen in previous lessons, a parenting relationship synchronizes changes in the parent layer with corresponding changes in the child layer. You’ll establish parenting relationships among the layers in this composition, and you’ll add the fire video as well.
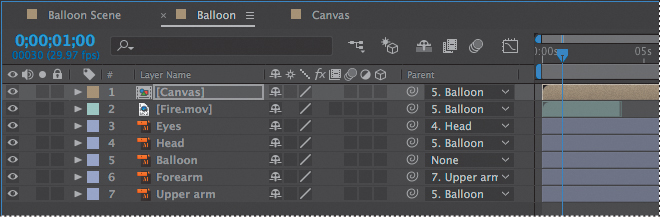
1. Deselect all layers in the Timeline panel, and then press Ctrl (Windows) or Command (Mac OS) as you select the Head and Upper arm layers.
2. In the Parent column for either of the selected layers, choose 7. Balloon from the pop-up menu.
This establishes both the Head and Upper arm layers as child layers of the Balloon layer. When the Balloon layer moves, the other two layers will move with it.
The eyes not only need to move with the balloon, they need to move with the head, so you’ll create that parenting relationship next.
3. In the Parent column for the Eyes layer, choose 6. Head from the pop-up menu.
The forearm should move with the upper arm as well.
4. In the Parent column for the Forearm layer, choose 9. Upper arm from the pop-up menu.
Now you need to ensure that the fire video travels with the balloon.
5. Drag the Fire.mov file from the Project panel to the Timeline panel, positioning it directly below the canvas layers so that the fire will appear to go inside the balloon, rather than outside it. (The Fire layer should be between the Yellow Canvas layer and the Eyes layer.)
The fire video is positioned in the center of the composition, so you’ll need to zoom out a bit to see it.
6. Choose 25% from the Magnification Ratio pop-up menu so that you can see the outline of the selected video.
7. In the Composition window, drag the fire video over the burner. To see the flame in action so you can position it correctly, drag the current-time marker across the first second of the time ruler.
8. When you’re satisfied with the Fire layer’s position, choose 8. Balloon from the pop-up menu in the Fire layer’s Parent column.

9. Choose File > Save to save your work so far.
Precomposing layers
Sometimes it’s easier to work with a set of layers in a composition. Precomposing layers moves them to a new composition, nested inside the original composition. You’ll precompose the canvas layers so that you can work with them separately when you animate them sailing off the balloon.
1. In the Balloon Timeline panel, Shift-click the Green Canvas and Yellow Canvas layers to select all four canvas layers.
2. Choose Layer > Pre-compose.
3. In the Pre-compose dialog box, name the composition Canvas, select Move All Attributes Into The New Composition, and click OK.
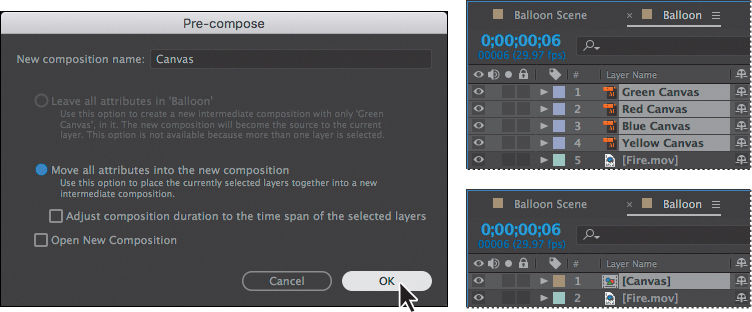
The four layers you selected in the Timeline panel are replaced by a single Canvas composition layer.
4. Double-click the Canvas layer in the Timeline panel to edit the composition.
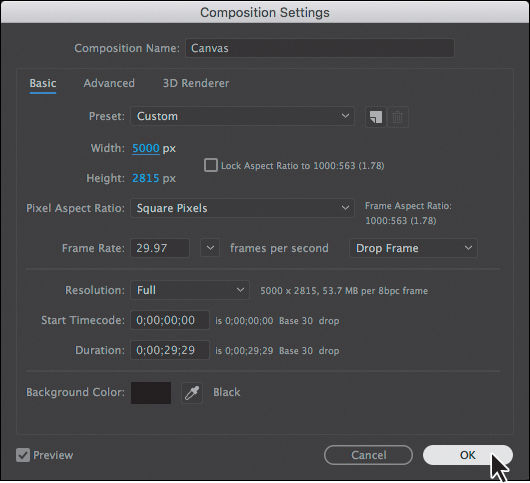
5. Choose Composition > Composition Settings.
6. In the Composition Settings dialog box, deselect Lock Aspect Ratio, change the Width value to 5000 px, and click OK.
7. Shift-select all four layers in the Timeline panel, and then drag them to the far left side of the Composition panel. You may need to change the magnification.
Increasing the width of the composition and then moving the canvas to the far left side will give you room to animate the canvas layers later.
8. Switch to the Balloon Timeline panel.
You moved the canvas to the far left side of the Canvas composition, revealing the uncovered balloon in the Balloon composition. At the beginning of the animation, though, the canvas should be on the balloon. You’ll reposition the Canvas layer.
9. Choose Fit from the Magnification Ratio pop-up menu in the Composition panel so you can see the full balloon.
10. Select the Canvas layer in the Timeline panel, and then drag the layer so that it covers the bare balloon in the Composition panel.
11. In the Parent column of the Canvas layer, choose 5. Balloon from the pop-up menu so that the canvas will follow the balloon.
Keyframing a motion path
Now that all the initial pieces are set up, you’re ready to animate the balloon and the character using position and rotation keyframes.
Copying layers into a composition
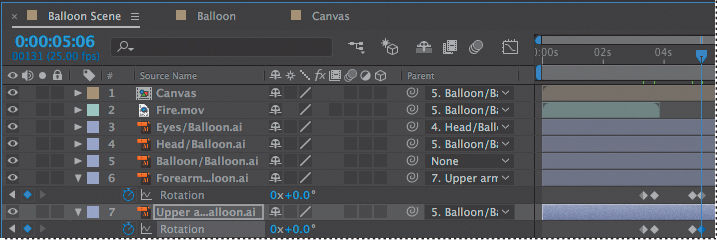
You’ve worked with the balloon, character, and fire layers in the Balloon composition. Now, you’ll copy those layers into the Balloon Scene composition.
1. In the Balloon Timeline panel, Shift-click the Canvas and Upper arm layers to select all the layers in the composition.
2. Press Ctrl+C (Windows) or Command+C (Mac OS) to copy all the layers.
3. Switch to the Balloon Scene Timeline panel.
4. Press Ctrl+V (Windows) or Command+V (Mac OS) to paste the layers.
5. Click an empty area in the Timeline panel to deselect all layers.

The layers appear in the same order they were when you copied them, and they retain all the properties they had in the Balloon composition, including parenting relationships.
Placing initial keyframes
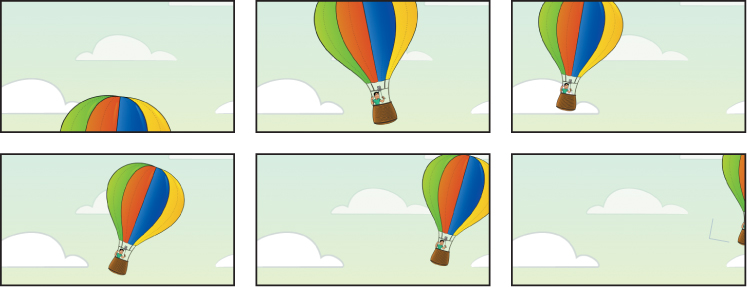
The balloon will enter the scene from the bottom, drift through the sky, and eventually depart from the upper right corner of the frame. You’ll keyframe the balloon’s starting and ending points first.
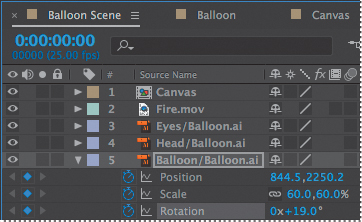
1. Select the Balloon/Balloon.ai layer, and press S to reveal its Scale property.
2. Press Shift+P to display its Position property, and then press Shift+R to display the Rotation property.
3. Change the Scale property to 60%.
The balloon and all of its child layers scale to 60%.
4. Choose 12.5% from the Magnification Ratio pop-up menu in the Composition panel so that you can see the pasteboard around the composition.
5. In the Composition panel, drag the balloon and its child layers offscreen, below the scene. (We used Position values 844.5, 2250.2.)
6. Drag the Rotation value to rotate the balloon so it tilts to the right. (We used 19 degrees.)
7. Click the stopwatch icons (![]() ) for the Position, Scale, and Rotation properties to create initial keyframes.
) for the Position, Scale, and Rotation properties to create initial keyframes.
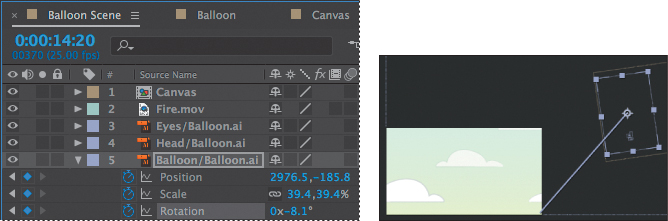
8. Go to 14:20.
9. Scale the balloon to about one-third its original size. We used 39.4%.
10. Drag the balloon off the upper right corner of the frame, tilted slightly to the left. We used the following values: Position 2976.5, –185.8; Rotation –8.1 degrees.
11. Move the current-time indicator across the timeline to see the animation so far.
Customizing a motion path
The balloon moves through the scene, but its path isn’t very interesting, and it isn’t onscreen long. You’ll customize the path between its starting point and end point. You can use the values we used or create your own path, as long as the balloon stays fully visible on the screen until a little after 11 seconds, and then slowly makes its way offscreen.
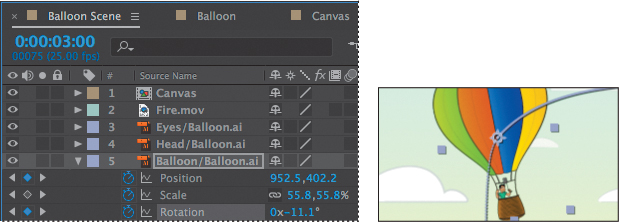
1. Go to 3:00.
2. Drag the balloon straight up so that the character and the basket are fully visible, and then rotate it slightly to the left. (We used Position: 952.5, 402.2; Rotation: –11.1 degrees.)
3. Go to 6:16.
4. Shift the balloon’s rotation the other direction. (We used 9.9 degrees.)
5. Move the balloon to the left side of the scene. (We used Position: 531.7, 404.)
6. Go to 7:20.
7. Change the scale to 39.4%.
8. Set additional Rotation keyframes to create swirling motions. If you’re using our values, do the following:
• At 8:23, change the Rotation value to –6.1.
• At 9:16, change the Rotation value to 22.1.
• At 10:16, change the Rotation value to –18.3.
• At 11:24, change the Rotation value to 11.9.
• At 14:19, change the Rotation value to –8.1.
9. Set additional Position keyframes to move the balloon. If you’re using our values, do the following:
• At 9:04, change the Position to 726.5, 356.2.
• At 10:12, change the Position to 1396.7, 537.1.
10. Press the spacebar key to preview the balloon’s current path, and then press the spacebar to stop the preview. Save your work so far.
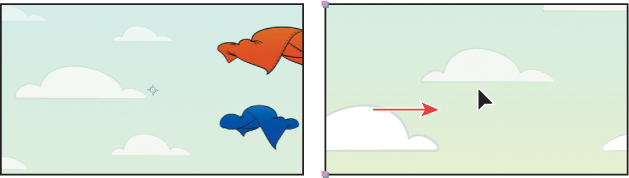
Using Bezier handles to smooth a motion path
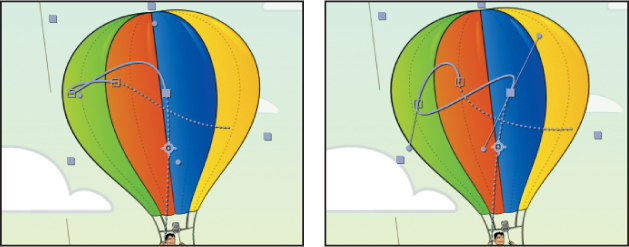
The basic path is in place, but you can smooth it out a bit. Each keyframe includes Bezier handles that you can adjust to change the angle of the curve. You’ll learn more about Bezier curves in Lesson 7.
1. Choose 50% from the Magnification Ratio pop-up menu in the Composition panel.
2. Make sure the Balloon/Balloon.ai layer is selected in the Timeline panel. Then move the current-time indicator to a position where you can clearly see the motion path in the Composition panel. (Between 4 and 6 seconds is probably good.)
3. Click a keyframe point in the Composition panel to reveal its Bezier handles, if they aren’t already shown.
4. Drag a Bezier handle to change the curve for that keyframe.
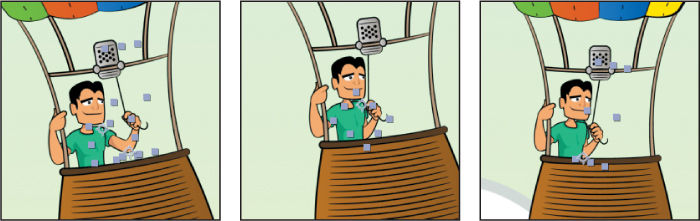
5. Continue to drag Bezier handles for the keyframe points until you achieve the path you want. Our final path is shown below in the image on the right.
6. Preview the balloon on the path by moving the current-time indicator across the time ruler. Make any adjustments you want. You can also make adjustments later, after you’ve animated the canvas and sky.
7. Hide the properties for the Balloon layer, and save your work so far.
Animating additional elements
The balloon swoops and swirls through the sky, and its child layers go with it. But the character is currently static in his balloon. You’ll animate his arm tugging on the cord to ignite the burner.
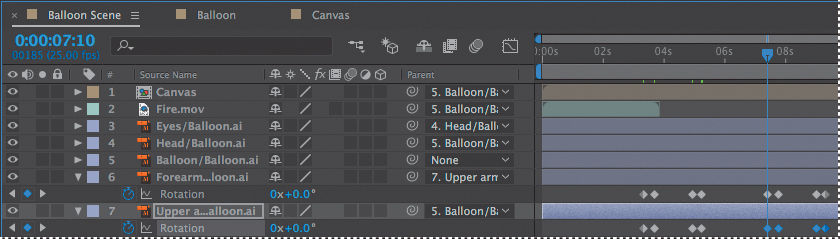
1. Go to 3:08.
2. Choose 100% from the Magnification Ratio pop-up menu in the Composition window so that you can see the character clearly. Use the Hand tool to adjust the image in the Composition window if you need to.
3. Shift-select the Forearm/Balloon.ai layer and the Upper arm/Balloon.ai layer.
4. Press R to reveal the Rotation property for both layers.
5. Click the stopwatch icon next to one of the Rotation properties to create an initial keyframe for each.
6. Go to 3:17, the point at which the character will tug the cord to ignite the burner.
7. Deselect the layers.
8. Change the Rotation property for the Forearm layer to –35 and the Rotation property for the Upper arm layer to 46.
The character tugs the cord down. You may need to deselect the layers so you can see the action clearly in the Composition window.
9. Go to 4:23.
10. Change the Rotation property for the Forearm layer to –32.8.
11. Click the Add Or Remove Keyframe At Current Time button (![]() ) to the left of the Rotation property for the Upper arm layer.
) to the left of the Rotation property for the Upper arm layer.
12. Go to 5:06.
13. Change the Rotation value for both layers to 0.
14. Deselect both layers, and then manually preview from 3:00 to 5:07 to see the character tug the cord. You may need to zoom out to see the animation.
Duplicating keyframes to repeat an animation
Now that you’ve created the initial movements, you can easily repeat them at different times in the timeline. You’ll duplicate the tugging arm, and then create corresponding head and eye movements.
1. Select the Rotation property for the Forearm layer to select all its keyframes.
2. Press Ctrl+C (Windows) or Command+C (Mac OS) to copy the keyframes.
3. Go to 7:10, the point at which the character tugs the cord again.
4. Press Ctrl+V (Windows) or Command+V (Mac OS) to paste the keyframes.
5. Repeat steps 1–4 to copy the Upper arm Rotation property keyframes.
6. Hide the properties for all layers.
7. Select the Head layer, and press R to reveal its Rotation property.
8. Go to 3:08, and click the stopwatch icon to create an initial keyframe.
9. Go to 3:17, and change the Rotation property to –10.3.
10. Go to 4:23, and click the Add Or Remove Keyframe At Current Time icon to add a keyframe at the current value.
11. Go to 5:06, and change the Rotation property to 0.
12. Select the Rotation property to select all of its keyframes, and press Ctrl+C (Windows) or Command+C (Mac OS) to copy them.
13. Go to 7:10, and press Ctrl+V (Windows) or Command+V (Mac OS) to paste them.
14. Press R to hide the Rotation property for the Head layer.
Now the character tilts his head up each time he tugs the cord. You’ll also animate the position of his eyes to create a subtle change each time he tilts his head.
15. Select the Eyes layer, and press P to reveal the Position property.
16. Go to 3:08, and click the stopwatch icon to create an initial keyframe at the current value (62, 55).
17. Go to 3:17, and change the Position value to 62.4, 53.
18. Go to 4:23, and create a keyframe at the current value.
19. Go to 5:06, and change the Position value to 62, 55.
20. Select the Position property to select all its keyframes, and then copy them.
21. Go to 7:10, and paste the keyframes.
22. Hide all layer properties, and then deselect all layers.
23. Choose Fit from the Magnification Ratio pop-up menu in the Composition window so that you can see the entire scene. Then preview the animation.

24. Save your work.
Positioning and duplicating a video
When the character tugs the cord, flame should emerge from the burner. You’ll use the four-second Fire.mov video to represent the flame each time the cord is tugged.
1. Go to 3:10.
2. Drag the Fire.mov video in the Timeline panel so that it starts at 3:10.
3. Select the Fire.mov layer, and choose Edit > Duplicate.
4. Go to 7:10.
5. Press the left bracket key ([) on your keyboard to move the In point of the duplicate Fire.mov layer to 7:10.

Applying an effect
Now that the balloon and character are taken care of, you’ll create the gust of wind that blows the canvas off the balloon. The Fractal Noise and Directional Blur effects will work well.
Adding a solid-color layer
You need to apply the effects on their own layer, which will be a solid-color layer. You’ll create a new composition for the layer.
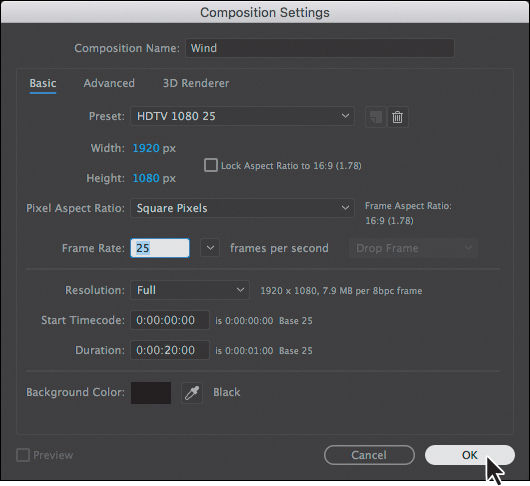
1. Press Ctrl+N (Windows) or Command+N (Mac OS) to create a new composition.
2. In the Composition Settings dialog box, do the following:
• Name the composition Wind.
• Make sure the width is 1920 px.
• Make sure the height is 1080 px.
• Make sure the duration is 20 seconds.
• Make sure the Frame Rate is 25 fps to match the Balloon Scene composition.
• Click OK.
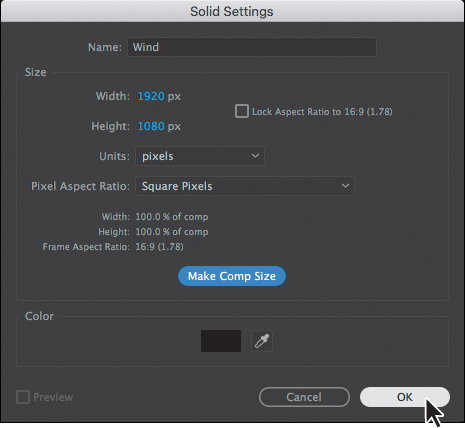
3. Right-click in the Timeline panel, and choose New > Solid.
4. In the Solid Settings dialog box, do the following:
• Name the layer Wind.
• Select black for the color.
• Click the Make Comp Size button.
• Click OK.
About solid-color layers
You can create solid images of any color or size (up to 30,000 x 30,000 pixels) in After Effects. After Effects treats solids as it does any other footage item: You can modify the mask, transform properties, and apply effects to a solid layer. If you change settings for a solid that is used by more than one layer, you can apply the changes to all layers that use the solid or to only the single occurrence of the solid. Use solid layers to color a background or to create simple graphic images.
Applying the effects
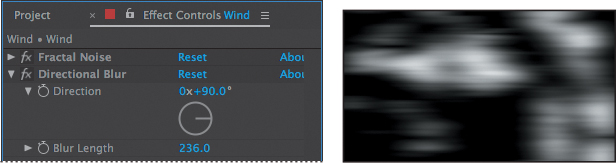
You’re ready to apply the effects to the solid layer. The Fractal Noise effect will create the gust of wind. The Directional Blur effect will create a blur in the direction the canvas flies.
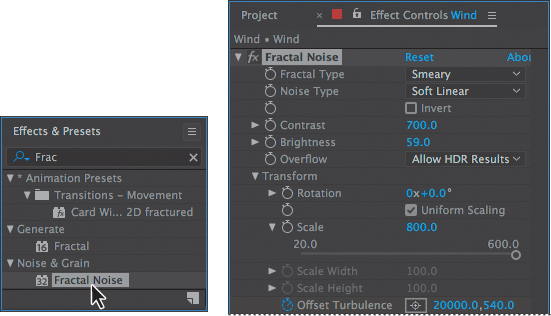
1. In the Effects & Presets panel, search for the Fractal Noise effect; it’s in the Noise & Grain category. Double-click the Fractal Noise effect to apply it.
2. In the Effect Controls panel, do the following:
• Choose Smeary for the Fractal Type.
• Choose Soft Linear for the Noise Type.
• Set the Contrast to 700.
• Set the Brightness to 59.
• Expand the Transform properties, and set the Scale to 800.
3. Click the stopwatch next to Offset Turbulence to create an initial keyframe at the beginning of the time ruler.
4. Go to 2:00, and change the x value for Offset Turbulence to 20,000 px.
5. Hide the Fractal Noise properties in the Effect Controls panel.
6. In the Effects & Presets panel, search for the Directional Blur effect, and then double-click it to apply it.
7. In the Effect Controls panel, set the Direction to 90 degrees and the Blur Length to 236.
You’ve created a sense of motion. Now you need to add the Wind composition to the Balloon Scene composition.
8. Switch to the Balloon Scene Timeline panel.
9. Click the Project tab, and then drag the Wind composition from the Project window into the Balloon Scene Timeline above all the other layers.
10. Go to 8:10, and then press the left bracket key ([) so that the Wind layer starts at 8:10.
Finally, you’ll apply a blending mode and adjust the opacity to make the effect of the wind more subtle.
11. Click Toggle Switches/Modes at the bottom of the Timeline panel to view the Mode column.
12. Choose Screen from the Wind layer’s Mode pop-up menu.
13. Press T to reveal the Opacity property for the Wind layer, and then click the stopwatch to create an initial keyframe at the beginning of the layer (8:10).
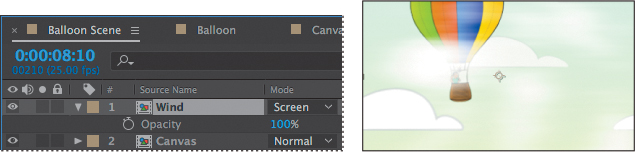
14. Go to 8:20, and change the opacity to 35%.
15. Go to 10:20, and change the opacity to 0%.
16. Press T to hide the Opacity property, and then save your work so far.
Animating precomposed layers
Earlier, you precomposed the four canvas layers, creating a composition called Canvas. You then positioned the Canvas composition layer to match the balloon, and parented the two. Now, you’ll animate the canvas layers so that they blow off the balloon when the gust of wind occurs.
1. Double-click the Canvas layer to open the Canvas composition in the Composition panel and the Timeline panel.
2. Go to 9:10, which is about a second after the wind effect begins.
3. Shift-select all four layers, and then press R to display their Rotation properties; press Shift+P to display the Position properties, too.
4. With all layers still selected, click the stopwatch icons for the Position and Rotation properties in one of the layers to create initial keyframes for all of them.
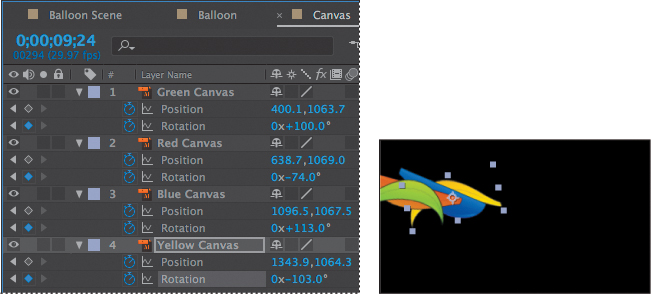
5. Go to 9:24.
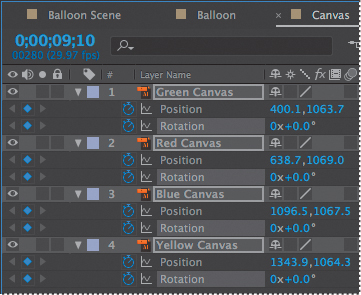
6. With all layers still selected, drag a Rotation value until the canvas is nearly horizontal (about 81 degrees). All four canvas layers become nearly horizontal.
7. Press F2 or click an empty area in the Timeline panel to deselect all areas so you can adjust their Rotation values separately.
8. Adjust each Rotation value, using positive and negative numbers so that there is some variation in their appearance. (We used these values: Green: +100, Red: –74, Blue: +113, Yellow: –103.)
9. Go to 10:12.
10. Move all the canvas layers off the screen to the right. Vary their motion paths to make them more interesting. You can add intermediate rotation and position keyframes (between 10:06 and 10:12), edit Bezier curves, or just drag the canvas layers off the edge. If you edit the Bezier curves, make changes only to the keyframes on the right side of the motion path (at 10:12) so you don’t disturb the original balloon formation.
11. Move the current-time indicator across the time ruler to preview the animation, and then make any adjustments you want.

12. Hide the properties for all layers, and save your work.
Adding an adjustment layer
You’ll add a warp effect to the canvas. You can use an adjustment layer to apply an effect to all the layers beneath it at once.
1. Click an empty area in the Timeline panel to deselect all layers.
2. Choose Layer > New > Adjustment Layer.
A new adjustment layer is automatically added to the top of the layer stack.
3. In the Effects & Presets panel, navigate to the Wave Warp effect in the Distort category, and then double-click the effect.
4. Go to 9:12.
5. In the Effect Controls panel, change Wave Height to 0 and Wave Width to 1. Then click the stopwatch icons to create initial keyframes for each of them.
6. Go to 9:16.
7. Change the Wave Height value to 90 and the Wave Width value to 478.
Trimming a layer
You don’t need the Wave Warp effect until the canvas flies off the balloon, but even if the values are 0, After Effects will have to calculate the effect for the entire layer. So you’ll trim the layer to speed up the time it takes to render the file.
1. Go to 9:12.
2. Press Alt+[ (Windows) or Option+[ (Mac OS) to set the In point to 9:12.
3. Return to the Balloon Scene Timeline panel.
4. Press the spacebar to preview the movie. Press the spacebar again to stop the preview.
5. Save your work so far.
![]() Note
Note
Press [ to move the In point of a clip without changing its duration. Press Alt+[ or Option+[ to trim a clip to a new In point, shortening its duration.
Animating the background
The movie should end with the revelation that the canvas from the balloons has been draped on the clouds. But right now, the canvas flies off and the balloon floats away. You need to animate the sky so that the canvas-covered clouds are centered at the end of the scene.
1. In the Balloon Scene Timeline panel, go to the beginning of the time ruler (0:00).
2. Select the Sky layer, and press P to display its Position property.
3. Click the stopwatch icon to create an initial keyframe.
4. Go to 16:00, and drag the Sky layer to the left until the wrapped clouds are in the center of the frame. (Our values are –236.4, 566.7.)
5. Go to 8:00, and move the wrapped clouds completely off the screen, far off to the right.
6. Right-click the first keyframe, and choose Keyframe Assistant > Easy Ease Out.
7. Right-click the middle keyframe, and choose Keyframe Assistant > Easy Ease, and then right-click the last keyframe, and choose Keyframe Assistant > Easy Ease In.
8. Move the current-time indicator through the time ruler to see how the departure of the canvas matches up with the appearance of the canvas-colored clouds. The canvas should be completely offscreen before the canvas-colored clouds appear.
9. Move the middle keyframe forward and backward in the time ruler to adjust the sky animation so that it matches the progress of the canvas and the balloon. The bare balloon should float in front of at least a few of the canvas-colored clouds before it disappears.
10. Press the spacebar to preview the entire video. Press the spacebar again to stop the preview.
11. Adjust the motion paths and rotations for the balloon, canvas pieces, or the sky as necessary.
12. Hide the properties for all layers, and save the project.
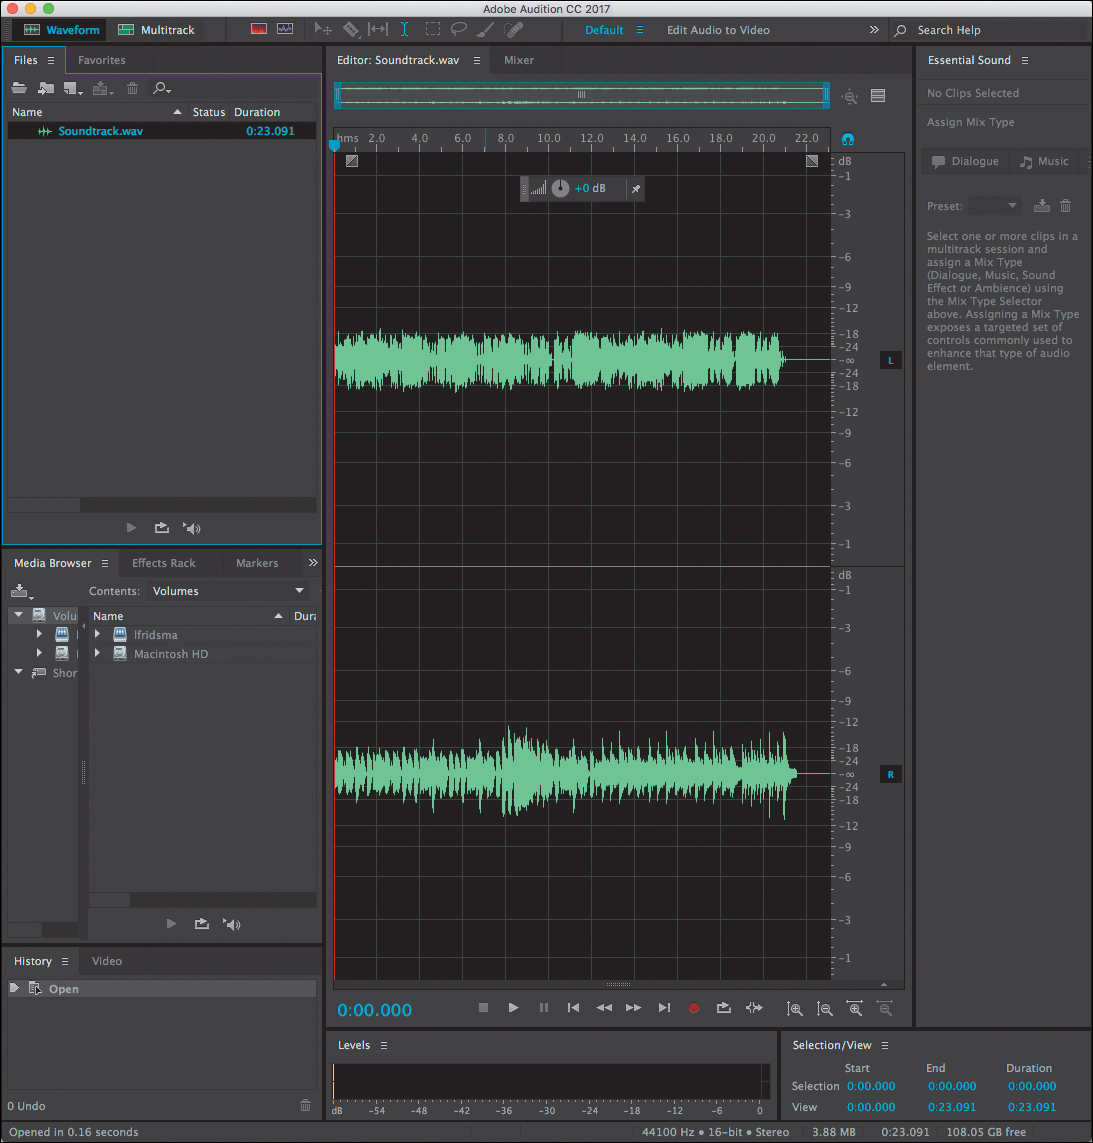
Adding an audio track
Give yourself a hand—you’ve done a lot of animating in this project. But you’re not quite done. You’ll add a soundtrack that matches the lighthearted mood of the video, and fade it out. You’ll also shorten the composition, since the last few seconds are static.
1. Click the Project tab to bring the Project panel forward. Then, double-click an empty area of the Project panel to open the Import File dialog box.
2. Navigate to the Lessons/Lesson05/Assets folder, and double-click the Soundtrack.wav file.
3. Drag the Soundtrack.wav item from the Project panel into the Balloon Scene Timeline panel, placing it at the bottom of the layer stack.
4. Preview the movie. The music changes just as the canvas flies off the balloon.
5. Go to 18:00, and press N to move the work area end point to the current time.
6. Choose Composition > Trim Comp to Work Area.
7. Go to 16:00. Expand the Soundtrack.wav layer and the Audio properties.
8. Click the stopwatch icon to create an initial keyframe for the Audio Levels value.
9. Go to 18:00, and change the Audio Levels value to –40 dB.
10. Preview the animation, and then save it.
Congratulations. You’ve just created a complex animation, practicing all kinds of After Effects techniques and capabilities along the way.
Supported audio file formats
You can import any of the following types of audio files into After Effects:
• Advanced Audio Coding (AAC, M4A)
• Audio Interchange File Format (AIF, AIFF)
• MP3 (MP3, MPEG, MPG, MPA, MPE)
• Waveform (WAV)
Editing audio files in Adobe Audition
You can make some very simple changes to audio in After Effects. For more substantial edits, use Adobe Audition. Audition is available with a full Adobe Creative Cloud membership.
You can use Audition to change the length of an audio file, alter its pitch, or change its tempo. You can apply effects, record new audio, mix multitrack sessions, and more.
To edit an audio clip you’ve used in After Effects, select the file in the Project panel, and choose Edit > Edit In Adobe Audition. Then, make your changes in Audition, and save the file. The changes you made are automatically reflected in your After Effects project.
Review questions
1. How does After Effects display an animation of the Position property?
2. What is a solid-color layer, and what can you do with it?
3. What types of audio can you import into an After Effects project?
Review answers
1. When you animate the Position property, After Effects displays the movement as a motion path. You can create a motion path for the position of the layer or for the anchor point of a layer. A position motion path appears in the Composition panel; an anchor-point motion path appears in the Layer panel. The motion path appears as a sequence of dots, where each dot marks the position of the layer at each frame. A box in the path marks the position of a keyframe.
2. You can create solid images of any color or size (up to 30,000 x 30,000 pixels) in After Effects. After Effects treats solids as it does any other footage item: You can modify the mask, transform properties, and apply effects to the solid layer. If you change settings for a solid that is used by more than one layer, you can apply the changes to all layers that use the solid or to only the single occurrence of the solid. Use solid layers to color a background or create simple graphic images.
3. You can import any of the following types of audio files into After Effects: Adobe Sound Document (ASND; multitrack files import as merged single track), Advanced Audio Coding (AAC, M4A), Audio Interchange File Format (AIF, AIFF), MP3 (MP3, MPEG, MPG, MPA, MPE), Video for Windows (AVI, WAV; requires QuickTime on Mac OS), and Waveform (WAV).