Adobe Creative Cloud Design Tools All-in-One For Dummies (2013)
Book III
Illustrator CC

 Discover how to create a circular border easily using the Rotate tool, and how to create perfectly even circular borders from your own custom shapes at www.dummies.com/extras/adobecreativeclouddesigntoolsaio.
Contents at a Glance
Chapter 1: What’s New in Illustrator CC
Chapter 2: Discovering Illustrator CC
Chapter 3: Using the Selection Tools
Chapter 4: Creating Basic Shapes
Chapter 5: Using the Pen Tool and Placing Images
Chapter 6: Using Type in Illustrator
Chapter 7: Organizing Your Illustrations
Chapter 8: Using Layers
Chapter 9: Livening Up Illustrations with Color
Chapter 10: Using the Transform and Distortion Tools
Chapter 11: Working with Transparency and Special Effects Tools
Chapter 12: Using Filters and Effects
Chapter 13: Using Your Illustrator Images
Chapter 1: What’s New in Illustrator CC
In This Chapter
![]() Working better with others
Working better with others
![]() Placing multiple files
Placing multiple files
![]() Packaging up your Illustrator artwork, links, and fonts
Packaging up your Illustrator artwork, links, and fonts
![]() Using Separations Preview
Using Separations Preview
![]() Working with the new Kuler panel
Working with the new Kuler panel
In this chapter, present Illustrator users can discover some of the great new features in Illustrator CC. If you are a new user, you can skip this chapter and move right into Chapter 2, “Discovering Illustrator CC,” and return to this one after you feel more comfortable using Adobe Illustrator.
Illustrator CC has added some timesaving features that are especially important to production artists and designers working within a group environment. You can now package up your artwork, unembed images, place multiple files, see more images about links, and much more.
There are many additional new features, tweaks, and improvements that have been added to Illustrator CC, but many of them are best explained within the context of how they are used. Read the rest of the illustrator minibook to discover additional new features as they apply to the content we discuss in each chapter.
New Features for Placing Images
In Illustrator CC many features that are related to the incorporation of images from other (non-Illustrator) file formats. Before diving in to the new features, it is wise to make sure that you understand how to import, or place, images into Illustrator.
Using File⇒Place, you can place a file into Illustrator. Illustrator supports more than 20 file formats, the most popular of which are native Photoshop images (PSD), EPS, JPEG, PNG, TIFF, AutoCAD (dxf, dwg), and other Illustrator files (AI). This capability is hardly new, but what is new is the fact that you can now choose to place multiple images at once.
To see how to place multiple images, as well as to learn how to use a few other new features related to placing images in Illustrator CC, follow these steps. If you don't have at least two image files that you would like to place, go to www.agitraining.com/dummies to find random images that you can use.
1. In Illustrator CC, choose File⇒New to create a new blank file. In the New Document dialog box, simply choose the Basic RGB profile from the Profiles drop-down menu and press OK.
2. Choose File⇒Place.
The Place dialog box appears.
3. Navigate to the folder that contains your images and then select your images. For this example, simply select the Pictures folder and then hold down the Ctrl (Windows) or ![]() (Mac) key and select two or more images to place.
(Mac) key and select two or more images to place.
 If you hold down the Shift key while selecting one image and then, while still holding down the Shift key, select another image, you will select those two files and all files that are between the two in the Place dialog box.
4. Hold down the Shift key to select consecutive images, or the Ctrl (Windows) or ![]() (Mac) keys to select nonconsecutive files. Do not click Place just yet!
(Mac) keys to select nonconsecutive files. Do not click Place just yet!
 Note that in your Place dialog box, you have an option to check or uncheck a Link check box. It is important for you to understand what this option means and how the selection affects your file. See the nearby sidebar To Link or not to link.
5. Make sure that Link is NOT checked, as you see in Figure 1-1, and then press Place. If you see a Profile Mismatch, or Paste Profile warning, simply leave the window at its default settings and press OK.
After pressing Place, a loader cursor appears with an indication of how many images you have placed, and the total to be placed, as you see in Figure 1-2. Each time you click the artboard, one of your image files is placed.
6. Click the artboard to place your images.
You can press the Esc key to skip the placement of a file and move on to the next.
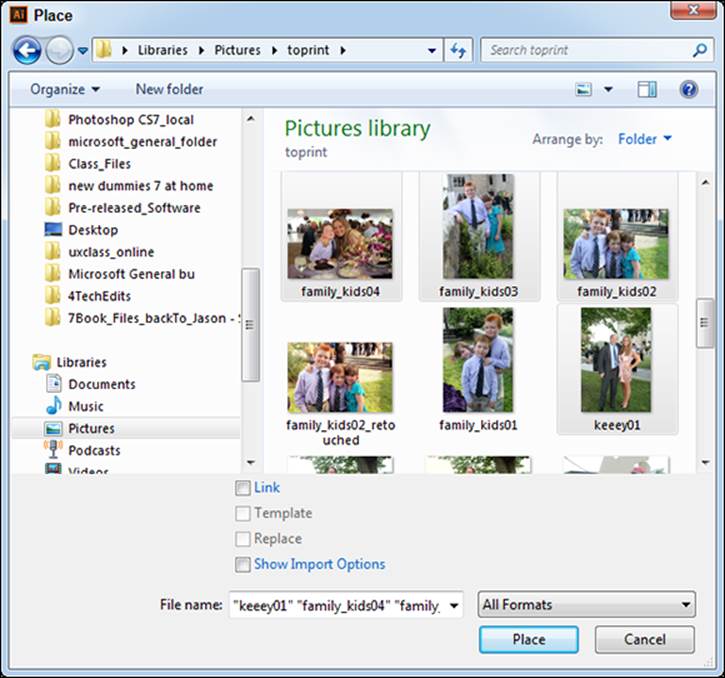
Figure 1-1: You can now select multiple images to place in Illustrator.

Figure 1-2: Placing multiple files onto the artboard.
To link or not to link
If the Link check box is checked, it means that your placed file is still needed. If you were to delete or move the original file that you placed, you would cause an error in your Illustrator file. A linked file displays a preview of the image file that you placed so that you can trace, crop, resize, and make other modifications to your image in Illustrator. By selecting Link, you can keep your Illustrator file much smaller in size and easily edit and update the original placed file at any time.
If Linked is unchecked, images are embedded into the Illustrator file. This means that the original file is now included in the Illustrator file and no longer needs to be referenced. This is a wise choice if you tend to move your files around quite a bit.
When your images are placed on your artboard, you can retrieve additional information about them in the Links panel. To do so, follow these steps:
1. Choose Window⇒Links to see the Links panel, where you can find the images that you placed.
2. Select any one of the images. Double-click it to see the additional details you can now access in Adobe Illustrator.
In addition to the basic icons to Relink, Go to Link, Update Link, and Edit Original, you see the following information, shown in Figure 1-3:
• Name: Displays the name of the linked file.
• Format: Displays the file type of the linked file and type of linking (Linked or Embedded).
• Color Space: Displays the color space and color profile of the linked file. It is blank for embedded files.
• Location: Displays the folder location of the linked file.
• PPI: Displays the effective PPI of the linked file.
• Dimensions: Displays the original dimensions of the linked file. This value does not change, even if you transform the linked file.
• Scale: Displays the artwork’s values for scale and rotation.
• Size: Displays the size of the file in bytes and kilobytes.
• Created: Displays the date the file was created.
• Modified: Displays the date the file was most recently modified.
• Transparent: Displays if the image contains an alpha transparency.
• Navigation: Click the Next or Previous arrow to view information for other linked files.
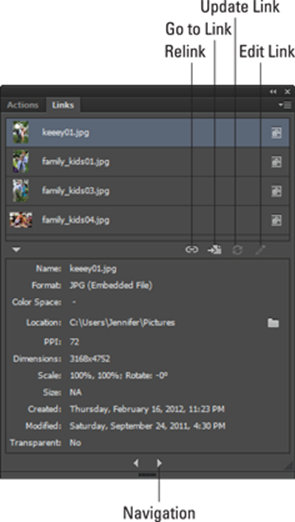
Figure 1-3: The improved Links panel offers additional information about your imported files.
Unembedding an Image
Now that you understand that a file becomes embedded when the Link option is unchecked — and if not, see the nearby sidebar To link or not to link — you can make sense of the new Unembed feature available in Illustrator CC. To use it, follow these steps:
1. Select one of your images in the Links panel and then, from the Links panel menu, select Unembed, as shown in Figure 1-4.
The Unembed dialog box appears.
2. In the Unembed dialog box, choose a location in which to save this file once it is unembedded.
Once a file is unembedded, it is converted to a Link file. You can tell a linked file from an embedded file because the linked file won’t have an icon to the right of it in the Links panel, as shown in Figure 1-5.
At any time you can also choose Embed from the Links panel menu if you want to embed a linked file.
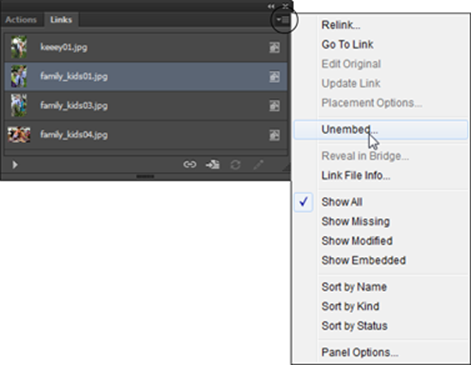
Figure 1-4: Select Unembed from the Links panel menu.
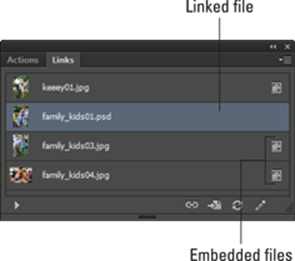
Figure 1-5: The newly unembedded file becomes a linked file.
3. You can close this file without saving it.
Packaging Your Illustrator File
If you work in production, you know the problems that can occur if you relocate an Illustrator file and neglect to include the associated linked images and fonts. You encounter similar problems if you receive a file and the images and fonts are not sent along. Now in Illustrator CC, you have several new link features that help you to keep track of linked artwork and fonts.
If you have ever experienced the process of manually locating the linked images and fonts you used in your Illustrator artwork, you’ll appreciate the new Package feature.
To try out this feature, follow these steps:
1. Open a file that includes at least one line of text and one image. If you do not have a file, you can find the example at www.agitraining.com/dummies.
2. If you have not done this already, choose File⇒Save and browse to save this file to a convenient location. You can leave the default settings as they are in the Save dialog box.
3. Choose File⇒Package.
The Package dialog box appears, as you see in Figure 1-6.
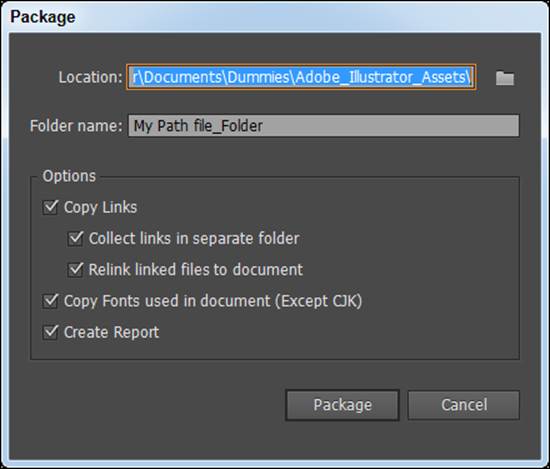
Figure 1-6: Use the Package feature to collect links and fonts.
In the Package dialog box, you can do the following:
• Choose a location to save the packaged file, fonts, and images.
• Select options that allow you to collect linked files as well as fonts and put them in the folder along with a copy of the Illustrator file.
4. Choose a save location and provide an appropriate folder name.
5. Leave all options selected and press Package. If you receive a warning about fonts, read it, and then click OK.
Your file has now been copied to the folder you indicated. That folder includes any linked images and fonts.
6. Close your sample file.
Improvements in Color Features
There have been several new features to help those who build illustrations with color in Illustrator. In this section you discover the following new features:
![]() Kuler
Kuler
![]() The Separations Preview panel
The Separations Preview panel
![]() Enhanced find color
Enhanced find color
![]() Color by proxy
Color by proxy
Discovering the improved Kuler panel
 If you like using color in your illustrations, you’ll love being able to save combinations of colors as themes. You can do this by accessing the Kuler website directly from Adobe Illustrator. To do so, follow these steps:
To follow along with these steps, first create a new document to take advantage of some existing color themes from the Kuler website.
1. Choose File⇒New and select Devices for Basic RGB for the Profile.
If you don’t see the Kuler panel, choose Window⇒Kuler now. Note that the panel will most likely be empty, unless you have previously used the Kuler website with an Adobe log in.
2. Click the Launch Kuler Website button as shown in Figure 1-7.
The website kuler.adobe.com launches.
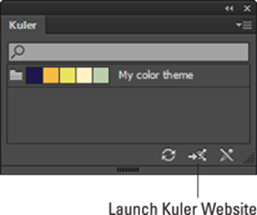
Figure 1-7: Select the Launch Kuler website button.
3. Sign in using your Adobe ID in the upper-right corner.
After you are signed in, you can save, edit, and create color themes.
4. Select Most Popular in the column on the left to see the themes that have been downloaded the most. The most popular themes populate the column to the right. (See Figure 1-8.)
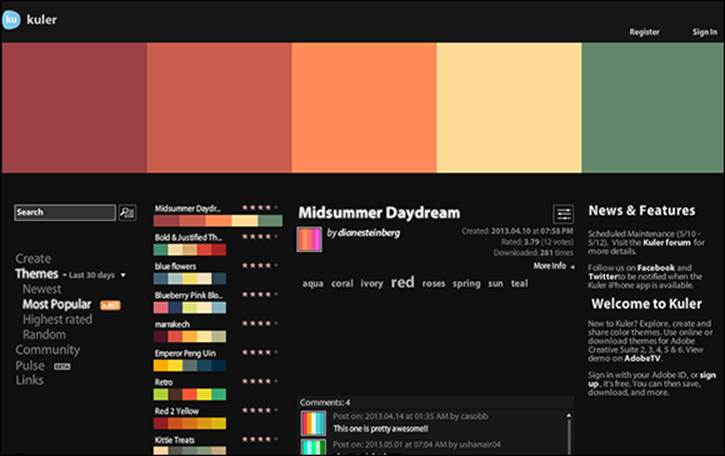
Figure 1-8: Select Most Popular to see the most popular themes.
Keep in mind that you can use the Search text field to search existing color themes as well. Themes can be found by creator, keyword, and title.
5. Select any one of the Most Popular themes and note that you now have these options: Add to Favorites, Download the theme as an Adobe Swatch Exchange file, or Make Changes to This Theme and View Color Values, as shown in Figure 1-9. For this lesson, choose Make Changes to This Theme and View Color Values.
A window appears in which you can select each color and edit its values. For this lesson, you’ll make a simple change to one of your color values. You can experiment more with the Kuler website on your own, after you have a better idea of how to use it.
You can also select Create from the column on the left to create your own color theme from scratch.
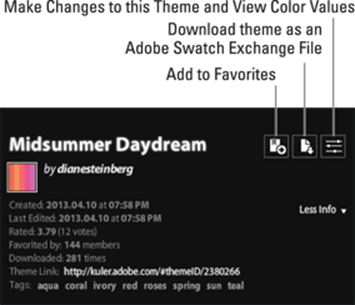
Figure 1-9: Select any theme to see these options.
6. Select any color and then use the color sliders beneath it to change the value.
7. Add a name to the Title text field. In this example My Dummies Color Theme was used as the name, as shown in Figure 1-10, but you can name your color theme anything you like. Press Save.
This color theme has been saved under your account. You will now return to Adobe Illustrator to access it.
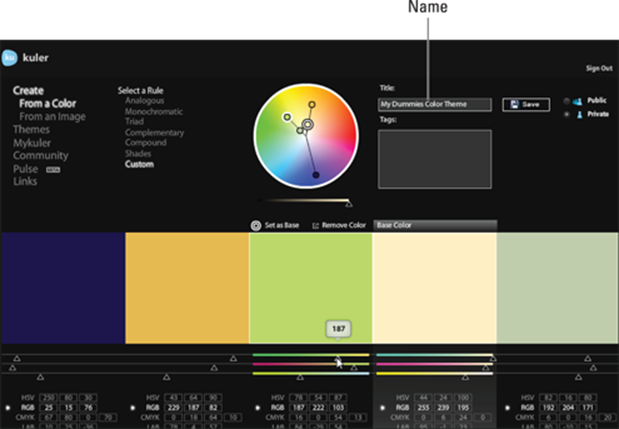
Figure 1-10: Change the color values of any one of the color swatches and save the theme.
8. Return to Adobe Illustrator and locate the Kuler panel.
9. Click the Refresh (RefreshKuler.png) button.
Your color theme appears, as shown in Figure 1-11.
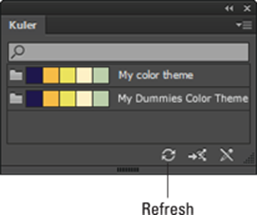
Figure 1-11: Click Refresh to see your own color themes in Illustrator.
10. Select the Panel menu in the upper-right corner to Add to Swatches.
You can now use your color theme in your own graphics.
This is just an introduction to using Kuler, which offers many other capabilities you will want to explore on your own.
Using the Separations Preview panel
If you work with color illustrations and graphics that are to be professionally printed, take note of the new Separations Preview panel. (See Figure 1-12.) The Separations Preview panel displays process and spot colors. By using the panel, you can now tell if your colors are created for 4-color process (CMYK) or are built for in RGB.
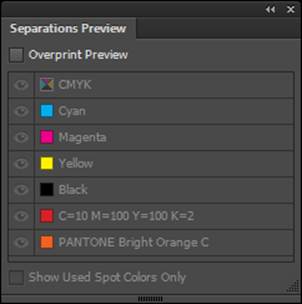
Figure 1-12: You can now see if your colors are spot or process more easily.
To discover color fundamentals about spot and process colors in Illustrator CC, see Chapter 9, “Livening up Illustrations with Color.”
Guides Enhancements
If you are a precision designer, you have been dragging guides out of the ruler to help you create your graphics. In Illustrator CC, four new enhancements have been added to guides. To test these, first choose View⇒Rulers, if your rulers are not visible. You can also press Ctrl+R (Windows) or ![]() +R (Mac) to turn on or off the visibility of your rulers, then note the following:
+R (Mac) to turn on or off the visibility of your rulers, then note the following:
![]() Double-clicking the ruler creates a guide at that specific location on the ruler.
Double-clicking the ruler creates a guide at that specific location on the ruler.
![]() When you hold Shift and then double-click a specific location on a ruler, the guide created at the point automatically snaps to the closest mark (division) on the ruler.
When you hold Shift and then double-click a specific location on a ruler, the guide created at the point automatically snaps to the closest mark (division) on the ruler.
![]() If you hide guides, by using Ctrl+; (semi-colon) or
If you hide guides, by using Ctrl+; (semi-colon) or ![]() +; (semi-colon) (Ctrl/
+; (semi-colon) (Ctrl/![]() + ;) and then choose to show them, the guides are not locked automatically.
+ ;) and then choose to show them, the guides are not locked automatically.
![]() You can also create horizontal and vertical guides in one action by following these steps:
You can also create horizontal and vertical guides in one action by following these steps:
1. At the top-left corner of the Illustrator window, left-click the intersection of the Rulers, as shown in Figure 1-13.
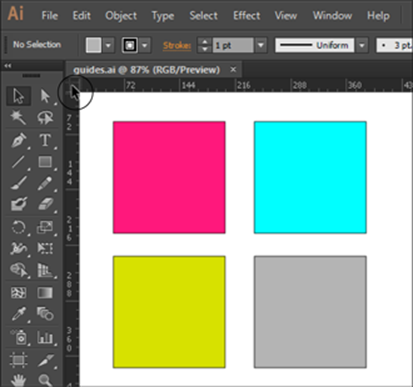
Figure 1-13: Click in the upper-left hand corner of the ruler.
2. Press Ctrl (or ![]() on a Mac), and drag the mouse to any location in the Illustrator window.
on a Mac), and drag the mouse to any location in the Illustrator window.
The mouse pointer becomes cross hairs to indicate where a horizontal and vertical guide can be created, as you see in Figure 1-14.
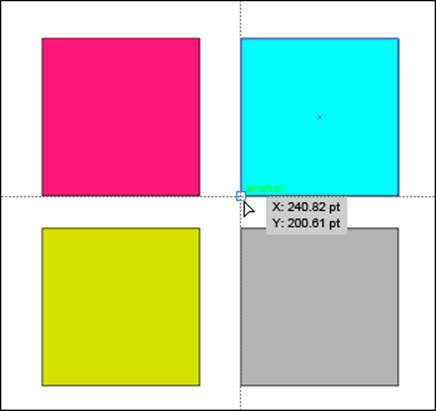
Figure 1-14: The mouse pointer shows cross hairs.
3. Release the mouse, and horizontal and vertical guides are automatically created, as shown in Figure 1-15.
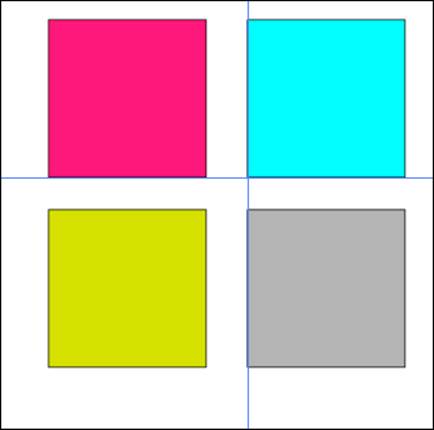
Figure 1-15: The guides are auto-matically created.
All materials on the site are licensed Creative Commons Attribution-Sharealike 3.0 Unported CC BY-SA 3.0 & GNU Free Documentation License (GFDL)
If you are the copyright holder of any material contained on our site and intend to remove it, please contact our site administrator for approval.
© 2016-2026 All site design rights belong to S.Y.A.