Adobe Creative Suite 6 Design and Web Premium All-in-One For Dummies (2012)
Book II
InDesign CS6
Chapter 7: Exporting to PDF, Flash, and Printing
In This Chapter
![]() Checking (preflighting) documents
Checking (preflighting) documents
![]() Packaging documents for delivery
Packaging documents for delivery
![]() Understanding file formats
Understanding file formats
![]() Exporting to different file formats
Exporting to different file formats
![]() Printing documents
Printing documents
In addition to printing, you can also export InDesign documents into several different kinds of file formats. In this chapter, we take a closer look at the preparations for delivering a file to a print vendor as well as many of the different kinds of files you can create electronically from an InDesign document. (We cover HTML, ePub, and digital document export in the next chapter.) Before you print a document, it’s good to make sure you have everything you need, so we start by looking at the preflight option.
Preflight: Preparing Your Documents for Printing
The Preflight feature in InDesign helps confirm that everything you need to print your document is ready and available. It also provides information about the document you’re printing, such as listing its fonts, print settings, and inks used. Using Preflight can help you determine whether your InDesign document has unlinked images or missing fonts before printing it. Here’s how to use the preflight option:
1. Choose Window⇒Output⇒Preflight.
The Preflight panel opens. The Summary screen shows you all current images and fonts in the document, based on an analysis of that document.
2. Make sure the On check box is selected and the Profile is set to [Basic] (working).
These settings provide a basic preflight of the document, confirming that all images and fonts are available for printing, and that nothing unusual exists in the color that might cause common printing errors.
3. If any errors are noted in the document, click the page number listed to the right of the error in the preflight window to view the error.
Common errors, such as missing fonts and overset text (text that doesn’t fit completely into a text frame) are all listed in the Preflight panel, and can generally be corrected easily with a little time. It’s much better to fix errors before you print them!
 When the preflight option is turned on, a small green or red circle appears along the bottom left corner of the document window. Green indicates that the document is preflighted and no errors are reported, whereas red indicates a possible error. You can simply click the circle along the bottom-left corner of the document window to open the Preflight panel and investigate any possible errors.
Packaging Your Documents
If you need to deliver your documents to a print service provider or to another designer, you’ll want to give them everything they need to continue working on the InDesign file. This is where the Package command is helpful. Package gathers copies of all images and fonts used in the document along with a copy of the InDesign document itself into a single folder that you can easily deliver to a print service provider or to a colleague. You can even use this option to archive completed jobs, to make sure that all necessary elements are stored together. Here’s how:
1. Choose File⇒Package.
The Package dialog box opens. The Summary screen shows you all current images and fonts in the document, based on an analysis of that document.
2. Click Fonts in the list on the left side of the dialog box.
Any fonts in your document are listed on this screen. Select fonts from this list and click the Find Font button to discover where they’re located. These fonts are saved directly into the package folder when you finish.
3. Click Links and Images in the list on the left side of the dialog box.
The Links and Images screen lists the images within your document. Find the image, update it, and repair links before packing the file. If any images aren’t properly linked, your document is incomplete and prints with pictures missing.
4. When you’re finished, click the Package button at the bottom of the dialog box.
Your document and all its associated files are saved into a folder. You’re given the opportunity to name the folder and specify a location on your hard drive.
If you’re taking a file to a professional print service provider, you can give them your original InDesign document or you can create a high-quality PDF file suitable for printing. It’s a good idea to ask your print service provider about the file type they prefer to receive. By providing an InDesign file, you give them a chance to fine-tune the document before printing, and if you provide a PDF, the document has limited capabilities for editing. Different print vendors prefer to receive different file types.
Understanding File Formats
The kind of file you decide to create by exporting depends on your needs. The first thing to determine is where you’ll use the exported file. For example, you might need to
![]() Put an image of your InDesign document or page on the web
Put an image of your InDesign document or page on the web
![]() Send an entire document to someone who doesn’t have InDesign but wants to receive it by e-mail
Send an entire document to someone who doesn’t have InDesign but wants to receive it by e-mail
![]() Import the content into a different program, such as Macromedia Flash or Adobe Illustrator
Import the content into a different program, such as Macromedia Flash or Adobe Illustrator
![]() Take a particular kind of file somewhere else to print it
Take a particular kind of file somewhere else to print it
Exporting InDesign documents lets you make them “portable” so that they can be used in different ways — such as on the web or in another program. You can choose from the many file formats InDesign supports, and you can control many settings related to the files you create.
Some of the file formats you can create from InDesign are listed in Table 7-1.
Table 7-1 File Formats
|
File Format |
Description |
|
JPEG (Joint Photographic Experts Group), PNG (Portable Network Graphics) |
Either of these commonly used formats for compressed images is a good choice for creating a picture of an InDesign page to post on a website. This is only a picture and is good for something like a thumbnail image representing a document. Don’t use this if you want someone to actually read the InDesign file on the web — for that you’ll want to export to HTML or PDF. This is simply a picture preview of what a document page looks like. |
|
EPS (Encapsulated PostScript) |
A self-contained image file that contains high-resolution printing information about all the text and graphics used on a page. This format is commonly used for high-quality printing when you need to have an image of an InDesign page used within another document — such as a picture of a book cover created with InDesign that needs to appear in a promotional catalog — so that you can use an EPS of the book cover in your layout. |
|
XML (Extensible Markup Language) |
Lets you separate the content from the layout so that all the content on a page can be repurposed and used in different ways — online or in print. Corporations commonly use XML for storing their product data when they have a large amount of information — such as thousands of items in a catalog. |
|
FLA and SWF |
Use the FLA (Flash) file format if you want to take your InDesign document into Flash, add interactivity to it, and continue to edit the document. Use the SWF (ShockWave Flash) format to deliver the PDF for viewing in a web browser as an SWF file for viewing (but not editing). Note that many web browsers no longer support the SWF file format, so use this option only if you are certain the recipient is able to view the file. |
|
PDF (Portable Document Format) |
Used to exchange documents with users on different computer systems and operating systems. This format is used extensively for distributing files such as e-books and brochures. You may need to distribute the file to a wide audience or to a service provider for printing. Anyone who has installed Adobe Reader (also known as Acrobat Reader) on a computer can view your document. You can export PDFs designed for printing by selecting PDF (Print). Select PDF (Interactive) if your PDF contains hyperlinks or movies and will be distributed on-line instead of being printed. |
|
Rich or Plain text (text files) |
Can include formatting (Rich) or plain text only (Plain). A text file is a simple way to export content. If you need the text from your document only to incorporate or send elsewhere, you can export it as plain (Text Only), tagged, or rich text. If you need to send a document to someone who doesn’t have InDesign, exporting it as text may be a good option. |
|
EPUB |
Use the ePub file format to create electronic books that can be read using an electronic book reader, including devices such as the nook or iPad, or using any eBook reader software. With additional conversion, this file can also be read on the Amazon Kindle. |
|
HTML |
Use the HTML file format to export a document as HTML (HyperText Markup Language), which is the language used by web browsers. Documents exported using this option typically require some HTML editing for formatting and design, which you can do using Adobe Dreamweaver. |
|
IDML |
Use the InDesign Markup Language option to export InDesign documents in a format that can be read by earlier versions of InDesign. For example, if you have a colleague using InDesign CS5 and you want to provide them with your document, but you are using InDesign CS6, export the document using the IDML option and they will be able to open it. If you simply save the file, the older version of InDesign is not able to open the document. |
 JPEG, PDF, and EPS files can be exported from InDesign and then imported into other software programs. You can export these images for use in print after they’re imported into a different graphics program, or you can use the images on the web. It all depends on how you set up the document for export and the settings you use.
After determining in which file format to export your file, take a look at how to export these files and the different kinds of settings you can control when doing so. The rest of this chapter shows you how to export different file types from InDesign.
Exporting Publications
You can export publications from the Export dialog box. After you open it by choosing File⇒Export, you can choose the file format, name, and location. After specifying a name and location and a format to export to, click Save. A new dialog box opens, where you can make settings specific to the file format you picked. We discuss in the following sections some of the most common file formats you’re likely to use for export.
Exporting PDF documents for printing
Create a PDF file of your document if you want to make sure what you created is exactly what a viewer sees — even if they don’t have InDesign. A PDF file also limits the editing capabilities, making it unlikely your document will be changed. If you choose to export a PDF document, you have many options to customize the document you’re exporting. You can control the amount of compression in the document, the marks and bleeds it has in InDesign, and its security settings. Here’s how to export to PDF:
1. Choose File⇒Export.
The Export dialog box opens.
2. Choose a location in which to save the file and then enter a new filename.
Browse to a location on your hard drive using the Save In drop-down list (if you’re using Windows) and name the file in the File Name text field. If you’re using a Mac, name the file in the Save As text field and select a location from the Where drop-down list.
3. Select Adobe PDF (Print) from the Save As Type (Windows) or Format (Mac) drop-down list at the bottom of the Export window.
4. Click Save.
The Export PDF dialog box appears with the General options screen open.
5. Choose a preset from the Preset drop-down list.
These presets are easy to use. If you’re familiar with Adobe Acrobat and the Adobe Distiller functions, they’re the same. (For more detailed information about what each setting does, see Book V.)
The presets on the Preset drop-down list automatically change the individual export settings of a document. For example, you can select Smallest File Size from the list if you’re displaying your work online or select High Quality Print if you plan for the PDF to be printed on home printers. Select Press Quality if you intend to have the PDF professionally printed.
6. Leave the Standard drop-down list at None.
Leave it at None unless, of course, you know about the PDF/X standards used for sharing advertisements. (For more on PDF/X, see Book III.)
7. Select a range of pages to export by typing the start page (and then a hyphen) and the end page in the Range text box.
You can also export nonconsecutive pages by separating the page numbers with a comma.
By default, all pages are exported.
8. Choose a compatibility setting for the PDF from the Compatibility drop-down list.
Compatibility settings determine which kind of reader is required in order to view the document. Setting compatibility to Acrobat 5 (PDF 1.4) ensures that a wide audience can view your PDF files. Some older PDF readers may not be able to interpret certain features in your document if you choose compatibility for a higher version. The current version of Acrobat that ships with Adobe Creative Suite 6 is Acrobat X (or 10). Setting this value to Acrobat 5 or later ensures that anyone who has installed Adobe Reader or Acrobat in the past 10 years will be able to view the PDF file.
9. Choose whether to embed thumbnails and whether to optimize the document, and then choose which kinds of elements to include in the file by selecting the check box to the left of the options in the Include section.
Other settings specify the inclusion of bookmarks, links, and other elements in the file. Unless you’ve added any of these elements, you don’t need to worry about selecting these options. You may want to embed thumbnail previews, but Acrobat creates thumbnails automatically when the file is opened, so this can add to the file size unnecessarily.
 Click Security in the list on the left of the Export PDF dialog box to open the Security screen, where you can specify passwords to open the document. You can also choose a password that’s required to print or modify the PDF file.
10. Click the Export button to export the file.
The file is saved to the location you specified in Step 2.
Exporting EPS files
From InDesign, you can export EPS files, which are useful for importing into other programs. EPS files are single-page graphics files, which means that each exported InDesign page is saved as a separate EPS file.
You have no need to export an EPS file to place an InDesign file into another InDesign file! If you’re creating classified pages or any page that contains other InDesign pages, you can save yourself a few steps by simply choosing File⇒Place and selecting the InDesign file. InDesign can import InDesign files into a layout, or even PDFs — so the only reason to export to EPS is to create a picture for an older software or database that doesn’t work with newer file formats.
Here’s how to export EPS files:
1. Choose File⇒Export.
The Export dialog box opens.
2. Select a location on your hard drive to save the EPS files, enter a new filename, and select EPS from the Save As Type (Windows) or Format (Mac) drop-down list; click Save.
The Export EPS dialog box opens.
3. Choose a page or range of pages to export.
Select the All Pages option to export all pages or select the Ranges option and enter a range of pages. If you want spreads to export as one file, select the Spreads radio button.
If you’re creating more than one EPS file (for example, exporting more than one page of your InDesign document), the file is saved with the filename, an underscore, and then the page number. For example, page 7 of a cats.indd file would be saved as cats_7.eps in the designated location.
4. From the Color drop-down list, select a color mode; from the Embed Fonts drop-down list, select how to embed fonts.
From the Color drop-down list, select Leave Unchanged to retain the color mode you’re using for the InDesign document. You can also change the color mode to CMYK (Cyan, Magenta, Yellow, Black), Gray (grayscale), or RGB (Red, Green, Blue). For more information on color modes, flip back to Chapter 5 of this minibook.
From the Embed Fonts drop-down list, select Subset to embed only the characters used in the file. If you select Complete, all fonts in the file are loaded when you print the file. Selecting None means that a reference to where the font is located is written into the file.
5. Choose whether you want a preview to be generated for the file by choosing from the Preview drop-down list.
A preview (a small thumbnail image) is useful if an EPS file can’t be displayed. For example, if you’re browsing a library of images, you see a small thumbnail image of the EPS file; so whether or not you use the image or open it on your computer, you can see what the file looks like. From the Preview drop-down list, you can select TIFF to generate a preview; select None if you don’t want a preview to be created.
6. Click the Export button to export the files.
The files are saved to the location you designated in Step 2.
Exporting JPEG and PNG files
You can export JPEG and PNG files from an InDesign document. These file formats are commonly used in web publishing and are useful if you need to place a picture of an InDesign document or page online. You can export as a JPEG or PNG image either a single object on the selected page or export entire pages and spreads. JPEG and PNG files allow you to effectively compress full color or black-and-white images, which is useful if you need a picture of an InDesign page to appear on the web.
To export a JPEG or PNG image, follow these steps:
1. Select an object on a page or make sure that no object is selected if you want to export a page or spread.
2. Choose File⇒Export.
The Export dialog box opens.
3. Type a filename, locate the spot where you want to save the file on your hard drive, and select either JPEG or PNG from the Save As Type (Windows) or Format (Mac) drop-down list; click Save.
The Export JPEG or PNG dialog box opens.
4. If you want to export a page, select the Page option and enter the page number; if you want to export the selected object, make sure that the Selection option is selected.
The Selection option is available only if a selection was made in Step 1.
5. Choose an image quality and format to export by selecting from the Image Quality and Format Method drop-down lists.
The Image Quality drop-down list controls the amount of compression that’s used when you export a JPEG or PNG file. Choose from these options:
• Maximum: Creates an image with the largest file size and highest quality
• High: Creates an image with a larger file size and high quality
• Medium: Creates an image with medium file size and medium quality
• Low: Creates a smaller file of lesser quality because it includes less image information
These options don’t appear if you are creating a PNG image.
If you select the Baseline format from the Format Method drop-down list, the entire image has to be downloaded before it’s displayed in a web browser. Select Progressive to show the image in a progressively complete display as it downloads in a web browser.
6. Click the Export button.
The file is exported and saved to the location you specified in Step 3.
Exporting to Flash
Using InDesign CS6, you can export an InDesign document as a Flash Professional file (FLA) that can be edited in Flash CS6, or as a Flash Player (SWF) file that can be viewed (but not edited).
Many modern web browsers do not support Flash, including the browsers on the Apple iPhone, iPad, and Windows Phone. Microsoft has announced that the next-generation Internet Explorer browser will not support plug-ins such as Flash. Because the Flash file format is currently on the decline, you should carefully consider whether you want to export to Flash at all. We suggest you review other options for exporting digital documents, which we cover in the next chapter in this minibook. However, because Flash export is still an available option, we cover it here.
To export to the Flash Player (SWF) format, follow these steps:
1. Choose File⇒Export.
The Export dialog box appears.
2. Choose a location to save the files, enter a new filename, and choose Flash Player (SWF) from the Save As Type (Windows) or Format (Mac) drop-down list.
If you need to include video, audio, animation, or complex interactivity, export the file in Flash CS6 Professional (FLA) format because you can then use Flash Professional to modify and edit the file until it meets your exact needs. While the SWF format will quickly create a SWF version of your document which can be viewed online, it doesn’t provide you with an option to refine and edit your choices after exporting. To create an FLA file that can be edited using Flash CS6 Professional, choose Flash CS6 Professional (FLA) as the export choice instead of Flash Player (SWF).
In the Export SWF dialog box, shown in Figure 7-1, you can set the output size, specify pages to include, and make various conversion and compression choices.
Figure 7-1:Choose the export options to export a file in the SWF format.
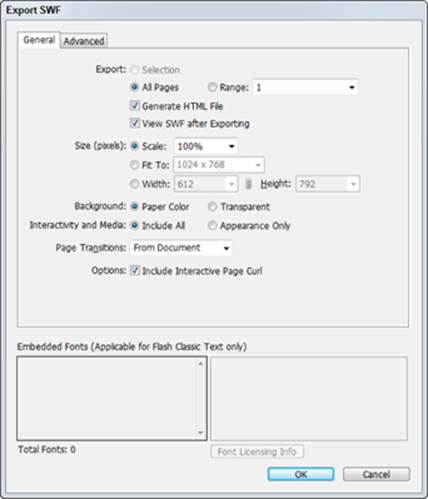
3. Choose the size you want for the exported file.
Select the Scale option and leave the drop-down list at 100% if you don’t want to change the size of the exported file. Otherwise, select the Fit To option and select from the drop-down list or select the Width option and enter your own dimensions in the Width and Height drop-down lists.
4. Select which page or pages you want to export.
Select the All Pages option to export the entire document; select Range and enter a page number if you want to export only a specific page or pages.
5. Select the Interactivity options you want by choosing whether you want to include all interactive options or only those that affect appearance.
6. Choose whether you want an interactive page curl to appear at the top corner of the document page.
7. Click OK to export your InDesign document as a Flash file.
Exporting text files
You can extract text from an InDesign document so that it can be edited or used elsewhere. The text formats vary slightly depending on the text in your document.
To export text, follow these steps:
1. Select the Text tool from the toolbox and select some text within a text frame in your document, or place the cursor within a text frame where you want to export all the text.
The cursor must be in a text frame in order to export text.
2. Choose File⇒Export.
The Export dialog box opens.
3. Enter a filename, select a location to save the file in, and select Text Only from the Save As Type (Windows) or Format (Mac) drop-down list; click Save.
The Text Export Options dialog box opens.
4. Choose a platform and encoding for the export.
Select either PC or Macintosh from the Platform drop-down list to set the PC or Mac operating system compatibility. Select an encoding method for the platform you choose from the Encoding drop-down list; you can choose either Default Platform or Unicode.
The universal character-encoding standard Unicode is compatible with major operating systems. Encoding, which refers to how characters are represented in a digital format, is essentially a set of rules that determines how the character set is represented by associating each character with a particular code sequence.
5. Click the Export button.
The file is exported and saved to the location you specified in Step 3.
Printing Your Work
You can print your work from an InDesign document in many different ways, with many kinds of printers and processes. You can either use your home or office printer, or you can take your work to a professional printing service. Both printers and printing services vary in the quality of production they can offer you.
The following subsections look at the different ways you can set up a document for printing and the kinds of issues you may encounter during this process.
Understanding bleed
If you want an image or span of color to go to the edge of a page, without any white margins, you bleed it off the edge of the document. Bleeding extends the print area slightly beyond the edge of the page into the area that will be cut and removed during the printing process. (Professional printers sometimes print your documents on a larger page size than necessary, and then trim off the extra paper.) You can bleed your own work, too. While you’re designing, you can turn on crop and bleed marks to show where the page needs to be trimmed to make sure that the image bleeds far enough off the edge of the page area. We cover this topic in the next section.
Doing it yourself: Printing and proofing at home or the office
Because many InDesign documents are designed to be professionally printed, the available print settings are quite robust. Just because they are robust doesn’t make them complicated, though. We demystify the settings for you here:
Choose File⇒Print to open the Print dialog box. Choose the printer you intend to use from the Printer drop-down menu. If you don’t have a printer, choose Adobe PDF from the Printer drop-down menu to follow-along with the steps below.
Many printing options are available in the list on the left side of the Print dialog box. Clicking an item causes the dialog box to change, displaying the settings you can change for the selected item. Click each of the items below to better understand these common printing options:
![]() General: Set the number of copies of the document you want to print and the range of pages to print. You can select the Reverse Order check box to print from the last to first page. Select an option from the Sequence drop-down list to print only even or odd pages instead of all pages. If you’re working with spreads that need to be printed on a single page, select the Spreads radio button.
General: Set the number of copies of the document you want to print and the range of pages to print. You can select the Reverse Order check box to print from the last to first page. Select an option from the Sequence drop-down list to print only even or odd pages instead of all pages. If you’re working with spreads that need to be printed on a single page, select the Spreads radio button.
![]() Setup: Define the paper size, orientation (portrait or landscape), and scale. You can scale a page so that it’s as much as 1,000 percent of its original size or as little as 1 percent. You can (optionally) constrain the scale of the width and height so that the page remains at the same ratio. The Page Position drop-down list is useful when you’re using paper that’s larger than the document you’ve created. This option helps you center the document on larger paper.
Setup: Define the paper size, orientation (portrait or landscape), and scale. You can scale a page so that it’s as much as 1,000 percent of its original size or as little as 1 percent. You can (optionally) constrain the scale of the width and height so that the page remains at the same ratio. The Page Position drop-down list is useful when you’re using paper that’s larger than the document you’ve created. This option helps you center the document on larger paper.
![]() Marks and Bleed: Turn on or off many of the printing marks in the document, such as crop, bleed, and registration marks. For example, you may want to show these marks if a bleed extends past the boundaries of the page and you need to show where to crop each page. You see a preview of what the page looks like when printed, and you can select options to print page information (such as filename and date) on each page.
Marks and Bleed: Turn on or off many of the printing marks in the document, such as crop, bleed, and registration marks. For example, you may want to show these marks if a bleed extends past the boundaries of the page and you need to show where to crop each page. You see a preview of what the page looks like when printed, and you can select options to print page information (such as filename and date) on each page.
![]() Output: Choose how to print pages — for example, as a separation or a composite, using which inks (if you’re using separations), or with or without trapping. InDesign can separate and print documents as plates (which are used in commercial printing) from settings you specify.
Output: Choose how to print pages — for example, as a separation or a composite, using which inks (if you’re using separations), or with or without trapping. InDesign can separate and print documents as plates (which are used in commercial printing) from settings you specify.
![]() Graphics: Control how graphics and fonts in the document are printed. The Send Data drop-down list controls bitmap images and specifies how much of the data from these images is sent to the printer. Here are some other options available when printing:
Graphics: Control how graphics and fonts in the document are printed. The Send Data drop-down list controls bitmap images and specifies how much of the data from these images is sent to the printer. Here are some other options available when printing:
• All: Sends all bitmap data. Use this for the highest quality printing, but it may take a long time for your jobs to print if you’re using high-resolution images.
• Optimized Subsampling: Sends as much image data as the printer can handle. Use this if you are having difficulty with printing high quality images when using the All option.
• Proxy: Prints lower-quality images mostly to preview them.
• None: Prints placeholder boxes with an X through them. This option lets you quickly print a proof of a layout to just get a quick understanding of a page design.
![]() Color Management: Choose how you want color handled when it’s output. If you have profiles loaded in your system for your output devices, you can select the profiles here. Color management is more commonly used by commercial print vendors and vendors with critical color needs. It’s a complex topic — entire books are available on the subject of color management — and we don’t have space to cover it in depth here.
Color Management: Choose how you want color handled when it’s output. If you have profiles loaded in your system for your output devices, you can select the profiles here. Color management is more commonly used by commercial print vendors and vendors with critical color needs. It’s a complex topic — entire books are available on the subject of color management — and we don’t have space to cover it in depth here.
![]() Advanced: Determine how you want images to be sent to the printer. If you are unfamiliar with Open Prepress Interface (OPI), you can leave this setting at the default. Also known as image-swapping technology, the OPI process allows low-resolution images inserted into InDesign to be swapped with the high-resolution version for output. It’s a highly specialized setting used by commercial print vendors — such as catalog print vendors — that work with a large number of images.
Advanced: Determine how you want images to be sent to the printer. If you are unfamiliar with Open Prepress Interface (OPI), you can leave this setting at the default. Also known as image-swapping technology, the OPI process allows low-resolution images inserted into InDesign to be swapped with the high-resolution version for output. It’s a highly specialized setting used by commercial print vendors — such as catalog print vendors — that work with a large number of images.
Flattening needs to be addressed if you use a drop shadow, feather an object in InDesign, or apply transparency to any objects, even if they were created in Photoshop or Illustrator.
Use the preset Medium Resolution for desktop printers and High Resolution for professional press output.
![]() Summary: You can’t make modifications but you can see a good overview of all your print settings.
Summary: You can’t make modifications but you can see a good overview of all your print settings.
After you finish your settings, click the Save Preset button if you want to save the changes you’ve made. If you think you may print other documents with these settings repeatedly, using the Save Preset feature can be a great timesaver.
After you click the Save Preset button, the Save Preset dialog box opens, where you can enter a new name to save the settings. The next time you print a document, you can select the saved preset from the Print Preset drop-down list in the Print dialog box.
Click the Print button at the bottom of the Print dialog box when you’re ready to print the document.