Adobe Creative Suite 6 Design and Web Premium All-in-One For Dummies (2012)
Book V
Acrobat X
Chapter 3: Adding Interactivity to PDF Files
In This Chapter
![]() Adding interactive bookmarks
Adding interactive bookmarks
![]() Creating and editing links
Creating and editing links
![]() Using buttons for easy navigation
Using buttons for easy navigation
Because many PDF documents are viewed online, you should make them easy for readers to navigate. With Acrobat, you can design documents that are easier to navigate than their printed counterparts and that include rich interactive features that simply aren’t available with paper documents.
Rather than making readers scroll through a document to find what they want, you can add links within an index or a table of contents, or you can add links to websites and e-mail addresses. Acrobat also includes bookmarks, which are an interactive table of contents. You can even add buttons that link to specific pages within a PDF document or that cause an action to occur when clicked, such as printing the document. We discuss all these features in this chapter.
Adding Bookmarks to Create Easy PDF Navigation
Users have come to expect documents that involve easy-to-use navigation and ways to quickly find what they need. You can make your PDF documents more user-friendly by adding bookmarks, which are the equivalent of a table of contents that’s always available, no matter what page the user is viewing in the Document window.
Bookmarks provide a listing of contents within a PDF file or links to relevant external content. Bookmarks sit within a panel, and when you click one, you’re taken to a specific destination in the PDF document (or possibly to an external file), much like a hyperlink. You can create bookmarks from existing text, or you can use your own text to describe the content, which is useful if the destination of the bookmark is a figure, chart, or graphic.
By default, the Bookmarks icon resides along the left side of the Acrobat Document window in the navigation panel. Click the Bookmarks icon to make the panel appear; click the Bookmarks icon a second time to hide it. If the icon isn’t visible, choose View⇒Show/Hide⇒Navigation Panes⇒Bookmarks to make it appear.
Creating bookmarks that link to a page
By navigating to a page, and to a specific view on a page, you can establish the destination of a bookmark link. With a PDF document open, follow these steps:
1. If the Bookmark icon isn’t visible choose View⇒Show/Hide⇒Navigation Panes⇒Bookmarks.
The Bookmarks panel appears on the left of the Document window.
2. In the Document window, navigate to the page that you want as the bookmark’s destination.
3. Set the magnification of the view that you want viewers to see when they click the bookmark by using the Marquee Zoom tool to either zoom in or zoom out.
The zoom level that you’re at when you create the bookmark is the view that viewers see when they click the bookmark.
4.  In the Bookmarks panel, click the New Bookmark icon. (It shows a ribbon with a starburst.)
The new bookmark appears in the Bookmarks panel as Untitled.
5. Change the name by typing something more descriptive.
 If you leave the bookmark as Untitled but want to rename it later, you must right-click the bookmark and then choose Rename, or you can click the Bookmark panel menu in the upper-left corner of the panel and choose Rename Bookmark.
6. Test your bookmark by scrolling to another page and viewing it in the Document window; then click your saved bookmark in the Bookmark panel.
The Document window shows the exact location and zoom that you selected when you created the bookmark.
![]() Use the Selection tool to highlight text, such as a headline or a caption, that’s part of the bookmark destination. Then choose New Bookmark, and the selected text becomes the title of the new bookmark. You can use this shortcut to avoid entering a new name for new bookmark titles. You can also press Ctrl+B (Windows) or
Use the Selection tool to highlight text, such as a headline or a caption, that’s part of the bookmark destination. Then choose New Bookmark, and the selected text becomes the title of the new bookmark. You can use this shortcut to avoid entering a new name for new bookmark titles. You can also press Ctrl+B (Windows) or ![]() +B (Mac) to quickly create a bookmark, and any selected text becomes the bookmark title.
+B (Mac) to quickly create a bookmark, and any selected text becomes the bookmark title.
Creating bookmarks that link to a website
Although bookmarks are most commonly used to link to content within a PDF file, you can also use bookmarks to create links to other websites or even other documents. To create a link to an external website, follow these steps:
1. Choose Options⇒New Bookmark in the Bookmarks panel.
The Options menu looks like two circles on top of each other, found in the upper-left corner of the Bookmarks window.
2. Replace the Untitled bookmark entry that appears in the Bookmarks panel with an appropriate name for the bookmark.
3. Choose Options⇒Properties from the Bookmarks panel menu.
The Bookmark Properties dialog box appears. With this dialog box, you can change a bookmark so that it links to any web address or even another file. In this example, we use a web address, but the bookmark could be a link to another PDF file, a Photoshop file, or even a Microsoft Excel file. Just remember that this bookmark creates a relative link. The linked file must travel with the PDF document in order for the link to work.
4. In the Bookmark Properties dialog box, click the Actions tab, select Open a Web Link from the Select Action drop-down list, and then click the Add button.
The Edit URL dialog box appears.
5. Enter the web address to which the users should be taken when they click this bookmark. Then click OK.
The bookmarked link is created.
 You can use bookmarks to choose different actions, such as opening another file or even playing a sound or movie.
Using bookmarks
Bookmarks are intuitive to use, which makes them an attractive option to add to PDF files. After you click a bookmark, the action associated with it is performed, which typically navigates you to a certain page within the PDF file.
Unfortunately, the Bookmarks panel doesn’t open automatically with a document, even when bookmarks are present within a file. To display the Bookmarks panel when a file is opened, follow these steps:
1. Choose File⇒Properties.
2. In the Document Properties dialog box that opens, select the Initial View tab, as shown in Figure 3-1.
Figure 3-1: The Documents Properties dialog box in Adobe Acrobat.
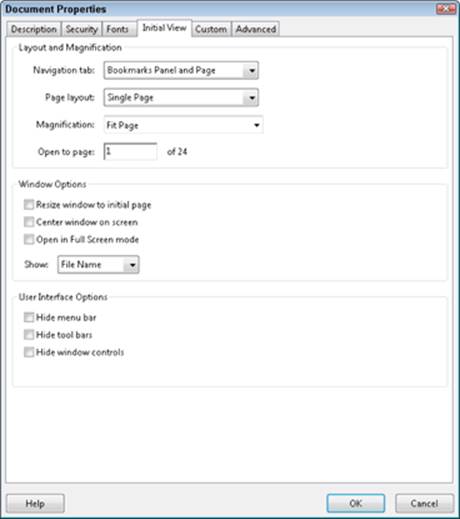
3. From the Navigation drop-down list, select Bookmarks Panel and Page and then click OK.
After you save and reopen the file, the Bookmarks panel displays whenever the document is opened.
Editing bookmarks
You can change the attributes of bookmarks so that they have a different color, a different text style, or a link to another location. Make these changes by selecting a bookmark and then choosing Options⇒Properties in the Bookmarks panel. (Remember the Options button appears in the upper-left corner of the panel, and it’s the icon with two circles.) In the Bookmark Properties dialog box that opens, choose the color and font style of the bookmark on the Appearance tab: To change the bookmark’s font style, select a style from the Style drop-down list; to change the bookmark’s color, click the Color box and choose a color from the Color Picker.
On the Actions tab of the Bookmark Properties dialog box, you can delete existing actions (in the Actions section of the Actions tab) by clicking to select an action and then clicking the Delete button. Also, you can add actions by choosing another action from the Add Action section and then clicking the Add button. You can add more than one action to a bookmark.
Adding Interactive Links
When viewing a PDF file electronically, you can add links for e-mail addresses, web addresses, and references to other pages. Unlike bookmarks which are neatly organized in a panel, links are attached to a region of a page, which you identify with the Link tool.
To add an interactive link to your PDF document, follow these steps:
1. Locate an area of a page where you want to add a link and then choose Tools⇒Content⇒Link.
2.  Using the Link tool, click and drag to select the region where the user will click to activate the link.
The Create Link dialog box appears.
3. In the Link Action section of the Create Link dialog box, choose an action that the link will perform:
• Go to a Page View: This option is the default, where you can scroll to the page that is the destination of the link.
• Open a File: Alternatively, you can choose to link to another file; click the Browse button to locate the file.
• Open a Web Page: If you choose this option, you’re choosing to link to a web address. In the Address text box, enter the complete address of the website to which the link should direct viewers. To create a link to an e-mail address, type mailto: followed by an e-mail address. (Note that mailto: is all one word.)
• Custom Link: Use this option to choose from other types of links in the Link Properties dialog box.
4. Set the appearance of the link, such as visible or invisible.
5. Click Next and follow the instructions in the next dialog box before clicking OK.
The instructions have you navigate to the intended destination of the link, which you should do before clicking OK.
Although the Link tool is relatively simple to use, you may prefer to create links from text using the Selection tool. To do so, click and drag to select the text that will become a link, then right-click (Windows) or Ctrl-click (Mac), and choose Create Link from the contextual menu that appears.
You can also have links transferred automatically from your original Microsoft Office documents when using PDF Maker, or from Adobe InDesign if you use the hyperlinks panel within InDesign to create the links.
You can edit links by choosing the Link tool and double-clicking the existing link to open the Link Properties dialog box. While editing a link, you can change how it’s presented in the Appearance tab. Make a link invisible or add a border to the link, such as a blue border that commonly is used to define hyperlinks. On the Actions tab of the Link Properties dialog box, you can add, edit, or delete actions, just as you can with bookmarks (see the preceding section).
Adding Buttons to Simplify Your PDF Files
Along with links and bookmarks, buttons provide another way to make your files more useful when they’re viewed online. You can create interactive buttons entirely within Acrobat — designing their appearance and adding text to them. Or you can import buttons created in other Adobe Creative Suite applications, such as Photoshop and Illustrator, and add actions to them within Acrobat. For example, within Acrobat, a button that advances the viewer to the next page in a document will be a simple button with text. However, if you want an arrow icon, you can create it in Photoshop or Illustrator and import the button icon into your PDF page using Acrobat.
You can also create interactive buttons for a PDF document by using InDesign. Buttons created using InDesign carry through to a PDF when you export an interactive PDF document.
![]() You can add buttons directly within Acrobat by using the Button tool.
You can add buttons directly within Acrobat by using the Button tool.
To add a button to your PDF document, follow these steps:
1. Choose Tools⇒Content⇒Add or Edit Interactive Object⇒Button.
The cursor changes to a cross hair, which you can then use to draw the location of the button on your PDF document.
2. Click and drag to specify the location where you want the button to appear in the document.
3. Type in an appropriate name for your button in the Field Name dialog box that appears.
4. Click the All Properties button to see the Button Properties dialog box.
5. In the General tab, you can enter a name for the button in the Name text box and provide a tooltip in the ToolTip text box. You can also specify whether the button is visible only onscreen or when printing under the Common Properties section.
A tooltip is the text that appears whenever the mouse cursor is positioned over the button.
6. In the Appearance tab, establish how your button will look by setting the following options:
• Border Color/Fill Color: Click the square to the right of the appropriate attribute in the Borders and Colors section of the Appearance tab and then choose a color from the Color Picker.
• Line Thickness and Style: These options don’t appear unless you change the border color from None (red diagonal line) to another selection.
• Font Size/Font: Change the size and font of the button text by making a selection from the Font Size and the Font drop-down lists.
• Text Color: Change the color of the text by clicking the color square and choosing a color from the Color Picker.
7. In the Options tab, make these selections:
• Layout: Use the Layout drop-down list to specify whether you want to use a label (text that you enter in Acrobat that appears on the face of the button) or whether you want an icon (an imported button graphic that you may have designed in Photoshop or Illustrator).
• Behavior: Select Push from the Behavior drop-down list to create different appearances for a button so that it changes based upon whether the mouse cursor is positioned over the button. The button appearance can also change when clicked.
• State: To specify the different appearances (see Behavior, discussed in the preceding paragraph), click the State on the left side of the Options tab and then choose the Label or Icon status for each state.
• Label: If you choose to use a label, enter the text for it in the Label text field.
• Icon: If you choose to use an icon, specify the location of the graphic file by clicking the Choose Icon button. You can create button icons in either Photoshop or Illustrator and save them in the PDF format for importing as a button icon.
8. In the Actions tab, select an action from the Select Action drop-down list and then click the Add button.
Actions are applied to buttons similar to the way in which they’re applied to links and bookmarks:
• To specify when the action occurs, click the Select Trigger drop-down list and choose whether the mouse clicking, being released, or being moved over an area causes the action to occur. The default trigger is Mouse Up, which causes the action to occur when the mouse button is depressed and then released. You can choose other actions, such as the mouse cursor merely rolling over the button without the need to click it.
• To choose actions that are a part of the menu commands, such as printing a document, closing a file, or navigating to the next or preceding page, click the Select Action drop-down list and then specify the command to be accessed.
9. After you make all your changes in the Button Properties dialog box, click Close.