Adobe Creative Suite 6 Design and Web Premium All-in-One For Dummies (2012)
Book V
Acrobat X
Chapter 4: Editing and Extracting Text and Graphics
In This Chapter
![]() Manipulating text with the Edit Document Text tool
Manipulating text with the Edit Document Text tool
![]() Modifying graphics and page objects with the Edit Object tools
Modifying graphics and page objects with the Edit Object tools
![]() Pulling text and graphics out of PDFs for use in other documents
Pulling text and graphics out of PDFs for use in other documents
You may assume that PDF files are mere pictures of your documents and can’t be edited, but nothing is further from the truth. Adobe Acrobat includes a variety of tools for editing both text and graphics. You can use these tools as long as the file hasn’t been secured to prohibit editing. We introduce you to the tools for modifying PDF documents in this chapter. We discuss security, which allows you to limit access to these tools, in Chapter 6 of this minibook.
Editing Text
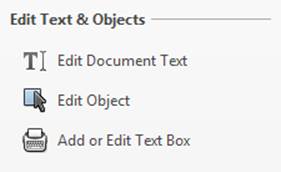
You can access the tools for editing text and graphics by clicking Tools⇒Content, and then you can find them in the Edit Text & Object section. (See Figure 4-1.)
Figure 4-1: The Edit Text & Objects tools
 For editing objects, you have three choices:
![]() Edit Document Text tool: Used to manipulate text.
Edit Document Text tool: Used to manipulate text.
![]() Edit Object tool: Used to manipulate objects and graphics.
Edit Object tool: Used to manipulate objects and graphics.
![]() Add or Edit Text Box tool: Used to add new text onto a document or to manipulate text previously applied using this same tool.
Add or Edit Text Box tool: Used to add new text onto a document or to manipulate text previously applied using this same tool.
Using the Edit Document Text tool to manipulate text
The Edit Document Text tool is used for manipulating text. This can include changing actual text characters or the appearance of text. You can change cat to read dog, or you can change black text to blue, or you can even change the Helvetica font to the Times font.
 When you change a PDF file, the original source document isn’t modified.
You have a few ways to accomplish text edits:
![]() Choose the Edit Document Text tool, click within the text that you want to change to obtain an insertion point, and then start typing the new text.
Choose the Edit Document Text tool, click within the text that you want to change to obtain an insertion point, and then start typing the new text.
![]() Click with the Edit Document tool in your text and press the Backspace or Delete key to delete text.
Click with the Edit Document tool in your text and press the Backspace or Delete key to delete text.
![]() With the Edit Document tool, drag to highlight text and enter new text to replace the highlighted text.
With the Edit Document tool, drag to highlight text and enter new text to replace the highlighted text.
When changing text — whether you’re adding or deleting — Acrobat tries to use the font that was specified in the original document. Sometimes, this font is built into the PDF file, which means that it’s embedded in the file. Other times, the font may not be available either because it hasn’t been embedded or it’s been embedded as a subset where only some of the characters from the font are included in the PDF file. In these cases, Acrobat may provide the following warning message:
Warning! Since the original font is not available, a substituted font for editing is used. Any changes to the text of the original font will place a new font dependency upon the document.
Fortunately, you can change the font if you need to edit the text. However, when you change the font, the text may not retain the same appearance as the original document. In some instances, you may not have the exact same font on your computer as the font used in the PDF document, but you may have a similar font you can use without causing a noticeable change — most people won’t notice the difference between Helvetica and Arial or between Times and Times New Roman. Fonts with the same name but from different font designers often look very similar. For example, Adobe Garamond looks similar to ITC Garamond, even though they’re two different fonts.
To change the font that’s used for a word or a range of words, follow these steps:
1. With the Edit Document Text tool, drag over the text you want to select.
You may see a Loading System Fonts message followed by another Loading Document Fonts message. Depending on the number of fonts installed on your system, it may take a while for this message to disappear.
2. Right-click (Windows) or Control-click (Mac) the highlighted text and choose Properties from the contextual menu. The Edit Document Properties dialog box appears, as shown in Figure 4-2.
Figure 4-2: The Edit Document Properties dialog box.
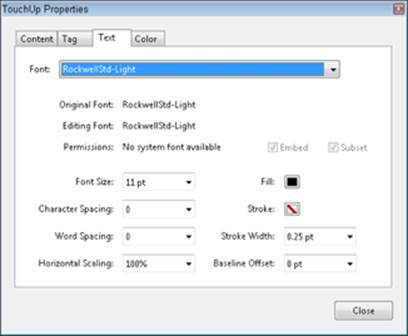
3. In the Text tab, choose the typeface you want to use from the Font drop-down list and make any other changes you want.
In this dialog box, you can also change the size by selecting or typing a number into the Font Size drop-down list. In addition, you can modify the color by clicking the Fill color swatch.
4. When you’re satisfied with your changes, click the Close button to apply your changes to the selected text.
Add or Edit Text Box: The Typewriter tool
You can use the Typewriter tool to type anywhere on the document. Access the Typewriter tool by choosing Tools⇒Content⇒Add or Edit Text Box. Then position your cursor where you want to begin typing, click, and start to type, pressing the Enter or Return key whenever you want to add a line. The Typewriter toolbar appears after you click on a page. Use the toolbar to change the font or size of the text you’re adding to the page by clicking the increase or decrease type size buttons or by selecting a specific size from the drop-down list.
Likewise, to change the space between the lines, click the Increase or Decrease Line Spacing buttons. You can move or resize the Typewriter block by selecting it with the Select tool and either moving or resizing the text box. Your text remains editable. So, if you’ve made a mistake and want to correct it, or want to add or delete text, you select the Typewriter tool again and double-click in the type box.
Using the Edit Object tool to edit graphics
You can use the Edit Object tool to access editing software for modifying graphics. For example, you can use the Edit Object tool to select a graphic, bring the graphic into Photoshop, and then save the modified version back into the PDF file. In other words, you can edit the graphics used in PDF documents, even if you don’t have access to the original graphic files.
To edit a photographic file from Acrobat in Photoshop, follow these steps:
1. Select the image with the Edit Object tool, right-click (Windows) or Control-click (Mac) on a photographic image with the Edit Object tool, and then choose Edit Image from the contextual menu.
The image file opens in Adobe Photoshop.
2. With the many tools of Photoshop, make the necessary changes to the graphic and then choose File⇒Save.
When you return to the PDF file in Acrobat, the graphic is updated automatically in the PDF document.
If you have the original graphic file, it remains untouched — only the version used within the PDF file is modified. It isn’t necessary to have the original graphic file to perform these steps.
You can also use Acrobat to edit vector objects from within PDF files, such as those created with Adobe Illustrator. Just follow these steps:
1. Select a piece of vector artwork with the Edit Object tool, right-click (Windows) or Control-click (Mac) the vector artwork, and then choose Edit Object from the contextual menu.
Note: Acrobat displays Edit Object in the contextual menu if it detects a vector object, and it displays Edit Image if it detects a bitmap image. Acrobat also displays Edit Objects (note the plural) if you have more than one object selected.
If you’re editing a complex illustration, be sure to select all its components by holding down the Ctrl (Windows) or ![]() (Mac) key while clicking them with the Edit Object tool.
(Mac) key while clicking them with the Edit Object tool.
After choosing Edit Object, the object opens for editing in Adobe Illustrator.
2. After you make the necessary changes in Illustrator, choose File⇒Save.
The graphic is updated in the PDF document.
If Acrobat doesn’t start Photoshop or Illustrator after choosing the Edit Image or Edit Object command, you may need to access preferences by choosing Edit⇒Preferences⇒Touch Up (Windows) or Acrobat⇒Preferences⇒Touch Up (Mac OS) and then specifying which programs should be used for editing images or objects.
You can also use the Edit Object tool to edit the position of text or graphic objects on a page, which includes the ability to relocate individual lines of text or to change the position of a graphic on a page. After you select an object with the Edit Object tool, you can simply drag it to a new location on the page. Similarly, you can delete objects from a PDF document by selecting them and then pressing the Delete key.
Exporting Text and Graphics
Although editing text and graphics is helpful, you may need to take text or images from a PDF document and use them in another file. Fortunately, Acrobat also includes tools to make this a breeze. Of course, you should always make certain that you have the permission of the owner of a document before reusing content that isn’t your original work.
You can export text, images, or charts from Acrobat by copying and pasting, or by saving as a specific file type. These methods are discussed in detail in the following sections.
Exporting text with Select, Copy, and Paste
Follow these steps to select, copy, and paste text from a PDF file:
1. With the Select tool, highlight the text you want to export.
The Select tool is the I-bar/black arrow in the toolbar. When you hold the arrow over a section of your document, it turns into an I-bar cursor, which you can drag to select the text you want to copy.
If the Cut, Copy, and Paste commands are unavailable after you’ve selected some text, the author of the document may have set the security settings to disallow copying. If you can’t select the text, you may be trying to copy text that’s part of an image. If you’re trying to select text that’s in a single column, a sidebar, or table, press and hold the Ctrl key (Windows) or Command key (Mac) and then click and drag over the area with text to be selected.
2. Right-click (Windows) or Control-click (Mac) the selected text. Then, from the contextual menu, either choose Copy to copy only the text or choose Copy with Formatting to retain the font, size, and color characteristics.
Being able to extract the text out of a PDF document by selecting and copying it is useful if you don’t have access to the original source document, but you need to use the text from a PDF file in another document.
3. Open another text-editing program, such as Adobe InDesign or Microsoft Word.
You can paste the copied text into a new document or a preexisting file.
4. Insert your cursor in the document at the appropriate spot and choose Edit⇒Paste.
The text is pasted into the document, ready for you to use.
Exporting text with Save As
Use the File⇒Save As⇒Microsoft Word or File⇒Save As⇒Spreadsheet commands to export all the text in your PDF file. After choosing the location where you want the file saved, click Save to save the Microsoft word or Spreadsheet file.
You can also choose File⇒Save As⇒More Options to save the document with no formatting as a plain text document. The More Options choice includes several other formats you can use for exporting your PDF documents:
![]() Encapsulated PostScript and PostScript: These formats are generally used by commercial printers or IT professionals who need PostScript output.
Encapsulated PostScript and PostScript: These formats are generally used by commercial printers or IT professionals who need PostScript output.
![]() Various Adobe PDF option formats, such as PDF/E for engineering or PDF/A for archiving: These formats are used to switch to a specific subset of the PDF file format used for a particular industry or line of work.
Various Adobe PDF option formats, such as PDF/E for engineering or PDF/A for archiving: These formats are used to switch to a specific subset of the PDF file format used for a particular industry or line of work.
![]() HTML and XML: These are used to attempt to convert the PDF to another file format that can be used for viewing on the web without a PDF plug-in. PDF files do not always convert well to HTML, so be sure to test this option if you want to use it for any important documents.
HTML and XML: These are used to attempt to convert the PDF to another file format that can be used for viewing on the web without a PDF plug-in. PDF files do not always convert well to HTML, so be sure to test this option if you want to use it for any important documents.
![]() Graphics: To save your PDF document as an image, use the File⇒Save As⇒Image command and choose from any of the various graphics formats, including JPEG, JPEG2000, PNG, and TIFF. If you choose one of these options, your text will no longer be editable because all of the PDF pages will be converted to images, with each page in the PDF becoming a separate image file.
Graphics: To save your PDF document as an image, use the File⇒Save As⇒Image command and choose from any of the various graphics formats, including JPEG, JPEG2000, PNG, and TIFF. If you choose one of these options, your text will no longer be editable because all of the PDF pages will be converted to images, with each page in the PDF becoming a separate image file.
Text that’s copied from a PDF file is no longer linked to the original document. Edits made to the extracted text aren’t reflected within the PDF file, and it’s extremely difficult to have the extracted text reinserted into the PDF document, as the Add or Edit Text Box tool and Typewriter tool are rather limited in their ability to add any significant amount of text onto a page. Think of the extraction process as a one-way trip for the text, which can be extracted but not reinserted.
You can also export portions of text and tables so you can edit them later using a spreadsheet program, such as Microsoft Excel, or a word processing program such as Microsoft Word. Just follow these steps:
1. Click the Select tool and click and drag to select the text in the table.
Depending upon how the table was created, you may also be able to position your cursor just outside the edge of the table and then draw a box around a table. Remember you can Ctrl-click (Windows) or Command-click (Mac) and then drag around a table to select it.
A border appears around the selected table.
2. Right-click (Windows) or Control-click (Mac) and choose Export Selection As from the contextual menu.
Alternatively, you can save the table directly to a file or copy to the Clipboard to be pasted later: If Acrobat has trouble identifying the text in the table, it may be saved as an image file, which is not editable text.
• Choose Export Selection As from the contextual menu to save the text directly to a file.
• To copy the table to the Clipboard so that you can paste it into other documents, choose Copy with Formatting from the contextual menu.
After opening Excel or whatever spreadsheet program you have installed on your computer, you can paste the table into the spreadsheet.
And that’s it. You can now use that table in another program.
Extracting graphics
You can also extract graphics from PDF files, but extracting graphics is very different from editing them. We discuss editing graphics and vector objects earlier in this chapter. When editing graphics, you open the original graphic file at its highest possible quality. Extracting graphics is different because they’re removed at the quality of the screen display resolution, which may be of much lower quality than the original, embedded graphics.
With the Select tool, right-click (Windows) or Control-click (Mac) an image, or drag with the Select tool to select a part of the image. Then you can either drag and drop the selection into an open document or choose Copy Image from the contextual menu. The image is now available to be pasted into other applications. Your other option is to choose Save Image As from the contextual menu and then save the selected area as a BMP graphics file.