Adobe Creative Suite 6 Design and Web Premium All-in-One For Dummies (2012)
Book VI
Dreamweaver CS6
Chapter 7: Creating Tables
In This Chapter
![]() Creating tables
Creating tables
![]() Manipulating rows, columns, and cells
Manipulating rows, columns, and cells
![]() Selecting tables and cells
Selecting tables and cells
![]() Changing the color and alignment of table cells
Changing the color and alignment of table cells
![]() Styling tables with CSS
Styling tables with CSS
![]() Adding and importing content
Adding and importing content
Tables are useful for presenting data and can be helpful when you’re arranging elements in a tabular format. You can use tables to display data (such as pricing information or a schedule of events) much like you would a spreadsheet.
In this chapter, you find out how to create a table and apply formatting with CSS. Note: Although tables have been used as a method of creating page layouts in the past, this is considered bad practice, so we don’t cover it in this minibook.
Working with Tables
When you think of a table, think of a grid that has multiple cells in it, much like a spreadsheet. Tables are used in HTML pages so that elements and data can be contained and positioned within specific cells in a series of rows and columns. You can change the colors of cells in tables, divide or span the cells (combine them with other cells), and apply borders to them.
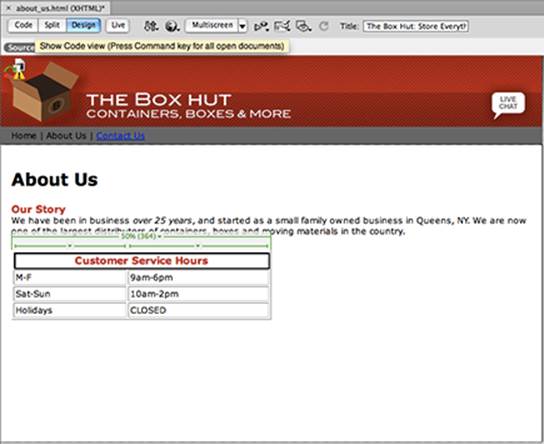
When you create a table, you can determine how many rows and columns it contains, as well as set fixed or scalable widths for rows and columns where necessary. You can also choose to merge rows and columns to create unique tables, as shown in Figure 7-1.
Figure 7-1: A table with columns merged.
To create a table in Dreamweaver, follow these steps:
1. ![]() Put the cursor where you want the table to appear, make sure that the Common tab on the Insert panel is visible, and then click the Table button.
Put the cursor where you want the table to appear, make sure that the Common tab on the Insert panel is visible, and then click the Table button.
Alternatively, you can choose Insert⇒Table. Whichever method you use, the Table dialog box appears, as shown in Figure 7-2.
Figure 7-2: Set table speci-fications in the Table dialog box.
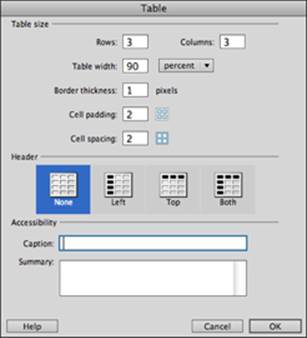
2. Enter or select the attributes of the table you want to create:
• Rows: In the Rows text box, enter the number of rows you want in the table. Rows stack vertically and can be added or deleted after you create the table.
• Columns: In the Columns text box, enter the number of columns you want in the table. Columns are created horizontally across a table and can be added or deleted after you create them.
• Table Width: Enter a width measurement in the Table Width text box and then select a measurement (Pixels or Percent) from the drop-down list to the right. Table width is an important attribute because it sets the default size for the table. If you leave this setting at 100 percent, the table occupies 100 percent of its container. You can change the width to a different percentage, such as 50 percent, to have the table occupy half the width of its container (shown in Figure 7-1), or you can enter a pixel value to ensure that the table always stays the same size.
• Border Thickness: Enter (in pixels) the thickness you want for the width of the border surrounding the cells and outside the table. If you want to see no table formatting, type 0 in the Border Thickness text box. Note: In Design view, you still see a dashed table border — it’s only a visual aid. You see true borders when you view the page in a browser or in Live view.
• Cell Padding: Enter a number in the Cell Padding text box if you want to use padding to create a margin around all content inside the cell.
• Cell Spacing: Enter a number in the Cell Spacing text box if you want to change the spacing to push cells apart.
• Header: The Header check box converts the top row of the table from a standard row to a defined header (using the <th> tag). This reinforces that the first row and its contents define the header of the table.
• Accessibility options: You can provide additional information to help visually impaired users understand the contents of your table. Add a caption that’s relevant to your table in the Caption text box. In the Summary area, include several lines of text to provide more information about the purpose of the table and its contents.
3. Click OK.
Your table is created.
 When working with tables, try to take advantage of the Expanded table feature in Dreamweaver. (Find the Expanded button in the Layout section of the Insert panel.) Expanded view adds cell padding and spacing in a table and increases the size of the border to make selecting cells and content easier. For an accurate preview, return to Standard view (click the Standard button in the Layout section of the Insert panel) after you finish editing.
Editing table attributes
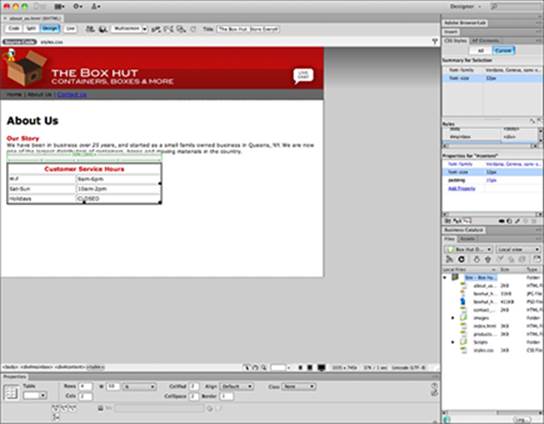
Even if you’ve already created a table, you can go back and edit its attributes by selecting the table and entering changes in the Property inspector, as shown in Figure 7-3.
If the Property inspector isn’t expanded (refer to Figure 7-3), click the arrow in the lower-right corner of the inspector. The inspector then expands, offering additional options.
When a table is selected, you can use the handles that appear in the lower-right corner as well as the bottom and left sides to resize the table manually.
Adding and deleting rows and columns
You can use the Property inspector to add or delete rows and columns as fast as your client’s (or boss’s) needs require, but the Modify menu gives you a little more control over which rows and columns are deleted and where new ones are added.
Figure 7-3:Make changes to your table with the Property inspector.
To add a row, follow these steps:
1. Insert the cursor in a cell in the row that you want to add a new row above or below.
2. Choose Insert⇒Table Objects⇒Insert Row Above or Insert Row Below.
Alternatively, press Ctrl+M (Windows) or ![]() +M (Mac).
+M (Mac).
The new row appears.
To add more rows to the bottom of the table, place the cursor in the last current row and press the Tab key.
Follow these steps to delete a row:
1. Insert the cursor in a cell of the row you want to delete.
2. Choose Modify⇒Table⇒Delete Row.
Alternatively, press Ctrl+Shift+M (Windows) or Shift+![]() +M (Mac).
+M (Mac).
The row is deleted.
To add a column, follow these steps:
1. Insert the cursor in a cell.
Insert the cursor in the cell in the column that you want a new column added to the left or right of.
2. Choose Insert⇒Table Objects⇒Insert Column to the Left or Insert Column to the Right.
The new column appears.
Follow these steps to delete a column:
1. Insert the cursor in a cell of the column you want to delete.
2. Choose Modify⇒Table⇒Delete Column.
Alternatively, press Ctrl+Shift+- (minus) (Windows) or Shift+![]() +- (minus) (Mac).
+- (minus) (Mac).
The column is deleted.
Merging and splitting cells
Often, you may need to merge or split cells. You can combine cells with other cells horizontally or vertically. By merging cells, you can create more interesting and useful tables or accommodate different types and amounts of content. Figure 7-4 contains a table with one large, merged cell across the top.
Figure 7-4: In the top row, two columns of cells have been merged.

Follow these steps to merge cells in a row or column:
1. Click within a cell and then drag across to select neighboring cells in the row or drag down to select neighboring cells in the column.
2. Choose Modify⇒Table⇒Merge Cells.
The cells are merged.
To split a merged cell back into separate cells, follow these steps:
1. Put the cursor in the merged cell or column.
2. Choose Modify⇒Table⇒Split Cell.
The Split Cell dialog box appears, as shown in Figure 7-5.
3. Choose whether you want to split into rows or columns by selecting either the Rows or Columns radio button.
Figure 7-5:Split cells as easily as you merge them.
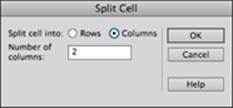
4. Enter the number of rows or columns you want to create by splitting the cell in the Number of Rows/Columns text box.
5. Click OK.
The merged cell is now split into the number of cells you specified.
Selecting a Table and a Cell
You can use several methods to select a cell or the whole table. After a cell or table is selected, you can change all sorts of attributes for the selected cell or table, including the color, size, and format of its contents.
To select a table or cell, follow these steps:
1. In Design view, select the Layout category from the Insert panel and select Expanded to put your table in Expanded view.
You can more easily select and make changes in this view. (Remember to click the Standard button to see a more realistic preview of your table.)
2. While holding Ctrl (Windows) or ![]() (Mac), move your cursor over a cell and click to select it.
(Mac), move your cursor over a cell and click to select it.
You can select multiple cells by using this technique.
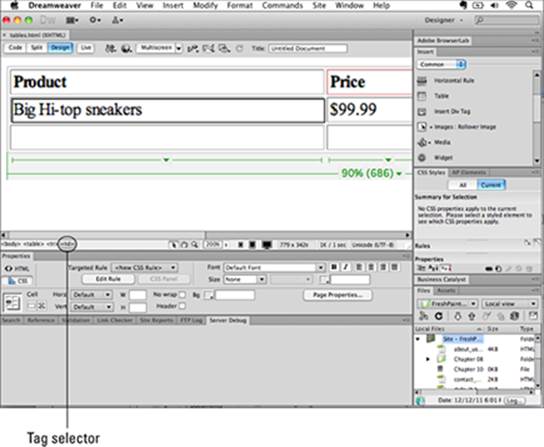
The tag selector is an incredible tool to use to select any page element, though it’s especially helpful when selecting individual components of a table or a nested table. The tag selector is in the lower-left corner of the Document window, as shown in Figure 7-6.
To use the tag selector, just put the cursor inside a cell. The tag selector shows the tags that apply to the insertion point’s location. Then select <td> to select the cell that holds the cursor, <tr> to select the entire row, or <table> to select the entire table.
The table tag is <table> (it’s a difficult one to remember, right?), and each row is in a <tr> (table row) tag. Each cell is in a <td> (table data) tag. Tables created with headers also make use of the <th> (table header) tag.
Figure 7-6:Use the tag selector to select cells and tables.
Changing the Color and Alignment of Table Cells
You can change colors of a single cell, multiple cells, or an entire row in Dreamweaver. You can also choose to vertically and horizontally align cell contents. You can use either standard HTML attributes (via the Property inspector) or create CSS rules to apply formatting to any portion of a table.
To change the color of a cell or multiple cells in a table, follow these steps:
1. Ctrl-click (Windows) or ![]() -click (Mac) anywhere within a cell to select that cell.
-click (Mac) anywhere within a cell to select that cell.
You can continue to add cells to your selection by keeping the key pressed and clicking more cells.
2. In the Property inspector, make sure that HTML view is selected (click the HTML tab on the left edge of the panel) and locate the Bg Color Picker.
3. Assign color to cells by following one of these methods:
• Click the swatch to the right of Bg and select a color from the Color Picker that appears. Remember that you can choose from additional color models by clicking the palette menu in the upper-right corner of the Color Picker.
• If you know the hexadecimal number of your color, you can type it in the text field next to the Bg color swatch.
• Select a color from any element you can see onscreen by clicking the color fill box to the right of Bg and then moving the Eyedropper tool over any color on your screen that you want the cell color to pick up. Click when the color appears in the Color Picker preview window.
4. The color is applied as a background to the selected cells.
5. With the cell still selected, locate the Horz and Vert drop-down menus at the bottom of the Property inspector.
These control the horizontal and vertical alignment of cell contents, respectively.
6. Select “Center” from the Horz menu, and “Middle” from the Vert menu.
This step positions the contents in the middle of the table cell.
When the table cell is not much taller than its contents, vertical alignment is not as obvious as horizontal alignment. Try vertical alignment on cells with a taller height or on multiple cells merged across two or more rows.
Applying Table Formatting with CSS
In addition to using the Property inspector, you can format entire tables or individual table cells (and their contents) by using CSS. In most cases, this is considered a better practice, as it maintains a separation between markup, content, and the actual styling used to make it aesthetically pleasing.
You can use CSS to format a table as follows:
1. Create a CSS Class rule from either the Property inspector or the CSS Styles panel (as discussed in Chapter 5 of this minibook).
2. Under the Type category, select a size and color for your table’s text.
3. Under the Background category in the CSS Rule Definition dialog box, assign a background color to your table by using the Background color property and then click OK.
4. Select the table you want to apply the new Class style to.
5. Assign the class by using the Class drop-down list in the Property inspector.
Your entire table takes on the new formatting, as shown in Figure 7-7.
Figure 7-7: A table before and after a new CSS class is applied.

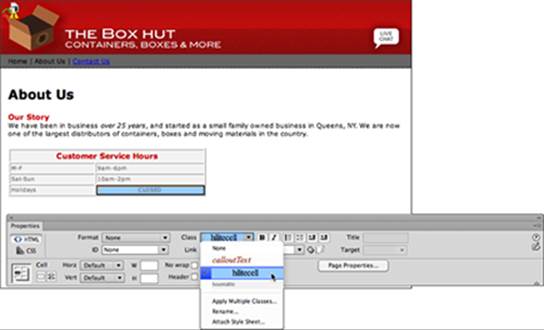
Similar to the way you can use the Property inspector to color and align individual cells, you can create and apply CSS rules to table cells. In most cases, this is considered a better practice than relying on HTML attributes. To do this, just follow these steps:
1. Create a CSS Class rule from either the Property inspector or the CSS Styles panel (as discussed in Chapter 5 of this minibook).
2. Under the Background category, select a Background color.
3. Under the Block category, select Middle from the Vertical-Align drop-down list, select Center from the Text-Align drop-down list, and then click OK.
4. Select the table cell that you’d like to apply the new class to.
5. From the Property inspector, locate the Class drop-down list and select your new class.
Your formatting choices are applied to the table cell, as shown in Figure 7-8.
Figure 7-8:Apply color, text formatting, and alignment to table cells by using CSS rules.
Adding and Importing Content
Adding content to a table is easy: You can type or insert content within table cells just as you would within the page itself. (You can even include other tables!) You can also cut, copy, and paste content from documents and other web pages directly into table cells.
If you already have spreadsheet-style data in text form, you don’t have to retype it into a Dreamweaver table. Dreamweaver has an incredibly useful feature you can use to bring in tabular data as a formatted table: Import Tabular Data.
CSV (comma-separated values) and tab-delimited files are plain text files that can be generated from a number of popular programs, such as Microsoft Excel. You can use these files to save spreadsheet data in a way that lets it be exchanged with other applications such as Dreamweaver.
In CSV files, columns are noted by commas between values, and each line return indicates a new row. In tab-delimited files, a tab between values indicates a new column and a line return forces a new row.
To import tabular data, follow these steps:
1. Using Microsoft Excel or a similar program, create a spreadsheet of data, and save it as .csv (comma-separated values).
You can save this wherever you’d like, as long as you can easily locate it.
2. Return to Dreamweaver and open a page where you’d like to add a table.
3. Put the cursor on the page where you want the table to be created.
4. Choose File⇒Import⇒Tabular Data.
The Import Tabular Data dialog box appears.
5. Use the Browse button to browse to the location of a CSV (.csv) file or a tab-delimited (.txt) plain-text file.
6. Verify or select the delimiter that your file uses.
Typically, the delimiter (where a new column will be created) is a comma or tab; however, you can also instruct Dreamweaver to create a new column from other delimiters, such as Comma, Semicolon, Colon, or other options, by using the Delimited drop-down list.
7. Determine the table width.
You can choose to have the table automatically sized to fit the data by leaving the Fit to Data radio button selected, or you can enter a number in the Set To text box to set a percentage or pixel value.
8. Enter numbers in the Padding, Spacing, and Border text boxes and specify top-row formatting in the Format Top Row drop-down list at the bottom of the dialog box.
9. When you’re finished with these settings, click OK.
Your table is created!
You can export table data from Dreamweaver just as easily as you can import it, by selecting a table and choosing File⇒Export⇒Table. When the Export Table dialog box appears, choose an element to be the delimiter and choose the type of line break. Click Export, determine where you want to save the file, and click Save.
If you select every cell in a row, you also have the opportunity to change the alignment of an entire row. In the Property inspector, you find a horizontal alignment drop-down list that changes the alignment of an entire row or selected cell. Choose from Left (default), Center, or Right. Note that any changes you make in the individual cell alignment override the row alignment.
You can also change the vertical alignment in the Property inspector when you have a row selected. Click the Vert drop-down list and select Default, Top, Middle, Bottom, or Baseline.
To select an entire row at once, position the cursor on the left side of the row you want to select. When the black arrow appears, simply click. You can also use this method of selecting an entire column by positioning the cursor on top of the column you want to select until the black arrow appears.
All materials on the site are licensed Creative Commons Attribution-Sharealike 3.0 Unported CC BY-SA 3.0 & GNU Free Documentation License (GFDL)
If you are the copyright holder of any material contained on our site and intend to remove it, please contact our site administrator for approval.
© 2016-2026 All site design rights belong to S.Y.A.