Adobe Creative Suite 6 Design and Web Premium All-in-One For Dummies (2012)
Book VII
Flash Professional CS6
Chapter 6: Lights, Camera, Movie Clips!
In This Chapter
![]() Exploring movie clip uses and advantages
Exploring movie clip uses and advantages
![]() Creating and placing movie clips
Creating and placing movie clips
![]() Previewing movie clip animation
Previewing movie clip animation
![]() Transforming and tweening movie clip instances
Transforming and tweening movie clip instances
![]() Modifying movie clips
Modifying movie clips
![]() Using the 3D Translation and 3D Rotation tools
Using the 3D Translation and 3D Rotation tools
Complicated machines, such as automobiles, are made from many smaller machines and moving parts. To build an automobile any other way just isn’t possible. Along those lines, you may find that some animations are too elaborate to create on the main Timeline alone. You can break them down into smaller animations that can be brought together as part of a larger animation.
You’ll find that your movie may need to reuse several identical animations. (Think about the four spinning wheels on a car.) In these cases, you have movie clips.
Discovering Movie Clips
The powerful and versatile movie clip symbol type can include entire, independent animations yet be placed and maintained in your movie just as easily as graphic symbols. The movie clip is one of three symbol types in Flash, and as with all symbols (see Chapter 3 of this minibook), they can be easily duplicated and maintained from a single master symbol in the library.
Movie clips are unique in that each one contains its own Timeline that looks and works just like the main one. This Timeline is completely self-contained, so animations in movie clips don’t depend on the length of the main Timeline. Movie clips can almost be thought of as movies within a movie. Movie clips behave just like other symbols, so several instances of the same movie clip can be dragged to the main stage to easily duplicate animations. If you need to change an animation that appears several times throughout a movie, you need to modify only the original movie clip in the library that contains it.
Movie clips have all the same features as graphic symbols: You can easily drag multiple instances to the stage, and each instance can have its own scaling, tint, alpha, and rotation applied.
Because a movie clip can contain independent animations, it’s a useful way to break down complex animations into smaller, more manageable pieces. Trying to coordinate too many animations across the main Timeline may be not only quite difficult, but also in some cases impossible, depending on what you’re trying to create.
Movie clips can also be nested inside other movie clips, giving you virtually unlimited levels of depth and complexity.
 The frame rate, a global setting for your movie, sets the rate for all movie clips as well as for the main Timeline. To speed up or slow down individual movie clip animations, consider modifying the length of any included tweens before adjusting the overall frame rate.
Unlike graphic symbols, movie clips provide 3D support, allowing you to rotate and position in the 3D realm the 2D artwork contained in movie clip symbols. In addition, all 3D properties can be animated, opening the door for stunning camera, rotation, and depth effects.
Flash CS6 includes the 3D Rotation and 3D Translation tools, which let you transform movie clip instances along the x, y, and z axes. You can animate 3D properties as part of a standard motion tween and modify them from the Motion Editor panel. We explore these tools in detail later in this chapter.
Creating and Placing Movie Clips
Movie clips are created as new, empty symbols as well as from existing content on the stage. If you create a movie clip from scratch, you can add animation and graphics later by editing the symbol.
Follow these steps to create a movie clip from existing graphics:
1. Create some interesting graphics on the stage by using the drawing tools.
2. Select the new artwork and choose Modify⇒Convert to Symbol.
The Convert to Symbol dialog box appears. (See Figure 6-1.)
Figure 6-1:Enter a name for your movie clip.
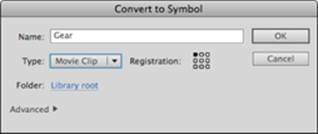
3. Enter a name for your new movie clip in the Name text box, select Movie Clip from the Type drop-down list, select a Folder (if it’s other than the main Library root), and click OK.
The artwork now appears as a movie clip on the stage.
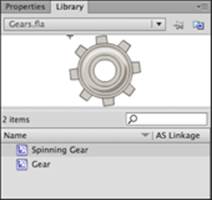
4. Choose Window⇒Library to check out your new symbol in the library with a special Movie Clip icon next to it, as shown in Figure 6-2.
Figure 6-2:Add artwork to your library as a movie clip symbol.
Nonanimated graphics converted to movie clips behave the same as graphic symbols, so you can place, tween, and modify instances on the stage. The difference, however, is that you can always add animated content later to the movie clip by editing it and creating tweens on its own Timeline.
In most cases, you take full advantage of movie clips by adding animation in a new movie clip symbol. To do so, you can start with a new, empty movie clip symbol and add the animated content afterward.
To create a new movie clip symbol and add animation, follow these steps:
1. Choose Insert⇒New Symbol.
The Create New Symbol dialog box appears. (Refer to Figure 6-1.)
2. Enter a name for the movie clip in the Name text box, select Movie Clip from the Type drop-down list, choose a folder (if it’s other than the Library root) to sort the new symbol into and click OK to create the new symbol.
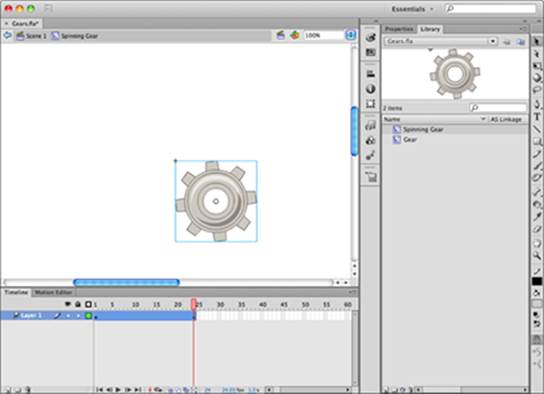
You see a new timeline, shown in Figure 6-3, and the symbol is ready for you to add animation. This Timeline works just like the main one: You can add and reorder layers and create tweens. You still need to convert any artwork to graphic symbols before creating motion tweens.
Figure 6-3: The Timeline of your new movie clip symbol can contain tweens, just like the main Timeline.
3. Create some new graphics on Frame 1 of the existing layer 1, select the graphics, choose Modify⇒Convert to Symbol, name the symbol and select Graphic from the Type drop-down list, and then click OK.
4. Right-click Frame 1 and choose Create Motion Tween to create a new tween span on the layer; click and drag the last frame of the tween span to shorten it to 24 frames (only if the span is greater than 24 frames).
5. On Frame 24, change the position or rotation of your symbol to set it in motion.
6. Press Enter or Return to preview the new Movieclip Timeline and make sure your animation plays back properly.
7. Click the Scene 1 link above the stage to return to the main Timeline.
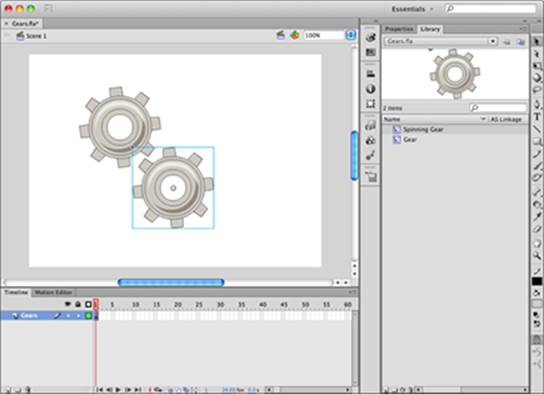
8. Locate your new movie clip symbol in the Library panel and drag two instances of it to the stage, as shown in Figure 6-4.
Figure 6-4:Drag two instances of the new movie clip from the Library panel to the main stage.
If you press Enter or Return to watch your movie clip play on the stage, you’ll probably be a little disappointed. Don’t worry: To see your movie clip in action, you just need to preview the movie in Flash Player.
Previewing Movie Clip Animation
Movie clips contain their own Timelines, and pressing Enter or Return while viewing the main Timeline doesn’t automatically playback any placed movie clips. To view movie clip animation, preview your movie in Flash Player using one of two methods:
![]() Test Movie mode exports a compressed (.swf) Flash movie and immediately launches it in a Flash Player window. Test Movie is used to give you a quick look at how the finished movie will appear to users as you build. Test the new movie clip by choosing Control⇒Test Movie⇒In Flash Professional.
Test Movie mode exports a compressed (.swf) Flash movie and immediately launches it in a Flash Player window. Test Movie is used to give you a quick look at how the finished movie will appear to users as you build. Test the new movie clip by choosing Control⇒Test Movie⇒In Flash Professional.
You can preview your movie in Test Movie mode by using the shortcut key combination Ctrl+Enter (Windows) or ![]() +Return (Mac).
+Return (Mac).
![]() Publish Preview works similarly to Test Movie but exports the .swf (compressed Flash movie) using the final delivery settings you’ve already created by using File⇒Publish Settings. Publish Preview can also display your movie in an HTML (web) page in your system’s default browser. To preview a movie in Publish Preview, choose File⇒Publish Preview⇒HTML or File⇒Publish Preview⇒Flash.
Publish Preview works similarly to Test Movie but exports the .swf (compressed Flash movie) using the final delivery settings you’ve already created by using File⇒Publish Settings. Publish Preview can also display your movie in an HTML (web) page in your system’s default browser. To preview a movie in Publish Preview, choose File⇒Publish Preview⇒HTML or File⇒Publish Preview⇒Flash.
Chapter 9 of this minibook covers publish settings for your movie, but you should know how these seemingly identical methods differ. Both methods let you accurately preview movie clip animation while you create it in your movie.
Modifying Movie Clip Instances
You can modify each movie clip instance with its own size, transformation, and color settings. This type of flexibility lets you get lots of mileage from a single movie clip symbol before having to create a new version or variation of your symbol in the Library panel. Just like graphic symbols, these transformations don’t affect the master symbol or other instances on the stage.
 Although all instances of a movie clip share a Timeline with its master symbol in the library, each individual instance can be stopped, started, and controlled individually using ActionScript. For more on how to control movie clip instances with ActionScript, see Chapter 7 of this minibook.
To transform any instance of a movie clip, you can use the Transform tool, the Transform panel, or the Transform submenu. (Choose Modify⇒Transform.) Try dragging two more instances of your new movie clip on the stage and applying different transformations to each one.
To apply a transformation to a movie clip instance, choose the Transform tool from the Tools panel and select an instance on the stage. Use the handles to resize, distort, and skew the instance or select an instance on the stage with the Selection tool and use the Transform panel (open it by choosing Window⇒Transform) to type exact amounts for horizontal and vertical scale, rotation, and skew.
Use the Style drop-down list in the Color Effect section of the Property inspector with any selected movie clip instance to apply unique tints and alpha (transparency) effects and to change brightness. To apply a color effect to a movie clip instance, select an instance on the stage and choose an effect from the Style drop-down list. Use the option controls to dial in the exact amount and type of color effect you need.
Combining Movie Clips
To create a new animation from several smaller ones, you can create a new movie clip from other movie clip instances on the stage. This technique allows you to group several movie clips and drag them as one instance to the stage. Unlike standard groups (Modify⇒Group), however, you gain all the advantages of working with symbols, including the ability to duplicate, maintain, and tween the combined movie clips as one unit.
The practice of including one movie clip inside another is sometimes referred to as nesting. Although movie clips can include other movie clips, graphic symbols, and buttons, graphic symbols shouldn’t include movie clip instances. Movie clips should always be included in other movie clips so that their animation plays back properly.
Follow these steps to create a new movie clip from other movie clips on the stage:
1. Select two or more movie clip instances on the stage.
These can be instances of different movie clip symbols in your library or of the same symbol.
2. Choose Modify⇒Convert to Symbol.
The Convert to Symbol dialog box appears, as shown in Figure 6-5.
3. Enter a name for your new symbol in the Name text box, choose Movie Clip from the Type drop-down list, and set the registration point by clicking a point on the grid shown to the right. Click OK to create the new symbol.
 The registration point sets the location from which a symbol’s position is determined on the stage. This point can be any of the four corners or four sides or the center of the symbol.
The symbol instances appear on the stage as a single movie clip, and a new movie clip appears in your library.
Figure 6-5: You can combine multiple movie clip instances into a single movie clip.

You can now drag and drop several instances of the new movie clip to the stage. Experiment by adding a few instances to the stage and applying different transformations or color effects to each one. Preview your movie by choosing Control⇒Test Movie⇒in Flash Professional. You see that the movie clips now are treated as one item, but still animate and behave as they did when they were separate instances on the stage.
When you nest movie clips, you create dependencies between those symbols in your library. Movie clips that include other movie clip symbols do so by reference; the included movie clip symbols aren’t duplicated but are connected to the movie clip that includes them.
Movie clips become dependent on any other symbols they’re created from. The smaller symbols remain in the library and are referenced by the movie clip that includes them, which means that you can’t remove included movie clips without destroying the symbols that they’re part of. For this reason, be sure not to trash any symbols in your Library panel until you’re sure that they’re not being used in your movie or by another movie clip symbol.
A helpful way to see which symbols are in use is to choose Select Unused Items from the Library panel’s panel menu. This command highlights symbols in your Library panel that aren’t being used anywhere on the stage or by other symbols in the library. If a movie clip isn’t used on the stage but is included in another symbol, it isn’t highlighted, indicating that it’s “in use.”
Rendering and Animating Movie Clips in the 3D Realm
The extensive drawing and animation capabilities of Flash can be greatly enhanced by the 3D Translation and 3D Rotation tools. You can use each of these tools to rotate and position 2D content in any movie clip instance around or along x, y, and z axes.
Combined with the powerful Flash animation engine, you can animate these properties as part of a motion tween to add cool depth, camera panning, and perspective effects to your movies.
Using the 3D Rotation tool
 This 3D Rotation tool can be used on any movie clip instance to rotate and transform the symbol around x, y, and z axes.
To render a movie clip instance in 3D, follow these steps:
1. Place a movie clip instance on a new layer on the Timeline by dragging the clip from the Library panel.
2. Select the 3D Rotation tool from the Tools panel and click the new movie clip instance to select it.
Color-coded circular handles appear, each one corresponding to an axis along which the movie clip can be rotated.
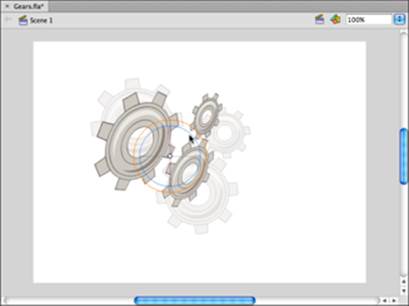
3. Rotate your movie clip (see Figure 6-6):
• Click and drag the green line that crosses your movie clip horizontally directly on the line to spin the clip around the y (vertical) axis.
• Click and drag the red line that crosses your movie clip vertically to rotate the clip around the x (horizontal) axis.
• Click and drag the blue circle that surrounds your movie clip to rotate it around the z axis (depth).
• Click and drag the outermost red circle in any direction to rotate multiple axes at one time.
Figure 6-6:Use the handles in the 3D Rotation tool to rotate a movie clip around the x, y, and z axes, or all at one time.
To reset all transformations performed with the 3D Rotation tool, select the movie clip and press Ctrl+Shift+Z (Windows) or ![]() +Shift+Z (Mac).
+Shift+Z (Mac).
Using the 3D Translation tool
 In contrast to the 3D Rotation tool, which rotates movie clips around an axis, the 3D Translation tool slides a movie clip along a specific axis to change its perceived distance and depth relative to other objects on the stage.
Think of this concept as having three train tracks moving left and right, up and down, or forward and backward that your movie clip can ride along.
To use the 3D Translation tool to position a movie clip in three dimensions, follow these steps:
1. Using the Selection tool, place a movie clip by dragging it from the Library panel or click to select an existing movie clip instance on the stage.
2. Choose the 3D Translation tool from the Tools panel, which you can find under the 3D Rotation tool.
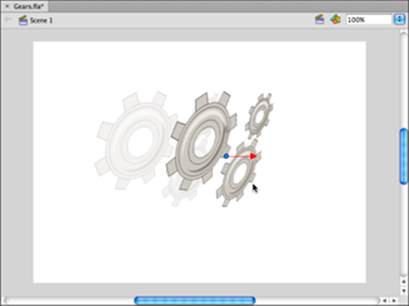
Three guides appear and correspond to the x, y, and z axes. You can slide your movie clip along any of these three guides by clicking and dragging the appropriate guide, as shown in Figure 6-7:
• To slide a movie clip from left to right along the x axis, click and drag the arrow connected to the red horizontal guide line.
• To slide a movie clip up or down along the y axis, click and drag the arrow connected to the green vertical guide line.
• To change the perceived distance of a movie clip on the stage, click and drag the center point to slide it along the z axis.
Figure 6-7: To change the perceived depth and distance, slide and position a movie clip along the x, y, and z axes.
3D Translation and 3D Rotation transformations can be combined on the same movie clip for interesting perspective effects.
Tweening 3D properties
After you have a feel for how the 3D Rotation and 3D Translation tools transform movie clips, you can incorporate these effects into a motion tween to create stunning effects just as easily as you would with position and transparency.
Follow these steps to create a tween with 3D properties:
1. Place a single movie clip instance on a new layer on the Timeline by dragging it from the Library panel.
2. Right-click (Windows) or Control-click (Mac) the first frame of the new layer and choose Create Motion Tween from the contextual menu that appears.
A new tween span is created, and the playhead jumps to the end of the span.
3. Select the 3D Rotation tool and click the movie clip to make it active; circular handles appear around the instance.
4. Click and drag the axes to rotate the movie clip until you set an angle and a position.
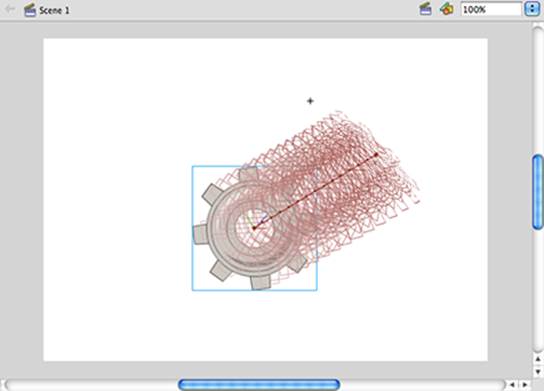
5. Press the Enter or Return key to play back your Timeline and your movie clip tweens from its original 2D position to the 3D settings you applied, as shown in Figure 6-8.
6. Repeat Steps 3 through 5 with the 3D Translation tool to see your movie clip slide in three dimensions.
Figure 6-8: A 3D tween in Onion Skin Outlines mode.
All materials on the site are licensed Creative Commons Attribution-Sharealike 3.0 Unported CC BY-SA 3.0 & GNU Free Documentation License (GFDL)
If you are the copyright holder of any material contained on our site and intend to remove it, please contact our site administrator for approval.
© 2016-2026 All site design rights belong to S.Y.A.