Adobe Creative Suite 6 Design and Web Premium All-in-One For Dummies (2012)
Book VII
Flash Professional CS6
Chapter 5: Adding Graphics, Audio, and Video
In This Chapter
![]() Importing bitmap images and vector artwork
Importing bitmap images and vector artwork
![]() Importing Illustrator and Photoshop files
Importing Illustrator and Photoshop files
![]() Importing audio files
Importing audio files
![]() Adding video to your movies
Adding video to your movies
You may decide to enhance your Flash movies with the addition of photos or graphics created in other applications, such as Photoshop CS6 and Illustrator CS6. Flash natively supports Photoshop and Illustrator file format imports as well as many popular image formats. Combine this feature with the ability to import and use most popular audio and video formats, and you can truly make your Flash movies an immersive multimedia experience.
Bitmap versus Vector Artwork
In computer-based design, you need to be aware of two graphic types: bitmap and vector. The drawing environment in Flash natively creates vector graphics, but you can use both bitmap and vector graphics in a Flash movie.
Vector graphics refer to scalable artwork consisting of points, paths, and fills that the computer creates based on mathematical formulas. Changing the size, shape or color of vector shape is simply a matter of recalculating the formula and redrawing the shape. As a result, vector graphics maintain crisp quality even when scaled far beyond their original size. Flash (like its cousin Illustrator CS6) can natively create detailed vector illustrations and typography that you can easily scale or modify.
Bitmap graphics are created from a series of multicolored, tightly arranged pixels. The detail of the image can vary based on a number of factors, including how many pixels, or dots, are used per inch to create the image. This amount is referred to as pixels per inch, or ppi.
Importing Other File Formats
Your choice of file formats is based on which applications you commonly work with. Flash supports many popular file formats and the industry standard Photoshop and Illustrator file formats, giving you lots of flexibility.
Flash supports and imports a number of file formats, including the following:
![]() Illustrator (.ai)
Illustrator (.ai)
![]() Photoshop (.psd)
Photoshop (.psd)
![]() Encapsulated PostScript (.eps)
Encapsulated PostScript (.eps)
![]() Flash SWF (.swf)
Flash SWF (.swf)
![]() JPEG
JPEG
![]() GIF
GIF
![]() PNG (requires the QuickTime plug in)
PNG (requires the QuickTime plug in)
 Layered PNG files from Fireworks will be flattened upon import.
 Flash, like many web-centric applications, works with images at 72 dpi (dots per inch). Images at higher (or lower) resolutions are conformed to screen resolution upon import, and their sizes on the Flash stage may be different from what you expect.
Vector graphics, such as illustrations and typography, can be created in applications such as Adobe Illustrator CS6. Flash can import and re-create layered artwork from Adobe Illustrator and Photoshop via the Import menu command (File⇒Import to Stage/Import to Library). See the section, “Importing Photoshop and Illustrator Files,” later in this chapter for more details.
Bitmap graphics, such as photos, can be saved and imported in a variety of formats. If you’re working with a layered Photoshop document, you can import and distribute layers into Flash maintaining most layer effects, such as drop shadows.
Other popular formats include JPEG, GIF, and PNG:
![]() JPEG (Joint Photographic Experts Group) can reproduce the wide range of color and detail necessary to reproduce photographs while keeping file size reasonable. For that reason, it’s the best choice for photocentric documents. (See Figure 5-1.)
JPEG (Joint Photographic Experts Group) can reproduce the wide range of color and detail necessary to reproduce photographs while keeping file size reasonable. For that reason, it’s the best choice for photocentric documents. (See Figure 5-1.)
Figure 5-1:JPEG files have the color depth necessary to reproduce detailed photos.

![]() GIF (Graphics Interchange Format; see Figure 5-2), a lightweight format with a limited color gamut (range) of 256 colors, is a good choice for reproducing crisp type, logos, and titling. GIF also supports transparency, so it’s a good choice when the graphics you need to import must be placed discretely against varying backgrounds.
GIF (Graphics Interchange Format; see Figure 5-2), a lightweight format with a limited color gamut (range) of 256 colors, is a good choice for reproducing crisp type, logos, and titling. GIF also supports transparency, so it’s a good choice when the graphics you need to import must be placed discretely against varying backgrounds.
![]() The PNG (Portable Network Graphics) format has capabilities that cross over between those of JPEGs and GIFs. PNG also supports transparency and opacity. Between the two PNG types (PNG-8 and PNG-24), you can reproduce both simple graphics and photos with depth and accuracy.
The PNG (Portable Network Graphics) format has capabilities that cross over between those of JPEGs and GIFs. PNG also supports transparency and opacity. Between the two PNG types (PNG-8 and PNG-24), you can reproduce both simple graphics and photos with depth and accuracy.
Figure 5-2:GIFs and PNGs are best for logos and crisp type.

Ultimately, your choice of format depends on which type of graphics you’re working with and how they work in context with the rest of your Flash movie.
Importing Bitmap Images
When you need to make use of a photo or graphic file, such as JPEG, GIF, or PNG, import it into Flash by choosing File⇒Import.
Imported bitmaps are added to your library as assets. Assets aren’t to be mistaken for symbols, which you can duplicate and manage from the library. Assets are simply non-Flash items that you import, store, and use throughout your movie. Although bitmap assets can be converted to symbols, they’re not automatically converted on import; you still need to add them as symbols. (See Chapter 3 of this minibook.)
To import a bitmap image, follow these steps:
1. In a new Flash document, choose File⇒Import⇒Import to Stage.
The Import dialog box appears, asking you to find a file on your local computer.
 To import an image (or images) to the library for later use, such as a series of photos that will be used in a photo gallery, choose File⇒Import⇒Import to Library. This command places the chosen images directly in the library so that you can use them when you’re ready.
2. Locate on your hard drive a bitmap file such as JPEG or GIF, select it, and click Open (Windows) or Import (Mac).
The file is imported and placed on your stage on the active layer.
3. Locate and open the Library panel (choose Window⇒Library), and you see that the bitmap has also been placed in your library.
If you try to import an image to the stage and the active layer is locked, the Import to Stage option is unavailable (grayed out). In that case, choose a different, unlocked layer or unlock the active layer.
Converting Bitmap Images to Symbols
When a bitmap image is on the stage or in the library, it can be converted to a symbol just like any other graphic on the stage. The process is the same, and the image inherits the same abilities that graphic symbols do, including tween ability, tint, transparency, and management from a master symbol in the library. See Chapter 4 of this minibook for more details on how to create and add symbols to the library.
Symbols created from imported bitmaps create dependencies because they continue to reference the original raw bitmaps in the library. Deleting raw bitmap assets from the library causes them to disappear from any symbols that use them.
Applying motion tweens
You can apply motion tweens to any bitmap that’s been converted to a symbol in exactly the same way you would with any other symbol. Working with symbols created from images opens up many new creative options, such as cinematic fades, moving slide shows, and unique presentation ideas.
To apply a motion tween to an image-based symbol, refer to the coverage on creating motion tweens in Chapter 4 of this minibook.
Importing Photoshop and Illustrator Files
Flash offers the seamless import of Photoshop and Illustrator files with the Illustrator and Photoshop Import panels. Graphics created in these applications can be imported with ease and the highest quality possible, which is great news if Photoshop and Illustrator are already essential parts of your creative workflow.
Using the Import panels, you can view, select, and convert Photoshop layers to symbols or keyframes or distribute them to Flash layers while maintaining common layer effects, such as drop shadows and blurs. The ability to select individual layers means that you can use specific elements from .psd and .ai files without the need to bring in lots of unnecessary art from complex files.
Importing Photoshop (.psd) files
Even with complex layered PSD files, Flash can import any .psd file while keeping individual layers editable, including type layers, most layer styles and even layer comps. You can distribute Photoshop layers to Flash layers, sequence them as keyframes, or individually convert layer contents to symbols to be added to the library.
Before you begin, locate a Photoshop file that you want to import into Flash. A great example is a file that combines layers and type and the basic use of Photoshop layer styles, such as drop shadows.
To import a Photoshop file, follow these steps:
1. Choose File⇒Import⇒Import to Stage.
2. When the Import dialog box appears, choose a Photoshop file from your hard drive and click Open (Windows) or Choose (Mac).
The Import to Library dialog box appears (as shown in Figure 5-3) with full Photoshop file import options and a full view of all layers in your file.
Figure 5-3: You can choose layers to import and even convert individual layers into symbols.
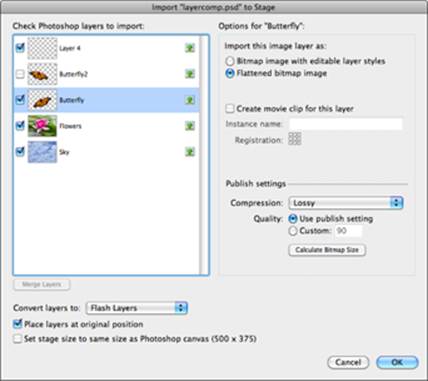
3. With the check boxes next to each layer, select the layers you want to import into Flash.
Now you can set options for how to import the contents of each layer.
4. Highlight a layer you’ve chosen to import.
You can choose from several options that appear on the right side of the panel. (See the nearby sidebar, “The Photoshop Import Options panel,” for a detailed explanation of each option.)
5. Click OK to import the file.
The artwork you selected appears on the stage.
Because you can selectively import layers and merge layers directly from the Import panel, consider using .psd files instead of importing flattened artwork (such as JPEG or GIF files). This panel allows you to extract specific elements and maintain transparency from Photoshop layers.
Importing Illustrator (.ai) files
Importing .ai files is nearly identical to importing .psd files, with a full layer view and lots of options for converting and distributing artwork and type from Illustrator layers. Because Illustrator is natively vector (just like Flash), you can often continue editing imported artwork in Flash using the Subselection and Pen tools.
The Photoshop Import Options panel
The Photoshop Import Options panel gives you a detailed choice of what is imported, and how, from .psd files. You can send bitmap artwork directly to the library as assets or movie clips; type and vector layers can be converted or kept as editable paths or type layers.
Here’s a detailed look at what you see in this panel:
![]() Select Photoshop Layer Comp: If your document contains layer comps, you can select one from this drop-down list. The layers and positioning that make up the selected comp become active in Layer view.
Select Photoshop Layer Comp: If your document contains layer comps, you can select one from this drop-down list. The layers and positioning that make up the selected comp become active in Layer view.
![]() Layers view: All layers in the .psd file appear listed on the left side of the Import to Library panel, and you can choose which layers to import by selecting the check boxes to the left. Highlighting a layer displays its import options on the right.
Layers view: All layers in the .psd file appear listed on the left side of the Import to Library panel, and you can choose which layers to import by selecting the check boxes to the left. Highlighting a layer displays its import options on the right.
![]() Merge Layers button: When more than one layer is highlighted, you can choose to merge the layers on import into a single layer, which has no effect on the original .psd file.
Merge Layers button: When more than one layer is highlighted, you can choose to merge the layers on import into a single layer, which has no effect on the original .psd file.
![]() Convert Layers to Flash Layers or Convert Layers to Keyframes: Selecting the Flash Layers option maintains the layer structure (as well as layer groups) and distributes layer contents exactly as they are in your .psd file. Selecting the Keyframes option distributes layer contents across a sequence of keyframes on the Timeline.
Convert Layers to Flash Layers or Convert Layers to Keyframes: Selecting the Flash Layers option maintains the layer structure (as well as layer groups) and distributes layer contents exactly as they are in your .psd file. Selecting the Keyframes option distributes layer contents across a sequence of keyframes on the Timeline.
![]() Place Layers at Original Position: This check box (selected by default) positions layer contents exactly as they are in the original .psd.
Place Layers at Original Position: This check box (selected by default) positions layer contents exactly as they are in the original .psd.
![]() Set Stage to Same Size As Photoshop Canvas: Selecting this option resizes your movie to match the original size of the .psd file.
Set Stage to Same Size As Photoshop Canvas: Selecting this option resizes your movie to match the original size of the .psd file.
![]() Import This Image Layer As: The two options shown convert the layer contents to either a bitmap image with editable Flash filter effects (converted from Photoshop layer styles) or a flattened bitmap image, which merges any applied layer styles along with the bitmap image.
Import This Image Layer As: The two options shown convert the layer contents to either a bitmap image with editable Flash filter effects (converted from Photoshop layer styles) or a flattened bitmap image, which merges any applied layer styles along with the bitmap image.
![]() Editable Paths and Layer Styles (Shape Layers Only): You can keep shape layers and vector artwork editable in Flash by selecting this option, which places artwork on the stage as drawing objects.
Editable Paths and Layer Styles (Shape Layers Only): You can keep shape layers and vector artwork editable in Flash by selecting this option, which places artwork on the stage as drawing objects.
![]() Editable Text (Type Layers Only): Selecting this option keeps imported text layers editable, re-creating Photoshop type layers as Flash type layers.
Editable Text (Type Layers Only): Selecting this option keeps imported text layers editable, re-creating Photoshop type layers as Flash type layers.
![]() Vector Outlines (Type Layers Only): Selecting this option converts type layers into raw vector graphics (drawing objects). Type is no longer editable, but its outline can be manipulated with tools, such as the Subselection tool and Pen tool.
Vector Outlines (Type Layers Only): Selecting this option converts type layers into raw vector graphics (drawing objects). Type is no longer editable, but its outline can be manipulated with tools, such as the Subselection tool and Pen tool.
![]() Create Movie Clip for This Layer: Selecting this option converts the layer contents to a new movie clip symbol that’s also added to the library. You have the option of setting a registration point as well as an instance name. (See Chapter 7 of this minibook for more on instance names.)
Create Movie Clip for This Layer: Selecting this option converts the layer contents to a new movie clip symbol that’s also added to the library. You have the option of setting a registration point as well as an instance name. (See Chapter 7 of this minibook for more on instance names.)
![]() Publish settings: For each layer, you can set individual compression and quality settings or choose to use the document’s publish settings instead. A handy Calculate Bitmap Size button lets you see how your selected compression and quality settings affect the resulting file size of the imported content.
Publish settings: For each layer, you can set individual compression and quality settings or choose to use the document’s publish settings instead. A handy Calculate Bitmap Size button lets you see how your selected compression and quality settings affect the resulting file size of the imported content.
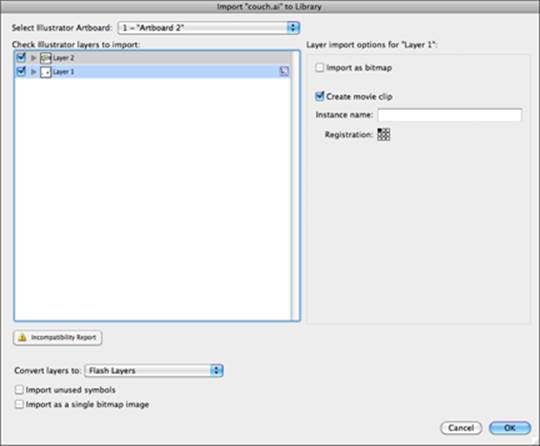
To import an Illustrator file, follow these steps:
1. In a new Flash document, choose File⇒Import⇒Import to Stage; choose an Illustrator file from your hard drive and choose Open (Windows) or Import (Mac).
The Import to Stage dialog box appears with a full view of all layers in your Illustrator document.
2. Select the check boxes for the layers you want to import into your document.
3. Highlight each layer you’ve chosen for import to set options for each one, as shown in Figure 5-4.
You can import each layer and individual path as either a bitmap or an editable path. You can import groups as bitmaps or movie clips.
Figure 5-4: You can bring Illustrator type paths into Flash as editable text.
4. Click OK to import the artwork to the Flash stage.
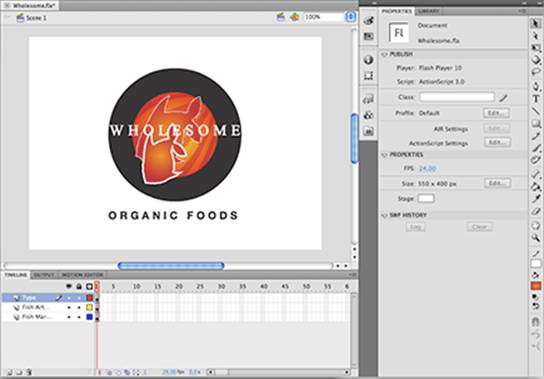
Check out the stage and the Library panel to see how your artwork was placed in Flash. (See Figure 5-5.)
Figure 5-5: A finished import, with all Illustrator layers converted to Flash layers.
Look for the Incompatibility Report button at the bottom of the layer view in the Import panel. This button can indicate potential problems that can prevent the artwork from importing properly into Flash. If you see the Incompatibility Report button, click it and read the warnings to address any pending issues before import.
A Note about Illustrator Symbol Libraries
In recent versions of Adobe Creative Suite, the relationship between Illustrator and Flash has been significantly improved. Now, Illustrator symbols offer support for most Flash symbol properties, allowing you to easily develop symbol libraries in Illustrator and import them directly into Flash projects. This includes the ability to set registration points (new in CS6), 9-slice scaling options, and symbol types, all of which are carried over seamlessly into Flash.
If you’re importing an Illustrator file that uses symbols on the artboard, those symbols are automatically added to your Library. However, if a document contains a symbol library but not all symbols are in use on the artboard, be sure to check the Import Unused Symbols option in the Illustrator Import Options panel so that all symbols from the document’s library are added to your Flash project’s library.
A view of the Illustrator Import Options panel
The Illustrator Import Options panel gives you a detailed choice of elements to import from .ai files. You can convert grouped artwork, compound paths, and type layers to movie clips or bitmaps or keep them as editable paths or type layers.
Layer view: All layers in the .ai file appear in this panel, and you can choose which layers to import by selecting the check boxes to the left. Highlighting a layer displays its import options on the right.
Incompatibility Report button: When this button is active, potential issues in your Illustrator file may need to be resolved for a clean, successful import. Click this button and review the report to resolve any problems before completing the import.
Convert Layers to Flash Layers or Convert Layers to Keyframes: Selecting the Flash Layers option maintains the layer structure (as well as layer groups) and distributes layer contents exactly as they are in your .ai file. Selecting the Keyframes option distributes layer contents across a sequence of keyframes on the Timeline.
Place Layers at Original Position: This check box (selected by default) positions layer contents exactly as they appear in the original Illustrator file.
Set Stage to Same Size as Illustrator Canvas: Selecting this option resizes movie dimensions to match the original size of the .ai file.
Import Unused Symbols: Illustrator CS6 files can contain their own symbol libraries, which work in a similar manner to Flash symbols. Symbols that exist in an imported .ai file but that aren’t being used on the canvas are added to the Flash library when you select this check box.
Note: You can choose to import an Illustrator document’s entire symbol library without importing any visible artwork from its canvas.
Import As a Single Bitmap Image: Selecting this option flattens and rasterizes the entire Illustrator document and places it as a bitmap image on the stage as well as a bitmap asset in your Flash document’s library.
Import as
![]() Bitmap Image: Selecting this option rasterizes (converts vector to bitmap) the selected artwork and imports it to the stage and library as a bitmap. Any vector artwork or type loses its editability.
Bitmap Image: Selecting this option rasterizes (converts vector to bitmap) the selected artwork and imports it to the stage and library as a bitmap. Any vector artwork or type loses its editability.
![]() Editable Path (Individual Paths Only): Selecting this option places vector paths in Illustrator as drawing objects that you can further modify on the Flash stage.
Editable Path (Individual Paths Only): Selecting this option places vector paths in Illustrator as drawing objects that you can further modify on the Flash stage.
![]() Editable Text (Type Layers Only): Selecting this option keeps imported text layers editable, re-creating Illustrator type paths as Flash type layers.
Editable Text (Type Layers Only): Selecting this option keeps imported text layers editable, re-creating Illustrator type paths as Flash type layers.
![]() Vector Outlines (Type Layers Only): This converts type to vector outlines, which will no longer be editable as a type layer in Flash.
Vector Outlines (Type Layers Only): This converts type to vector outlines, which will no longer be editable as a type layer in Flash.
Create Movie Clip for This Layer: Selecting this option converts the layer contents to a new movie clip symbol, which is also added to the library. You have the option of setting a registration point as well as an instance name. (See Chapter 7 of this minibook for more on instance names.) This option and Convert to Bitmap are the only available options for entire Illustrator layers and grouped artwork.
Importing Sounds
The best multimedia creations can be enhanced tremendously using sound effects and music. Flash fully supports the import, placement, and control of sounds in lots of different formats, so you can easily bring in loops, sound effect files, and even music from your .mp3 collection.
You can enhance your movie with background music or narrative, and sound effects can make using buttons and menus more intuitive. Flash can stream longer sounds (such as soundtracks or long-form narration) to minimize loading time so that users get right to the good stuff.
Flash imports the following audio file formats:
![]() AIFF
AIFF
![]() MP3
MP3
![]() Windows WAV
Windows WAV
Note: Additional file formats are available with the optional QuickTime plug-in installed.
Follow these steps to import a sound into your library:
1. Create a new Flash document and choose File⇒Import⇒Import to Library.
2. Browse and choose an .mp3, .wav, or .aiff file from your hard drive and click Open (Windows) or Choose (Mac).
3. Choose Window⇒Library to launch the Library panel.
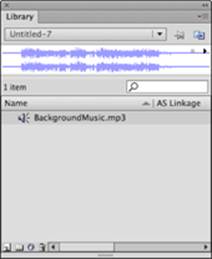
The sound appears in the library with a speaker icon, as shown in Figure 5-6.
Figure 5-6:Imported sounds appear next to a speaker icon in your Library panel.
4. Select the sound and check out the Preview window.
A waveform preview of your sound appears, and you can listen to the sound by using the Stop and Play buttons in the upper-right corner of the panel.
Placing sounds on the Timeline
After you have imported your favorite sounds into your Flash document, you can place them on keyframes along the Timeline to have them play at specific points in your movie.
You can assign sounds with the Property inspector, which displays the Sound section when a keyframe is selected. Sounds can be combined across different layers and used inside buttons to create sound effects for controls and navigation menus.
To place a sound on the Timeline, follow these steps:
1. On a new layer, create a blank keyframe along the Timeline and launch the Property inspector (if it’s not already visible).
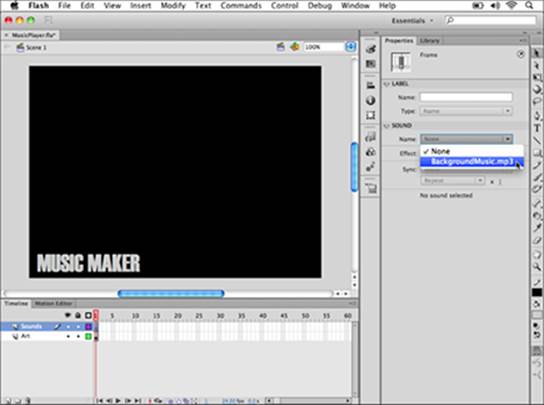
2. On the right side of the Property inspector, locate the Sound section and select a sound from the Name drop-down list.
This drop-down list shows all sounds in your library. (See Figure 5-7.)
The sound is now placed on your Timeline.
3. Press Enter or Return to play your movie.
The sound plays when the playhead reaches the keyframe.
Note: If you are placing a sound on Frame 1, you may not hear sound playback unless additional frames follow it. If you need to preview a sound on a single frame timeline, Press Ctrl+Enter (Windows) or Command+Enter (Mac) to test your movie and hear your sounds.
Press the Esc key to stop sound playback when previewing (very helpful if you fire off too many sounds at once!).
After you place a sound on your Timeline, you can use additional options in the Property inspector to control looping, repeating, and playback performance. The most common options to experiment with are the Repeat and Loop options, which control the number of times (if any) a sound should repeat when it’s played.
Figure 5-7:Place sounds on a keyframe from the Sound section in the Property inspector.
To repeat the sound, follow these steps:
1. Select the keyframe where you already have a sound placed and locate the Sound options in the Property inspector.
2. Locate the Repeat drop-down list and enter the number of times you want the sound to repeat in the text box to the right.
By default, the sound repeats at least once, but if you enter 2, for example, your sound repeats twice.
3. Press Enter or Return to play your movie.
The sound you placed plays and then repeats the number of times you entered in Step 2.
To loop the sound (repeat it endlessly), follow these steps:
1. Select the keyframe and, with the Sound options, click the arrow beside Repeat and choose Loop from the drop-down list.
The sound is now set to loop continuously until the movie is shut down or another action turns it off.
2. Choose File⇒Publish Preview⇒Flash to preview your movie.
The sound plays and then continues to repeat until you close the preview.
Editing sounds
Flash provides a useful way to do basic editing on placed sounds using the Edit Envelope dialog box. The Edit Envelope dialog box performs basic trims and volume effects and lets you adjust volume and pan settings for each sound placed in your movie. Although nothing quite replaces well-recorded and edited source files, you can do last-minute, nondestructive edits so that your sounds complement the rest of your movie.
To edit a sound, select a keyframe that has a sound placed on it or add a sound to a new keyframe and then follow these steps:
1. Select the keyframe on which the sound is placed.
2. In the Property inspector, locate and click the Edit Sound Envelope button (the pencil icon to the right of the Effect drop-down list) in the Sound section.
The Edit Envelope dialog box appears with a waveform preview. The center time ruler has two sliders on the far left and far right.
3. Move these sliders to edit the in and out points of the sound or to trim unnecessary silence, as shown in Figure 5-8.
The lines above each waveform represent the volume envelope.
Figure 5-8:Eliminate silence by sliding the starting trim point to the right and the ending trim point to the left.
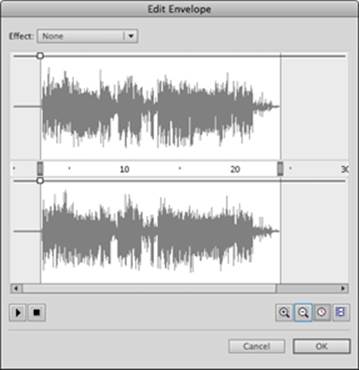
4. Click the lines above each waveform and drag them up or down to adjust the overall volume of the sound or to add handles and vary the volume at different points during the sound.
The higher the line or handle, the louder the sound.
5. Use the Effect drop-down list in the upper-left corner to choose from several preset volume and pan effects to enhance your sound.
6. When you’re done, click OK and then press Enter or Return to play your movie and hear the changes made to the sound.
Adding Video to Your Flash Movie
Video has become one of the most prominent types of web and mobile content, and users have come to expect nearly every site or mobile application to feature video in some way.
Fortunately, Flash makes it easy to import and add video content to your movies, or simply to convert video for playback in the Flash player. As a matter of fact, Flash has become a choice platform for video delivery for many major video, social networking, and content portals. (YouTube, Hulu, and Facebook all rely heavily on Flash for video delivery.)
The video import process requires an additional tool, the Adobe Media Encoder (AME), which is a utility application included with Creative Suite 6. AME converts video into a Flash-friendly format so it can be placed in your Flash movie.
Using the AME, Flash can import, convert, and encode many common file formats for desktop, mobile, and other devices.
To embed or not to embed?
There are two primary ways to place video in a Flash document. You can either embed a video, which copies the contents of the video to the Timeline, or you can link to an external video file and have Flash play it back in a special video player component.
The advantage of the first approach is that the content becomes part of your movie, so you can more easily synchronize it with other content (such as animations) in your movie. However, this approach also drastically increases the size of your published SWF.
The second approach, linking to a video, creates a dependency to an external file, but it allows your movie to stream the video progressively when needed without adding the extra weight of the video to your final movie.
To import and link to a video into Flash, follow these steps:
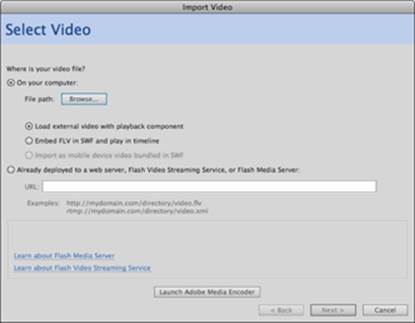
1. In a new or existing Flash document, choose File⇒Import⇒Import Video. The Import Video dialog box appears.
The Import Video option isn’t available for documents whose publish target is set as HTML.
The Import Video dialog box gives you two ways to direct Flash to your video, as shown in Figure 5-9: On Your Computer and Already Deployed to a Web Server. The first (On Your Computer) is the most common. It indicates you have local a file on your computer that you’d like to use.
2. Leave the On Your Computer and the Load External Video with Playback Component radio buttons selected. Click the Browse button.
Figure 5-9:Choose the type of file you’d like to import. Most commonly you’ll want to load video externally.
3. Locate your video and click OK.
This can be an .mpg, an .mp4, a .mov, or other popular file format. If the selected file isn’t compatible for playback in Flash player (most won’t be), you’ll receive a warning and the option to encode the file in the AME. If this is the case, follow these steps:
a. Click the Launch Adobe Media Encoder button at the bottom of the dialog box to launch the AME.
The Adobe Media Encoder application launches. On the left side of the window is the queue, where you’ll drag the videos you want to encode for Flash.
b. On your local file system, locate the file you tried to import and drag it into the queue window, as shown in Figure 5-10.
Figure 5-10:Drag video files into the AME queue to get them ready for conversion.
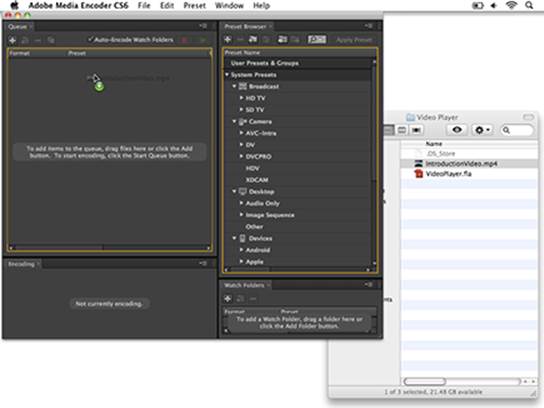
c. In the queue, the target file format and settings are listed under the video file. For now, leave the default, which should be F4V, Match Source Attributes (High Quality). Click the Start Queue button or simply press the Return/Enter key to start encoding the video.
A chime should sound when encoding is successfully completed.
d. Switch back to Flash CS6.
The Import Video dialog box should still be open. If not, repeat Steps 1-3.
e. Once again, click Browse and locate the newly encoded file, which should be in the same directory as the original. It will appear with a .f4v extension. Click OK/Open and then click Next at the bottom of the dialog box.
Because this is a linked video file, your published movie will continue to look for the video in its original location and will fail if either the video file or movie is relocated. It’s recommended that you copy or move the encoded version of the file to the same directory where you intend on publishing your final movie.
You’re viewing the Skinning screen, where you can customize a skin for the player that displays your video.
4. From the Skin drop-down list, choose a skin that displays the style and type of controls you’d like to use.
For example, the SkinUnderAllNoCaption option creates a toolbar that sits under the video window and features all common video playback controls except for the Closed Captioning option.
5. From the Color picker, choose the color tint for your skin.
6. Click Next to complete the process and click Finish to close the Import Video dialog box.
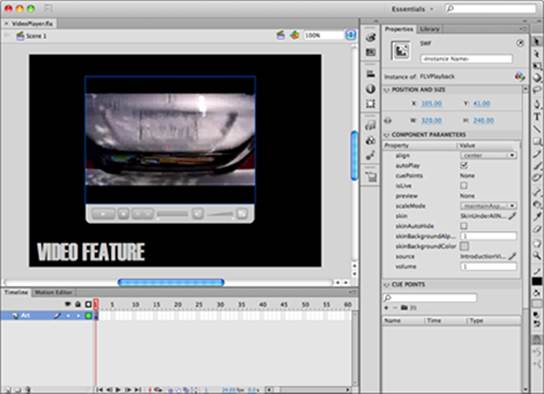
After a moment, the new video (and its player) is placed on the stage, as shown in Figure 5-11.
Figure 5-11:After you import external video, it appears on the stage in an FLVPlayback component.
7. Choose Control⇒Test Movie ⇒In Flash Professional to preview your movie with the new video added.
Working with the FLVPlayback component
After you’ve placed video on the stage, you can modify settings on the FLVPlayback component, which houses and controls linked video. Select the component on the stage and use the Component Parameters section of the Property Inspector to modify properties such as Volume, Autoplay, and Skin Color, and even change the source to point to a different F4V video file.
Embedding Video on the Timeline
For most purposes, linking to a video file is the best way to place a video in your movie. However, on occasion you’d like your video to be more integrated with the rest of your content, such as when you’re timing an animation to match events in the video. In these cases, you can place video directly on the Timeline as a movie clip or sequence of frames. The approach is similar to linking video, but you don’t work with the FLVPlayback component.
In this approach, video content is copied directly into your movie, which can add significant file size (and in turn loading time) to your final published SWF.
To import and embed video directly into your movie, follow these steps:
1. In a new or existing Flash document, choose File⇒Import⇒Import Video.
The Import Video dialog box appears.
2. Within the Import Video dialog box, leave the On Your Computer option selected and choose Embed FLV in SWF and Play in Timeline.
3. Click Browse, locate the video file you’d like to import, and click OK.
Just as with linked video, if you choose a non-Flash-compatible video file, you’ll be prompted to encode the file in the AME. If so, click the Launch Adobe Media Encoder button at the bottom of the dialog box to launch the AME and follow these steps:
The Adobe Media Encoder application launches. On the left side is the queue, where you’ll drag videos you’d like to encode for Flash.
a. On your local file system, locate the file you’re trying to import and drag it into the queue window.
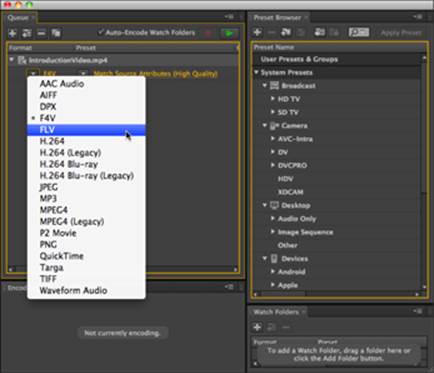
b. In the queue, the target file format and settings are listed under the video file. Select FLV as the file format in the Format drop-down list on the far left of the line. Leave the remaining settings, which should read Match Source Attributes (High Quality). Click the Start Queue button or simply press the Return/Enter key to start encoding the video.
Unlike linked video, it’s necessary to encode video in FLV format for embedding on the Timeline, as shown in Figure 5-12.
Figure 5-12:You’ll need to convert video to the FLV format if you want to embed it in your movie.
A chime should sound when encoding is successfully completed.
c. Switch back to Flash CS6.
The Import Video dialog box should still be open. If not, repeat Steps 1-3.
d. Once again, click Browse and locate the newly encoded FLV file, which should be in the same directory as the original. Click OK/Open and then click Next at the bottom of the dialog box.
4. On the Embedding screen, leave all check boxes selected. Under the Symbol Type drop-down list, make sure Embedded Video is selected.
Note: You can also select Movie Clip if you’d like to place this video in more than one location in your movie, but you won’t see the length of the video represented on the main Timeline.
5. Click Next to advance to the Finish Video Import screen and then click Finish to complete the import.
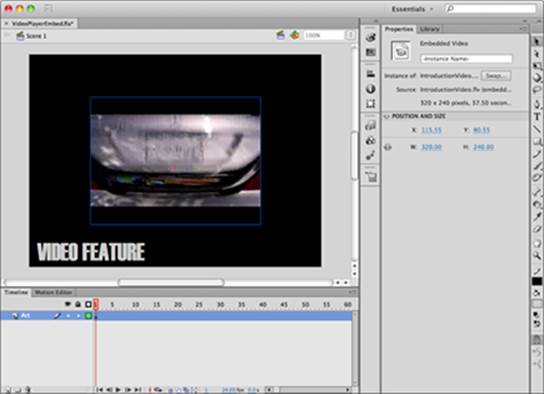
You see the video spanned across the Timeline, much like a frame-by-frame animation, as shown in Figure 5-13. You can now insert layers on the Timeline and add more content, such as animations, if you’d like.
Figure 5-13:Embedded video spans the Timeline. You can place content on other layers to sync it with events in the video.
All materials on the site are licensed Creative Commons Attribution-Sharealike 3.0 Unported CC BY-SA 3.0 & GNU Free Documentation License (GFDL)
If you are the copyright holder of any material contained on our site and intend to remove it, please contact our site administrator for approval.
© 2016-2026 All site design rights belong to S.Y.A.